figma下载_Figma和ProtoPie中的原型制作,比较
figma下载
第1部分 (Part 1)
Prototyping has never had such a high profile with a whole host of tools that now give you varying ability to realize your designs beyond their static UI and into a working usable thing. It’s fair to say that prototyping within tools has been a bit of a battlefield, with some UI tools offering basic prototyping on top of their established drawing features and others offering a more advanced but specialized set of prototyping features to enable designers to build more realistic experiences.
原型开发从未具有如此高的知名度,它拥有大量的工具,这些工具现在使您能够从静态UI到可使用的东西来实现您的设计。 可以说,工具内的原型制作一直是一个战场,有些UI工具在其既定的绘图功能之上提供基本的原型制作,而其他UI工具则提供了一套更高级但更专业的原型制作功能,以使设计师能够构建更逼真的体验。
Today I want to look at Figma and ProtoPie who offer on the surface an overlap of features but with differences in their capabilities and approach to prototyping.
今天,我想看看Figma和ProtoPie,它们表面上提供了重叠的功能,但是在功能和原型制作方法上却有所不同。
Figma is a fully-fledged UI creation tool that has some prototyping capabilities. Its prototyping features allow you to do basic clickthroughs with some nice simple motion design capabilities.
Figma是功能完善的UI创建工具,具有一些原型设计功能。 它的原型功能使您可以通过一些不错的简单运动设计功能来进行基本的点击操作。
ProtoPie, on the other hand, is not a UI creation tool per se, its focus is on interaction design and prototyping relying on tools such as Figma for UI creation. With ProtoPie you can build everything from basic clickthroughs all the way up to high fidelity prototypes — to the point where you would be hard-pressed to differentiate them from real apps.
另一方面, ProtoPie本身并不是UI创建工具,它的重点是交互设计和原型设计,该工具依赖于诸如Figma之类的工具来创建UI。 借助ProtoPie,您可以构建所有内容,从基本的点击一直到高逼真度的原型,直至难以将它们与真实应用程序区分开的地步。
This tutorial will hopefully give a good overview of what each tool is capable of doing, how they work individually but also how they can work together to complete your prototyping arsenal.
希望本教程能够很好地概述每种工具的功能,它们各自的工作方式,以及它们如何可以共同完成原型设计库。
我们会做什么 (What we’ll be doing)
To explore these tools we’ll be prototyping a fairly simple but common app login journey. I have already designed the screens and UI in Figma so that we can concentrate on Prototyping.
为了探索这些工具,我们将对一个相当简单但通用的应用程序登录过程进行原型设计。 我已经在Figma中设计了屏幕和UI,以便我们可以专注于原型设计。
用户体验 (The user experience)
Before we get stuck in let’s review the experience we are looking to build.
在陷入困境之前,让我们回顾一下我们正在寻求的经验。
The login prototype has three views
登录原型具有三个视图
- Application load应用负荷
- Login登录
- Home家
01应用负荷 (01 Application load)
I want to start by loading the application animating its brand logo. I want to animate this to the top of the screen and then reveal the username and password text fields underneath. Because its a login screen and the primary action is to input the username first, I want to give focus to the username text field.
我想首先加载动画其品牌徽标的应用程序。 我想将此动画设置为屏幕顶部,然后在下面显示用户名和密码文本字段。 因为它是一个登录屏幕,并且主要的操作是首先输入用户名,所以我想重点介绍用户名文本字段。
02登录 (02 Login)
Once the user has typed their username I want to autofocus on the Password field. If the user types the correct password they will successfully log into the app’s home screen; if not then I want to show them that an error has occurred.
用户键入用户名后,我要在“ 密码”字段上自动对焦。 如果用户输入正确的密码,他们将成功登录到应用程序的主屏幕; 如果不是,那么我想向他们显示发生了错误。
The user will then need to find and correct the error.
然后,用户将需要查找并纠正错误。
03首页 (03 Home)
Once the login credentials are correct the user will be logged in to the home screen. I want to also show a personalized message at the top of the home.
登录凭据正确后,用户将登录到主屏幕。 我还想在家庭顶部显示个性化消息。
In part 1 of this tutorial, we’ll be focussing on the application load.
在本教程的第1部分中,我们将专注于应用程序负载。
在Figma中原型化应用程序负载 (Prototyping application load in Figma)
Figma works by linking screens together, You define a start and end state, and then an animation type to define what happens in between.
Figma的工作方式是将屏幕链接在一起,定义开始和结束状态,然后定义一种动画类型以定义之间的关系。
To create the app load transition I’ve created these screens ( if you’re new to Figma these are called frames).
为了创建应用程序加载过渡,我创建了这些屏幕(如果您不熟悉Figma,这些屏幕称为框架)。

To prototype in Figma, you have to select the Prototype tab located in the right-hand contextual panel.
要在Figma中进行原型制作 ,您必须选择位于右侧上下文面板中的Prototype标签。
Prototyping mode reveals little circular nodes on each frame (and nested frame). These nodes are what you use to connect frames together to allow you to create the interactions in between.
原型制作模式在每个框架(和嵌套框架)上显示出很少的圆形节点。 这些节点是用于将框架连接在一起以允许您在它们之间创建交互的对象。
Figma has a special After Delay interaction which allows you to trigger animations automatically when the frame loads rather than by a user-generated interaction such as a button tap. This is useful as it allows me to ‘daisy-chain’ many frames together to achieve a seamless animation.
Figma具有特殊的After After交互作用,该交互作用使您可以在框架加载时自动触发动画,而无需通过用户生成的交互作用(如按钮点击)触发动画。 这很有用,因为它允许我将许多帧“菊花链”在一起以实现无缝动画。
To connect two frames together I can click and drag the frame node from the first frame to the second or choose the destination frame in the Interaction sub-panel within the Prototype.
要将两个框架连接在一起,我可以单击框架节点并将其从第一个框架拖到第二个框架,或者在Prototype的Interaction子面板中选择目标框架。
In the case of my prototype, I want my first screen to animate automatically so I’m using the After Delay option. Because I want my logo to animate first before I show the login form I need a logo end-state frame.
对于我的原型,我希望我的第一个屏幕能够自动设置动画,因此我使用了After Delay选项。 因为我希望在显示登录表单之前先对徽标进行动画处理,所以我需要一个徽标结束状态框。
Here I want to animate multiple object properties, namely position, and scale so I’ll use the Smart Animate option. Smart Animate works by figuring out individual property transformations between two states. Setting the Animation type to this gives me my first animation of the logo moving and scaling into position.
在这里,我想为多个对象属性(即位置和比例)设置动画,因此我将使用“ 智能动画”选项。 Smart Animate通过找出两个状态之间的单个属性转换来工作。 设置动画类型为此,我得到徽标移动和缩放到位置的第一个动画。

The second part of the animation is to show the login text fields. I simply want these to fade in so I set another After Delay between frames 2 and 3 and change the Animation preset this time to Dissolve.
动画的第二部分是显示登录文本字段。 我只是想让它们淡入,所以我在第2帧和第3帧之间设置了另一个After Delay ,并将这次的Animation预设更改为Dissolve。

The final part of the app load animation is to give focus to the username text field and show the keyboard.
应用程序加载动画的最后一部分是将焦点放在用户名文本字段并显示键盘。
Again I’m using After Delay for this. This time though I need to animate the keyboard up. To do this I’m using Smart Animate to move a fake keyboard into position. This means I need the keyboard on my previous frame but off-screen.
我再次为此使用After Delay 。 这次虽然我需要为键盘设置动画。 为此,我使用Smart Animate将假键盘移动到适当位置。 这意味着我需要键盘在上一帧但不在屏幕上。

In a real app, the user knows which text field has focus because of the flashing cursor. Because Figma doesn’t have a real keyboard I need to fake it, the best I can do is to add a static cursor in the text field. a cursor
在真实的应用程序中,由于光标闪烁,用户知道哪个文本字段具有焦点。 因为Figma没有真正的键盘,所以我需要伪造它,所以我能做的最好的就是在文本字段中添加一个静态光标。 光标
Below you can view the Figma prototype animation:
您可以在下面查看Figma原型动画:
ProtoPie中的原型应用程序负载 (prototyping application load in ProtoPie)
Now let’s look at how we can achieve the same thing and more in ProtoPie
现在让我们看看如何在ProtoPie中实现相同的目标
To prototype my login in ProtoPie I need to import assets from Figma. The first thing I need to do before I import anything is to optimize my Figma file.
为了使登录ProtoPie原型化,我需要从Figma导入资产。 导入任何内容之前,我需要做的第一件事就是优化Figma文件。
Because I’m doing all of the interaction inside of ProtoPie all I need from Figma are the assets. All of my assets for the login are covered by these three screens.
因为我正在ProtoPie内部进行所有交互,所以我从Figma中需要的就是资产。 这三个屏幕涵盖了我所有的登录资产。

First off I want my logo to be a single vector object. It was drawn using multiple paths which I don’t need access to in ProtoPie as I’ll only be animating the logo as a single object. To do this I can use the Flatten command to reduce the logo to a single vector object (CMD+E or Object Menu > Flatten Selection).
首先,我希望徽标是单个矢量对象。 它是使用多个路径绘制的,在ProtoPie中我不需要访问这些路径,因为我只会将徽标作为单个对象进行动画处理。 为此,我可以使用“展平”命令将徽标缩小为单个矢量对象(CMD + E或“对象菜单”>“展平选择”)。
The smaller logo on the second screen will just be used as a reference which I’ll delete later so it doesn’t need flattening but you can do so if you wish.
第二个屏幕上较小的徽标将用作参考,稍后我将删除它,因此它不需要展平,但是您可以根据需要这样做。
I’ve made sure that I haven’t used components for anything, as a component when imported will be turned into a flattened graphic.
我已经确保没有使用任何组件,因为导入时组件将变成平坦的图形。
For the list on Home, I’m going to use the component flattening feature to my advantage. I’ve made each card a component. This means it will be flattened on import but as its still a component in Figma, I‘ll have access to its elements if I need to make any edits in the future. Nested frames map to ProtoPie containers so I can leave the cards grouping as is.
对于Home上的列表,我将利用组件展平功能来发挥自己的优势。 我已经将每张卡都制成了组件。 这意味着它将在导入时变平,但由于它仍然是Figma中的一个组成部分,如果将来需要进行任何编辑,我将可以访问其元素。 嵌套框架映射到ProtoPie容器,因此我可以将卡片分组保持原样。
With that, all done my assets are prepped and ready for when I need to import them into ProtoPie.
这样,当我需要将所有资产导入ProtoPie时,我的资产就做好了准备。
设置我的ProtoPie文件 (Setting up my ProtoPie file)
Before I import anything I need to set up my pie.
在导入任何东西之前,我需要先设置好馅饼。
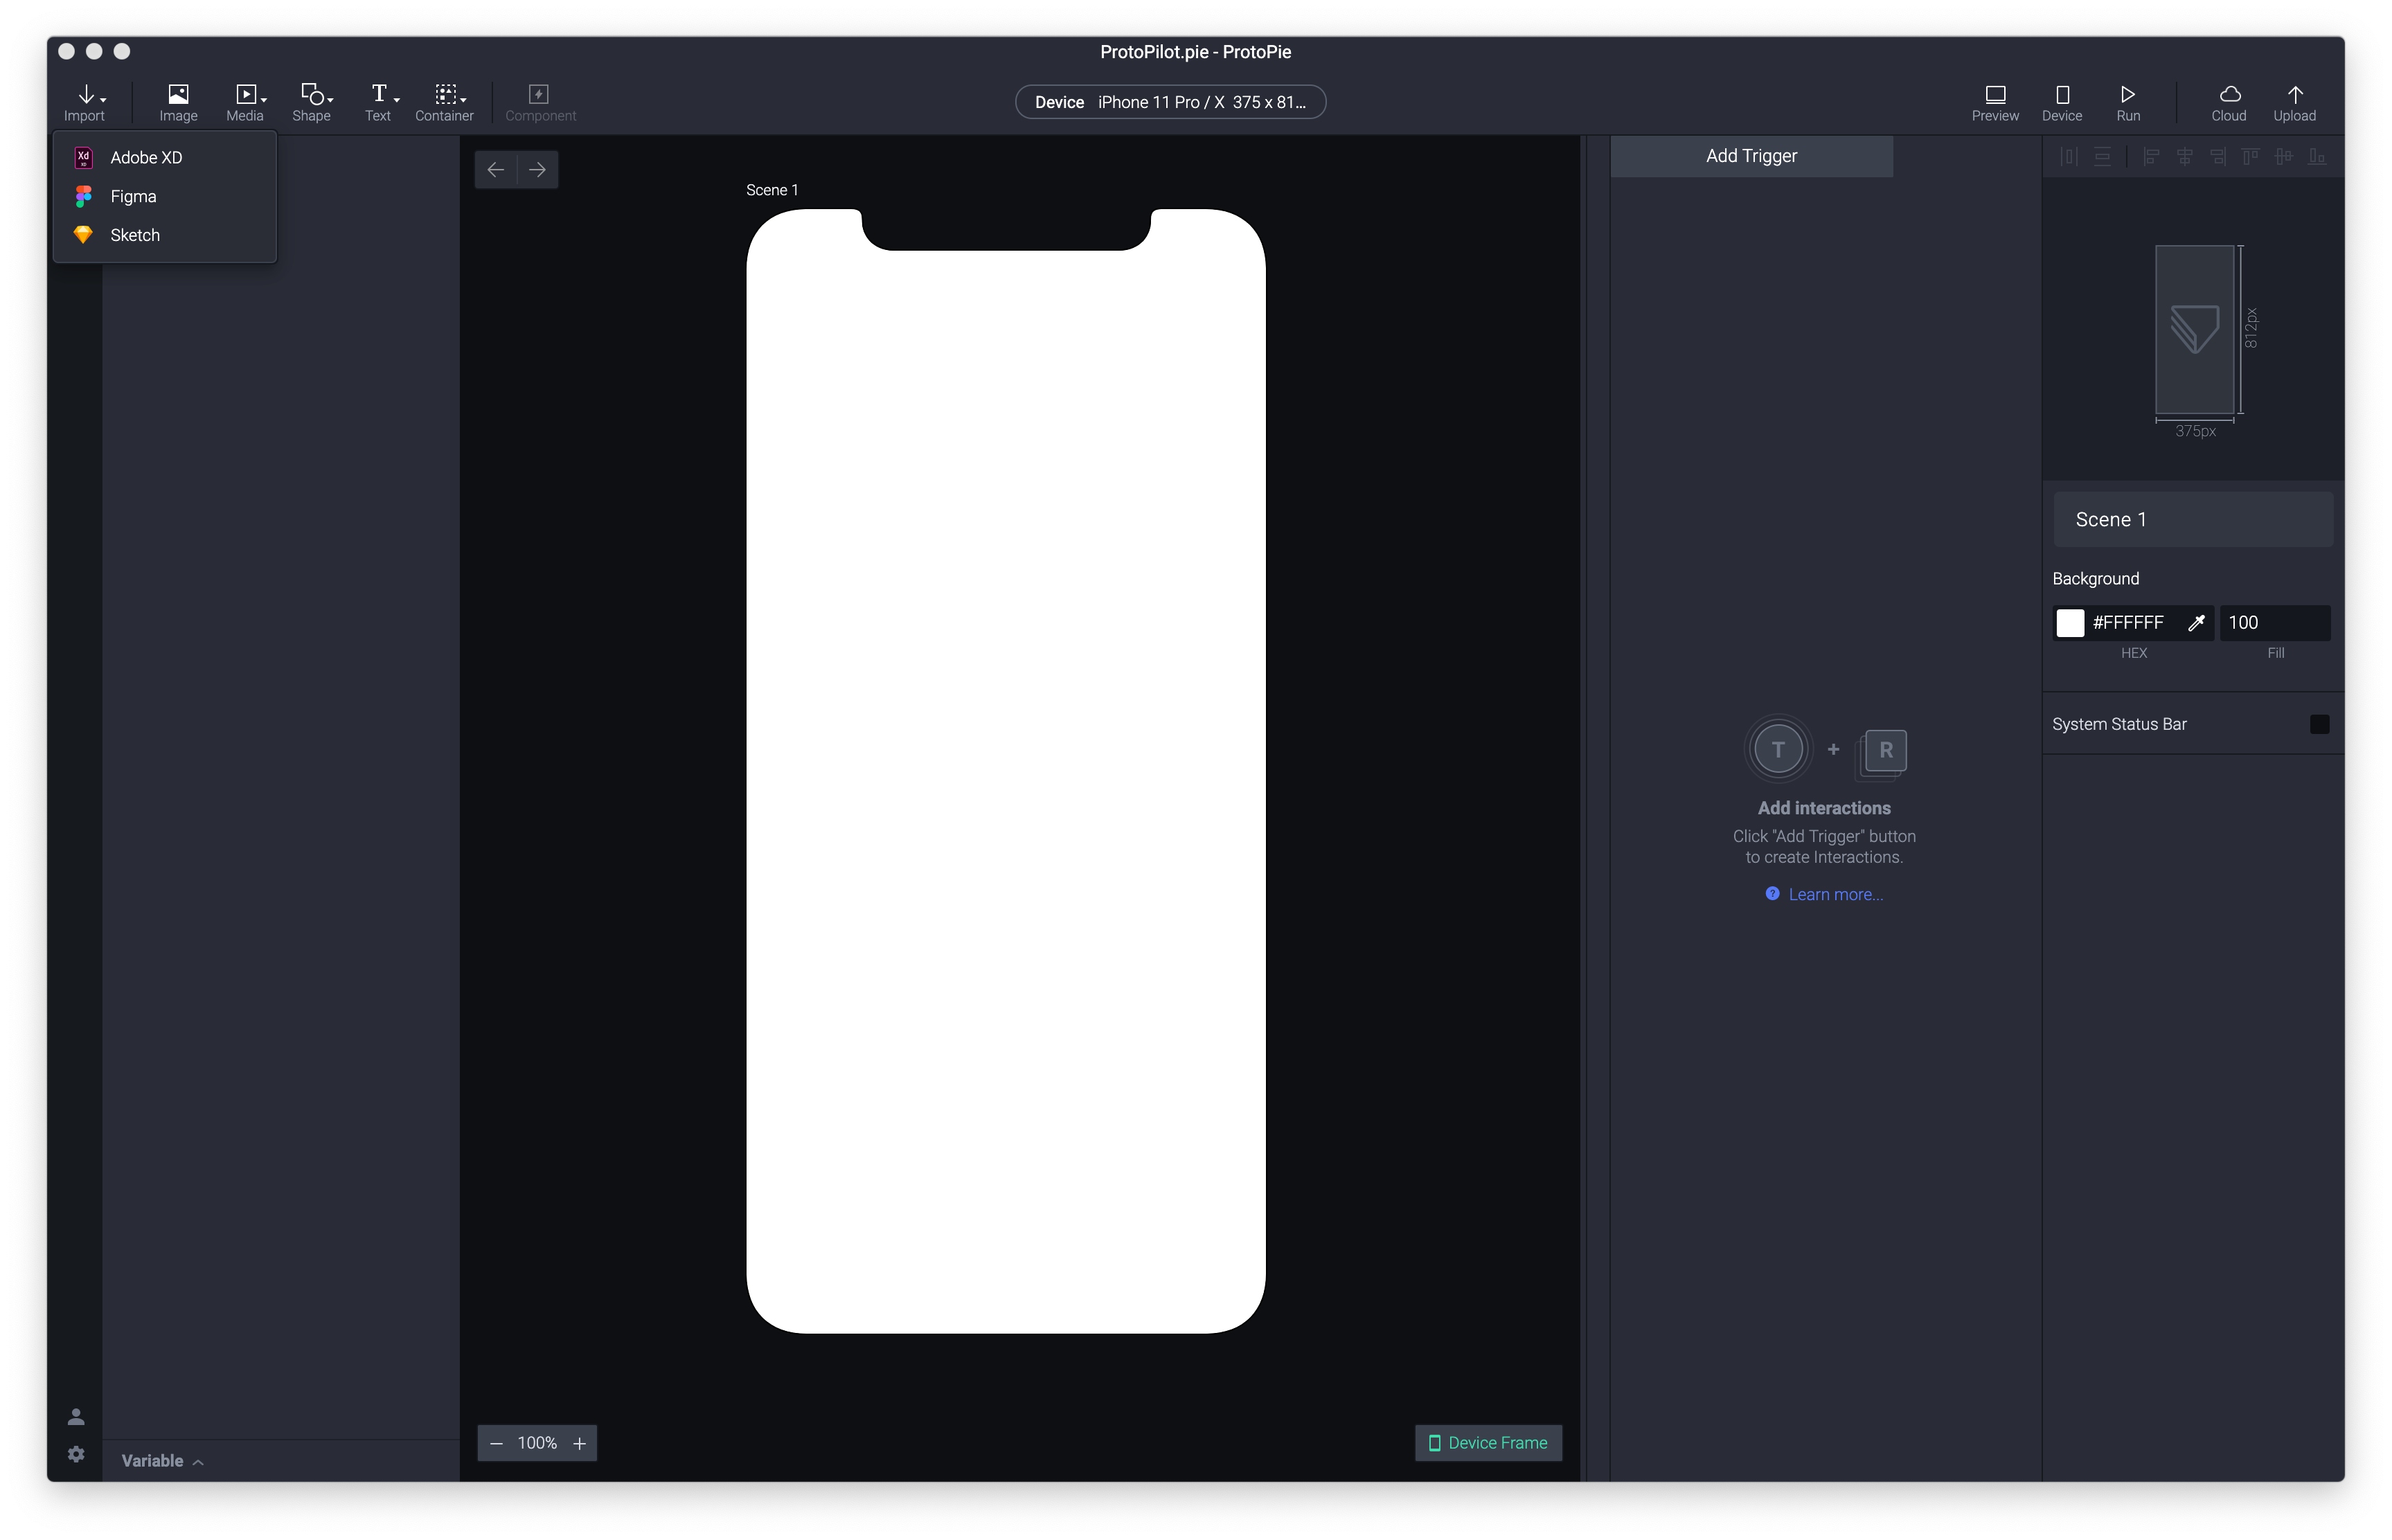
By default, a new pie will default to an iPhone 11 Pro/X which is what I want but you can choose from many presets by tapping the device name in the toolbar just below the file name.
默认情况下,新的饼图将默认为我想要的iPhone 11 Pro / X,但是您可以通过点击文件名下方工具栏中的设备名称,从许多预设中进行选择。

ProtoPie has a dedicated Figma importer which allows me to easily import my assets, so the first thing I’ll do is tap Import and choose Figma.
ProtoPie具有专用的Figma导入器,它使我可以轻松导入我的资产,因此我要做的第一件事是点击Import并选择Figma 。
I’ve already logged into Figma from ProtoPie, once done ProtoPie will automatically read the file I have open in Figma in the background. in the importer, I can see a list of my frames in the same order that they appear in my Figma file. The first screen I want to import is Start. A thing to note; to the right of the frames list is an Import Size list. ProtoPie currently only supports pixel-based graphics via import; for the most part, this is fine for our needs. All I need to make sure is that the screen density in the box matches the screen density of my pie, which in this case for iPhone 11 is @3x (Note: There are SVG import capabilities outside of the Figma import).
我已经从ProtoPie登录到Figma,一旦完成,ProtoPie将自动在后台读取我在Figma中打开的文件。 在导入程序中,我可以按照与我的Figma文件中出现的顺序相同的顺序查看框架列表。 我要导入的第一个屏幕是Start 。 要注意的事情; 框架列表右侧的是“ 导入大小”列表。 ProtoPie当前仅通过导入支持基于像素的图形。 在大多数情况下,这可以满足我们的需求。 我只需要确保框中的屏幕密度与我的馅饼的屏幕密度匹配即可,在这种情况下,iPhone 11的屏幕密度为@ 3x(注意:在Figma导入之外,还有SVG导入功能)。

I’m going to leave the rest of the dialog settings at their defaults and press Import.
我将其余的对话框设置保留为默认值,然后按Import 。
I now have my start screen imported. In the layers panel on the left, I can see a single logo graphic.
现在,我的启动屏幕已导入。 在左侧的图层面板中,我可以看到一个徽标图形。

ProtoPie has the concept of multiple pages like Figma does but in ProtoPie these are called scenes. We are going to use scenes to build our prototype but they work a bit differently to Figma pages.
ProtoPie具有类似于Figma的多个页面的概念,但是在ProtoPie中,这些称为场景。 我们将使用场景来构建我们的原型,但是它们的工作方式与Figma页面略有不同。
动画模型 (The Animation model)
Unlike Figma, ProtoPie doesn’t have a Smart Animate feature. Scenes are merely a way of breaking up the complexity of your prototype. Scenes do, however, have a similar set of page transitions to Figma which are detailed below:
与Figma不同,ProtoPie没有Smart Animate功能。 场景仅仅是打破原型复杂性的一种方式。 但是,场景确实具有与Figma类似的一组页面过渡,下面将对此进行详细介绍:
ProtoPie transition| Figma transition
原型过渡 | Figma过渡
None | Instant
无 | 瞬间
Fade | Dissolve
淡入淡出 溶解
Pop | No comparison, Pop is a scaling animation
流行音乐 | 没有可比性,Pop是缩放动画
Slide In | Slide In
滑入 滑入
Slide Out | Slide Out
滑出 滑出
N/A | Move In ( Can be created as a custom transition)
N / A | 移入(可以创建为自定义过渡)
N/A | Move Out ( Can be created as a custom transition)
N / A | 移出(可以创建为自定义过渡)
N/A | Push ( Can be created as a custom transition)
N / A | 推送(可以创建为自定义过渡)
For our prototype, we are going to use scenes but instead of thinking of scenes representing every state like Figma, we are going to think of scenes as representing app views.
对于我们的原型,我们将使用场景,而不是考虑将场景表示为每个状态(例如Figma),而是将场景视为表示应用程序视图。
Our first scene will be our Login View and will start with the logo animation and end with the login form. Our second scene will be our Logged-In View.
我们的第一个场景是“ 登录视图” ,它将以徽标动画开始,并以登录表单结束。 我们的第二个场景是登录视图 。
Let’s grab the other graphics we need for our login view by going back to the Figma import and this time choosing the Login frame.
返回到Figma导入,这次选择“ 登录”框架,以获取登录视图所需的其他图形。

We need to do some tidying up so I’m going to change the name of Scene 1 to Login. Scenes can be accessed by tapping the Scenes icon just under Import.
我们需要进行一些整理,因此我将场景1的名称更改为Login 。 可以通过点击Import下方的Scenes图标来访问场景。
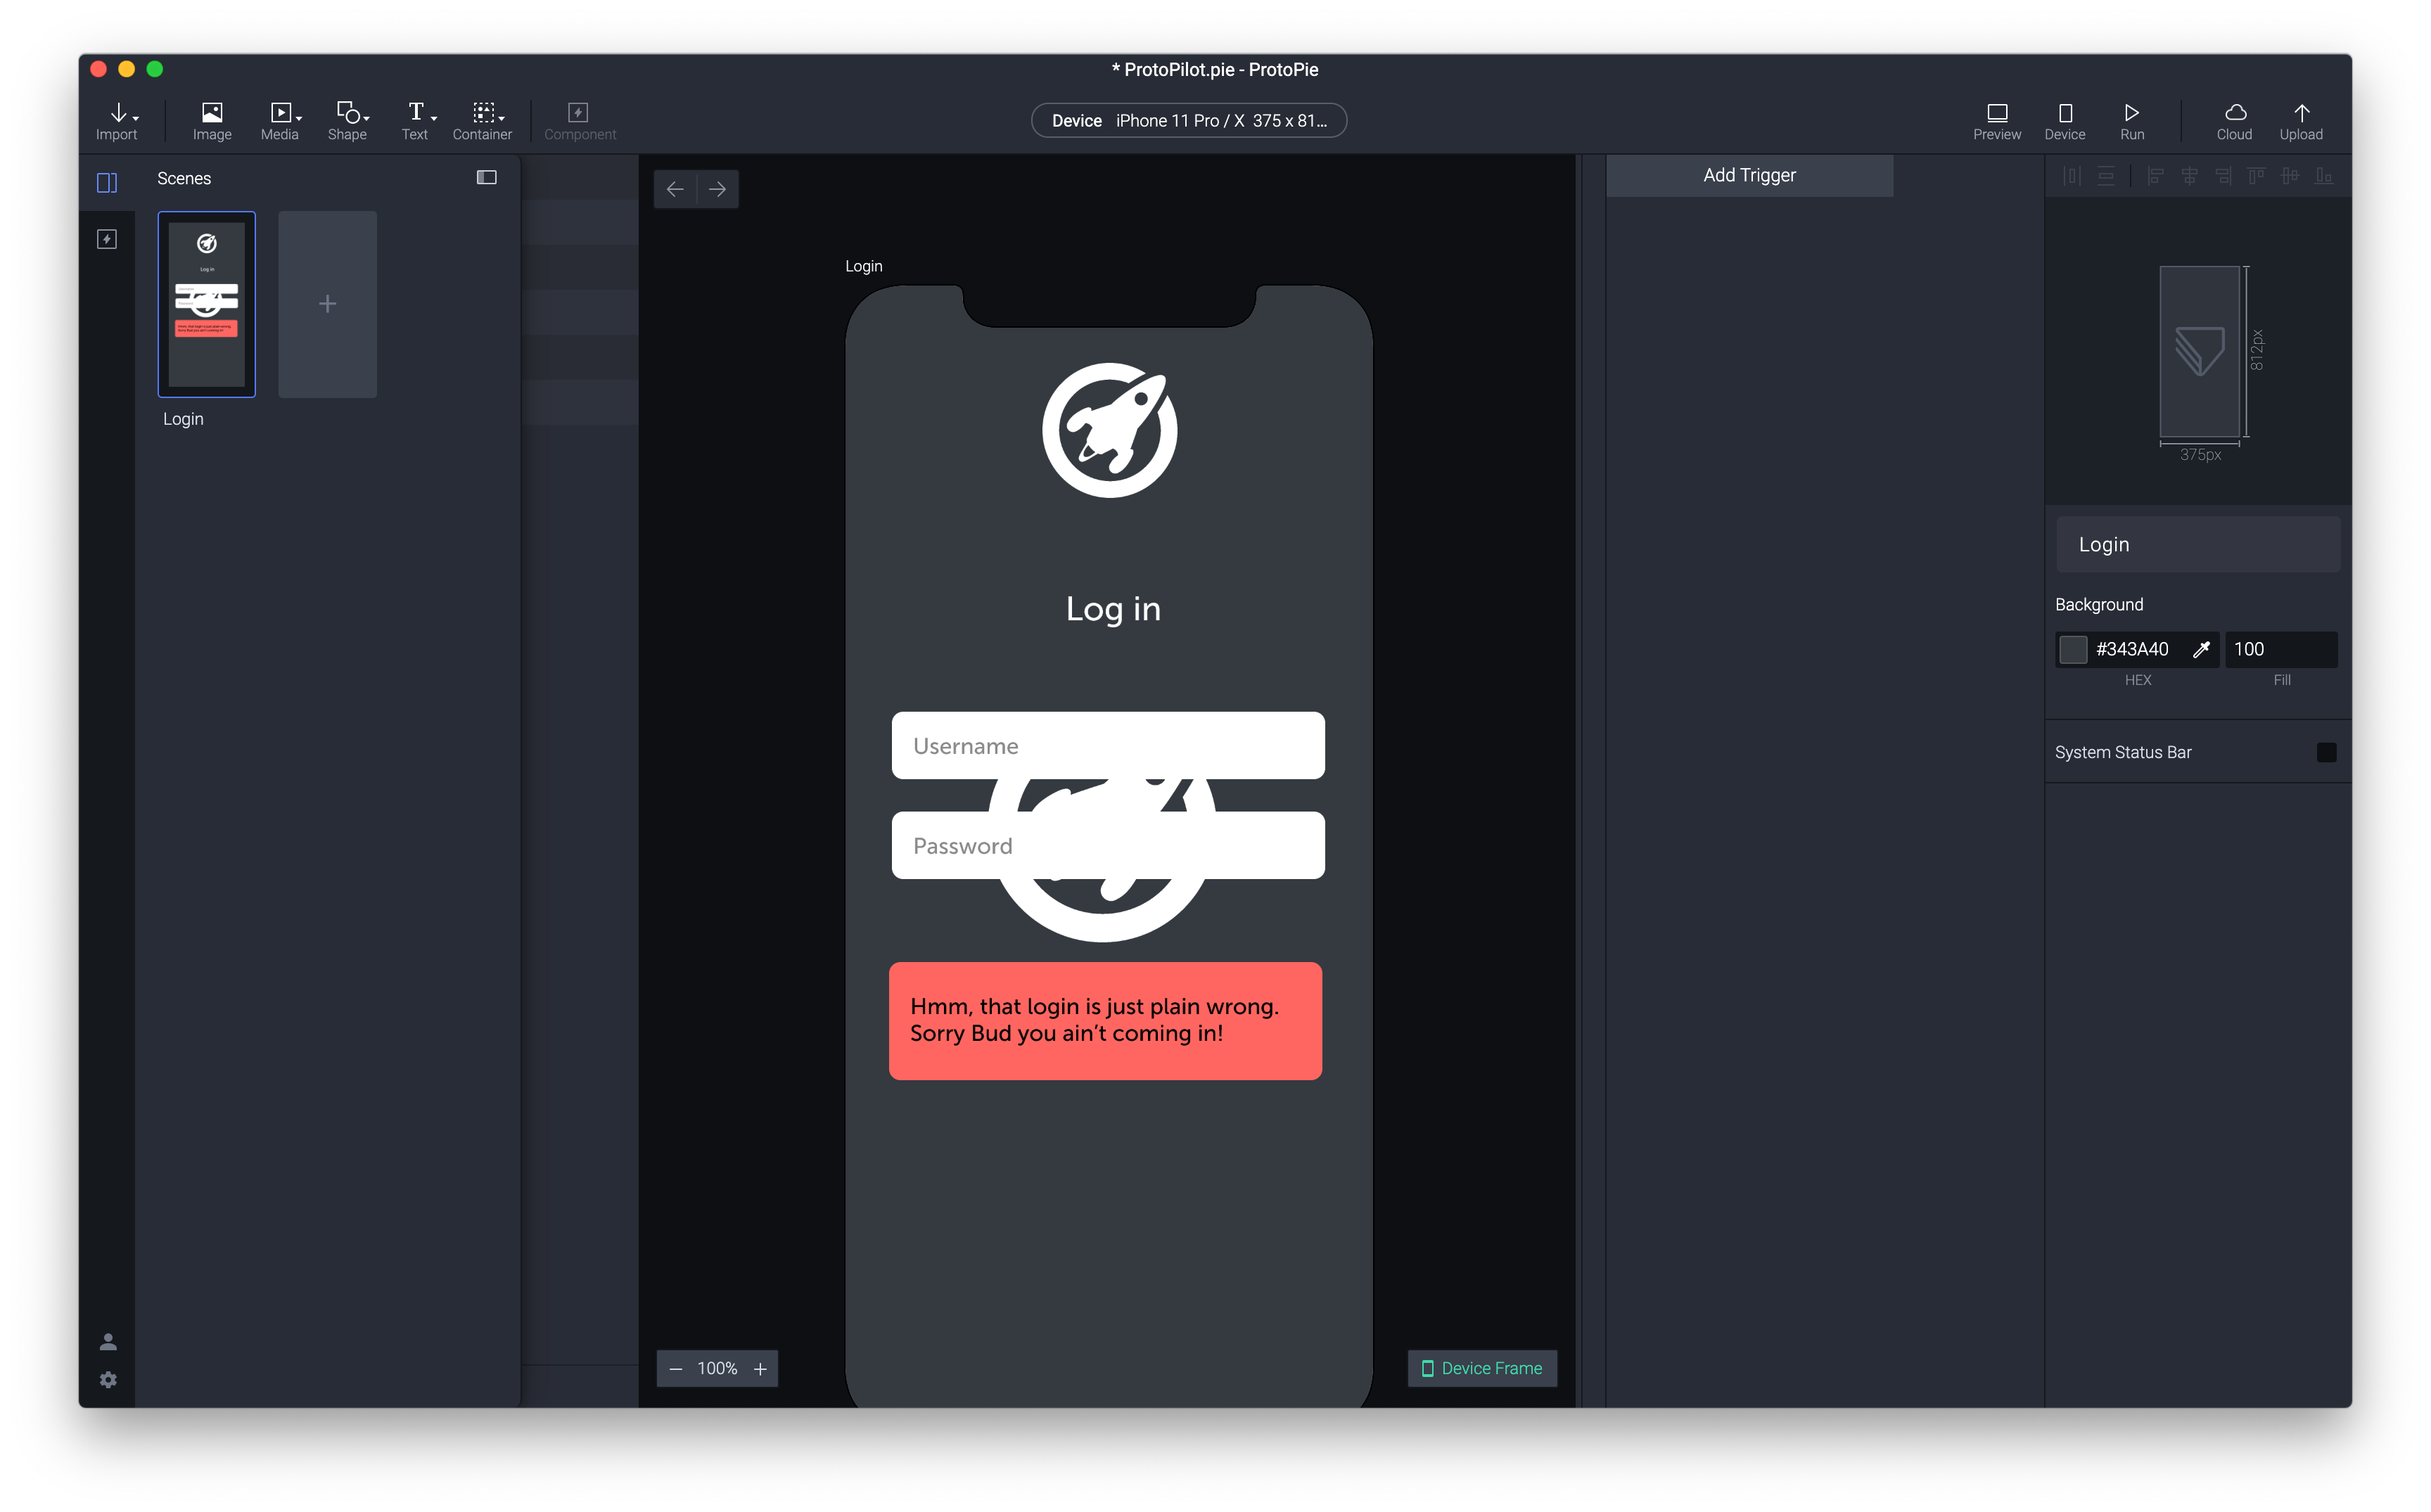
Like Figma all objects in ProtoPie have properties that you can change such as position and opacity and can be located in the right-hand context panel; I want my view to represent the starting state so I’m going to set the opacity of my title, text fields and authentication message to 0. So now all I have visible is the two logos.
像Figma一样,ProtoPie中的所有对象都具有可以更改的属性,例如位置和不透明度,并且可以位于右侧上下文面板中。 我希望我的视图代表开始状态,因此我将标题,文本字段和身份验证消息的不透明度设置为0。所以现在我看到的是这两个徽标。
In ProtoPie we don’t animate between a start and end state but instead change properties over time. This is a more classic way of animating and will be familiar to you if you’ve used tools such as After Effects. For our logo, we want to animate its position and size over time. We also want this to happen as soon as the view loads.
在ProtoPie中,我们不在开始状态和结束状态之间进行动画处理,而是随时间更改属性。 这是一种更经典的动画制作方式,如果您使用过After Effects之类的工具,将会很熟悉。 对于我们的徽标,我们希望随时间变化其位置和大小。 我们还希望这种情况在视图加载后立即发生。
Both tools share the interaction model:
这两个工具共享交互模型:
Object > Trigger > Response
对象>触发器>响应
Our object, in this case, is our logo; with it selected I’m going to add a Start response in the trigger panel.
在这种情况下,我们的对象是我们的徽标; 选择它后,我将在触发面板中添加一个开始响应。

Now I’ve added the Trigger (Start) I can add a response. I’m going to add two responses by tapping the + icon under Start, Scale and Move.
现在,我已经添加了触发器(开始),可以添加响应。 我将通过点击“ 开始”,“缩放”和“ 移动”下的+图标来添加两个响应。
I know where I want my logo to end up as I have the reference image (the small logo) already in my scene so I’m just going to read off the values. This is an easy way to mimic the smart move approach in Figma and should take some of the sting out of a different way of doing things until you get used to it. One more thing I want to do before I set the values is to change the Origin point of both logo graphics which by default are set to the top left, to the center. The origin point is where the animation will pivot from, I want mine to animate from the center.
我知道我希望徽标结束的位置,因为我的场景中已经有参考图像(小徽标),因此我将读取这些值。 这是模仿Figma中的智能移动方法的简便方法,并且应该从一些不同的处理方式中脱颖而出,直到您习惯了。 在设置值之前,我还想做的一件事是将两个徽标图形的“ 原点”更改为默认设置为左上角至中间。 原始点是动画旋转的起点,我希望我的动画从中心开始。

Going back to my responses I’m going to first read of the end width and height of my small logo and add them to the Scale response values which are both 96.
回到我的回答中,我将首先阅读小徽标的末端宽度和高度,并将它们添加到Scale响应值中,它们均为96 。
Next, I want to tweak the animation timings. In Figma, we used the After Delay interaction with duration, and then we set another duration in the Animate section. In ProtoPie we do this by adding values to Start Delay and Duration which you can see in the image below. ProtoPie’s values are in seconds as opposed to Figma using milliseconds so 200ms would be 0.2.
接下来,我想调整动画时间。 在Figma中,我们使用了After Delay交互作用与持续时间, 然后我们设置另一个 动画部分中的持续时间。 在ProtoPie中,我们通过在“ 开始延迟”和“ 持续时间”中添加值来做到这一点,您可以在下图中看到。 ProtoPie的值以秒为单位,而Figma使用毫秒,因此200ms为0.2。

Unlike Figma, we have more control over the individual properties which means I can set my move trigger to different values. I want to do this as I want a sort of swooping animation. You can see here I’ve changed the values slightly to create this animation effect. I can also now remove my reference logo image as its no longer needed.
与Figma不同,我们可以更好地控制各个属性,这意味着我可以将移动触发器设置为不同的值。 我想要这样做,因为我想要一种扑朔迷离的动画。 您可以在此处看到我稍微更改了值以创建此动画效果。 现在,我也可以删除不再需要的参考徽标图像。

ProtoPie allows me to play with all object properties separately and it even has a basic timeline that you can access to the right of the interaction stack. This allows me to visually control delay and duration and is especially useful when choreographing complex motion.
ProtoPie允许我分别处理所有对象属性,它甚至具有一个基本的时间轴,您可以访问交互堆栈的右侧。 这使我可以从视觉上控制延迟和持续时间,在编排复杂动作时特别有用。

动画形式 (Animating the form)
In the final part of my load animation, I want to fade in the title and form elements and give focus to the first text field.
在加载动画的最后一部分中,我要淡入标题和表单元素,并将焦点放在第一个文本字段上。
One of the cool features of ProtoPie is that it has a real keyboard. To add this feature we need to edit our text field graphics to include a special input element.
ProtoPie的很酷的功能之一是它具有真实的键盘。 要添加此功能,我们需要编辑文本字段图形以包括特殊的输入元素。
I’m going to increase the opacity of my text fields so I can edit them and then add inputs from the text toolbar menu.
我将增加文本字段的不透明度,以便可以对其进行编辑,然后从文本工具栏菜单中添加输入。

The input element has a broad range of features and customization but I’m going to focus on restyling the field to match my design. I can completely replace my graphic field for username by changing the Placeholder Text and the input’s visual appearance using Radius to round the corners and Fill to change the color.
输入元素具有广泛的功能和自定义功能,但我将重点介绍如何重新设计字段以使其与我的设计相匹配。 我可以通过使用Radius圆角和Fill更改颜色来更改占位符文本和输入的视觉外观,从而完全替换用户名的图形字段。
You can control the type of keyboard for each input in Keypad options. For this one seeing as its a standard text field, I’m going to leave it at the defaults.
您可以在“ 键盘”选项中控制每个输入的键盘类型。 对于这个将其视为标准文本字段的人,我将其保留为默认值。
I’ll then duplicate this field to use it for the password field. I can change the keyboard type for this to Text Password which will give the native password masking dots.
然后,我将复制该字段以将其用作密码字段。 我可以将其键盘类型更改为“ 文本密码” ,以提供本机密码屏蔽点。

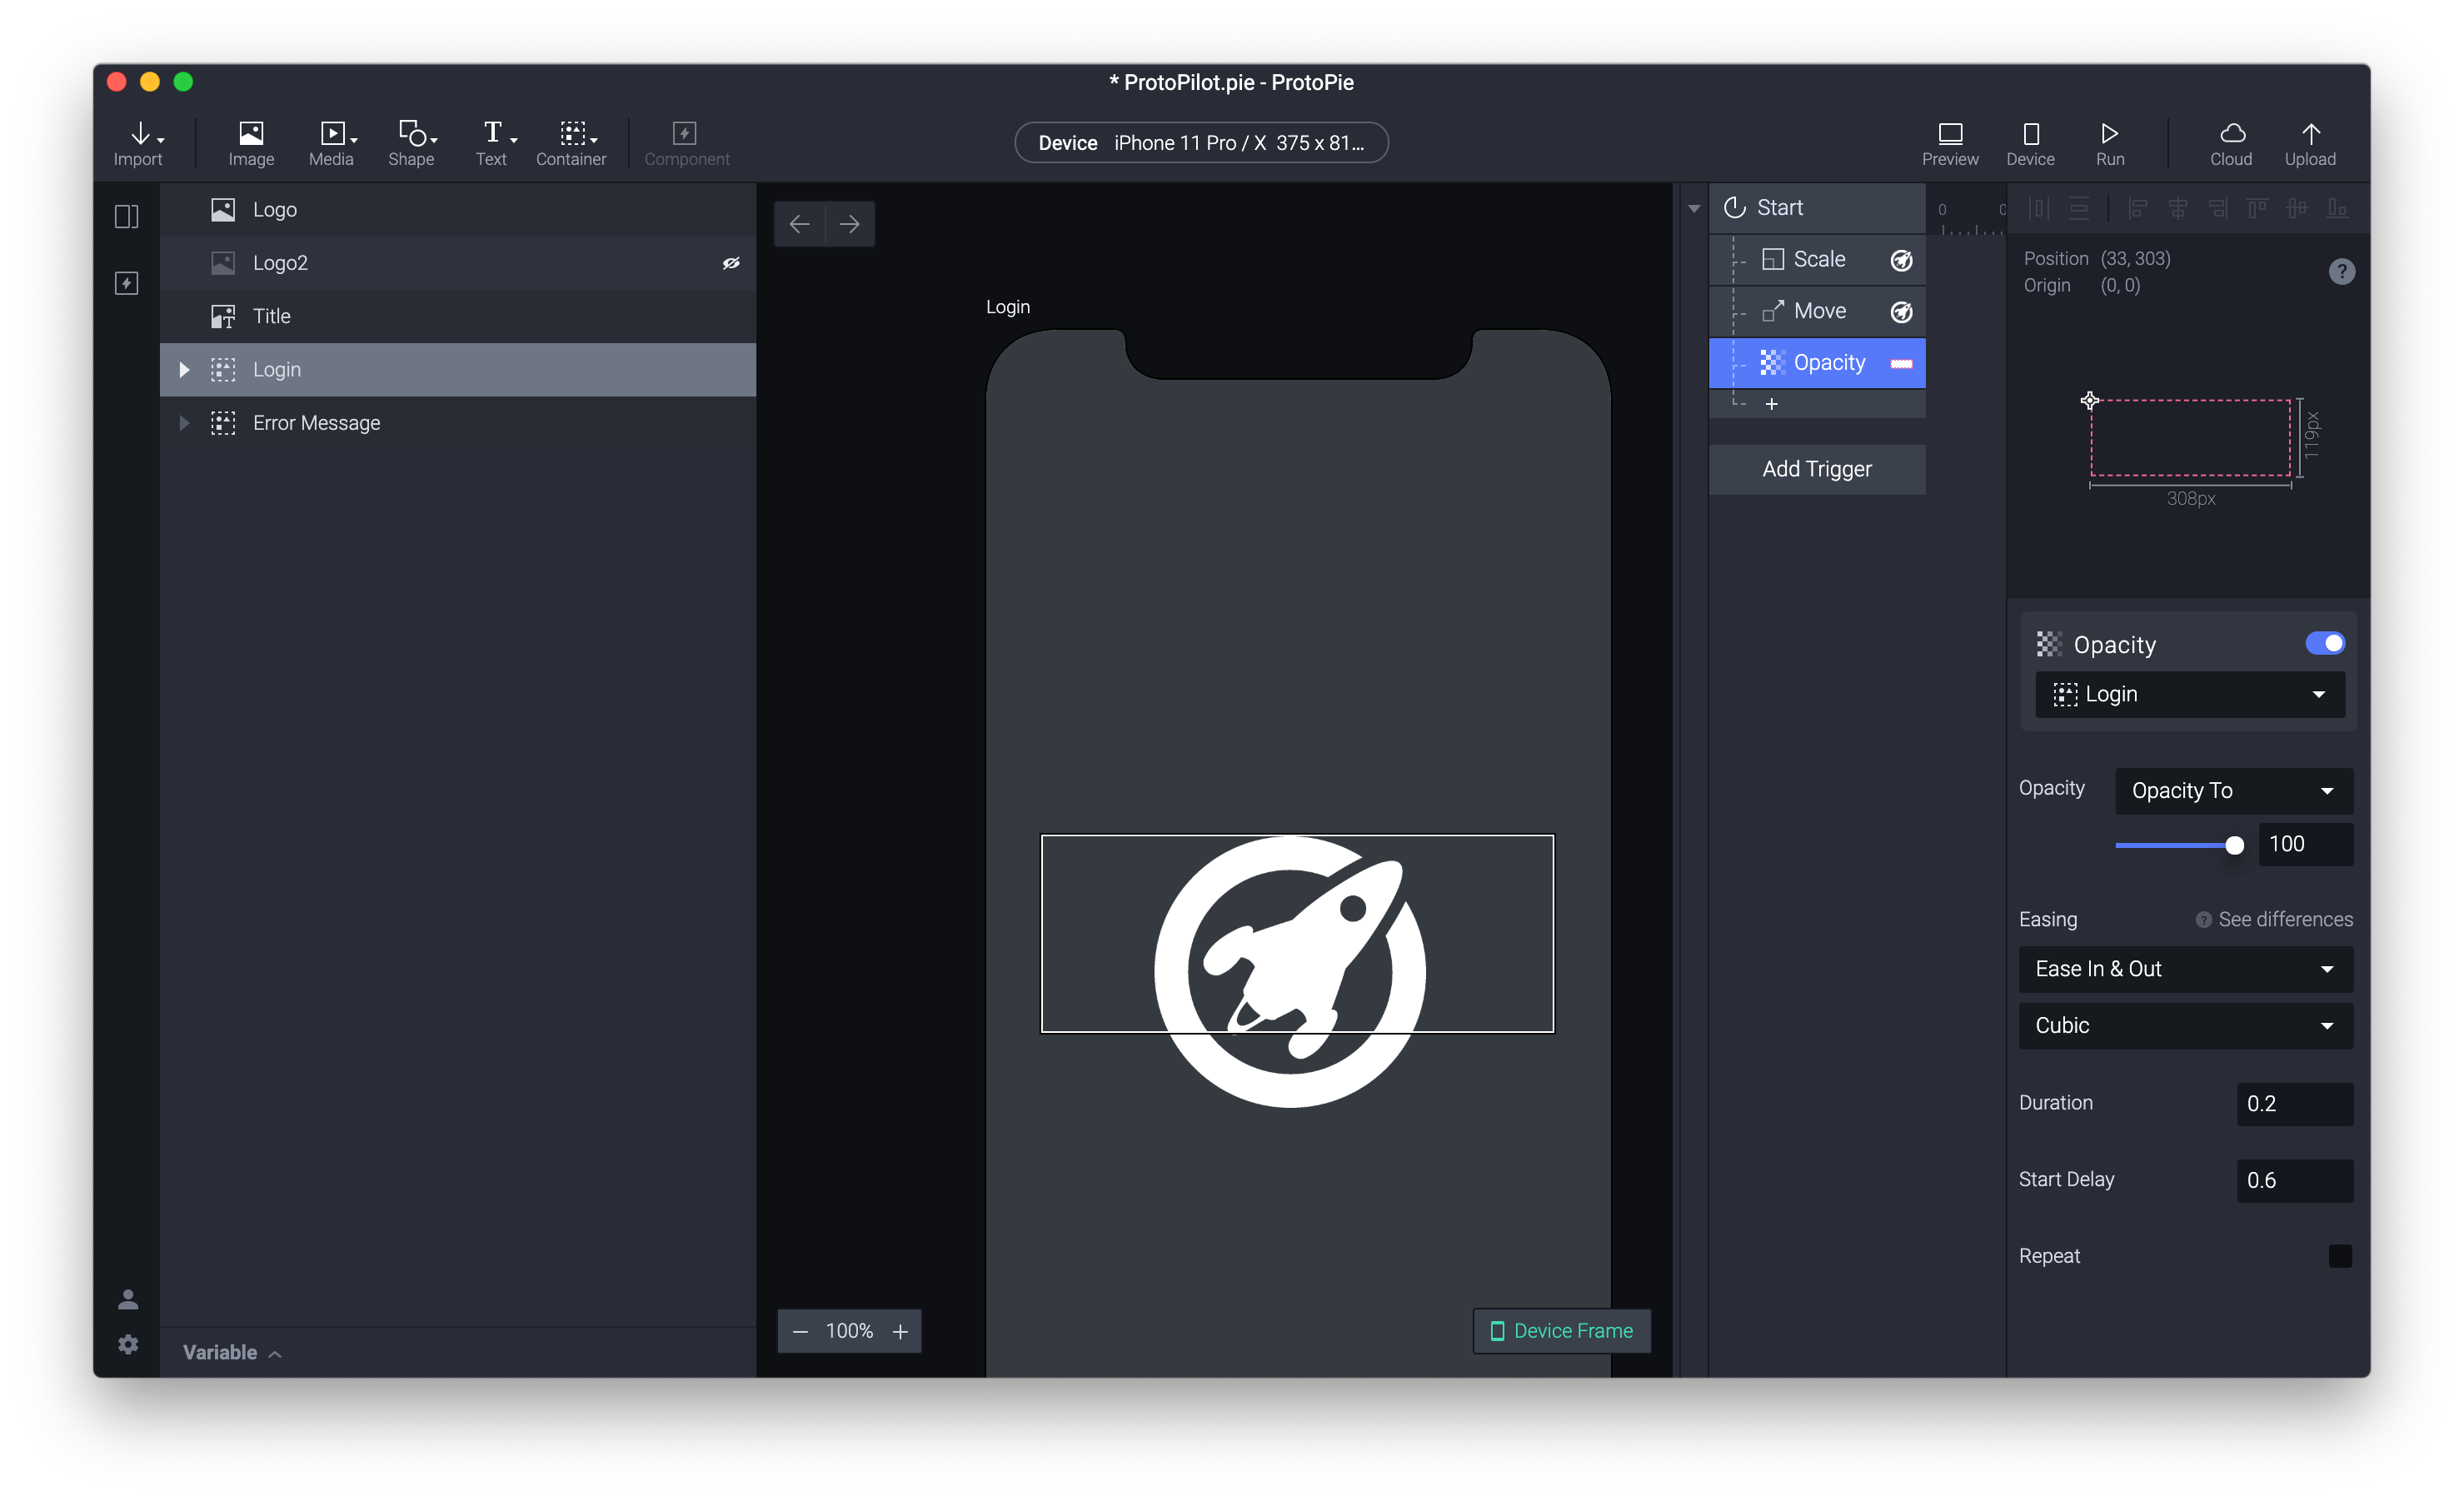
I can now remove the graphic text field groups and animate the two text fields in by just fading them after the logo has moved into place. Because I want to apply the same fade animation to both text fields I’ll group them and apply the fade to the group container instead.
我现在可以删除图形文本字段组,并通过在徽标移动到位后将它们淡化来设置两个文本字段的动画。 因为我想对两个文本字段应用相同的淡入淡出动画,所以将它们分组,然后将淡入淡出应用于组容器。
I’ll set the Opacity of the group to 0 in the properties panel to set the default state and then with the group selected I’ll add an Opacity response to the Start trigger. I’ll set the Duration to 0.2 and the Start Delay to 0.6
我将在属性面板中将该组的“ 不透明度 ”设置为0以设置默认状态,然后在选择该组的情况下,将“ 不透明度”响应添加到“ 开始”触发器。 我将“ 持续时间”设置为0.2 ,“ 启动延迟”设置为0.6
The final thing I want to do for the login view animation is to have the keyboard pop up by default and give focus to the username field.
我要为登录视图动画做的最后一件事是默认情况下弹出键盘,并将焦点放在用户名字段上。
To do this I’ll add a Focus response to the Start trigger and choose my username text field. I’ll then set the Focus In Start Delay to 0.6.
为此,我将Focus响应添加到Start触发器,然后选择我的用户名文本字段。 然后,我将“ 开始聚焦延迟”设置为0.6 。
That’s it! the first part of my prototype is complete.
而已! 我的原型的第一部分完成了。
Here is the ProtoPie prototype animation:
这是ProtoPie原型动画:
This completes part of 1 of comparing Figma prototyping to ProtoPie. You can already see some of the advanced features ProtoPie gives you as well as how easy it is to start to think in terms of basic interaction and motion with Figma.
这样就完成了将Figma原型制作与ProtoPie进行比较的部分1。 您已经可以看到ProtoPie提供的一些高级功能,以及开始思考与Figma的基本交互和运动方面的难度。
Both have their pros and cons but hopefully, this gives you some insight into both to help you choose when and where you should use them.
两者都有其优点和缺点,但有希望的是,这可以使您对两者都有一定的了解,以帮助您选择何时何地使用它们。
下周第二部分! (Coming up in part 2 next week!)
In part 2 I’ll be continuing to build out our login prototype and showing you how you can use both tools to prototype failed and successful journeys.
在第2部分中,我将继续构建我们的登录原型,并向您展示如何使用这两种工具对失败和成功的旅程进行原型设计。
See you in part 2!
在第二部分见!
翻译自: https://uxdesign.cc/prototyping-in-figma-and-protopie-a-comparison-part-1-7313004f6b3
figma下载
http://www.taodudu.cc/news/show-894246.html
相关文章:
- 大屏设计的视觉统一_视觉设计中的统一
- d3 制作条形图_停止制作常见的坏条形图的5个简单技巧
- android 辅助功能_辅助功能简介
- RawCode-本身就是实验性的8位类型
- 视觉设计_视觉设计:
- ios设计登录功能_亲爱的产品设计师,这是iOS 14的新功能
- jakob slam_Jakob Nielsen针对用户界面设计的第二种可用性启发法
- matplotlib可视化_EDA:Geopandas,Matplotlib和Bokeh中的可视化
- 笔记本移交_创建完美的设计移交
- 一个好的设计师_是什么让一个好的设计师
- ux和ui_首先要做的— UX / UI案例研究
- 帝国cms重置管理员_重新设计《纽约时报》 CMS飞行员
- latex排版基础_排版基础分类
- 比特平面分层_平面设计中的分层
- real类型_如何使用REAL方法对您的Web内容进行现实检查
- 加快信息化建设对地方发展的_加快设计师职业发展的9种方法
- vue.js ui_UI / UX开发:考虑Vue.js
- flex如何做响应式设计_响应式设计-您做错了!
- 创建用户友好的表单
- hp-ux 单用户 启动_UX备忘单:搜索与浏览
- 荒岛余生为什么没有打开包裹_您会带到荒岛什么办公桌设置?
- 拟态防御_纯素食汉堡的拟态
- 制作五彩纸屑转场动效_何时以及如何将五彩纸屑添加到产品UI
- 跨库一致性_设计跨平台的一致性
- 胖子脸:库珀·布莱克100年
- 设计模式练习_设计练习是邪恶的
- 如何忽略证书继续访问_前5个最容易被忽视的可访问性问题
- 版式设计与创意 pdf_恋爱与版式
- ui设计 网络错误_UI设计人员常犯的10个错误
- 背景图片_背景
figma下载_Figma和ProtoPie中的原型制作,比较相关推荐
- figma下载_Figma中的高级图像处理
figma下载 Figma is not exactly suited for image manipulation, and that's completely fine. While it doe ...
- figma下载_Figma中的动态内容和颜色
figma下载 First off, why use dynamic data? 首先,为什么要使用动态数据? It's easy to create and manage long lists of ...
- figma下载_Figma的自动版式实用
figma下载 Figma's Auto Layout has been around for a while, but not everyone's aware of the benefits it ...
- figma下载_Figma重新构想的团队库
figma下载 一个新的,功能更强大的界面,用于在整个组织中共享组件 (A new, more powerful interface for sharing Components across you ...
- figma下载_素描vs Figma困境
figma下载 I distinctly remember how much hatred I had in my heart when I lived through my first UI upd ...
- sketch钢笔工具_设计工具(Sketch,Adobe XD,Figma和InVision Studio)中奇怪的一项功能
sketch钢笔工具 When you build a new product that is very similar to the existing products in the market, ...
- figma下载_在Figma中进行原型制作的技巧和窍门
figma下载 自定义过渡和微交互 (Custom transitions and micro-interactions) Yep, I know that there are a lot of us ...
- figma下载_在Figma上进行原型制作的各种触发选项
figma下载 Prototypes are model versions of digital products. They're used to measure usability by test ...
- figma下载_通过构建7个通用UI动画来掌握Figma中的动画
figma下载 Originally published on my personal blog. 最初发布在我的 个人博客上 . Most designers will spend many hou ...
最新文章
- Sql Server数据库连接Oracle数据库
- python 屏幕找图 点击_捕获屏幕并查找参考图像
- 我有文章了,但也不想搞学术了
- VIP 时代,详解会员营销系统架构技术实践!
- VMware网络设置
- cadence 常见pcb电阻_不加端接电阻的快乐,你们绝对想象不到!
- 【渝粤教育】国家开放大学2018年春季 0176-21T电机学(一) 参考试题
- Spring 各种包功能
- 最新wineQQ 完美解决方案
- 硬件工程师痛苦的BOM整理工作,幸好123BOM工具把我拽出水深火热之的BOM编辑工作,超级好用的研发BOM工具,集BOM编辑、BOM合并、BOM拆分、BOM整理等
- 6000字跟你讲清数据运营到底是做什么的?
- 藏语计算机基础知识,2017年青海民族大学计算机学院738藏语与现代汉语基础考研题库...
- MySQL:2016年天猫双11化妆品销量数据分析
- SAP中有些物料凭证不能用MBST冲销的原因分析
- java.lang.NoClassDefFoundError: org/dom4j/io/SAXReader
- 绿色版Mysql的安装配置
- kube-apiserver启动时报错并且不能操作etcd
- 显示计算机工程系老师所教课程的成绩表.,sql查询
- Chrome插件:请开始你的表演,smartUp手势骚操作
- CA基本常识:X.509标准
热门文章
- win7+vs2015/13+caffe+matlab+python(CPU only)配置
- string中c_str()、data()、copy(p,n)函数的用法
- lua 从一串数字中取出偶数位的数字_为什么JavaScript中 0.1 0.2 不等于0.3?
- js修改css样式属性_这个笔记《CSS样式的常见属性及值》,让菜鸟轻松学会包粽子...
- closewait一直不释放_机床为什么要释放应力?怎么释放应力才好?
- HTML多选框滚动条,《HTM单选.doc
- FreeRTOS操作系统,在按键中断函数中恢复被挂起的任务,程序卡死的原因和解决办法...
- linux文件夹打包命令
- jq关于对象类型的判断
- debian jessie install note