figma下载_Figma中的高级图像处理
figma下载
Figma is not exactly suited for image manipulation, and that’s completely fine. While it does provide an ample amount of tools that let you apply some basic changes to your raster images, for anything more complex you need to look someplace else. Unless of course you’re really stubborn, like me, and enjoy doing things the hard way.
Figma并不完全适合于图像处理,这完全可以。 尽管它确实提供了大量工具,可让您对栅格图像进行一些基本更改,但对于更复杂的事情,则需要在其他地方查找。 除非您当然像我一样顽固,并且喜欢用艰辛的方式做事。
基础 (The basics)
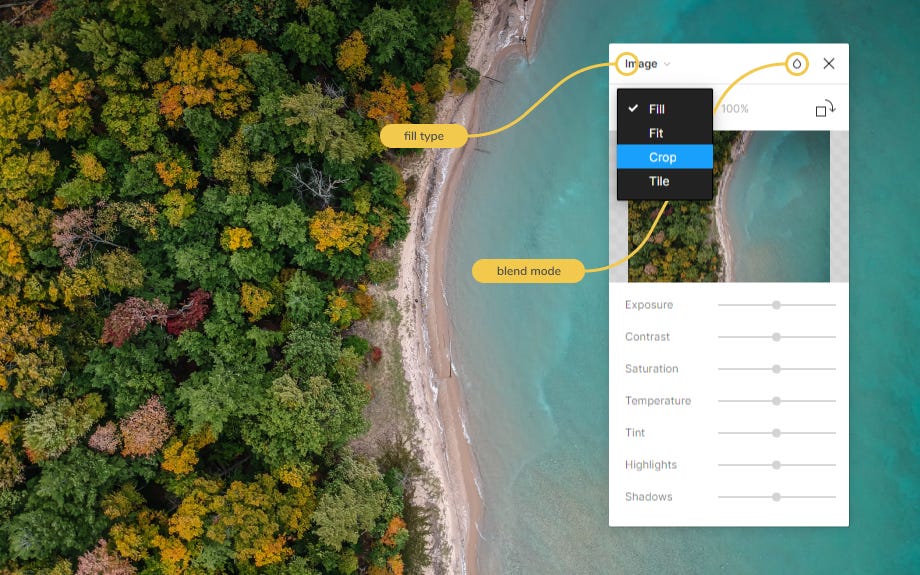
Now let’s quickly cover the basics of what you can do. First, you have the set of slider controls anyone who’s modified a photo on their phone should be familiar with.
现在,让我们快速介绍您可以做什么的基础知识。 首先,您拥有一组滑块控件,任何在手机上修改过照片的人都应该熟悉。

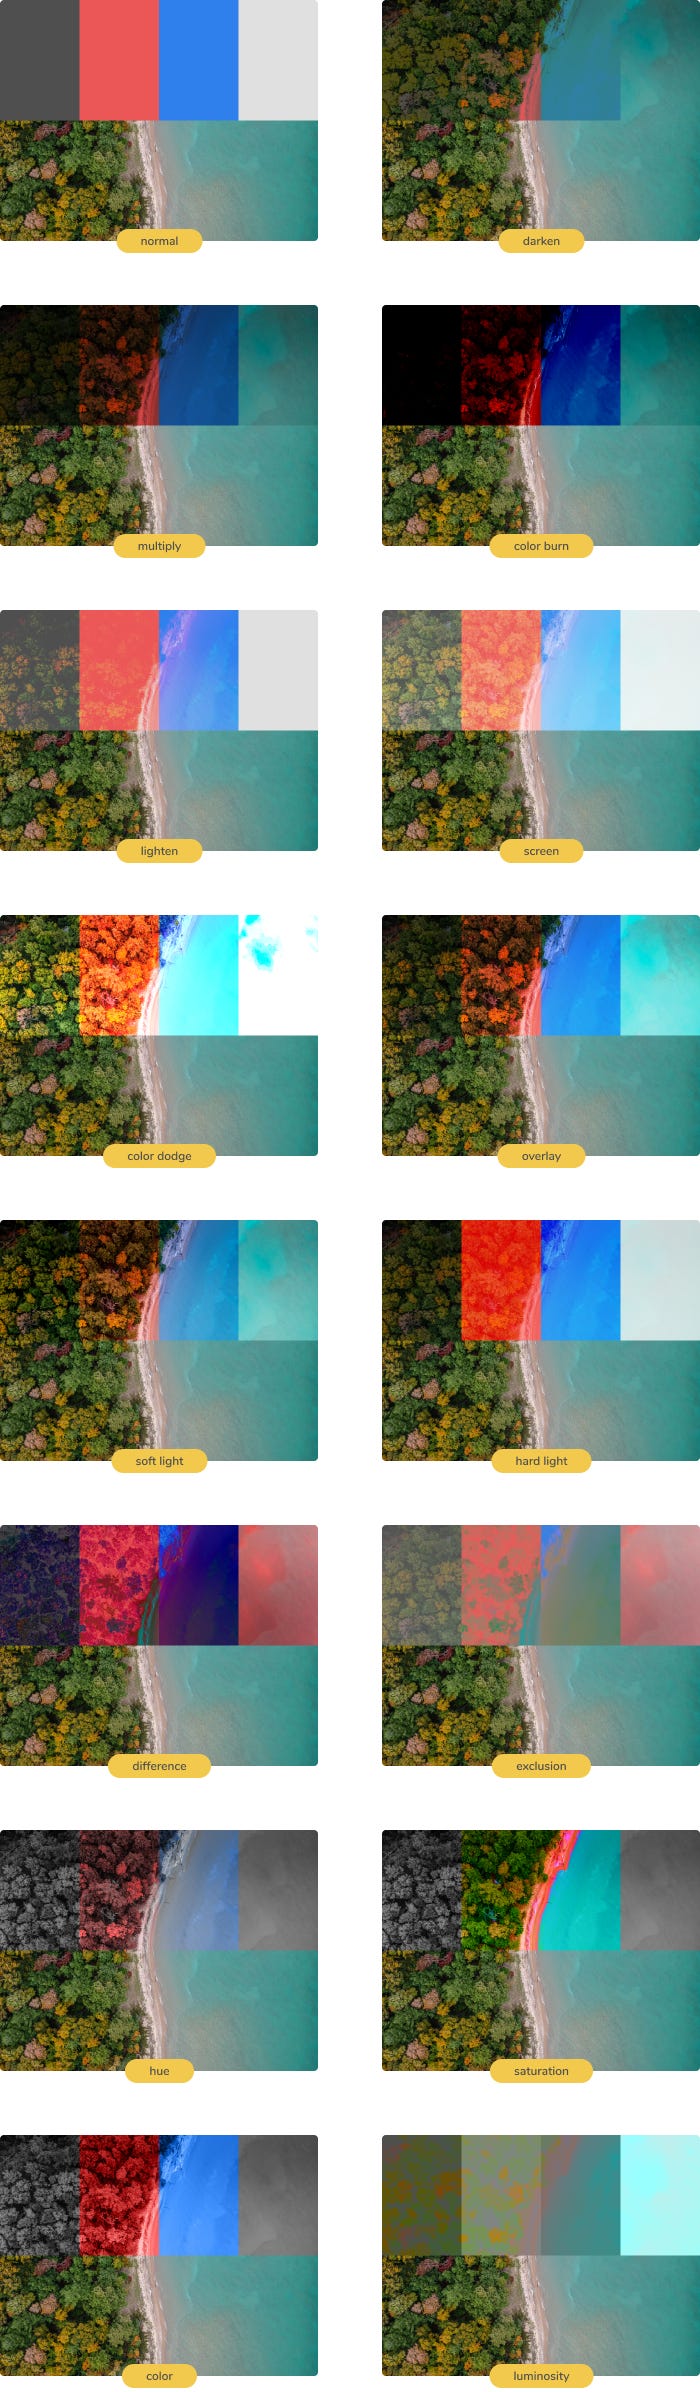
Figma also provides you with the blend mode feature, used to determine how two layers interact with each other. Well known to those of us who have used Photoshop or similar apps in the past. Blend modes are a great feature, but using them properly may require a lot of practice and experimentation.
Figma还为您提供了混合模式功能,该功能用于确定两个图层之间如何交互。 在过去使用过Photoshop或类似应用程序的我们当中众所周知。 混合模式是一个很棒的功能,但是正确使用它们可能需要大量的实践和实验。
You also get to choose how an image behaves when it’s resized, or rather when its bounding area is resized. This should make the most sense to those who are not afraid to dabble in CSS.
您还可以选择调整图像大小或调整其边界区域时的行为。 对于那些不怕涉足CSS的人来说,这应该是最有意义的。
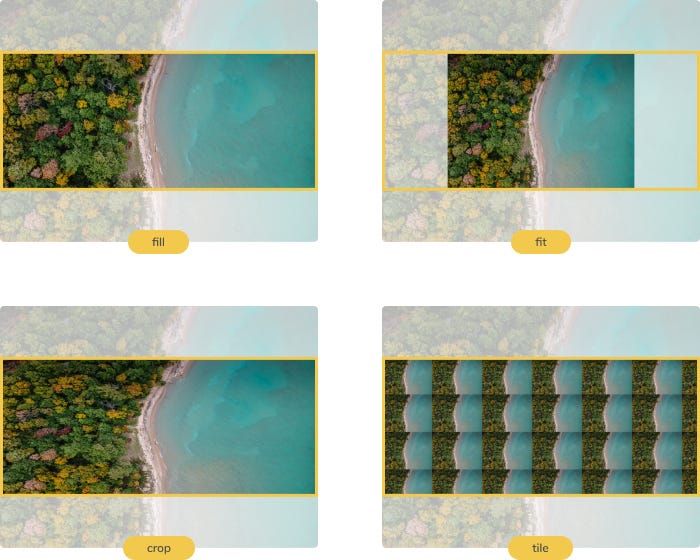
The default option for an image is to fill its bounding area. What this means is that when it’s scaled up or down and the image no longer fits the bounding area, some of its parts will get cropped away or rather hidden from view.
图像的默认选项是填充其边界区域。 这意味着当放大或缩小图像且图像不再适合边界区域时,其某些部分将被裁剪掉或从视图中隐藏。
The second option is fit. The image always remains in full view and is centered inside the bounding area. If the bounding area is too wide or too tall, you’ll get some empty space on the sides of an image.
第二种选择是合适的。 图像始终保持全屏状态,并且位于边界区域的中央。 如果边界区域太宽或太高,您将在图像的侧面获得一些空白区域。
Crop seems a little janky, I rarely use it. When you choose crop from the menu, you get these handles that allow you to specify the bounding area. Even though the X, Y, W & H properties change accordingly when you manipulate the bounding area with your mouse, you can’t use them to define its exact size or location. As soon as you click either of those controls you get kicked out of the crop mode. Thankfully snapping still works. You have to be careful after using crop mode, as the image will lose its aspect ratio (as shown in the example below) when the bounding area is resized without the shift key being pressed.
作物看起来有些枯燥,我很少使用。 从菜单中选择“裁剪”时,将获得这些手柄,可用于指定边界区域。 即使使用鼠标操作边界区域时,X,Y,W和H属性也会发生相应变化,但您无法使用它们来定义其确切大小或位置。 单击这些控件中的任何一个,就可以立即退出裁剪模式。 值得庆幸的是,捕捉仍然有效。 使用裁切模式后,请务必小心,因为在未按Shift键的情况下调整边界区域的大小时,图像将失去其长宽比(如下例所示)。
Using tile for the first time brings the image to its original aspect ratio and size. If the bounding area’s smaller then the original image, you won’t see the effect of tiling. You can modify the size of the tile by setting its size in percentages or grabbing the side of a tile and moving it around. The tiles always retain the aspect ratio of the original image. This is a great tool for generating pattern backgrounds.
第一次使用图块使图像达到其原始纵横比和大小。 如果边界区域小于原始图像,则看不到平铺效果。 您可以通过以下方式修改图块的大小:以百分比设置其大小,或抓住图块的侧面并四处移动。 这些图块始终保留原始图像的纵横比。 这是生成图案背景的好工具。
All of these changes can be reversed, although there’s no quick way to bring back an image to its original size and properties. You could delete the modified image and reimport it, but that’d be way too easy. What any self-respecting Figma aficionado should do is set the image to tile. That’ll make the image pop back to its original size (or if you’ve been using tile before on the image, just set the tile size to 100%) and aspect ratio. Now resize the bounding box to fit the image’s frame and there you go.
尽管没有快速的方法可以将图像恢复到其原始大小和属性,但所有这些更改都可以撤消。 您可以删除修改后的图像并重新导入它,但这太简单了。 任何自重的Figma爱好者都应该将图像设置为平铺。 这将使图像弹回其原始大小(或者如果您以前在图像上使用平铺,只需将平铺大小设置为100%)和宽高比即可。 现在,调整边界框的大小以适合图像的框架,然后就可以了。
填充层堆叠 (Fill layer stacking)
Now that we’ve got all the obvious stuff out of the way, it’s time to move on to the fun parts. One of the coolest and less known features is the ability to stack fill layers of an object. It’s kind of like nesting layers inside an object or even a separate system of layers that behaves pretty much as the normal layers do.
既然我们已经排除了所有明显的问题,现在是时候继续介绍有趣的部分了。 最酷和鲜为人知的功能之一是能够堆叠对象的填充层。 这有点像在对象内部嵌套图层,甚至像单独的图层系统一样,其行为都与普通图层类似。
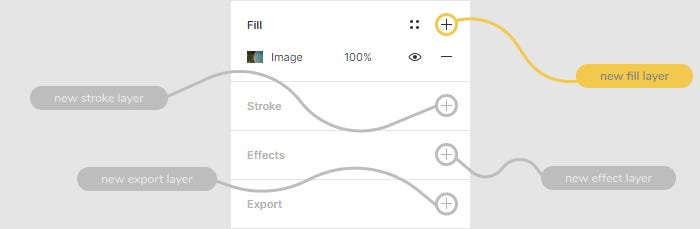
You can have multiple fill layers, stroke layers, effect layers or export settings. Since we’re talking about image modification, we’re going to be talking about fill exclusively. Clicking the + button more than once keeps adding additional fill layers. The default type setting for the second fill layer, regardless of what kind of fill layer is set as the first one, is gradient.
您可以具有多个填充层,笔触层,效果层或导出设置。 由于我们在谈论图像修改,因此我们将专门讨论填充。 多次单击+按钮将继续添加其他填充层。 无论将哪种填充层设置为第一填充层,第二填充层的默认类型设置都是渐变。
This is really cool because you can exercise greater control over your imported images while keeping your regular layer structure clean. Normally you’d need to put the image object in a frame and have the effects in a separate object, all of them appropriately constrained. By stacking fill layers you keep all your effect layers inside one single object and you don’t need to worry about constraints.
这真的很酷,因为您可以对导入的图像进行更大的控制,同时保持常规图层结构的清洁。 通常,您需要将图像对象放在一个框架中,并将效果放在一个单独的对象中,所有这些都应适当地加以约束。 通过堆叠填充层,您可以将所有效果层保留在一个对象中,而不必担心约束。
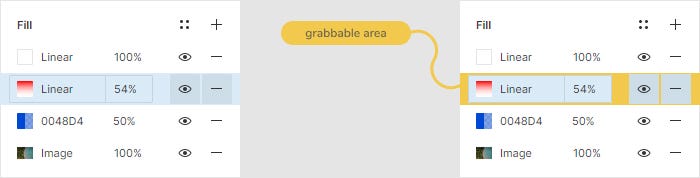
Just as with normal layers, you can change the stack order of your fill layers. All you have to do is grab one and move it to wherever you like. The tricky part is actually grabbing one. The example on the left (above) highlights the entire area of a single fill layer in the Fill panel and from left to right you’ve got four controls that let you set fill type and color, opacity or remove the layer. Everything that isn’t a control is grabbable (highlighted on the right) and allows you to move the layer around. Knowing all that you can go all kinds of crazy with overlay tints, gradients and blend modes to receive many satisfying or unsatisfying effects, but there’s more.
与普通图层一样,您可以更改填充图层的堆叠顺序。 您所要做的就是抓住其中一个并将其移至您喜欢的任何位置。 棘手的部分实际上是抢一把。 左侧的示例(上方)在“填充”面板中突出显示了单个填充图层的整个区域,从左到右,您具有四个控件,可用于设置填充类型和颜色,不透明度或删除图层。 并非控件的所有内容均可抓取(在右侧突出显示),并允许您四处移动图层。 知道了所有这些之后,您就可以通过叠加色调,渐变和混合模式来疯狂进行各种操作,以获得许多令人满意或不令人满意的效果,但是还有更多。
Once you have a fill layer selected you can copy it, but only through keyboard shortcuts. There’s no right click menu for this layer system in case you’re wondering. Since you’re copying a property rather than an object, you need to select an object or a set of objects in order to be able to paste your fill layer into. And this is actually pretty awesome, because it lets you copy a fill layer from an imported image and paste it into any object that accepts fill layers. It could be a circle (if you’re creating, say, an avatar) or it could be text. This action doesn’t overwrite any preexisting layers — it gets added as the topmost layer of an object.
一旦选择了填充层,就可以复制它,但是只能通过键盘快捷键进行复制。 如果您想知道,此图层系统没有右键单击菜单。 由于要复制属性而不是对象,因此需要选择一个对象或一组对象才能将填充层粘贴到其中。 这实际上非常棒,因为它使您可以从导入的图像复制填充层并将其粘贴到任何接受填充层的对象中。 它可以是一个圆圈(如果您要创建一个头像),也可以是文本。 此操作不会覆盖任何先前存在的层,而是将其添加为对象的最顶层。

This is different than using the more fleshed out method of copying properties of an object. When you’re doing that you’re copying a set of different properties — could be a lot of them. Using my method you can be very particular about choosing the properties you want to copy between two objects.
这与使用更加充实的对象属性复制方法不同。 当您这样做时,您正在复制一组不同的属性-其中可能有很多。 使用我的方法,您在选择要在两个对象之间复制的属性时可能会非常特别。
图片作为样式 (Images as styles)
Some of the features I’ve described seem so obscure and unintuitive to use, it almost makes me questions their intendedness. As I’ve mentioned before, you could achieve the same effects by using the normal system of layers, masks, and constraints, though I often find myself preferring the fill stacking method. One of the reasons for that is that you can turn a combination of fill layers that includes an image into a color style for your design system. Once you’re ready setting up your layer stack, just add it to your color styles and it’s now ready to be applied to any object that accepts colors. So yeah, nothing’s stopping you from using it as a stroke layer now.
我所描述的某些功能使用起来似乎晦涩难懂且不直观,几乎使我怀疑它们的用途。 如前所述,尽管我经常发现自己更喜欢填充堆积方法,但是通过使用常规的图层,蒙版和约束系统也可以达到相同的效果。 原因之一是可以将包含图像的填充层组合转换为设计系统的颜色样式。 准备好设置图层堆栈后,只需将其添加到颜色样式中,即可将其应用于接受颜色的任何对象。 是的,没有什么阻止您现在将其用作笔触图层。
I hope that this newly acquired knowledge will have you switching back to Photoshop a little less now. Good luck.
我希望这些新获得的知识能使您现在切换回Photoshop的时间有所减少。 祝好运。
翻译自: https://uxdesign.cc/advanced-image-manipulation-in-figma-e1a0468c4982
figma下载
http://www.taodudu.cc/news/show-894049.html
相关文章:
- 指针和指针的指针_网络上的iPad指针
- 书籍排版学习心得_为什么排版是您可以学习的最佳技能
- 线框图用什么软件_为什么要在线框中着色?
- qq空间网页设计_网页设计中负空间的有效利用
- matlab中的:的优先级_内容早期设计:内容优先
- 脑裂问题解决方案_从解决方案到问题
- 调查谋杀案以换取Obra Dinn
- ux设计中的各种地图_移动应用程序设计中的常见UX错误
- 工业仪器仪表 界面设计_如何设计时尚的仪表板界面
- ui和ux的区别_UI和UX之间的区别
- 文本字段和表单设计-UI组件系列
- 阿拉伯语排版设计_针对说阿拉伯语的用户的测试和设计
- 火焰和烟雾的训练图像数据集_游戏开发者是烟雾和镜子的大师
- 全球 化 化_全球化设计
- 手动创建线程池 效果会更好_创建更好的,可访问的焦点效果
- eazy ui 复选框单选_UI备忘单:单选按钮,复选框和其他选择器
- 初级中级高级_初级职位,(半)高级职位
- figma下载_迁移至Figma
- 微服务负载均衡实现高可用_使用负载平衡实现大容量可用性
- tcp 接收端优雅的写法_如何更优雅地接收设计反馈
- 文案写作软件_11种可改善网站用户体验的文案写作技术
- web开发集成数字证书_每个数字设计师都应该知道的Web开发的七个原则
- figma设计_Figma与Adobe XD:我们如何选择下一个设计工具
- figma设计_如何在Figma中构建设计入门套件(第1部分)
- saej1929_(1929年-2020年)
- 不要重新发明轮子_是否重新发明轮子
- shields 徽标_符号,标志,文字标记:徽标类型的综合指南
- 设计师更高效_如何丢掉我的工作使我成为一名更好的设计师
- figma设计_如何在Figma中构建设计入门套件(第二部分)
- unity vr 交互_基于手动的VR / MR交互,用于删除实体
figma下载_Figma中的高级图像处理相关推荐
- figma下载_Figma中的动态内容和颜色
figma下载 First off, why use dynamic data? 首先,为什么要使用动态数据? It's easy to create and manage long lists of ...
- figma下载_Figma和ProtoPie中的原型制作,比较
figma下载 第1部分 (Part 1) Prototyping has never had such a high profile with a whole host of tools that ...
- R 语言中的高级图像处理包
最新的 magick 包是为能够在 R 中更现代化.简单化高质量图像处理而进行的一次努力.该包封装了目前最强大的开源图片处理库 ImageMagick STL . ImageMagick 库具有大量功 ...
- figma下载_Figma的自动版式实用
figma下载 Figma's Auto Layout has been around for a while, but not everyone's aware of the benefits it ...
- figma下载_Figma重新构想的团队库
figma下载 一个新的,功能更强大的界面,用于在整个组织中共享组件 (A new, more powerful interface for sharing Components across you ...
- figma设计_Figma中简单,可重复使用的设计系统
figma设计 Putting together a design system may seem like an unnecessary hassle. It's often easier to j ...
- figma下载_素描vs Figma困境
figma下载 I distinctly remember how much hatred I had in my heart when I lived through my first UI upd ...
- figma下载_通过构建7个通用UI动画来掌握Figma中的动画
figma下载 Originally published on my personal blog. 最初发布在我的 个人博客上 . Most designers will spend many hou ...
- figma下载_在Figma中进行原型制作的技巧和窍门
figma下载 自定义过渡和微交互 (Custom transitions and micro-interactions) Yep, I know that there are a lot of us ...
最新文章
- ubuntu codeblocks 设置用默认的gnome-terminal进行调试
- python决策树生成规则_如何从scikit-learn决策树中提取决策规则?
- web developer tips (28):CSS class 也支持“转到定义”
- 日期加减加1天_2小时整理了13个时间日期函数,动图演示简单易学,收藏备用吧...
- 转 C#对多个集合和数组的操作(合并,去重,判断)
- Python | 如何使用pip升级所有Python软件包?
- .net core orm框架_轻量级高性能PHP框架ycroute
- php空间搭建tcshare,新秀网 - 宝塔面板搭建天翼云盘目录列表TCShare
- offsetLeft,Left,clientLeft的区别
- Illustrator 教程,如何在 Illustrator 中使用曲率工具绘制?
- Mac常用触摸板手势
- python列表的增删查改,已经冒泡,选择,快速排序
- 「题解」NOIP模拟测试题解乱写II(36)
- 黑盒测试简介和常用方法
- C++跳出for循环
- js通过字节长度截取中英文混合字符串
- 专项---APP安全---Android APP安全测试内容
- 2019 年终回顾:不忘初心,负重前行
- 一篇文章看懂:量化交易
- 2020校招美团点评笔试
热门文章
- 员工培训与开发实训心得体会_公司新员工培训心得体会800字范文
- serialversionuid的作用_为什么阿里Java规约要求谨慎修改serialVersionUID字段
- fatal error LNK1169: 找到一个或多个多重定义的符号 的解决方案
- php异步处理下载文件,异步处理Excel文件导入【流程图+PHP示例】
- 包含html语言的超链接标记的网页_零基础入门 HTML 的 8 分钟极简教程
- html4的语法,HTML——语法
- 程序日志--要养成好习惯
- 【discuz x3】源代码中的sql调用
- PowerDesigner 逆向工程 从SQL文件转换成PDM 从PDM转成CDM
- 在Red Hat 4 AS U7上安装oracle10gR2