figma下载_Figma的自动版式实用
figma下载
Figma’s Auto Layout has been around for a while, but not everyone’s aware of the benefits it brings. It doesn’t replace constraints, they’re still very much needed. The trick is to use the right feature where necessary. I want to show you how to combine components, constraints, and Auto Layout for the best results.
Figma的自动版式已经存在了一段时间,但并不是每个人都意识到它带来的好处。 它不能代替约束,仍然非常需要它们。 诀窍是在必要时使用正确的功能。 我想向您展示如何组合组件,约束和自动版式以获得最佳效果。
I threw together a screen for an Uber Eats inspired food delivery app and I’m going to tear it down to show you how you can use Auto Layout along with constraints and components to up your design game.
我为受Uber Eats启发的送餐应用程序放了一个屏幕,我将其拆下来向您展示如何使用自动版式以及约束和组件来设计游戏。

Most of you already know that, but for a word of introduction, what Auto Layout does is automatically arrange elements placed inside of a frame. These elements can be either arranged vertically or horizontally and you can set the spacing between individual elements as well as between the elements and the borders of the frame. Because of this can’t use constraints or place elements on top of one another in frames that use Auto Layout.
你们大多数人都已经知道这一点,但简单地说,“自动布局”的作用是自动排列放置在框架内部的元素。 这些元素可以垂直或水平排列,您可以设置各个元素之间以及元素与框架边框之间的间距。 因此,不能使用约束,也不能在使用“自动布局”的框架中将元素彼此重叠放置。

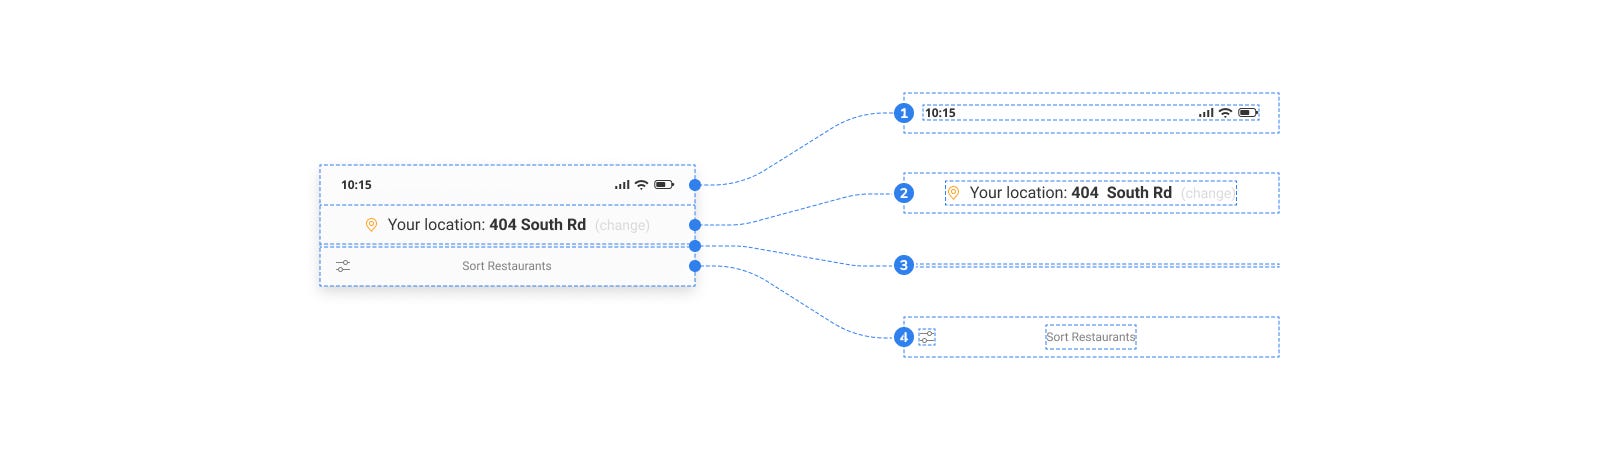
At the top-most level, these are the four separate elements that the screen/frame is comprised of.
在最顶层,这些是组成屏幕/框架的四个独立元素。
- The header consists of four inner frames and uses Auto Layout. We’ll get to it later.页眉由四个内部框架组成,并使用“自动布局”。 我们稍后再讨论。
- This is the headline element which is simply a left and bottom constrained text element inside a frame.这是标题元素,仅是框架内的左侧和底部约束文本元素。
- The content area frame is a little more complex. More on that later.内容区域框架稍微复杂一些。 以后再说。
- The bottom menu houses a top and horizontally stretched 375x1px light gray rectangle and a group of icons inside a frame that we’ll tackle a little later.底部菜单包含顶部和水平拉伸的375x1px浅灰色矩形,以及框架内的一组图标,稍后我们将解决。
The frame for the screen is a lot longer than shown in the example above so that the much longer content area can be scrollable. The header’s and the menu’s positions are fixed when scrolling, which is one of the reasons we can’t be using Auto Layout in this frame. The sections (2) and (3) have their constraints set to align to top and stick to the left and right edges so that if the frame was to be resized, they’d stick to their initial position and also fill out the screen horizontally the way they do now.
屏幕的框架比上面的示例显示的要长得多,因此可以滚动更长的内容区域。 滚动时标题和菜单的位置是固定的,这是我们不能在此框架中使用“自动布局”的原因之一。 将第(2)和(3)节的约束设置为与顶部对齐并固定在左右边缘,这样,如果要调整框架的大小,它们将固定在其初始位置并水平填充屏幕他们现在的方式。
Now let’s look at the header element. It’s comprised of another four frames and this is where Auto Layout comes into play. They’re arranged vertically and there’s no spacing between any of them or any of the borders of the frame.
现在让我们看一下header元素。 它由另外四个帧组成,这是自动版式发挥作用的地方。 它们是垂直排列的,它们之间或框架的边框之间都没有间距。
- This is the typical status icon setup in iOS. This frame contains a group of elements locked inside a frame that is set centered both horizontally and vertically. The inner frame houses a left and center constrained text element and right and center constrained vector icons.这是iOS中典型的状态图标设置。 此框架包含一组锁定在水平和垂直居中设置的框架内的元素。 内部框架包含一个左和中心约束的文本元素以及右和中心约束的矢量图标。
- This frame contains a frame that again uses Auto Layout to take care of the elements inside of it — we’ll get to it later.该框架包含一个框架,该框架再次使用“自动布局”来处理其中的元素-我们将在稍后进行介绍。
- It’s just a simple spacer element, a frame that is 1px tall with a light gray background.这只是一个简单的间隔元素,一个高度为1px的框架,背景为浅灰色。
- This frame contains a left and center aligned icon and a horizontally and vertically centered text element.该框架包含一个左对齐和居中对齐的图标以及一个水平居中和垂直居中的文本元素。
Now since every frame I use in this project is a component, what this does is enable me to easily modify the content of the header element across many screens. I can now easily modify the height of all inner frames or add more inner frames.
现在,由于我在该项目中使用的每个框架都是一个组件,因此使我能够轻松地在许多屏幕上修改header元素的内容。 现在,我可以轻松地修改所有内部框架的高度或添加更多内部框架。
I often use this type of structuring when designing menus. In one of the bigger projects I work on we often use popup menus with a set number of options. The master component includes all these available options, but since each child instance of the popup menu uses 3–4 options at most, I just hide all the unnecessary ones. This way I use the same component across the entire system and just hide/unhide whatever menu options I need on a given screen. This technique could be used the same way in case of the header above — you could include all types of header elements used anywhere in the app and just hide/unhide the ones you need on a given screen.
在设计菜单时,我经常使用这种类型的结构。 在我从事的较大的项目之一中,我们经常使用带有一定数量选项的弹出菜单。 主组件包括所有这些可用选项,但是由于弹出菜单的每个子实例最多使用3–4个选项,因此我只隐藏了所有不必要的选项。 这样,我在整个系统中使用相同的组件,并且只隐藏/取消隐藏给定屏幕上需要的任何菜单选项。 对于上面的标题,可以以相同的方式使用此技术-您可以包括应用程序中任何位置使用的所有标题元素类型,而只在给定屏幕上隐藏/取消隐藏所需的标题元素。

The content area frame contains cards (in the case of this particular project there are 5 cards) that are arranged vertically. The cards are 345px wide, and the horizontal padding is set to 15. That’s because I’m designing with a specific screen size in mind. I might be adding more cards, but I won’t be changing the screen’s size to anything other than 375px wide. We also needed some spacing between the cards themselves, so I set it to 32px. All cards use the same parent component whose inner elements (the image, the title etc.) I later modify accordingly.
内容区域框架包含垂直排列的卡片(在此特定项目中,有5张卡片)。 这些卡的宽度为345px,水平填充设置为15。这是因为我在设计时考虑了特定的屏幕尺寸。 我可能会添加更多的卡,但是我不会将屏幕的尺寸更改为375像素宽以外的任何尺寸。 我们还需要在卡本身之间留一些间距,因此我将其设置为32px。 所有卡都使用相同的父组件,其内部元素(图像,标题等)将在以后进行相应修改。

The card element is another component that exploits the Auto Layout feature.
卡元素是利用自动布局功能的另一个组件。
This is the image frame. In case of an app like this you could set up a bunch of image components that you could then easily switch between. You could also set these images up as styles. Check out my article on how to create a simple design system to find out how.
这是图像帧。 如果是这样的应用,您可以设置一堆图像组件,然后可以在它们之间轻松切换。 您也可以将这些图像设置为样式。 查看有关如何创建简单设计系统的文章,以了解如何进行。
- The title & delivery time frame consists of two elements — one aligned to left and center, the other one to right and center as well.标题和交付时间框架由两个元素组成-一个元素左对齐并居中,另一个元素右对齐并居中。
- This Auto Laid out frame uses Auto Layout for the two tags inside that are also using Auto Layout themselves. I’ll focus on this particular element in a bit.此自动布局框架将自动布局用于内部的两个标签,它们本身也使用自动布局。 我将重点关注这个特定元素。
Now again this kind of setup enables us to modify the contents of an individual card — modify, add or remove elements from it without negatively impacting the content area. Say your stakeholders decide it’d be a good idea to place a little description for every restaurant under its name, you just add a frame that houses a text element and you’re good to go — this design change is not only automatically populated to all your screen but also arranged according to the layout you’ve decided on.
现在,这种设置再次使我们能够修改单个卡的内容-修改,添加或删除其中的元素,而不会对内容区域造成负面影响。 假设您的利益相关者认为在每个餐厅的名称下放置一个简短的描述是一个好主意,您只需添加一个包含文本元素的框架,便可以了,这种设计更改不仅会自动填充到您的所有屏幕,还可以根据您确定的布局进行排列。

The tags use the type of Auto Layout structuring I talked about earlier. As shown above, both tags stem from the same master component. The master component contains all types of elements used in a tag. The icon (replacable) and 3 editable text elements. The visibility of these elements is then configured accordingly. This way if you decide to change the font styling, the colors or the border radius of a tag, all you need to do is modify the settings of only one component.
标记使用我之前提到的“自动布局”结构的类型。 如上所示,两个标签都来自同一主组件。 主组件包含标签中使用的所有类型的元素。 图标(可替换)和3个可编辑文本元素。 然后相应地配置这些元素的可见性。 这样,如果您决定更改标签的字体样式,颜色或边框半径,则只需修改一个组件的设置即可。

This is one of my favorite examples of combining Auto Layout with constraints. At the top-most level, both frames contain a center-aligned frame. The center-aligned frames use Auto Layout to arrange elements they contain and depending on what’s going on inside, how many elements there are or how big they are, they expand or contract while retaining the correct position.
这是将自动版式与约束相结合的最喜欢的示例之一。 在最顶层,两个框架都包含一个中心对齐的框架。 居中对齐的框架使用“自动布局”来排列它们包含的元素,并根据内部发生的情况,有多少个元素或它们的大小来扩展或收缩,同时保留正确的位置。
There are many other way to combine Auto Layout with constraints, especially at a more complex level, where you need to accommodate for screen size changes as well as any changes inside the frames, but this short article should give you a general idea of what can be done using the features Figma provides.
还有许多其他方法可以将自动版式与约束结合起来,尤其是在更复杂的级别上,在这种情况下,您需要适应屏幕尺寸的变化以及框架内的任何变化,但是这篇简短的文章应该让您大致了解可以使用Figma提供的功能来完成。
Do you use Auto Layout in your designs? Would you do any of the things differently? Let me know in the comments below.
您在设计中使用自动版式吗? 您会以不同的方式做任何事情吗? 在下面的评论中让我知道。
翻译自: https://uxdesign.cc/figmas-auto-layout-in-action-d84c4688aca4
figma下载
http://www.taodudu.cc/news/show-893945.html
相关文章:
- lottie 动画_使用After Effects和Lottie制作网络动画而不会损失质量
- 模式匹配 怎么匹配减号_如何使您的应用导航与用户的思维模式匹配
- ux的重要性_颜色在UX中的重要性
- element-ui表单_每日UI挑战强加-登录表单(分步教程)
- shields 徽标_徽标不够用时如何设计应用程序图标
- zoom 用户被锁定_重新考虑Zoom的用户体验
- ui设计看的书_5本关于UI设计的书
- 案例研究设计与方法-罗伯_旭进口重新设计-用户体验案例研究
- axure rp 创建弹框_如何在Axure RP 9中创建交换机
- 界面设计语言_使用任何语言设计界面的提示
- hp-ux锁定用户密码_UX设计101:提出正确的问题-规划和促进用户访谈
- mac基本操作技巧_6个基本设计技巧
- stack smash_扶手椅VGUX:Super Smash Bros.Ultimate
- 全库模式 用户模式 表模式_暗模式,亮模式和用户的故事
- ios 刷新遮罩遮罩_在Adobe XD中进行遮罩的3种方法
- 图像标注技巧_保护互联网上图像的一个简单技巧
- ar软件测试工具_如何为用户测试制作快速的AR原型
- 未来ui设计的发展趋势_2025年的未来UI趋势?
- CSSyphus:烦躁不安的烦恼设计指南。
- 类从未使用_如果您从未依赖在线销售,如何优化您的网站
- 程序详细设计之代码编写规范_我在不编写任何代码的情况下建立了一个设计策划网站
- 图书漂流系统的设计和研究_研究在设计系统中的作用
- 西里尔字符_如何设计西里尔字母Њ(Nje),Љ(Lje),Ћ(Tshe)和Ђ(Dje)
- 最新ui设计趋势_10个最新且有希望的UI设计趋势
- 404 错误页面_如何设计404错误页面,以使用户留在您的网站上
- 公网对讲机修改对讲机程序_更少的对讲机,对讲机-更多专心,专心
- ui设计基础_我不知道的UI设计的9个重要基础
- vue路由匹配实现包容性_包容性设计:面向老年用户的数字平等
- 见证开户_见证中的发现
- facebook有哪些信息_关于Facebook表情表情符号的所有信息
figma下载_Figma的自动版式实用相关推荐
- figma下载_Figma和ProtoPie中的原型制作,比较
figma下载 第1部分 (Part 1) Prototyping has never had such a high profile with a whole host of tools that ...
- figma下载_Figma中的高级图像处理
figma下载 Figma is not exactly suited for image manipulation, and that's completely fine. While it doe ...
- figma下载_Figma重新构想的团队库
figma下载 一个新的,功能更强大的界面,用于在整个组织中共享组件 (A new, more powerful interface for sharing Components across you ...
- figma下载_Figma中的动态内容和颜色
figma下载 First off, why use dynamic data? 首先,为什么要使用动态数据? It's easy to create and manage long lists of ...
- figma下载_素描vs Figma困境
figma下载 I distinctly remember how much hatred I had in my heart when I lived through my first UI upd ...
- figma下载_切换到Figma并在其中工作不必是火箭科学,这就是为什么
figma下载 We have seen Elon Musk and SpaceX making Rocket Science look like a child's play. In the sam ...
- figma下载_搬到Figma对我意味着什么
figma下载 A couple of years ago, amidst the boom of new design and prototyping software, I was pretty ...
- figma下载_我如何使用Figma,CSS Grid和CSS Flexbox构建登录页面
figma下载 I enjoy looking at website designs that are on platforms like Behance, Dribble, etc. as they ...
- figma下载_在Figma上进行原型制作的各种触发选项
figma下载 Prototypes are model versions of digital products. They're used to measure usability by test ...
最新文章
- C 语言编程 — 输入/输出与文件操作
- 软件测试用python一般用来做什么-如何将Python应用到实际测试工作中?
- oracle得到日期对应的星期
- 8个我希望早点意识到的学生思维
- ASPNETPager常用属性
- ETL作业调度软件TASKCTL自定义扩展作业类型插件安装
- 视频图像传输学习笔记-基础小知识(一)
- Docker 开发环境的滑坡
- css3动画 --- Animation
- 【算法】剑指 Offer 45. 把数组排成最小的数 【重刷】
- 使程序在Windows任务管理器隐藏
- python和java哪个好学-到底学python好还是学java比较好 哪个容易学习点
- C++刷题——2802: 推断字符串是否为回文
- 【Tensorflow/keras】KeyError: ‘loss‘
- 今日股市板块利好早知道,全球科技巨头聚齐联手保护云数据
- 如何清除 Linux 命令行历史记录
- 论文笔记:ALA loss:Adaptive Logit Adjustment Loss for Long-Tailed Visual Recognition
- ssm+springboot校园外卖订餐配送系统javaweb
- 【javaScript案例】之搜索的数据显示
- PSM倾向匹配详细步骤和程序
热门文章
- android 文件选择器_Android 开发 打开系统文件、图片、视频等 实现单选多选功能...
- 从零开始学python项目_从零开始可以这样学python
- python逐行写入csv_python将列表按行写入csv
- Form表单的主要Content-Type
- 【Lucene4.8教程之中的一个】使用Lucene4.8进行索引及搜索的基本操作
- windows生成dump文件
- 从.Net到Java学习第四篇——spring boot+redis
- Spring Boot 入门之缓存和 NoSQL 篇(四)
- Python用MySQLdb, pymssql 模块通过sshtunnel连接远程数据库
- UML入门之类图教程