knn分类 knn_关于KNN的快速小课程
knn分类 knn
As the title says, here is a quick little lesson on how to construct a simple KNN model in SciKit-Learn. I will be using this dataset. It contains information on students’ academic performance.
就像标题中所说的,这是关于如何在SciKit-Learn中构建简单的KNN模型的快速入门课程。 我将使用此数据集 。 它包含有关学生学习成绩的信息。
Features included are things like how many times a student raises their hand, their gender, parent satisfaction, how often they were absent from class, and how often they participated in class discussion.
这些功能包括诸如学生举手次数,性别,父母满意度,他们缺席课堂的频率以及他们参加课堂讨论的频率之类的东西。
Each student is grouped into one of three academic classes: High (H), Medium (M), and Low (L). I used the other features in order to predict which class they fall in.
每个学生分为三个学术班级之一:高(H),中(M)和低(L)。 我使用其他功能来预测它们属于哪个类。
Just for reference:
仅供参考:
- High, 90–100高,90-100
- Medium, 70–89中,70–89
- Low, 0–69低,0–69
Okay, cool! Let’s get started.
好吧,酷! 让我们开始吧。
图书馆进口 (Library Import)
import numpy as npimport pandas as pdimport seaborn as snsimport statsmodels.api as smfrom sklearn.model_selection import train_test_splitfrom sklearn.preprocessing import StandardScalerfrom sklearn.neighbors import KNeighborsClassifierfrom statsmodels.formula.api import olsfrom sklearn.metrics import precision_score, recall_score, accuracy_score, f1_scoreimport matplotlib.pyplot as plt%matplotlib inlineFirst, you want to import all of the libraries that you’re going to need. Some people import each library at each stage of the process, but personally I like to do it all at the beginning.
首先,您要导入所有需要的库。 有些人在流程的每个阶段都导入每个库,但是我个人最喜欢一开始就全部完成。
Technically we won’t really be using Seaborn or MatplotLib, but I like to keep them around just in case I want to visualize something during the process.
从技术上讲,我们实际上并不会使用Seaborn或MatplotLib,但我希望保留它们,以防万一我想在此过程中可视化某些东西。
初始数据导入 (Initial Data Import)
df = pd.read_csv('xAPI-Edu-Data.csv')df.head()
Cool! The data is in good shape to begin with. There are no missing values and no outliers to speak of. However, we will have to do a small amount of preprocessing to get it ready for our model.
凉! 首先,数据处于良好状态。 没有遗漏的值,也没有离群值。 但是,我们将需要进行少量预处理才能为模型准备就绪。
前处理 (Preprocessing)
# Dropping all unnecessary columnsdf = df.drop(['NationalITy', 'PlaceofBirth', 'StageID', 'GradeID', 'SectionID', 'Topic', 'Relation', 'ParentAnsweringSurvey'], axis = 1, inplace = False)df.head()
When feeding a KNN model, you only want to include the features that you actually want to be making the decision. This may seem obvious but I figured it was worth mentioning.
在提供KNN模型时,您只想包含您实际要做出决定的功能。 这似乎很明显,但我认为值得一提。
# Binary encoding of categorical variablesdf['gender'] = df['gender'].map({'M': 0, 'F': 1})df['Semester'] = df['Semester'].map({'F': 0, 'S': 1})df['ParentschoolSatisfaction'] = df['ParentschoolSatisfaction'].map({'Good': 0, 'Bad': 1})df['StudentAbsenceDays'] = df['StudentAbsenceDays'].map({'Under-7': 0, 'Above-7': 1})df.head()
Something perhaps not so obvious if you have never done this, is that you have to encode your categorical variables. It makes sense if you think about it. A model can’t really interpret ‘Good’ or ‘Bad’, but it can interpret 0 and 1.
如果您从未执行过此操作,那么可能不太明显的是您必须对分类变量进行编码。 如果您考虑一下,这是有道理的。 模型无法真正解释“好”或“差”,但可以解释0和1。
# Check for missing valuesdf.isna().sum()
I know I already said that we don’t have any missing values, but I just like to be thorough.
我知道我已经说过,我们没有任何缺失的价值观,但我只是想做到周全。
# Create a new dataframe with our target variable, remove the target variable from the original dataframelabels = df['Class']df.drop('Class', axis = 1, inplace = True)And then —
然后 -
df.head()
labels.head()
Next, we want to separate our target feature from our predictive features. We do this in order to create a train/test split for our data. Speaking of!
接下来,我们要将目标特征与预测特征分开。 我们这样做是为了为我们的数据创建一个训练/测试组。 说起!
训练/测试拆分 (Train/Test Split)
X_train, X_test, y_train, y_test = train_test_split(df, labels, test_size = .25, random_state = 33)*I realize the above formatting is terrible, I’m just trying to make it readable for this Medium article.
*我意识到上面的格式很糟糕,我只是想让这篇中型文章可读。
扩展数据 (Scaling the Data)
This next part brings up two important points:
下一部分提出了两个要点:
- You need to scale the data. If you don’t, variables with larger absolute values will be given more weight in the model for no real reason. We have our features that are binary encoded (0, 1) but we also have features on how many times student raise their hands (0–80). We need to put them on the same scale so they have the same importance in the model.您需要缩放数据。 如果您不这样做,则在没有真正原因的情况下,具有更大绝对值的变量将在模型中获得更大的权重。 我们具有二进制编码的功能(0,1),但也具有学生举手次数(0–80)的功能。 我们需要将它们放到相同的规模,以便它们在模型中具有相同的重要性。
You have to scale the data AFTER you perform the train/test split. If you don’t, you will have leakage and you will invalidate your model. For a more thorough explanation, check out this article by Jason Browlee who has tons of amazing resources on machine learning.
执行训练/测试拆分后,您必须缩放数据。 如果不这样做,将会泄漏,并使模型无效。 有关更全面的解释,请查看Jason Browlee的这篇文章 ,他拥有大量有关机器学习的惊人资源。
The good news is, this is extremely easy to do.
好消息是,这非常容易做到。
scaler = StandardScaler()scaled_data_train = scaler.fit_transform(X_train) scaled_data_test = scaler.transform(X_test)scaled_df_train = pd.DataFrame(scaled_data_train, columns = df.columns)scaled_df_train.head()
Awesome. Easy peasy lemon squeezy, our data is scaled.
太棒了 轻松榨取柠檬,我们的数据即可缩放。
拟合KNN模型 (Fit a KNN Model)
# Instantiate the modelclf = KNeighborsClassifier()# Fit the modelclf.fit(scaled_data_train, y_train)# Predict on the test settest_preds = clf.predict(scaled_data_test)It really truly is that simple. Now, we want to see how well our baseline model performed.
真的就是这么简单。 现在,我们想看看基线模型的性能如何。
评估模型 (Evaluating the Model)
def print_metrics(labels, preds): print("Precision Score: {}".format(precision_score(labels, preds, average = 'weighted'))) print("Recall Score: {}".format(recall_score(labels, preds, average = 'weighted'))) print("Accuracy Score: {}".format(accuracy_score(labels, preds))) print("F1 Score: {}".format(f1_score(labels, preds, average = 'weighted')))print_metrics(y_test, test_preds)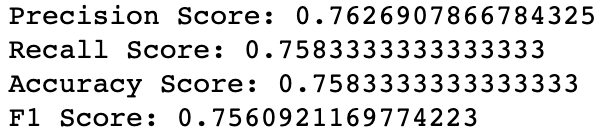
And there you have it, with almost no effort, we created a predictive model that is able to classify students into their academic performance class with an accuracy of 75.8%. Not bad.
在这里,您几乎无需付出任何努力,就创建了一个预测模型,该模型能够以75.8%的准确度将学生分类为他们的学习成绩班级。 不错。
We can probably improve this by at least a few points by tuning the parameters of the model, but I will leave that for another post.
我们可以通过调整模型的参数至少将其改进几个点,但是我将在另一篇文章中讨论。
Happy learning.
knn分类 knn_关于KNN的快速小课程相关推荐
- 【数据挖掘】K-NN 分类 ( 简介 | 分类概念 | K-NN 分类实例 | K-NN 分类准确度评估 | K-NN 分类结果评价指标 | 准确率 | 召回率 )
文章目录 I . K-NN 简介 II . K-NN 分类 III . K-NN 分类实例 IV . K-NN 分类 准确性评估方法 V . 保持法 VI . kkk-交叉确认法 VII . K-NN ...
- knn分类 knn_实施的knn直观指南
knn分类 knn kNN is one of the simplest algorithms of classification and, as a result, remains one of t ...
- KNN 分类算法原理代码解析
作者 | Charmve 来源 | 迈微AI研习社 k-最近邻算法是基于实例的学习方法中最基本的,先介绍基x`于实例学习的相关概念. 基于实例的学习 已知一系列的训练样例,很多学习方法为目标函数建立起 ...
- Python实现knn分类算法(Iris 数据集)
1.KNN分类算法 KNN分类算法(K-Nearest-Neighbors Classification),又叫K近邻算法,是一个概念极其简单,而分类效果又很优秀的分类算法. 他的核心思想就是,要确定 ...
- 机器学习算法之——K最近邻(k-Nearest Neighbor,KNN)分类算法原理讲解
K最近邻(k-Nearest Neighbor,KNN)分类算法详解及Python实现 一.基于实例的学习 二.k-最近邻法 1. KNN算法概述 2. 基本思想 3. 有关KNN算法的几点说明 4. ...
- 【机器学习】机器学习算法之——K最近邻(k-Nearest Neighbor,KNN)分类算法原理讲解...
k-最近邻算法是基于实例的学习方法中最基本的,先介绍基于实例学习的相关概念. 01 基于实例的学习 已知一系列的训练样例,很多学习方法为目标函数建立起明确的一般化描述:但与此不同,基于实例的学习方法只 ...
- python分类算法_用Python实现KNN分类算法
本文实例为大家分享了Python KNN分类算法的具体代码,供大家参考,具体内容如下 KNN分类算法应该算得上是机器学习中最简单的分类算法了,所谓KNN即为K-NearestNeighbor(K个最邻 ...
- OpenCV——KNN分类算法 摘
KNN近邻分类法(k-Nearest Neighbor)是一个理论上比较成熟的方法,也是最简单的机器学习算法之一. 这个算法首先贮藏所有的训练样本,然后通过分析(包括选举,计算加权和等方式)一个新样本 ...
- k近邻算法(KNN)-分类算法
k近邻算法(KNN)-分类算法 1 概念 定义:如果一个样本在特征空间中的k个最相似(即特征空间中最邻近)的样本中的大多数属于某一个类别,则该样本也属于这个类别. k-近邻算法采用测量不同特征值之间的 ...
最新文章
- VS2005工程的Device右边内容为空问题
- CSS垂直翻转/水平翻转提高web页面资源重用性
- 除了TensorFlow、PyTorch,还有哪些深度学习框架值得期待?
- 群晖按装mysql_如何连接群晖里的MYSQL数据库
- 【ZOJ - 3778】Talented Chef(贪心)
- C#多线程窗体控件安全访问实现方法
- 吴恩达机器学习 8.应用机器学习的建议
- JavaScript错误与异常
- 放大器的频率特性(2)-- 共源极的频率特性
- ACM-ICPC 2018 北京赛区网络预赛 Tomb Raider(暴力)
- 一个二线城市程序员的昨天、今天和明天【坐标:河北石家庄】
- python 按行读取_python按行读取
- Gini和AUC的关系(Gini=2AUC-1真的成立吗?)
- 树莓派外挂ESP32-USB
- Unity Shader - 伪次表面散射模拟
- 关于人工神经网络的论文,人工神经网络参考文献
- 深度学习入门笔记(十六):计算机视觉之边缘检测
- Linux内核及其发行版本
- js获取当前日期及下一天日期
- C++中tan、atan、sin、cos等三角函数用法的代码演示及结果,注意角度和弧度的转换!