基于聚类和神经网络的图像颜色提取和评分方案
概述
详细
代码下载:http://www.demodashi.com/demo/10321.html
本文github地址:colorful-color。
体验 demo。
一、目录结构
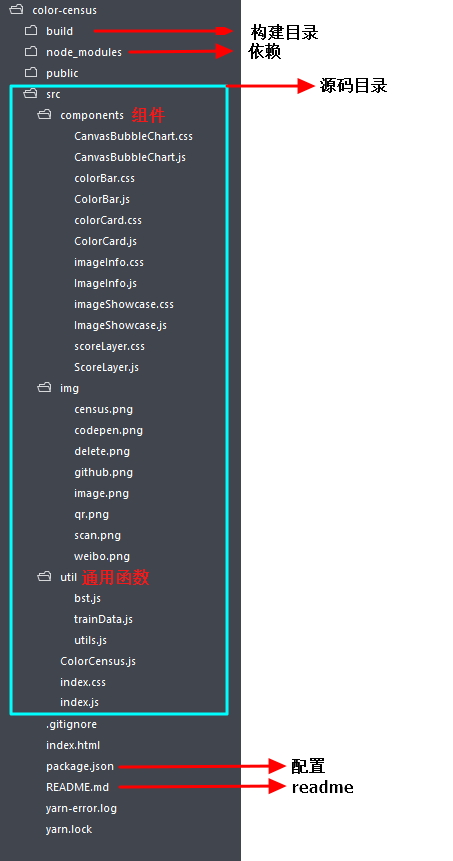
本项目是基于React编写的,build目录下有编译好的版本,编译源码前执行以下指令以安装依赖(需要安装好了node和npm):
npm install
二、组件介绍
components目录下包含6个组件:
1. CanvasBubbleChart.js:一个基于canvas,用于颜色可视化的组件,使用方式:
<CanvasBubbleChart colors={this.state.colorsInfo}></CanvasBubbleChart>colors 是输入的颜色信息,是一个数组,数组中的对象格式如下:
{fre: "表示颜色的权重,也就是出现次数",h: "HSL中的色相",s: "HSL中的饱和度"l: "HSL中的明度"
}
2. ColorBar.js:显示三个颜色,使用方式如下:
<ColorBar label="main color" ></ColorBar>组件包含的如下state:
this.state = {colorStart: '',colorMiddle: '',colorEnd: ''
};
3. ColorCard.js:以卡片形式显示一系列颜色,使用方式如下:
<ColorCard colors={}></ColorCard>colors 属性是数组,包含要显示的颜色:
colors = ["red", "blue", "#333"];
4. ImageInfo.js:显示提取结果的相关信息:
<ImageInfo processInfo={this.state.processInfo}></ImageInfo>colors 属性是数组,包含要显示的颜色:
processInfo = {colors: 0,censusTime: 0,kmeansIteration:0,kmeansTime:0,top5Count: 0,showQr:false
},
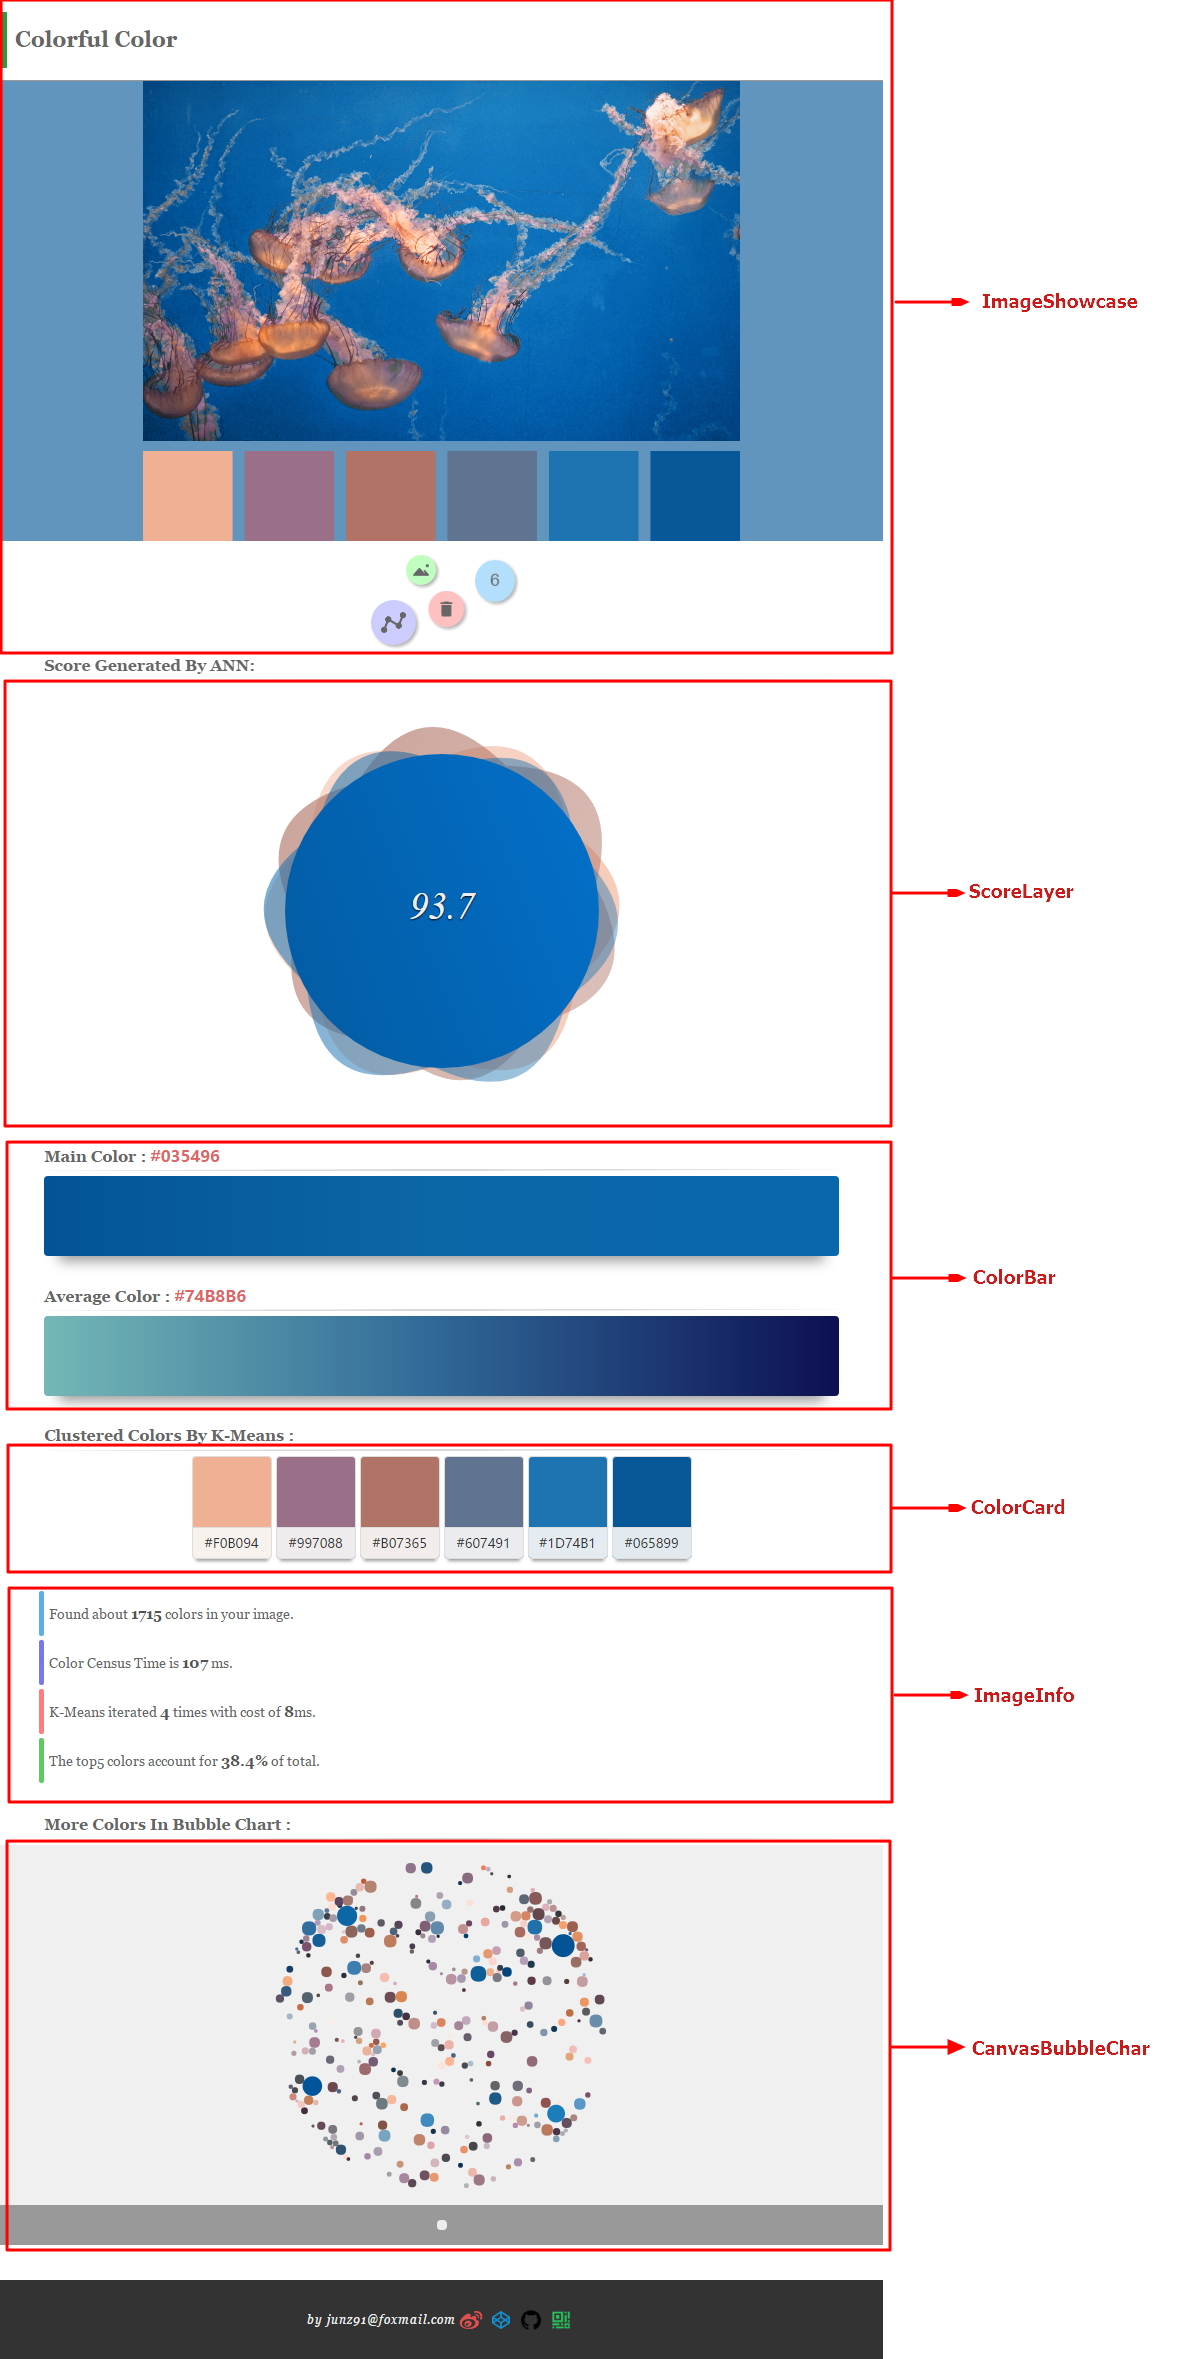
5. ImageShowcase.js:用于显示用户选取的图像,最终的调色盘也会绘制在此组件的canvas中:
<ImageShowcase setScoreLayer={this.setScoreLayer} censusColors={this.censusColors} resetApp={this.resetApp}></ImageShowcase>setScoreLayer 函数用于唤起评分结果页,censusColors 函数是颜色提取和评分的入口函数,resetApp 函数用于重置整个app,组件包含的状态如下:
this.state = {bgC: "",K: 6,isMounted: false,clusterColors:[],showSave:false
};
6. ScoreLayer.js:用于显示用户选取的图像,最终的调色盘也会绘制在此组件的canvas中:
<ScoreLayer loopColors={this.state.loopColors} score={this.state.score} setScoreLayer={this.setScoreLayer} showScoreLayer = {this.state.showScoreLayer}></ScoreLayer>loopColors 属性用于唤起评分结果页,score 表示得分,showScoreLayer 用于控制全屏显示组件与否。
三、关键函数
3.1 读取图像
读取图像的逻辑在 ImageShowcase 类中,入口是 readFile 函数,核心在于对尺寸比例的控制,因为要使得移动端显示清晰,所以确定尺寸要考虑 window.devicePixelRatio ,代码如下:
let pixelRatio = this.pixelRatio;
let c_w = canvas.width;
let c_h = canvas.height;
let img_w = img.width > (c_w-_w)/pixelRatio ? (c_w-_w)/pixelRatio : img.width;
let img_h = img.height > (c_h-_h)/pixelRatio ? (c_h-_h)/pixelRatio : img.height;
let scale = (img_w / img.width < img_h / img.height) ? (img_w / img.width) : (img_h / img.height);
img_w = img.width * scale;
img_h = img.height * scale;
canvas.style.width = img_w + _w/pixelRatio + "px";
canvas.style.height = img_h + _h/pixelRatio + "px";
canvas.width = (img_w*pixelRatio + _w);
canvas.height = (img_h*pixelRatio + _h);
ctx.drawImage(img, 0, 0, img.width, img.height, 0, 0, img_w*pixelRatio, img_h*pixelRatio);
3.2 render
Demo的根组件是 ColorCensus.js ,里面包含了一个叫做 ColorCensus 的类,所谓关键函数就是 ColorCensus 类的各个成员函数。首先是render函数,也就是Demo的JSX部分咯,看代码:
render() {let mcProps = this.colorToProps(this.state.mainColor);let acProps = this.colorToProps(this.state.averageColor);let footWrapClass = this.state.showQr ? 'show-qr' : '';footWrapClass += " foot-wrap";return (<div className="App">// 顶部的组件,用于显示图像和提取的主要颜色<ImageShowcase setScoreLayer={this.setScoreLayer} censusColors={this.censusColors} resetApp={this.resetApp}></ImageShowcase>// 评分结果组件<ScoreLayer loopColors={this.state.loopColors} score={this.state.score} setScoreLayer={this.setScoreLayer} showScoreLayer = {this.state.showScoreLayer}></ScoreLayer>// 显示主要颜色与平均颜色<ColorBar label="main color" {...mcProps}></ColorBar><ColorBar label="average color" {...acProps}></ColorBar>// 显示聚类后的主要颜色<ColorCard colors={this.state.clusterColors}></ColorCard>// 显示提取的信息<ImageInfo processInfo={this.state.processInfo}></ImageInfo>// 颜色可视化--color bubble<CanvasBubbleChart colors={this.state.colorsInfo}></CanvasBubbleChart><div className={footWrapClass}>// 页面底部内容,不重要所以忽略</div>);}
3.3 censusColors
颜色提取与评分的入口函数,首先来看形参:
/*** [censusColors description]* @param {Object} ctx context of canvas* @param {number} K K for K-Means* @param {number} c_w width of canvas* @param {number} c_h height of canvas* @param {Boolean} isHorizontal direction of image* @param {function} callBack callback when census done*/censusColors(ctx, K, c_w, c_h, isHorizontal, callBack) {}
颜色提取的第一步是统计图片的颜色信息,所以需要获取canvas中的图像数据,把颜色转换到 HSL 空间,降采样后编码得到不同颜色的 key ,看代码:
// 从canvas中获取图像数据
let w = c_w;
let h = c_h;
let imageDate;
let pixelRatio = window.devicePixelRatio || 1;
if(isHorizontal){imageDate = ctx.getImageData(0, 0, w, h-100*pixelRatio);
}else{imageDate = ctx.getImageData(0, 0, w-100*pixelRatio, h);
}// 遍历图像以统计颜色信息
let rows = imageDate.height;
let cols = imageDate.width;
let keys = [];
let colors_info = [];
let pixel_step = (rows * cols < 600 * 600) ? 1 : 2;  // 降采样步长// 遍历
for (let row = 1; row < rows - 1;) {for (let col = 1; col < cols - 1;) {r = imageDate.data[row * cols * 4 + col * 4];g = imageDate.data[row * cols * 4 + col * 4 + 1];b = imageDate.data[row * cols * 4 + col * 4 + 2];hsl = rgbToHsl(r,g,b);// 过滤太亮或太暗的颜色if("太亮或太暗的条件"){continue;}// 编码得到keyh_key = Math.floor(hsl[0] / 10) * 10000;s_key = Math.floor(hsl[1] / 5) * 100;l_key = Math.floor(hsl[2] / 5);key = h_key + s_key + l_key;let index = keys.indexOf(key);if (index < 0) {// 没找到该颜色,将key加入到keys序列中} else {// 找到了key,更新颜色的fre(出现次数)值}col += pixel_step;}row += pixel_step;
}
接下来是对颜色信息进行排序和过滤:
// 按照出现次数从高到低排序
colors_info.sort(function(pre, next) {return next.fre - pre.fre;
});
// 过滤掉孤立的颜色
colors_info = colors_info.filter((color) => {// isolated colorlet flag = (color.fre < 5 - pixel_step) && (len > 400);return !flag;
});
之后便是进行聚类和评分了,后续会展开讲。
3.4 chooseSeedColors
因为K均值聚类对初始种子点比较敏感,为了尽快收敛和聚类的精确性,专门写了一个函数用于筛选种子点,核心代码如下:
// 从出现次数最高的颜色开始遍历
for (let i = 0; i < len; i++) {// 比较和已有种子点的差异for (; j < l; j++) {let h_diff = Math.abs(init_seed[j].h - color.h);let s_diff = Math.abs(init_seed[j].s - color.s);let l_diff = Math.abs(init_seed[j].l - color.l);if (h_diff + s_diff + l_diff < 45) {// 差异太小则跳过该颜色break;}}// 差异比较大则加入种子点数组if (j === l) {init_seed.push({h:color.h,s:color.s,l:color.l,category: color.category,fre: color.fre});}// 如果已经满足指定选取的种子点数量,则停止遍历if (init_seed.length >= num) {break;}}
3.5 K均值聚类
kMC函数是K均值聚类的实现,形参:
/*** [kMC description]* @param {Array} colors colors of image* @param {Array} seeds init seeds* @param {number} max_step max iteration of KMeans* @return {Array} results of KMeans*/kMC(colors, seeds, max_step) {}
核心流程:
kMC(colors, seeds, max_step) {let iteration_count = 0;// 迭代while (iteration_count++ < max_step) {// filter seedsseeds = seeds.filter((seed) => {return seed;});// divide colors into different categories with duff's devicelet len = colors.length;let count = (len / 8) ^ 0;let start = len % 8;while (start--) {this.classifyColor(colors[start], seeds);}while (count--) {this.classifyColor(colors[--len], seeds);this.classifyColor(colors[--len], seeds);this.classifyColor(colors[--len], seeds);this.classifyColor(colors[--len], seeds);this.classifyColor(colors[--len], seeds);this.classifyColor(colors[--len], seeds);this.classifyColor(colors[--len], seeds);this.classifyColor(colors[--len], seeds);}// compute center of categorylen = colors.length;let hsl_count = [];let category;while (len--) {category = colors[len].category;if (!hsl_count[category]) {hsl_count[category] = {};hsl_count[category].h = 0;hsl_count[category].s = 0;hsl_count[category].l = 0;hsl_count[category].fre_count = colors[len].fre;} else {hsl_count[category].fre_count += colors[len].fre;}}len = colors.length;while (len--) {category = colors[len].category;hsl_count[category].h += colors[len].h*colors[len].fre/hsl_count[category].fre_count;hsl_count[category].s += colors[len].s*colors[len].fre/hsl_count[category].fre_count;hsl_count[category].l += colors[len].l*colors[len].fre/hsl_count[category].fre_count;}// 判断是否满足退出条件let flag = hsl_count.every((ele, index) => {return Math.abs(ele.h - seeds[index].h)<0.5 && Math.abs(ele.s - seeds[index].s)<0.5 && Math.abs(ele.l - seeds[index].l)<0.5;});// 新的聚类中心seeds = hsl_count.map((ele, index) => {return {h: ele.h,s: ele.s,l: ele.l,category: index,fre: ele.fre_count};});if (flag) {break;}}return [seeds,iteration_count];}
其中的 classifyColor 函数用于对颜色分类,比较好懂,具体实现参见源码。
3.6 评分
评分部分的实现在 imageScore 函数中,提取的评价指标比较好运算,所以这里只讲一下相关指标的含义:
let info = {colorCount: (Math.log10(colorInfo.length)), // 总的颜色数量average:0,  // 平均出现次数variance: 0,  // 标准差top50Count: 0,  // 前50种颜色占比(出现次数)top50Average: 0,  // 前50种颜色的平均出现次数top50Variance: 0,  // 前50种颜色出现次数的标准差top20Count: 0,  // 同上top20Average: 0,top20Variance: 0,top10Count: 0,  // 同上top10Average: 0,top10Variance: 0,top5Count: 0,  // 同上top5Average: 0,top5Variance: 0
};
需要注意的是:
有些指标的数量级太大需要使用 Math.log10() 减少量级;
所有指标需要归一化到0~1之间,为了保留尽可能多的信息采用除最大值的归一化方法
神经网络评分:
this.net.run(info)
神经网络采用的是 brain ,离线网络存储在util文件夹下的 trainData.js 中,训练数据也在其中,为了提高精确性我用了两个网络评分,最后加权值算了个综合的结果。训练的图片选自图虫网热门图片,因为很难找到相关的带评分的图像数据集,且评分往往是综合的(包含内容,构图,人物等)考量结果,很难从评分中分离出只和颜色相关的部分,所以我按照自己的主观想法对图片进行了打分,训练结果会强烈的偏向我个人的喜好。你也可以按照自己的喜好重新训练,训练方式参见brain的说明文档。
四、SVG和动画
svg动画在 ScoreLayer.js 中,如下:
<svg className="circle" viewBox="0,0,120,120"><defs><linearGradient key="basic0" id="basic0" x1="0" y1="70%" x2="100%" y2="30%"><stop offset="0%" style={{stopColor:this.props.loopColors.bc0[0],stopOpacity:1}}></stop><stop offset="100%" style={{stopColor:this.props.loopColors.bc0[1],stopOpacity:1}}></stop></linearGradient><linearGradient key="basic1" id="basic1" x1="0" y1="0%" x2="100%" y2="100%"><stop offset="0%" style={{stopColor:this.props.loopColors.bc1[0],stopOpacity:1}} /><stop offset="100%" style={{stopColor:this.props.loopColors.bc1[1],stopOpacity:1}}/></linearGradient><linearGradient key="basic2" id="basic2" x1="0" y1="0%" x2="100%" y2="100%"><stop offset="0%" style={{stopColor:this.props.loopColors.bc2[0],stopOpacity:1}} /><stop offset="100%" style={{stopColor:this.props.loopColors.bc2[1],stopOpacity:1}} /></linearGradient><linearGradient key="basic3" id="basic3" x1="0" y1="0%" x2="100%" y2="100%"><stop offset="0%" style={{stopColor:this.props.loopColors.bc3[0],stopOpacity:0.9}} /><stop offset="100%" style={{stopColor:this.props.loopColors.bc3[1],stopOpacity:0.9}} /></linearGradient></defs><g><path className="c1" d="m 40 25.35 q 20 -25.35 40 0 q 31.96 4.65 20 34.64 q 11.96 30 -20 34.64 q -20 25.35 -40 0 q -31.96 -4.65 -20 -34.64 q -11.96 -30 20 -34.64"/><animateTransform attributeName="transform" begin="0s" dur="17s" type="rotate" values="0 60 60;-180 59 59;-360 60 60" repeatCount="indefinite"/></g><g><path className="c2" d="m 40 25.35 q 20 -25.35 40 0 q 31.96 4.65 20 34.64 q 11.96 30 -20 34.64 q -20 25.35 -40 0 q -31.96 -4.65 -20 -34.64 q -11.96 -30 20 -34.64"/><animateTransform attributeName="transform" begin="0s" dur="13s" type="rotate" values="0 60 60;180 61 59;360 60 60" repeatCount="indefinite"/></g><g><path className="c3" d="m 40 25.35 q 20 -25.35 40 0 q 31.96 4.65 20 34.64 q 11.96 30 -20 34.64 q -20 25.35 -40 0 q -31.96 -4.65 -20 -34.64 q -11.96 -30 20 -34.64"/><animateTransform attributeName="transform" begin="0s" dur="11s" type="rotate" values="0 60 60;-180 59 61;-360 60 60" repeatCount="indefinite"/></g><g><circle cx="60" cy="60" r="45" className="c0"><animate attributeName="r" values="45;40;45" dur="11s" repeatCount="indefinite" /></circle></g><text className="scores" x="50%" y="50%" textAnchor="middle" dominantBaseline="middle">{this.props.score ? this.props.score.toFixed(1) : 'score...'}</text>
</svg>
SVG部分可参考我的codepen,canvas动画本身也不简单,代码也都是我自己实现的,详细的可参考这个codepen。
五、运行结果
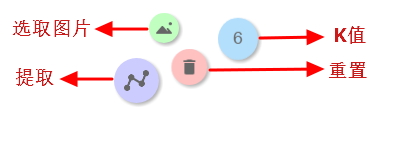
操作:
我已经把编译好的代码打包到 colorful-color 目录下的 index.html 中了,直接在浏览器中就可以打开运行。如果你修改了源代码,需要你重新编译(npm run build)。
先选取图片,然后点击紫色button执行demo。
结果:
有任何问题可以到github提issue。
注:本文著作权归作者,由demo大师(http://www.demodashi.com)宣传,拒绝转载,转载需要作者授权
基于聚类和神经网络的图像颜色提取和评分方案相关推荐
- 零基础基于U-Net网络实战眼底图像血管提取
文章目录 1 前言 2 血管提取任务概述 3 U-Net架构简介 4 眼底图像血管分割代码 5 结果评估可视化(ROC曲线) 6 改进U-Net网络完成眼底图像血管提取任务思路 1 前言 本文基于U- ...
- 基于深度卷积神经网络的图像网络分类
摘要 我们训练了一个大型的.深层的卷积神经网络,将ImageNet lsvrc-2010比赛中的120万张高分辨率图像分类为1000个不同的类别.在测试数据上,我们实现了前1位和前5位错误率分别为37 ...
- 基于Luca-Kanade光流算法的图像运动场提取matlab仿真
目录 1.算法概述 2.仿真效果 3.MATLAB仿真源码 1.算法概述 光流是一种运动模式,这种运动模式指的是一个物体.表面.边缘在一个视角下由一个观察者(比如眼睛.摄像头等)和背景之间形成的明显移 ...
- 神经网络照片解读下载,神经网络识别图像原理
如何通过人工神经网络实现图像识别 . 人工神经网络(ArtificialNeuralNetworks)(简称ANN)系统从20世纪40年代末诞生至今仅短短半个多世纪,但由于他具有信息的分布存储.并行处 ...
- 基于K-Means聚类算法的主颜色提取
点击上方"小白学视觉",选择加"星标"或"置顶" 重磅干货,第一时间送达 01.简介 本期我们将一起实现基于K-Means聚类算法的主色提取 ...
- 一种基于卷积神经网络的图像去雾研究-含matlab代码
目录 一.绪论 二.去雾卷积网络 2.1 特征提取 2.2 多尺度映射 2.3 局部均值 2.4 非线性回归 三.实验与分析 四.Matlab代码获取 一.绪论 雾是一种常见的大气现象,空气中悬浮的水 ...
- 基于可逆神经网络的图像隐藏技术 (ICCV 2021) - HiNet: Deep Image Hiding by Invertible Network
HiNet: Deep Image Hiding by Invertible Network [pdf] [github] Figure 1. The illustration of differen ...
- 论文阅读(4)基于卷积神经网络的自适应颜色增强在皮肤深层病变分割中的应用
目录 基于卷积神经网络的自适应颜色增强在皮肤深层病变分割中的应用 摘要 1.引言 2.人工数据增强 2.1 颜色增强 2.2 空间增强 3. 网络结构 4.结果 5.讨论 5.1 色彩增强的有效性-- ...
- 清华大学提出基于生成对抗神经网络的自然图像多风格卡通化方法并开源代码...
近日,清华大学刘永进教授课题组在 IEEE Transactions on Visualization and Computer Graphics 上发表论文,提出基于生成对抗神经网络的自然图像多风格 ...
最新文章
- poj-1384 Piggy-Bank
- Scott Mitchell的ASP.NET2.0数据指南中文版索引
- 居然是Firefox没有抛弃我们
- JdbcPagingItemReader多线程的Step
- python-含参函数
- 计算机模块测试题,模拟计算机基础模块测试题.doc
- 点云应用于电力行业助力输配电安全距离检测分析以及精细化巡检
- NXP MPC574X eTimer
- 驱动精灵在服务器的系统安装,驱动精灵怎么安装打印机驱动?打印机驱动安装的方法...
- 曾经我也有一个做游戏的梦想,这几本游戏开发的书籍推荐给为未来的游戏工程师
- VSCode-解决中文乱码和Run in terminal问题控制台不能输入
- JS—随机三个0-9不重复的随机数
- 分离数字的python编码_把数字拆分成2的幂的和
- ORACLE隐式类型转换
- 埋点 神策小程序_神策埋点思路
- 2022年中国新式茶饮行业发展现状及未来发展趋势分析:新式茶饮深受广大年轻消费群体的欢迎[图]
- 凶猛现金贷背后的欲望深渊:女子网上撸81只猫,欠下70万元债
- 反病毒引擎设计之虚拟机查毒篇
- 快递鸟接口的调用过程
- PhD Debate-6 预告|深度推荐系统的探索与实践