构建azure对话机器人_如何在5分钟内使用Azure创建聊天机器人
构建azure对话机器人
介绍 (Introduction)
As we enter an era of artificial intelligence and serverless computing, the tools to help us create perceived intelligent programs have become so advanced and intuitive that the effort in building a fully functional Q and A chat bot has become almost negligible.
随着我们进入人工智能和无服务器计算时代,用于帮助我们创建感知的智能程序的工具已经变得如此先进和直观,以至于构建功能完善的Q and A聊天机器人的努力几乎可以忽略不计。
In this article, I will show you how to do just that.
在本文中,我将向您展示如何做到这一点。
关于问答机器人 (About Q and A bots)
The thing about Q & A bots are, that they are only as good as the questions and answers you provide them. Ultimately, they are not very clever, they serve a specific purpose which is to provide programmed responses to predefined questions.
关于问答机器人的问题是,它们仅与您提供的问题和答案一样好。 最终,它们不是很聪明,它们有一个特定的目的,即提供对预定义问题的程序化响应。
It displays some intelligence in the sense that it can match a free text question asked by a person to the questions it has in its knowledge base even if it’s not asked in exactly the same way.
从某种意义上来说,它显示了某种智慧,即,即使不是以完全相同的方式提问,它也可以将一个人提出的自由文本问题与其知识库中的问题相匹配。
Of course once you have a Q & A bot, nothing stops you from extending your bot to do other fabulous things such as identifying pictures with the Computer Vision API or determining Emotion with the Emotion API
当然,一旦有了问答机器人,就不会阻止您扩展机器人以执行其他出色的事情,例如使用Computer Vision API识别图片或使用Emotion API确定Emotion
But for the purpose of this article we will build a plain and simple Q and A bot. Let’s get started.
但是出于本文的目的,我们将构建一个简单的问与答机器人。 让我们开始吧。
步骤1:建立知识库 (Step 1: Building the knowledge base)
To build the knowledge base we will make use of a very handy website called QnA Maker.
为了建立知识库,我们将使用一个非常方便的网站QnA Maker。
Click on Create new service
点击创建新服务
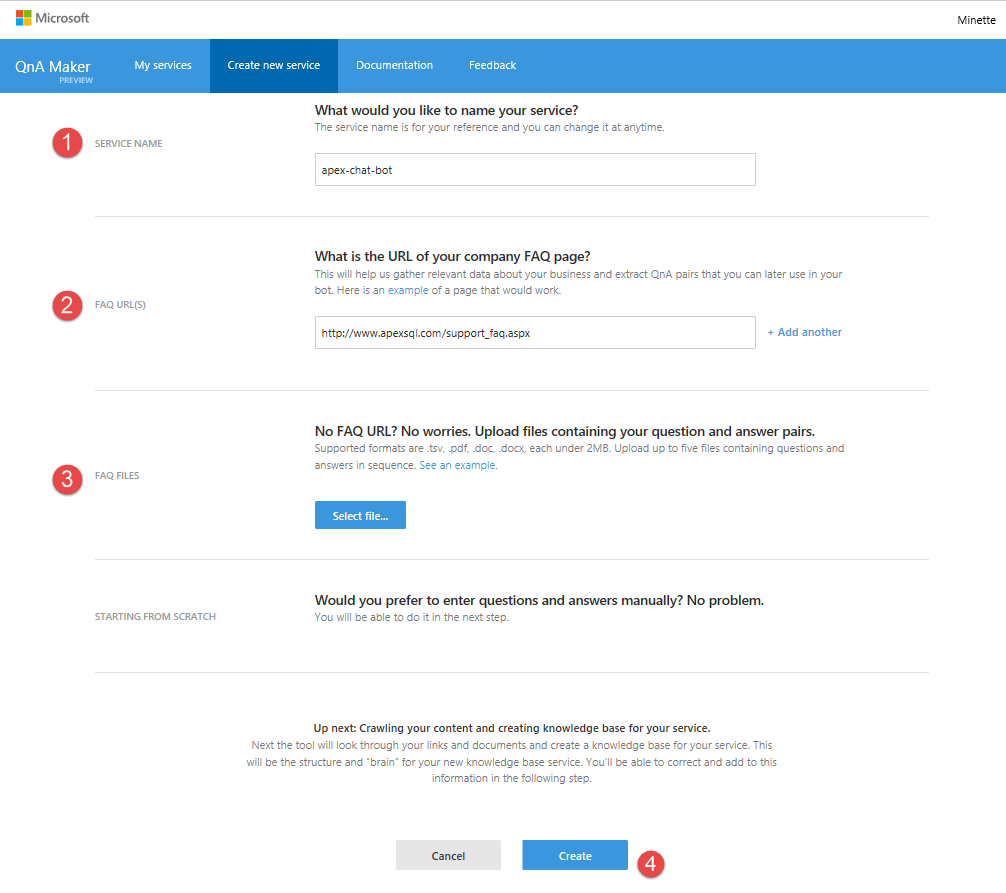
In the create new service window add:
在“创建新服务”窗口中,添加:
The Service name
服务名称
The URL of the FAQ page you would like to use
您想使用的常见问题页面的URL
You don’t necessarily have to use an FAQ page. You can upload a Word Document, text file or a .pdf with question and answer pairs. Strangely it does not accept an Excel spreadsheet.
您不一定必须使用FAQ页面。 您可以上传带有问题和答案对的Word文档,文本文件或.pdf。 奇怪的是,它不接受Excel电子表格。
Upload a file with questions or answers.
上传包含问题或答案的文件。
You don’t have to choose between a website FAQ or a file. You can do either or both or multiple websites or multiple files or you don’t have to do either and just type questions and answers from scratch. It’s entirely up to you.
您无需在网站常见问题解答或文件之间进行选择。 您既可以做一个网站,也可以做两个网站,也可以做多个文件,或者不必做任何一个,而只是从头开始输入问题和答案。 这完全取决于您。
Click Create
点击创建
The QnA Maker will proceed to generate the knowledge base from the FAQs provided.
QnA Maker将继续从提供的常见问题解答中生成知识库。
In this case it extracted 18 Q and A pairs from the website.
在这种情况下,它从网站上提取了18个Q和A对。
You can click here to add another Q and A pair. This will be added in the Editorial section.
您可以单击此处添加另一个Q和A对。 这将添加到“编辑”部分。
This displays the source of the Q and A. In this particular case, we only have 2 sources: The original source: Editorial and the FAQ website.
这将显示Q和A的来源。在这种情况下,我们只有2个来源:原始来源:社论和FAQ网站。
Save and retrain. To see changes you made to the knowledge base you should save and retrain it for the changes to take effect.
保存并重新训练。 要查看您对知识库所做的更改,您应该保存并对其进行重新培训,以使更改生效。
Before the knowledge base will become available for use by a real bot it should be published which I will discuss a little bit later.
在知识库可以被真正的机器人使用之前,应该先发布知识,稍后我将进行讨论。
Go to the Test tab to test the knowledge base. Let’s to that now:
转到“测试”选项卡以测试知识库。 现在让我们开始:
Here is where I would type my question. As you can see, the first question I typed was “How good is your support?”, the actual question on the FAQ was, “Is your support any good?” so the bot was at least clever enough to understand that it is almost the same question.
这是我要输入问题的地方。 如您所见,我输入的第一个问题是“您的支持有多好?”,而FAQ上的实际问题是“您的支持有好处吗?” 因此该机器人至少足够聪明,可以理解这几乎是一个相同的问题。
Notice that all the links which were in the FAQ page remains active and clickable as before.
请注意,“常见问题”页面中的所有链接都像以前一样保持活动和可单击状态。
If the bot did not pick the most appropriate answer, it lists other answers here which it might think is appropriate. Or you can select none of the above to leave it as is. If you changed anything here, you must click on (4) Save and Retrain before asking another question or it won’t be applied.
如果机器人未选择最合适的答案,它将在此处列出其他认为合适的答案。 或者,您也可以选择以上任何一项以保持原样。 如果您在此处进行了任何更改,则必须先单击(4)保存并重新训练,然后再问其他问题,否则它将不被应用。
Here you can provide alternative phrasings. So, if you want someone to be able to ask: “Can you do a demonstration?” as well as “Do you do demos?”, you can add this here and similarly to above click on (4) Save and Retrain before doing any other action.
您可以在此处提供其他措辞。 因此,如果您希望有人能够问:“您可以进行示范吗?” 以及“您是否进行演示?”,您可以在此处添加此内容,类似于上面的操作,然后单击(4)保存并重新训练,然后再执行其他任何操作。
Save and retrain
保存并重新训练
Once you are happy with the knowledge base. Click on Publish. A summary screen will appear.
一旦您对知识库感到满意。 单击发布。 出现摘要屏幕。
Number of Q and A in the current knowledge base.
当前知识库中的Q和A数。
The number of Q and A just added. In this case, everything was just added, since its new.
刚刚添加的Q和A的数量。 在这种情况下,所有内容都是新添加的。
The number of Q and A deleted if there are any.
Q和A的数目(如果有)被删除。
Click publish again when you are satisfied that the summary is reflecting your intensions correctly. This will publish the Q and A service and create an Endpoint.
如果您对摘要感到满意,请再次单击“发布”。 这将发布“问与答”服务并创建一个端点。

步骤2:建立漫游器 (Step 2: Creating the bot)
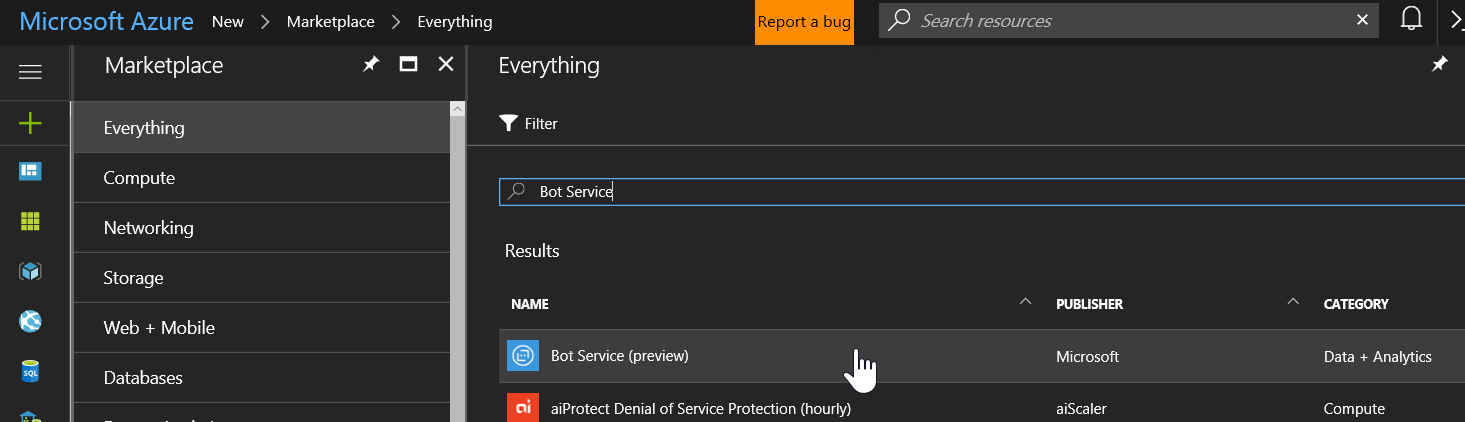
To create the bot, we need to login to Azure.
要创建机器人,我们需要登录到Azure。
In Azure Market place search for Bot Service and click on it.
在Azure Market地方搜索Bot Service,然后单击它。
This will take you to the Bot pre-creation screen which provides some useful links to documentation and pricing details.
这将带您进入Bot预创建屏幕,该屏幕提供了一些有用的文档链接和价格详细信息链接。
Click on Create
点击创建
To create the bot:
创建机器人:
Add a name for the bot. This needs to be a unique name and it will indicate with the green check mark on the right, if its accepted or not.
为机器人添加一个名称。 这必须是唯一的名称,并且无论是否接受,它都将在右侧带有绿色的复选标记表示。
Select the subscription you want to use.
选择您要使用的订阅。
Create a new resource group or use an existing one.
创建一个新的资源组或使用现有的资源组。
Select the region where you’d like your bot to reside.
选择您希望机器人驻留的区域。
I usually pin my stuff to the dashboard just so that I can find it again easily.
我通常将我的东西固定在仪表板上,以便可以轻松地再次找到它。
Click create.
单击创建。
Once the bot is created you will be required to create a Microsoft App ID and Password. This is done in the Application Registration Portal. You will be automatically directed to the portal when you click on the “Create Microsoft App ID and password” button.
一旦创建了漫游器,您将需要创建一个Microsoft App ID和密码。 这是在应用程序注册门户中完成的。 单击“创建Microsoft应用程序ID和密码”按钮时,您将自动定向到门户。
Click on the Create Microsoft App ID and password button. This will require you to login using a live account. Once you completed the login. It will automatically generate an App ID.
单击创建Microsoft应用程序ID和密码按钮。 这将要求您使用真实帐户登录。 完成登录后。 它将自动生成一个应用程序ID。
Click on the “Generate an app password to continue”. This will show a popup with your new password. Copy this password and also save it somewhere with the App ID in case you need it again in the future.
单击“生成应用程序密码以继续”。 这将显示带有您的新密码的弹出窗口。 复制此密码,并将其与应用程序ID一起保存在某处,以备将来再次使用时使用。
Click ok. And on the next screen click:
单击确定。 然后在下一个屏幕上单击:

This should take you back to Azure where you left off your bot configuration.
这应该带您回到Azure,不再使用bot配置。
Paste the password which you just copied into the password field.
将刚刚复制的密码粘贴到密码字段中。

Choose your preferred language. I prefer C#, but you can use Node.JS as well.
选择您喜欢的语言。 我更喜欢C#,但是您也可以使用Node.JS。
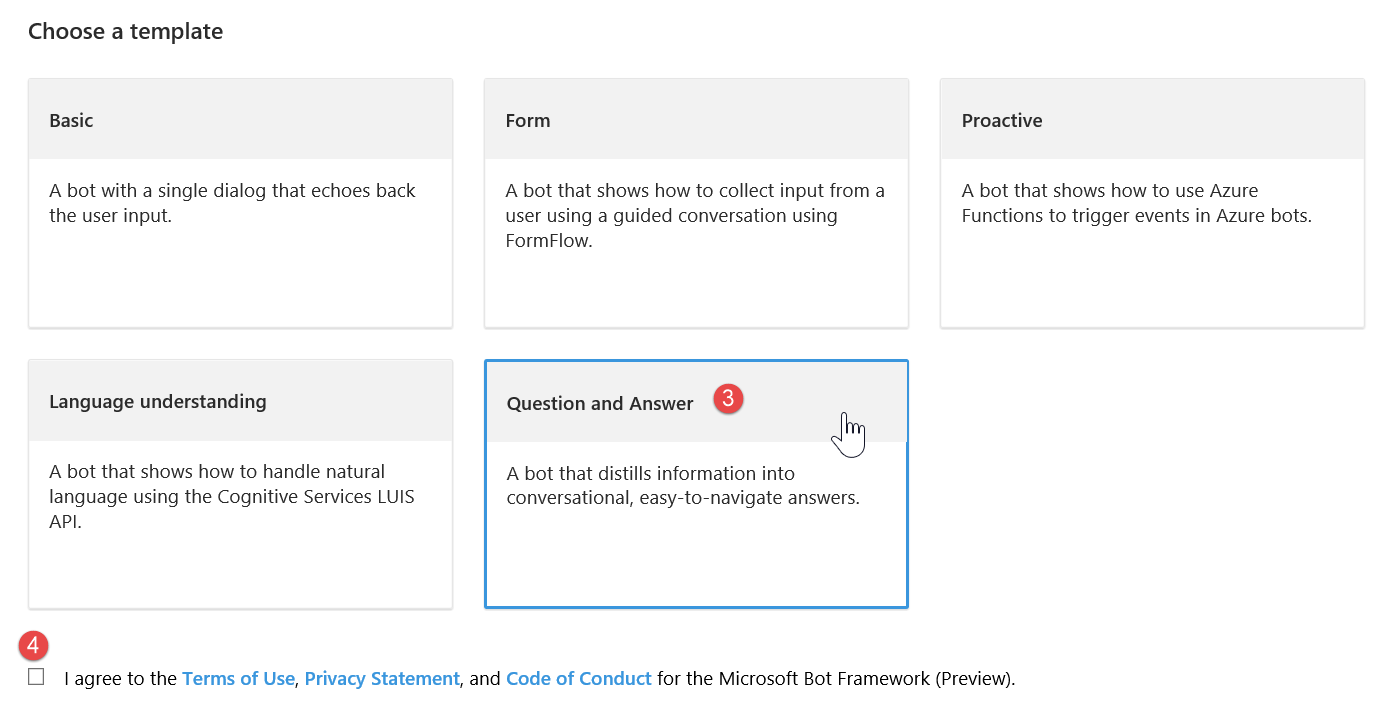
Here you have to choose a template. In this case we will select the Question and Answer Template because it happens to be exactly what we want to do.
在这里,您必须选择一个模板。 在这种情况下,我们将选择“问答模板”,因为它恰好正是我们想要做的。
Agree to terms and conditions.
同意条款和条件。
Click on “Create bot”
点击“创建机器人”
A popup will appear to connect the bot to the QnA Maker. Because I signed in in both instances with my live account, and I published my knowledge base my knowledge base should be available to select from the dropdown.
将会出现一个弹出窗口,将机器人连接到QnA Maker。 因为我在两个实例中都使用自己的真实帐户登录,并且我发布了知识库,所以应该可以从下拉列表中进行选择。
Select the knowledge base previously created.
选择先前创建的知识库。
Click ok.
单击确定。
Once the bot is created, your screen will look something like this: (I will discuss each briefly but it’s really outside the scope of this article.)
一旦创建了漫游器,您的屏幕将类似于以下内容:(我将简要讨论每一个,但实际上不在本文讨论范围之内。)
This is the current tab, where you can modify the source code.
这是当前选项卡,您可以在其中修改源代码。
The channels tab allows you to connect your bot to multiple channels, by default it can connect to Skype and Web Chat.
频道标签可让您将漫游器连接到多个频道,默认情况下,它可以连接到Skype和Web Chat。
The analytics screen gives you basic statistics as to how many users chatted through which channels.
“分析”屏幕为您提供了有关通过哪些渠道聊天的用户数量的基本统计信息。
The settings tab lets you change the configuration of the bot. Including the name, the icon, the knowledge base, cognitive services, continuous integration etc.
设置选项卡可让您更改机器人的配置。 包括名称,图标,知识库,认知服务,持续集成等。
The test tab allows you to test the bot. This is different from testing the knowledge base, because it actually tests the knowledge base as it reacts when being called through the bot. So, any changes made to the bot code will also be visible here, whereas those changes will not be visible in the test of the QnA Maker.
测试选项卡允许您测试机器人。 这与测试知识库不同,因为它实际上是在通过机器人调用时响应时对知识库进行测试。 因此,对bot代码所做的任何更改也将在此处可见,而这些更改在QnA Maker的测试中将不可见。
To finish this off I am now going to add this bot to my skype as a contact.
为了完成此操作,我现在要将这个机器人作为联系人添加到我的Skype中。
On the channels tab, click on the Skype channel. This will appear:
在“频道”选项卡上,单击“ Skype”频道。 这将出现:
Click on add to contacts. It will be added to your skype contacts, and you can then chat with your bot.
单击添加到联系人。 它将被添加到您的Skype联系人中,然后您可以与您的机器人聊天。
结论 (Conclusion)
I hope that you were able to see just how easy it is to create a Q and A bot and that this will inspire you to play around with bots and expand on this simple one by adding cognitive services and machine learning.
我希望您能够看到创建问答机器人的过程是多么容易,并且这将激发您尝试使用机器人并通过添加认知服务和机器学习来扩展这个简单的机器人。
翻译自: https://www.sqlshack.com/create-chatbot-azure-5-minutes/
构建azure对话机器人
构建azure对话机器人_如何在5分钟内使用Azure创建聊天机器人相关推荐
- javascript创建类_如何在10分钟内使用JavaScript创建费用管理器
javascript创建类 by Per Harald Borgen 通过Per Harald Borgen 如何在10分钟内使用JavaScript创建费用管理器 (How to create an ...
- github创建静态页面_如何在10分钟内使用GitHub Pages创建免费的静态站点
github创建静态页面 Static sites have become all the rage, and with good reason – they are blazingly fast a ...
- 机器人坐标系建立_如何在30分钟内建立一个简单的搜索机器人
机器人坐标系建立 by Quinn Langille 奎因·兰吉尔(Quinn Langille) 如何在30分钟内建立一个简单的搜索机器人 (How to Build A Simple Search ...
- es6 ... 添加属性_如何在10分钟内免费将HTTPS添加到您的网站,以及为什么您现在不止需要这样做......
es6 ... 添加属性 by Ayo Isaiah 通过Ayo Isaiah 如何在10分钟内免费将HTTPS添加到您的网站,以及为什么现在比以往更需要这样做 (How to add HTTPS t ...
- 服务器创建多个dhcp服务_如何在15分钟内创建无服务器服务
服务器创建多个dhcp服务 by Charlee Li 通过李李 如何在15分钟内创建无服务器服务 (How to create a serverless service in 15 minutes) ...
- 机器学习做自动聊天机器人_当您14岁时建立和销售聊天机器人会是什么样的感觉...
机器学习做自动聊天机器人 by Alec Jones 通过亚历克琼斯 当您14岁时建立和销售聊天机器人会是什么样的感觉 (What it's like to build and market a ch ...
- 如何在开源社区贡献代码_如何在15分钟内从浏览器获得您的第一个开源贡献
如何在开源社区贡献代码 Matt Mullenweg, founder of Automattic, recently offered this advice to aspiring develope ...
- wordpress模板_如何在15分钟内定制WordPress模板
wordpress模板 You know what my favorite WordPress development gigs are? The ones where I get to start ...
- 愉快的舞会c++_如何在5分钟内建立一个令人愉快的加载屏幕
愉快的舞会c++ First, here is what we will build. Set your timer! 首先,这是我们将要建立的. 设置您的计时器! Does this look fa ...
最新文章
- Android init.rc文件解析过程详解(一)
- 【转载】给不同 type 的 input 自动设置样式
- jQuery的eval
- spotlight soo5072:there was an error reading the tnsnames.ora
- JAVA中限制接口流量、并发的方法
- 背景图层和普通图层的区别_ps:图层有多少种类?我已经列出来了,学不学就看你自己了...
- 大数据数据收集数据困难_大数据就是好数据吗?研究人员在处理大数据集时遭遇的 5 大挑战...
- vscode写python爬虫_如何在vscode中调试python scrapy爬虫
- 函数平移口诀_初三二次函数平移规律的口诀
- Python 实现多元线性回归预测
- python mongodb_python实现mongodb的增删改查
- mysql数据怎么提取出来分析_Mysql数据提取器
- FLTK--轻量级C++跨平台GUI库
- 信息论实验一:信源熵的计算
- 怎么把ide改成ahci_不重装系统如何开启ahci模式_不重装系统ahci改ide模式的方法...
- 如何做好应用架构分层和模块化?
- python 手写字符识别
- ue4白天夜晚切换_白天/夜晚编码的美好时光...多年来最佳
- 虚拟化技术加速Android模拟器尝试
- 2010-2021年上市公司专利数据