boto3 连接aws_Python,Boto3和AWS S3:神秘化
boto3 连接aws
Amazon Web Services (AWS) has become a leader in cloud computing. One of its core components is S3, the object storage service offered by AWS. With its impressive availability and durability, it has become the standard way to store videos, images, and data. You can combine S3 with other services to build infinitely scalable applications.
Amazon Web Services(AWS)已成为云计算的领导者。 它的核心组件之一是S3,它是AWS提供的对象存储服务。 凭借其令人印象深刻的可用性和耐用性,它已成为存储视频,图像和数据的标准方法。 您可以将S3与其他服务结合起来以构建无限可扩展的应用程序。
Boto3 is the name of the Python SDK for AWS. It allows you to directly create, update, and delete AWS resources from your Python scripts.
Boto3是适用于AWS的Python SDK的名称。 它允许您直接从Python脚本中创建,更新和删除AWS资源。
If you’ve had some AWS exposure before, have your own AWS account, and want to take your skills to the next level by starting to use AWS services from within your Python code, then keep reading.
如果您之前有过一些AWS经验,请拥有自己的AWS帐户,并希望通过从Python代码中开始使用AWS服务来将自己的技能提高到一个新的水平,然后继续阅读。
By the end of this tutorial, you’ll:
在本教程结束时,您将:
- Be confident working with buckets and objects directly from your Python scripts
- Know how to avoid common pitfalls when using Boto3 and S3
- Understand how to set up your data from the start to avoid performance issues later
- Learn how to configure your objects to take advantage of S3’s best features
- 有信心直接从您的Python脚本处理存储桶和对象
- 了解使用Boto3和S3时如何避免常见的陷阱
- 从一开始就了解如何设置数据以避免以后出现性能问题
- 了解如何配置对象以利用S3的最佳功能
Before exploring Boto3’s characteristics, you will first see how to configure the SDK on your machine. This step will set you up for the rest of the tutorial.
在探索Boto3的特性之前,您将首先了解如何在计算机上配置SDK。 此步骤将为您完成本教程的其余部分。
Free Bonus: 5 Thoughts On Python Mastery, a free course for Python developers that shows you the roadmap and the mindset you’ll need to take your Python skills to the next level.
免费奖金: 关于Python精通的5个想法 ,这是针对Python开发人员的免费课程,向您展示了将Python技能提升到新水平所需的路线图和心态。
安装 (Installation)
To install Boto3 on your computer, go to your terminal and run the following:
要在计算机上安装Boto3,请在终端上运行以下命令:
 $ pip install boto3
$ pip install boto3
You’ve got the SDK. But, you won’t be able to use it right now, because it doesn’t know which AWS account it should connect to.
您已经有了SDK。 但是,您现在将无法使用它,因为它不知道应连接到哪个AWS账户。
To make it run against your AWS account, you’ll need to provide some valid credentials. If you already have an IAM user that has full permissions to S3, you can use those user’s credentials (their access key and their secret access key) without needing to create a new user. Otherwise, the easiest way to do this is to create a new AWS user and then store the new credentials.
要使其针对您的AWS账户运行,您需要提供一些有效的凭证。 如果您已经拥有对S3拥有完全权限的IAM用户,则可以使用这些用户的凭据(他们的访问密钥和他们的秘密访问密钥),而无需创建新用户。 否则,最简单的方法是创建一个新的AWS用户,然后存储新的凭证。
To create a new user, go to your AWS account, then go to Services and select IAM. Then choose Users and click on Add user.
要创建新用户,请转到您的AWS账户,然后转到服务并选择IAM。 然后选择“用户”,然后单击“添加用户”。
Give the user a name (for example, boto3user). Enable programmatic access. This will ensure that this user will be able to work with any AWS supported SDK or make separate API calls:
为用户命名(例如boto3user)。 启用程序访问。 这将确保该用户将能够使用任何AWS支持的SDK或进行单独的API调用:

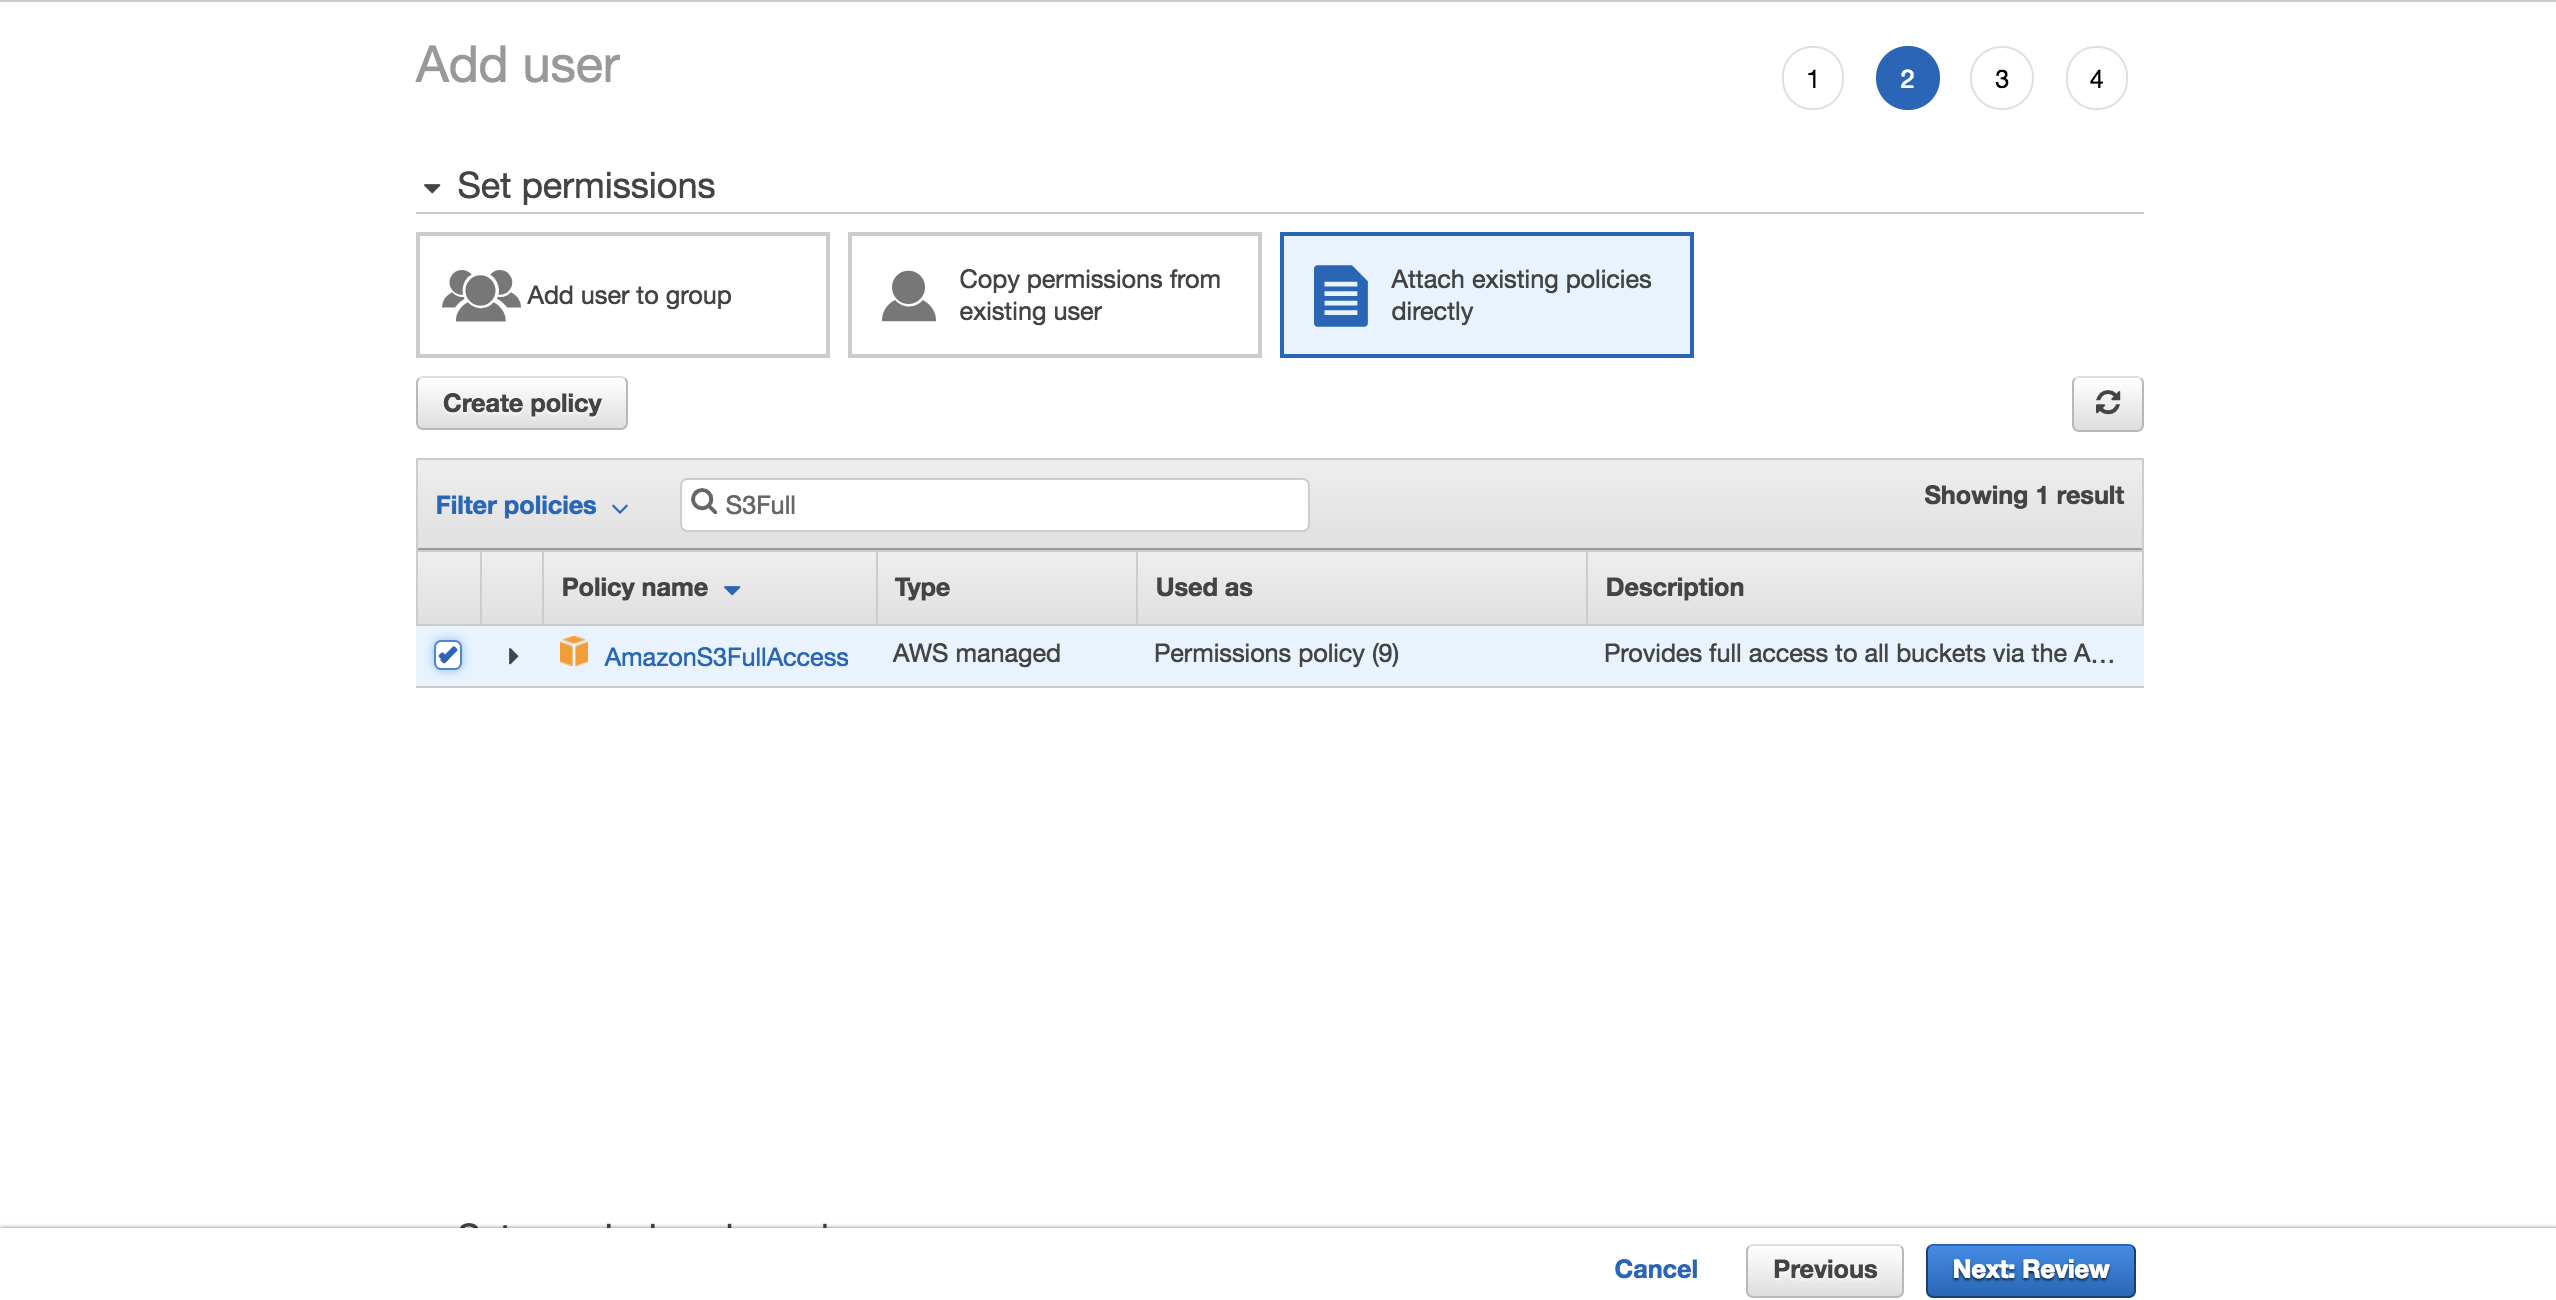
To keep things simple, choose the preconfigured AmazonS3FullAccess policy. With this policy, the new user will be able to have full control over S3. Click on Next: Review:
为简单起见,请选择预配置的AmazonS3FullAccess策略。 使用此策略,新用户将能够完全控制S3。 单击下一步:审阅:
Select Create user:
选择创建用户:
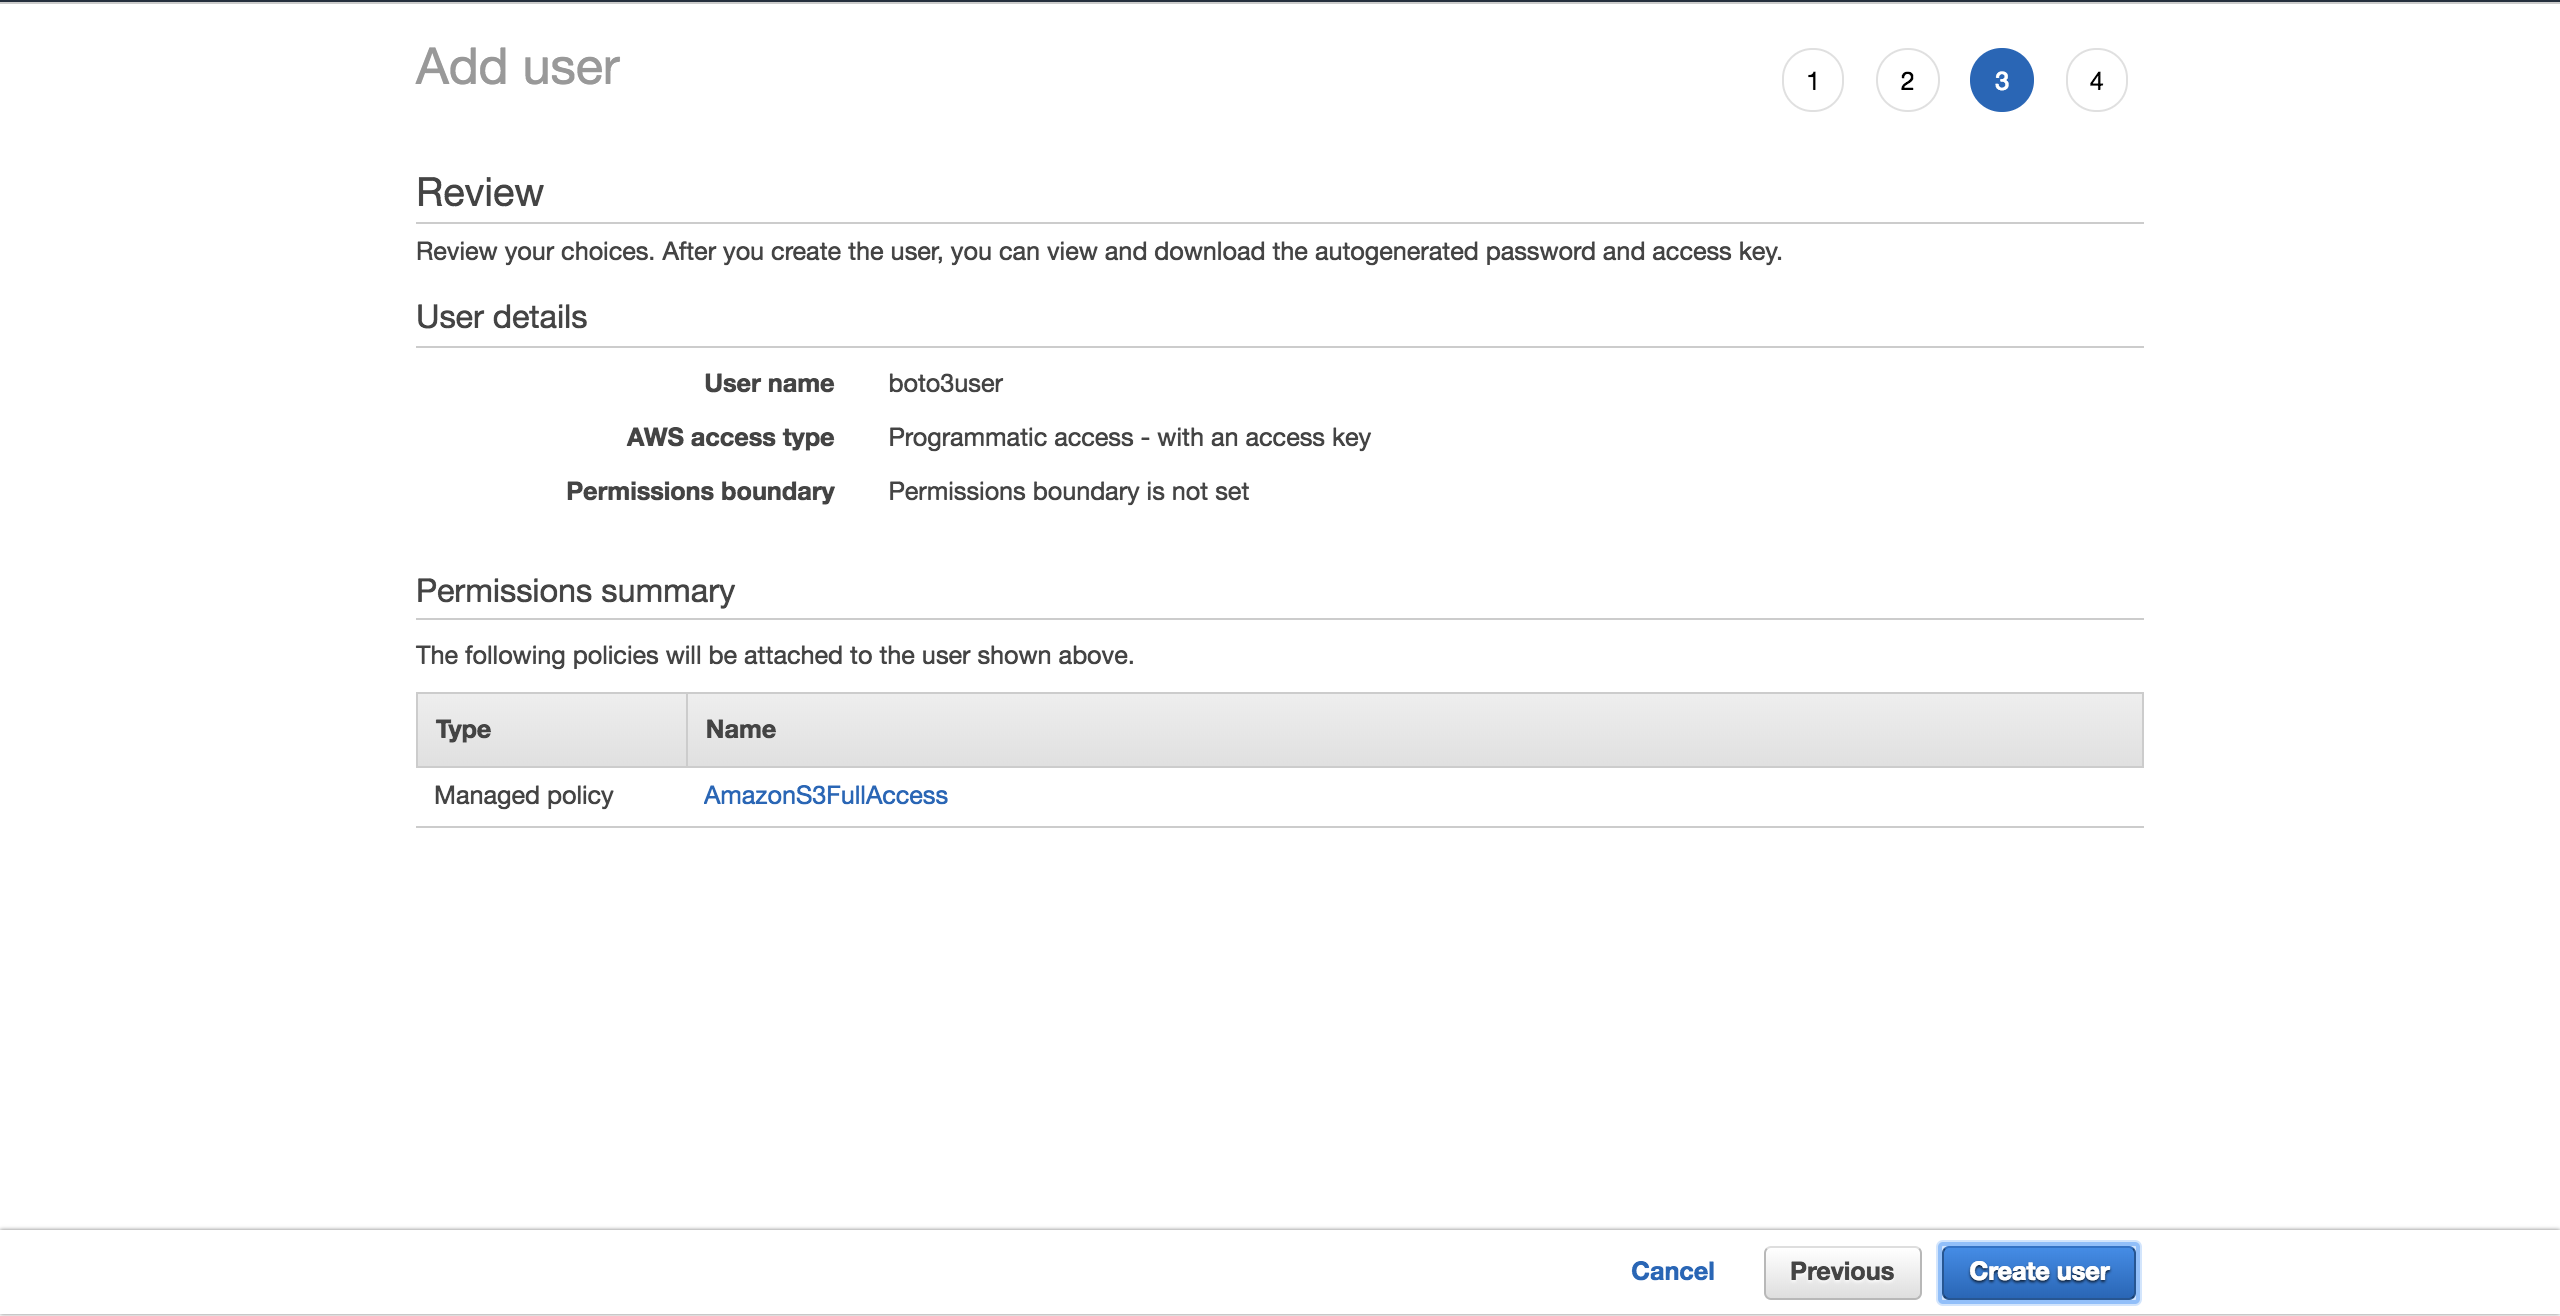
A new screen will show you the user’s generated credentials. Click on the Download .csv button to make a copy of the credentials. You will need them to complete your setup.
新的屏幕将向您显示用户生成的凭据。 单击“下载.csv”按钮以制作凭据的副本。 您将需要他们来完成设置。
Now that you have your new user, create a new file, ~/.aws/credentials:
现在您有了新用户,创建一个新文件~/.aws/credentials :
Open the file and paste the structure below. Fill in the placeholders with the new user credentials you have downloaded:
打开文件并粘贴下面的结构。 使用您下载的新用户凭据填写占位符:
 [default]
[default]
aws_access_key_id aws_access_key_id = = YOUR_ACCESS_KEY_ID
YOUR_ACCESS_KEY_ID
aws_secret_access_key aws_secret_access_key = = YOUR_SECRET_ACCESS_KEY
YOUR_SECRET_ACCESS_KEY
Save the file.
保存文件。
Now that you have set up these credentials, you have a default profile, which will be used by Boto3 to interact with your AWS account.
现在,您已经设置了这些凭证,您将拥有一个default配置文件,Boto3将使用它来与您的AWS账户进行交互。
There is one more configuration to set up: the default region that Boto3 should interact with. You can check out the complete table of the supported AWS regions. Choose the region that is closest to you. Copy your preferred region from the Region column. In my case, I am using eu-west-1 (Ireland).
还需要设置另一种配置:Boto3应该与之交互的默认区域。 您可以签出受支持的AWS区域的完整表格 。 选择离您最近的区域。 从“区域”列中复制您的首选区域。 就我而言,我使用的是eu-west-1(爱尔兰)。
Create a new file, ~/.aws/config:
创建一个新文件~/.aws/config :
Add the following and replace the placeholder with the region you have copied:
添加以下内容,并将占位符替换为您复制的region :
 [default]
[default]
region region = = YOUR_PREFERRED_REGION
YOUR_PREFERRED_REGION
Save your file.
保存文件。
You are now officially set up for the rest of the tutorial.
现在,您将正式设置本教程的其余部分。
Next, you will see the different options Boto3 gives you to connect to S3 and other AWS services.
接下来,您将看到Boto3为您提供连接到S3和其他AWS服务的不同选项。
客户与资源 (Client Versus Resource)
At its core, all that Boto3 does is call AWS APIs on your behalf. For the majority of the AWS services, Boto3 offers two distinct ways of accessing these abstracted APIs:
从本质上讲,Boto3所做的只是代表您调用AWS API。 对于大多数AWS服务,Boto3提供了两种不同的方法来访问这些抽象的API:
- Client: low-level service access
- Resource: higher-level object-oriented service access
- 客户端:低级服务访问
- 资源:更高级别的面向对象的服务访问
You can use either to interact with S3.
您可以使用其中任何一个与S3进行交互。
To connect to the low-level client interface, you must use Boto3’s client(). You then pass in the name of the service you want to connect to, in this case, s3:
要连接到低级客户端接口,必须使用Boto3的client() 。 然后,您输入要连接的服务的名称,在这种情况下为s3 :
To connect to the high-level interface, you’ll follow a similar approach, but use resource():
要连接到高级界面,您将遵循类似的方法,但是要使用resource() :
 import import boto3
boto3
s3_resource s3_resource = = boto3boto3 .. resourceresource (( 's3''s3' )
)
You’ve successfully connected to both versions, but now you might be wondering, “Which one should I use?”
您已经成功连接到两个版本,但是现在您可能想知道,“我应该使用哪个版本?”
With clients, there is more programmatic work to be done. The majority of the client operations give you a dictionary response. To get the exact information that you need, you’ll have to parse that dictionary yourself. With resource methods, the SDK does that work for you.
对于客户而言,还有更多的编程工作要做。 大多数客户端操作都会为您提供字典响应。 为了获得所需的确切信息,您必须自己解析该词典。 使用资源方法,SDK可以为您工作。
With the client, you might see some slight performance improvements. The disadvantage is that your code becomes less readable than it would be if you were using the resource. Resources offer a better abstraction, and your code will be easier to comprehend.
使用客户端,您可能会看到一些轻微的性能改进。 缺点是您的代码变得比使用资源时的可读性差。 资源提供了更好的抽象,并且您的代码将更易于理解。
Understanding how the client and the resource are generated is also important when you’re considering which one to choose:
在考虑选择哪个客户端和资源时,了解客户端和资源的生成方式也很重要:
- Boto3 generates the client from a JSON service definition file. The client’s methods support every single type of interaction with the target AWS service.
- Resources, on the other hand, are generated from JSON resource definition files.
- Boto3从JSON服务定义文件生成客户端。 客户端的方法支持与目标AWS服务的每种单一类型的交互。
- 另一方面,资源是从JSON资源定义文件生成的。
Boto3 generates the client and the resource from different definitions. As a result, you may find cases in which an operation supported by the client isn’t offered by the resource. Here’s the interesting part: you don’t need to change your code to use the client everywhere. For that operation, you can access the client directly via the resource like so: s3_resource.meta.client.
Boto3根据不同的定义生成客户端和资源。 结果,您可能会发现资源不提供客户端支持的操作的情况。 这是有趣的部分:您无需更改代码即可在任何地方使用客户端。 对于该操作,您可以直接通过资源访问客户端,如下所示: s3_resource.meta.client 。
One such client operation is .generate_presigned_url(), which enables you to give your users access to an object within your bucket for a set period of time, without requiring them to have AWS credentials.
这样的client操作之一就是.generate_presigned_url() ,它使您能够在指定的时间段内让用户访问存储桶中的对象,而无需他们具有AWS凭证。
常用操作 (Common Operations)
Now that you know about the differences between clients and resources, let’s start using them to build some new S3 components.
现在您已经了解了客户端和资源之间的区别,让我们开始使用它们来构建一些新的S3组件。
创建一个桶 (Creating a Bucket)
To start off, you need an S3 bucket. To create one programmatically, you must first choose a name for your bucket. Remember that this name must be unique throughout the whole AWS platform, as bucket names are DNS compliant. If you try to create a bucket, but another user has already claimed your desired bucket name, your code will fail. Instead of success, you will see the following error: botocore.errorfactory.BucketAlreadyExists.
首先,您需要一个S3 bucket 。 要以编程方式创建一个,您必须首先为存储桶选择一个名称。 请记住,此名称在整个AWS平台上必须唯一,因为存储桶名称符合DNS。 如果您尝试创建存储桶,但另一个用户已经声明了所需的存储桶名称,则代码将失败。 除了成功之外,您还会看到以下错误: botocore.errorfactory.BucketAlreadyExists 。
You can increase your chance of success when creating your bucket by picking a random name. You can generate your own function that does that for you. In this implementation, you’ll see how using the uuid module will help you achieve that. A UUID4’s string representation is 36 characters long (including hyphens), and you can add a prefix to specify what each bucket is for.
您可以通过选择随机名称来增加创建存储桶时的成功机会。 您可以生成自己的函数为您执行此操作。 在此实现中,您将看到使用uuid模块如何帮助您实现这一目标。 UUID4的字符串表示形式长36个字符(包括连字符),您可以添加前缀以指定每个存储段的用途。
Here’s a way you can achieve that:
您可以通过以下方式实现这一目标:
You’ve got your bucket name, but now there’s one more thing you need to be aware of: unless your region is in the United States, you’ll need to define the region explicitly when you are creating the bucket. Otherwise you will get an IllegalLocationConstraintException.
您已经有了存储桶名称,但是现在还需要注意一件事:除非您的区域在美国,否则在创建存储桶时需要明确定义区域。 否则,您将收到IllegalLocationConstraintException 。
To exemplify what this means when you’re creating your S3 bucket in a non-US region, take a look at the code below:
为了说明在非美国地区创建S3存储桶时的含义,请看下面的代码:
 s3_resources3_resource .. create_bucketcreate_bucket (( BucketBucket == YOUR_BUCKET_NAMEYOUR_BUCKET_NAME ,,CreateBucketConfigurationCreateBucketConfiguration == {{'LocationConstraint''LocationConstraint' : : 'eu-west-1''eu-west-1' })
})
You need to provide both a bucket name and a bucket configuration where you must specify the region, which in my case is eu-west-1.
您需要提供存储桶名称和存储桶配置,必须在其中指定区域(在我的情况下为eu-west-1 。
This isn’t ideal. Imagine that you want to take your code and deploy it to the cloud. Your task will become increasingly more difficult because you’ve now hardcoded the region. You could refactor the region and transform it into an environment variable, but then you’d have one more thing to manage.
这不是理想的。 想象一下,您想获取代码并将其部署到云中。 您的任务将变得越来越困难,因为您已经对区域进行了硬编码。 您可以重构区域并将其转换为环境变量,但是接下来您还需要管理另一件事。
Luckily, there is a better way to get the region programatically, by taking advantage of a session object. Boto3 will create the session from your credentials. You just need to take the region and pass it to create_bucket() as its LocationConstraint configuration. Here’s how to do that:
幸运的是,有一种更好的方法可以利用会话对象以编程方式获取区域。 Boto3将使用您的凭据创建session 。 您只需要获取区域并将其传递给create_bucket()作为其LocationConstraint配置。 这样做的方法如下:
The nice part is that this code works no matter where you want to deploy it: locally/EC2/Lambda. Moreover, you don’t need to hardcode your region.
令人高兴的是,无论您将代码部署在哪里,它都可以工作:local / EC2 / Lambda。 而且,您不需要对您的区域进行硬编码。
As both the client and the resource create buckets in the same way, you can pass either one as the s3_connection parameter.
由于客户端和资源都以相同的方式创建存储桶,因此可以将其中一个作为s3_connection参数传递。
You’ll now create two buckets. First create one using the client, which gives you back the bucket_response as a dictionary:
现在,您将创建两个存储桶。 首先使用客户端创建一个客户端,该客户端将bucket_response作为字典返回:
>>> first_bucket_name, first_response = create_bucket(
...     bucket_prefix='firstpythonbucket',
...     s3_connection=s3_resource.meta.client)
firstpythonbucket7250e773-c4b1-422a-b51f-c45a52af9304 eu-west-1>>> first_response
{'ResponseMetadata': {'RequestId': 'E1DCFE71EDE7C1EC', 'HostId': 'r3AP32NQk9dvbHSEPIbyYADT769VQEN/+xT2BPM6HCnuCb3Z/GhR2SBP+GM7IjcxbBN7SQ+k+9B=', 'HTTPStatusCode': 200, 'HTTPHeaders': {'x-amz-id-2': 'r3AP32NQk9dvbHSEPIbyYADT769VQEN/+xT2BPM6HCnuCb3Z/GhR2SBP+GM7IjcxbBN7SQ+k+9B=', 'x-amz-request-id': 'E1DCFE71EDE7C1EC', 'date': 'Fri, 05 Oct 2018 15:00:00 GMT', 'location': 'http://firstpythonbucket7250e773-c4b1-422a-b51f-c45a52af9304.s3.amazonaws.com/', 'content-length': '0', 'server': 'AmazonS3'}, 'RetryAttempts': 0}, 'Location': 'http://firstpythonbucket7250e773-c4b1-422a-b51f-c45a52af9304.s3.amazonaws.com/'}
Then create a second bucket using the resource, which gives you back a Bucket instance as the bucket_response:
然后使用该资源创建第二个存储桶,这将为您提供一个Bucket实例作为bucket_response :
>>> second_bucket_name, second_response = create_bucket(
...     bucket_prefix='secondpythonbucket', s3_connection=s3_resource)
secondpythonbucket2d5d99c5-ab96-4c30-b7f7-443a95f72644 eu-west-1>>> second_response
s3.Bucket(name='secondpythonbucket2d5d99c5-ab96-4c30-b7f7-443a95f72644')
You’ve got your buckets. Next, you’ll want to start adding some files to them.
你有水桶。 接下来,您将要开始向其中添加一些文件。
命名文件 (Naming Your Files)
You can name your objects by using standard file naming conventions. You can use any valid name. In this article, you’ll look at a more specific case that helps you understand how S3 works under the hood.
您可以使用标准文件命名约定来命名对象。 您可以使用任何有效名称。 在本文中,您将研究一个更具体的案例,该案例可以帮助您了解S3的工作原理。
If you’re planning on hosting a large number of files in your S3 bucket, there’s something you should keep in mind. If all your file names have a deterministic prefix that gets repeated for every file, such as a timestamp format like “YYYY-MM-DDThh:mm:ss”, then you will soon find that you’re running into performance issues when you’re trying to interact with your bucket.
如果您打算在S3存储桶中托管大量文件,则应牢记一些注意事项。 如果所有文件名都具有确定性前缀,并且每个文件都重复使用该确定性前缀,例如“ YYYY-MM-DDThh:mm:ss”这样的时间戳格式,那么您很快就会发现自己遇到了性能问题重新尝试与您的存储桶进行互动。
This will happen because S3 takes the prefix of the file and maps it onto a partition. The more files you add, the more will be assigned to the same partition, and that partition will be very heavy and less responsive.
发生这种情况是因为S3使用文件的前缀并将其映射到分区上。 您添加的文件越多,分配给同一分区的文件就越多,该分区将非常繁重且响应速度较慢。
What can you do to keep that from happening?
您可以采取什么措施防止这种情况发生?
The easiest solution is to randomize the file name. You can imagine many different implementations, but in this case, you’ll use the trusted uuid module to help with that. To make the file names easier to read for this tutorial, you’ll be taking the first six characters of the generated number’s hex representation and concatenate it with your base file name.
最简单的解决方案是将文件名随机化。 您可以想象有许多不同的实现,但是在这种情况下,您将使用受信任的uuid模块来帮助实现这一点。 为了使本教程的文件名更易于阅读,您将使用生成的数字的hex表示形式的前六个字符,并将其与基本文件名连接起来。
The helper function below allows you to pass in the number of bytes you want the file to have, the file name, and a sample content for the file to be repeated to make up the desired file size:
下面的帮助器功能允许您传递想要的文件字节数,文件名以及要重复的文件的样本内容,以组成所需的文件大小:
 def def create_temp_filecreate_temp_file (( sizesize , , file_namefile_name , , file_contentfile_content ):):random_file_name random_file_name = = '''' .. joinjoin ([([ strstr (( uuiduuid .. uuid4uuid4 ()() .. hexhex [:[: 66 ]), ]), file_namefile_name ])])with with openopen (( random_file_namerandom_file_name , , 'w''w' ) ) as as ff ::ff .. writewrite (( strstr (( file_contentfile_content ) ) * * sizesize ))return return random_file_name
random_file_name
Create your first file, which you’ll be using shortly:
创建您的第一个文件,稍后将使用它:
By adding randomness to your file names, you can efficiently distribute your data within your S3 bucket.
通过为文件名添加随机性,您可以在S3存储桶中高效地分发数据。
创建Bucket和Object实例 (Creating Bucket and Object Instances)
The next step after creating your file is to see how to integrate it into your S3 workflow.
创建文件后的下一步是查看如何将其集成到S3工作流程中。
This is where the resource’s classes play an important role, as these abstractions make it easy to work with S3.
这是资源的类发挥重要作用的地方,因为这些抽象使使用S3变得容易。
By using the resource, you have access to the high-level classes (Bucket and Object). This is how you can create one of each:
通过使用资源,您可以访问高级类( Bucket和Object )。 这是您可以创建以下每种方法之一:
 first_bucket first_bucket = = s3_resources3_resource .. BucketBucket (( namename == first_bucket_namefirst_bucket_name )
)
first_object first_object = = s3_resources3_resource .. ObjectObject ((bucket_namebucket_name == first_bucket_namefirst_bucket_name , , keykey == first_file_namefirst_file_name )
)
The reason you have not seen any errors with creating the first_object variable is that Boto3 doesn’t make calls to AWS to create the reference. The bucket_name and the key are called identifiers, and they are the necessary parameters to create an Object. Any other attribute of an Object, such as its size, is lazily loaded. This means that for Boto3 to get the requested attributes, it has to make calls to AWS.
您在创建first_object变量时未看到任何错误的原因是Boto3不会调用AWS来创建引用。 bucket_name和key称为标识符,它们是创建Object的必要参数。 延迟加载Object任何其他属性,例如其大小。 这意味着Boto3要获取请求的属性,必须调用AWS。
了解子资源 (Understanding Sub-resources)
Bucket and Object are sub-resources of one another. Sub-resources are methods that create a new instance of a child resource. The parent’s identifiers get passed to the child resource.
Bucket和Object是彼此的子资源。 子资源是创建子资源的新实例的方法。 父级的标识符传递给子级资源。
If you have a Bucket variable, you can create an Object directly:
如果您具有Bucket变量,则可以直接创建一个Object :
Or if you have an Object variable, then you can get the Bucket:
或者,如果您有一个Object变量,则可以获取Bucket :
 first_bucket_again first_bucket_again = = first_objectfirst_object .. BucketBucket ()
()
Great, you now understand how to generate a Bucket and an Object. Next, you’ll get to upload your newly generated file to S3 using these constructs.
太好了,您现在了解了如何生成Bucket和Object 。 接下来,您将使用这些构造将新生成的文件上传到S3。
上载档案 (Uploading a File)
There are three ways you can upload a file:
您可以通过三种方式上传文件:
- From an
Objectinstance - From a
Bucketinstance - From the
client
- 从
Object实例 - 从
Bucket实例 - 来自
client
In each case, you have to provide the Filename, which is the path of the file you want to upload. You’ll now explore the three alternatives. Feel free to pick whichever you like most to upload the first_file_name to S3.
在每种情况下,您都必须提供Filename ,这是您要上传的文件的路径。 现在,您将探索三种选择。 随意选择最喜欢的人,将first_file_name上载到S3。
Object Instance Version
对象实例版本
You can upload using an Object instance:
您可以使用Object实例上传:
Or you can use the first_object instance:
或者,您可以使用first_object实例:
 first_objectfirst_object .. upload_fileupload_file (( first_file_namefirst_file_name )
)
Bucket Instance Version
值区执行个体版本
Here’s how you can upload using a Bucket instance:
以下是使用Bucket实例上传的方法:
Client Version
客户端版本
You can also upload using the client:
您也可以使用client上传:
 s3_resources3_resource .. metameta .. clientclient .. upload_fileupload_file ((FilenameFilename == first_file_namefirst_file_name , , BucketBucket == first_bucket_namefirst_bucket_name ,,KeyKey == first_file_namefirst_file_name )
)
You have successfully uploaded your file to S3 using one of the three available methods. In the upcoming sections, you’ll mainly work with the Object class, as the operations are very similar between the client and the Bucket versions.
您已使用三种可用方法之一成功将文件上传到S3。 在接下来的部分中,您将主要使用Object类,因为client和Bucket版本之间的操作非常相似。
下载文件 (Downloading a File)
To download a file from S3 locally, you’ll follow similar steps as you did when uploading. But in this case, the Filename parameter will map to your desired local path. This time, it will download the file to the tmp directory:
要从本地S3下载文件,您将按照与上载时类似的步骤进行操作。 但是在这种情况下, Filename参数将映射到所需的本地路径。 这次,它将文件下载到tmp目录:
You’ve successfully downloaded your file from S3. Next, you’ll see how to copy the same file between your S3 buckets using a single API call.
您已经从S3成功下载了文件。 接下来,您将看到如何使用单个API调用在S3存储桶之间复制相同文件。
在存储桶之间复制对象 (Copying an Object Between Buckets)
If you need to copy files from one bucket to another, Boto3 offers you that possibility. In this example, you’ll copy the file from the first bucket to the second, using .copy():
如果您需要将文件从一个存储桶复制到另一个存储桶,则Boto3提供了这种可能性。 在此示例中,您将使用.copy()将文件从第一个存储桶复制到第二个存储桶:
 def def copy_to_bucketcopy_to_bucket (( bucket_from_namebucket_from_name , , bucket_to_namebucket_to_name , , file_namefile_name ):):copy_source copy_source = = {{'Bucket''Bucket' : : bucket_from_namebucket_from_name ,,'Key''Key' : : file_namefile_name}}s3_resources3_resource .. ObjectObject (( bucket_to_namebucket_to_name , , file_namefile_name )) .. copycopy (( copy_sourcecopy_source ))copy_to_bucketcopy_to_bucket (( first_bucket_namefirst_bucket_name , , second_bucket_namesecond_bucket_name , , first_file_namefirst_file_name )
)
Note: If you’re aiming to replicate your S3 objects to a bucket in a different region, have a look at Cross Region Replication.
注意:如果您打算将S3对象复制到其他区域中的存储桶,请查看“ 跨区域复制” 。
删除对象 (Deleting an Object)
Let’s delete the new file from the second bucket by calling .delete() on the equivalent Object instance:
让我们通过在等效的Object实例上调用.delete()从第二个存储桶中删除新文件:
You’ve now seen how to use S3’s core operations. You’re ready to take your knowledge to the next level with more complex characteristics in the upcoming sections.
您现在已经了解了如何使用S3的核心操作。 在接下来的部分中,您已经准备好将您的知识带入更复杂的特征的新水平。
进阶设定 (Advanced Configurations)
In this section, you’re going to explore more elaborate S3 features. You’ll see examples of how to use them and the benefits they can bring to your applications.
在本节中,您将探索更详细的S3功能。 您将看到有关如何使用它们以及它们可以为您的应用程序带来好处的示例。
ACL(访问控制列表) (ACL (Access Control Lists))
Access Control Lists (ACLs) help you manage access to your buckets and the objects within them. They are considered the legacy way of administrating permissions to S3. Why should you know about them? If you have to manage access to individual objects, then you would use an Object ACL.
访问控制列表(ACL)可帮助您管理对存储桶及其中对象的访问。 他们被认为是管理S3权限的传统方法。 您为什么要了解它们? 如果必须管理对单个对象的访问,则可以使用对象ACL。
By default, when you upload an object to S3, that object is private. If you want to make this object available to someone else, you can set the object’s ACL to be public at creation time. Here’s how you upload a new file to the bucket and make it accessible to everyone:
默认情况下,将对象上载到S3时,该对象是私有的。 如果要使该对象可用于其他人,则可以在创建时将对象的ACL设置为公共。 以下是将新文件上传到存储桶并使所有人都可以访问的方法:
 second_file_name second_file_name = = create_temp_filecreate_temp_file (( 400400 , , 'secondfile.txt''secondfile.txt' , , 's''s' )
)
second_object second_object = = s3_resources3_resource .. ObjectObject (( first_bucketfirst_bucket .. namename , , second_file_namesecond_file_name )
)
second_objectsecond_object .. upload_fileupload_file (( second_file_namesecond_file_name , , ExtraArgsExtraArgs == {{'ACL''ACL' : : 'public-read''public-read' })
})
You can get the ObjectAcl instance from the Object, as it is one of its sub-resource classes:
您可以从Object获得ObjectAcl实例,因为它是其子资源类之一:
To see who has access to your object, use the grants attribute:
要查看谁有权访问您的对象,请使用grants属性:
>>> second_object_acl.grants
[{'Grantee': {'DisplayName': 'name', 'ID': '24aafdc2053d49629733ff0141fc9fede3bf77c7669e4fa2a4a861dd5678f4b5', 'Type': 'CanonicalUser'}, 'Permission': 'FULL_CONTROL'}, {'Grantee': {'Type': 'Group', 'URI': 'http://acs.amazonaws.com/groups/global/AllUsers'}, 'Permission': 'READ'}]
You can make your object private again, without needing to re-upload it:
您可以再次将对象设为私有,而无需重新上传它:
>>> response = second_object_acl.put(ACL='private')
>>> second_object_acl.grants
[{'Grantee': {'DisplayName': 'name', 'ID': '24aafdc2053d49629733ff0141fc9fede3bf77c7669e4fa2a4a861dd5678f4b5', 'Type': 'CanonicalUser'}, 'Permission': 'FULL_CONTROL'}]
You have seen how you can use ACLs to manage access to individual objects. Next, you’ll see how you can add an extra layer of security to your objects by using encryption.
您已经了解了如何使用ACL来管理对单个对象的访问。 接下来,您将看到如何使用加密为对象添加额外的安全性。
Note: If you’re looking to split your data into multiple categories, have a look at tags. You can grant access to the objects based on their tags.
注意:如果您想将数据分为多个类别,请查看标签 。 您可以根据对象的标签授予对这些对象的访问权限。
加密 (Encryption)
With S3, you can protect your data using encryption. You’ll explore server-side encryption using the AES-256 algorithm where AWS manages both the encryption and the keys.
使用S3,您可以使用加密保护数据。 您将探索使用AES-256算法的服务器端加密,其中AWS管理加密和密钥。
Create a new file and upload it using ServerSideEncryption:
创建一个新文件并使用ServerSideEncryption上传:
 third_file_name third_file_name = = create_temp_filecreate_temp_file (( 300300 , , 'thirdfile.txt''thirdfile.txt' , , 't''t' )
)
third_object third_object = = s3_resources3_resource .. ObjectObject (( first_bucket_namefirst_bucket_name , , third_file_namethird_file_name )
)
third_objectthird_object .. upload_fileupload_file (( third_file_namethird_file_name , , ExtraArgsExtraArgs == {{'ServerSideEncryption''ServerSideEncryption' : : 'AES256''AES256' })
})
You can check the algorithm that was used to encrypt the file, in this case AES256:
您可以检查用于加密文件的算法,在这种情况下为AES256 :
 >>>  third_object . server_side_encryption
'AES256'
You now understand how to add an extra layer of protection to your objects using the AES-256 server-side encryption algorithm offered by AWS.
现在,您将了解如何使用AWS提供的AES-256服务器端加密算法为您的对象添加额外的保护层。
存储 (Storage)
Every object that you add to your S3 bucket is associated with a storage class. All the available storage classes offer high durability. You choose how you want to store your objects based on your application’s performance access requirements.
您添加到S3存储桶中的每个对象都与一个存储类相关联。 所有可用的存储类别均具有很高的耐用性。 您可以根据应用程序的性能访问要求选择存储对象的方式。
At present, you can use the following storage classes with S3:
目前,您可以在S3中使用以下存储类:
- STANDARD: default for frequently accessed data
- STANDARD_IA: for infrequently used data that needs to be retrieved rapidly when requested
- ONEZONE_IA: for the same use case as STANDARD_IA, but stores the data in one Availability Zone instead of three
- REDUCED_REDUNDANCY: for frequently used noncritical data that is easily reproducible
- 标准 :经常访问的数据的默认值
- STANDARD_IA :用于不经常使用的数据,需要在请求时快速检索
- ONEZONE_IA :与STANDARD_IA相同,但将数据存储在一个可用区中,而不是三个
- REDUCED_REDUNDANCY :用于易于重现的常用非关键数据
If you want to change the storage class of an existing object, you need to recreate the object.
如果要更改现有对象的存储类,则需要重新创建该对象。
For example, reupload the third_object and set its storage class to Standard_IA:
例如,重新上传third_object并将其存储类设置为Standard_IA :
Note: If you make changes to your object, you might find that your local instance doesn’t show them. What you need to do at that point is call .reload() to fetch the newest version of your object.
注意:如果对对象进行更改,则可能会发现本地实例未显示它们。 此时,您需要做的是调用.reload()来获取对象的最新版本。
Reload the object, and you can see its new storage class:
重新加载该对象,您可以看到其新的存储类:
>>> third_object.reload()
>>> third_object.storage_class
'STANDARD_IA'
Note: Use LifeCycle Configurations to transition objects through the different classes as you find the need for them. They will automatically transition these objects for you.
注意:使用LifeCycle Configurations可以根据需要在不同的类之间转换对象。 他们将自动为您转换这些对象。
版本控制 (Versioning)
You should use versioning to keep a complete record of your objects over time. It also acts as a protection mechanism against accidental deletion of your objects. When you request a versioned object, Boto3 will retrieve the latest version.
您应该使用版本控制来保持一段时间内对象的完整记录。 它还充当防止意外删除对象的保护机制。 当您请求版本对象时,Boto3将检索最新版本。
When you add a new version of an object, the storage that object takes in total is the sum of the size of its versions. So if you’re storing an object of 1 GB, and you create 10 versions, then you have to pay for 10GB of storage.
当您添加对象的新版本时,该对象总共占用的存储空间是其版本大小的总和。 因此,如果要存储1 GB的对象并创建10个版本,则必须支付10GB的存储空间。
Enable versioning for the first bucket. To do this, you need to use the BucketVersioning class:
为第一个存储桶启用版本控制。 为此,您需要使用BucketVersioning类:
 def def enable_bucket_versioningenable_bucket_versioning (( bucket_namebucket_name ):):bkt_versioning bkt_versioning = = s3_resources3_resource .. BucketVersioningBucketVersioning (( bucket_namebucket_name ))bkt_versioningbkt_versioning .. enableenable ()()printprint (( bkt_versioningbkt_versioning .. statusstatus )
)
 >>>  enable_bucket_versioning ( first_bucket_name )
Enabled
Then create two new versions for the first file Object, one with the contents of the original file and one with the contents of the third file:
然后为第一个文件Object创建两个新版本,一个包含原始文件的内容,另一个包含第三个文件的内容:
Now reupload the second file, which will create a new version:
现在,重新上传第二个文件,这将创建一个新版本:
 s3_resources3_resource .. ObjectObject (( first_bucket_namefirst_bucket_name , , second_file_namesecond_file_name )) .. upload_fileupload_file ((second_file_namesecond_file_name )
)
You can retrieve the latest available version of your objects like so:
您可以像这样检索对象的最新可用版本:
 >>>  s3_resource . Object ( first_bucket_name , first_file_name ) . version_id
'eQgH6IC1VGcn7eXZ_.ayqm6NdjjhOADv'
In this section, you’ve seen how to work with some of the most important S3 attributes and add them to your objects. Next, you’ll see how to easily traverse your buckets and objects.
在本节中,您已经了解了如何使用一些最重要的S3属性并将其添加到对象中。 接下来,您将看到如何轻松地遍历存储桶和对象。
遍历 (Traversals)
If you need to retrieve information from or apply an operation to all your S3 resources, Boto3 gives you several ways to iteratively traverse your buckets and your objects. You’ll start by traversing all your created buckets.
如果您需要从所有S3资源中检索信息或对其进行操作,则Boto3为您提供了几种遍历存储桶和对象的方法。 首先遍历所有已创建的存储桶。
铲斗穿越 (Bucket Traversal)
To traverse all the buckets in your account, you can use the resource’s buckets attribute alongside .all(), which gives you the complete list of Bucket instances:
要遍历帐户中的所有存储桶,可以在.all()旁边使用资源的buckets属性,该属性为您提供了Bucket实例的完整列表:
 >>>  for bucket in s3_resource . buckets . all ():
...     print ( bucket . name )
...
firstpythonbucket7250e773-c4b1-422a-b51f-c45a52af9304
secondpythonbucket2d5d99c5-ab96-4c30-b7f7-443a95f72644
You can use the client to retrieve the bucket information as well, but the code is more complex, as you need to extract it from the dictionary that the client returns:
您也可以使用client来检索存储桶信息,但是代码更加复杂,因为您需要从client返回的字典中提取它:
 >>>  for bucket_dict in s3_resource . meta . client . list_buckets () . get ( 'Buckets' ):
...     print ( bucket_dict [ 'Name' ])
...
firstpythonbucket7250e773-c4b1-422a-b51f-c45a52af9304
secondpythonbucket2d5d99c5-ab96-4c30-b7f7-443a95f72644
You have seen how to iterate through the buckets you have in your account. In the upcoming section, you’ll pick one of your buckets and iteratively view the objects it contains.
您已经了解了如何遍历帐户中的存储桶。 在接下来的部分中,您将选择一个存储桶并迭代地查看其中包含的对象。
对象遍历 (Object Traversal)
If you want to list all the objects from a bucket, the following code will generate an iterator for you:
如果要列出存储桶中的所有对象,则以下代码将为您生成一个迭代器:
 >>>  for obj in first_bucket . objects . all ():
...     print ( obj . key )
...
127367firstfile.txt
616abesecondfile.txt
fb937cthirdfile.txt
The obj variable is an ObjectSummary. This is a lightweight representation of an Object. The summary version doesn’t support all of the attributes that the Object has. If you need to access them, use the Object() sub-resource to create a new reference to the underlying stored key. Then you’ll be able to extract the missing attributes:
obj变量是一个ObjectSummary 。 这是Object的轻量级表示。 摘要版本不支持Object具有的所有属性。 如果需要访问它们,请使用Object()子资源创建对基础存储键的新引用。 然后,您将能够提取缺少的属性:
 >>>  for obj in first_bucket . objects . all ():
...     subsrc = obj . Object ()
...     print ( obj . key , obj . storage_class , obj . last_modified ,
...           subsrc . version_id , subsrc . metadata )
...
127367firstfile.txt STANDARD 2018-10-05 15:09:46+00:00 eQgH6IC1VGcn7eXZ_.ayqm6NdjjhOADv {}
616abesecondfile.txt STANDARD 2018-10-05 15:09:47+00:00 WIaExRLmoksJzLhN7jU5YzoJxYSu6Ey6 {}
fb937cthirdfile.txt STANDARD_IA 2018-10-05 15:09:05+00:00 null {}
You can now iteratively perform operations on your buckets and objects. You’re almost done. There’s one more thing you should know at this stage: how to delete all the resources you’ve created in this tutorial.
您现在可以迭代地对存储桶和对象执行操作。 你几乎完成。 在此阶段,您还应该了解一件事:如何删除在本教程中创建的所有资源。
删除存储桶和对象 (Deleting Buckets and Objects)
To remove all the buckets and objects you have created, you must first make sure that your buckets have no objects within them.
要删除所有已创建的存储桶和对象,必须首先确保存储桶中没有对象。
删除非空存储桶 (Deleting a Non-empty Bucket)
To be able to delete a bucket, you must first delete every single object within the bucket, or else the BucketNotEmpty exception will be raised. When you have a versioned bucket, you need to delete every object and all its versions.
为了能够删除存储桶,您必须首先删除存储桶中的每个对象,否则会引发BucketNotEmpty异常。 具有版本化存储桶时,需要删除每个对象及其所有版本。
If you find that a LifeCycle rule that will do this automatically for you isn’t suitable to your needs, here’s how you can programatically delete the objects:
如果发现将自动为您执行此操作的LifeCycle规则不适合您的需求,则可以通过以下方式以编程方式删除对象:
The above code works whether or not you have enabled versioning on your bucket. If you haven’t, the version of the objects will be null. You can batch up to 1000 deletions in one API call, using .delete_objects() on your Bucket instance, which is more cost-effective than individually deleting each object.
无论您是否在存储桶上启用了版本控制,以上代码均有效。 如果没有,则对象的版本将为null。 您可以在Bucket实例上使用.delete_objects() ,在一个API调用中最多批处理1000个删除操作,这比单独删除每个对象更具成本效益。
Run the new function against the first bucket to remove all the versioned objects:
针对第一个存储桶运行新功能,以删除所有版本控制的对象:
>>> delete_all_objects(first_bucket_name)
[{'Key': '127367firstfile.txt', 'VersionId': 'eQgH6IC1VGcn7eXZ_.ayqm6NdjjhOADv'}, {'Key': '127367firstfile.txt', 'VersionId': 'UnQTaps14o3c1xdzh09Cyqg_hq4SjB53'}, {'Key': '127367firstfile.txt', 'VersionId': 'null'}, {'Key': '616abesecondfile.txt', 'VersionId': 'WIaExRLmoksJzLhN7jU5YzoJxYSu6Ey6'}, {'Key': '616abesecondfile.txt', 'VersionId': 'null'}, {'Key': 'fb937cthirdfile.txt', 'VersionId': 'null'}]
As a final test, you can upload a file to the second bucket. This bucket doesn’t have versioning enabled, and thus the version will be null. Apply the same function to remove the contents:
作为最终测试,您可以将文件上传到第二个存储桶。 该存储桶未启用版本控制,因此版本将为null。 应用相同的功能删除内容:
>>> s3_resource.Object(second_bucket_name, first_file_name).upload_file(
...     first_file_name)
>>> delete_all_objects(second_bucket_name)
[{'Key': '9c8b44firstfile.txt', 'VersionId': 'null'}]
You’ve successfully removed all the objects from both your buckets. You’re now ready to delete the buckets.
您已成功从两个存储桶中删除了所有对象。 现在您可以删除存储桶了。
删除桶 (Deleting Buckets)
To finish off, you’ll use .delete() on your Bucket instance to remove the first bucket:
最后,您将在Bucket实例上使用.delete()删除第一个存储桶:
 s3_resources3_resource .. BucketBucket (( first_bucket_namefirst_bucket_name )) .. deletedelete ()
()
If you want, you can use the client version to remove the second bucket:
如果需要,可以使用client版本删除第二个存储桶:
Both the operations were successful because you emptied each bucket before attempting to delete it.
两项操作均成功,因为您在尝试删除每个存储桶之前将其清空。
You’ve now run some of the most important operations that you can perform with S3 and Boto3. Congratulations on making it this far! As a bonus, let’s explore some of the advantages of managing S3 resources with Infrastructure as Code.
现在,您已经运行了一些可以用S3和Boto3执行的最重要的操作。 恭喜! 另外,让我们探索一下使用“基础结构即代码”管理S3资源的一些优点。
Python代码还是基础架构即代码(IaC)? (Python Code or Infrastructure as Code (IaC)?)
As you’ve seen, most of the interactions you’ve had with S3 in this tutorial had to do with objects. You didn’t see many bucket-related operations, such as adding policies to the bucket, adding a LifeCycle rule to transition your objects through the storage classes, archive them to Glacier or delete them altogether or enforcing that all objects be encrypted by configuring Bucket Encryption.
如您所见,本教程中与S3进行的大多数交互都与对象有关。 您没有看到许多与存储桶相关的操作,例如向存储桶添加策略,添加LifeCycle规则以通过存储类转换对象,将其归档到Glacier或完全删除它们,或者通过配置存储桶强制所有对象加密加密。
Manually managing the state of your buckets via Boto3’s clients or resources becomes increasingly difficult as your application starts adding other services and grows more complex. To monitor your infrastructure in concert with Boto3, consider using an Infrastructure as Code (IaC) tool such as CloudFormation or Terraform to manage your application’s infrastructure. Either one of these tools will maintain the state of your infrastructure and inform you of the changes that you’ve applied.
随着您的应用程序开始添加其他服务并变得越来越复杂,通过Boto3的客户端或资源手动管理存储桶的状态变得越来越困难。 要与Boto3一起监视基础架构,请考虑使用诸如CloudFormation或Terraform之类的基础架构即代码(IaC)工具来管理应用程序的基础架构。 这些工具之一将维护您的基础结构状态,并通知您已应用的更改。
If you decide to go down this route, keep the following in mind:
如果您决定沿这条路线走,请牢记以下几点:
- Any bucket related-operation that modifies the bucket in any way should be done via IaC.
- If you want all your objects to act in the same way (all encrypted, or all public, for example), usually there is a way to do this directly using IaC, by adding a Bucket Policy or a specific Bucket property.
- Bucket read operations, such as iterating through the contents of a bucket, should be done using Boto3.
- Object-related operations at an individual object level should be done using Boto3.
- 任何以任何方式修改存储桶的存储桶相关操作都应通过IaC完成。
- 如果您希望所有对象以相同的方式(例如,所有加密或所有公共的)运行,通常可以通过添加存储桶策略或特定的存储桶属性,直接使用IaC来执行此操作。
- 存储桶读取操作(例如遍历存储桶的内容)应使用Boto3完成。
- 应该使用Boto3在单个对象级别执行与对象相关的操作。
结论 (Conclusion)
Congratulations on making it to the end of this tutorial!
祝贺您完成本教程的结尾!
You’re now equipped to start working programmatically with S3. You now know how to create objects, upload them to S3, download their contents and change their attributes directly from your script, all while avoiding common pitfalls with Boto3.
现在,您已准备好开始以编程方式使用S3。 现在,您知道如何创建对象,将它们上传到S3,下载它们的内容以及直接从您的脚本更改其属性,同时避免了Boto3的常见陷阱。
May this tutorial be a stepping stone in your journey to building something great using AWS!
希望本教程可以成为您使用AWS构建出色产品的旅程的垫脚石!
进一步阅读 (Further Reading)
If you want to learn more, check out the following:
如果您想了解更多信息,请查看以下内容:
- Boto3 documentation
- Generating Random Data in Python (Guide)
- IAM Policies and Bucket Policies and ACLs
- Object Tagging
- LifeCycle Configurations
- Cross-Region Replication
- CloudFormation
- Terraform
- Boto3文档
- 在Python中生成随机数据(指南)
- IAM策略,存储桶策略和ACL
- 对象标记
- LifeCycle配置
- 跨区域复制
- 云形成
- 地貌
翻译自: https://www.pybloggers.com/2018/10/python-boto3-and-aws-s3-demystified/
boto3 连接aws
boto3 连接aws_Python,Boto3和AWS S3:神秘化相关推荐
- AWS S3 Windows系统下的文件夹上传基于python
AWS S3 上传文件,基于cmd命令行发现无法上传文件夹,只能上传单个文件,不知道是我能力不行还是什么原因,如果有大佬了解的可以在下面评论下! 一.环境配置 1.win10 X64: 2.awscl ...
- AWS S3云存储服务
AWS S3云存储服务 1 S3概念及基础知识 2 S3的基本操作 3 S3数据安全 4 S3数据加密以及命令行CLI 4.1 S3加密工作原理 4.1.1 server端的加密 4.1.2 clie ...
- AWS S3宕机的启发: 云必须分散化
上周,AWS S3云存储服务中断,互联网圈掀起一番波澜,然而AWS将其因归咎于一名技术人员在例行维修中的失误,关闭了S3子系统的少量服务器,由于一条错误的指令输入,被关闭的服务器比预期要多.事情过去了 ...
- aws rds恢复数据库_使用AWS Glue将数据从AWS S3加载到AWS RDS SQL Server数据库
aws rds恢复数据库 This article explains how to develop ETL (Extract Transform Load) jobs using AWS Glue t ...
- Storj白皮书v3最全面解读,Docker创始人的加入能否扳倒AWS S3
Storj新发了白皮书v3,地址是:https://storj.io/storjv3.pdf 这次白皮书一共有90页,看完还真要费不少时间.如果你没有时间看,可以看一下我这篇快速技术解读. 上次Sto ...
- Aws S3 基础操作
S3 基础知识 Amazon Simple Storage Service (Amazon S3) 是一项面向 Internet 的存储服务.您可以通过 Amazon S3 随时在 Web 上的任何位 ...
- 树莓派Zero W发布;亚马逊 AWS S3 服务出现故障 | IoT黑板报
树莓派Zero W发布,配有Wi-Fi和蓝牙售价10美元 @cnBeta 为了庆祝树莓派的第五个生日,树莓派基金会推出了树莓派Zero W,它本质上是树莓派Zero ,但是添加了许多用户一直要求的功能 ...
- AWS S3 挂载到EC2
利用S3fs在Amazon EC2 Linux实例上挂载S3存储桶 背景介绍 Amazon S3是互联网存储解决方案,能让所有开发人员访问同一个具备可扩展性.可靠性.安全性和快速价廉的数据存储基础设施 ...
- 中意阳光年金 - AWS S3 附件上传
AWS S3 附件上传 一.Java 代码调用 1.上传下载相关代码 2.配置文件 二.linux 服务器直接上传附件(大批量附件迁移) 1.linux安装awscli 1.1 安装awscli 1. ...
最新文章
- 一重量级联盟成立!北大、浙大、上交大、国科大等34校加入
- 关于Spring的69个面试问答——终极列表
- opencv python 从摄像头获取视频、帧率、分辨率等属性设置和使用
- 阿里巴巴数据中台实践分享
- oracle ogg下载安装,牛刀小试Oracle GoldenGate--OGG安装(一)
- yum的更多用法和源码编译安装apache
- C语言_printf
- BoomBeach海水效果实现
- 180822 逆向-网鼎杯(2-1)
- wamp mysql_WampServer 下载以及安装问题 以及配置远程连接MYSQL
- 「产品读书」增长黑客:创业公司的用户与收入增长秘籍
- 鲸会务一站式智能会议系统帮助主办方实现数字化会议管理
- 怎么给word文档注音_如何为整篇word文档加拼音标注
- java solid设计原则_六大设计原则之里氏替换原则(LSP)
- 广义相加模型(GAM)与向前逐步选择算法(基于R语言)
- 【RPA】UIpath Academy BA篇
- 革文:B2B企业如何用品牌思维玩转社群营销
- 北京化工大学计算机调剂要求,2020年北京化工大学考研调剂信息
- 计算机博士c类会议,我院研究生参加CSCWD国际学术会议(CCF C类)
- 【Java面试】并发编程实战(线程控制操作详解)