SpringBoot - 工作流Activiti开发
1.工作流
1.1 开发前奏
介绍
当前系统activit开发以springboot+mybatis开发为准,
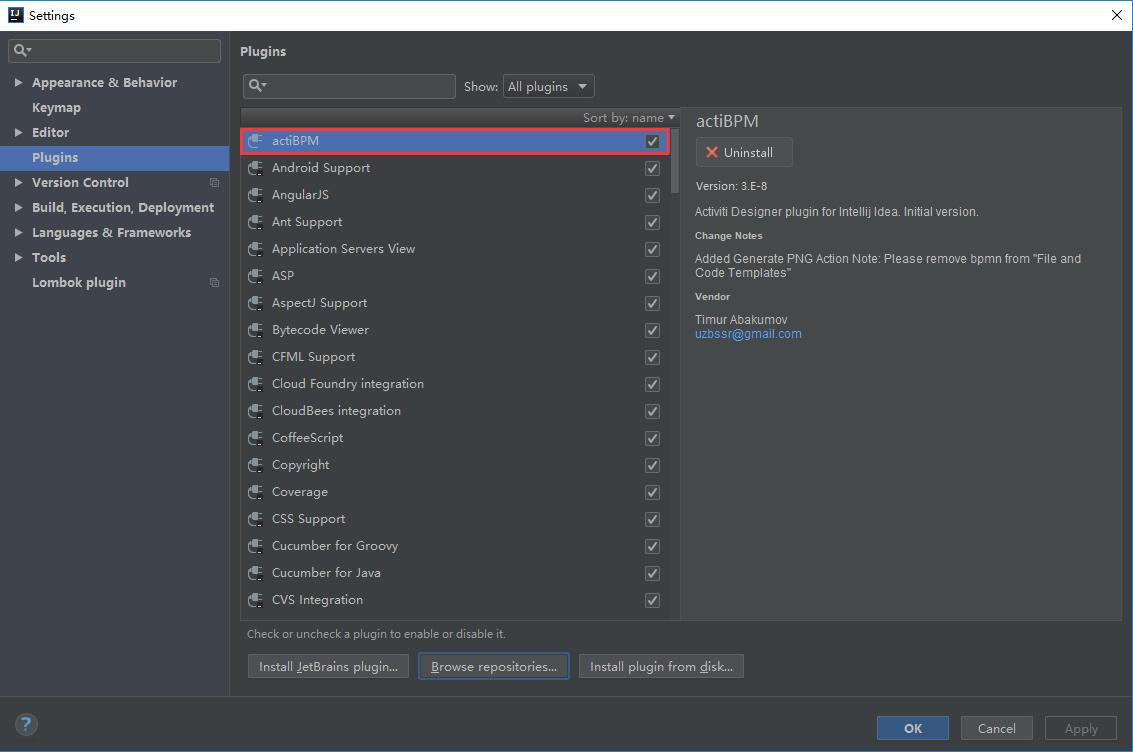
1.1.1 IDEA安装actiBPM
通过File -> Settings -> Plugins 找到actiBPM插件进行安装
1.1.2 核心API介绍
ProcessEngineConfiguration:流程引擎配置。
ProcessEngine:流程引擎
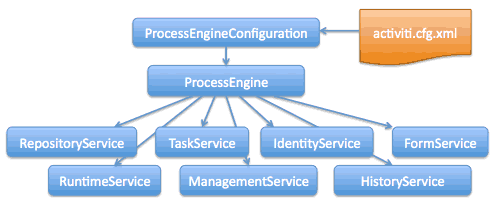
核心七大接口
RepositoryService:提供一系列管理流程部署和流程定义的API。
RuntimeService:在流程运行时对流程实例进行管理与控制。
TaskService:对流程任务进行管理,例如任务提醒、任务完成和创建任务等。
IdentityService:提供对流程角色数据进行管理的API,这些角色数据包括用户组、用户及它们之间的关系。
ManagementService:提供对流程引擎进行管理和维护的服务,提供对activiti数据库的直接访问【一般不用】
HistoryService:对流程的历史数据进行操作,包括查询、删除这些历史数据。FormService:表单服务
1.1.3 添加依赖 pom.xml
<dependency><groupId>org.activiti</groupId><artifactId>activiti-spring-boot-starter-basic</artifactId><version>6.0.0</version>
</dependency>
1.1.4 yml配置
spring:activiti:check-process-definitions: true #自动检查、部署流程定义文件database-schema-update: true #自动更新数据库结构history-level: full #保存历史数据级别设置为full最高级别,便于历史数据的追溯# process-definition-location-prefix: classpath:/processes/ #流程定义文件存放目录#process-definition-location-suffixes: #流程文件格式# - **.bpmn20.xml# - **.bpmnspringboot环境下不再以activiti.cfg.xml文件的形式配置,activiti使用starter配置后属于spring下,所以在yml里配置。
- check-process-definitions【检查Activiti数据表是否存在及版本号是否匹配】默认为true,自动创建好表之后设为false。设为false会取消自动部署功能。
database-schema-update【在流程引擎启动和关闭时处理数据库模式】如下四个值:
- false (默认值):在创建流程引擎时检查库模式的版本,如果版本不匹配则抛出异常。
- true:在创建流程引擎时,执行检查并在必要时对数据库中所有的表进行更新,如果表不存在,则自动创建。 、
- create-drop:在创建流程引擎时,会创建数据库的表,并在关闭流程引擎时删除数据库的表。
- drop-create:Activiti启动时,执行数据库表的删除操作,在Activiti关闭时,会执行数据库表的创建操作。
history-level 【历史数据保存级别】
- none:不保存任何的历史数据,因此,在流程执行过程中,这是最高效的。
- activity:级别高于none,保存流程实例与流程行为,其他数据不保存。
- audit:除activity级别会保存的数据外,还会保存全部的流程任务及其属性。audit为history的默认值。
- full:保存历史数据的最高级别,除了会保存audit级别的数据外,还会保存其他全部流程相关的细节数据,包括一些流程参数等。
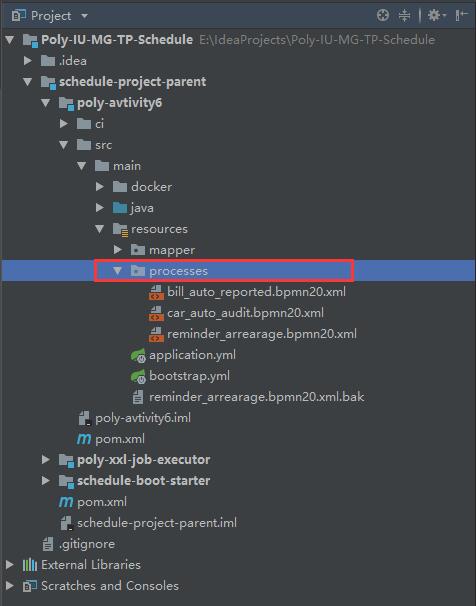
1.1.5 添加processes目录
SpringBoot集成activiti默认会从classpath下的processes目录下读取流程定义文件,所以需要在src/main/resources目录下添加processes目录,并在目录中创建流程文件.
如果没有processes目录,则需要修改配置spring.activiti.process-definition-location-prefix,指定流程文件存放目录。
1.1.6 其他相关配置
现在系统的启动类排除org.activiti.spring.boot.SecurityAutoConfiguration即可
@SpringBootApplication(exclude = SecurityAutoConfiguration.class,scanBasePackages="com.poly")
public class AvtivityApplication {public static void main(String[] args) {SpringApplication.run(AvtivityApplication.class, args); }}
官方文档给出的启动类配置
@Configuration
@ComponentScan
@EnableAutoConfiguration
public class MyApplication {public static void main(String[] args) {SpringApplication.run(MyApplication.class, args); }}
1.1.7 配置bpmn
- 通过插件配置
官方文档测试bpmn文件 命名为one-task-process.bpmn20.xml 放入processes目录
<?xml version="1.0" encoding="UTF-8"?>
<definitionsxmlns="http://www.omg.org/spec/BPMN/20100524/MODEL"xmlns:activiti="http://activiti.org/bpmn"targetNamespace="Examples"><process id="oneTaskProcess" name="The One Task Process"><startEvent id="theStart" /><sequenceFlow id="flow1" sourceRef="theStart" targetRef="theTask" /><userTask id="theTask" name="my task" /><sequenceFlow id="flow2" sourceRef="theTask" targetRef="theEnd" /><endEvent id="theEnd" /></process></definitions>
1.1.8 配置数据源
注意mysql连接池版本
# com.mysql.cj.jdbc.Driver
spring:datasource:driver-class-name: com.mysql.cj.jdbc.Driverurl: jdbc:mysql://127.0.0.1:3306/activiti_test?useUnicode=true&characterEncoding=UTF-8&serverTimezone=UTCusername: rootpassword: 12345678
1.2 表介绍
在1.1.2~1.1.8完成后 启动项目会生成如下表
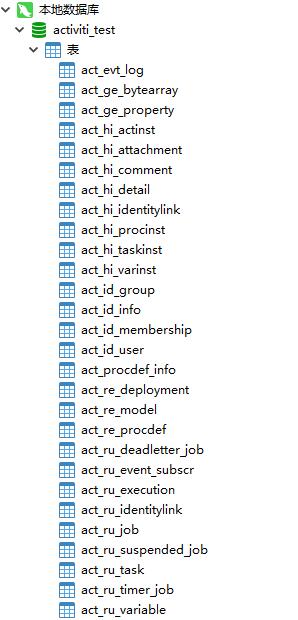
- act_ge_ 通用数据表,ge是general的缩写
- act_hi_ 历史数据表,hi是history的缩写,对应HistoryService接口
- act_id_ 身份数据表,id是identity的缩写,对应IdentityService接口
- act_re_ 流程存储表,re是repository的缩写,对应RepositoryService接口,存储流程部署和流程定义等静态数据
act_ru_ 运行时数据表,ru是runtime的缩写,对应RuntimeService接口和TaskService接口,存储流程实例和用户任务等动态数据
资源库流程规则表1) act_re_deployment 部署信息表2) act_re_model 流程设计模型部署表3) act_re_procdef 流程定义数据表运行时数据库表1) act_ru_execution运行时流程执行实例表2) act_ru_identitylink运行时流程人员表,主要存储任务节点与参与者的相关信息3) act_ru_task运行时任务节点表4) act_ru_variable运行时流程变量数据表历史数据库表1) act_hi_actinst 历史节点表2) act_hi_attachment历史附件表3) act_hi_comment历史意见表4) act_hi_identitylink历史流程人员表5) act_hi_detail历史详情表,提供历史变量的查询6) act_hi_procinst历史流程实例表7) act_hi_taskinst历史任务实例表8) act_hi_varinst历史变量表组织机构表1) act_id_group用户组信息表2) act_id_info用户扩展信息表3) act_id_membership用户与用户组对应信息表4) act_id_user用户信息表
1.3 开发实例
1.3.1 项目开发案例
- 通过actiBPM设置流程
在processes下建立bpmn流程,之后更改为bpmn20.xml格式(注:具体xml内容请看项目中processes文件)
1.3.2 个人实例
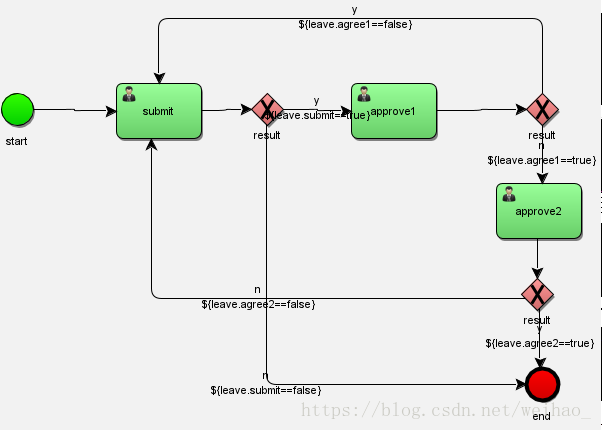
思路
- 员工请假,先创建请假流程
- 员工填写请假申请,也可以不填写,直接结束流程
- 提交给直接主管审批,如果直接主管拒绝,则重新填写,如果直接主管同意,再到部门主管审批,
- 部门主管审批部门主管同意,则请假流程结束,请假成功,如果部门主管不同意,返回员工重新提交申请。
- 创建流程文件
代码
<?xml version="1.0" encoding="UTF-8" standalone="yes"?>
<definitions xmlns="http://www.omg.org/spec/BPMN/20100524/MODEL" xmlns:activiti="http://activiti.org/bpmn" xmlns:bpmndi="http://www.omg.org/spec/BPMN/20100524/DI" xmlns:dc="http://www.omg.org/spec/DD/20100524/DC" xmlns:di="http://www.omg.org/spec/DD/20100524/DI" xmlns:tns="http://www.activiti.org/testm1539766523202" xmlns:xsd="http://www.w3.org/2001/XMLSchema" xmlns:xsi="http://www.w3.org/2001/XMLSchema-instance" expressionLanguage="http://www.w3.org/1999/XPath" id="m1539766523202" name="" targetNamespace="http://www.activiti.org/testm1539766523202" typeLanguage="http://www.w3.org/2001/XMLSchema"><process id="leave1" isClosed="false" isExecutable="true" processType="None"><startEvent id="_2" name="start"/><userTask activiti:assignee="${leave.userId}" activiti:exclusive="true" id="_3" name="submit"/><exclusiveGateway gatewayDirection="Unspecified" id="_4" name="result"/><userTask activiti:assignee="${leave.approver1}" activiti:exclusive="true" id="_5" name="approve1"/><exclusiveGateway gatewayDirection="Unspecified" id="_6" name="result"/><userTask activiti:assignee="${leave.approver2}" activiti:exclusive="true" id="_7" name="approve2"/><exclusiveGateway gatewayDirection="Unspecified" id="_8" name="result"/><endEvent id="_9" name="end"/><sequenceFlow id="_10" sourceRef="_2" targetRef="_3"/><sequenceFlow id="_11" sourceRef="_3" targetRef="_4"/><sequenceFlow id="_12" name="y" sourceRef="_4" targetRef="_5"><conditionExpression xsi:type="tFormalExpression"><![CDATA[${leave.submit==true}]]></conditionExpression></sequenceFlow><sequenceFlow id="_13" name="n" sourceRef="_4" targetRef="_9"><conditionExpression xsi:type="tFormalExpression"><![CDATA[${leave.submit==false}]]></conditionExpression></sequenceFlow><sequenceFlow id="_14" sourceRef="_5" targetRef="_6"/><sequenceFlow id="_15" name="n" sourceRef="_6" targetRef="_7"><conditionExpression xsi:type="tFormalExpression"><![CDATA[${leave.agree1==true}]]></conditionExpression></sequenceFlow><sequenceFlow id="_16" sourceRef="_7" targetRef="_8"/><sequenceFlow id="_17" name="y" sourceRef="_6" targetRef="_3"><conditionExpression xsi:type="tFormalExpression"><![CDATA[${leave.agree1==false}]]></conditionExpression></sequenceFlow><sequenceFlow id="_18" name="n" sourceRef="_8" targetRef="_3"><conditionExpression xsi:type="tFormalExpression"><![CDATA[${leave.agree2==false}]]></conditionExpression></sequenceFlow><sequenceFlow id="_19" name="y" sourceRef="_8" targetRef="_9"><conditionExpression xsi:type="tFormalExpression"><![CDATA[${leave.agree2==true}]]></conditionExpression></sequenceFlow></process>
</definitions>
编写接口
@RestController
@RequestMapping("/level/v1")
public class LeaveController {public static final Logger log = LoggerFactory.getLogger(LeaveController.class);@Autowired private RuntimeService runtimeService;@Autowired private TaskService taskService;@Autowired private ProcessEngine processEngine;/*** 启动流程* @param userId* @return*/ @RequestMapping(value = "/start", method = RequestMethod.GET) public Map<String, Object> start(@RequestParam String userId){Map<String, Object> vars = new HashMap<>();Leave leave = new Leave();leave.setUserId(userId);vars.put("leave",leave);ProcessInstance processInstance = runtimeService.startProcessInstanceByKey("leave1",vars);Map<String, Object> resultMap = new HashMap<>();return resultMap; }/*** 填写请假单* @param leave* @return*/ @RequestMapping(value="/apply", method = RequestMethod.POST) public Map<String, Object> apply(@RequestBody Leave leave){Task task = taskService.createTaskQuery().taskId(leave.getTaskId()).singleResult();Map<String, Object> vars = new HashMap<>();Leave origin = (Leave) taskService.getVariable(leave.getTaskId(), "leave");origin.setDesc(leave.getDesc());origin.setStartDate(leave.getStartDate());origin.setEndDate(leave.getEndDate());origin.setTotalDay(leave.getTotalDay());origin.setApprover1(leave.getApprover1());origin.setApprover2(leave.getApprover2());origin.setSubmit(leave.getSubmit());vars.put("leave", origin);taskService.complete(leave.getTaskId(), vars);Map<String, Object> resultMap = ResultMapHelper.getSuccessMap();return resultMap; }/*** 查询用户流程* @param userId* @return*/ @RequestMapping(value = "/find", method = RequestMethod.GET) public Map<String, Object> find(@RequestParam("userId")String userId){List<Task> taskList = taskService.createTaskQuery().taskAssignee(userId).list();List<Leave> resultList = new ArrayList<>();if(!CollectionUtils.isEmpty(taskList)){for(Task task : taskList){Leave leave = (Leave) taskService.getVariable(task.getId(),"leave");leave.setTaskId(task.getId());leave.setTaskName(task.getName());resultList.add(leave);}}Map<String, Object> resultMap = ResultMapHelper.getSuccessMap();resultMap.put("datas", resultList);return resultMap; }/*** 直接主管审批* @param leave* @return*/ @RequestMapping(value = "/approve1", method = RequestMethod.POST) public Map<String, Object> approve1(@RequestBody Leave leave){Task task = taskService.createTaskQuery().taskId(leave.getTaskId()).singleResult();Map<String, Object> vars = new HashMap<>();Leave origin = (Leave) taskService.getVariable(leave.getTaskId(), "leave");origin.setApproveDesc1(leave.getApproveDesc1());origin.setAgree1(leave.getAgree1());vars.put("leave", origin);taskService.complete(leave.getTaskId(),vars);Map<String, Object> resultMap = ResultMapHelper.getSuccessMap();return resultMap; }/*** 部门主管审批* @param leave* @return*/ @RequestMapping(value = "/approve2", method = RequestMethod.POST) public Map<String, Object> approve2(@RequestBody Leave leave){Task task = taskService.createTaskQuery().taskId(leave.getTaskId()).singleResult();Map<String, Object> vars = new HashMap<>();Leave origin = (Leave) taskService.getVariable(leave.getTaskId(), "leave");origin.setApproveDesc2(leave.getApproveDesc2());origin.setAgree2(leave.getAgree2());vars.put("leave", origin);taskService.complete(leave.getTaskId(),vars);Map<String, Object> resultMap = ResultMapHelper.getSuccessMap();return resultMap; }/*** 查看历史记录* @param userId* @return*/ @RequestMapping(value="/findClosed", method = RequestMethod.GET) public Map<String, Object> findClosed(String userId){HistoryService historyService = processEngine.getHistoryService();List<HistoricProcessInstance> list = historyService.createHistoricProcessInstanceQuery().processDefinitionKey("leave1").variableValueEquals("leave.userId",userId).list();List<Leave> leaves = new ArrayList<>();for(HistoricProcessInstance pi : list){leaves.add((Leave) pi.getProcessVariables().get("leave"));}Map<String, Object> resultMap = ResultMapHelper.getSuccessMap();resultMap.put("datas", leaves);return resultMap; }}
public class Leave implements Serializable {private static final long serialVersionUID = 2248469053125414262L;private String userId;private Boolean submit;private Date startDate;private Date endDate;private float totalDay;private String desc;private String taskId;private String taskName;private String approver1;private Boolean agree1;private String approveDesc1;private String approver2;private Boolean agree2;private String approveDesc2;
}
SpringBoot - 工作流Activiti开发相关推荐
- SpringBoot下的工作流Activiti开发
1.准备pom.xml <?xml version="1.0" encoding="UTF-8"?> <project xmlns=" ...
- Activiti工作流使用之SpringBoot整合Activiti
Activiti工作流使用之SpringBoot整合Activiti 文章目录 Activiti工作流使用之SpringBoot整合Activiti 一.springboot整合Activiti环境依 ...
- springBoot搭建activiti工作流
1.新建maven项目 2.依赖 的pom文件 <?xml version="1.0" encoding="UTF-8"?> <project ...
- 疯狂java workflow_疯狂Workflow讲义:基于Activiti的工作流应用开发 完整pdf扫描版[136MB]...
<疯狂Workflow讲义:基于Activiti的工作流应用开发>内容概括: 本书是一本介绍Java工作流领域的书,以Activiti为核心,内容囊括了多个流行的企业级Java EE框架, ...
- SpringBoot集成activiti工作流
SpringBoot集成activiti工作流(模拟请假流程) 链接:https://pan.baidu.com/s/10BT_Zertm1WBBrlrdE-QWQ 提取码:zsq6 学习视频地址见 ...
- # SpringBoot 整合 Activiti 工作流框架
SpringBoot 整合 Activiti 工作流框架 Activiti 介绍 Activiti是一个开源的工作流引擎,它实现了BPMN 2.0规范,可以发布设计好的流程定义,并通过api进行流程调 ...
- SpringBoot整合Activiti工作流
依赖: 新建springBoot项目时勾选activiti,或者在已建立的springBoot项目添加以下依赖: <dependency><groupId>org.activi ...
- 5步带你掌握工作流Activiti框架的使用
摘要:本文通过一个工作流Activiti框架的具体使用示例,具体详尽的介绍了工作流Activiti框架的使用方式. 本文分享自华为云社区<一个使用示例,五个操作步骤!从此轻松掌握项目中工作流的开 ...
- Springboot 整合activiti及使用案例
Springboot整合activiti 6.0 下载源码请点击这里 一 导入依赖 <dependencies><!--Activiti工作流 start--><depe ...
最新文章
- Linux命令基础6-mkdir命令
- 如何写一个脚本语言_如何写一个Nx schematic plugin?
- 第一个项目的需求分析
- android studio中如何设置注释模板
- Spark Streaming学习笔记
- 分布式服务动态上下线感知
- about osgeo中国
- 电子设计竞赛电源题(2)-检波与采样
- Spring.Net的AOP的通知
- 2014华为机试西安地区B组试题
- c语言函数二维数组调用,C语言之调用函数传递二维数组
- Java 基础知识 【钢镚核恒】
- UG NX10.0 软件安装教程
- BP神经网络代码和原理
- 打印5列五颗星_55组“数学顺口溜” 大九九乘法口诀表!孩子想学好数学必须背熟...
- h2ouve工具使用_NF8480M5 – BIOS设置
- Win10系统任务栏出现假死现象的解决办法
- 人脸检测 Retinaface - 数据集的处理(WIDER FACE)
- c#控制台模拟dos_超好用的C#控制台应用模板
- linux安装gfortran出现错误,Fortran gfortran linux中出现“Segmentation Fault(core dumped)”错误...