python3程序开发指南_Python 3安装和设置指南
python3程序开发指南
To get started working with Python 3, you’ll need to have access to the Python interpreter. There are several common ways to accomplish this:
要开始使用Python 3,您需要有权使用Python解释器。 有几种常见的方法可以完成此操作:
- Python can be obtained from the Python Software Foundation website at python.org. Typically, that involves downloading the appropriate installer for your operating system and running it on your machine.
- Some operating systems, notably Linux, provide a package manager that can be run to install Python.
- On macOS, the best way to install Python 3 involves installing a package manager called Homebrew. You’ll see how to do this in the relevant section in the tutorial.
- On mobile operating systems like Android and iOS, you can install apps that provide a Python programming environment. This can be a great way to practice your coding skills on the go.
- 可以从Python Software Foundation网站python.org获得Python 。 通常,这涉及下载适合您的操作系统的安装程序并在您的计算机上运行它。
- 一些操作系统(尤其是Linux)提供了可以运行以安装Python的程序包管理器 。
- 在macOS上,安装Python 3的最佳方法是安装名为Homebrew的软件包管理器。 您将在本教程的相关部分中了解如何执行此操作。
- 在Android和iOS等移动操作系统上,您可以安装提供Python编程环境的应用程序。 这可能是在旅途中练习编码技能的好方法。
Alternatively, there are several websites that allow you to access a Python interpreter online without installing anything on your computer at all.
另外,有几个网站可让您在线访问Python解释器,而无需在计算机上完全安装任何东西。
Note: There is a chance that Python may have been shipped with your operating system and is already installed. Even if that is the case, it may be that the installed version is outdated, in which case you will want to obtain the latest version anyhow.
注意: Python可能已经随您的操作系统一起提供并已经安装。 即使是这种情况,也可能是安装的版本已过时,在这种情况下,您无论如何都希望获取最新版本。
In this Python installation guide, you’ll see step by step how to set up a working Python 3 distribution on Windows, macOS, Linux, iOS, and Android. So let’s get started!
在此Python安装指南中,您将逐步了解如何在Windows,macOS,Linux,iOS和Android上设置有效的Python 3发行版。 因此,让我们开始吧!
视窗 (Windows)
It is highly unlikely that your Windows system shipped with Python already installed. Windows systems typically do not. Fortunately, installing does not involve much more than downloading the Python installer from the python.org website and running it. Let’s take a look at how to install Python 3 on Windows:
Windows系统很可能已经安装了Python。 Windows系统通常不这样做。 幸运的是,安装仅涉及从python.org网站下载Python安装程序并运行它。 让我们看一下如何在Windows上安装Python 3:
步骤1:下载Python 3安装程序 (Step 1: Download the Python 3 Installer)
- Open a browser window and navigate to the Download page for Windows at python.org.
- Underneath the heading at the top that says Python Releases for Windows, click on the link for the Latest Python 3 Release – Python 3.x.x. (As of this writing, the latest is Python 3.6.5.)
- Scroll to the bottom and select either Windows x86-64 executable installer for 64-bit or Windows x86 executable installer for 32-bit. (See below.)
- 打开浏览器窗口,然后转到python.org 上的Windows下载页面 。
- 在顶部的标题为Windows的Python版本的标题下方,单击最新的Python 3版本– Python 3.xx的链接 。 (在撰写本文时,最新版本是Python 3.6.5。)
- 滚动到底部,然后选择64位的Windows x86-64可执行安装程序或32位的Windows x86可执行安装程序 。 (见下文。)
侧边栏:32位还是64位Python? (Sidebar: 32-bit or 64-bit Python?)
For Windows, you can choose either the 32-bit or 64-bit installer. Here’s what the difference between the two comes down to:
对于Windows,您可以选择32位或64位安装程序。 两者之间的区别归结为:
- If your system has a 32-bit processor, then you should choose the 32-bit installer.
- On a 64-bit system, either installer will actually work for most purposes. The 32-bit version will generally use less memory, but the 64-bit version performs better for applications with intensive computation.
- If you’re unsure which version to pick, go with the 64-bit version.
- 如果您的系统具有32位处理器,则应选择32位安装程序。
- 在64位系统上,两个安装程序实际上都可以用于大多数目的。 32位版本通常使用较少的内存,但64位版本对于需要大量计算的应用程序则具有更好的性能。
- 如果不确定要选择哪个版本,请使用64位版本。
Note: Remember that if you get this choice “wrong” and would like to switch to another version of Python, you can just uninstall Python and then re-install it by downloading another installer from python.org.
注意:请记住,如果您选择了“错误”,并且想要切换到其他版本的Python,则只需卸载Python,然后通过从python.org下载另一个安装程序来重新安装它。
步骤2:运行安装程序 (Step 2: Run the Installer)
Once you have chosen and downloaded an installer, simply run it by double-clicking on the downloaded file. A dialog should appear that looks something like this:
选择并下载安装程序后,只需双击下载的文件即可运行它。 应该出现一个对话框,看起来像这样:
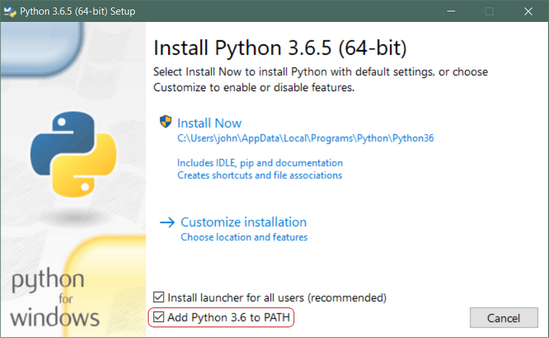
Important: You want to be sure to check the box that says Add Python 3.x to PATH as shown to ensure that the interpreter will be placed in your execution path.
重要提示:您需要确保选中显示将Python 3.x添加到PATH的框,如图所示,以确保将解释器放置在您的执行路径中。
Then just click Install Now. That should be all there is to it. A few minutes later you should have a working Python 3 installation on your system.
然后只需单击立即安装 。 那应该就是它的全部了。 几分钟后,您应该在系统上安装了有效的Python 3。
Windows Linux子系统(WSL) (Windows Subsystem for Linux (WSL))
If you are running Windows 10 Creators or Anniversary Update, you actually have another option for installing Python. These versions of Windows 10 include a feature called the Windows Subsystem for Linux, which allows you to run a Linux environment directly in Windows, unmodified and without the overhead of a virtual machine.
如果您正在运行Windows 10 Creators或Anniversary Update,则实际上还有另一种安装Python的选项。 这些版本的Windows 10包含称为Windows子系统的Linux功能,该功能使您可以直接在Windows中运行Linux环境,而无需进行修改,而不会增加虚拟机的开销。
- For more information, see the Windows Subsystem for Linux Documentation article on the Microsoft website.
- For instructions on how to enable the subsystem in Windows 10 and install a Linux distribution, see the Windows 10 Installation Guide.
- You can also check out this presentation on YouTube by Sarah Cooley, one of the members of the WSL development team.
- 有关更多信息,请参见Microsoft网站上的Windows Linux子系统文档系列文章。
- 有关如何在Windows 10中启用子系统和安装Linux发行版的说明,请参阅《 Windows 10安装指南》 。
- 您也可以在WSL开发团队成员之一Sarah Cooley在YouTube上查看此演示文稿。
Once you have installed the Linux distribution of your choice, you can install Python 3 from a Bash console window, just as you would if you were running that Linux distribution natively. (See below.)
一旦安装了所选的Linux发行版,就可以从Bash控制台窗口安装Python 3,就像在本地运行该Linux发行版一样。 (见下文。)
的Linux (Linux)
There is a very good chance your Linux distribution has Python installed already, but it probably won’t be the latest version, and it may be Python 2 instead of Python 3.
您的Linux发行版很有可能已经安装了Python,但它可能不是最新版本,并且可能是Python 2而不是Python 3。
To find out what version(s) you have, open a terminal window and try the following commands:
要找出您拥有的版本,请打开一个终端窗口,然后尝试以下命令:
python --versionpython2 --versionpython3 --version
python --versionpython2 --versionpython3 --version
One or more of these commands should respond with a version, as below:
这些命令中的一个或多个应以以下版本响应:
 $ python3 --version
$ python3 --version
Python 3.6.5
Python 3.6.5
If the version shown is Python 2.x.x or a version of Python 3 that is not the latest (3.6.5 as of this writing), then you will want to install the latest version. The procedure for doing this will depend on the Linux distribution you are running.
如果显示的版本是Python 2.xx或不是最新版本的Python 3(在撰写本文时为3.6.5),则您将需要安装最新版本。 执行此操作的过程将取决于您正在运行的Linux发行版。
的Ubuntu (Ubuntu)
Depending on the version of the Ubuntu distribution you run, the Python install instructions vary. You can determine your local Ubuntu version by running the following command:
根据您运行的Ubuntu发行版的版本,Python安装说明会有所不同。 您可以通过运行以下命令来确定本地Ubuntu版本:
Depending on the version number you see under Release in the console output, follow the instructions below:
根据您在控制台输出中的“ Release下看到的版本号,按照以下说明进行操作:
Ubuntu 17.10 (and above) comes with Python 3.6 by default. You should be able to invoke it with the command
python3.Ubuntu 16.10 and 17.04 do not come with Python 3.6 by default, but it is in the Universe repository. You should be able to install it with the following commands:
$ sudo apt-get update
$ sudo apt-get install python3.6
You can then invoke it with the command
python3.6.If you are using Ubuntu 14.04 or 16.04, Python 3.6 is not in the Universe repository, and you need to get it from a Personal Package Archive (PPA). For example, to install Python from the “deadsnakes” PPA, do the following:
As above, invoke with the command
python3.6.
Ubuntu 17.10 (及更高版本)默认情况下随附Python 3.6。 您应该能够使用命令
python3调用它。默认情况下, Ubuntu 16.10和17.04不附带Python 3.6,但它在Universe存储库中。 您应该能够使用以下命令进行安装:
 $ sudo apt-get update
$ sudo apt-get install python3.6
然后,您可以使用命令
python3.6调用它。如果您使用的是Ubuntu 14.04或16.04 ,则Python 3.6不在Universe存储库中,您需要从个人软件包存档(PPA)中获取它。 例如,要从“死神” PPA安装Python,请执行以下操作:
如上所述,使用命令
python3.6调用。
Linux Mint (Linux Mint)
Mint and Ubuntu use the same package management system, which frequently makes life easier. You can follow the instructions above for Ubuntu 14.04. The “deadsnakes” PPA works with Mint.
Mint和Ubuntu使用相同的软件包管理系统,这通常使生活更轻松。 您可以按照上面有关Ubuntu 14.04的说明进行操作。 “死神” PPA与Mint合作。
德比安 (Debian)
We found sources that indicated that the Ubuntu 16.10 method would work for Debian, but we never found a path to get it to work on Debian 9. Instead, we ended up making Python from source as listed below.
我们发现有消息表明Ubuntu 16.10方法可用于Debian,但我们从未找到让它在Debian 9上运行的途径。相反,我们最终从下面列出的源代码中制作了Python。
One issue with Debian, however, is that it generally does not install the sudo command by default. To install it, you’ll need to do the following before you carry out the Making Python From Source instructions below:
但是,Debian的一个问题是,默认情况下它通常不安装sudo命令。 要安装它,在执行下面的“从源代码制作Python”说明之前,您需要执行以下操作:
 $ su
$ su
$ apt-get install sudo
$ apt-get install sudo
$ vi /etc/sudoers
$ vi /etc/sudoers
After that, open the /etc/sudoers file using the sudo vim command (or your favorite text editor.) Add the following line of text to the end of the file, replacing your_username with your actual username:
之后,使用sudo vim命令(或您喜欢的文本编辑器)打开/etc/sudoers文件。将以下文本行添加到文件末尾,用您的实际用户名替换your_username :
openSUSE (openSUSE)
We found several sites describing how to get zypper to install the latest version of Python, but they seemed problematic or outdated. We did not manage to get any of them to work successfully, so we fell back to building Python from source. To do that, you will need to install the development tools, which can be done in YaST (via the menus) or by using zypper:
我们发现了几个站点,这些站点描述了如何使zypper安装最新版本的Python,但它们似乎有问题或已过时。 我们没有成功让它们中的任何一个成功地工作,因此我们退回到从源代码构建Python的角度。 为此,您将需要安装开发工具,可以在YaST (通过菜单)或使用zypper来完成开发工具:
 $ sudu zypper install -t pattern devel_C_C++
$ sudu zypper install -t pattern devel_C_C++
This step took a while and involved the installation of 154 packages, but once it was completed, we were able to build the source as shown in the Making Python From Source section above.
此步骤花费了一段时间,并涉及154个软件包的安装,但是一旦完成,我们就可以按照上面的“从源代码制作Python”部分中所示构建源代码 。
软呢帽 (Fedora)
Fedora has a roadmap to switch to Python 3 as the default Python published here. It indicates that the current version and the next few versions will all ship with Python 2 as the default, but Python 3 will be installed. If the python3 installed on your version is not 3.6, you can use the following command to install it:
Fedora有一个路线图,可以切换为此处发布的默认Python 3。 它表示当前版本和随后的几个版本都将默认使用Python 2附带,但将安装Python 3。 如果您的版本上安装的python3不是3.6,则可以使用以下命令进行安装:
Arch Linux (Arch Linux)
Arch Linux is fairly aggressive about keeping up with Python releases. It is likely you already have the latest version. If not, you can use this command:
Arch Linux在跟上Python版本方面相当积极。 您可能已经拥有最新版本。 如果没有,您可以使用以下命令:
 $ packman -S python
$ packman -S python
从源代码编译Python (Compiling Python From Source)
Sometimes your Linux distribution will not have the latest version of Python, or maybe you just want to be able to build the latest, greatest version yourself. Here are the steps you need to take to build Python from source:
有时您的Linux发行版没有最新版本的Python,或者您只是想自己构建最新,最好的版本。 这是从源代码构建Python所需采取的步骤:
步骤1:下载源代码 (Step 1: Download the Source Code)
To start, you need to get the Python source code. Python.org makes this fairly easy. If you go to the Downloads page, you will see the latest source for Python 3 at the top. (Make sure you don’t grab Legacy Python, Python 2.)
首先,您需要获取Python源代码。 Python.org使这变得相当容易。 如果转到“ 下载”页面,则会在顶部看到Python 3的最新资源。 (确保您没有掌握Legacy Python和Python2。)
When you select the version, at the bottom of the page there is a Files section. Select the Gzipped source tarball and download it to your machine. If you prefer a command line method, you can easily use wget to download it to your current directory:
选择版本后,页面底部将显示“ 文件”部分。 选择压缩后的源tarball并将其下载到您的计算机。 如果您喜欢命令行方法,则可以轻松地使用wget将其下载到当前目录:
步骤2:准备系统 (Step 2: Prepare Your System)
There are a few distro-specific steps involved in building Python from scratch. The goal of each step is the same on all distros, but you might need to translate to your distribution if it does not use apt-get:
从头开始构建Python涉及一些发行版特定的步骤。 在所有发行版中,每个步骤的目标都是相同的,但是如果不使用apt-get则可能需要转换为发行版:
The first step you should take when doing an operation like this is to update the system packages on your machine before you start. On Debian, this is what that looks like:
$ sudo apt-get update
$ sudo apt-get upgrade
Next, we want to make sure the system has the tools needed to build Python. There are a bunch of them and you might already have some, but that’s fine. I’ve listed them all in one command line, but you can break the list into shorter commands by just repeating the
sudo apt-get install -yportion:
进行此类操作时,您应该采取的第一步是在开始之前更新计算机上的系统软件包。 在Debian上,这是这样的:
 $ sudo apt-get update
$ sudo apt-get upgrade
接下来,我们要确保系统具有构建Python所需的工具。 它们很多,您可能已经有一些了,但这很好。 我将它们全部列在一个命令行中,但是您可以通过重复
sudo apt-get install -y部分将列表分成更短的命令:
步骤3:建立Python (Step 3: Build Python)
Once you have the prerequisites and the tar file, you can unpack the source into a directory. Note that the following command will create a new directory called
Python-3.6.5under the one you are in:$ tar xvf Python-3.6.5.tgz $ cd Python-3.6.5Now you need to run the
./configuretool to prepare the build:Next, you build the Python programs using
make. The-joption simply tellsmaketo split the building into parallel steps to speed up the compilation. Even with the parallel builds, this step can take a several minutes:$ make -j 8Then, you’ll want to install your new version of Python. You’ll use the
altinstalltarget here in order to not overwrite the system’s version of Python. Since you’re installing Python into/usr/bin, you’ll need to run as root:Warning: Please only use the
altinstalltarget onmake. Using theinstalltarget will overwrite thepythonbinary. While this seems like it would be cool, there are big portions of the system that rely on the pre-installed version of Python.
具备必备条件和tar文件后,可以将源文件解压缩到目录中。 请注意,以下命令将在您所在的目录下创建一个名为
Python-3.6.5的新目录:$ tar xvf Python-3.6.5.tgz $ cd Python-3.6.5现在,您需要运行
./configure工具来准备构建:接下来,使用
make构建Python程序。-j选项只是告诉make将建筑物分成并行步骤以加快编译速度。 即使使用并行构建,此步骤也可能需要几分钟:$ make -j 8然后,您将要安装新版本的Python。 您将在此处使用
altinstall目标,以便不覆盖系统的Python版本。 由于要将Python安装到/usr/bin,因此需要以root身份运行:警告 :请只使用
altinstall目标上make。 使用install目标将覆盖python二进制文件。 尽管这看起来很酷,但是系统的大部分内容都依赖于预安装的Python版本。
步骤4:验证您的Python安装 (Step 4: Verify Your Python Install)
Finally, you can test out your new Python version:
最后,您可以测试新的Python版本:
 $ python3.6 -V
$ python3.6 -V
Python 3.6.5
Python 3.6.5
macOS / Mac OS X (macOS / Mac OS X)
While current versions of macOS (previously known as “Mac OS X”) include a version of Python 2, it is likely out of date by a few months. Also, this tutorial series uses Python 3, so let’s get you upgraded to that.
尽管当前版本的macOS(以前称为“ Mac OS X”)包括Python 2版本,但它可能已经过时了几个月。 另外,本教程系列使用Python 3,因此让您升级到该版本。
The best way we found to install Python 3 on macOS is through the Homebrew package manager. This approach is also recommended by community guides like The Hitchhiker’s Guide to Python.
我们发现在macOS上安装Python 3的最佳方法是通过Homebrew软件包管理器 。 社区指南(如The Hitchhiker's Python指南 )也推荐这种方法。
步骤1:安装自制软件(第1部分) (Step 1: Install Homebrew (Part 1))
To get started, you first want to install Homebrew:
首先,您首先要安装Homebrew:
- Open a browser and navigate to http://brew.sh/. After the page has finished loading, select the Homebrew bootstrap code under “Install Homebrew”. Then hit Cmd+C to copy it to the clipboard. Make sure you’ve captured the text of the complete command because otherwise the installation will fail.
- Now you need to open a Terminal.app window, paste the Homebrew bootstrap code, and then hit Enter. This will begin the Homebrew installation.
- If you’re doing this on a fresh install of macOS, you may get a pop up alert asking you to install Apple’s “command line developer tools”. You’ll need those to continue with the installation, so please confirm the dialog box by clicking on “Install”.
- 打开浏览器并导航到http://brew.sh/ 。 页面加载完成后, 在“安装Homebrew”下选择Homebrew引导程序代码 。 然后按Cmd + C将其复制到剪贴板。 确保已捕获完整命令的文本,否则安装将失败。
- 现在,您需要打开Terminal.app窗口,粘贴Homebrew引导程序代码,然后 按Enter 。 这将开始Homebrew安装。
- 如果您是在全新安装的macOS上执行此操作,则可能会收到一个弹出警报, 要求您安装Apple的“命令行开发人员工具” 。 您将需要它们来继续安装,因此请单击“安装”以确认对话框 。
At this point, you’re likely waiting for the command line developer tools to finish installing, and that’s going to take a few minutes. Time to grab a coffee or tea!
此时,您可能正在等待命令行开发人员工具完成安装,这将需要几分钟。 是时候喝杯咖啡或茶了!
步骤2:安装自制软件(第2部分) (Step 2: Install Homebrew (Part 2))
You can continue installing Homebrew and then Python after the command line developer tools installation is complete:
您可以在命令行开发人员工具安装完成后继续安装Homebrew,然后继续安装Python:
- Confirm the “The software was installed” dialog from the developer tools installer.
- Back in the terminal, hit Enter to continue with the Homebrew installation.
- Homebrew asks you to enter your password so it can finalize the installation. Enter your user account password and hit Enter to continue.
- Depending on your internet connection, Homebrew will take a few minutes to download its required files. Once the installation is complete, you’ll end up back at the command prompt in your terminal window.
- 在开发人员工具安装程序中确认“已安装软件”对话框。
- 返回终端, 按Enter键继续进行Homebrew安装。
- Homebrew要求您输入密码,以便完成安装。 输入您的用户帐户密码,然后 按Enter继续。
- 根据您的Internet连接,Homebrew将需要几分钟来下载其所需文件。 安装完成后,您将返回到终端窗口中的命令提示符。
Whew! Now that the Homebrew package manager is set up, let’s continue on with installing Python 3 on your system.
ew! 现在已经设置了Homebrew软件包管理器,让我们继续在系统上安装Python 3。
步骤3:安装Python (Step 3: Install Python)
Once Homebrew has finished installing, return to your terminal and run the following command:
Homebrew安装完成后,请返回到您的终端并运行以下命令 :
Note: When you copy this command, be sure you don’t include the $ character at the beginning. That’s just an indicator that this is a console command.
注意:复制此命令时,请确保不要在开头包含$字符。 这只是表明这是一个控制台命令。
This will download and install the latest version of Python. After the Homebrew brew install command finishes, Python 3 should be installed on your system.
这将下载并安装最新版本的Python。 完成Homebrew brew install命令后,应在系统上安装Python 3。
You can make sure everything went correctly by testing if Python can be accessed from the terminal:
您可以通过测试是否可以从终端访问Python来确保一切正常:
- Open the terminal by launching Terminal.app.
- Type
pip3and hit Enter. - You should see the help text from Python’s “Pip” package manager. If you get an error message running
pip3, go through the Python install steps again to make sure you have a working Python installation.
- 通过启动Terminal.app打开终端 。
- 输入
pip3并按Enter 。 - 您应该从Python的“ Pip”包管理器中看到帮助文本。 如果在运行
pip3收到错误消息,请再次执行Python安装步骤,以确保您的Python安装正常。
Assuming everything went well and you saw the output from Pip in your command prompt window…congratulations! You just installed Python on your system, and you’re all set to continue with the next section in this tutorial.
假设一切顺利,并且您在命令提示符窗口中看到了Pip的输出……恭喜! 您刚刚在系统上安装了Python,并且已经准备好继续本教程的下一部分。
iOS(iPhone / iPad) (iOS (iPhone / iPad))
The Pythonista app for iOS is a full-fledged Python development environment that you can run on your iPhone or iPad. It’s basically a combination of a Python editor, documentation, and interpreter rolled into one single app.
适用于iOS的Pythonista应用程序是成熟的Python开发环境,您可以在iPhone或iPad上运行。 它基本上是将Python编辑器,文档和解释器组合到一个应用程序中的组合。
Pythonista is surprisingly fun to use. It’s a great little tool when you’re stuck without a laptop and want to work on your Python skills on the go. It comes with the complete Python 3 standard library and even includes full documentation you can browse offline.
Pythonista使用起来非常有趣。 当您没有笔记本电脑而又想在旅途中锻炼Python技能时,这是一个很棒的小工具。 它带有完整的Python 3标准库,甚至包括您可以脱机浏览的完整文档。
To install and set up Pythonista you need to download it from the iOS app store.
要安装和设置Pythonista,您需要从iOS应用商店中下载它 。
Android(手机和平板电脑) (Android (Phones & Tablets))
If you have an Android tablet or phone and want to practice Python on the go, there are a several options available. The one that we found most reliably supports Python 3.6 is Pydroid 3.
如果您使用的是Android平板电脑或手机,并且想随时随地练习Python,则有多种选择。 我们发现最可靠地支持Python 3.6的是Pydroid 3 。
Pydroid 3 features an interpreter you can use for REPL sessions, and it also provides the ability to edit, save, and execute Python code:
Pydroid 3具有可用于REPL会话的解释器,并且还提供了编辑,保存和执行Python代码的功能:
You can download and install Pydroid 3 from the Google Play store. There is a free version and also a paid Premium version which supports code prediction and code analysis.
您可以从Google Play商店下载并安装Pydroid 3 。 有一个免费版本和一个付费高级版本,支持代码预测和代码分析。
在线Python解释器 (Online Python Interpreters)
If you want to try out the examples in this tutorial without installing Python on your machine, there are several web sites available where you can interact with a Python interpreter online:
如果您想在不将Python安装到计算机上的情况下尝试本教程中的示例,则有几个网站可用于与Python解释器进行在线交互:
- Python.org Online Console: www.python.org/shell
- Python Fiddle: pythonfiddle.com
- Repl.it: repl.it
- Trinket: trinket.io
- Python Anywhere: www.pythonanywhere.com
- Python.org在线控制台: www.python.org/shell
- Python小提琴: pythonfiddle.com
- Repl.it:repl.it
- 小饰品: trinket.io
- Python Anywhere: www.pythonanywhere.com
These cloud-based Python interpreters may not be able to execute some of the more complex examples in this tutorial, but they will be adequate for running most of the simpler ones and may be a nice way to get you started. More information on using these sites is presented in the next section.
这些基于云的Python解释器可能无法执行本教程中的一些更复杂的示例,但是它们足以运行大多数较简单的示例,并且可能是入门的好方法。 下一部分将提供有关使用这些站点的更多信息。
结论 (Conclusion)
This section provided you with the information you need to gain access to a Python 3 interpreter. You are now ready to head to the next section and begin interacting with Python!
本部分为您提供了访问Python 3解释器所需的信息。 现在,您可以开始下一节并开始与Python交互!
Don’t miss the follow up tutorial: Click here to join the Real Python Newsletter and you’ll know when the next instalment comes out.
不要错过后续教程: 单击此处加入Real Python Newslet ,您将知道下一期的发行时间。
翻译自: https://www.pybloggers.com/2018/05/python-3-installation-setup-guide/
python3程序开发指南
python3程序开发指南_Python 3安装和设置指南相关推荐
- 微信小程序开发工具下载以及安装教程
微信小程序开发工具下载以及安装教程 听语音 浏览:0 | 更新:2019-01-09 16:53 1 2 3 4 5 6 7 分步阅读 查看全文 http://www.taodudu.cc/news/ ...
- VS.NET2005安装与设置指南
VS.NET2005安装与设置指南 系统要求 Visual Studio.NET所需的系统配置如下: 处理器:应使用主频不小于450MHz的处理器: 内存:如果使用的是Windows NT 4.0 W ...
- 微信小程序开发工具介绍及安装(中)
小程序开发工具的安装方法 微信小程序开发工具的安装方法相对简单,并且适用于多个操作系统平台.以下是关于Windows.macOS和Linux三个平台上安装微信小程序开发工具的步骤和注意事项的详细介绍. ...
- 微信小程序开发工具介绍及安装(下)
开发工具的基本功能介绍 微信小程序开发工具是一款强大的集成开发环境(IDE),旨在帮助开发者更便捷地创建.调试和发布微信小程序.它提供了丰富的功能和工具集,下面将对微信小程序开发工具的基本功能进行详细 ...
- 使用IntelliJ IDEA 社区版开发Android 应用安装和设置指南
要开始开发Android应用程序,必须建立一个合适的开发环境.它有助于开发人员使用创建应用程序所需的工具,并确保所有操作/流程以顺畅的方式进行.IDE(集成开发环境)是一个完整的应用程序套件,提供编写 ...
- python程序开发总结_python开发总结
两本不错的书: <Python参考手册>:对Python各个标准模块,特性介绍的比较详细. <Python核心编程>:介绍的比较深入,关键是,对Python很多高级特性都有介绍 ...
- python程序开发入门_Python开发入门14天集训营-第一章
python第一章 python变量 变量存储在内存中的值,数据是临时的.这就意味着在创建变量时会在内存中开辟一个空间. 基于变量的数据类型,解释器会分配指定内存,并决定什么数据可以被存储在内存中. ...
- python程序开发正则表达式_python正则表达式的使用(实验代码)
正则表达式是一个特殊的字符序列,它能帮助你方便的检查一个字符串是否与某种模式匹配. Python 自1.5版本起增加了re 模块,它提供 Perl 风格的正则表达式模式. re 模块使 Python ...
- python入门指南_Python中的逻辑门–入门指南
python入门指南 This article comprehensively covers the different logic gates in Python. Logic gates are ...
最新文章
- 关于面向对象的的设计原则的使用
- Mybatis解决实体类属性和表字段对应不上
- LeetCode——排序
- SAP Commerce Cloud portal 的 deployment
- 区块链浏览器_区块链FBI——如何用区块链浏览器追踪链上数据
- GDI绘图基本步骤总结(经典)
- linux .bin文件处理,linux下制作.bin文件方法简介
- selenium + plantomjs 实现自动化测试01
- java 带超时时间lru_如何在O(1)时间复杂度下实现LRU
- Yandex.Algorithm 2011 Round 2 D. Powerful array 莫队算法
- 关于Excel常用函数做数据分析
- pcr532,nfc读卡器复制家用门禁卡
- ai怎么渐变颜色_AI的渐变工具为什么如此难用?
- 我在垃圾场捡到一个黑匣子,拆给大家看看
- JVM调优参数大全及G1GC调优
- MSDC 4.3 接口规范(8)
- 什么蓝牙耳机颜值高音质好?颜值高音质好的蓝牙耳机推荐
- 【UGP VR眼镜排行榜】2018VR眼镜眼镜哪个好?什么VR眼镜值得买?综合推荐十大热品
- 深度学习语义分割论文笔记(待完善)
- 计算机专业学自我分析,计算机专业学习自我鉴定(精选6篇)