深度学习笔记:Tensorflow手写mnist数字识别
文章出处:深度学习笔记11:利用numpy搭建一个卷积神经网络
免费视频课程:Hellobi Live | 从数据分析师到机器学习(深度学习)工程师的进阶之路
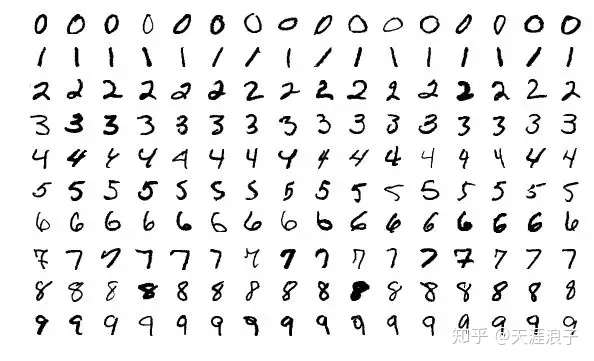
上一讲笔者和大家一起学习了如何使用 Tensorflow 构建一个卷积神经网络模型。本节我们将继续利用 Tensorflow 的便捷性完成 mnist 手写数字数据集的识别实战。mnist 数据集是 Yann Lecun 大佬基于美国国家标准技术研究所构建的一个研究深度学习的手写数字的数据集。mnist 由 70000 张不同人手写的 0-9 10个数字的灰度图组成。本节笔者就和大家一起研究如何利用 Tensorflow 搭建一个 CNN 模型来识别这些手写的数字。
数据导入
mnist 作为标准深度学习数据集,在各大深度学习开源框架中都默认有进行封装。所以我们直接从 Tensorflow 中导入相关的模块即可:
import tensorflow as tf
from tensorflow.examples.tutorials.mnist
import input_data
# load mnist data
mnist = input_data.read_data_sets('MNIST_data', one_hot=True)

快速搭建起一个简易神经网络模型
数据导入之后即可按照 Tensorflow 的范式创建相应的 Tensor 变量然后创建会话:
# create the session
sess = tf.InteractiveSession()
# create variables and run the session
x = tf.placeholder('float', shape=[None, 784])
y_ = tf.placeholder('float', shape=[None, 10])
W = tf.Variable(tf.zeros([784, 10]))
b = tf.Variable(tf.zeros([10]))
sess.run(tf.global_variables_initializer())
定义前向传播过程和损失函数:
# define the net and loss functiony = tf.nn.softmax(tf.matmul(x, W) + b)
cross_entropy = -tf.reduce_sum(y_*tf.log(y))
进行模型训练:
# train the model
train_step = tf.train.GradientDescentOptimizer(0.01).minimize(cross_entropy)
for i in range(1000):
batch = mnist.train.next_batch(50)
train_step.run(feed_dict={x: batch[0], y_: batch[1]})
使用训练好的模型对测试集进行预测:
# evaluate the model
correct_prediction = tf.equal(tf.argmax(y,1), tf.argmax(y_,1))
accuracy = tf.reduce_mean(tf.cast(correct_prediction, "float"))
print(accuracy.eval(feed_dict={x: mnist.test.images, y_: mnist.test.labels}))

预测准确率为 0.9,虽然说也是一个很高的准确率了,但对于 mnist 这种标准数据集来说,这样的结果还有很大的提升空间。所以我们继续优化模型结构,为模型添加卷积结构。
搭建卷积神经网络模型
定义初始化模型权重函数:
# initilize the weight
def weight_variable(shape):
initial = tf.truncated_normal(shape, stddev=0.1)
return tf.Variable(initial)def bias_variable(shape):
initial = tf.constant(0.1, shape=shape)
return tf.Variable(initial)
定义卷积和池化函数:
# convolutional and pooling
def conv2d(x, W):
return tf.nn.conv2d(x, W, strides=[1, 1, 1, 1], padding='SAME')def max_pool_2x2(x):
return tf.nn.max_pool(x, ksize=[1, 2, 2, 1],
strides=[1, 2, 2, 1], padding='SAME')
搭建第一层卷积:
# the first convolution layer
W_conv1 = weight_variable([5, 5, 1, 32])
b_conv1 = bias_variable([32])
x_image = tf.reshape(x, [-1,28,28,1])
h_conv1 = tf.nn.relu(conv2d(x_image, W_conv1) + b_conv1)
h_pool1 = max_pool_2x2(h_conv1)
搭建第二层卷积:
# the second convolution layer
W_conv2 = weight_variable([5, 5, 32, 64])
b_conv2 = bias_variable([64])
h_conv2 = tf.nn.relu(conv2d(h_pool1, W_conv2) + b_conv2)
h_pool2 = max_pool_2x2(h_conv2)
搭建全连接层:
# dense layer/full_connected layer
W_fc1 = weight_variable([7 * 7 * 64, 1024])
b_fc1 = bias_variable([1024])
h_pool2_flat = tf.reshape(h_pool2, [-1, 7*7*64])
h_fc1 = tf.nn.relu(tf.matmul(h_pool2_flat, W_fc1) + b_fc1)
设置 dropout 防止过拟合:
# dropout to prevent overfitting
keep_prob = tf.placeholder("float")
h_fc1_drop = tf.nn.dropout(h_fc1, keep_prob)
对输出层定义 softmax :
# model output
W_fc2 = weight_variable([1024, 10])
b_fc2 = bias_variable([10])
y_conv = tf.nn.softmax(tf.matmul(h_fc1_drop, W_fc2) + b_fc2)
训练模型并进行预测:
# model trainning and evaluating
cross_entropy = -tf.reduce_sum(y_*tf.log(y_conv))
train_step = tf.train.AdamOptimizer(1e-4).minimize(cross_entropy)
correct_prediction = tf.equal(tf.argmax(y_conv,1), tf.argmax(y_,1))
accuracy = tf.reduce_mean(tf.cast(correct_prediction, "float"))
sess.run(tf.initialize_all_variables())
for i in range(20000):
batch = mnist.train.next_batch(50)
if i%100 == 0:
train_accuracy = accuracy.eval(feed_dict={
x:batch[0], y_: batch[1], keep_prob: 1.0})
print("step %d, training accuracy %g"%(i, train_accuracy))
train_step.run(feed_dict={x: batch[0], y_: batch[1], keep_prob: 0.5})print("test accuracy %g"%accuracy.eval(feed_dict={
x: mnist.test.images, y_: mnist.test.labels, keep_prob: 1.0}))
部分迭代过程和预测结果如下:
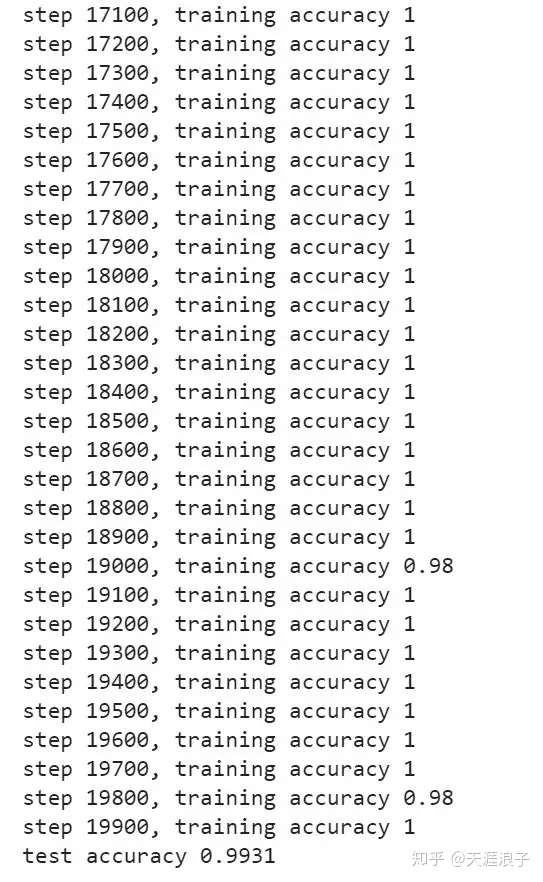
经过添加两层卷积之后我们的模型预测准确率达到了 0.9931,模型训练的算是比较好了。
注:本深度学习笔记系作者学习 Andrew NG 的 deeplearningai 五门课程所记笔记,其中代码为每门课的课后assignments作业整理而成。
参考资料:
https://www.coursera.org/learn/machine-learning
https://www.deeplearning.ai/
http://www.tensorfly.cn/tfdoc/tutorials/mnist_pros.html
深度学习笔记:Tensorflow手写mnist数字识别相关推荐
- 深度学习笔记:手写一个单隐层的神经网络
出处:数据科学家养成记 深度学习笔记2:手写一个单隐层的神经网络 笔记1中我们利用 numpy 搭建了神经网络最简单的结构单元:感知机.笔记2将继续学习如何手动搭建神经网络.我们将学习如何利用 num ...
- AI Studio 飞桨 零基础入门深度学习笔记6.3-手写数字识别之数据处理
AI Studio 飞桨 零基础入门深度学习笔记6.3-手写数字识别之数据处理) 概述 前提条件 读入数据并划分数据集 扩展阅读:为什么学术界的模型总在不断精进呢? 训练样本乱序.生成批次数据 校验数 ...
- TensorFlow 深度学习笔记 TensorFlow实现与优化深度神经网络
TensorFlow 深度学习笔记 TensorFlow实现与优化深度神经网络 转载请注明作者:梦里风林 Github工程地址:https://github.com/ahangchen/GDLnote ...
- 基于模板匹配的手写字体数字识别-含Matlab代码
目录 一.引言 二.系统知识的表示与组织 2.1 规则前提条件的描述 2.2 规则结论的表示 2.3 知识库的组织 三.手写字体数字识别算法流程 四.识别结果 五.参考文献 六.Matlab代码获取 ...
- 基于tensorflow2的手写中文数字识别(自己创建数据集)
基于tensorflow2的手写中文数字识别 @author--HCF 创建图片 首先准备手写汉字数字,并按照一定间隔整齐排列,这里是10行9列,共90个数字,如图所示 接下来使用PIL库对集中在一起 ...
- 深度学习项目实战——手写数字识别项目
摘要 本文将介绍的有关于的paddle的实战的相关的问题,并分析相关的代码的阅读和解释.并扩展有关于的python的有关的语言.介绍了深度学习步骤: 1. 数据处理:读取数据 和 预处理操作 2. 模 ...
- TensorFlow:实战Google深度学习框架(四)MNIST数据集识别问题
第5章 MNIST数字识别问题 5.1 MNIST数据处理 5.2 神经网络的训练以及不同模型结果的对比 5.2.1 TensorFlow训练神经网络 5.2.2 使用验证数据集判断模型的效果 5.2 ...
- pytorch深度学习神经网络实现手写字体识别
利用平pytorch搭建简单的神经网络实现minist手写字体的识别,采用三层线性函数迭代运算,使得其具备一定的非线性转化与运算能力,其数学原理如下: 其具体实现代码如下所示:import torch ...
- python手写字母识别_手写字母数字识别_Python_SDK调用(一)
解压SDK压缩包 ##所提供的测试代码中的信息如下所示: option = {} option["side"] = "front" try: response= ...
最新文章
- 详解C#的数学类,Math,浮点数(上)
- 等宽矩阵(a)相乘a %*% x = b的逆运算solve(a,b)=x
- 超多树形结构的JavaScript菜单实例
- 安卓实现记住密码登陆功能
- linux服务器last查看关机记录
- 【问链财经-区块链基础知识系列】 第四十六课 区块链如何作用于医药行业
- Netty(一)——Netty入门程序
- windows xp https页面找不到_Windows 提权快速查找 Exp
- 在百度搜索页添加公司总部的客服电话
- HTML元素显示与隐藏
- web小知识与问题串烧(html,css,js)
- java 数据类型之原码,补码,反码
- 服务器安装数据库显示启动服务,安装数据库没有启动服务器服务
- python输出字典_Python如何将字典键和值拆分为单独的列表?(代码示例)
- oracle 弱口令扫描器,超级弱口令检查工具
- 使用Python对比两个excel表格中的重复数据
- IDEA 设置单行注释格式化时不换行
- maya Xgen导入UE4中,UE4毛发动力学
- Day 24 - 设定开发帐号 HBuilder X - DCloud 注册
- OSG 绘制几何图元
热门文章
- python对列表进行分页_python列表分页
- dbref java_java – Spring Data REST MongoDB:检索DBRef的对...
- Windows + Eclipse + Gtk 环境(总结)
- amd显卡风扇调节_非公版才是真爱 讯景XFX RX6800 XT海外版显卡评测
- python函数调用键盘热键_Tkinter对键盘和鼠标事件的处理
- 自动控制matlab实验,自动控制matlab实验.doc
- python模拟键盘输入_python模拟键盘输入的问题
- python定义一个字典、存储雇员号和姓名_【一点资讯】python后端开发工程师考证试题...
- 加减乘除html代码vb,VB做加减乘除的代码是什么啊? 或者是怎么做加减乘除 ?...
- object 构造器java_“java”中为什么“Object”类要有一个空的构造函数?