【译】TetroGL: An OpenGL Game Tutorial in C++ for Win32 Platforms - Part 2 (上)
原文链接:TetroGL: An OpenGL Game Tutorial in C++ for Win32 Platforms - Part 2
在这个系列的第一部分中,作者介绍了窗口的创建以及OpenGL环境的创建,在接下来这一部分中,作者将介绍如何处理游戏中的资源以及如何显示简单的动画
简介
这个系列的第一篇文章关注于窗口的创建和OpenGL环境的创建,本文将有趣的多,因为我们将尝试加载显示图片文件,并且显示一些动画效果.你将会看到如何才能有效地操纵这些资源.当然本文完成的项目还不是一个游戏,因为它还没有加入任何游戏逻辑,它唯一能做的仅仅是在屏幕上移动人物角色,并且用动画的效果显示(没有实现碰撞检测)
文件的组织
首先来考虑如何更好地组织文件资源.作者一般会创建一个src文件夹来放置所有的源文件(.h和.cpp),一个bin文件夹来放置最终的可执行文件和所有所需要的资源,一个obj文件夹
用来放置编译所得到的中间文件,一个dependencies文件夹放置用到的第三方库.如果你有许多资源(图片,音乐,配置文件等),你甚至可以将bin文件夹进一步划分为子文件夹.
现在我们就来按照上面的文件组织形式来更改项目设置.对于源文件,只需要将它们复制到src文件夹中,并将其加入项目就行.为了配置输出文件夹和中间文件夹,更改如下图:

$(SolutionDir) 和$(ConfigurationName) 是预先定义的宏.前一个指向解决方案所在文件夹,后一个指向当前活动配置(debug or release):在obj文件夹中,会创建出两个子文件夹,一个配置一个文件夹
加载图片
很不幸,OpenGL对于加载图片没有提供任何帮助.因此我们必须借助第三方库的帮助.有很多第三方库可供选择,作者提供了两个建议: DevIL 和FreeImage.DevIL更适合于OpenGL,因此作者选择了它.
首先要做的是将所需要的DevIL文件拷贝到dependencies文件夹中:首先创建一个子文件夹DevIL,并将DevIL官网上的文件拷贝至此.要正确地使用它,我们必须修改一个文件的名字:在”include/IL”文件夹中,有一个名为config.h.win的文件,将其重命名为config.h.然后拷贝DevIL.dll到你的bin文件夹中,因为它将会被你的可执行文件使用到.
然后我们必须在项目属性中进行配置,以便使用DevIL.如下图所示:
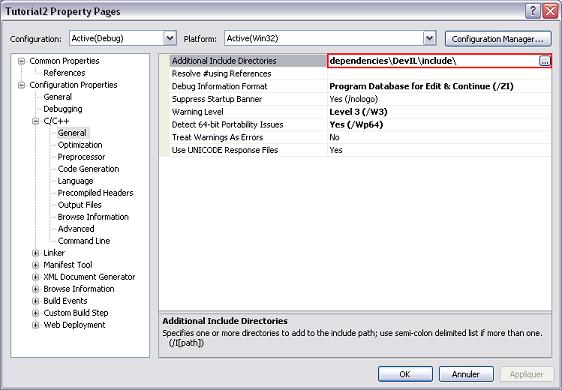
这将会告诉编译器到哪里去寻找所需要的DevIL头文件,这样设置,我们就可以不必提供DevIL头文件的全路径.
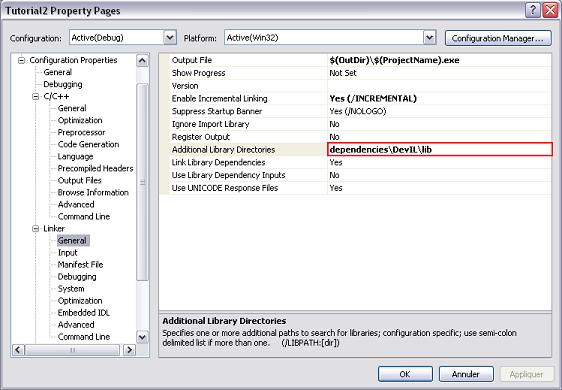
上图配置就告诉链接器到哪里去寻找附加的文件夹(这个文件夹中包含了要链接的库文件).
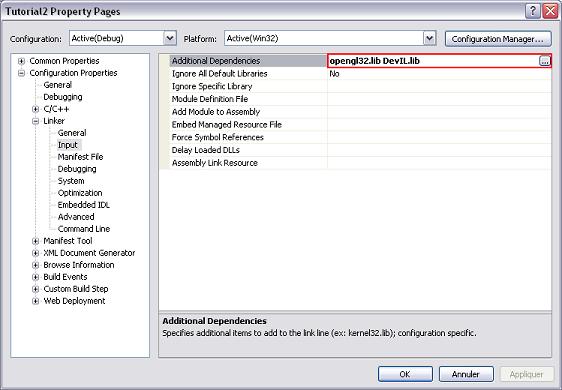
上图配置会告诉编译器此项目必须链接DevIL库和OpenGL库.
资源管理
现在使用DevIL的环境已经搭建好了,我们现在开始加载一些图片并显示它们.但在此之前,我们先考虑下如何更有效地管理这些资源文件.假设我们需要显示一棵树,它包含在个名为tree.png的文件中,最暴力的方法是简单地加载文件并保存在内存中,这样在每次重绘帧时可以重用它.这种方法看起来不错,但它有一个小问题:假设我们现在需要显示此树的次数超过一次,那么我们就必须几次在内存中加载纹理文件,而这显然是低效的.我们必须要想一个办法,即使我们在不同位置的代码中也能使用同一份纹理文件.这通过将加载资源文件代理给一个特定的类:纹理文件管理者就可以轻松地解决.让我们首先来看看这个类:
#include "Texture.h"
#include <string>
#include <map>
// The texture manager avoid a same texture to be loaded multiple
// times. It keeps a map containing all the already loaded textures.
class CTextureManager
{
public:
// Loads a texture specified by its filename. If the texture is not
// loaded already, the texture manager will load it, store it and
// return it. Otherwise it simply returns the existing one.
CTexture* GetTexture(const std::string& strTextName);
// Release the texture specified by its filename. Returns true if
// the texture was found, otherwise false.
bool ReleaseTexture(const std::string& strTextName);
// Returns the single instance of the texture manager.
// The manager is implemented as a singleton.
static CTextureManager* GetInstance();
protected:
// Both constructor and destructor are protected to make
// it impossible to create an instance directly.
CTextureManager();
~CTextureManager();
private:
typedef std::map<std::string,CTexture*> TTextureMap;
// The map of already loaded textures. There are indexed
// using their filename.
TTextureMap m_Textures; //已加载的资源文件映射表
};
这个类是以单例模式实现的.
{
// Returns the unique class instance.
static CTextureManager Instance;
return &Instance;
}
这样就可以拥有一个全局唯一的实例,并且访问它也十分简单:
这个类的构造函数负责对DevIL库进行初始化:
{
// Initialize DevIL
ilInit();
// Set the first loaded point to the
// upper-left corner.
ilOriginFunc(IL_ORIGIN_UPPER_LEFT);
ilEnable(IL_ORIGIN_SET);
}
在调用DevIL库函数前,必须先调用ilInit以便对库进行初始化.此外,我们还需要指明图片如何进行加载:先是左上方.这样做的目的是我们就不需要对纹理图片进行翻转.默认情况下这个选项是禁止的,因此我们需要调用ilEnable(IL_ORIGIN_SET);来使之设置为允许.
现在来看看GetTexture方法:
CTexture* CTextureManager::GetTexture(const string& strTextName)
{
// Look in the map if the texture is already loaded.
TTextureMap::const_iterator iter = m_Textures.find(strTextName);
if (iter != m_Textures.end())
return iter->second;
// If it was not found, try to load it from file. If the load
// failed, delete the texture and throw an exception.
CTexture* pNewText = NULL;
try
{
pNewText = new CTexture(strTextName);
}
catch (CException& e)
{
delete pNewText;
throw e;
}
// Store the newly loaded texture and return it.
m_Textures[strTextName] = pNewText;
return pNewText;
}
很简单的实现代码:首先根据给定的文件名在映射表中查找文件是否已经加载进来了,若是则直接返回,否则就从文件中进行加载.待会我们会看到在CTexture类的构造函数中会尝试加载文件,若失败则抛出异常.因此,在纹理文件管理者类中,若捕获到此异常,就删除纹理文件(这是为了避免内存泄露)并且再次抛出异常.若文件加载成功,则将其保存到映射表中(以其文件名作为键值).
此外,我们还提供了释放已加载资源的方法,非常简单的实现:在映射表中查找,若存在就删除它,并且从映射表中移除.
{
// Retrieve the texture from the map
bool bFound = false;
TTextureMap::iterator iter = m_Textures.find(strTextName);
if (iter != m_Textures.end())
{
// If it was found, we delete it and remove the
// pointer from the map.
bFound = true;
if (iter->second)
delete iter->second;
m_Textures.erase(iter);
}
return bFound;
}
资源包装类CTexture
#include <Windows.h>
#include "GL/gl.h"
#include <string>
class CTextureManager;
// Class that wraps information about a texture. This class
// won't be used directly by the users. Instead, they will
// manipulate the CImage class.
class CTexture
{
friend class CTextureManager;
public:
// Specifies a color key to be used for the texture. The color
// specifed as arguments will be transparent when the texture
// is rendered on the screen.
void SetColorKey(unsigned char Red, unsigned char Green, unsigned char Blue);
// Returns the width of the texture
unsigned int GetWidth() const { return m_TextData.nWidth; }
// Returns the height of the texture.
unsigned int GetHeight() const { return m_TextData.nHeight; }
// Adds/release a reference for the texture. When ReleaseReference
// is called and decreases the reference count to 0, the texture
// is released from the texture manager.
void AddReference();
void ReleaseReference();
// Bind this texture with openGL: this texture becomes
// the 'active' texture in openGL.
void Bind() const;
protected:
// Constructor which takes the filename as argument.
// It loads the file and throw an exception if the load
// failed.
CTexture(const std::string& strFileName);
~CTexture();
private:
// Loads the texture from the specifed file. Throws an
// exception if the load failed.
void LoadFile(const std::string& strFileName);
// Structure that contains the information about the texture.
struct STextureData
{
// Width of the texture
unsigned int nWidth; //纹理宽度
// Height of the texture
unsigned int nHeight; //纹理高度
// Byte array containing the texture data
unsigned char* pData; //包含纹理数据的字节数组
};
STextureData m_TextData;
// The openGL id associated with this texture.
mutable GLuint m_glId;
// Reference count of the number of images that still hold a reference
// to this texture. When no images reference the texture anymore, it is
// released.
int m_iRefCount; //引用计数
// The filename from which the texture was loaded from.
std::string m_strTextName;
};
我们可以看到此类的构造函数是受保护的,这是因为只允许CTextureManager类能够创建纹理,这也是为什么将其设为此类的友元类.CTexture类的核心是STextureData结构体,它包含了从文件加载进的所有信息:包含文件数据的字节数组,纹理的宽度和高度.
下面看看究竟是如何加载文件的:
void CTexture::LoadFile(const std::string& strFileName)
{
// Generate a new image Id and bind it with the
// current image.
ILuint imgId;
ilGenImages(1,&imgId);
ilBindImage(imgId);
// Load the file data in the current image.
if (!ilLoadImage(strFileName.c_str()))
{
string strError = "Failed to load file: " + strFileName;
throw CException(strError);
}
// Store the data in our STextureData structure.
m_TextData.nWidth = ilGetInteger(IL_IMAGE_WIDTH);
m_TextData.nHeight = ilGetInteger(IL_IMAGE_HEIGHT);
unsigned int size = m_TextData.nWidth * m_TextData.nHeight * 4; //字节数,RGBA类型
m_TextData.pData = new unsigned char[size];
ilCopyPixels(0, 0, 0, m_TextData.nWidth, m_TextData.nHeight,
1, IL_RGBA, IL_UNSIGNED_BYTE, m_TextData.pData);
// Finally, delete the DevIL image data.
ilDeleteImage(imgId);
}
正如你看到的,我们使用DevIL来加载文件.首先要做的是创建一个新的图片id,并将其绑定到当前图片上.如果你想使用id对某个特定图片进行一些操作时,这是必需的.实际上,我们只需要在删除图片时使用它.然后,我们使用ilLoadImage尝试加载文件.这个函数负责处理各种不同的文件格式,当加载失败时返回false(你还可以调用ilGetError来查询其错误代码).若是这种情况,我们简单地抛出一个异常.如果你还记得,在第一篇文章中这些异常将会在main函数中被捕获,并且在退出程序前显示一个错误信息.接下来,我们获取图片的宽度和高度(ilGetInteger和ilCopyPixels函数对当前活动图片总是有效的).然后,我们为m_TextData.pData域分配空间:每个像素由4个字节编码(因为是RGBA类型).然后,调用ilCopyPixels函数来拷贝缓冲区中的图片数据.前三个参数分别是开始拷贝点的x,y,z位置,接下来的参数是这些方向上待拷贝的像素数目.然后指定图片格式:RGBA意味着每个颜色通道一个字节(RGB),以及alpha通道一个字节(A).Alpha通道用于指明像素的透明度,值为0表示全透明,值为255表示不透明.然后指明了每个部分的类型:它们必须以无符号字节进行编码.最后一个参数是包含像素数据的缓冲区指针.最后,由于我们不再需要DevIL图片数据,因此将其删除.
注:在OpenGL中使用DevIL加载纹理图片有更加简单的方式.ILUT库允许你调用ilutGLLoadImage函数加载图片并直接联系到一个OpenGL纹理上,此函数会返回OpenGL纹理的id.这是最简单的方式,但如此一来你就无法对原始字节数据进行操作,而这是接下来进行抠色(Color Keying)时要做的.
一旦数据从文件中加载出来后,我们就需要产生一个新的OpenGL纹理,并为之提供数据.这在纹理被首次要请求时,在CTexture::Bind函数中实现:
void CTexture::Bind() const
{
// If the texture has not been generated in OpenGL yet,
// generate it.
if(!m_glId)
{
// Generate one new texture Id.
glGenTextures(1,&m_glId);
// Make this texture the active one, so that each
// subsequent glTex* calls will affect it.
glBindTexture(GL_TEXTURE_2D,m_glId);
// Specify a linear filter for both the minification and
// magnification.
glTexParameterf(GL_TEXTURE_2D, GL_TEXTURE_MAG_FILTER, GL_LINEAR);
glTexParameterf(GL_TEXTURE_2D, GL_TEXTURE_MIN_FILTER, GL_LINEAR);
// Sets drawing mode to GL_MODULATE
glTexEnvf(GL_TEXTURE_ENV, GL_TEXTURE_ENV_MODE, GL_MODULATE);
// Finally, generate the texture data in OpenGL.
glTexImage2D(GL_TEXTURE_2D, 0, 4, m_TextData.nWidth, m_TextData.nHeight,
0,GL_RGBA,GL_UNSIGNED_BYTE,m_TextData.pData);
}
// Make the existing texture specified by its OpenGL id
// the active texture.
glBindTexture(GL_TEXTURE_2D,m_glId);
}
OpenGL重要的一点是它每次只能使用一个纹理.因此,要想对一个多边形贴纹理,就必须选中活动纹理(也叫”绑定”).这通过调用glBindTexture来完成.每个OpenGL纹理都有其id,这里我们将其存储在 CTexture类的m_glId成员变量中.id为0表明纹理还没有被OpenGL产生出来.因此,当此函数第一次被调用时,m_glId将会是0.此时我们将会调用glGenTextures来请求OpenGL产生一个id.
m_glId是mutable的,这是因为我们想让Bind函数是const的,而这个成员变量只被修改一次(当纹理被产生时对其修改).glGenTextures函数可以允许你产生多个Id(第一个参数就是要产生的Id个数),但我们只想要单个Id.然后我们调用glBindTexture:这将绑定纹理(通过其Id)到活动的2维纹理上.这是必须的,因为接下来的纹理操作将会影响到你这里指定的特定纹理.
接下来的纹理操作就不解释了,可以参考红宝书…
抠色(Color Keying)
我们总是blit矩形区域的图片,但是很显然,几乎没有一个游戏的角色图片是矩形的。美工把图片画到一个矩形范围内,如果设定了特定的背景颜色,我们就可以把矩形图片上的角色“抠”下来,相对于背景来说,我们就是把不属于角色的背景颜色扣掉,故称抠色。有些文件格式不支持透明通道(比如bmp文件),因此如果你想让纹理图片的某些部分透明,唯一的选择就是使用一个特定的颜色来欺骗玩家.OpenGL并不支持抠色,但通过纹理图片的Alpha通道可以很轻松地加入这个特性.这就是CTexture::SetColorKey函数所做的:
void CTexture::SetColorKey(unsigned char Red, unsigned char Green, unsigned char Blue)
{
// If the texture has already been specified to OpenGL,
// we delete it.
if (m_glId)
{
glDeleteTextures(1,&m_glId);
m_glId = 0;
}
// For all the pixels that correspond to the specifed color,
// set the alpha channel to 0 (transparent) and reset the other
// ones to 255.
unsigned long Count = m_TextData.nWidth * m_TextData.nHeight * 4;
for (unsigned long i = 0; i<Count; i+=4)
{
if ( (m_TextData.pData[i]==Red) && (m_TextData.pData[i+1]==Green)
&& (m_TextData.pData[i+2]==Blue) )
m_TextData.pData[i+3] = 0; //将指定颜色的像素点设置透明的
else
m_TextData.pData[i+3] = 255; //其他颜色的像素点设置为不透明
}
}
它的实现很简单:遍历所有纹理数据,寻找指定颜色的像素点,将其Alpha通道设置为0,它就变得透明了.而对于其他像素点,将其Alpha通道设置为255.在这样做之前,我们必须先检查纹理是否已经指定给OpenGL了.若是,则必须在OpenGL中重新加载纹理.这只需要通过设置m_glId为0就可以完成(还记得吗?在Bind函数中会首先检查这个变量是否为0!).
最后,纹理是引用计数的,并且它的构造函数是受保护的,因此你无法直接创建一个CTexture对象.引用计数是通过下面两个函数实现的:
{
// Increase the reference count.
m_iRefCount++;
}
void CTexture::ReleaseReference()
{
// Decrease the reference count. If it reaches 0,
// the texture is released from the texture manager.
m_iRefCount--;
if (m_iRefCount == 0)
CTextureManager::GetInstance()->ReleaseTexture(m_strTextName);
}
之所以要使用引用计数,是因为多个CImage对象可以引用同一个纹理.我们必须知道此时有多少个CImage对象在使用此纹理,而不是当一个CImage对象销毁时就任意释放纹理资源.
【译】TetroGL: An OpenGL Game Tutorial in C++ for Win32 Platforms - Part 2 (上)相关推荐
- [译]A Simple CSS Animation Tutorial
原文: A Simple CSS Animation Tutorial 看到这篇文章描述简单易懂,适合初学者,于是乎就想着记录和分享一下. (正文) 以将黄色方块转变为蓝绿色圆型作为一个开始. Ani ...
- [译] APT分析报告:03.OpBlueRaven揭露APT组织Fin7/Carbanak(上)Tirion恶意软件
这是作者新开的一个专栏,主要翻译国外知名的安全厂商APT报告文章,了解它们的安全技术,学习它们溯源APT组织的方法,希望对您有所帮助.前文分享了钓鱼邮件网址混淆URL逃避检测,这篇文章将介绍APT组织 ...
- 快应用开发1--编译官方的代码并在手机上运行rpk文件(Windows系统上)
1.搭建环境 1)搭建nodejs环境 需要去Node官网下载和安装,官方推荐v6.11.3 LTS https://nodejs.org/en/blog/relea ...
- 5、OpenGL入门 贴图叠加【Win32+VS2019】亲测代码
配置和下载lib文件请前往 https://blog.csdn.net/weixin_37615774/article/details/120679105 说明:需要自己修改代码中 显示的图片文件名称 ...
- openGL之API学习(二一一)glColor遇上纹理
每一个像素点的颜色与glColor进行比较,最终取较小值 原图 glColor4f(1.0,0.0,0.0,1.0)时 glColor4f(0.0,0.0,0.0,1.0)时, glColor4f(0 ...
- Win32 OpenGL 编程
Win32 OpenGL 编程(1)Win32下的OpenGL编程必须步骤 一. 前言 人生在于折腾,继续折腾吧. OpenGL 编程的红宝书< OpenGL Programming Gu ...
- 【Android】OpenGL ES for Android 教程1 - HelloWorld
本教程及后续教程全部参考或者转载于:OpenGL ES Tutorial for Android 本例相当于openGL的HelloWorld程序. 先贴代码,代码中的注释比较具体了. 主Activi ...
- BERT Word Embeddings Tutorial
本文译自 BERT Word Emebddings Tutorial,我将其中部分内容进行了精简.转载请注明出处 1. Loading Pre-Trained BERT 通过 Hugging Face ...
- OpenGL 渲染篇
前面讨论了如何给3D图形染色,更一般的情况是使用位图来给Mesh上色(渲染材质).主要步骤如下: 创建Bitmap对象 使用材质渲染,首先需要构造用来渲染的Bitmap对象,Bitmap对象可以从资源 ...
最新文章
- Golang向Templates 插入对象的值
- 轻松掌握ISO8583报文协议
- 【坑爹微信】微信JSSDK图片上传问题和解决
- 计算机网络:TCP滑动窗口的流量控制和拥塞控制
- 机器学习算法基础——数据降维
- spring-security登录和权限管理
- 华三服务器管理口地址_路由器LAN口接入其他运营商宽带导致上网不稳定案例分析...
- 单麦克纳姆轮的速度分解
- [C#-Util]-读写文件汉字乱码
- 阶段3 1.Mybatis_11.Mybatis的缓存_6 Mybatis中的一级缓存
- Climbing Stairs @python
- win7读取linux硬盘序列号,Windows 下获取硬盘序列号
- 全网最新springCloud快速练手学习项目——简单超易懂系列
- 古筝d调变降e调怎么办_为什么古筝总要调音、还总调不好?
- 华氏温度转换为摄氏温度
- 无法直接安装Ubuntu16.04的Win10系统安装教程
- 视频去水印工具-在线短视频去水印工具
- 基于Vue开发的电商APP项目(仿蘑菇街)
- 代码 马佳义_马佳义 教授
- CentOS8安装Docker