粒子耗尽 粒子滤波_如何使用粒子的强大蓝牙API
粒子耗尽 粒子滤波
This post is originally from www.jaredwolff.com
这篇文章最初来自www.jaredwolff.com
I was defeated.
我被打败了。
I had spent the whole night trying to get a Bluetooth Low Energy project working. It was painful. It was frustrating. I was ready to give up.
我整夜都在努力使低功耗蓝牙项目正常工作。 真痛苦 真令人沮丧。 我准备放弃。
That was during the early days of Bluetooth Low Energy. Since then it's gotten easier and easier to develop. The Particle Mesh Bluetooth Library is no exception.
那是在蓝牙低功耗的早期。 从那时起,它变得越来越容易开发。 粒子网格蓝牙库也不例外。
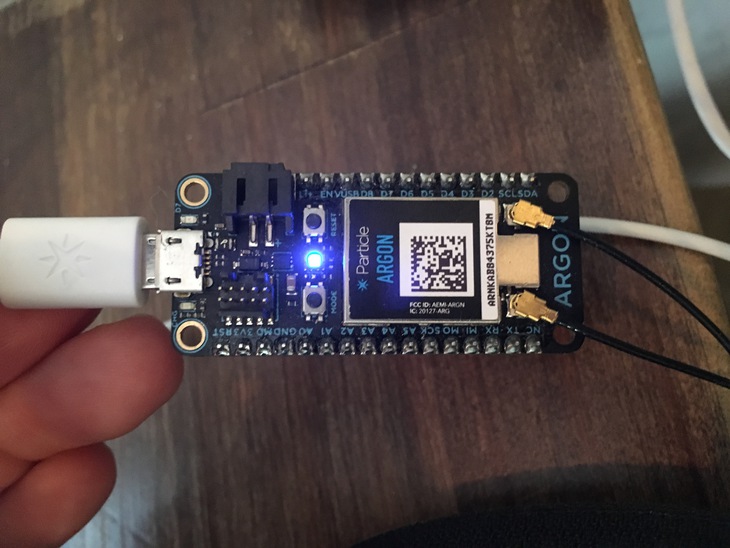
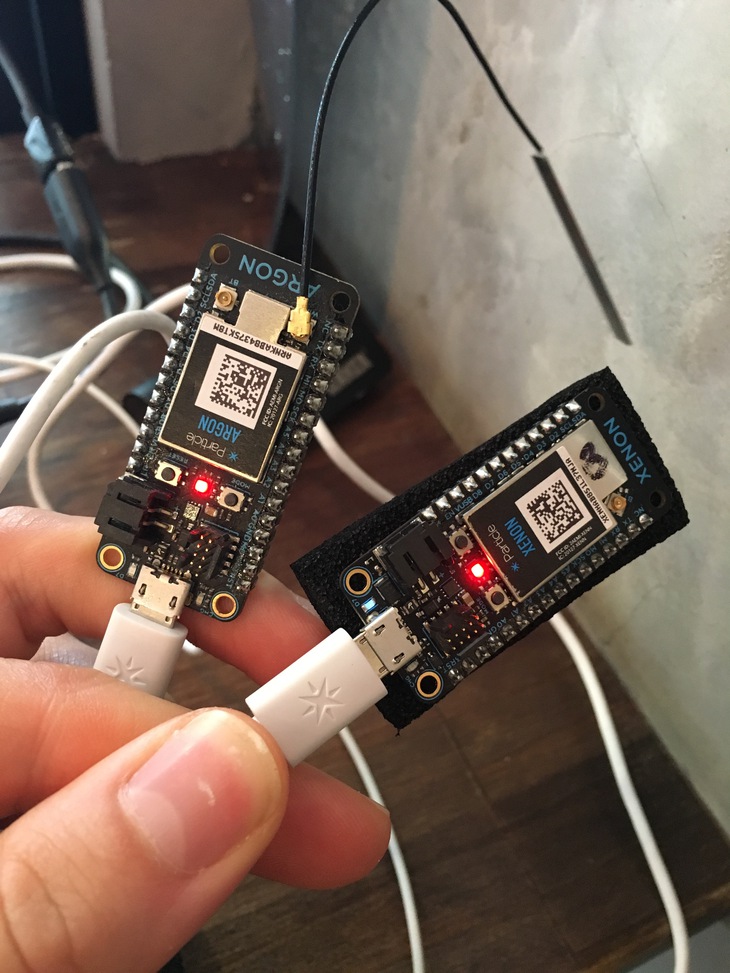
In this walkthrough, i'll show you how to use Particle's Bluetooth API. We'll configure some LEDs and watch them change over all devices in the Mesh network. We'll be using an Argon and Xenon board.
在本演练中,我将向您展示如何使用Particle的Bluetooth API。 我们将配置一些LED,并观察它们在Mesh网络中的所有设备上的变化。 我们将使用Argon和Xenon板。
Ready? Let's get started!
准备? 让我们开始吧!
P.S. this post is lengthy. If you want something to download, click here for a beautifully formatted PDF.
PS这个帖子很长。 如果要下载某些内容, 请单击此处以获取格式精美的PDF。
阶段1:设置蓝牙 (Stage 1: Setting Up Bluetooth)
Download/Install Particle Workbench
下载/安装Particle Workbench
Create a new Project. I picked a suitable location and then named it
ble_mesh创建一个新的项目。 我选择了一个合适的位置,然后命名为
ble_mesh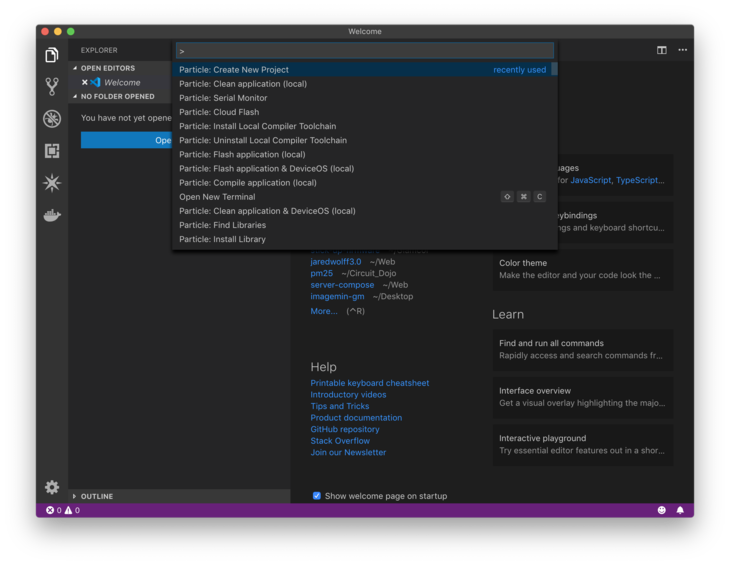
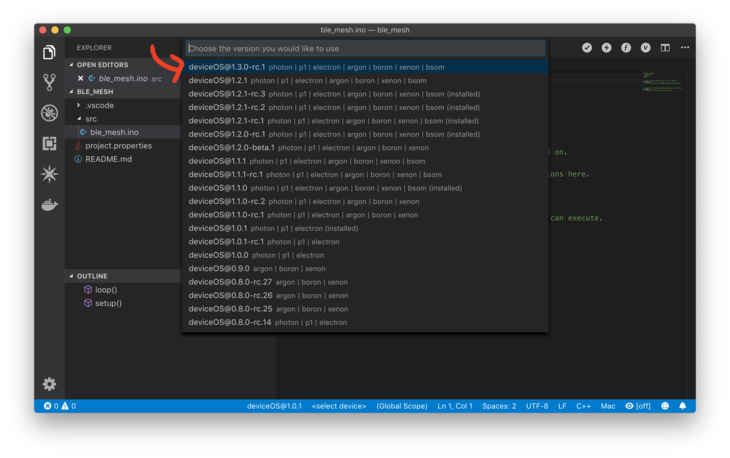
Go to your
/src/direcory and open your<your project name>.inofile转到
/src/目录,然后打开<your project name>.ino文件。Then make sure you change the version of your deviceOS to > 1.3.0
然后确保将deviceOS的版本更改为> 1.3.0
编写代码 (Write the Code)
We want to set up a service with 3 characteristics. The characteristics relate to the intensity of the RGB LEDs respectively. Here's how to get your Bluetooth Set Up:
我们想要建立一个具有3个特征的服务。 特性分别与RGB LED的强度有关。 以下是设置蓝牙的方法:
In your
Setup()function enable app control of your LED在
Setup()函数中,启用对LED的应用控制RGB.control(true);Set up your UUIDs at the top of your
.inofile在
.ino文件顶部设置您的UUIDconst char* serviceUuid = "6E400001-B5A3-F393-E0A9-E50E24DCCA9E";const char* red = "6E400002-B5A3-F393-E0A9-E50E24DCCA9E";const char* green = "6E400003-B5A3-F393-E0A9-E50E24DCCA9E";const char* blue = "6E400004-B5A3-F393-E0A9-E50E24DCCA9E";UUIDs are unique identifiers or addresses. They're used to differentiate different services and characteristics on a device.
UUID是唯一的标识符或地址。 它们用于区分设备上的不同服务和特性。
The above UUIDs are used in previous Particle examples. If you want to create your own you can use
uuidgenon the OSX command line. You can also go to a website like Online GUID Generator.上述UUID在先前的粒子示例中使用。 如果要创建自己的文件,则可以在OSX命令行上使用
uuidgen。 您也可以访问在线GUID Generator之类的网站。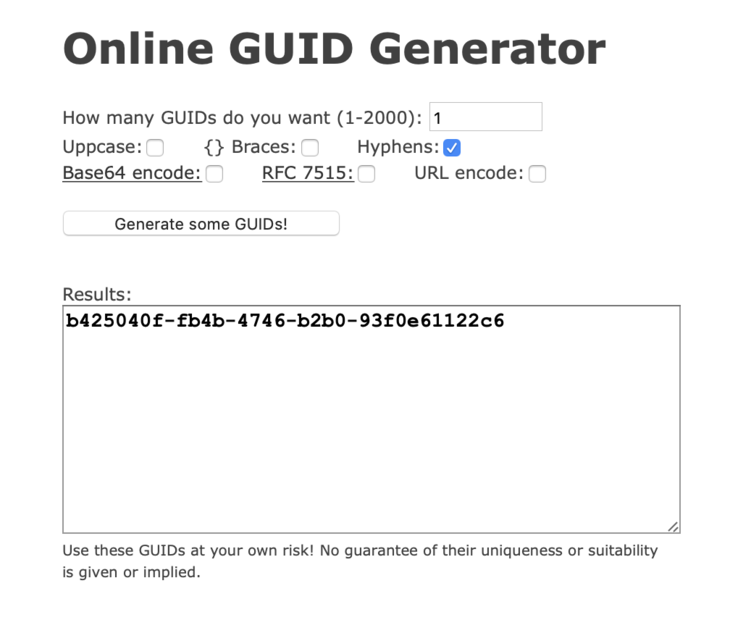
Use the above settings to get your own UUID. You can then create your service and characteristic UUIDS from this generated one:
使用以上设置获取您自己的UUID。 然后,您可以从生成的服务和特色UUIDS中创建服务:
const char* serviceUuid = "b425040**0**-fb4b-4746-b2b0-93f0e61122c6"; //serviceconst char* red = "b4250401-fb4b-4746-b2b0-93f0e61122c6"; //red charconst char* green = "b4250402-fb4b-4746-b2b0-93f0e61122c6"; //green charconst char* blue = "b4250403-fb4b-4746-b2b0-93f0e61122c6"; //blue charThere's no right or wrong way to do this. But you have to be careful you're not using the UUIDs reserved by the Bluetooth SIG. This is highly unlikely. If you do want to double check you can go here and here.
这样做没有对与错的方法。 但是您必须小心,不要使用Bluetooth SIG保留的UUID。 这极不可能。 如果确实要仔细检查,可以在这里和这里进行 。
For now, we'll stick with the first set of UUIDs.
现在,我们将坚持使用第一组UUID。
In
Setup(), initialize your service.在
Setup(),初始化您的服务。// Set the RGB BLE serviceBleUuid rgbService(serviceUuid);This is the first step of "registering' your service. More on this below.
这是“注册”服务的第一步,请参见下文。
Initialize each characteristic in
Setup()在
Setup()初始化每个特征BleCharacteristic redCharacteristic("red", BleCharacteristicProperty::WRITE_WO_RSP, red, serviceUuid, onDataReceived, (void*)red);BleCharacteristic greenCharacteristic("green", BleCharacteristicProperty::WRITE_WO_RSP, green, serviceUuid, onDataReceived, (void*)green);BleCharacteristic blueCharacteristic("blue", BleCharacteristicProperty::WRITE_WO_RSP, blue, serviceUuid, onDataReceived, (void*)blue);For this setup, we're going to use the
WRITE_WO_RSPproperty. This allows us to write the data and expect no response. I've referenced the UUIDs as the next two parameters. The first being the characteristic UUID. The second being the service UUID.对于此设置,我们将使用
WRITE_WO_RSP属性。 这使我们能够写入数据并且期望没有响应。 我已将UUID引用为接下来的两个参数。 第一个是特征性的UUID。 第二个是服务UUID。The next parameter is the callback function. When data is written to this callback, this function will fire.
下一个参数是回调函数。 将数据写入此回调时,将触发此函数。
Finally the last parameter is the context. What does this mean exactly? We're using the same callback for all three characteristics. The only way we can know which characteristic was written to (in deviceOS at least) is by setting a context. In this case we're going to use the already available UUIDs.
最后,最后一个参数是上下文。 这到底是什么意思? 我们为所有三个特征使用相同的回调。 我们(至少在deviceOS中)知道写入哪个特征的唯一方法是设置上下文。 在这种情况下,我们将使用已经可用的UUID。
Right after defining the characteristics, let's add them so they show up:
在定义特征之后,让我们添加它们,以便它们显示出来:
// Add the characteristicsBLE.addCharacteristic(redCharacteristic);BLE.addCharacteristic(greenCharacteristic);BLE.addCharacteristic(blueCharacteristic);Set up the callback function.
设置回调函数。
// Static function for handling Bluetooth Low Energy callbacksstatic void onDataReceived(const uint8_t* data, size_t len, const BlePeerDevice& peer, void* context) {}You can do this at the top of the file (above
Setup()) We will define this more later.您可以在文件顶部(在
Setup()上方Setup()执行此操作,我们将在以后进行定义。Finally, in order for your device to be connectable, we have to set up advertising. Place this code at the end of your
Setup()function最后,为了使您的设备可连接,我们必须设置广告。 将此代码放在
Setup()函数的末尾// Advertising dataBleAdvertisingData advData;// Add the RGB LED serviceadvData.appendServiceUUID(rgbService);// Start advertising!BLE.advertise(&advData);First we create a
BleAdvertisingDataobject. We add thergbServicefrom Step 3. Finally, we can start advertising so our service and characteristics are discoverable!首先,我们创建一个
BleAdvertisingData对象。 我们从步骤3添加了rgbService。最后,我们可以开始做广告,以便我们的服务和特性是可发现的!
测试时间 (Time to test)
At this point we have a minimally viable program. Let's compile it and program it to our Particle hardware. This should work with any Mesh enabled device. (Xenon, Argon, Boron)
至此,我们有了一个最低可行的程序。 让我们对其进行编译并将其编程到我们的粒子硬件中。 这应该与任何启用了网格的设备一起使用。 (氙,氩,硼)
Before we start testing, temporarily add
SYSTEM_MODE(MANUAL);to the top of your file. This will prevent the device connecting to the mesh network. If the device is blinking blue on startup, you'll have to set it up with the Particle App before continuing.在开始测试之前,请临时添加
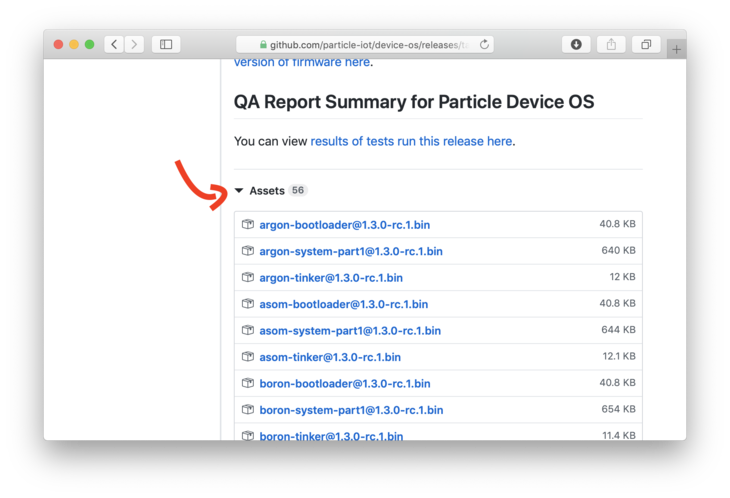
SYSTEM_MODE(MANUAL);到文件顶部。 这将阻止设备连接到网状网络。 如果设备在启动时呈蓝色闪烁,则必须先使用Particle App对其进行设置,然后再继续。Download the 1.3.0-rc.1 image here. For Xenon, you'll need xenon-system-part1@1.3.0-rc.1.bin. For others look for boron-system-part1@1.3.0-rc.1.bin and argon-system-part1@1.3.0-rc.1.bin. The files are at the bottom of the page under Assets
在此处下载1.3.0-rc.1映像。 对于Xenon,您需要xenon-system-part1@1.3.0-rc.1.bin。 对于其他用户,请查找boron-system-part1@1.3.0-rc.1.bin和argon-system-part1@1.3.0-rc.1.bin。 文件位于页面底部的“ 资产”下
Put your device into DFU mode. Hold the Mode Button and momentarily click the Reset Button. Continue holding the Mode Button until the LED blinks yellow.
将设备置于DFU模式。 按住“ 模式”按钮,然后立即单击“ 重置” 按钮。 继续按住模式按钮,直到LED闪烁黄色。
In a command line window, change directories to where you stored the file you downloaded. In my case the command is
cd ~/Downloads/在命令行窗口中,将目录更改为存储下载文件的目录。 在我的情况下,命令是
cd ~/Downloads/Then run:
然后运行:
particle flash --usb xenon-system-part1@1.3.0-rc.1.binThis will install the latest OS to your Xenon. Once it's done it will continue to rapidly blink yellow. Again if you have a different Particle Mesh device, change the filename to match.
这会将最新的操作系统安装到您的Xenon。 完成后,它将继续快速闪烁黄色。 同样,如果您有其他的“粒子网格”设备,请更改文件名以匹配。
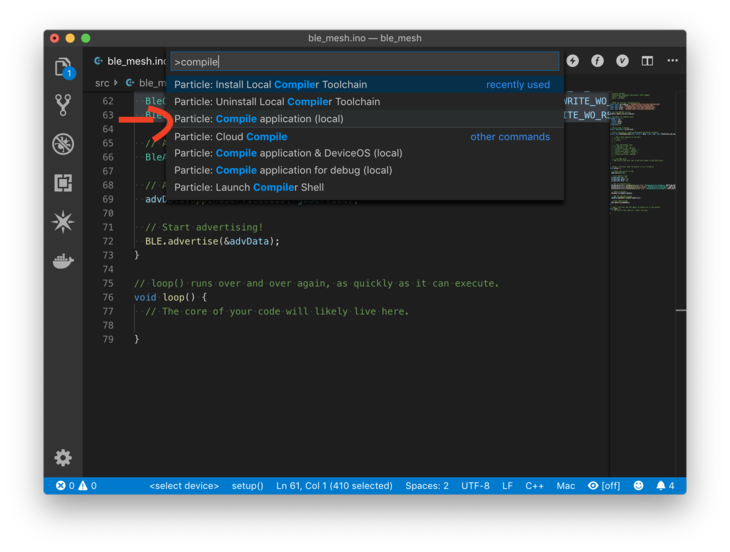
In Visual Code, use the Command + Shift + P key combination to pop up the command menu. Select Particle: Compile application (local)
在可视代码中,使用Command + Shift + P组合键弹出命令菜单。 选择粒子:编译应用程序(本地)
Fix any errors that may pop up.
修复可能弹出的所有错误。
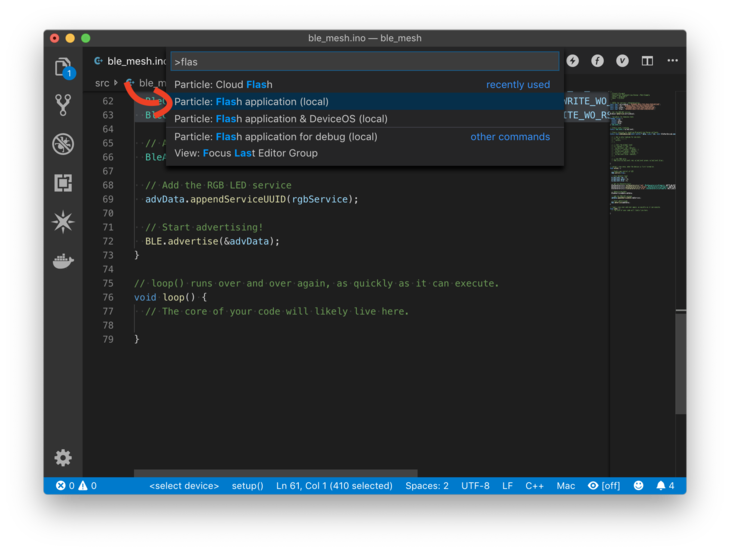
Then, open the same menu and select Flash application (local)
然后,打开相同菜单并选择Flash应用程序(本地)
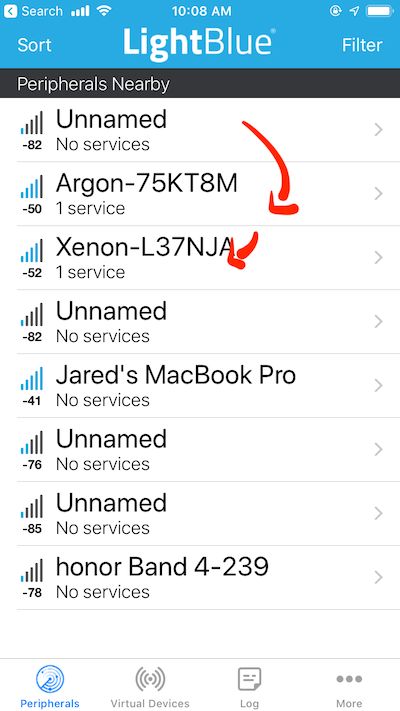
When programming is complete, pull out your phone. Then, open your favorite Bluetooth Low Energy app. The best ones are NRF Connect and Light Blue Explorer. I'm going to use Light Blue Explorer for this example.
编程完成后,拔出手机。 然后,打开您喜欢的Bluetooth Low Energy应用程序。 最好的是NRF Connect和Light Blue Explorer。 在此示例中,我将使用浅蓝色资源管理器。
Check if a device named "Xenon-" is advertising. Insert with the unique ID for your device.
检查名为“氙气- ” 是广告。 插 与您设备的唯一ID。
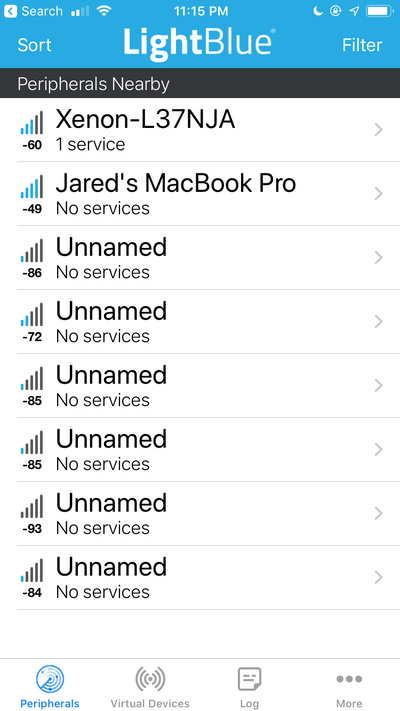
Find your device and click the name.
找到您的设备,然后单击名称。
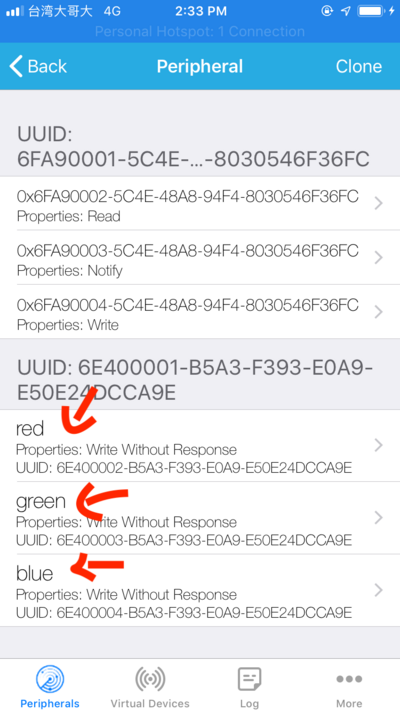
Look at the list of services & characteristics. Does it include the service and characteristic UUID's that we have set so far? For instance, does the service UUID show up as 6E400001-B5A3-F393-E0A9-E50E24DCCA9E?
查看服务和特性列表。 它是否包括我们到目前为止设置的服务和特征性UUID? 例如,服务UUID是否显示为6E400001-B5A3-F393-E0A9-E50E24DCCA9E ?
If everything shows up as you expect, you're in a good place. If not go through the earlier instructions to make sure everything matches.
如果一切都按预期显示,那么您来对地方了。 如果没有,请按照前面的说明进行操作,以确保所有内容均匹配。
第二阶段:处理数据 (Stage 2: Handling Data)
The next stage of our project is to process write events. We'll be updating our onDataReceived function.
我们项目的下一个阶段是处理写入事件。 我们将更新onDataReceived函数。
编写代码 (Write the Code)
First, let's create a struct that will keep the state of the LEDs. This can be done at the top of the file.
首先,让我们创建一个将保持LED状态的结构。 可以在文件顶部完成此操作。
// Variables for keeping statetypedef struct {uint8_t red;uint8_t green;uint8_t blue;} led_level_t;The second half of that is to create a static variable using this data type
第二部分是使用此数据类型创建静态变量
// Static level trackingstatic led_level_t m_led_level;The first two steps allows us to use one single variable to represent the three values of the RGB LED.
前两个步骤使我们可以使用一个变量来表示RGB LED的三个值。
Next, let's check for basic errors inside the
onDataReceivefunction For instance we want to make sure that we're receiving only one byte.接下来,让我们检查
onDataReceive函数内部的基本错误例如,我们要确保仅接收一个字节。// We're only looking for one byteif( len != 1 ) {return;}Next, we want to see which characteristic this event came from. We can use the
contextvariable to determine this.接下来,我们想看看此事件来自哪个特征。 我们可以使用
context变量来确定这一点。// Sets the global levelif( context == red ) {m_led_level.red = data[0];} else if ( context == green ) {m_led_level.green = data[0];} else if ( context == blue ) {m_led_level.blue = data[0];}Remember, in this case context will be equal to the pointer of either the red, green, or blue UUID string. You can also notice we're setting
m_led_level. That way we can update the RGB led even if only one value has changed.请记住,在这种情况下,上下文将等于红色,绿色或蓝色UUID字符串的指针。 您还可以注意到我们正在设置
m_led_level。 这样,即使只有一个值发生变化,我们也可以更新RGB led。Finally, once set, you can write to the
RGBobject最后,一旦设置,就可以写入
RGB对象// Set RGB colorRGB.color(m_led_level.red, m_led_level.green, m_led_level.blue);
测试代码 (Test the Code)
Let's go through the same procedure as before to flash the device.
让我们执行与之前相同的过程来刷新设备。
Put your device into DFU mode. Hold the Mode Button and click the Reset Button. Continue holding the Mode Button until the LED blinks yellow.
将设备置于DFU模式。 按住“ 模式”按钮 ,然后单击“ 重置” 按钮。 继续按住模式按钮,直到LED闪烁黄色。
Then, open the same menu and select Flash application (local)
然后,打开相同菜单并选择Flash应用程序(本地)
Once it's done programming, connect to the device using Light Blue Explorer.
编程完成后,使用Light Blue Explorer连接到设备。
Tap on the characteristic that applies to the red LED.
点击适用于红色LED的特性。
Write FF. The red LED should turn on.
写FF 。 红色LED应该亮起。
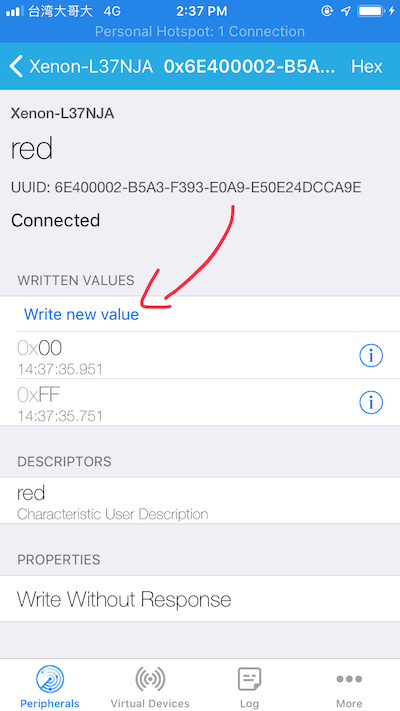

Write 00. The red LED should turn off.
写00 。 红色LED应该熄灭。
Do the same for the other two characteristics. We now have full control of the RGB LED over Bluetooth Low Energy!
对其他两个特征执行相同的操作。 现在,我们可以通过低功耗蓝牙完全控制RGB LED!
第三阶段:通过网格共享 (Stage 3: Sharing Via Mesh)
Finally, now that we're successfully receiving BLE message, it's time to forward them on to our mesh network.
最后,既然我们已经成功接收了BLE消息,是时候将它们转发到我们的网状网络了。
编写代码 (Write the Code)
First let's remove MANUAL mode. Comment out
SYSTEM_MODE(MANUAL);首先,让我们删除MANUAL模式。 注释掉
SYSTEM_MODE(MANUAL);At the top of the file let's add a variable we'll used to track if we need to publish
在文件顶部,我们添加一个变量,用于跟踪是否需要发布
// Tracks when to publish to Meshstatic bool m_publish;Then initialize it in
Setup()然后在
Setup()对其进行初始化// Set to false at firstm_publish = false;Then, after setting the RGB led in the
onDataReceivedcallback, let's set it true:然后,在
onDataReceived回调中设置RGB led之后,让我们将其设置为true:// Set RGB colorRGB.color(m_led_level.red, m_led_level.green, m_led_level.blue);// Set to publishm_publish = true;Let's add a conditional in the
loop()function. This will cause us to publish the LED status to the Mesh network:让我们在
loop()函数中添加一个条件。 这将导致我们将LED状态发布到Mesh网络:if( m_publish ) {// Reset flagm_publish = false;// Publish to MeshMesh.publish("red", String::format("%d", m_led_level.red));Mesh.publish("green", String::format("%d", m_led_level.green));Mesh.publish("blue", String::format("%d", m_led_level.blue));}Mesh.publishrequires a string for both inputs. Thus, we're usingString::formatto create a string with our red, green and blue values.Mesh.publish对于两个输入都需要一个字符串。 因此,我们使用String::format创建具有红色,绿色和蓝色值的字符串。Then let's subscribe to the same variables in
Setup(). That way another device can cause the LED on this device to update as well.然后,让我们在
Setup()订阅相同的变量。 这样,另一台设备也可以导致该设备上的LED也更新。Mesh.subscribe("red", meshHandler);Mesh.subscribe("green", meshHandler);Mesh.subscribe("blue", meshHandler);Toward the top of the file we want to create
meshHandler在文件顶部,我们要创建
meshHandler// Mesh event handlerstatic void meshHandler(const char *event, const char *data){}In this application, we need the
eventparameter anddataparameter. In order use them, we have to change them to aStringtype. That way we can use the built in conversion and comparison functions. So, inside themeshHandlerfunction add:在此应用程序中,我们需要
event参数和data参数。 为了使用它们,我们必须将它们更改为String类型。 这样,我们可以使用内置的转换和比较功能。 因此,在meshHandler函数内部添加:// Convert to String for useful conversion and comparison functionsString eventString = String(event);String dataString = String(data);Finally we do some comparisons. We first check if the event name matches. Then we set the value of the
dataStringto the corresponding led level.最后,我们进行一些比较。 我们首先检查事件名称是否匹配。 然后,将
dataString的值设置为相应的led级别。// Determine which event we recievedif( eventString.equals("red") ) {m_led_level.red = dataString.toInt();} else if ( eventString.equals("green") ) {m_led_level.green = dataString.toInt();} else if ( eventString.equals("blue") ) {m_led_level.blue = dataString.toInt();} else {return;}// Set RGB colorRGB.color(m_led_level.red, m_led_level.green, m_led_level.blue);Then at the end we set the new RGB color. Notice how I handle an unknown state by adding a
returnstatement in theelsesection. It's always good to filter out error conditions before they wreak havoc!然后最后我们设置新的RGB颜色。 注意,我如何通过在
else节中添加return语句来处理未知状态。 在错误情况造成严重破坏之前过滤掉错误情况总是好事!
测试代码 (Test the Code)
Open the Particle App on your phone
在手机上打开粒子应用
Let's set up the Argon first. If it's not blinking blue, hold the mode button until it's blinking blue.
让我们先设置Argon。 如果它不是蓝色闪烁,请按住模式按钮,直到它闪烁蓝色。
Note: if you've already programmed the app, the LED will be off by default. Hold the mode button for 5 seconds and then continue.
注意:如果您已经对应用程序进行了编程,则默认情况下,该指示灯将熄灭。 按住模式按钮5秒钟,然后继续。
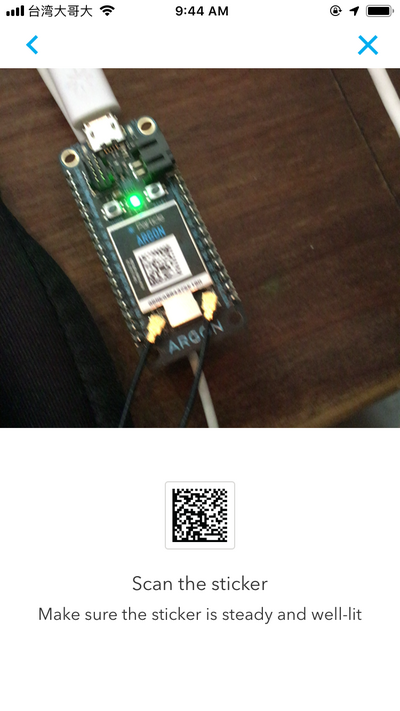
Go through the pairing process. The app walks you though all the steps. Make sure you remember the Admin password for your mesh network.
完成配对过程。 该应用程序将引导您完成所有步骤。 确保记住网状网络的管理员密码。
Program an Argon with the latest firmware (1.3.0) (see Stage 1 - Time to Test - Step 2 for a reminder on how to do this)
使用最新固件(1.3.0)对Argon进行编程(有关如何执行此操作的提示,请参见第1阶段-测试时间-第2步 )
Once rapidly blinking yellow, program the Argon with the Tinker app. You can download it at the release page.
黄色快速闪烁后,请使用Tinker应用程序对Argon进行编程。 您可以在发布页面下载它。
Once we have a nice solid Cyan LED (connected to the Particle Cloud) we'll program the app. Use the Cloud Flash option in the drop down menu.
一旦我们有了一个漂亮的稳定的青色LED(已连接到粒子云),我们便会对应用程序进行编程。 使用下拉菜单中的Cloud Flash选项。
As far as I can tell, Particle forces any device flashed locally into safe mode when connecting to the cloud. It may be my setup. Your mileage may vary here. Best to use Cloud Flash.
据我所知,当连接到云时,Particle会强制本地闪烁的所有设备进入安全模式。 这可能是我的设置。 您的里程可能会有所不同。 最好使用Cloud Flash 。
Make sure you select the correct deviceOS version (1.3.0-rc1), device type (Argon) and device name (What you named it during setup)
确保选择正确的deviceOS版本( 1.3.0-rc1 ),设备类型( Argon )和设备名称( 在安装过程中命名的名称)
Connect to the Xenon using the phone app
使用手机应用程序连接到Xenon
Connect the Xenon to your Mesh network using the phone app
使用手机应用程序将Xenon连接到您的Mesh网络
Flash your Xenon using Cloud Flash. Use the name that you gave it during the phone app setup. As long as the device is connected to Particle Cloud or in safe mode (Purple LED), it should program.
使用Cloud Flash闪烁Xenon。 使用您在电话应用程序设置过程中为其提供的名称。 只要设备已连接到Particle Cloud或处于安全模式(紫色LED),它都应该进行编程。
Once connected, let's get to the fun part. Open up Light Blue Explorer. Connect to either the Argon or the Xenon.
连接后,让我们进入有趣的部分。 打开浅蓝色资源管理器。 连接到Argon或Xenon 。
Select one of the LED characteristics and change the value.
选择一种LED特性并更改值。
The LED should change on all devices!
所有设备上的LED都应该改变!
最终密码 (Final Code)
Here's the final code with all the pieces put together. You can use this to make sure you put them in the right place!!
这是将所有部分组合在一起的最终代码。 您可以使用它来确保将它们放置在正确的位置!!
/** Project ble_mesh* Description: Bluetooth Low Energy + Mesh Example* Author: Jared Wolff* Date: 7/13/2019*///SYSTEM_MODE(MANUAL);// UUIDs for service + characteristics
const char* serviceUuid = "6E400001-B5A3-F393-E0A9-E50E24DCCA9E";
const char* red         = "6E400002-B5A3-F393-E0A9-E50E24DCCA9E";
const char* green       = "6E400003-B5A3-F393-E0A9-E50E24DCCA9E";
const char* blue        = "6E400004-B5A3-F393-E0A9-E50E24DCCA9E";// Set the RGB BLE service
BleUuid rgbService(serviceUuid);// Variables for keeping state
typedef struct {uint8_t red;uint8_t green;uint8_t blue;
} led_level_t;// Static level tracking
static led_level_t m_led_level;// Tracks when to publish to Mesh
static bool m_publish;// Mesh event handler
static void meshHandler(const char *event, const char *data)
{// Convert to String for useful conversion and comparison functionsString eventString = String(event);String dataString = String(data);// Determine which event we recievedif( eventString.equals("red") ) {m_led_level.red = dataString.toInt();} else if ( eventString.equals("green") ) {m_led_level.green = dataString.toInt();} else if ( eventString.equals("blue") ) {m_led_level.blue = dataString.toInt();} else {return;}// Set RGB colorRGB.color(m_led_level.red, m_led_level.green, m_led_level.blue);}// Static function for handling Bluetooth Low Energy callbacks
static void onDataReceived(const uint8_t* data, size_t len, const BlePeerDevice& peer, void* context) {// We're only looking for one byteif( len != 1 ) {return;}// Sets the global levelif( context == red ) {m_led_level.red = data[0];} else if ( context == green ) {m_led_level.green = data[0];} else if ( context == blue ) {m_led_level.blue = data[0];}// Set RGB colorRGB.color(m_led_level.red, m_led_level.green, m_led_level.blue);// Set to publishm_publish = true;}// setup() runs once, when the device is first turned on.
void setup() {// Enable app control of LEDRGB.control(true);// Init default levelm_led_level.red = 0;m_led_level.green = 0;m_led_level.blue = 0;// Set to false at firstm_publish = false;// Set the subscription for Mesh updatesMesh.subscribe("red",meshHandler);Mesh.subscribe("green",meshHandler);Mesh.subscribe("blue",meshHandler);// Set up characteristicsBleCharacteristic redCharacteristic("red", BleCharacteristicProperty::WRITE_WO_RSP, red, serviceUuid, onDataReceived, (void*)red);BleCharacteristic greenCharacteristic("green", BleCharacteristicProperty::WRITE_WO_RSP, green, serviceUuid, onDataReceived, (void*)green);BleCharacteristic blueCharacteristic("blue", BleCharacteristicProperty::WRITE_WO_RSP, blue, serviceUuid, onDataReceived, (void*)blue);// Add the characteristicsBLE.addCharacteristic(redCharacteristic);BLE.addCharacteristic(greenCharacteristic);BLE.addCharacteristic(blueCharacteristic);// Advertising dataBleAdvertisingData advData;// Add the RGB LED serviceadvData.appendServiceUUID(rgbService);// Start advertising!BLE.advertise(&advData);
}// loop() runs over and over again, as quickly as it can execute.
void loop() {// Checks the publish flag,// Publishes to a variable called "red" "green" and "blue"if( m_publish ) {// Reset flagm_publish = false;// Publish to MeshMesh.publish("red", String::format("%d", m_led_level.red));Mesh.publish("green", String::format("%d", m_led_level.green));Mesh.publish("blue", String::format("%d", m_led_level.blue));}}
结论 (Conclusion)
In this tutorial you learned how to add Bluetooth to a Particle Mesh project. As you can imagine, the possibilities are endless. For instance you can add user/administrative apps into the experience. Now that's awesome. ?
在本教程中,您学习了如何将蓝牙添加到粒子网格项目。 您可以想象,可能性是无限的。 例如,您可以将用户/管理应用程序添加到体验中。 现在好极了。 ?
You can expect more content like this in my upcoming book: The Ultimate Guide to Particle Mesh. Subscribe to my list for updates and insider content. Plus all early subscribers get a discount when it's released! Click here to sign up.
在我即将出版的书: 《粒子网格的终极指南》中,您可以期待更多类似的内容。 订阅我的列表以获取更新和内幕内容。 另外,所有早期订阅者在发布时均可获得折扣! 点击此处注册。
翻译自: https://www.freecodecamp.org/news/how-to-use-particles-powerful-bluetooth-api/
粒子耗尽 粒子滤波
粒子耗尽 粒子滤波_如何使用粒子的强大蓝牙API相关推荐
- java 粒子滤波_粒子滤波 - gary_123 - 博客园
跟着博主http://blog.csdn.net/heyijia0327/article/details/40899819一起学习 尽管利用高斯逼近能有效解决许多滤波问题,但当滤波分布为多模型或某些状 ...
- 【SLAM基础入门】贝叶斯滤波、卡尔曼滤波、粒子滤波笔记(2)
基于B站老王的贝叶斯滤波.卡尔曼滤波.粒子滤波 Bilibili 文章目录 第三部分:随机过程的贝叶斯滤波BF 第四部分:卡尔曼滤波KF 第三部分:随机过程的贝叶斯滤波BF 随机过程包含一系列随机变量 ...
- 【SLAM基础入门】贝叶斯滤波、卡尔曼滤波、粒子滤波笔记(1)
贝叶斯滤波.卡尔曼滤波.粒子滤波 (https://www.bilibili.com/video/BV1HT4y1577g?spm_id_from=333.999.header_right.histo ...
- maya对象属性_Maya2014全面使用手册_了解每粒子属性和每对象属性_软件教程_资源库...
摘要:Maya2014全面使用手册_了解每粒子属性和每对象属性_软件教程_资源库 相关视频教程学习推荐: 造型设计<鹫>造型上色完整流程[实名认证] 5,777人在学 总时长:27h 可以 ...
- 粒子群优化算法_每日论文19:粒子群优化算法综述
每日论文 第十九篇 2020/07/27 摘要:粒子群优化 (PSO)算法是一种新兴的优化技术 ,其思想来源于人工生命和演化计算理论.PSO通过粒子追随自己找到的最好解和整个群的最好解来完成优化.该算 ...
- 多目标粒子群优化算法_基于粒子群优化的投资组合优化研究
原文链接: 基于粒子群优化的投资组合优化研究tecdat.cn 我今年的研究课题是使用粒子群优化(PSO)的货币进位交易组合优化.在本文中,我将介绍投资组合优化并解释其重要性.其次,我将演示粒子群优 ...
- java粒子群优化算法_粒子群优化算法的JAVA实现
说明:算法为了演示功能,所以没有优化,没有异常处理等,仅作演示用. /* * To change this template, choose Tools | Templates * and open ...
- maya对象属性_了解每粒子属性和每对象属性
可以将两种类型的属性动态添加到"粒子形状"(particle shape)节点: 每粒子 每对象 每粒子属性允许您分别设定对象的每个粒子的属性值.每对象属性允许您通过单个值整体设定 ...
- 智源“高能对撞粒子分类挑战赛”开启,品鉴宇宙粒子的独特“味道”
2019 年 11 月,北京智源人工智能研究院联合数据评测平台 biendata,共同发布了粒子碰撞数据集,其中包含数百万条高能对撞中所产生的喷注信息(质量.能量.方向等),以及相关的碰撞事件信息和喷 ...
最新文章
- 三菱gs触摸屏进入设定菜单_三菱触摸屏常用功能设置 以及界面调整
- ListView 与 ImageList
- python培训班价格-Python培训班一般多少钱?学费多少?
- 安装百分之80卡住_新车买回来要不要安装发动机护板呢?装好还是不好?
- C# Regex 正则表达式 匹配特定的内容
- html中scope的作用,AngularJS 作用域(Scope)
- php公交查询系统源代码,基于Smarty公交查询系统的设计与实现(PHP,MySQL)
- JVM内存模型与垃圾回收GC
- java界面编辑教程_java程序设计基础教程第六章图形用户界面编辑.docx
- android模拟器太卡,安卓模拟器安装之后太卡怎么解决
- endnotex7怎么导入中文文献,EndNote 7.0使用中文详细教程
- 数字信号处理技术在各个领域(电信、音频、图像、雷达、声呐等)的用途
- html的abbr标签,html标签里有个abbr 请问这个标签是肿么使用的
- 美式期权定价python_蒙特卡洛模拟和美式期权定价
- 计算机显示没有可以的ip地址,w7电脑提示没有有效ip地址怎么处理
- 广义Pareto分布---极值理论的学习3
- 使用docker安装ubuntu镜像
- highcharts 制作3D立体饼图
- 转帖 FreeTextBox 工具条
- 第四次作业:《财务决策与分析》——财务报表的逻辑架构(慕课组)
热门文章
- python 打包 .app 运行 控制台窗口_Python打包工具
- 怎樣制作线段动画_PPT动画还能这么做?我擦!动画源文件免费送你
- 微信小程序云开发,使用阿里云短信服务,搜索员工生日定期发送短信。
- 接入网易云信IM即时通讯的微信小程序聊天室
- 阿里云https证书apache配置
- [微信小程序]this.setData , that.setData , this.data.val三者之间的区别和作用
- UITableView嵌套WKWebView的那些坑
- HTML5:理解head
- 解决Error response from daemon: Get https://registry-1.docker.io/v2/library/hello-world/manifests/
- MediaCodeC解码视频指定帧,迅捷、精确