使用tensorflow建模LSTM的详细步骤通俗易懂解读
使用tensorflow建模LSTM的详细步骤人性化解读
一步步条理清晰的写tensorflow代码
Understanding LSTM in Tensorflow(MNIST dataset)
Long Short Term Memory(LSTM) are the most common types of Recurrent Neural Networks used these days. They are mostly used with sequential data.An in depth look at LSTMs can be found in this incredible blog post.
Our Aim
As the title suggests,the main aim of this blogpost is to make the reader comfortable with the implementation details of basic LSTM network in tensorflow
For fulfilling this aim we will take MNIST as our dataset.
The MNIST dataset
The MNIST dataset consists of images of handwritten digits and their corresponding labels.We can download and read the data in tensorflow with the help of following in built functionality-
from tensorflow.examples.tutorials.mnist import input_data
mnist = input_data.read_data_sets("/tmp/data/", one_hot=True)
The data is split into three parts-
- Training data(mnist.train)-55000 images of training data
- Test data(mnist.test)-10000 images of test data
- Validation data(mnist.validation)-5000 images of validation data.
Shape of the data
Let us discuss the shape with respect to training data of MNIST dataset.Shapes of all three splits are identical.
The training set consists of 55000 images of 28 pixels X 28 pixels each.These 784(28X28) pixel values are flattened in form of a single vector of dimensionality 784.The collection of all such 55000 pixel vectors(one for each image) is stored in form of a numpy array of shape (55000,784) and is referred to as mnist.train.images
Each of these 55000 training images are associated with a label representing the class to which that image belongs.There are 10 such classes(0,1,2…9).Class labels are represented in one hot encoded form.Thus the labels are stored in form of numpy array of shape (55000,10) and is referred to as mnist.train.labels.
Why MNIST?
LSTMs are generally used for complex sequence related problems like language modelling which involves NLP concepts such as word embeddings, encoders etc.These topics themselves need a lot of understanding.It would be nice to eliminate these topics to concentrate on implementation details of LSTMs in tensorflow such as input formatting,LSTM cells and network designing.
MNIST gives us such an opportunity.The input data here is just a set of pixel values.We can easily format these values and concentrate on implementation details.
Implementation
Before getting our hands dirty with code,let us first draw an outline of our implementation.This will make the coding part more intuitive.
A vanilla RNN
A Recurrent Neural Network,when unrolled through time,can be visualised as-
![]()
Here,
- xt refers to the input at time step t.
- st refers to the hidden state at time step t.It can be visualised as “memory” of our network.
- ot refers to the output at time step t.
- U,V and W are parameters that are shared across all the time steps.The significance of this parameter sharing is that our model performs same task at each time step with different input.
What we have achieved by unrolling the RNN,is that at each time step,the network can be visualised as feed forward network taking into account the output of the previous time step(signified by the connections between the time steps).
Two caveats
Our implementation will hinge upon two main concepts which will make us comfortable with our implementation:
- Interpretation of LSTM cells in tensorflow.
- Formatting inputs before feeding them to tensorflow RNNs.
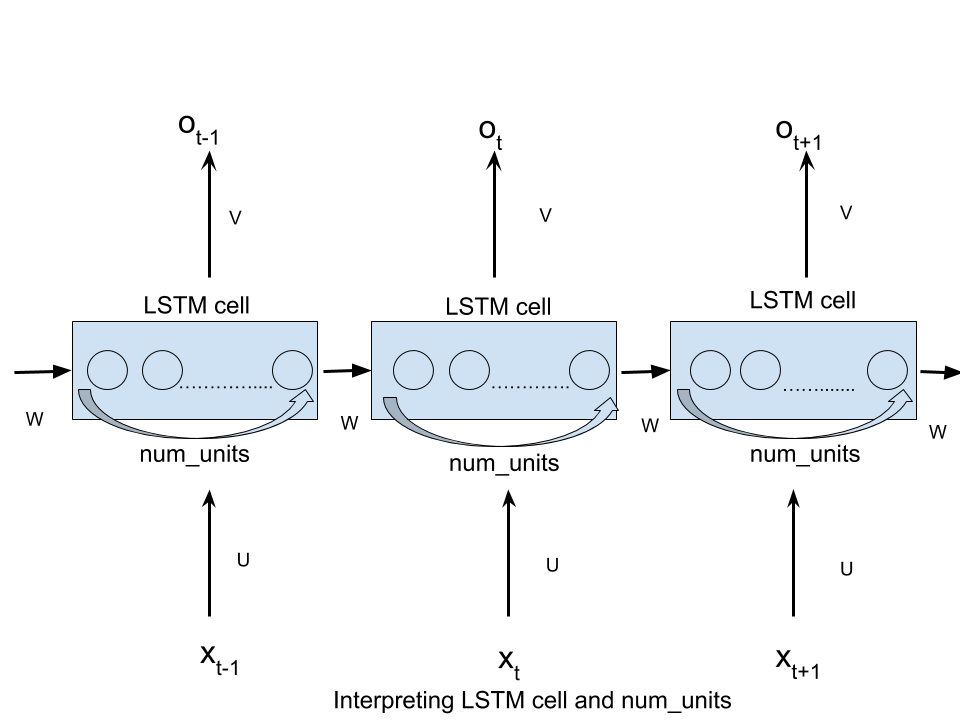
Interpretation of LSTM cells in tensorflow
A basic LSTM cell is declared in tensorflow as-
tf.contrib.rnn.BasicLSTMCell(num_units)
here num_units refers to the number of units in LSTM cell.
num_units can be interpreted as the analogy of hidden layer from the feed forward neural network.The number of nodes in hidden layer of a feed forward neural network is equivalent to num_units number of LSTM units in a LSTM cell at every time step of the network.Following picture should clear any confusion-
![]() 转存失败重新上传取消
转存失败重新上传取消
![]() 转存失败重新上传取消
转存失败重新上传取消
Each of the num_units LSTM unit can be seen as a standard LSTM unit-

![]() 转存失败重新上传取消
转存失败重新上传取消
The above diagram is taken from this incredible blogpost which describes the concept of LSTM effectively.
Formatting inputs before feeding them to tensorflow RNNs
The simplest form of RNN in tensorflow is static_rnn.It is defined in tensorflow as
tf.static_rnn(cell,inputs)
There are other arguments as well but we’ll limit ourselves to deal with only these two arguments.
The inputs argument accepts list of tensors of shape [batch_size,input_size].The length of this list is the number of time steps through which network is unrolled i.e. each element of this list corresponds to the input at respective time step of our unrolled network
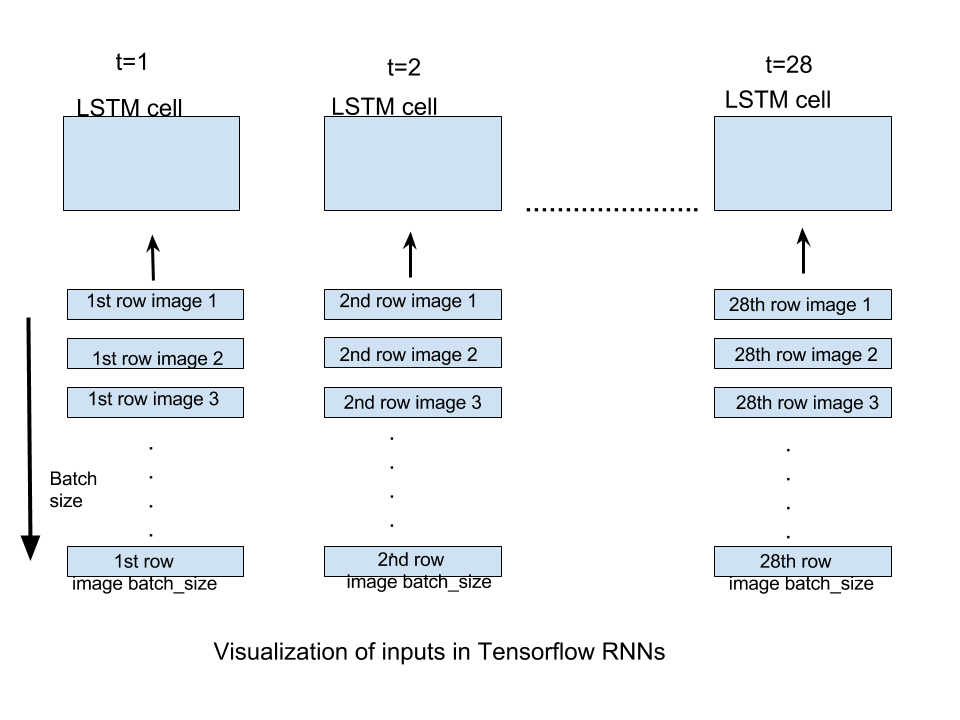
For our case of MNIST images,we have images of size 28X28.They can be inferred as images having 28 rows of 28 pixels each.We will unroll our network through 28 time steps so that at every time step we can input one row of 28 pixels(input_size) and thus a full image through 28 time steps.If we supply batch_size number of images,every time step will be supplied with respective row of batch_size images.Following figure should clear any doubts-
![]() 转存失败重新上传取消
转存失败重新上传取消
The output generated by static_rnn is a list of tensors of shape [batch_size,num_units].The length of the list is number of time steps through which network is unrolled i.e. one output tensor for each time step.In this implementation we will only be concerned with output of the final time step as the prediction will be generated when all the rows of an image are supplied to RNN i.e. at the last time step.
Now that we have done all the heavy-lifting,we are ready to write the code.The coding part is very straight forward once above concepts are clear.
Code
To start with,lets import necessary dependencies,dataset and declare some constants.We will use batch_size=128 and num_units=128
import tensorflow as tf
from tensorflow.contrib import rnn#import mnist dataset
from tensorflow.examples.tutorials.mnist import input_data
mnist=input_data.read_data_sets("/tmp/data/",one_hot=True)#define constants
#unrolled through 28 time steps
time_steps=28
#hidden LSTM units
num_units=128
#rows of 28 pixels
n_input=28
#learning rate for adam
learning_rate=0.001
#mnist is meant to be classified in 10 classes(0-9).
n_classes=10
#size of batch
batch_size=128
Lets now declare placeholders and weights and bias variables which will be used to convert the output of shape [batch_size,num_units] to [batch_size,n_classes] so that correct class can be predicted.
#weights and biases of appropriate shape to accomplish above task
out_weights=tf.Variable(tf.random_normal([num_units,n_classes]))
out_bias=tf.Variable(tf.random_normal([n_classes]))#defining placeholders
#input image placeholder
x=tf.placeholder("float",[None,time_steps,n_input])
#input label placeholder
y=tf.placeholder("float",[None,n_classes])
Now that we are receiving inputs of shape [batch_size,time_steps,n_input],we need to convert it into a list of tensors of shape [batch_size,n_inputs] of length time_steps so that it can be then fed to static_rnn
#processing the input tensor from [batch_size,n_steps,n_input] to "time_steps" number of [batch_size,n_input] tensors
input=tf.unstack(x ,time_steps,1)
Now we are ready to define our network.We will use one layer of BasicLSTMCell and make our static_rnn network out of it.
#defining the network
lstm_layer=rnn.BasicLSTMCell(num_units,forget_bias=1)
outputs,_=rnn.static_rnn(lstm_layer,input,dtype="float32")
As we are considered only with input of last time step,we will generate our prediction out of it.
#converting last output of dimension [batch_size,num_units] to [batch_size,n_classes] by out_weight multiplication
prediction=tf.matmul(outputs[-1],out_weights)+out_bias
Defining loss,optimizer and accuracy.
#loss_function
loss=tf.reduce_mean(tf.nn.softmax_cross_entropy_with_logits(logits=prediction,labels=y))
#optimization
opt=tf.train.AdamOptimizer(learning_rate=learning_rate).minimize(loss)#model evaluation
correct_prediction=tf.equal(tf.argmax(prediction,1),tf.argmax(y,1))
accuracy=tf.reduce_mean(tf.cast(correct_prediction,tf.float32))
Now that we have defined out graph,we can run it.
#initialize variables
init=tf.global_variables_initializer()
with tf.Session() as sess:sess.run(init)iter=1while iter<800:batch_x,batch_y=mnist.train.next_batch(batch_size=batch_size)batch_x=batch_x.reshape((batch_size,time_steps,n_input))sess.run(opt, feed_dict={x: batch_x, y: batch_y})if iter %10==0:acc=sess.run(accuracy,feed_dict={x:batch_x,y:batch_y})los=sess.run(loss,feed_dict={x:batch_x,y:batch_y})print("For iter ",iter)print("Accuracy ",acc)print("Loss ",los)print("__________________")iter=iter+1
One crucial thing to note here is that our images were essentially flattened into a single vector of dimensionality 784 to begin with.The function next_batch(batch_size) necessarily returns batch_size batches of these 784 dimensional vectors.They are thus reshaped to [batch_size,time_steps,n_input] so that it can be accepted by our placeholder.
We can also calculate test accuracy of our model-
#calculating test accuracy
test_data = mnist.test.images[:128].reshape((-1, time_steps, n_input))
test_label = mnist.test.labels[:128]
print("Testing Accuracy:", sess.run(accuracy, feed_dict={x: test_data, y: test_label}))
On running,the model runs with a test accuracy of 99.21%.
This blogpost was aimed at making the reader comfortable with the implementational details of RNNs in tensorflow.We’ll built some more complex models to use RNNs effectively in tensorflow.Stay tuned!
使用tensorflow建模LSTM的详细步骤通俗易懂解读相关推荐
- win10系统搭建Tensorflow深度学习平台详细步骤
Anaconda是由Python提供支持的领先的开放数据科学平台. Anaconda的开源版本是Python和R的高性能分发版本,包括超过100个用于数据科学的最流行的Python,R和S ...
- 评分卡模型建模详细步骤-评分卡建模实例之scorecardpy
目录 0.引言 1.scorecardpy介绍 2.评分卡建模过程 2.1数据加载 2.1变量筛选 2.2数据划分 2.3变量分箱 2.3.1 自动分箱 2.3.2 手动调整分箱 2.4变量转化woe ...
- Windows安装mysql详细步骤(通俗易懂,简单上手)
前期在windows电脑尝试安装mysql,经历诸多不顺,特把安装详细步骤以及遇见的问题记录下来,提供给有需者使用.配置过程主要分为五个步骤,如下所示: (1)确认本地是否安装mysql (2)下载m ...
- Tensorflow实现LSTM详解
关于什么是 LSTM 我就不详细阐述了,吴恩达老师视频课里面讲的很好,我大概记录了课上的内容在吴恩达<序列模型>笔记一,网上也有很多写的好的解释,比如:LSTM入门.理解LSTM网络 然而 ...
- 对接商汤摄像头详细步骤
对接商汤摄像头详细步骤 已实现接口 准备工作 STNetSDK(商汤摄像头dll文件函数) 题外话:博主写这篇文章的背景也很简单, 公司需要对接商汤的DVR摄像头,捕捉其人脸识别的数据.坑爹的是商汤没 ...
- 在3dmax软件中添加样条的方法和详细步骤
在3dmax软件中添加样条的方法和详细步骤! 在3dmax软件中添加样条的方法和详细步骤!三dsMax是一款三建模.动画和渲染软件.借助3dsMax,可以创造一个宏伟的游戏世界,布彩的场景,实现设计可 ...
- TensorFlow安装和下载详细教程-内附多种解决方案
TensorFlow安装和下载详细教程 根据网上的多个帖子及自身的成功经验,总结出在Windows平台上安装 TensorFlow 1.3. 需要注意以下几点: 安装tensorflow是基于Pyth ...
- abaqus梁模型仿真图文详细步骤
abaqus梁模型仿真图文详细步骤 一.建模 二.添加属性 三.定义截面 四.创建网格 五.创建分析步 六.创建梁末端位移输出 七.施加载荷 八.分析 九.查看结果 本文基于abaqus6.12 在a ...
- python安装torch详细步骤
python安装torch详细步骤 PyTorch 是Torch7 团队开发的,从它的名字就可以看出,其与Torch 的不同之处在于PyTorch 使用了Python 作为开发语言.所谓"P ...
最新文章
- 怎么学python-初学者如何学习Python?掌握这17个实用小技巧快速入门!
- react hook——你可能不是“我”所认识的useEffect
- 崩溃日志记录Landroid/support/v4/animation/AnimatorCompatHelper
- 图表可视化seaborn风格和调色盘
- spring的前后台数据传输。
- Power BI for Office 365 概览
- 用python爬取中南大学所有教师个人主页的个人简介
- 阶段3 2.Spring_01.Spring框架简介_06.spring的体系结构
- 百度智能云金融安全计算平台有多强?安排!
- 史上最全wireshark使用教程,8万字整理总结,建议先收藏再耐心研读
- IDEA 插件开发 发送弹框提示信息
- # Android12 wifi和4G同时使用
- 在python中datetime使用中如何识别上月同期日期
- Linux 实现OpenSSL 服务器端客户端通信
- flashpaper java_Flash中使用FlashPaper - javaplan - JavaEye技术网站
- 麦子学院Linux教程:环境搭建
- mysql win10 优化设置_Win10电脑优化必做的几个优化技巧提升速度!
- 黑马程序员新版Linux零基础快速入门到精通——学习笔记
- CSS 3.0实现泡泡特效
- Excel中FgColorsum函数根据字体颜色求和
热门文章
- Python面向对象编程:深度认识类class
- 应用层级时空记忆模型(HTM)实现对时序数据的异常检测
- linux message日志只有4k,命令长期运行 常用技巧 Linux 服务器 · 404k的前后端日志...
- 苹果手机数据转移到新手机_买了新手机,数据迁移用它轻松搞定
- linux系统内核文百科,Linux之内核中的文件系统 -电脑资料
- securecrt连接mysql_使用SecureCRTP 连接生产环境的web服务器和数据库服务器
- 网页中的盒模型css属性,详解CSS中的Box Model盒属性的使用
- pythonos模块使用方法_Python OS模块常用方法总结
- 数字货币普涨 比特币现金算力暴涨21.45%
- 《精通自动化测试框架设计》—第1章 1.3节五天太久,还能压缩吗