完美通行证身份证号格式_如何渲染3D足球通行证网络
完美通行证身份证号格式
Pass network analysis has long been a popular visualization method amongst football analysts. So why yet another article about it? Well, one rainy Sunday I thought it would be a great idea to boost my science ego by running someone else’s comprehensive Python script on my computer, patting myself on the back for what a great data scientist I am. Not surprisingly, the script executed successfully at first attempt — obviously not because of my programming genius, but because of the excellent quality of the script I used, namely Sergio Llana’s GitHub repository for building customizable passing networks with Matplotlib. So after a single button press [Run Script], I’m proudly staring at my first “self-programmed” pass network:
长期以来,传递网络分析一直是足球分析师中流行的可视化方法。 那么,为什么还有另一篇文章呢? 好吧,在一个下雨的星期天,我认为通过在计算机上运行其他人全面的Python脚本来激发我的科学自我,这是一个不错的主意,这使我背对自己是一位伟大的数据科学家。 毫不奇怪,该脚本首次尝试成功执行-显然不是由于我的编程天才,而是因为我使用的脚本质量出色,即Sergio Llana的GitHub存储库,用于使用Matplotlib构建可自定义的传递网络。 因此,在按一下[Run Script]后,我很自豪地盯着我的第一个“自编程”通过网络:
But then a thought comes to mind: “Wouldn’t it be nice if I could immerse myself into the network to see how many low or high passes were played?”. That’s when I began experimenting with Cinema4D’s built-in Python module. To my own surprise, I was able to realize my idea with minimal effort. In this article, I want to share my (possibly unconventional) visualization approach.
但是随后想到了一个想法:“如果我能沉浸在网络中,看看打了多少次低通或高通,那会不会很好?” 从那时起,我开始尝试使用Cinema4D的内置Python模块。 令我惊讶的是,我能够以最小的努力实现自己的想法。 在本文中,我想分享我的(可能是非常规的)可视化方法。
Disclaimer: If you’re here for analytical insights, I’m afraid you’ll be disappointed. This article is solely about how to transform traditional 2D passing networks into 3D.
免责声明:如果您是来这里进行分析的,这恐怕会让您失望的。 本文仅涉及如何将传统的2D传递网络转换为3D。
如何开始 (How to get started)
As already mentioned, I was only able to achieve my results because someone else was generous enough to share his/her code. Many code sections I used for the data preparation are taken directly from Sergio Llana’s GitHub page (in particular the import and processing of StatsBomb’s open data repository). People are lazy after all, so there’s no shame in copy-pasting code! …right? That said, you can find my Python scripts and C4D project files on my GitHub.
如前所述,我之所以只能取得结果,是因为其他人足够慷慨地分享他/她的代码。 我用于数据准备的许多代码部分直接来自Sergio Llana的GitHub页面(尤其是StatsBomb的开放数据存储库的导入和处理)。 人们毕竟是懒惰的,所以粘贴粘贴代码中不会丢人! …对? 也就是说,您可以在GitHub上找到我的Python脚本和C4D项目文件。
数据采集 (Data acquisition)
I was surprised at how much scouting data is publicly available nowadays. For this project, I used the game Portugal vs Spain (3:3), which took place during the 2018’s World Cup group stage. You’ll find the event data of all matches from the 2018 World Cup at StatsBomb. Another great source worth mentioning is a recently published article in the Nature magazine to which a public data set of spatio-temporal match events is attached.
令我惊讶的是,如今公开获得了多少侦察数据。 在这个项目中,我使用了葡萄牙对西班牙(3:3)游戏, 这是在2018年世界杯小组赛阶段进行的。 您可以在StatsBomb上找到2018年世界杯所有赛事的赛事数据。 另一个值得一提的重要消息来源是《自然》杂志上最近发表的一篇文章,其中附有一组时空匹配事件的公共数据集。
网络基础 (Network basics)
A football pass networks consist of a set of circular ‘nodes’ (i.e. players) that are connected through ‘edges’ (i.e. passes). Instead of ‘edges’, I will use the term ‘splines’ from here on. You'll understand why later. The size of the nodes is usually representative of the total number of passes a player has completed during a game. Each player’s field position (a.k.a. tactical line-up) can be obtained by either (a) calculating the average XY-coordinate from each player’s spatio-temporal tracking data (if available) or by (b) calculating the average XY-coordinate from each player’s scouting events (i.e. passes). Traditionally, the weight (thickness) of the edges represents the number of completed passes that have occurred between two players.
足球通行证网络由一组通过“边”(即通行证)连接的圆形“节点”(即球员)组成。 从这里开始,我将使用术语“样条线”代替“边缘”。 稍后您会明白为什么。 节点的大小通常代表玩家在游戏过程中完成的通过总数。 可以通过(a)从每个玩家的时空跟踪数据(如果有)中计算平均XY坐标,或者通过(b)从每个玩家的平均XY坐标中计算平均每个XY坐标,来获得每个玩家的战场位置(又称为战术阵容)玩家的侦察事件(即传球)。 传统上,边缘的权重(厚度)表示在两个玩家之间完成的传球次数。
准备数据 (Preparing the data)
I will skip the part on how to parse StatsBomb’s JSON files and extract completed pass connections into a separate DataFrame. Sergio’s scripts work like a charm, so I made only minor adjustments. I knew beforehand that I wanted to render each node and pass one by one. That’s why I created two DataFrames that I could save as a text file and import into Cinema4D using its built-in Python connector:
我将跳过有关如何解析StatsBomb的JSON文件并将完整的过程连接提取到单独的DataFrame中的部分。 塞尔吉奥的剧本像个咒语,所以我只做了很小的调整。 我事先知道我想渲染每个节点并一个接一个地传递。 这就是为什么我创建了两个可以保存为文本文件并使用其内置的Python连接器导入Cinema4D的数据帧的原因:
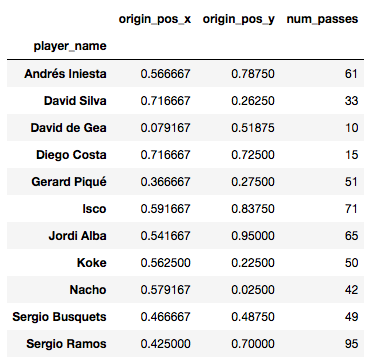
For the player nodes, we need each player’s name, average field coordinate, and the total number of completed passes:
对于玩家节点,我们需要每个玩家的姓名,平均场坐标以及完成的传球总数:
For the pass splines, we need a list containing (a) all player pairings [pair_key], (b) the number of completed low and high passes by each player pairing, and (c) the average field coordinate of both the passing and receiving player:
对于传球样条线,我们需要一个包含以下内容的列表:(a)所有球员配对[pair_key], (b)每个球员配对完成的低传和高传次数,以及(c)传球和接球的平均场坐标球员:
使用Cinema4D进行网络渲染 (Network rendering with Cinema4D)
Cinema4D (C4D) is a 3D design, animation and rendering software which is primarily used for motion graphics, modelling, and texturing; however, it comes with a comprehensive Python module. That said, pretty much every user action can be executed via a Python command, thus allowing the automation of design processes. Below is an example of my customized user interface, showing the 3D viewport (top left), object manager (top right), and material manager (middle right). In between is the Python script manager, allowing to create single objects as well as entire scenes programmatically. The next two paragraphs will demonstrate how easy it is to create any 3D object with just a few lines of code.
Cinema4D (C4D)是3D设计,动画和渲染软件,主要用于运动图形,建模和纹理处理; 但是,它带有一个全面的Python模块。 也就是说,几乎每个用户操作都可以通过Python命令执行,从而可以实现设计流程的自动化。 以下是我的自定义用户界面的示例,显示了3D视口(左上),对象管理器(右上)和材质管理器(右中)。 介于两者之间的是Python脚本管理器,允许以编程方式创建单个对象以及整个场景。 接下来的两段将演示仅用几行代码创建任何3D对象是多么容易。
生成玩家节点 (Generating player nodes)
I will use a simple disk to represent a player’s node. Creating a disk and changing its attributes via Python commands is pretty straight forward in C4D. The following code example generates a disk with an outer radius of 100 cm at the origin (0,0,0):
我将使用一个简单的磁盘来表示玩家的节点。 在C4D中,通过Python命令创建磁盘并更改其属性非常简单。 以下代码示例生成一个圆盘,该圆盘的原点(0,0,0)的半径为100 cm:
import c4ddef main():# this command creates a default diskc4d.CallCommand(5164, 5164)# we now have to select the disk to change its attributesselected = doc.GetActiveObject()# change the disk's inner and outer radius selected[c4d.PRIM_DISC_ORAD] = 100 selected[c4d.PRIM_DISC_IRAD] = 80# change the disk's name selected[c4d.ID_BASELIST_NAME] = 'my_disk'# change the disk's positionselected[c4d.ID_BASEOBJECT_REL_POSITION,c4d.VECTOR_X] = 0selected[c4d.ID_BASEOBJECT_REL_POSITION,c4d.VECTOR_Y] = 0selected[c4d.ID_BASEOBJECT_REL_POSITION,c4d.VECTOR_Z] = 0if __name__=='__main__':main()生成通过轨迹 (Generating pass trajectories)
Instead of showing a single weighted edge between players (representative of the number of passes), I wanted to render each pass individually. To achieve this effect, we have to introduce some randomness…
我不想在玩家之间显示一个加权的边(代表传球次数),而是希望分别渲染每个传球。 为了达到这种效果,我们必须引入一些随机性……
I found that the easiest way to render a pass trajectory between two players is to create a spline object. Initially, I thought that each spline should merely consist of a start (passing player) and endpoint (receiving player), but that would have resulted in perfectly straight lines — as we know it from traditional pass networks. Instead, I wanted to create the impression that (a) each pass trajectory is slightly different, and (b) high passes were rendered as an arc. That’s why I ended up using three spline points for each pass trajectory, giving me the possibility to add a flight curve to high passes, as well as introduce some random offset to the centre spline point (creating the illusion that each pass is displayed individually). The following code example generates ten random spline objects between two points.
我发现在两个玩家之间绘制传球轨迹的最简单方法是创建一个样条线对象。 最初,我认为每个样条线应仅由起点(传球手)和终点(接收球手)组成,但这将产生完美的直线-正如我们从传统的传球网络中知道的那样。 相反,我想给人的印象是(a)每个通过轨迹都略有不同,并且(b)高通过被渲染为圆弧。 这就是为什么我最终为每个通过轨迹使用三个样条点,使我有可能在高通过上添加一个飞行曲线,并对中心样条点引入一些随机偏移(给人一种错觉,即每个通过单独显示) 。 下面的代码示例在两个点之间生成十个随机样条线对象。
import c4d
import randomdef main():for i in range(10):Spline = c4d.SplineObject(3,0) # create an empty spline object with three pointsSpline[c4d.SPLINEOBJECT_TYPE] = 3 # change the type from 'linear' to 'cubic'# Define the spline start pointpos = c4d.Vector()pos.x = 0pos.y = 0pos.z = 0Spline.SetPoint(0,pos)# Define the center pointpos2 = c4d.Vector()pos2.x = 100 pos2.y = 100 + random.randint(-10, 10)pos2.z = 0 + random.randint(-10, 10)Spline.SetPoint(1,pos2)# Define the end pointSpline.SetPoint(2,pos)pos3 = c4d.Vector()pos3.x = 200pos3.y = 0pos3.z = 0Spline.SetPoint(2,pos3)doc.InsertObject(Spline,checknames=True) # insert the splinec4d.EventAdd() # make it visible in the guiif __name__=='__main__':main()运行循环 (Running the loop)
Now that we know how to generate player nodes and pass trajectories, it is time to replace the default values with our player-specific values. This works best with a loop that iterates through the player node file and creates a name and disk for each player. A second loop iterates through the pass value file and generates random pass trajectories between player pairings — depending on the number of passes that were completed between them.
现在我们知道了如何生成玩家节点并传递轨迹,现在该用我们的玩家特定值替换默认值了。 这最适合循环访问播放器节点文件并为每个播放器创建名称和磁盘的循环。 第二个循环遍历通行证值文件,并在玩家配对之间生成随机的通行轨迹-取决于它们之间完成的通行次数。
画龙点睛 (Finishing touches)
All that’s left to do now is to add the field lines, pick your favourite colours (a.k.a. materials), add some informative text, find a decent camera angle, adjust the render settings to your likings — and hit the [render] button:
现在剩下要做的就是添加场线,选择自己喜欢的颜色(又称材质),添加一些有用的文字,找到合适的相机角度,根据自己的喜好调整渲染设置,然后点击[render]按钮:
关键要点? (Key takeaways?)
Arguably few for the typical football analyst. But if you’re like me and your interests lie somewhere between data science and graphic design, you’ll be amazed what can be realized by combining a programming language (Python) with 3D design software (C4D).
对于典型的足球分析师来说,可以说很少。 但是,如果您像我一样,并且您的兴趣介于数据科学和图形设计之间,那么您会惊讶于将编程语言(Python)与3D设计软件(C4D)相结合可以实现的目标。
Admittedly, C4D isn’t necessarily considered a standard tool for data scientists, and you’ll also need to invest some time to learn the basics. It also remains debatable whether 3D pass networks offer any added value compared to traditional 2D networks. Nevertheless, I enjoyed experimenting with Python in C4D, and I will certainly integrate it more often in the future.
诚然,C4D不一定被认为是数据科学家的标准工具,并且您还需要花费一些时间来学习基础知识。 与传统的2D网络相比,3D传递网络是否具有任何附加价值还值得商bat。 尽管如此,我还是喜欢在C4D中使用Python进行实验,并且将来肯定会更频繁地集成它。
接下来是什么? (What comes next?)
Animation! C4D shows its real strength when it comes to animation, which is great because some might argue that static pass networks provide a rather superficial insight into the game. Instead, showing how a team’s network dynamic changes over time (and how it reacts to the opposing team’s network) could provide much deeper insights. Let’s see what’s possible. I’ll keep you posted!
动画! C4D在动画方面表现出了真正的实力,这是很棒的,因为有些人可能会认为静态传递网络提供了对游戏的相当肤浅的洞察力。 相反,显示团队的网络动态随时间变化(以及它如何对对方团队的网络做出React)可以提供更深入的见解。 让我们看看有什么可能。 我会及时向大家发布!
Thanks for reading my article! Don’t hesitate to contact me if you have any questions or feedback — or if you just want to get in touch.
感谢您阅读我的文章! 如果您有任何疑问或反馈,或者只是想保持联系,请随时与我联系。
翻译自: https://towardsdatascience.com/how-to-render-3d-football-pass-networks-bf889f5ab1b0
完美通行证身份证号格式
http://www.taodudu.cc/news/show-3462576.html
相关文章:
- 坎公骑冠剑普系角色德魯伊坎納属性、专武曝光
- java康纳塔评测_CANNONATA康纳塔 JAVA发布2016款终极赛车
- java康纳塔22s评测_Pico G2 4K和奇遇2s的测评对比 上
- 从学习如何学习开始
- 《Option Volatility Pricing》阅读笔记之 Theoretical Pricing Model(理论定价模型)
- (gcd,lcm,互质) 康纳的表情包--SDUT,Wolf and Rabbit--HDOJ
- 【历史上的今天】2 月 5 日:雅达利创始人出生;改变战争命运的 Colossus 计算机问世;希捷收购康纳外设
- 2017 山东理工第九届校赛 C 康纳的表情包
- Java使用mysql_connector驱动包连接数据库
- java康纳塔碳纤维硬吗,碳纤维车身是最硬的吗 最奢侈的汽车材料就是它
- java终结者怎么样_终结者6:丹妮与约翰康纳相比怎么样?她绝对也是个好领袖!...
- java康纳塔和费罗切_这里是广告:这种配置不要六千?你敢信?
- SDUT 3917 康纳的表情包
- java康纳塔评测_Java地位无可动摇的12个原因C_服务器评测与技术-中关村在线
- FullCodePress采访:蒂姆·康纳(Tim Connor),新西兰队
- 1130 mysql 服务器_mysql 连接远程连接服务器 1130错误
- 康纳的表情包
- mysql 远程登陆设置_mysql远程登陆设置
- 原Borland Delphi研发部程序员Joe C. Hecht讲述自己离开Borland公司作为个体户程序员独立单干接活谋生的故事
- cct一级计算机考试试题,cct一级计算机考试单选题.doc
- 面试常问经典Java算法题(附带参考代码)
- 计算机基础知识 上机 xp 试题,计算机应用基础上机指导及试题汇编
- 计算机网络 复习题(带答案)
- 数据结构与算法习题库
- Java基础50题
- 全国计算机等级考试试题研究组,全国计算机等级考试题研究中心
- python企业面试题250道
- c语言编程带铰钢架问题,C语言编程练习题绝对经典
- PTA 数据结构部分选择题
- HCIP-H12-222多选题库(2)
完美通行证身份证号格式_如何渲染3D足球通行证网络相关推荐
- 完美通行证身份证号格式_使用通行证js进行节点js身份验证
完美通行证身份证号格式 In this article, I will share my knowledge of authenticating node.js server using passpo ...
- SpringBoot自定义注解实现身份证号格式校验
背景 身份证的组成部分较为复杂, 如果仅使用正则表达式的话, 有些情况也无法校验出来, 例如正确的证件号为513334200310119074, 如果把最后一位变成9, 则是一个错误的证件号, 但 ...
- 验证身份证号 格式问题
导入的时候 验证身份证号的格式问题 if(!sfzh.equals("")&&isIDNumber(sfzh) == false){returnMap.put(&q ...
- 使用js验证身份证号格式以及身份证号中的生日验证
由于不管是测试项目练手还是实际项目开发,都应该考虑数据的严密性和软件的通俗易懂的实用性,下面是我用js实现的验证身份证号格式以及身份证号中的生日验证代码 //生日移出点击事件验证身份证号中的生日验证 ...
- SQL 校验身份证号格式
调用示例: SELECT dbo.[fn_IDCardChk]('123') /* --------------------------- 校验身份证号是否有效 成功返回1 失败返回0Jacker ...
- JS 身份证号格式验证
var idcard = data.field.idcard; if(!/(^\d{15}$)|(^\d{17}(x|X|\d)$)/.test(idcard)){ //验证身份证号15位或18位la ...
- 用python判断身份证号性别_验证身份证号的Python脚本
引用 a[0], a[1], a[2], a[3], ..., a[16], a[17] 其中a[i]表示第i位数字,i=0,1,2,...,17,如果最后一位(校验位)是X,则a[17]=10 每一 ...
- JS校验手机号和身份证号格式
1:校验手机号 //JS正则表达式校验手机号function isPoneAvailable(poneInput) {var myreg=/^[1][3,4,5,7,8][0-9]{9}$/;if ( ...
- java验证身份证号格式
//15位到18位的身份证号 public static boolean checkIdCard(String idCard) { String regex = "^[1-9]\\d{7}( ...
最新文章
- Linux13-bash脚本编程基础及配置文件
- python moviepy 特效编辑
- Codeforces Round #268 (Div. 1) C. Hack it! 数位dp + 构造数位
- import _ssl # if we can‘t import it, let the error propagate
- 【Kafka】Confluent Schema Registry
- maven学习(6)-Maven依赖范围
- HDU1272 小希的迷宫【并查集】
- 【交通标志识别】基于matlab GUI矩匹配算法路标识别【含Matlab源码 1175期】
- 主流数据库对比,主流数据库性能、选型对比
- udhcpc 参数使用说明
- WPF学习记录1:ListView的一个模板
- oracle数据文件recover,又遇BUG-ORA-01148:数据文件忽然变为recover状态
- 银河麒麟V10 远程桌面
- 银行都是用什么技术做超级App
- 广域网的基本概念和技术特点
- 坚挺市场下,ICT企业如何赢盈并重持续增长–2022年B2B企业新增长趋势之ICT篇
- github git上传代码简单使用
- 候选码、主码、外码、主属性、主键、主关键字、非主属性
- shell脚本 数组
- 状态码(Status Codes)
热门文章
- 玩转华为ENSP模拟器系列 | 两个网关之间利用Tunnel接口实现IPSec VdPdNd隧道多链路备份
- HFSS天线仿真文件到Altium Designer绘制PCB
- MATLAB卷积运算解释(conv、conv2、convn)
- excel打开txt格式文件
- 废品机械师双脚机器人教程_《废品机械师》自动机器人制作方法
- 图像处理----入门资料,Matlab r2019最新版,r2008a,《数字图像处理》冈萨雷斯 第三版 《数字图像处理 Matlab 版》
- 8T硬盘安装windows server版本
- 视觉orb_slam中LM算法的分析
- 【OSPF路由配置命令汇总大全】面面俱到
- Python实现秒解数独