EventBus 加强学习深入了解
2019独角兽企业重金招聘Python工程师标准>>> 
一、概述
前一篇给大家装简单演示了EventBus的onEventMainThread()函数的接收,其实EventBus还有另外有个不同的函数,他们分别是:
1、onEvent
2、onEventMainThread
3、onEventBackgroundThread
4、onEventAsync
这四种订阅函数都是使用onEvent开头的,它们的功能稍有不同,在介绍不同之前先介绍两个概念:
告知观察者事件发生时通过EventBus.post函数实现,这个过程叫做事件的发布,观察者被告知事件发生叫做事件的接收,是通过下面的订阅函数实现的。
onEvent:如果使用onEvent作为订阅函数,那么该事件在哪个线程发布出来的,onEvent就会在这个线程中运行,也就是说发布事件和接收事件线程在同一个线程。使用这个方法时,在onEvent方法中不能执行耗时操作,如果执行耗时操作容易导致事件分发延迟。
onEventMainThread:如果使用onEventMainThread作为订阅函数,那么不论事件是在哪个线程中发布出来的,onEventMainThread都会在UI线程中执行,接收事件就会在UI线程中运行,这个在Android中是非常有用的,因为在Android中只能在UI线程中跟新UI,所以在onEvnetMainThread方法中是不能执行耗时操作的。
onEventBackground:如果使用onEventBackgrond作为订阅函数,那么如果事件是在UI线程中发布出来的,那么onEventBackground就会在子线程中运行,如果事件本来就是子线程中发布出来的,那么onEventBackground函数直接在该子线程中执行。
onEventAsync:使用这个函数作为订阅函数,那么无论事件在哪个线程发布,都会创建新的子线程在执行onEventAsync.
二、实战
1、解析
上面列出的这四个函数,关键问题在于,我们怎么指定调用哪个函数呢?
我们先研究一下,上一篇中是怎么调用的onEventMainThread函数,除了在接收端注册与反注册以后,关键问题在于新建的一个类:
新建一个类:
package com.harvic.other;public class FirstEvent {private String mMsg;public FirstEvent(String msg) {// TODO Auto-generated constructor stubmMsg = msg;}public String getMsg(){return mMsg;}
}
发送时:
EventBus.getDefault().post(new FirstEvent("FirstEvent btn clicked"));
接收时:
public void onEventMainThread(FirstEvent event) { ……}
发现什么问题了没?
没错,发送时发送的是这个类的实例,接收时参数就是这个类实例。
所以!!!!!!当发过来一个消息的时候,EventBus怎么知道要调哪个函数呢,就看哪个函数传进去的参数是这个类的实例,哪个是就调哪个。那如果有两个是呢,那两个都会被调用!!!!
为了证明这个问题,下面写个例子,先看下效果
2、实例
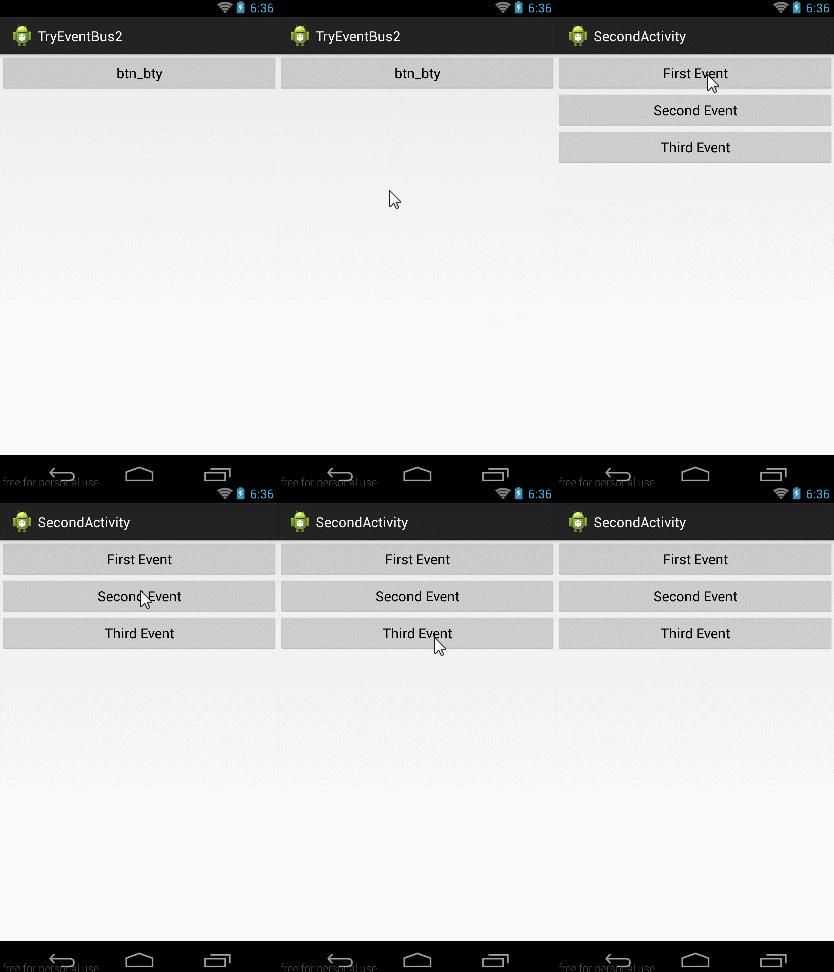
先看看我们要实现的效果:
这次我们在上一篇的基础上,新建三个类:FirstEvent、SecondEvent、ThirdEvent,在第二个Activity中发送请求,在MainActivity中接收这三个类的实例,接收时的代码为:
public void onEventMainThread(FirstEvent event) {Log.d("harvic", "onEventMainThread收到了消息:" + event.getMsg());
}public void onEventMainThread(SecondEvent event) {Log.d("harvic", "onEventMainThread收到了消息:" + event.getMsg());
}public void onEvent(ThirdEvent event) {Log.d("harvic", "OnEvent收到了消息:" + event.getMsg());
}
使用两个onEventMainThread分别接收FirstEvent实例的消息和SecondEvent实例的消息,使用onEvent接收ThirdEvent实例的消息。界面操作及结果如下:

Log输出结果:

可以看到,在发送FirstEvent时,在MainActiviy中虽然有三个函数,但只有第一个onEventMainThread函数的接收参数是FirstEvent,所以会传到它这来接收。所以这里识别调用EventBus中四个函数中哪个函数,是通过参数中的实例来决定的。
因为我们是在上一篇例子的基础上完成的,所以这里的代码就不详细写了,只写改动的部分。
1、三个类
package com.harvic.other;public class FirstEvent {private String mMsg;public FirstEvent(String msg) {// TODO Auto-generated constructor stubmMsg = msg;}public String getMsg(){return mMsg;}
}
package com.harvic.other;public class SecondEvent{private String mMsg;public SecondEvent(String msg) {// TODO Auto-generated constructor stubmMsg = "MainEvent:"+msg;}public String getMsg(){return mMsg;}
}
package com.harvic.other;public class ThirdEvent {private String mMsg;public ThirdEvent(String msg) {// TODO Auto-generated constructor stubmMsg = msg;}public String getMsg(){return mMsg;}
}
2、发送
然后在SecondActivity中新建三个按钮,分别发送不同的类的实例,代码如下:
package com.harvic.tryeventbus2;import com.harvic.other.FirstEvent;
import com.harvic.other.SecondEvent;
import com.harvic.other.ThirdEvent;import de.greenrobot.event.EventBus;
import android.app.Activity;
import android.os.Bundle;
import android.view.View;
import android.widget.Button;public class SecondActivity extends Activity {private Button btn_FirstEvent, btn_SecondEvent, btn_ThirdEvent;@Overrideprotected void onCreate(Bundle savedInstanceState) {super.onCreate(savedInstanceState);setContentView(R.layout.activity_second);btn_FirstEvent = (Button) findViewById(R.id.btn_first_event);btn_SecondEvent = (Button) findViewById(R.id.btn_second_event);btn_ThirdEvent = (Button) findViewById(R.id.btn_third_event);btn_FirstEvent.setOnClickListener(new View.OnClickListener() {@Overridepublic void onClick(View v) {// TODO Auto-generated method stubEventBus.getDefault().post(new FirstEvent("FirstEvent btn clicked"));}});btn_SecondEvent.setOnClickListener(new View.OnClickListener() {@Overridepublic void onClick(View v) {// TODO Auto-generated method stubEventBus.getDefault().post(new SecondEvent("SecondEvent btn clicked"));}});btn_ThirdEvent.setOnClickListener(new View.OnClickListener() {@Overridepublic void onClick(View v) {// TODO Auto-generated method stubEventBus.getDefault().post(new ThirdEvent("ThirdEvent btn clicked"));}});}}
3、接收
在MainActivity中,除了注册与注册,我们利用onEventMainThread(FirstEvent event)来接收来自FirstEvent的消息,使用onEventMainThread(SecondEvent event)接收来自SecondEvent 实例的消息,使用onEvent(ThirdEvent event) 来接收ThirdEvent 实例的消息。
package com.harvic.tryeventbus2;import com.harvic.other.FirstEvent;
import com.harvic.other.SecondEvent;
import com.harvic.other.ThirdEvent;import de.greenrobot.event.EventBus;
import android.app.Activity;
import android.content.Intent;
import android.os.Bundle;
import android.util.Log;
import android.view.Menu;
import android.view.MenuItem;
import android.view.View;
import android.widget.Button;
import android.widget.TextView;public class MainActivity extends Activity {Button btn;TextView tv;EventBus eventBus;@Overrideprotected void onCreate(Bundle savedInstanceState) {super.onCreate(savedInstanceState);setContentView(R.layout.activity_main);EventBus.getDefault().register(this);btn = (Button) findViewById(R.id.btn_try);btn.setOnClickListener(new View.OnClickListener() {@Overridepublic void onClick(View v) {// TODO Auto-generated method stubIntent intent = new Intent(getApplicationContext(),SecondActivity.class);startActivity(intent);}});}public void onEventMainThread(FirstEvent event) {Log.d("harvic", "onEventMainThread收到了消息:" + event.getMsg());}public void onEventMainThread(SecondEvent event) {Log.d("harvic", "onEventMainThread收到了消息:" + event.getMsg());}public void onEvent(ThirdEvent event) {Log.d("harvic", "OnEvent收到了消息:" + event.getMsg());}@Overrideprotected void onDestroy() {// TODO Auto-generated method stubsuper.onDestroy();EventBus.getDefault().unregister(this);}
}
在MainActivity中接收时,我们在接收SecondEvent时,在上面onEventMainThread基础上另加一个onEventBackgroundThread和onEventAsync,即下面的代码:
//SecondEvent接收函数一public void onEventMainThread(SecondEvent event) {Log.d("harvic", "onEventMainThread收到了消息:" + event.getMsg());}//SecondEvent接收函数二public void onEventBackgroundThread(SecondEvent event){Log.d("harvic", "onEventBackground收到了消息:" + event.getMsg());}//SecondEvent接收函数三public void onEventAsync(SecondEvent event){Log.d("harvic", "onEventAsync收到了消息:" + event.getMsg());}
完整的代码在这里:
package com.harvic.tryeventbus2;import com.harvic.other.FirstEvent;
import com.harvic.other.SecondEvent;
import com.harvic.other.ThirdEvent;import de.greenrobot.event.EventBus;
import android.app.Activity;
import android.content.Intent;
import android.os.Bundle;
import android.util.Log;
import android.view.Menu;
import android.view.MenuItem;
import android.view.View;
import android.widget.Button;
import android.widget.TextView;public class MainActivity extends Activity {Button btn;TextView tv;EventBus eventBus;@Overrideprotected void onCreate(Bundle savedInstanceState) {super.onCreate(savedInstanceState);setContentView(R.layout.activity_main);EventBus.getDefault().register(this);btn = (Button) findViewById(R.id.btn_try);btn.setOnClickListener(new View.OnClickListener() {@Overridepublic void onClick(View v) {// TODO Auto-generated method stubIntent intent = new Intent(getApplicationContext(),SecondActivity.class);startActivity(intent);}});}public void onEventMainThread(FirstEvent event) {Log.d("harvic", "onEventMainThread收到了消息:" + event.getMsg());}//SecondEvent接收函数一public void onEventMainThread(SecondEvent event) {Log.d("harvic", "onEventMainThread收到了消息:" + event.getMsg());}//SecondEvent接收函数二public void onEventBackgroundThread(SecondEvent event){Log.d("harvic", "onEventBackground收到了消息:" + event.getMsg());}//SecondEvent接收函数三public void onEventAsync(SecondEvent event){Log.d("harvic", "onEventAsync收到了消息:" + event.getMsg());}public void onEvent(ThirdEvent event) {Log.d("harvic", "OnEvent收到了消息:" + event.getMsg());}@Overrideprotected void onDestroy() {// TODO Auto-generated method stubsuper.onDestroy();EventBus.getDefault().unregister(this);}
}
经过上面的分析,当发送SecondEvent实例的消息过来的时候,这三个函数会同时接收到并各自执行,所以当点击Second Event这个button的时候,会出现下面的结果:

参考文章:
《Android解耦库EventBus的使用和源码分析》:http://blog.csdn.net/yuanzeyao/article/details/38174537
《EventBus的使用初试》:http://blog.csdn.net/pp_hdsny/article/details/14523561
《EventBusExplained 》:https://code.google.com/p/guava-libraries/wiki/EventBusExplained
《Google Guava EventBus实例与分析》
项目实例代码:
https://github.com/wangzhiyuan888/EventBusDemo
转载于:https://my.oschina.net/u/2933456/blog/783731
EventBus 加强学习深入了解相关推荐
- .NET Core开发实战(第33课:集成事件:使用RabbitMQ来实现EventBus)--学习笔记(下)...
33 | 集成事件:使用RabbitMQ来实现EventBus 为了演示我们的发布和订阅的话,我们在这里的代码做一些稍微的调整 namespace GeekTime.API.Application.D ...
- .NET Core开发实战(第33课:集成事件:使用RabbitMQ来实现EventBus)--学习笔记(上)...
33 | 集成事件:使用RabbitMQ来实现EventBus 这一节我们来讲解如何通过 CAP 组件和 RabbitMQ 来实现 EventBus 要实现 EventBus,我们这里借助了 Rabb ...
- Android事件总线设计(一)- EventBus初步学习
Android事件总线设计(一) 我们通常在进行安卓设计的时候,不同的Activity,Fragment,Service等之间通讯一直是个不小的问题,用Intent以及Handler都觉得有一点麻烦, ...
- EventBus—思考观察者模式与发布订阅者模式
EventBus系列文章: EventBus-使用实践 EventBus-源码解析 1. 概述 EventBus是基于发布订阅者模式的消息处理框架. EventBus is an open-sourc ...
- ASP.NET Core应用的7种依赖注入方式
ASP.NET Core框架中的很多核心对象都是通过依赖注入方式提供的,如用来对应用进行初始化的Startup对象.中间件对象,以及ASP.NET Core MVC应用中的Controller对象和V ...
- Intent的数据传输
在学习时,看到公司的规范里有句话: Activity间的数据通信,对于数据量比较大的,避免使用intent+Parcelable的方式,可以考虑EventBus等代替方法,以免造成Transactio ...
- Guava包学习--EventBus
之前没用过这个EventBus,然后看了一下EventBus的源码也没看明白,(-__-)b.反正大概就是弄一个优雅的方式实现了观察者模式吧.慢慢深入学习一下. 观察者模式其实就是生产者消费者的一个变 ...
- Guava库学习:学习Guava EventBus(二)EventBus 事件订阅示例
2019独角兽企业重金招聘Python工程师标准>>> 原文地址:Guava库学习:学习Guava EventBus(二)EventBus 事件订阅示例 上一篇Guava库学习:学习 ...
- 开源消息总线eventBus学习
在编程过程中,当我们想通知其他组件某些事情发生时,我们通常使用观察者模式,正式因为观察者模式非常常见,所以在jdk1.5中已经帮助我们实现了观察者模式,我们只需要简单的继承一些类就可以快速使用观察者模 ...
- Android 框架学习2:源码分析 EventBus 3.0 如何实现事件总线
Go beyond yourself rather than beyond others. 上篇文章 深入理解 EventBus 3.0 之使用篇 我们了解了 EventBus 的特性以及如何使用,这 ...
最新文章
- chrome java插件_selenium启动Chrome配置参数问题
- 4、libgdx应用框架
- TensorFlow学习笔记:共享变量
- js中replace未定义_js中replace的用法
- Xcode的一些按钮使用
- 一种嵌套滑动冲突的解决方案
- 服务机器人产品---避障设计
- java jdk工具
- C++命名空间和头文件的关系 例如已经使用了#includestring,为什么还要 using std::string?...
- Windows10蓝屏提示错误操作Wdwifi.sys
- 一文读懂什么是数据产品交易
- 设计师:设计师知识储备之硬装部分/软装部分简介、家装材料知识(吊顶材料/门窗材料/五金材料/墙面材料/地面材料/胶粘材料/油漆材料/水电材料/瓦工部分)之详细攻略
- 本地创建git仓库并提交到码云
- 扇贝python学完_爬虫:爬取扇贝上python常用单词,减少登陆和贝壳的繁琐
- php files 转数组,转 PHP文件上传$_FILES数组各键值含义说明
- Linux系统下的文件传输
- 以太坊学习路线——(四、上)Truffle安装、truffle项目创建、编译、部署
- 使用帕累托最优选择解释涌现现象
- csharp基础练习题:小数的位数【难度:1级】--景越C#经典编程题库,不同难度C#练习题,适合自学C#的新手进阶训练
- CQ的包打开进行修改
