SmartGWT入门,提供出色的GWT界面
SmartGWT简介
我最近开始使用SmartGWT ,它是一个基于GWT的框架,该框架为您的应用程序UI提供了一个全面的小部件库,并为服务器端的数据管理提供了帮助。 您可以在SmartGWT展示柜上查看其漂亮的功能。 我准备了一个简短的“入门”指南,介绍如何将库与GWT项目集成(假设您已经安装了GWT SDK和Eclipse的Google插件 )。 请注意,Smart GWT与GWT 1.5.3,GWT 1.6.4,GWT 1.7.x和GWT 2.0.x兼容。
创建GWT项目
第一步是从下载部分下载库。 我将在本教程中使用的版本是2.1(直接从此处下载)。 解压缩ZIP文件,并在新目录中找到框架的文档,一些示例,“ Hello World”示例以及必要的JAR文件。 在新的浏览器选项卡中打开JavaDocs 。
接下来,我们在Eclipse中创建一个新的“ Web应用程序项目”。 为项目选择适当的名称,并选择适当的包装。 确保选中“使用Google Web Toolkt”复选框(不需要Google的App Engine,因此请不要选择该复选框)。 该向导将如下所示:

添加SmartGWT库
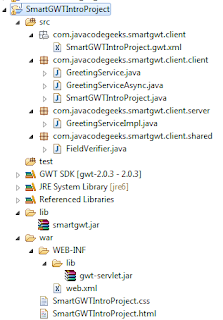
创建项目框架之后,浏览文件系统到项目位置,然后创建一个名为“ lib”的新文件夹。 将解压缩的ZIP中的“ smartgwt.jar”文件复制到新创建的文件夹中,并在Eclipse中刷新项目,以便新文件显示在此处。 然后配置项目的类路径以包含JAR文件(“项目”→“属性”→“ Java构建路径”→“添加JAR”…)。 到目前为止的标准东西。 Eclipse中的扩展项目应如下所示:
然后编辑模块xml文件(名为“ SmartGWTIntroProject.gwt.xml”),并在标准“继承”声明之后添加以下行:
<inherits name="com.smartgwt.SmartGwt"/>模块xml文件将是:
<?xml version="1.0" encoding="UTF-8"?>
<module rename-to='smartgwtintroproject'>
<!-- Inherit the core Web Toolkit stuff.                        -->
<inherits name='com.google.gwt.user.User'/><!-- Inherit the default GWT style sheet.  You can change       -->
<!-- the theme of your GWT application by uncommenting          -->
<!-- any one of the following lines.                            -->
<!-- <inherits name='com.google.gwt.user.theme.standard.Standard'/> -->
<!-- <inherits name='com.google.gwt.user.theme.chrome.Chrome'/> -->
<!-- <inherits name='com.google.gwt.user.theme.dark.Dark'/>     --><!-- Other module inherits                                      --><inherits name="com.smartgwt.SmartGwt"/><!-- Specify the app entry point class.                         -->
<entry-point class='com.javacodegeeks.smartgwt.client.client.SmartGWTIntroProject'/><!-- Specify the paths for translatable code                    -->
<source path='client'/>
<source path='shared'/></module>
这使GWT知道您的应用程序将使用SmartGWT库。
更新:“ com.google.gwt.user.theme.standard.Standard”声明应像上面一样被删除或注释掉,因为它与某些SmartGWT样式冲突。
之后,在“ war”文件夹中找到主HTML。 编辑它,并在编译的模块声明之前添加以下行:
<script>var isomorphicDir="smartgwtintroproject/sc/";</script>更新:从2.2版开始,不再需要定义isomorpihcDir值。 查看Smart GWT 2.2的发行说明 。 但是,对于本教程(使用2.1版),需要声明。
在同一文件中,向下滚动并找到以下几行:
<td id="nameFieldContainer"></td>
<td id="sendButtonContainer"></td>
将其替换为以下内容:
<td id="formContainer"></td>
<td id="buttonContainer"></td>
这些是将包含文本项HTML元素以及稍后将添加的按钮。
完整HTML文件如下:
<!doctype html>
<!-- The DOCTYPE declaration above will set the    -->
<!-- browser's rendering engine into               -->
<!-- "Standards Mode". Replacing this declaration  -->
<!-- with a "Quirks Mode" doctype may lead to some -->
<!-- differences in layout.                        --><html>
<head>
<meta http-equiv="content-type" content="text/html; charset=UTF-8"><!--                                                               -->
<!-- Consider inlining CSS to reduce the number of requested files -->
<!--                                                               -->
<link type="text/css" rel="stylesheet" href="SmartGWTIntroProject.css"><!--                                           -->
<!-- Any title is fine                         -->
<!--                                           -->
<title>Web Application Starter Project</title><!--                                           -->
<!-- This script loads your compiled module.   -->
<!-- If you add any GWT meta tags, they must   -->
<!-- be added before this line.                -->
<!--                                           -->
<script>var isomorphicDir="smartgwtintroproject/sc/";</script>
<script type="text/javascript" language="javascript" src="smartgwtintroproject/smartgwtintroproject.nocache.js"></script>
</head><!--                                           -->
<!-- The body can have arbitrary html, or      -->
<!-- you can leave the body empty if you want  -->
<!-- to create a completely dynamic UI.        -->
<!--                                           -->
<body><!-- OPTIONAL: include this if you want history support -->
<iframe src="javascript:''" id="__gwt_historyFrame" tabIndex='-1' style="position:absolute;width:0;height:0;border:0"></iframe><!-- RECOMMENDED if your web app will not function without JavaScript enabled -->
<noscript>
<div style="width: 22em; position: absolute; left: 50%; margin-left: -11em; color: red; background-color: white; border: 1px solid red; padding: 4px; font-family: sans-serif">Your web browser must have JavaScript enabled
in order for this application to display correctly.
</div></noscript><h1>
Web Application Starter Project</h1><table align="center">
<tr>
<td colspan="2" style="font-weight:bold;">Please enter your name:</td>
</tr><tr>
<td id="formContainer"></td>
<td id="buttonContainer"></td>
</tr><tr>
<td colspan="2" style="color:red;" id="errorLabelContainer"></td>
</tr></table></body>
</html>
创建应用程序入口点
通过Eclipse创建GWT时,会创建许多自动生成的文件。 其中之一是“客户端”包中的主要Java文件,该文件用作应用程序的入口点。 因此,删除生成的代码并添加以下内容:
package com.javacodegeeks.smartgwt.client.client;import com.google.gwt.core.client.EntryPoint;
import com.google.gwt.user.client.ui.RootPanel;
import com.smartgwt.client.util.SC;
import com.smartgwt.client.widgets.IButton;
import com.smartgwt.client.widgets.events.ClickEvent;
import com.smartgwt.client.widgets.events.ClickHandler;
import com.smartgwt.client.widgets.form.DynamicForm;
import com.smartgwt.client.widgets.form.fields.TextItem;public class SmartGWTIntroProject implements EntryPoint {public void onModuleLoad() {final DynamicForm form = new DynamicForm();final TextItem textItem = new TextItem();textItem.setTitle("Name");form.setFields(textItem);final IButton button = new IButton("Hello");button.addClickHandler(new ClickHandler() {public void onClick(ClickEvent event) {String name = textItem.getValue().toString();SC.say("Hello " + name);}});RootPanel.get("formContainer").add(form);RootPanel.get("buttonContainer").add(button);}}
确保导入的软件包如上所示,因为SmartGWT使用的名称与核心GWT框架的名称相同的类。
启动应用程序
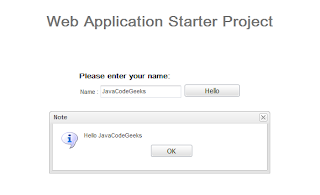
接下来,我们准备启动我们的应用程序。 选择运行? 运行为? Web应用程序并使用您喜欢的浏览器访问提供的URL:
http://127.0.0.1:8888/SmartGWTIntroProject.html?gwt.codesvr=127.0.0.1:9997
您应该能够看到以下内容:
而已。 现在您可以创建一些由SmartGWT支持的出色应用程序了。 您可以在此处找到Eclipse项目(某些文件已从项目中删除)。
这只是有关如何将SmartGWT添加到项目中的简短指南。 在以下文章中,我将基于SmartGWT创建一个完整的应用程序,以向您展示其一些出色的功能。 敬请关注。
- 高级SmartGWT教程,第1部分
- 将CAPTCHA添加到您的GWT应用程序
- 使用Spring Security保护GWT应用程序
- GWT 2 Spring 3 JPA 2 Hibernate 3.5教程– Eclipse和Maven 2展示
- 建立自己的GWT Spring Maven原型
- GWT EJB3 Maven JBoss 5.1集成教程
翻译自: https://www.javacodegeeks.com/2010/06/getting-started-smartgwt-gwt-interfaces.html
SmartGWT入门,提供出色的GWT界面相关推荐
- smartgwt_SmartGWT入门,提供出色的GWT界面
smartgwt SmartGWT简介 我最近开始使用SmartGWT ,它是一个基于GWT的框架,该框架为您的应用程序UI提供了一个全面的小部件库,并为服务器端的数据管理提供了帮助. 您可以在Sma ...
- web登录界面设计_出色的Web界面设计的7条规则
web登录界面设计 When you work on a website or on the design of web pages, remember that their success is n ...
- 树莓派python界面qt_树莓派QT入门教程——使用Qt开发界面程序控制GPIO
树莓派QT入门教程--使用Qt开发界面程序控制GPIO 玩转树莓派2017-07-12 12:36 树莓派入门教程--使用Qt开发界面程序 前言 Qt是一个1991年由奇趣科技开发的跨平台C++图形用 ...
- wix图片导入设置_奇葩史的奇葩事 | [译]:WiX Toolset入门——内置的WixUI界面使用配置...
[译]:WiX Toolset入门--内置的WixUI界面使用配置 2016年11月8日 13:30:00 博客分类: 官方教程 使用内置WixUI对话框 WixUI对话框库主要包含以下几种对话框集合 ...
- Swift - 访问通讯录联系人(使用系统提供的通讯录交互界面)
1,通讯录访问介绍 通讯录(或叫地址簿,电话簿)是一个数据库,里面储存了联系人的相关信息.要实现访问通讯录有如下两种方式: (1)AddressBook.framework框架 : 没有界面,通过代码 ...
- 基于Intel Lake-UP3平台的超声设备方案设计,提供出色的图形和AI性能
超声系统要求 有效的超声系统可加快诊断速度,并帮助医生更快做出更有效的治疗决策. 为此,超声机器要求极高的处理性能和图形渲染效果以提高诊断准确性,并立即获取精确的图像. 类似地,还需要易于移动以适应不 ...
- ps基础教程新手入门第一篇:ps界面的介绍
欢迎来到慕恬瑶平面设计,今天给大家介绍PS基础教程新手入门第一篇: ps界面的介绍.目的让第一次接触ps的小伙伴通过ps基础教程新手入门来了解ps界面的菜单栏,工具栏已方便日后使用. 首先,打开PS ...
- 《AutoCAD 2016中文版室内装潢设计从入门到精通》——第2章 AutoCAD 2016入门2.1 操作界面...
本节书摘来自异步社区<AutoCAD 2016中文版室内装潢设计从入门到精通>一书中的第2章,第2.1节,作者: 贾燕 更多章节内容可以访问云栖社区"异步社区"公众号查 ...
- Consul入门07 - Consul Web界面
Consul还带来了一个界面美观,功能强大的,开箱即用的Web界面.通过该界面我们可以查看所有的服务以及节点,查看所有的健康监测及其当前的状态,以及读取和设置键/值数据.该Web界面自动支持多数据中心 ...
最新文章
- LeetCode简单题之最常见的单词
- Microsoft Expression Blend 2 密钥,key
- 10 i lt shell的if_shell脚本编程之if、case条件语句
- 如何提高android串口kernel log等级
- wpf 加载html页面,使用MVVM在WPF中显示HTML
- 05-cache相关的系统寄存器
- java异步调用数据库存储过程详解,java中如何调用存储过程
- Visual Studio DSL 入门 9---创建状态机的图形符号
- Mplayer 音频解码分析
- 语言做一个自动售货机软件_软件开发手机app系统软件高端定制做一个app软件要多少钱...
- mac json工具_工具类封装的思路 | 钉钉群机器人为例
- pdf转swf linux,Linux环境安装配置Swftools,pdf转swf工具
- 我的ROS学习之路——服务通信
- android+p开机动画,android开机动画[转]
- 微信小程序地图坐标转换
- bzoj 2763:[JLOI2011]飞行路线(luogu 4568)
- 新炬网络签约GBASE南大通用 让中国用户用上世界级国产数据库
- 外牌年检车辆在上海办理年检
- 腾讯优图api接口+Python SDK(1)
- 测试一个教室和一个椅子
热门文章
- apache ignite_Kubernetes集群上的Apache Ignite和Spring第3部分:测试应用程序
- apache kafka_Apache Kafka消费者再平衡
- java oauth2.0_OAuth 2.0 Java指南:5分钟保护您的应用程序安全
- nutshell_Nutshell中的Java 8语言功能-第1部分
- r中rep_Spring中@ Component,@ Service,@ Controller和@Repository之间的区别
- 技术停滞_检测和测试停滞的流– RxJava常见问题解答
- openshift k8s_带有DIY的Openshift上的Spring Boot / Java 8 / Tomcat 8
- JavaFX技巧32:需要图标吗? 使用Ikonli!
- Spring Data JPA教程
- 创建存储,修改存储_安全地创建和存储密码