使用深度学习Web项目的手写Marathi印地语字母书写和检测
For the sake of convenience and clarity, This article is divided into two parts as follows :
为了方便和清楚起见,本文分为以下两个部分:
A. In the first part, we are gonna understand how to build a neural net on Kaggle (Since our data is Huge we are using an online notebook).
答:在第一部分中,我们将了解如何在Kaggle上构建神经网络(由于我们的数据非常庞大,我们正在使用在线笔记本)。
B. In the second part, We are building a clean and simple web app using flask so that the user can draw the character on board and our model predicts it
B.在第二部分中,我们将使用flask构建一个干净而简单的Web应用程序,以便用户可以在板上绘制字符,并且我们的模型可以预测该字符
Final Output will look like
最终输出看起来像
A.建立卷积神经网络模型,对其进行训练并导出模型 (A. Building Convolutional Neural Net Model, Train it and Export the Model)

The dataset is available on Kaggle here. You can either download the dataset or you can just go to Kaggle and create a new notebook there. As the second option is easy and convenient it’s suitable for most of us.
该数据集可在此处的Kaggle上找到。 您可以下载数据集,也可以直接转到Kaggle在此处创建一个新的笔记本。 由于第二种选择既方便又方便,因此适合我们大多数人。
The very first thing about building any machine learning or deep learning project is to have clean data to have better outputs but fortunately and to keep it simple we already have much cleaner data.
构建任何机器学习或深度学习项目的第一件事是拥有干净的数据以提供更好的输出,但是幸运的是,为了保持简单,我们已经拥有了更干净的数据。
We start the tutorial by including the libraries needed for the model building and other stuff
我们通过包括模型构建所需的库和其他内容开始教程
import pandas as pd
import numpy as npfrom keras.models import Sequential
from keras.layers import Dense
from keras.layers import Dropout
from keras.layers import Flatten
from keras.callbacks import EarlyStopping
from keras.layers.convolutional import Conv2D
from keras.layers.convolutional import MaxPooling2D
from keras.utils import np_utils
Pandas is used to handle huge data frames in the most efficient way possible Numpy is used to do numerical calculations and data type conversions and Keras is a deep learning library popularly used to build different deep learning models
Pandas用于以尽可能高效的方式处理海量数据帧Numpy用于进行数值计算和数据类型转换,而Keras是深度学习库,通常用于构建不同的深度学习模型
df = pd.read_csv('/kaggle/input/devanagari-character-set/data.csv')# From First Col to (last-1) col with all rows
X = df.iloc[:,:-1]# last Col with all rows
y = df.iloc[:,-1]
Now we load the actual data in the pandas’ data frame as a table-like format. Our data frame has 1025 columns as (32 x 32) pixel columns and the last column for that actual character string. we split data into input and output parameter as first 1024 columns as input X and last column as output y
现在,我们以表格形式将实际数据加载到熊猫的数据框中。 我们的数据框有1025列(32 x 32)像素列,最后一列是该实际字符串。 我们将数据分为输入和输出参数,前1024列作为输入X,最后一列作为输出y
Labelbinarizer: Binarize labels in a one-vs-all fashion
Labelbinarizer:以一对多的方式对标签进行二值化
Labelbinarizer: indexes the output column of data frame i.e y and store it into an array which can be accessed through .classes_ param of an object
Labelbinarizer:索引数据帧的输出列,即y并将其存储到一个数组中,该数组可以通过对象的.classes_ param访问
# output in binary format for NN
from sklearn.preprocessing import LabelBinarizer
binencoder = LabelBinarizer()
y = binencoder.fit_transform(y)
We had given data in tabular format as it is pixel data but to see how the actual image looks like we reshape the data using NumPy reshape to image like a 2D array of pixels and plot it using matplotlib’s pyplot. I used that imshow function to display the very first image in IMG array but you can view any image just by changing index of the array
我们已经以表格格式给出了数据,因为它是像素数据,但是要查看实际图像的样子,我们使用NumPy整形来对数据进行整形以像像素的2D数组那样成像,并使用matplotlib的pyplot对其进行绘制。 我使用了imshow函数来显示IMG数组中的第一张图像,但是您只需更改数组的索引就可以查看任何图像
X_images = X.values.reshape(92000,32,32)
import matplotlib.pyplot as plt
plt.imshow(X_images[0])
plt.show()
train_test_split : Split arrays or matrices into random train and test subsets
train_test_split:将数组或矩阵拆分为随机的训练和测试子集
now for testing and training the model we have split the data frame horizontally like some rows for training and other for testing sci-kit learns train_test_split function help to split the data frame as per ratio given (test_size = 0.2 in our case which is 20% test data 80% training data)
现在,为了测试和训练模型,我们已经像一些行进行训练一样对数据帧进行了水平分割,而其他一些用于测试sci-kit的东西则学习了train_test_split函数,它有助于按照给定的比率来分割数据帧(在本例中,test_size = 0.2,即20%测试数据80%的培训数据)
after splitting we divide each value in the training set and testing set’s input by 255 as the color value ranges in 0 to 255 and for neuron value range should be 0.0 to 1.0
分割后,我们将训练集和测试集输入中的每个值除以255,因为颜色值范围在0到255之间,而神经元值范围应该在0.0到1.0之间
from sklearn.model_selection import train_test_split
X_train, X_test, y_train, y_test = train_test_split(X_images, y, test_size=0.20, random_state=92)X_train = X_train/255
X_test = X_test/255# changing from 3 to 4 dimensions of inputss
X_train = X_train.reshape(X_train.shape[0], 32, 32, 1).astype('float32')
X_test = X_test.reshape(X_test.shape[0], 32, 32, 1).astype('float32')
also, we need to shift our data from 3D to 4D because our neural net input itself adds one layer of the array and need to change the datatype to float using Numpy
同样,我们需要将数据从3D转换为4D,因为神经网络输入本身会增加数组的一层,并且需要使用Numpy将数据类型更改为float
我们的目标是首先构建卷积模型,然后在卷积模型的输出上构建密集网络以唯一地标识46个字符,因此让我们深入了解 (Our target is to build the convolutional model first the on the output of the convolutional model we build the dense network as to uniquely identifying 46 characters so let dive into that)
# Building the Convolutional Model
conv_model = Sequential()# Adding first CONV layer wit max-pooling
conv_model.add(Conv2D(32, (4, 4), input_shape=(32, 32,1),activation='relu', name="firstConv")
)conv_model.add(MaxPooling2D(pool_size=(2, 2), name="FirstPool")
)# Adding second set of Conv and max-pool layersconv_model.add(Conv2D(64, (3, 3), activation='relu', name="SecondConv")
)conv_model.add(MaxPooling2D(pool_size=(2, 2),name="SecondPool")
)conv_model.add(Dropout(0.2)) # Prevents Overfitting in Conv Nete
So started with sequential we add first conv2D layer of 32 filters and relu activation (the name is just for model.summary() purpose) after each convolution layer we add max polling which is basically selecting the max value form the given square window of an array
因此,从顺序开始,我们在32个滤镜上添加了第一个conv2D层,并在每个卷积层之后添加了relu激活(名称仅用于model.summary()目的),我们添加了max polling,这基本上是从给定的正方形窗口中选择最大值。数组
similarly, we added a 2nd Conv layer we add 64 filters with feature map kernel size of 3 x 3 and again we do max-pooling of 2 x 2 window
同样,我们添加了第二个Conv层,添加了64个滤镜,其特征图内核大小为3 x 3,并且再次进行了2 x 2窗口的最大池化
After this two convolutional layer and pooling layers followed by them we need to add the dropout layer, there is the reason for that as we train our convolutional after some training it starts overfitting crazily to stop that after tuning all the major hyperparameters we have to tune for drop out rate in our case 20% dropout worked fine
在这两个卷积层和池化层之后, 我们需要添加退出层,这是因为在进行一些训练后训练卷积时,它开始疯狂地过度拟合,从而在调整了所有需要调整的主要超参数之后停止了过度拟合在我们的案例中,辍学率是20%
# Building Dense neural net on outputs of the Conv Net# Input Layer : Flattening the Outputs of the Conv Nets
conv_model.add(Flatten())# Two Dense Layers 128 Neuraons and 50 Neurons
conv_model.add(Dense(128,activation='relu',name="dense_1")
)
conv_model.add(Dense(50, activation='relu', name="dense_2")
)# Output Layer with 46 Unique Outputs
conv_model.add(Dense(46, activation='softmax', name="modeloutput")
)conv_model.compile(loss='categorical_crossentropy', optimizer='adam',metrics=['accuracy']
)
On the output of the conv net, we first flatten it to 1D and start building fully connected dense net of 128, 50, 48 layers respectively with first 2 rely activation and of course last needs to be different as softmax activation we compile the modal using categorical cross-entropy as we have multiple choices at the output and optimizing it for accuracy
在conv net的输出上,我们首先将其展平为1D并开始分别使用前2个依赖激活分别构建128、50、48层的完全连接的密集网络,当然最后一个需要不同,因为softmax激活我们使用以下方式编译模态类别交叉熵,因为我们在输出端有多种选择,并对其进行了优化以提高准确性
conv_model.summary()
"""
Model: "sequential_20"
_________________________________________________________________
Layer (type)                 Output Shape              Param #
=================================================================
firstConv (Conv2D)           (None, 29, 29, 32)        544
_________________________________________________________________
FirstPool (MaxPooling2D)     (None, 14, 14, 32)        0
_________________________________________________________________
SecondConv (Conv2D)          (None, 12, 12, 64)        18496
_________________________________________________________________
SecondPool (MaxPooling2D)    (None, 6, 6, 64)          0
_________________________________________________________________
dropout_10 (Dropout)         (None, 6, 6, 64)          0
_________________________________________________________________
flatten_16 (Flatten)         (None, 2304)              0
_________________________________________________________________
dense_1 (Dense)              (None, 128)               295040
_________________________________________________________________
dense_2 (Dense)              (None, 50)                6450
_________________________________________________________________
modeloutput (Dense)          (None, 46)                2346
=================================================================
Total params: 322,876
Trainable params: 322,876
Non-trainable params: 0
_________________________________________________________________
"""
Now is time to reflect before we start training the model layer and the trainable parameter in each layer
现在是时候开始思考,在我们开始训练模型层和每层中的可训练参数之前
this is the heart of this code as a lot of fitting the model on data gives the idea of how optimized it is for accuracy as well as all the other factors Ideally with every epoch your loss will be decreasing and accuracy is increasing
这是此代码的核心,因为大量将模型拟合到数据上可得出如何针对准确性以及所有其他因素进行优化的想法。 理想情况下,随着时间的流逝,您的损失会减少,准确性会增加
# Training the Model on TRaining Dataset
result = conv_model.fit(X_train, y_train, validation_split=0.20, epochs=10, batch_size=92,verbose=2)
"""
Train on 58880 samples, validate on 14720 samples
Epoch 1/10- 37s - loss: 1.0177 - accuracy: 0.7208 - val_loss: 0.3405 - val_accuracy: 0.9010
Epoch 2/10- 36s - loss: 0.2779 - accuracy: 0.9165 - val_loss: 0.2022 - val_accuracy: 0.9397
Epoch 3/10- 36s - loss: 0.1771 - accuracy: 0.9452 - val_loss: 0.1631 - val_accuracy: 0.9521
Epoch 4/10- 36s - loss: 0.1273 - accuracy: 0.9600 - val_loss: 0.1546 - val_accuracy: 0.9542
Epoch 5/10- 37s - loss: 0.0975 - accuracy: 0.9692 - val_loss: 0.1290 - val_accuracy: 0.9634
Epoch 6/10- 37s - loss: 0.0787 - accuracy: 0.9751 - val_loss: 0.1255 - val_accuracy: 0.9637
Epoch 7/10- 36s - loss: 0.0676 - accuracy: 0.9781 - val_loss: 0.1206 - val_accuracy: 0.9668
Epoch 8/10- 36s - loss: 0.0567 - accuracy: 0.9806 - val_loss: 0.1007 - val_accuracy: 0.9717
Epoch 9/10- 36s - loss: 0.0475 - accuracy: 0.9845 - val_loss: 0.1057 - val_accuracy: 0.9698
Epoch 10/10- 37s - loss: 0.0452 - accuracy: 0.9850 - val_loss: 0.1075 - val_accuracy: 0.9707"""
Now try the model on testing data to get testing accuracy and export the model to use it further in web app building You can also use pickle or joblib to export the model
现在尝试对测试数据进行建模以获得测试准确性,并导出模型以在Web应用程序构建中进一步使用它。您还可以使用pickle或joblib导出模型
# TESt Data Testign Accuracy
scores = conv_model.evaluate(X_test, y_test, verbose=0)
print("Accuracy: %.2f%%" % (scores[1]*100))conv_model.save('/kaggle/working/conv_model.hdf5')
This is Just for Fun piece of code this basically first how the image predict the output of the image by our model and display it below as you can change the num variable image will be changed
这只是一段有趣的代码,基本上这首先是图像如何通过我们的模型预测图像的输出并在下面显示,因为您可以更改num变量图像。
num = 25220
plt.imshow(X_images[num])
plt.show()imgTrans = X_images[num].reshape(1,32,32,1)
imgTrans.shapepredictions = conv_model.predict(imgTrans)
binencoder.classes_[np.argmax(predictions)]
Congratulations You just completed the first part of this 2 part article!
恭喜,您刚刚完成了这两部分文章的第一部分!
In this first part we
在第一部分中,我们
- Cleaned the Data清理数据
- Built Convolutional Net内置卷积网
- Built Dense neural net on the back of conv net在卷积网的背面建立密集的神经网
- export the model导出模型
B.围绕卷积模型和“绘图画布”构建Full Flask Flesh Web应用程序。 (B. Building Full Flask Flesh web app around the convolutional model and Drawing Canvas.)
Now you have that model.hdf5 file.Congratulations on that! In this tutorial, we are using flask backend and bootstrap for a little styling. As both are Quick and Easy to learn technologies and super perfect for small-sized projects. To keep this article short and sweet I focused majorly on the core logic of the code and not the very minute details of UI and other stuff
现在您有了那个model.hdf5文件。恭喜! 在本教程中,我们将使用flask后端和bootstrap进行一些样式设置。 两者都是快速且易于学习的技术,对于小型项目而言非常完美。 为使本文简短而有趣,我主要关注代码的核心逻辑,而不是UI和其他内容的详细信息。
Starting with the Backend part flask app has only one starting file i.e app.py we make folders named static for all CSS and JS code templates for the front end HTML templates and one folder for our saved model file
从后端零件瓶应用程序开始,只有一个开始文件,即app.py,我们为前端HTML模板的所有CSS和JS代码模板创建名为static的文件夹,为我们保存的模型文件创建一个文件夹
import pickle
import cv2
from keras.models import load_model
import tensorflow as tf
import numpy as np
from labels import labelsimport warningsmodel = load_model('kaggle-ip/conv_model_Final.hdf5', compile=False)
graph = tf.get_default_graph()"""
_________________________________________________________________
Layer (type)                 Output Shape              Param #
=================================================================
firstConv (Conv2D)           (None, 29, 29, 32)        544
_________________________________________________________________
FirstPool (MaxPooling2D)     (None, 14, 14, 32)        0
_________________________________________________________________
SecondConv (Conv2D)          (None, 12, 12, 64)        18496
_________________________________________________________________
SecondPool (MaxPooling2D)    (None, 6, 6, 64)          0
_________________________________________________________________
dropout_2 (Dropout)          (None, 6, 6, 64)          0
_________________________________________________________________
flatten_2 (Flatten)          (None, 2304)              0
_________________________________________________________________
dense_1 (Dense)              (None, 128)               295040
_________________________________________________________________
dense_2 (Dense)              (None, 50)                6450
_________________________________________________________________
modeloutput (Dense)          (None, 46)                2346
=================================================================
Total params: 322,876
Trainable params: 322,876
Non-trainable params: 0
_________________________________________________________________
"""def prepareImg(number):img = cv2.imread(f'uploads/image-{number}.png')img = cv2.cvtColor(img, cv2.COLOR_BGR2GRAY)img = cv2.resize(img, (32, 32))img = img.reshape(1, 32, 32, 1)print(img.shape)return img# model.summary()
# BE = pickle.load(open('kaggle-ip/labelBinarizerFinal.pickle', 'rb'))def GetPredict(x):with graph.as_default():pred = model.predict(prepareImg(x))warnings.simplefilter("ignore")index = np.argmax(pred)# index -= 1print(labels[index])return labels[index]#chr = BE.classes_[index]# print(chr)# GetPredict(41)"""
Running Script :
python -W ignore conv_model.py
"""
First of all, we load the modal using Keras load_model method there are 2 functions in the code
首先,我们使用Keras load_model方法加载模态,代码中有2个函数
prepareImg: (prepareImg:)
- this function loads the uploaded image此功能加载上传的图像
- convert it into Grayscale image将其转换为灰度图像
- convert that grayscale into a 4D array of shape (1, 32, 32, 1)将该灰度转换为形状为(1、32、32、1)的4D数组
- returns this 4D array返回此4D数组
GetPredict: (GetPredict:)
This function takes imageId x as the parameter
此函数将imageId x作为参数
- load the image in Neural Net using prepareImg function使用prepareImg函数将图像加载到神经网络中
- find the maximum probability of 46 unique outputs找到46个唯一输出的最大概率
- returns the index of maximum probability返回最大概率的索引
labels = ['character_01_ka', 'character_02_kha', 'character_03_ga','character_04_gha', 'character_05_kna', 'character_06_cha','character_07_chha', 'character_08_ja', 'character_09_jha','character_10_yna', 'character_11_taamatar', 'character_12_thaa','character_13_daa', 'character_14_dhaa', 'character_15_adna','character_16_tabala', 'character_17_tha', 'character_18_da','character_19_dha', 'character_20_na', 'character_21_pa','character_22_pha', 'character_23_ba', 'character_24_bha','character_25_ma', 'character_26_yaw', 'character_27_ra','character_28_la', 'character_29_waw', 'character_30_motosaw','character_31_petchiryakha', 'character_32_patalosaw','character_33_ha', 'character_34_chhya', 'character_35_tra','character_36_gya', 'digit_0', 'digit_1', 'digit_2', 'digit_3','digit_4', 'digit_5', 'digit_6', 'digit_7', 'digit_8', 'digit_9']labels.py simply used export the actual value to the key index returned by Neural Net there are 46 values each can be accessed by a unique index
labels.py简单地用于将实际值导出到Neural Net返回的键索引中,每个唯一索引可以访问46个值
from flask import Flask, render_template, request, flash, redirect, jsonify, send_file
import os
from binascii import a2b_base64
import random
import numpy as np
from conv_model import GetPredict#BE = pickle.load(open('kaggle-ip/labelBinarizerFinal.pickle', 'rb'))app = Flask(__name__)# model = load_model('kaggle-ip/conv_model_Final.hdf5', compile=False)
# graph1 = tf.get_default_graph()
# K.clear_session()# Open it with Numpy Reshape it
# Start the Model
# Feed this Input Image
# Get Result Return Request@app.route('/ref')
def ref():return render_template('ref.html')@app.route('/upload', methods=['POST'])
def uploadAndPredict():image_b64 = request.values['imageBase64']count = random.randint(0, 10000)# Removing Prefix from Data URIdata = image_b64.replace("data:image/png;base64,", '')binary_data = a2b_base64(data)# Get the Images Saved in Upload Folderfd = open(f'uploads/image-{count}.png', 'wb')fd.write(binary_data)fd.close()# Getting Prediction from Conv-modelchrX = GetPredict(count)# Sending the JSON response of the Objectres = {"imageID": count,"prediction": chrX}return jsonify(res)# Function to send image according to Id@app.route('/image/<imageID>')
def getImage(imageID):filename = f'uploads/image-{imageID}.png'return send_file(filename, mimetype='image/png')@app.route('/')
def home():return render_template('home.html')
App.py is the root entry in the flask app it has multiple routes and associated functions to that routes as below
App.py是flask应用程序中的根条目,它具有多个路由以及与该路由相关的功能,如下所示
“/ref”: this route sends to Ref Static page just show up a page
“ / ref ”:此路由发送到“ Ref Static”页面,仅显示一个页面
“/upload”: there is a lot going in here
“ / upload ”:这里有很多内容
- Image data URI is sent to the server图像数据URI被发送到服务器
- It is converted to PNG image and is saved in file system /uploads folder它将转换为PNG图像,并保存在文件系统/ uploads文件夹中
- Image is feed to Neural Net and Output is taken图像被馈送到神经网络并获取输出
- Output and Random Id generated is sent to frontend in JSON format生成的输出和随机ID以JSON格式发送到前端
3.”/image/<imageID>”: this route return the Image file of the Image ID passed as a parameter
3.” / image / <imageID> ”:此路由返回作为参数传递的Image ID的Image文件
4.”/” This is Homepage as renders Drawing screen on “Home.html”
4.” / ”这是主页,“ Home.html”上的“绘图”屏幕
Now we go by starting the very static part (just for show part) i.e ref.html
现在我们开始非常静态的部分(仅用于显示部分),即ref.html
<!DOCTYPE html>
<html lang="en"><head><meta charset="UTF-8" /><meta name="viewport" content="width=device-width, initial-scale=1.0" /><title>References - Marathi letter recognition | DL Project</title><linkrel="stylesheet"href="https://stackpath.bootstrapcdn.com/bootstrap/4.5.0/css/bootstrap.min.css"/><link rel="stylesheet" href="static/drawing-board/drawingboard.min.css" /><link rel="stylesheet" href="static/css/comman.css" /></head><body><!-- Header Code --><nav class="navbar navbar-light bg-primary"><a class="d-flex navbar-brand" href="#"><imgsrc="static/img/logo.png"width="50"height="50"class="d-inline-block align-top"alt=""style="border-radius: 50%;"/><h3 class="text-light px-2">Marathi Handwritten Letter Recognition</h3></a><div class="text-right"><a href="/" class="text-light"><button class="btn btn-light">Homepage</button></a></div></nav><!-- Body araa --><div class="container py-2"><h4>Marathi</h4><p>Marathi is an Indo-Aryan language spoken by about 71 million peoplemainly in the Indian state of Maharashtra and neighbouring states.Marathi is also spoken in Israel and Mauritius. Marathi is thought to bea descendent of Maharashtri, one of the Prakrit languages whichdeveloped from Sanskrit. <br />Marathi first appeared in writing duringthe 11th century in the form of inscriptions on stones and copperplates. From the 13th century until the mid 20th century, it was writtenwith the Modi alphabet. Since 1950 it has been written with theDevanāgarī alphabet.</p><hr class="my-3" /><h6>Marathi Vowels</h6><img src="static/img/ref/vowels.gif" alt="" class="w-100" /><hr class="my-3" /><h6>Marathi Consonents</h6><img src="static/img/ref/consonents.gif" alt="" class="w-100" /><hr class="my-3" /><h6>Marathi Numbers</h6><img src="static/img/ref/numbers.gif" alt="" class="w-100" /><hr class="my-3" /><a href="/" class="text-light text-right d-flex justify-content-end"><button class="btn btn-light">Homepage</button></a></div><!-- Footer Code --><navclass="navbar navbar-light bg-primary sticky-bottom text-light d-flex justify-content-center"><p class="text-light text-center">Dataset Link :<aclass="text-light"href="https://archive.ics.uci.edu/ml/datasets/Devanagari+Handwritten+Character+Dataset">https://archive.ics.uci.edu/ml/datasets/Devanagari+Handwritten+Character+Dataset</a><br />Made with ❤️ by<a href="https://github.com/Mayank-MP05" class="text-light">@Mayank_MP5</a></p></nav></body>
</html>
We are using the DrawingBoard.js to create a blank drawable drawing board you can read about it more here
我们正在使用DrawingBoard.js创建一个空白的可绘制绘图板,您可以在此处内容
https://leimi.github.io/drawingboard.js/
https://leimi.github.io/drawingboard.js/
<!DOCTYPE html>
<html lang="en"><head><meta charset="UTF-8" /><meta name="viewport" content="width=device-width, initial-scale=1.0" /><title>Marathi letter recognition | DL Project</title><linkrel="stylesheet"href="https://stackpath.bootstrapcdn.com/bootstrap/4.5.0/css/bootstrap.min.css"/><link rel="stylesheet" href="static/drawing-board/drawingboard.min.css" /><link rel="stylesheet" href="static/css/comman.css" /></head><body><!-- Header Code --><nav class="navbar navbar-light bg-primary"><a class="d-flex navbar-brand" href="#"><imgsrc="static/img/logo.png"width="50"height="50"class="d-inline-block align-top"alt=""style="border-radius: 50%;"/><h3 class="text-light px-2">Marathi Handwritten Letter Recognition</h3></a><div class="text-right"><a href="./ref" class="text-light"><button class="btn btn-light">Reference Sheet</button></a></div></nav><!-- Body araa --><div class="container py-2"><div class="row"><div class="col-5"><h6>Draw that Character on Board below</h6><divclass="board drawing-board square-board m-2"id="simple-board"></div><div class="d-inline w-100 text-center btn-socket"><button class="btn btn-danger" onclick="ResetBG()">Clear</button><buttontype="submit"class="btn btn-success"onclick="GetImageURL()">Predict</button></div></div><div class="col-7"><h5>Predictions from Drawn Images :</h5><table class="table table-bordered"><thead class="thead-dark"><tr><th scope="col">#</th><th scope="col">Drawn Image</th><th scope="col">Prediction</th></tr></thead><tbody><tr><th scope="row" id="current-count">Current</th><td id="current-img">Loading...</td><td id="current-prediction">Loading...</td></tr><tr><th scope="row">Previous</th><td><imgsrc="http://localhost:5000/image/1343"alt=""class="thumb-img"/></td><td>character_06_cha</td></tr><tr><th scope="row">Previous</th><td><imgsrc="http://localhost:5000/image/9386"alt=""class="thumb-img"/></td><td>character_25_ma</td></tr><tr><th scope="row">Previous</th><td><imgsrc="http://localhost:5000/image/5376"alt=""class="thumb-img"/></td><td>character_02_kha</td></tr></tbody></table></div></div></div><!-- Footer Code --><navclass="navbar navbar-light bg-primary sticky-bottom text-light d-flex justify-content-center"><p class="text-light text-center">Dataset Link :<aclass="text-light"href="https://archive.ics.uci.edu/ml/datasets/Devanagari+Handwritten+Character+Dataset">https://archive.ics.uci.edu/ml/datasets/Devanagari+Handwritten+Character+Dataset</a><br />Made with ❤️ by<a href="https://github.com/Mayank-MP05" class="text-light">@Mayank_MP5</a></p></nav><script src="https://ajax.googleapis.com/ajax/libs/jquery/3.5.1/jquery.min.js"></script><script src="static/drawing-board/drawingboard.min.js"></script><script src="static/js/drawing-board-controls.js"></script><script src="static/js/imageAndTextUpdate.js"></script></body>
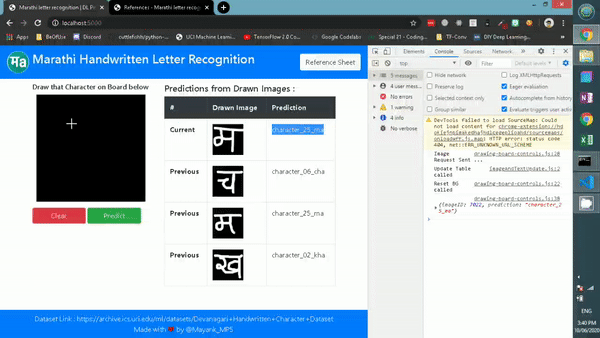
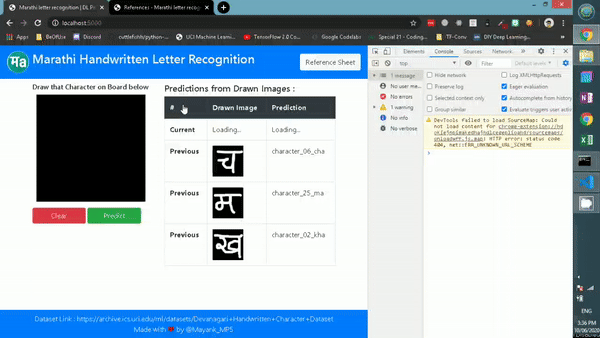
</html>On the Home page there is Drawing Board on the Left and the Prediction column on the right there are 2 buttons below the drawing board one for clearing the board and other for prediction
在主页上,左侧是制图板,右侧是“预测”列,制图板下方有2个按钮,一个用于清除板,另一个用于预测
let’s dive into the front end javascript code for drawing board and clearing
让我们深入研究用于画板和清理的前端javascript代码
var simpleBoard = new DrawingBoard.Board("simple-board", {controls: false,background: "#000",color: "#fff",size: 20,webStorage: false,
});
//simpleBoard.addControl("Download"); //if the DrawingBoard.Control.Download class exists//listen to an event
simpleBoard.ev.bind("board:reset", why);//stop listening to itsimpleBoard.ev.unbind("board:reset", why);function why() {alert("OH GOD WHY");
}const ResetBG = () => {console.log("Reset BG called");simpleBoard.resetBackground();
};const GetImageURL = () => {url = simpleBoard.getImg();console.log("Image Request Sent ...");$.ajax({type: "POST",url: "/upload",data: {imageBase64: url,},}).done(function (e) {updateTable(e);ResetBG();console.log(e);});
};
We created the instance of the drawing board class board with a black background and white pointer
我们用黑色背景和白色指针创建了绘图板类板的实例
ResetBG: is used to clear the board to full black
ResetBG :用于将板清除为全黑
GetImageURL: used to get Image URI and send it to backend /upload route via post request to the server and clearing the canvas after sending that
GetImageURL :用于获取图像URI并将其通过后请求发送到服务器的后端/上传路由,并在发送后清除画布
const updateTable = (obj) => {console.log("Update Table called");const imgParent = document.getElementById("current-img");const predictParent = document.getElementById("current-prediction");imageID = obj.imageID;prediction = obj.prediction;url = `http://localhost:5000/image/${imageID}`;img = `<img src="${url}" class="thumb-img">`;imgParent.innerHTML = img;predictParent.innerHTML = prediction;
};
we need to update the prediction coming from the backend on the front end table and that task is done by updateTable function it updates image URL and Image ID coming from the server
我们需要更新来自前端表后端的预测,并且该任务由updateTable函数完成,它会更新来自服务器的图像URL和图像ID
Here is the Final Output of what we built in this tutorial
这是我们在本教程中构建的内容的最终输出
you can take look at code here in the web-app directory :
您可以在web-app目录中查看以下代码:
Thanks for Reading!
谢谢阅读!
翻译自: https://medium.com/ai-in-plain-english/handwritten-marathi-hindi-letter-writing-and-detection-using-deep-learning-web-project-2552ed429dbe
http://www.taodudu.cc/news/show-3016586.html
相关文章:
- 2021年编程列入高考_什么是2021年最佳的后端编程语言?
- jquery 堆栈溢出_带有jQuery和CSS3的漂亮照片堆栈库
- jquery 照片墙抽奖_使用jQuery滑动面板照片墙画廊
- 印度软件和中国软件工程师_如何成为印度的软件工程师?
- Sixth season seventh episode,Phoebe‘s running style is so free!!!
- se.arch.php,arch暴涨,数据库差点挂。请教
- TOEFL-Write-课堂笔记
- 学位英语考试复习
- 【贪玩巴斯】带你一起攻克英语语法长难句—— 第五章——尾声的凯旋:状语和状语从句 ——2022年2月25日-3月17日
- 专升本——主从复合句
- 背包问题专栏(01,完全,多重)
- 基础知识回顾2
- 大学最后一个学习的半年,Do crazily without hesitation
- The fourth,fifth,sixth,seventh episode of Crazily Speak English
- nacos忘记密码
- 忘记数据库密码怎么办
- 忘记了电脑登陆密码,只记得PIN密码时可以登陆电脑怎么修改密码
- centos7虚拟机忘记密码
- navicat连接mysql忘记密码_navicat忘记密码怎么办
- 公司计算机系统忘记用户密码怎么办,电脑开机密码忘记了怎么办,教您如何解决忘记电脑开机密码...
- ubuntu忘记mysql密码,怎么办
- suse linux如何重置密码忘记,SUSE Linux忘记root密码的对策
- Mysql8.0 忘记密码怎么办
- 计算机用户账户密码重置,简单三步重置忘记的电脑密码,记得收藏!
- M1忘记mysql密码
- linux忘了用户名和密码_linux忘记用户名怎么办
- kali linux忘记用户名,kali_linux忘记root密码怎么办?
- MySQL安装 忘记密码
- 深度linux密码忘记,Deepin深度系统登录密码忘记重设
- ubuntu安装mysql忘记密码并重置
使用深度学习Web项目的手写Marathi印地语字母书写和检测相关推荐
- 深度学习(4)手写数字识别实战
深度学习(4)手写数字识别实战 Step0. 数据及模型准备 1. X and Y(数据准备) 2. out=relu{relu{relu[X@W1+b1]@W2+b2}@W3+b3}out=relu ...
- 深度学习(3)手写数字识别问题
深度学习(3)手写数字识别问题 1. 问题归类 2. 数据集 3. Image 4. Input and Output 5. Regression VS Classification 6. Compu ...
- 深度学习 卷积神经网络-Pytorch手写数字识别
深度学习 卷积神经网络-Pytorch手写数字识别 一.前言 二.代码实现 2.1 引入依赖库 2.2 加载数据 2.3 数据分割 2.4 构造数据 2.5 迭代训练 三.测试数据 四.参考资料 一. ...
- 深度学习笔记:Tensorflow手写mnist数字识别
文章出处:深度学习笔记11:利用numpy搭建一个卷积神经网络 免费视频课程:Hellobi Live | 从数据分析师到机器学习(深度学习)工程师的进阶之路 上一讲笔者和大家一起学习了如何使用 Te ...
- 深度学习——CNN实现MNIST手写数字的识别
活动地址:CSDN21天学习挑战赛 目录 知识点介绍 MNIST 介绍 下载 数据的简单处理 CNN神经网络 CNN的作用 CNN的主要特征 CNN的神经网络结构 CNN的相关参数 MNIST识别的 ...
- [李宏毅老师深度学习视频] 机器学习深度学习基本内容【手写笔记】
此笔记来源于李宏毅老师的机器学习视频,以下属于自己的理解以及老师上课的内容,由于公式过多,不便于直接打字,故用手写笔记替代. Github的链接(pdf):https://github.com/Bes ...
- 深度学习笔记(MNIST手写识别)
先看了点花书,后来觉得有点枯燥去看了b站up主六二大人的pytorch深度学习实践的课,对深度学习的理解更深刻一点,顺便做点笔记,记录一些我认为重要的东西,便于以后查阅. 一. 机器学习基础 学习的定 ...
- 02:一文全解:利用谷歌深度学习框架Tensorflow识别手写数字图片(初学者篇)
标签(空格分隔): 王小草Tensorflow笔记 笔记整理者:王小草 笔记整理时间2017年2月24日 Tensorflow官方英文文档地址:https://www.tensorflow.org/g ...
- 利用python卷积神经网络手写数字识别_Keras深度学习:卷积神经网络手写数字识别...
引言:最近在闭关学习中,由于多久没有写博客了,今天给大家带来学习的一些内容,还在学习神经网络的同学,跑一跑下面的代码,给你一些自信吧!Nice 奥里给! 正文:首先该impor的库就不多说了,不会的就 ...
最新文章
- 手低眼高 初学者学习Hibernate的方法
- 跟vczh看实例学编译原理——二:实现Tinymoe的词法分析
- .Net Core2.*学习手册
- 贪心策略摘果子(洛谷P1478题题解,Java语言描述)
- 痞子衡嵌入式:极易上手的可视化wxPython GUI构建工具(wxFormBuilder)
- apache主机的重定向和多域名绑定
- HanLP词性标注集
- html5 dom storage,Client-side data storing,DOM storage or HTML5 Local Storage?
- python3.5安装pip_python详细安装pip教程
- spark 类别特征_spark 机器学习基础 数据类型
- “你需要TrustedInstaller提供的权限才能对此文件进行更改” 解决方案
- mysql 百万级数据库优化方案
- 嵌入式物联网软件开发实战
- 计算机32还是64位操作系统,电脑系统32位好还是64位好 哪个快?
- 2021最新 北京互联网公司排名
- 如何免费下载DJKK的音乐
- 【高数】高数第六章节——平面图形的面积旋转体体积平面截面体体积平面曲线的弧长定积分在物理学中的应用
- I met my soulmate. She didn't.
- Javascript深克隆和浅克隆
- 香港服务器 微信支付,如何给微信开通香港钱包(WeChat Pay HK)