win10下安装ubuntu14.04双系统(UEFI固件)
2019独角兽企业重金招聘Python工程师标准>>> 
在windows10环境下安装双系统,遇到了很多坑。作为一个用惯了虚拟机的人,本想通过安装双系统来充分利用计算机本身的硬件资源,结果失败了n次,摸索了整整一天,看了一篇详细的博客才安装好的。实验室的大牛看到我这情况估计也是醉了。总结下遇到了哪些坑:
在双系统下就不用创建/boot分区了,这样会妨碍系统的按照,安装过程中会报错。{因为我是在win10已经在本机上正常运行的情况下,通过将磁盘进行压缩卷之后,在此基础之上来进行ubuntu的安装的。}
系统安装完之后,开机直接进入windows,不提示ubuntu的进入选项,这是因为引导失败导致的,计算机无法识别ubuntu的引导加载程序。这个时候只需要按F1进入bios设置一下启动优先级,使得ubuntu的优先级高于windows即可。因为ubuntu在启动的时候会检测到windows,而windows在启动的时候则会忽略掉ubuntu的启动加载程序——grub。我装第一台机器的时候按照下文的博客中的方式还更新了grub的启动项。但是由于我是先有windows10,后来再安装的ubuntu,与作者先安装ubuntu,后安装windows有不同的地方。
uefi与bios不同,导致很多的加载项不能按照旧的模式进行匹配,很多网上的资料说使用EasyBCD,但是这样的话需要先建立引导,后安装,我是安装完之后才建立引导的。而且,我经过实际的操作,总结出,其实只要你进入bios修改一下就行,不需要而且无法使用easyBCD。因此需要注意Step 4.1也是不需要操作的。
下面给出那篇博客的地址https://askubuntu.com/questions/666631/how-can-i-dual-boot-windows-10-and-ubuntu-on-a-uefi-hp-notebook/666632#666632?newreg=baf0501fc8b94705aeeb00f1afc9ba4d
果然很多事都是需要深入理解其背后的内涵,熟能生巧。我第二次帮一个师妹安装双系统才花了20多分钟就整好了。但是这里面还是有很多东西值得去细细地分析。The devil is always in the details.关于计算机,我们有很多值得学习和研究的地方。
This is the longest post I've ever made on a StackExchange site, but this process requires a lot of explanation and attention to detail. It's also somewhat specific to the hardware in question, which requires more explanation.
After a lot of headache, two accidental hard drive reformattings, and lots of frustration with HP's buggy firmware implementation, I finally got Xubuntu and Windows 10 running nicely side-by-side. I've done this with Windows 10, but it should also work with Windows 8.1. Both of these newer operating systems use the new(ish) UEFI firmware system, instead of the traditional BIOS system, which is where most confusions with dual-booting seem to arise. I read lots of things from lots of places with instructions for dual-booting with a BIOS system, that talk about UEFI as if it's just a different kind of BIOS, or an optional layer between BIOS and and OS. UEFI and BIOS are not the same thing; a UEFI is not a BIOS, and a BIOS is not a UEFI. They're completely different. There are some things that need to be done differently when dual-booting with a UEFI system.
Firstly, do not use EasyBCD. I've seen a lot of outdated dual-booting tutorials that recommend EasyBCD, but it is designed to work with traditional BIOS firmware used by Windows 7 and Windows Vista, and it does not work well with newer UEFI firmware (Windows 8, 8.1, or 10). If you have already fiddled with EasyBCD, don't worry- the worst it probably did is make a mess in your EFI boot entries by writing things to the MBR. We'll clean that up in step 4. Speaking of MBR, avoid that like the plague. The Master Boot Record is what's used in traditional BIOS firmware as a list of bootloaders stored in the boot partition (or, if written by Windows, in whichever partition is first) of your hard drive. It's meant to list the operating systems on the hard drive, and tell the firmware which one gets booted first. This does not work well with HP's UEFI firmware. It seems that if there's any MBR modification done, HP's UEFI firmware gets confused and runs back to the Windows Boot Manager, which will completely bypass GRUB.
What you'll need:
A live USB or installation CD with your preferred Ubuntu distribution.
Installation media for your Windows OS. If you're upgrading from Windows 8.1, you can do it without downloading the full 3+ GB .iso for Windows 10- there is a web installer that downloads it as it installs- but, for this method, you need the .iso extracted to a CD or USB drive. It's also a good idea to have it on hand for the future, so you might as well create it now. Since this question is about dual-booting with a UEFI system, you'll need the 64-bit OS.
Make sure you have your Product Key, or you won't be able to upgrade/install.
Optional, but highly recommended: A drive large enough to back up your current Windows files.
Enough space on your hard drive for both operating systems, a boot partition (only 200 MB), and a linux-swap partition (usually the same size as your physical RAM).
Step 1: Make a backup
Back up all of your Windows files and folders that you don't want to lose. As long as you have enough free hard drive space for your new Ubuntu partition, this process should not interfere with Windows files. Should is a risky word, though.
Windows 8.1 has a "make a recovery disk" tool, but I found it useless and non-functional when it came to restoring the backup I made with it. The most straightforward way to preserve the files you don't want to lose is to just open Windows Explorer, and copy them to a backup disk. It takes forever, but it's worth it.
Step 2: Disable Fast Startup, and shut down your computer
You'll need to be logged in as an administrator to do this.
It's very important to disable Fast Startup before installing GRUB, because whether the Ubuntu installer can detect Windows' presence depends on how Windows represents itself in the boot partition. With Fast Startup properly disabled, it should be detected. Detection will be covered in step 4.
Windows 8, 8.1, and 10 use this fancy new thing called Fast Startup, which tells your firmware to load a special bootloader that restores the system to its pre-shutdown state very quickly. Pretty cool, huh? Well, because it changes the EFI system's next-boot option, this feature will have to be disabled while you're installing GRUB. This can be done by going to the Control Panel, then to Power Options, click "Choose what the power button does", click "Change settings that are currently unavailable", then uncheck the box that says "Turn on fast startup (Recommended)" at the bottom. More detailed instructions can be found here. You can re-enable Fast Startup after installing GRUB, and it seems not to cause any problems with Ubuntu/GRUB. Just make sure it's disabled during the installation.
After you've disabled Fast Startup, shut down your computer. Since Fast Startup is disabled, Windows will do a complete shutdown, and not change the next-boot option in the firmware's EFI manager. (Layman's terms: Windows won't tell your HP system to boot its Fast Startup file when it's next turned on, so it will use the EFI boot manager's list, as it should. GRUB will place itself first on this list.)
Step 3: Set up the partitions with gparted
Before installing Ubuntu, you'll want to use your live CD/USB to make a separate partition for it. That way, it *won't overwrite Windows.
*Make sure you've got a backup. No guarantees- this depends on what Windows has decided to do in your boot partition, and it may also depend on which Ubuntu version/distribution you're using- I haven't used them all.
To make the partitions, you need to boot to your live CD/USB, and open gparted. There are plenty of tutorials on using gparted, and it's pretty easy to figure out, so I'll leave the specifics up to you and the Internet.
You will need 4 partitions:
If installing from scratch, make your Ubuntu partition just as described above. Make sure it's formatted as ext4, ext3, or ext2. This will allow Ubuntu to use it, but keep the Windows 10 installer from recognizing it, which should cause it to default to the FAT32 partition you made in step 3, which it can read.
If installing both operating systems from scratch (again, this will wipe out all of your data), Microsoft says you'll need at least 20 GB for 64-bit OS, so this partition needs to be at least 20 GB. You'll probably want more than that, though: I just used half of the space after the boot partition for Windows, and half of it for Ubuntu and linux-swap. If you're going from scratch, this partition needs to be formatted as FAT32. When you install Windows, it will format it to NTFS. Do not do this with gparted; Windows' implementation of NTFS is different than gparted's implementation, and Windows may not be able to recognize the partition. In the Windows 10 installer, you should have the option to select which partition to place Windows 10 on. If it's formatted as FAT32, Windows should be able to see it and install itself there. If you can label this partition, label it
Windows. That will make it easier for you during the Windows install. Speaking of the Windows installer- don't begin that yet. If you're doing new installations of both Ubuntu and Windows at the same time, instead of upgrading from 8 or 8.1 to 10, it'smuch easier to install Ubuntu first.If you're doing a new installation, and you want to start everything from scratch (this will wipe out all of your data), go ahead and delete all of the partitions on your drive, and then make this partition. It should be the first partition; its format should be FAT32; and it should be at least 200 MB in size. If gparted has an option to label it, just call it
boot. If there's not label option, don't worry about it.
A boot partition. If you already have Windows installed, you shouldn't need to do anything- it should already be one of the first partitions in your drive. Sometimes Windows also makes another small partition at the beginning of the disk called Recovery. Just leave this alone.
A Windows partition. Again, if you already have Windows installed, this partition should obviously be here, after the boot and Recovery partitions. This is where you want it, but you need to resize it to make room for your Ubuntu partition, and the linux-swap partition. Use gparted's resize/move option to do this. Ubuntu needs at least 5 GB, and the linux-swap partition should be at least half the size of your physical RAM, so Resize the windows partition to make enough room for that. gparted will warn you about potential data loss- shrinking your partition should not destroy or corrupt any data, as long as you don't shrink it down into the space being used.
A Linux partition. Like the Windows partition, this can vary in size, but Ubuntu's websiterecommends at least 5 GB. Again, you'll probably want a lot more than that. If you're upgrading instead of doing a fresh install of both operating systems, you should be able to create this partition in the new "unallocated" space shown in gparted. Make it as big as you like but remember to leave space for a linux-swap partition if you plan on using one. It should be formatted as ext4 ext2 or ext3 should work too, if you prefer those for some reason.
Optional, but recommended: a linux-swap partition. At least half the size of your physical RAM is a good start, but I recommend reading the details. I've got 8 GB of RAM, and a 1TB hard drive, so I just made this partition the same size as my physical RAM.
Step 4: Install Ubuntu first
Whether you're upgrading to Windows 10 from an existing Windows OS, or installing both Windows 10 and and Ubuntu distribution to a new or newly-repartitioned hard drive, it's a lot easier to install Ubuntu first. Ubuntu uses GRUB 2 as its bootloader, which does things the way an EFI bootloader should. Windows 10 uses Windows Boot Manager, which does things... well, the way Windows does them... If you install Windows first, you likely won't be able to boot to Ubuntu without holding down a special key during the boot process to stop the Windows Boot Manager from loading, because Windows Boot Manager doesn't respect GRUB when it's added to its list of bootloaders. So instead, install Ubuntu and GRUB first, then add an entry to GRUB for the Windows Boot Manager.
Step 4.1: Cleaning out old EFI entries (optional)
Please be careful here. Deleting the wrong thing can cause huge problems.
Before installing Ubuntu, we want to make sure that the ghosts of past OS installations aren't going to come back to haunt us in the future. In a UEFI system, operating systems use EFI (extensible firmware interface) files to tell the firmware: "Hey, I exist. This is where you can find me." When a new OS is installed, it adds an entry to the EFI Boot Manager's list, which gives it a unique entry number, and tells the EFI Boot Manager where it's EFI file(s) is/are (Windows registers several different EFI files- one for regular boot, one for a recovery boot, one for Fast Startup- possibly more depending on your firmware and your OS version). The EFI Boot Manager also keeps track of the boot-order: a list of entry numbers that specify what gets booted first. If you've been using EasyBCD; bcdedit; Windows' Boot Repair or Recovery tools; boot-repair in a Linux OS; or even if you've updated Windows or reinstalled it, there's a good chance that your EFI entry list now has some duplicates. At least, that was the case with mine. Having duplicates here can bog down your booting process, as the firmware sifts through the out-of-date or wrong-file entries until it finds a bootloader that works. It can also cause a boot-loop, where bootloader A points the firmware to bootloader B, which points it back to A, and then things start to take a very, very long time...
Anyway, to view your EFI entry list, and see what needs to be cleaned use the efibootmgr package with your live CD/USB. You'll need to install it using sudo apt-get install efibootmgr in a terminal, then run it using sudo efibootmgr. By default, you'll get a list of entries that looks something like this:
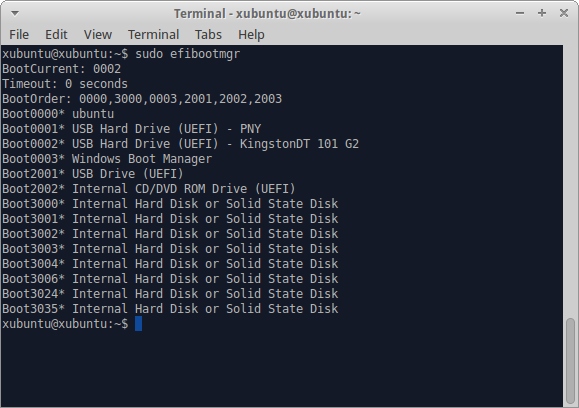
When I first used this tool after fiddling with EasyBCD and bcdedit trying to get things to boot in the right order, I had over a hundred entries here, most of them duplicates.
If your boot manager list isn't too cluttered, or if you're not comfortable deciding what can be deleted and what shouldn't be deleted, just skip to step 4.2.
To clean out any entries you don't need, use efibootmgr -b <hex_number> -B, where hex_number is replaced by the number listed with the boot entry. So, to remove the USB Drive (UEFI) entry (numbered Boot2001), I'd use sudo efibootmgr -b 2001 -B. You'll notice that I left some duplicates (all of the 3000+ numbered entries). You can use efibootmgr with different options to view some other attributes of the entries, such as the file paths they point to. Those entries look like duplicates, but they all point to different files used by my HP laptop to update its BIOS. Please be careful what you remove. It can be very difficult or impossible to replace things here. You can also use efibootmgr to change the BootOrder, which it displays. See the man page for more information on this useful tool.
Step 4.2: Installing Ubuntu
After you've cleaned up the EFI Boot Manager entries, if you chose to do so, it's finally time to install Ubuntu. With your live CD/USB loaded, select the install option from the bootloader menu, or launch it from the desktop after logging in. Choose your options on the first page of the installer. The second part will look something like this: (I'm using Xubuntu 14.04, so your installer may vary, but the options should be pretty similar.)
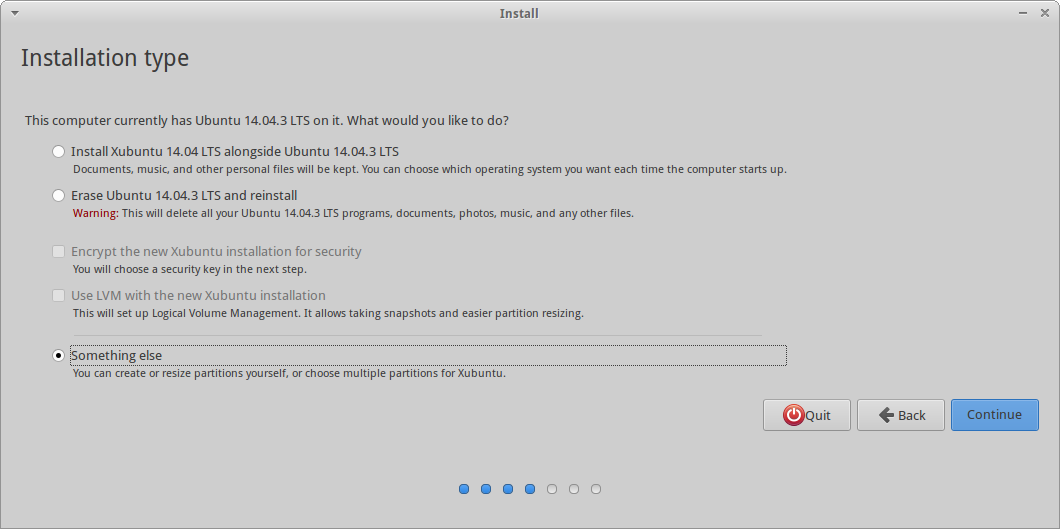
If your installer doesn't detect your Windows installation (like mine), you'll need to select the "Something else" option. From there, you'll get a screen that looks similar to the gparted menu you used to set up your partitions. Simply select the partitions you made, and assign them to the correct mount point by selecting a partition and clicking "Change".
If you're installing both OSes from scratch, do the same thing. Do not use the automatic installation option. You need to make sure Ubuntu gets installed in the ext2/ext3/ext4 partition, notthe FAT32 Windows partition.
Step 5: Update or install Windows second
You should have an installation disk for Windows 10. Before you start installing, make sure you have your product key nearby, or you won't be able to install/upgrade. When you boot to the installation CD/USB, the installer is pretty simple. A bit too simple for my comfort- the only button was "Install Windows 10" or something like that, and Windows 8, 8.1, and 10, are infamous for their behind-the-scenes installs, where it simply says "We're getting things ready", and provides no details about what it's actually doing to your system. If you've followed these instructions so far, it should be OK to begin installation regularly.
If you're upgrading from Windows 8 or Windows 8.1, you shouldn't have to do anything special with the installation process. Get through the (very long) installation, and proceed to step 6.
If you're doing a fresh install, the installer will ask you where you want to install Windows 10. Make sure you select the FAT32 partition you made in step 2, and not another partition, or that partition will be wiped and formatted. Because Ubuntu is already installed, Windows 10 should be respectful of the boot partition and not reformat it. Having the rubbish entries cleaned out of the EFI Boot Manager's list will also free up space in the tiny 200 MB boot partition, lessening the chances that Windows to get confused and angry and clear the whole thing for itself.
Step 6: Update and (optionally) customize GRUB
After installing or upgrading to Windows 10, you'll need to reboot to Ubuntu to update GRUB so it includes Windows Boot Manager on its list. Before you do this, disable Fast Startup again. This is done very similarly to how you did it in step 2. The control panel and settings UI are a bit different, but most of the options are still there.
After you've disabled Fast Startup again, reboot your computer.
If Windows boots by default, you will need to hold down the special key for your laptop to get to the system's firmware menu. On my HP Touchsmart, that key is Esc. Other common keys are F12, Delete, F10... Your computer's manual should be able to help you out here. From the firmware menu, boot into GRUB. There should be an option to "select a boot device" or something similar, and Ubuntu or GRUB should be listed there. If it's not listed, look for an option to boot from an EFI file, and browse to /EFI/ubuntu/grubx64.efi or (if you have Secure Boot enabled), use EFI/ubuntu/shimx64.efi instead. The actual paths of these files may vary depending on your options, and how your boot partition is set up. Selecting one of these .efi files should boot to GRUB, where you can then boot to your Ubuntu distribution. Once you've logged in, open a terminal and type sudo update-grub. This will run the os-prober script that GRUB uses to compile grub.cfg, which tells grub's EFI file which entries to include, what colors to use, etc. The os-prober script should identify Windows Boot Manager, and automatically add it to the list.
Optionally, you can install Grub Customizer to change the order of menu entries and change the behavior and the color and background of the GRUB menu. You can install this from a terminal using sudo apt-get install grub-customizer, and then run sudo grub-customizer.
When using GRUB on a UEFI system shared with a Windows OS, DO NOT install to MBR.Some tutorials list it as a crucial step to use Grub Customizer's "Install to MBR" option under the File menu. You should not do this on most UEFI systems. The MBR (Master Boot Record) is designed for BIOS firmwares, and is still used by the Windows Boot Loader to some extent. Adding GRUB to the MBR, when it's already in the EFI entry list, can cause lots of hairballs. If you need to make sure that GRUB is the first entry in the boot-order list (i.e. if Windows is always booting, even though you did everything right), use efibootmgr (see step 4.2) to view/edit the EFI Manager's boot order.
Notes
I haven't mentioned Secure Boot at all, because it should normally not affect Ubuntu's installation. Many dual-booting tutorials talk about disabling it, but that's usually not necessary with a current 64-bit installer. However, each PC is different, and Secure Boot is fairly new (2012), so different firmwares may implement things differently. For example, the version of my HP firmware includes a "legacy boot" option, which disables Secure Boot and treats installed OSes as though it were BIOS firmware: some people recommend enabling this for installing for dual-boot. Installing Ubuntu in legacy boot mode on my system prevented GRUB from adding itself to the EFI entry list, so all it could do was add itself to the MBR, which Windows Boot Manager had full control of. Windows Boot Manager took a lot of tweaking to even display the list of entries, and after all that, it would only boot the Windows entries, making GRUB unusable without manually selecting its EFI file every time I powered on.
See here for more information on Ubuntu and Secure Boot and Legacy Boot, and information about the difference between UEFI and BIOS installations in general.
转载于:https://my.oschina.net/donngchao/blog/541218
win10下安装ubuntu14.04双系统(UEFI固件)相关推荐
- HP暗影精灵三win10下安装ubuntu16.04双系统(uefi安装)
1.系统启动盘制作 准备一个空优盘(需不需要空待考究),下载好Ubuntu16.04的安装包,直接右键解压到U盘.这样就ok,亲试有效. 2.准备磁盘分区 win10下win+x 进入[磁盘管理],压 ...
- 戴尔笔记本(外星人)win10下安装ubuntu18.04双系统历险记
1.背景 (1)原本是装了ubuntu16.04的,但是因为现在很多东西都以18.04为标准了(比如华为mindspore-gpu就是用在18.04,比如ffmpeg硬解码在16.04就没用成功等等) ...
- 【安装教程】windows8.1 下安装ubuntu14.04 双系统
From: https://blog.csdn.net/u011918106/article/details/53339250 最近真是折腾,安装软件出现点儿问题,忙得焦头烂额.放松一下,写篇博客. ...
- OMEN惠普HP暗夜精灵5:win10下安装Ubuntu16.04双系统(win10+linux)
笔记本电脑为:OMEN5 15.6英寸 i5-9300H 24G 512SSD+1T GTX1660Ti(自己加装了内存条和机械硬盘) 一.准备工作 1.下载并安装软碟通:百度搜索免费下载UltraI ...
- win10 mbr下装linux,(MBR模式)Win10下安装Ubuntu18.04双系统
1.制作U盘启动工具. 2.删除一个磁盘,不格式化(我删除了200G的磁盘). 3.启动电脑,按F12进入启动选项,选择U盘启动,安装Ubuntu18.04系统. 4.进入启动界面,选择try ubu ...
- win7下安装ubuntu14.04双系统问题总结
原文:http://blog.csdn.net/may0324/article/details/50635870 这里主要总结一下安装过程中遇到的问题: 1.ubuntu分区中,应首先在win7下利用 ...
- win10下U盘安装ubuntu14.04双系统
本篇介绍一下win10下用U盘安装ubuntu14.04双系统的方法,本人是64bit电脑. 1.首先要下载一个系统镜像文件.我是在Linux公社下载的 http://www.linuxidc.com ...
- win10下安装Ubuntu18.4双系统(适合小白)
win10下安装Ubuntu18.4双系统(适合小白) 注:本篇为传统MBR引导方式下安装. 查了很多博客,有的地方说法都不同,导致踩了一些坑.所以大家参考的时候还是得对自己的电脑配置等要具体情况具体 ...
- win10下安装ubuntu,双系统,免U盘
win10下安装ubuntu,双系统,免U盘 关键词:win10,ubuntu,双系统,免, U盘 1-6,8 参考:https://www.jianshu.com/p/417c1001a559 7 ...
最新文章
- 装饰模式(Decorator Pattern)
- 通过GeoIP2分析访问者IP获取地理位置信息
- p1273 日常打表
- java——File类常用方法
- 在Python中使用Twitter Rest API批量搜索和下载推文
- Java局域网对战游戏、天气预报项目
- 计算机网络设备配置遇到的问题,网络设备使用与维护
- HALCON 20.11:深度学习笔记(3)---Data(数据)
- 第 7 章 Neutron - 073 - Service Plugin / Agent
- Xshell 如何导入 PuTTYgen 生成的 key
- redis 客户端操作命令
- JSP 创建 CRUD 示例 MyBatis DAO 用于数据库JSTL 用于遍历记录
- 前缀和以及哈希表优化
- iceoryx(冰羚)-IPC中间件交叉编译
- Ubuntu16.06 单Nvidia显卡 深度学习运行时 界面卡顿(刷新慢)的解决方法
- 小知识·CMake基本指令
- 【LVGL学习笔记】(三)控件使用
- [Java并发包学习八]深度剖析ConcurrentHashMap
- 老鼠也会跟着音乐「蹦迪」,最喜欢Lady Gaga的歌|日本新研究
- 为什么这几年电脑病毒不见了?