Spring AOP之四:利用AOP实现动态数据源切换
2019独角兽企业重金招聘Python工程师标准>>> 
简介和依赖
项目的前提是安装了MySQL数据库,并且建立了2个数据库一个是master,一个是slave,并且这2个数据库都有一个user表,表导出语句如下:
DROP TABLE IF EXISTS `user`;
CREATE TABLE `user` (`id` int(10) unsigned NOT NULL AUTO_INCREMENT,`name` varchar(20) NOT NULL COMMENT '用户名,字母数字中文',`password` char(64) NOT NULL COMMENT '密码,sha256加密',`nick_name` varchar(20) DEFAULT '' COMMENT '昵称',`portrait` varchar(30) DEFAULT '' COMMENT '头像,使用相对路径',`status` enum('valid','invalid') DEFAULT 'valid' COMMENT 'valid有效,invalid无效',PRIMARY KEY (`id`)
) ENGINE=InnoDB AUTO_INCREMENT=2 DEFAULT CHARSET=utf8 COMMENT='用户表';
数据库中有一个密码为123456的tim用户对这2个库有读写权限。你可以在配置文件中修改用户名和密码,也可以执行下面的语句授权给tim用户:
grant select,insert,update,delete on slave.* to tim identified by '123456'
grant select,insert,update,delete on master.* to tim identified by '123456'
或者给tim全部权限(除了grant):
grant all privileges on slave.* to tim identified by '123456'
grant all privileges on master.* to tim identified by '123456'
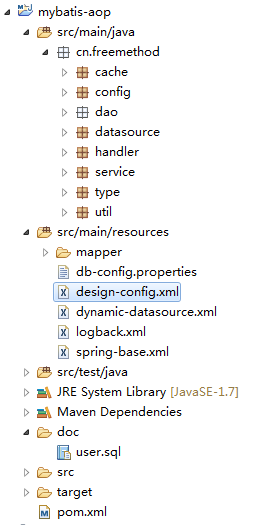
还是来一张工程目录的图片吧:

Spring AbstractRoutingDataSource分析
我们使用org.springframework.jdbc.datasource.lookup.AbstractRoutingDataSource做动态数据源。
既然是数据源肯定直接或者间接的实现了javax.sql.DataSource接口,所以直接找getConnection方法就可以了。
我们可以看到AbstractRoutingDataSource#getConnection方法:
@Overridepublic Connection getConnection() throws SQLException {return determineTargetDataSource().getConnection();}
没有什么说的,直接看AbstractRoutingDataSource#determineTargetDataSource:
protected DataSource determineTargetDataSource() {Assert.notNull(this.resolvedDataSources, "DataSource router not initialized");Object lookupKey = determineCurrentLookupKey();DataSource dataSource = this.resolvedDataSources.get(lookupKey);if (dataSource == null && (this.lenientFallback || lookupKey == null)) {dataSource = this.resolvedDefaultDataSource;}if (dataSource == null) {throw new IllegalStateException("Cannot determine target DataSource for lookup key [" + lookupKey + "]");}return dataSource;}
determineCurrentLookupKey是一个抽象方法:
protected abstract Object determineCurrentLookupKey();
resolvedDataSources是一个HashMap<String,Object> resolvedDefaultDataSource是一个DataSource
所以整个的逻辑就非常清楚了: AbstractRoutingDataSource是一个抽象类,我们只需要继承它就可以了,然后提供一个包含多个数据源的HashMap,还可以提供一个默认的数据源resolvedDefaultDataSource,然后实现determineCurrentLookupKey返回一个String类型的key,通过这个key来找到一个对应的数据源。如果没有找到就使用默认的数据源。
接下来我们就来通过继承AbstractRoutingDataSource来实现一个动态数据源。
AbstractRoutingDataSource实现
import org.springframework.jdbc.datasource.lookup.AbstractRoutingDataSource;public class DynamicDataSource extends AbstractRoutingDataSource {@Overrideprotected Object determineCurrentLookupKey() {return DataSourceKeyThreadHolder.getDataSourceKey();}
}
import org.springframework.util.Assert;public class DataSourceKeyThreadHolder {// 同一个线程持有相同的keyprivate static final ThreadLocal<String> dataSourcesKeyHolder = new ThreadLocal<String>();public static void setDataSourceKey(String customerType) {Assert.notNull(customerType, "DataSourceKey cannot be null");dataSourcesKeyHolder.set(customerType);}public static String getDataSourceKey() {return dataSourcesKeyHolder.get();}public static void clearDataSourceKey() {dataSourcesKeyHolder.remove();}
}
其实完全没有必要拆分为2个类,虽然这样可以让DynamicDataSource的逻辑清晰一些,但是对于整个的来说并不一定是更加清晰的。
使用ThreadLocal让每一个线程持有一个key也只是一种手段,也可以通过其他的方式实现。
下面我们来看一下数据源的配置文件,让配置文件和DynamicDataSource对应起来:
<?xml version="1.0" encoding="UTF-8"?>
<beans xmlns="http://www.springframework.org/schema/beans" xmlns:xsi="http://www.w3.org/2001/XMLSchema-instance"xmlns:tx="http://www.springframework.org/schema/tx"xsi:schemaLocation="http://www.springframework.org/schema/beanshttp://www.springframework.org/schema/beans/spring-beans-3.0.xsd http://www.springframework.org/schema/txhttp://www.springframework.org/schema/tx/spring-tx-3.0.xsd"><bean id="design" abstract="true" class="com.alibaba.druid.pool.DruidDataSource"><property name="driverClassName" value="${common.driver}" /><!-- 配置初始化大小、最小、最大 --><property name="initialSize" value="10" /><property name="minIdle" value="10" /><property name="maxActive" value="60" /><!-- 从池中取连接的最大等待时间,单位ms --><property name="maxWait" value="3000" /><!-- 配置一个连接在池中最小生存的时间,单位是毫秒 --><property name="minEvictableIdleTimeMillis" value="300000" /><!-- 配置间隔多久才进行一次检测,检测需要关闭的空闲连接,单位是毫秒 --><property name="timeBetweenEvictionRunsMillis" value="60000" /><!-- 测试语句 --><property name="validationQuery" value="SELECT 'x'" /><!-- 指明连接是否被空闲连接回收器(如果有)进行检验 --><property name="testWhileIdle" value="true" /><!-- 是否在从池中取出连接前进行检验 --><property name="testOnBorrow" value="false" /><!-- 是否在归还到池中前进行检验 --><property name="testOnReturn" value="false" /><!-- 打开PSCache,并且指定每个连接上PSCache的大小 --><property name="poolPreparedStatements" value="false" /><property name="maxPoolPreparedStatementPerConnectionSize" value="20" /><!-- 配置监控统计拦截的filters --><property name="filters" value="stat" /><!-- 打开removeAbandoned功能 --><property name="removeAbandoned" value="true" /><!-- 1800秒,也就是30分钟 --><property name="removeAbandonedTimeout" value="1800" /><!-- 关闭abanded连接时输出错误日志 --><property name="logAbandoned" value="true" /></bean><bean id="master" parent="design"><property name="username" value="${master.username}" /><property name="password" value="${master.password}" /><property name="url" value="${master.url}"/></bean><bean id="slave" parent="design"><property name="username" value="${slave.username}" /><property name="password" value="${slave.password}" /><property name="url" value="${slave.url}"/></bean><!-- 动态数据源 --><bean id="dynamicDataSource" class="cn.freemethod.datasource.DynamicDataSource"><property name="targetDataSources"><map key-type="java.lang.String"><entry key="master" value-ref="master"/><entry key="slave" value-ref="slave"/></map></property><!-- 默认数据源 --><property name="defaultTargetDataSource" ref="master"/></bean><bean id="sqlSessionFactory" class="org.mybatis.spring.SqlSessionFactoryBean"><property name="dataSource" ref="dynamicDataSource" /><property name="configLocation" value="classpath:design-config.xml"/><property name="mapperLocations" value="classpath:mapper/design/*.xml"/></bean><bean id="sqlSessionTemplate" class="org.mybatis.spring.SqlSessionTemplate" ><constructor-arg index="0" ref="sqlSessionFactory" /></bean><!--  配置mapper的映射扫描器 根据包中定义的接口自动生成dao的实现类--><bean class="org.mybatis.spring.mapper.MapperScannerConfigurer"><property name="basePackage" value="cn.freemethod.dao.mapper"/></bean></beans>
我们先看一下id为design这个bean,注意这个bean配置了abstract="true",表明这个bean是不会实例化的是用来被其他bean继承的。这个bean使用的是com.alibaba.druid.pool.DruidDataSource。
接下来配置了2个数据源一个master一个slave,这2个bean继承了design。
重点看id为dynamicDataSource的bean,这个就是我们继承了AbstractRoutingDataSource的类,看到在属性为targetDataSources的Map中注入了2个数据源master和slave,key也是master和slave,默认的数据源defaultTargetDataSource配置的是master。
所以在我们的DynamicDataSource的determineCurrentLookupKey中如果返回的是master就是使用的是master数据源,如果返回的是slave使用的就是slave数据源。
上面说到的都是和动态数据源有关的没有使用到AOP啊,下面我们就介绍一下把AOP应用上。
利用AOP切换数据源
既然是利用AOP,那当然得有一个切面了,我们就先来看一下切面的代码吧。
import org.aspectj.lang.JoinPoint;
import org.aspectj.lang.annotation.After;
import org.aspectj.lang.annotation.Aspect;
import org.aspectj.lang.annotation.Before;
import org.aspectj.lang.annotation.Pointcut;
import org.springframework.stereotype.Component;@Component
@Aspect
public class DataSourceAspect {@Pointcut("@annotation(cn.freemethod.datasource.DataSourceKey)")
//    @Pointcut("this(cn.freemethod.service.UserService)")public void dataSourceKey() {}@Before("dataSourceKey() && @annotation(dataSourceKey)")public void doBefore(JoinPoint point,DataSourceKey dataSourceKey) {
//        MethodSignature signature = (MethodSignature) point.getSignature();
//        Method method = signature.getMethod();
//        DataSourceKey datasource = method.getAnnotation(DataSourceKey.class);if (dataSourceKey != null) {String sourceKey = DataSourceKey.master;if (dataSourceKey.value().equals(DataSourceKey.master)) {sourceKey = DataSourceKey.master;} else if (dataSourceKey.value().equals(DataSourceKey.slave)) {sourceKey = DataSourceKey.slave;}DataSourceKeyThreadHolder.setDataSourceKey(sourceKey);}}@After("dataSourceKey()")public void doAfter(JoinPoint point) {DataSourceKeyThreadHolder.clearDataSourceKey();}
}
首先我们要明确连接点,就是要在什么地方进行切换数据源操作,这里很明确了我们要在有DataSourceKey注解的方法上进行切换数据源。
根据我们前面学习的Pointcut表达式,我们很容易的就能写出下面的表达式:
@Pointcut("@annotation(cn.freemethod.datasource.DataSourceKey)")
通知逻辑也很简单,我们只需要把线程的上下文的key设置为方法注解上获取的数据源的key就可以了。方法执行之后再设置为之前的数据源。这样在方法执行的过程中如果使用的数据源获取到的就是方法注解上的配置对应的数据源。
看一下下面的实例怎样使用吧:
@DataSourceKey("master")@Overridepublic int saveUserMaster(UserBean user) {return userBeanMapper.insertSelective(user);}
测试代码:
import javax.annotation.Resource;import org.apache.commons.codec.digest.DigestUtils;
import org.junit.Assert;
import org.junit.Test;
import org.junit.runner.RunWith;
import org.springframework.test.context.ContextConfiguration;
import org.springframework.test.context.junit4.SpringJUnit4ClassRunner;import cn.freemethod.config.AspectConfig;
import cn.freemethod.dao.bean.design.UserBean;
import cn.freemethod.service.UserService;
import cn.freemethod.util.DataGenerateUtil;
//@ContextConfiguration(locations = {"classpath:spring-base.xml"})
@ContextConfiguration(classes={AspectConfig.class})
@RunWith(SpringJUnit4ClassRunner.class)
public class UserServiceImplTest {@ResourceUserService userServiceImpl;@Testpublic void testSaveUserMaster() {UserBean userBean = getUser();int actual = userServiceImpl.saveUserMaster(userBean);Assert.assertEquals(1, actual);}@Testpublic void testSaveUserSlave() {UserBean userBean = getUser();int actual = userServiceImpl.saveUserSlave(userBean);Assert.assertEquals(1, actual);}@Testpublic void testGetUser(){UserBean user = userServiceImpl.getUser(2);System.out.println(user);}private UserBean getUser(){UserBean userBean = new UserBean();userBean.setName(DataGenerateUtil.getAlphabet(3));userBean.setPassword(DigestUtils.sha256Hex(DataGenerateUtil.getAlnum(6)));return userBean;}}
完整的代码请下载参考中的完整工程代码链接,这里之所以把测试类贴出来是因为有一个非常纠结的问题要讲,你应该也搜不到相关的资料。所以如果感兴趣的话最好把源码下载下来,然后对比着测试一下。
细心的同学可能已经注意到了切面类DataSourceAspect中注释的代码:
//        MethodSignature signature = (MethodSignature) point.getSignature();
//        Method method = signature.getMethod();
//        DataSourceKey datasource = method.getAnnotation(DataSourceKey.class);
这里有2个矛盾的地方,一个是Spring中注入的类型只能是接口类型的如测试中的:
@Resource
UserService userServiceImpl;
如果替换为:
@Resource
UserServiceImpl userServiceImpl;
就会注入失败。
但是在Spring AOP(使用AspectJ)中通过下面的代码:
 MethodSignature signature = (MethodSignature) point.getSignature();
Method method = signature.getMethod();
获取的不是实际委派的方法,也就是说UserService注入的实际的类型是UserServiceImpl,但是通过UserService调用方法上面得到的签名Method的是UserService的方法签名。这个有什么影响呢?在上面的例子中最直接的影响就是userServiceImpl中的方法上的注解公共上面的方法获取不到。
最开始我也是弄的我一愣一愣的,弄了很久,最后还是通过Advice 参数把注解注入到通知当中的。如下:
@Before("dataSourceKey() && @annotation(dataSourceKey)")
关于Advice的Parameter可以参考后面的Spring AOP 之三:通知(Advice)方法参数这篇文章。
参考
项目码云链接
完整工程代码
Spring AOP 之一:基本概念与流程
Spring AOP 之二:Pointcut注解表达式
Spring AOP 之三:通知(Advice)方法参数
转载于:https://my.oschina.net/u/2474629/blog/1083552
Spring AOP之四:利用AOP实现动态数据源切换相关推荐
- Spring Boot + Mybatis 配合 AOP 和注解实现动态数据源切换配置
Spring Boot + Mybatis 配合 AOP 和注解实现动态数据源切换配置 前言: 1. 数据库准备: 2. 环境准备: 3.代码部分 4. 测试: 5.等等 6.配合注解实现 7 .测试 ...
- SpringBoot多数据源切换,AOP实现动态数据源切换
SpringBoot多数据源切换,AOP实现动态数据源切换 操作数据一般都是在DAO层进行处理,可以选择直接使用JDBC进行编程 或者是使用多个DataSource 然后创建多个SessionFact ...
- spring environment_程序员:Spring项目中简单几步实现多个动态数据源切换
每一个请求与其他的用户是面对不同的数据库,这就需要用到动态数据源切换,来满足不同数据库.不同数据表(不同数据源)的灵活调用. 动态数据源切换 满足mysql.oracle等主流数据库进行动态数据源切换 ...
- 动态数据源切换--AbstractRoutingDataSource
转载自http://blog.csdn.net/x2145637/article/details/52461198 在Spring 2.0.1中引入了AbstractRoutingDataSource ...
- springboot动态数据源切换(多数据源配置)
动态数据源切换即多数据源切换,由于业务的需要或者历史的遗留等原因,一个项目中配置了多个数据库,用于查询不同类型的数据,因此我们就需要经常在各个库中切换数据源,接下来我们将进行具体的说明: 项目结构如下 ...
- 【原】继承AbstractRoutingDataSource再通过AOP实现动态数据源切换
关于AbstractRoutingDataSource动态切换数据源是我在研究某开源项目时候才注意到的,大概就看懂了Spring AOP切面这里,根据作者的意思是通过继承这个抽象类可以实现数据源的动态 ...
- Spring(AbstractRoutingDataSource)实现动态数据源切换
参考:http://linhongyu.blog.51cto.com/6373370/1615895 一.前言 近期一项目A需实现数据同步到另一项目B数据库中,在不改变B项目的情况下,只好选择项目A中 ...
- Spring(AbstractRoutingDataSource)实现动态数据源切换--转载
原始出处:http://linhongyu.blog.51cto.com/6373370/1615895 一.前言 近期一项目A需实现数据同步到另一项目B数据库中,在不改变B项目的情况下,只好选择项目 ...
- spring 动态数据源切换实例
我们很多项目中业务都需要涉及到多个数据源,最简单的做法就是直接在java代码里面lookup需要的数据源,但是这样的做法很明显耦合度太高了, 而且当逻辑流程不够严谨的时候就会出现各种大家不愿意看到的问 ...
最新文章
- 苹果的安全神话即将结束?No!
- lr_save_string lr_eval_string使用介绍
- URAL 1721 Two Sides of the Same Coin(二分图匹配,输出匹配对象)
- 腾讯阿里谋定联姻农业 智慧农业对话中国农民丰收节交易会
- boost::mpl模块实现multiset相关的测试程序
- python爬虫入门实战---------一周天气预报爬取_Python爬虫入门实战--------一周天气预报爬取【转载】【没有分析...
- rust睡觉按键没反应_腐蚀Rust有哪些实用操作 腐蚀Rust实用操作汇总-游侠网
- 基于jquery的复选树的插件
- 使用BroadcastReceiver的Android IntentService
- 科创板开市暴涨,详解25家企业的“造富”能力
- 分享Word如何转PDF的方法,还不快来看看
- php源代码压缩,代码压缩工具_PHP 源代码压缩小工具
- linux分区修复命令,在Linux下成功修复分区表出错
- 无线AP Aruba-515初始化设置
- 第四十七题 UVA437 巴比伦塔 The Tower of Babylon
- chrome打开链接隐私设置错误_解决用谷歌浏览器访问https网站遇到的“隐私设置错误 您的连接不是私密连接”问题...
- 通过DCF模型对股票进行估值
- Python快速生成gif图
- Security+新版601考过啦,分享我的备考经验
- 开源月刊《HelloGitHub》第 62 期
