c++编写托管dll_教程:如何编写简单的网站并免费托管
c++编写托管dll
本教程适用于谁? (Who is this tutorial for?)
- This tutorial assumes no prior knowledge and is suitable for complete beginners as a first project本教程假定您没有先验知识,并且适合初学者作为第一个项目
您将需要什么 (What you will need)
a GitHub account (if you already have one set up, skip step 1)
一个GitHub帐户(如果已经设置了一个帐户,请跳过步骤1)
- a Netlify account一个Netlify帐户
a code editor (for this tutorial I used Visual Studio Code)
一个代码编辑器(对于本教程,我使用了Visual Studio Code )
- terminal app终端应用
- approximately 1–2 hour大约1-2小时
让我们开始吧! (Let’s get started!)
步骤1:注册GitHub帐户。 (Step 1: Sign up for a GitHub account.)
What exactly is GitHub? The Git in GitHub is a version control system, so that every time anything changes in our code, that change is tracked. This lets you trace everything you’ve ever written and changed within a project and revert back to an old version of your code if you need to. Git on its own is a command-line tool. GitHub is where it all comes together. It’s where we can store our projects, track all our work and code changes, as well as network with other developers (and check out their projects!).
GitHub到底是什么? GitHub中的Git是一个版本控制系统,因此每当我们的代码中发生任何更改时,都会跟踪该更改。 这样,您就可以跟踪您在项目中编写和更改的所有内容,并在需要时还原为旧版本的代码。 Git本身就是一个命令行工具。 GitHub是所有功能的结合体。 在这里,我们可以存储我们的项目,跟踪我们的所有工作和代码更改,以及与其他开发人员建立联系(并检查他们的项目!)。
步骤2:建立新的GitHub存放区 (Step 2: Create a new GitHub repository)
It’s good practice to initialize your project with a README file. In this file, you can put some information about your project so that anyone who is interested can understand what the project is and how to make sense of the project files.
最好使用README文件初始化项目。 在此文件中,您可以放入有关项目的一些信息,以便任何感兴趣的人都可以了解项目是什么以及如何理解项目文件。
步骤3:将存储库克隆到计算机上 (Step 3: Clone your repository on to your computer)
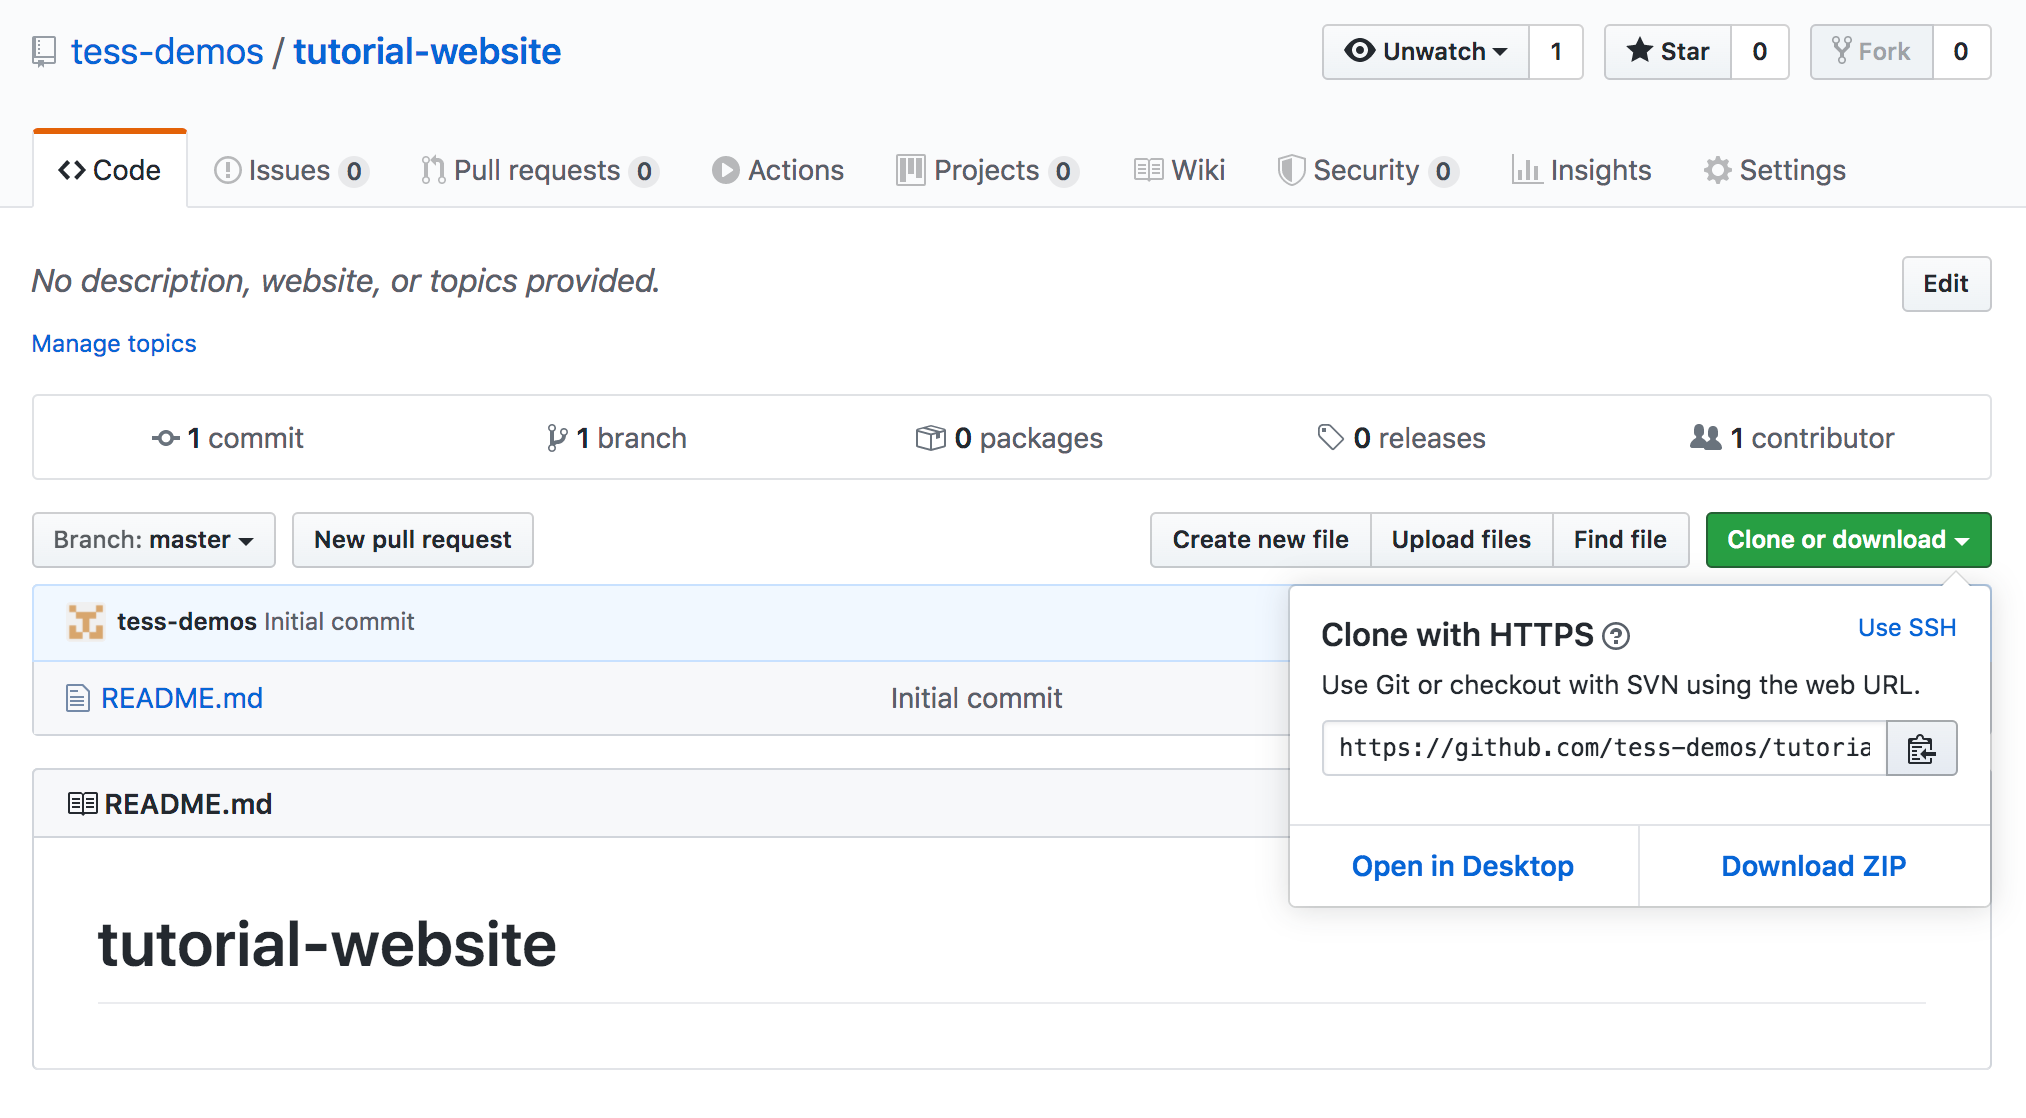
- Click on “Clone or download” and copy the HTTPS URL单击“克隆或下载”并复制HTTPS URL
Open up your terminal (on a mac just hit the search icon and type Terminal)
打开终端(在Mac上,只需点击搜索图标,然后输入Terminal )
The Terminal is the interface to the underlying operating system of our computer. It is a command line. From here we can do a bunch of cool things. But for now, let’s navigate to where we want to keep our project files and make a “clone” of the repository that we just created on GitHub.
终端是计算机底层操作系统的接口。 这是一个命令行。 从这里我们可以做很多很酷的事情 。 但是现在,让我们导航到要保留项目文件的位置,并对刚刚在GitHub上创建的存储库进行“克隆”。
Give it a go with the following commands:
尝试以下命令:
$ pwdThis stands for print working directory. As you can see above, it will show you where you are within your files.
这代表打印工作目录。 如上所示,它将显示文件中的位置。
$ lsThis one will give you a list of all the directories and files within your current directory. It stands for short listing as it only gives you the name of the file or directory.
这将为您提供当前目录中所有目录和文件的列表。 它代表简短清单 ,因为它只为您提供文件或目录的名称。
To learn more terminal commands, check out this cheat sheet.
要了解更多终端命令,请查看此备忘单 。
Let's create a directory for our project
让我们为项目创建一个目录
Use the following commands to create a new directory and clone your project
使用以下命令创建新目录并克隆您的项目
$ cd Documents$ git clone <HTTPS URL from your GitHub repository>$ cd <name of your project repository>$ lsNow we have a new directory, mine is called tutorial-website, and within this directory, we can type “ls” to see that we have our README file.
现在,我们有了一个新目录,我的目录称为tutorial-website,在该目录中,我们可以键入“ ls”以查看我们是否有README文件。
步骤4:打开代码编辑器并创建项目文件 (Step 4 : Open your code editor and create your project files)
There are lots of different code editors and everyone has their personal preferences. For this tutorial, I will use Visual Studio Code. It’s free, it’s simple, it’s good. You can download it here.
有许多不同的代码编辑器,每个人都有自己的个人喜好。 在本教程中,我将使用Visual Studio Code。 它是免费的,它很简单,很好。 您可以在此处下载。
- Let’s launch VS code and open our project让我们启动VS代码并打开我们的项目
So far we only have our README file. Let’s go to our terminal and create 2 new files, one will be our HTML file and the other will be the CSS file.
到目前为止,我们只有README文件。 让我们转到终端并创建2个新文件,一个是我们HTML文件,另一个是CSS文件。
$ ls (to make sure you are still in the right directory)$ touch index.html$ touch style.cssThe touch command followed by the name of our file is how we can create a new file. Now let’s go back to VS code and see our files.
紧随我们文件名之后的touch命令是我们如何创建新文件的方法。 现在,让我们回到VS代码并查看我们的文件。
Our 2 new files have arrived in our project folder and they are highlighted green so that we know that they are new.
我们的2个新文件已到达项目文件夹,并以绿色突出显示,因此我们知道它们是新文件。
第5步:编写一些代码! (Step 5: Write some code!)
- let’s open our index.html file and write some code让我们打开index.html文件并编写一些代码
<!DOCTYPE html><html><head> <title>Tutorial Website</title></head><body></body></html>- This boilerplate code is the structure of our Html file. In the <head> tag, we have our meta-data, which is simply information about our website.此样板代码是我们HTML文件的结构。 在<head>标记中,我们有我们的元数据,这只是有关我们网站的信息。
- In the <body> tag is where we will write our code to bring our website together在<body>标记中,我们将编写代码以将我们的网站整合在一起
Let’s put some content in the <body> tag.
让我们在<body>标签中添加一些内容。
You can copy and paste the code below of course but I’ve found that the best way to learn how to code when you’re just getting started, is to type everything out!
您当然可以复制和粘贴下面的代码,但是我发现,刚入门时学习编码的最佳方法是键入所有内容!
<!DOCTYPE html><html><head> <title>Tutorial Website</title></head><body> <div class="main-container"> <div class="header"> <h1>Tess's Website</h1> </div> <div class="main-content"> <img src="portrait-drawing.png" <p>Hi, my name is Tess and I'm writing a tutorial on how to build and deploy a simple website!</p> </div></div></body></html>I’ve decided to put an image on my website. Make sure to add your image to the project folder and put the file name in the <img> tag.
我决定在我的网站上放一张图片。 确保将图像添加到项目文件夹,并将文件名放在<img>标记中。
This is how everything should look at this point:
这是此时一切的样子:
How can we tell if it’s working? Simply open your index.html file with your browser.
我们如何知道它是否有效? 只需使用浏览器打开index.html文件。
This is how it’s looking so far:
到目前为止是这样的:
步骤6:添加CSS样式 (Step 6: Adding CSS styling)
Let’s make it look good! Html is the structure of our page, but CSS is where the magic happens to make it look just how we want it.
让我们看起来不错! HTML是页面的结构,而CSS恰恰是神奇的地方,它使它看起来像我们想要的样子。
- Open the style.css file打开style.css文件
Let’s write some code
让我们写一些代码
body { margin: 0; font-family: -apple-system, BlinkMacSystemFont, 'Segoe UI', Roboto, Oxygen, Ubuntu, Cantarell, 'Open Sans', 'Helvetica Neue', sans-serif;}h1 { color: pink; font-size: 100px;}img { max-width: 250px;}.main-container { width: 100%; height: 100vh; display: flex; flex-direction: column; align-items: center; justify-content: center;}.header { width: auto; border-bottom: 3pt solid pink; padding: 0px 100px; margin-bottom: 100px;}.main-content { display: flex; justify-content: space-between; max-width: 800px;}.main-content p { font-size: 25px; margin-left: 30px;}This is how our CSS file should look now:
这就是我们CSS文件现在的外观:
Now we need to make sure our CSS file is referenced in our Html file so that our website knows to read the styles we have defined in our CSS file.
现在我们需要确保我们HTML文件中引用了我们CSS文件,以便我们的网站知道读取我们在CSS文件中定义的样式。
In our Html file, let’s add some code to our <head> tag.
在我们HTML文件中,让我们向<head>标签添加一些代码。
<!DOCTYPE html><html><head> <title>Tutorial Website</title> <link rel="stylesheet" type="text/css" href="style.css"></head><body> <div class="main-container"> <div class="header"> <h1>Tess's Website</h1> </div> <div class="main-content"> <img src="portrait-drawing.png" <p>Hi, my name is Tess and I'm writing a tutorial on how to build and deploy a simple website!</p> </div></div></body></html>Let’s go ahead and check how everything is looking now in our browser!
让我们继续前进,检查浏览器中现在的一切情况!
A bit of an improvement!
有点改善!
Step 7: Commit the code to GitHub
步骤7:将代码提交到GitHub
As you work on your project, it’s important to commit your code to your GitHub repository to make sure that you never lose any of your work. The most common way to work is to commit your code every time you finish a feature.
在您处理项目时,将代码提交到GitHub存储库以确保您不会丢失任何工作非常重要。 最常见的工作方式是在每次完成功能时提交代码。
Let’s go back to our terminal and commit our code.
让我们回到终端并提交我们的代码。
$ git add .$ git commit -m "write a message here that describes the change you've made to your project files"$ git pushNow we can go to our GitHub repository and our files will be there.
现在,我们可以转到我们的GitHub存储库,我们的文件将在那里。
We can see our new files, and we can see the commit message which should include information about the changes we are committing to our project.
我们可以看到我们的新文件,也可以看到提交消息,其中应该包含有关我们提交给项目的更改的信息。
第8步:直播! 让我们部署我们的网站 (Step 8: Make it live! Let’s deploy our website)
Sign up for a Netlify account here
在此处注册Netlify帐户
- I used my GitHub login to sign-up, makes it easy and quick我使用GitHub登录名进行注册,因此变得简单快捷
From the landing dashboard, click on “New site from Git”
在着陆仪表板中,单击“来自Git的新站点”
Select GitHub for continuous deployment
选择GitHub进行连续部署
Chose whether you want to allow Netlify to access all your repositories, or select only specific repositories, and click “install”.
选择是要允许Netlify访问您的所有存储库,还是仅选择特定的存储库,然后单击“安装”。
Go back to the Netlify dashboard and select your project repository:
返回到Netlify仪表板并选择您的项目存储库:
Double-check the details, and click “Deploy site”
仔细检查详细信息,然后单击“部署站点”
We are live baby!
我们是活着的宝贝!
Your URL will consist of a strange generated Netlify domain. Here is the final product: https://mystifying-ride-b035ec.netlify.app/
您的URL将包含一个奇怪的生成的Netlify域。 这是最终产品: https : //mystifying-ride-b035ec.netlify.app/
You can also buy a domain name and set up your site to point to your custom domain name by following Netlify’s easy instructions here.
你也可以买一个域名,并通过以下Netlify的简易说明你的网站点设置到您的自定义域名在这里 。
Here is the final product:
这是最终产品:
I hope you enjoyed following this tutorial. The fun part now is to play around with the code and make it your own!
希望您喜欢本教程。 现在最有趣的部分是使用代码并自己编写代码!
Thanks for following along, I hope it was useful!
感谢您的关注,希望它对您有所帮助!
翻译自: https://uxdesign.cc/how-to-code-a-simple-website-and-host-it-for-free-d3bf8b1bab37
c++编写托管dll
http://www.taodudu.cc/news/show-893799.html
相关文章:
- 设计 色彩 构图 创意_我们可以从时尚的创意方向中学到色彩
- 如何在UI设计中制作完美阴影
- mongodb 群集图_群集和重叠条形图
- figma下载_搬到Figma对我意味着什么
- gtk/Glade编程 编译命令不成功 解决方法
- 在Linux下禁用键盘、鼠标、触摸板(笔记本)等输入设备
- 通过rtcwake命令设置系统S3(休眠到内存)/S4(挂起到硬盘)一段时间后自动唤醒
- Linux下的屏保设置 xset s 与 xset dpms
- dbus 和 policykit 实例篇(python)
- 和菜鸟一起学linux之DBUS基础学习记录
- dbus-python指南
- 源码编译安装Nginx
- 可变参数列表(va_list,va_arg,va_copy,va_start,va_end)
- 使用xrandr和cvt命令添加自定义的分辨率模式
- 如何在linux下通过ssh运行X图形软件
- gsettings命令使用简介
- 运用xlib进行事件响应(X11 API)的小例子
- x11 gtk qt gnome kde 之间的区别和联系
- apt-get 获取源码的方法
- error while loading shared libraries: xxx.so.x 错误的原因和解决办法
- libghttp 编译及封装使用实例
- shell中的${},##和%%的使用
- windows挂载linux网络文件系统NFS
- RTP与RTCP协议介绍
- java数据类型及其说明
- java中的equals用法
- Android 第一课 Activity
- Android 第二课 Intent
- Android 第三课 Activity的生命周期
- Android 第四课 活动的启动模式
c++编写托管dll_教程:如何编写简单的网站并免费托管相关推荐
- 哪些网站可以免费托管静态页面
前几天看到有人提问:如何免费托管个人博客网站.由于个人博客主要是静态页面,所以这个问题可以扩展为:哪些网站可以免费托管静态页面. 首先,一些代码托管的网站可以免费托管静态页面:GitHub Pages ...
- Linux编写makefile详细教程
Linux下编写 makefile 详细教程 近期在学习Linux下的C编程,买了一本叫<Linux环境下的C编程指南>读到makefile就越看越迷糊,可能是我的理解能不行. 于是goo ...
- VB编写DirectX简明教程
VB编写DirectX简明教程 随这计算机软硬件的发展,计算机不在只是一个简单的计算工具而成为了一个可以玩游戏.进行多媒体操作的多功能平台.为了编写高性能的游戏和应用程序,我们需要绕过操作系统提供的A ...
- 教程:编写 Transact-SQL 语句
第 1 课:创建数据库对象 本课将介绍如何创建数据库,在数据库中创建表,然后访问表中的数据并对其进行更改.由于本课是对使用 Transact-SQL 的简介,因此它未使用或说明为这些语句提供的许多选项 ...
- 初学者编写bash脚本教程
初学者编写bash脚本教程 bash shell script 定义 bash bash是命令语言解释器.广泛用于各种gun/unix系统上的默认命令解释器.全程叫做"Bourne-Agai ...
- 我的世界服务器修改原版血量,我的世界服务器MythicMobs插件教程技能编写血量限制与触发几率...
小编为大家带来了<我的世界>服务器MythicMobs插件教程技能编写血量限制与触发几率,由于这两个太简单了,又都是用来控制[触发器]的,所以就放在一起讲了. 1)血量限制 故名思议,就是 ...
- 关于Flash CS5 自己编写组件的教程
关于Flash CS5 自己编写组件的教程 flash cs5 在自己制作图形组件时非常简单.比FLEX更方便. 以下为简易教程,有错误请及时纠正: 以一个按钮"MYBTN"为例 ...
- ROS教程四——编写Publisher和Subscriber节点(Python篇)
本教程介绍如何在python中编写发布者和订阅者节点 1.编写Publisher节点 "节点"是连接到ROS网络的可执行文件的ROS术语.在这里,我们将创建广播消息的 publis ...
- ROS教程四——编写Publisher和Subscriber节点(C++篇)
本教程介绍如何使用C ++编写发布者和订阅者节点 1.编写 Publisher Node "节点"是连接到ROS网络的可执行文件的ROS术语.现在将创建一个发布者(publishe ...
最新文章
- [LeetCode] Sum of Two Integers 两数之和
- 浅入浅出JS中的eval及json
- C语言 | 基于51单片机实现MPU6050的卡尔曼滤波算法(代码类2)
- 人工智能如何提升大数据存储与管理效率?
- jeewms仓库管理系统源码
- WPF动画1---基础动画
- 数据堂智能语音数据库,让客服更智能
- 把e.printStackTrace的堆栈信息打印在log.error()中
- matlab滤除100hz,关于滤波器滤波的问题,要求滤除3000Hz以上,但滤除后只剩下1000Hz以内的...
- 开发类似vs的界面_C#会不会成为移动开发最便捷的语言?
- Java 标识符的命名规则与规范
- IC基础(三):跨时钟域处理——电平同步器
- OceanBase数据库Docker部署文档
- android app应用签名生成工具,Android APK生成证书并签名方法
- js从地址栏获取参数
- wfp 禁用ip_WFP网络过滤驱动——限制网站访问
- 好养活的“狗剩儿”和“胖丫儿”。龙芯电脑测评!
- 12分钟入门python基础-计算机视觉方向
- MySQL下载和安装(Windows)
- MySql 存储boolean的数据
热门文章
- linux编译运行build.sh,linux下libwebsockets编译及实例
- c++ 虚函数的实现机制
- access考试素材_NCRE考试当天常见问题处理办法及各科目注意事项大汇总
- mysql 备份到别的机器_物理拷贝备份mysql到其他机器上恢复
- 下 终端_Linux/UNIX 下终端复用利器 tmux
- python123查找指定字符输入m_大数据应用人才培养系列教材 Python语言 刘 鹏 张 燕 总主编 李肖俊 主编 刘 河 钟 涛 副主编....
- c++ 数组的输入遇到特定字符停止输入_滑动窗口思维--挑战“无重复字符的最长子串”
- 网口扫盲二:Mac与Phy组成原理的简单分析(转)
- 1-5Tomcat 目录结构 和 web项目目录结构
- OGRE分析之设计模式