october cms_October CMS静态页面入门
october cms
This article was created in partnership with October CMS. Thank you for supporting the partners who make SitePoint possible. Looking to partner with SitePoint? Get more information here.
本文是与October CMS合作创建的。 感谢您支持使SitePoint成为可能的合作伙伴。 想要与SitePoint合作? 在此处获取更多信息 。
These days it can be tough for website developers, especially now with WordPress going through the biggest and the most dramatic update in its history. Over the past few months, we’ve observed a growing interest in the October CMS community.
这些天对网站开发人员来说可能很难,尤其是现在WordPress正在经历其历史上最大,最戏剧性的更新 。 在过去的几个月中,我们注意到对十月CMS社区的兴趣与日俱增。
October CMS is the natural choice for developers that look for a modern and reliable content management system based on the Laravel PHP framework. Launched in 2014, today October CMS is a mature platform with a large ecosystem. October CMS is known for its reliability and non-breaking updates, which is greatly appreciated by developers and their clients. The philosophy “Getting back to basics” really matters to freelancers and digital studios, whose businesses depend on the quality of the software they use. The quickly growing Marketplace and the supporting businesses built around October are great proof of the community’s trust. In 2018 October CMS was also voted the Best Flat File CMS in the CMS Critic Award contest.
对于寻求基于Laravel PHP框架的现代,可靠的内容管理系统的开发人员而言,十月CMS是自然的选择。 2014年10月推出的CMS是今天的成熟平台,拥有庞大的生态系统。 October CMS以其可靠性和不间断的更新而闻名,开发人员及其客户对此表示赞赏。 自由职业者和数字工作室的理念“重返基础”确实很重要,他们的业务取决于他们使用的软件的质量。 快速发展的市场和10月前后建立的支持业务是社区信任的很好证明。 在2018年10月,CMS还被CMS Critic Award竞赛评选为最佳平面文件CMS。
October CMS has a simple extensible core. The core provides basic CMS functions and a lot of functionality can be added with plugins from the Marketplace. The plugins Marketplace includes a lot of product categories, which include blogging, e-commerce, contact forms, and many others.
October CMS具有一个简单的可扩展核心。 该核心提供基本的CMS功能,并且可以通过Marketplace的插件添加很多功能。 插件市场包括许多产品类别,其中包括博客,电子商务,联系表格等。
In this tutorial, we will demonstrate how to create a website with pages editable in WYSIWYG (What You See Is What You Get) mode, and blogging features. We will use the Static Pages plugin that allows you to create a dynamic website structure with pages and menus manageable by non-technical end users. At the same time, the website will include dynamic blog pages, with content managed with the Blog plugin. All plugins used in this tutorial are free for anyone to install. The ideas from this tutorial can be extended to creating more complex websites. Themes implementing similar features can be found on the Themes Marketplace, but the goal of this tutorial is to show how easy it is to make an October website from scratch.
在本教程中,我们将演示如何创建一个网站,该网站的页面可以在所见即所得(所见即所得)模式下进行编辑,并具有博客功能。 我们将使用“ 静态页面”插件 ,该插件可让您创建动态网站结构,其中页面和菜单可由非技术最终用户管理。 同时,该网站将包括动态博客页面,其内容由Blog插件管理。 本教程中使用的所有插件都是免费的,任何人都可以安装。 本教程中的思想可以扩展到创建更复杂的网站。 可以在Themes Marketplace上找到实现类似功能的主题 ,但是本教程的目的是说明从头开始制作October网站的过程有多么容易。
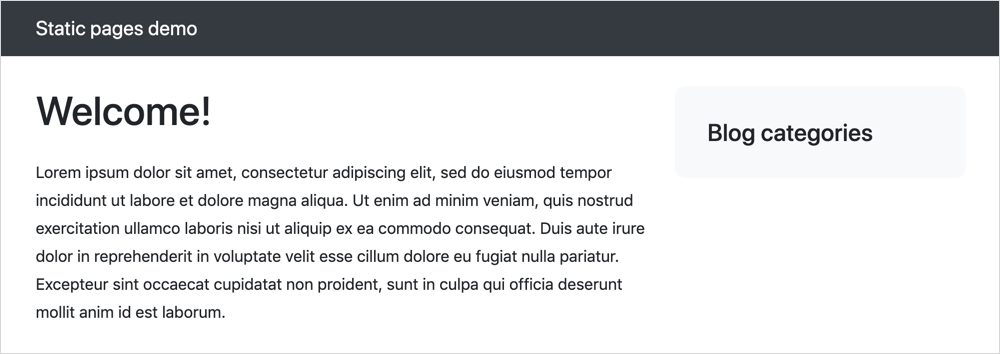
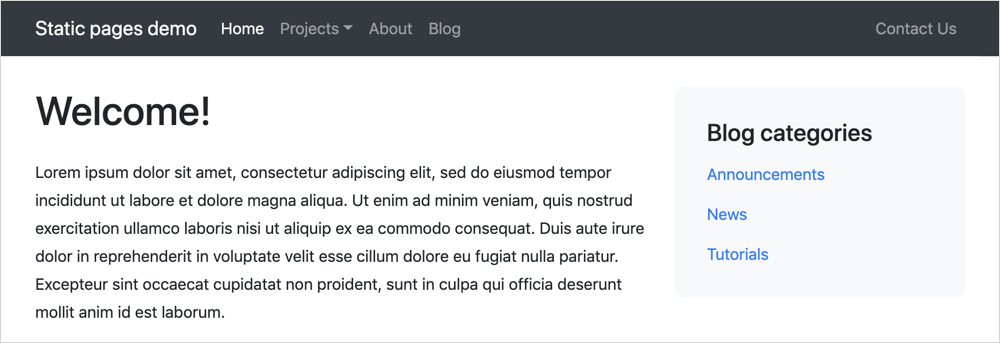
This is what we will have at the end:
这是最后的内容:
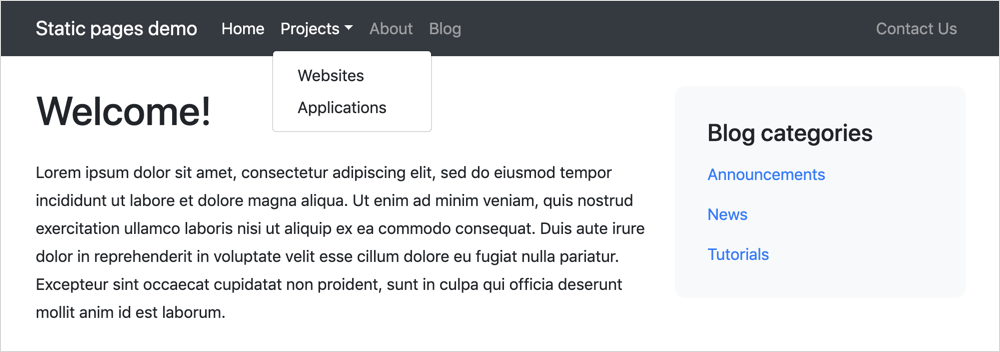
The website theme is completely based on Twitter Bootstrap 4.3. The demo website also includes a simple CSS file that manages some light styling features, such as padding and colors, but since it is not relevant for the topic of this tutorial, it won’t be described in this guide.
网站主题完全基于Twitter Bootstrap 4.3。 该演示网站还包括一个简单CSS文件,该文件管理一些浅色样式功能(例如填充和颜色),但是由于它与本教程的主题无关,因此在本指南中将不再进行描述。
安装October CMS (Installing October CMS)
To install October CMS you must have a web server meeting the minimum requirements. You can use MAMP as a solution to try October on your computer.
要安装October CMS,您必须具有满足最低要求的Web服务器。 您可以使用MAMP作为在计算机上尝试十月的解决方案。
There are several ways to install October CMS. We will use the Wizard Installer option, which is simple and user-friendly. The installation process is explained in the documentation. Create a new MySQL database, download the installer, unpack it to a directory you prepared for October and open the install.php script in a browser.
有几种安装October CMS的方法。 我们将使用向导安装程序选项,该选项简单易用。 文档中说明了安装过程。 创建一个新MySQL数据库, 下载安装程序 ,将其解压缩到您为10月准备的目录中,然后在浏览器中打开install.php脚本。
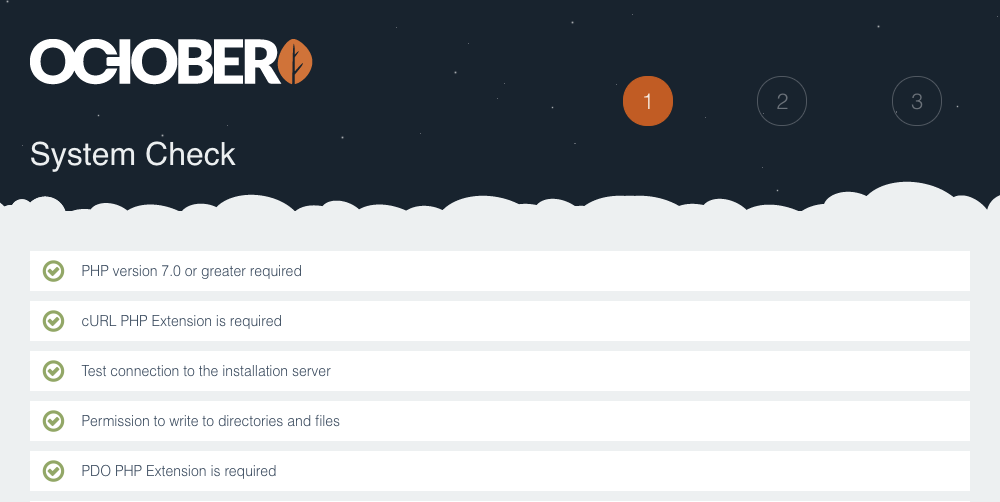
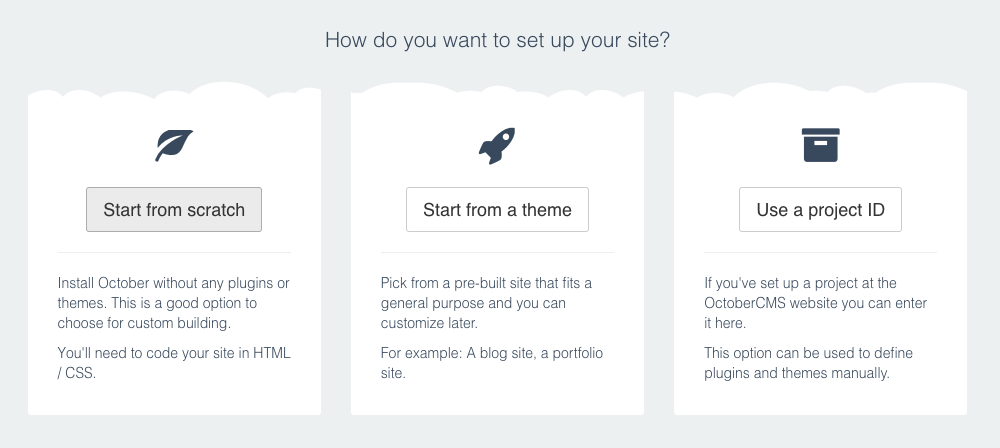
The installation process is fairly straightforward, showing the standard prompts to enter the database details and set up the administrator credentials. On the last step, click Start from scratch. This will create an empty installation with a simple demo theme.
安装过程非常简单,显示标准提示以输入数据库详细信息并设置管理员凭据。 在最后一步,单击从头开始。 这将创建一个带有简单演示主题的空安装。
After the installation finishes, click the Administration Area link and log into the October CMS back-end using the credentials you provided during the installation.
安装完成后,单击“ 管理区域”链接,并使用在安装过程中提供的凭据登录到October CMS后端。
安装静态页面和博客插件 (Installing Static Pages and Blog Plugins)
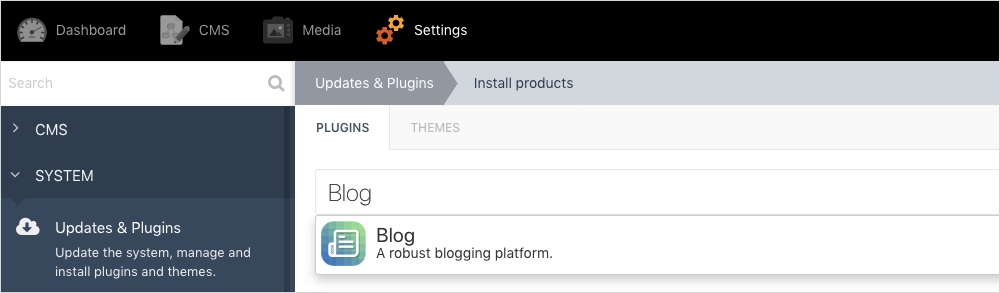
In this step, we will install two plugins required for our little project. In the October CMS Administration Area, navigate to the Settings page and click the Updates & Plugins link in the sidebar. Enter “Static Pages” in the search bar and when the plugin list finishes loading, click the Static Pages plugin.
在这一步中,我们将安装我们的小项目所需的两个插件。 在十月CMS管理区域中,导航到“ 设置”页面,然后单击侧栏中的“ 更新和插件”链接。 在搜索栏中输入“静态页面”,然后在插件列表加载完成时,单击“ 静态页面”插件。

This will install the Static Pages plugin. Repeat the process to install the Blog plugin.
这将安装“静态页面”插件。 重复该过程以安装Blog插件。
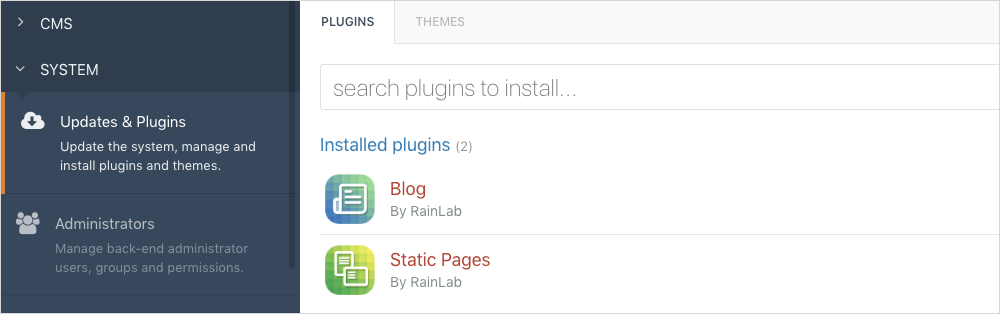
If you did everything right, you should see two plugins installed:
如果您做对了所有事情,那么应该会看到安装了两个插件:
创建新主题 (Creating the new theme)
We want to start with a blank theme for our tutorial. To create a new theme, open the Settings page in the October CMS Administration Area and click the Front-end theme item in the sidebar. Click Create a new blank theme link. Enter the new theme name, for example, “My blog theme”. Click Create.
我们想从本教程的空白主题开始。 若要创建新主题,请在十月CMS管理区域中打开“ 设置”页面,然后单击侧栏中的“前端”主题项。 单击创建新的空白主题链接。 输入新的主题名称,例如“我的博客主题”。 点击创建 。
创建布局 (Creating the Layout)
In October CMS, Layouts define pages scaffold – usually, they include the HTML, HEAD, TITLE and BODY tags. Almost every CMS page has a layout assigned to it. The simplest functional layout code looks like this:
在十月CMS中, 布局定义了页面支架-通常,它们包括HTML,HEAD,TITLE和BODY标签。 几乎每个CMS页面都分配有布局。 最简单的功能布局代码如下所示:
<html>
<body>
{% page %}
</body>
</html>
Note the {% page %} tag — it gets replaced by the page contents when the page is requested and rendered by October CMS.
请注意{% page %}标记-当十月CMS请求并呈现该页面时,它将替换为页面内容。
For our tutorial, the Layout will define the markup required for a Twitter Bootstrap page. We will basically copy it from the Bootstrap Starter Template example and extend with October CMS features.
对于我们的教程,布局将定义Twitter Bootstrap页面所需的标记。 我们基本上将从Bootstrap Starter Template示例中复制它,并使用October CMS功能进行扩展。
To create a Layout, open the CMS editor by clicking CMS on the main menu. Note that using the built-in CMS editor is not a requirement since all theme objects — Layouts, Pages and Partials — are just HTML files in the theme directory (although there is an option to use a database instead). This means that you can edit them with your favorite code editor. However, using the CMS editor is preferable for new users.
若要创建布局,请通过单击主菜单上的CMS打开CMS编辑器。 请注意,由于所有主题对象(布局,页面和部分)都是主题目录中HTML文件,因此不需要使用内置的CMS编辑器(尽管可以选择使用数据库)。 这意味着您可以使用自己喜欢的代码编辑器对其进行编辑。 但是,对于新用户而言,最好使用CMS编辑器。

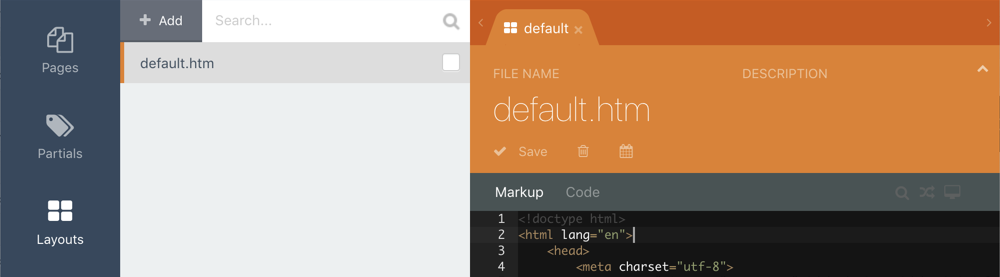
Click the Layouts item in the sidebar and then click the Add button. In the Layout editor enter default in the File Name field and click Save (alternatively you can click Ctrl+S on Windows or Cmd+S on Mac). Paste the following text in the Markup code editor and make sure you save the layout again.
单击边栏中的“ 布局”项,然后单击“ 添加”按钮。 在布局编辑器中,在“ 文件名”字段中输入default ,然后单击“ 保存” (或者,在Windows上单击Ctrl + S ,在Mac上单击Cmd + S )。 将以下文本粘贴到标记代码编辑器中,并确保再次保存布局。
<!doctype html>
<html lang="en">
<head>
<meta charset="utf-8">
<meta name="viewport" content="width=device-width, initial-scale=1, shrink-to-fit=no">
<meta name="description" content="">
<title>My blog theme</title>
<!-- Bootstrap core CSS -->
<link rel="stylesheet" href="https://stackpath.bootstrapcdn.com/bootstrap/4.3.1/css/bootstrap.min.css" integrity="sha384-ggOyR0iXCbMQv3Xipma34MD+dH/1fQ784/j6cY/iJTQUOhcWr7x9JvoRxT2MZw1T" crossorigin="anonymous">
<link href="{{ 'assets/css/theme.css'|theme }}" rel="stylesheet">
</head>
<body>
<nav class="navbar navbar-expand-md navbar-dark bg-dark">
<div class="container">
<a class="navbar-brand" href="/">Static pages demo</a>
<button class="navbar-toggler" type="button" data-toggle="collapse" data-target="#navbarsExampleDefault" aria-controls="navbarsExampleDefault" aria-expanded="false" aria-label="Toggle navigation">
<span class="navbar-toggler-icon"></span>
</button>
<div class="collapse navbar-collapse">
<!-- Menu contents will go here -->
</div>
</div>
</nav>
<main role="main" class="container">
<div class="row">
<div class="col-8">
{% page %}
</div>
<div class="col">
<div class="blog-categories-sidebar">
<h4>Blog categories</h4>
<!-- Blog category list will go here -->
</div>
</div>
</div>
</main><!-- /.container -->
<script src="https://code.jquery.com/jquery-3.3.1.slim.min.js" integrity="sha384-q8i/X+965DzO0rT7abK41JStQIAqVgRVzpbzo5smXKp4YfRvH+8abtTE1Pi6jizo" crossorigin="anonymous"></script>
<script src="https://cdnjs.cloudflare.com/ajax/libs/popper.js/1.14.7/umd/popper.min.js" integrity="sha384-UO2eT0CpHqdSJQ6hJty5KVphtPhzWj9WO1clHTMGa3JDZwrnQq4sF86dIHNDz0W1" crossorigin="anonymous"></script>
<script src="https://stackpath.bootstrapcdn.com/bootstrap/4.3.1/js/bootstrap.min.js" integrity="sha384-JjSmVgyd0p3pXB1rRibZUAYoIIy6OrQ6VrjIEaFf/nJGzIxFDsf4x0xIM+B07jRM" crossorigin="anonymous"></script>
</body>
</html>
As mentioned above, the markup was copied from the Bootstrap Starter Template, with a few additions:
如上所述,该标记是从Bootstrap Starter Template复制而来的,其中还增加了一些内容:
We added a reference to the
theme.cssasset file. This stylesheet is not relevant for the tutorial. It defines a visual style for the blog categories menu and manages some text styles.我们添加了对
theme.css资产文件的引用。 此样式表与本教程无关。 它为博客类别菜单定义了一种视觉样式,并管理了一些文本样式。The main container has two columns. The left column contains the
{% page %}tag and will be replaced with the actual page contents by October CMS when an actual page is requested. The right column contains the blog category menu.主容器有两列。 左列包含
{% page %}标记,当请求实际页面时,十月CMS会将其替换为实际页面内容。 右列包含博客类别菜单。- The top menu elements were removed. We will replace them with the automatically generated content later in this tutorial.顶部菜单元素已删除。 在本教程的后面,我们将用自动生成的内容替换它们。
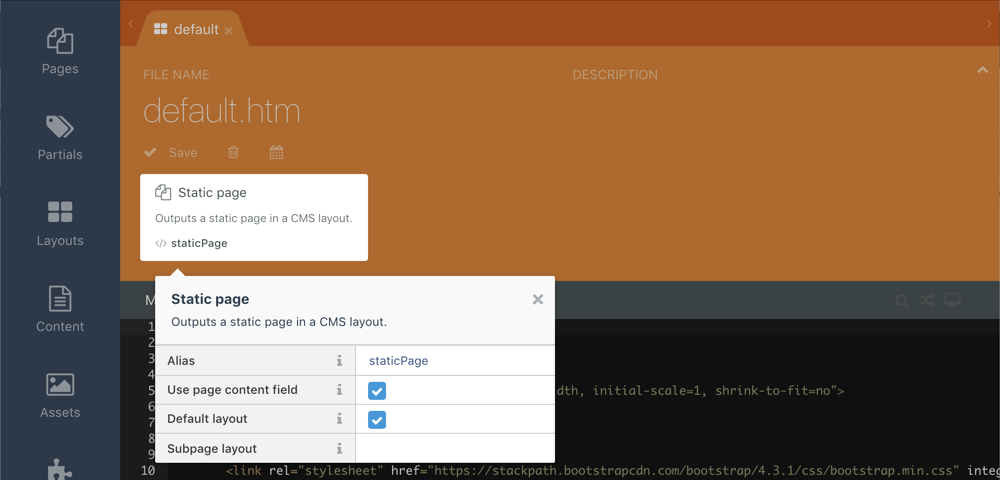
To make the layout available for Static Pages, we must add the Static Page component to the layout. Click the Components item in the sidebar and click the Static Page component. It is located in the Pages section. This will add the component to your layout. This component does not require any configuration, but you can click it to see the available properties in the Inspector. You can also check the Default layout checkbox to make this layout default for all new pages.
为了使布局可用于“静态页面”,我们必须将“静态页面”组件添加到布局中。 单击边栏中的“ 组件”项,然后单击“ 静态页面”组件。 它位于页面部分。 这会将组件添加到您的布局。 该组件不需要任何配置,但是您可以单击它以在Inspector中查看可用的属性。 您还可以选中“ 默认布局”复选框,以使所有新页面的该布局均为默认布局 。
Don’t forget to save the layout before leaving the page!
不要忘记在离开页面之前保存布局!
创建静态页面 (Creating static pages)
Our imaginary website will have the following page structure:
我们虚构的网站将具有以下页面结构:
- Home (/)主页(/)
Projects (/projects)
项目(/项目)
- Websites (/projects/websites)网站(/项目/网站)
- Applications (/projects/applications)应用程序(/项目/应用程序)
- About (/about)关于(/关于)
- Blog (/blog)博客(/博客)
- Contact Us (/contact-us)与我们联系(/ contact-us)
All pages except the Blog are going to be static pages. Static pages can be created by end-users without any web development knowledge, in WYSIWYG mode. Let’s now create the static pages.
除Blog之外的所有页面都将是静态页面。 最终用户可以在所见即所得模式下由不具有任何Web开发知识的最终用户创建静态页面。 现在让我们创建静态页面。
Click the Pages item in the main October CMS menu to open the Static Pages editor.
单击“十月CMS”主菜单中的“ 页面”项,以打开“静态页面”编辑器。

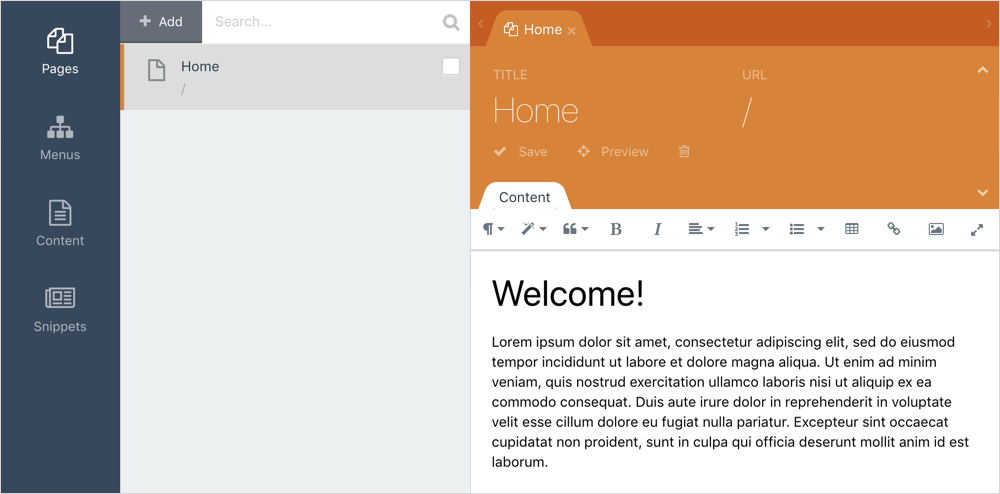
Click the Add button to create a new static page. Enter Home in the title field and “/” (forward slash) in the URL field. Put any text to the Content field and save the page.
单击添加按钮以创建一个新的静态页面。 在标题字段中输入Home ,在URL字段中输入“ /”(正斜杠)。 将任何文本放入“ 内容”字段并保存页面。
Repeat the same process to create Projects, About and Contact Us page. The Blog page is not a static page, just skip it for now. You can use any URLs for the pages you create. The Static Pages plugin will try to generate URLs based on the page titles you provide.
重复相同的过程以创建“项目”,“关于”和“联系我们”页面。 博客页面不是静态页面,请暂时跳过。 您可以为创建的页面使用任何URL。 静态页面插件将尝试根据您提供的页面标题生成URL。
As you might have noticed, the Websites and Applications are subpages of the Projects page. To create a subpage, hover over the Projects page in the page list and click the Add subpage link:
您可能已经注意到,“网站和应用程序”是“项目”页面的子页面。 要创建子页面,请将鼠标悬停在页面列表中的“项目”页面上,然后单击“ 添加子页面”链接:

The automatically generated URL for subpages will reflect their location, for example, /projects/websites.
子页面的自动生成的URL将反映其位置,例如/projects/websites 。
You can now test your website by clicking the Preview icon in the top menu of the Administration Area. The icon is located in the right corner, to the left of the user avatar image. If you did everything right, the website now shows the home page and you can try opening other pages by entering their URLs in the browser address bar.
现在,您可以通过单击管理区域顶部菜单中的预览图标来测试您的网站。 图标位于用户头像图像的右上角。 如果一切操作正确,该网站现在将显示主页,您可以尝试通过在浏览器地址栏中输入其他URL来打开其他页面。
The website top menu and blog category list are not visible yet and we are going to fix this in the following sections.
网站顶部菜单和博客类别列表尚不可见,我们将在以下各节中对此进行修复。
创建菜单 (Creating menus)
Now that we have the static pages created, we can create the main website menus. The Static Pages plugin can automatically create the menu structure based on the structure of your static pages, blog categories, and much more. You can add menu items manually, or you can configure the menu to generate its items automatically.
现在我们已经创建了静态页面,我们可以创建网站的主菜单。 静态页面插件可以根据您的静态页面,博客类别等等的结构自动创建菜单结构。 您可以手动添加菜单项,也可以配置菜单以自动生成其菜单项。
Our website has two menus on the top – the left menu and the right menu. Let’s start with creating the left menu. On the Pages screen click the Menus item in the sidebar and then click Add button to create your first menu. Enter “Top menu – left” in the Name field. Click Add item in the Menu items area.
我们的网站顶部有两个菜单-左侧菜单和右侧菜单。 让我们从创建左侧菜单开始。 在页面屏幕上,单击边栏中的菜单项,然后单击添加按钮以创建第一个菜单。 在名称字段中输入“顶部菜单-左侧”。 在菜单项区域中单击添加项 。
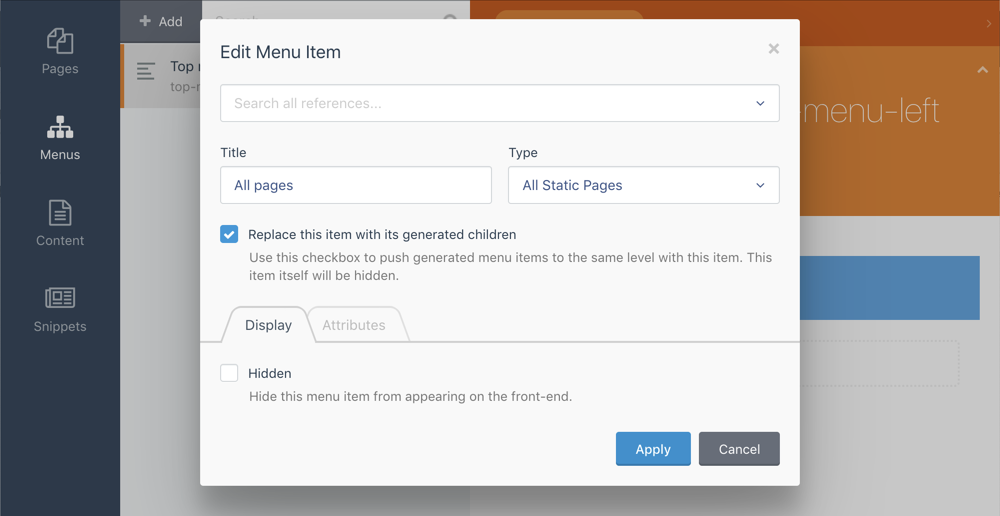
Enter any value in the Title field – this menu item title will not be visible anyways. Select All Static Pages in the Type dropdown menu. Check the Replace this item with its generated contents checkbox. Save the menu item and the menu itself.
在“ 标题”字段中输入任何值-该菜单项的标题将始终不可见。 在类型下拉菜单中选择所有静态页面 。 选中将其替换为生成的内容复选框。 保存菜单项和菜单本身。
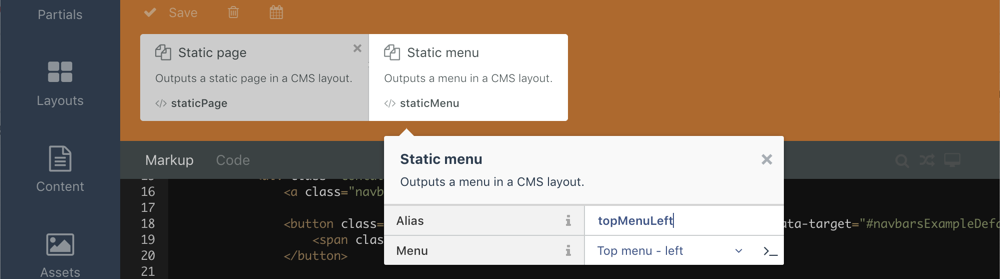
Now we can add the menu to our Layout to make it visible on all website pages. Return to the CMS area, click Layouts and click default.htm layout in the layout list to open the layout in the editor. Now click Components item in the sidebar and click the Static Menu component. Click the new component on the Layout components area to open Inspector and make sure that the Menu property shows “Top menu – left”. Enter topMenuLeft in the Alias property. Save the layout.
现在,我们可以将菜单添加到布局中,以使其在所有网站页面上可见。 返回CMS区域,单击“ 布局” ,然后单击布局列表中的default.htm布局以在编辑器中打开布局。 现在,单击侧栏中的“ 组件”项,然后单击“ 静态菜单”组件。 单击“布局组件”区域上的新组件以打开Inspector ,并确保“ 菜单”属性显示“顶部菜单-左侧”。 在Alias属性中输入topMenuLeft 。 保存布局。
Now we are going to have a bit of coding. Bootstrap 4 expects a very specific markup for navbars:
现在,我们将进行一些编码。 Bootstrap 4期望导航栏有一个非常具体的标记 :
<ul class="navbar-nav">
<li class="nav-item active"><a class="nav-link" href="...">Active item</a></li>
<li class="nav-item"><a class="nav-link" href="...">Inactive item</a></li>
</ul>
For dropdown menus, it is a little more complicated.
对于下拉菜单,它有点复杂。
The Static Pages plugin can generate markup for menus automatically, but the default markup is not specific to Bootstrap – this is just not possible to have a universal markup format that would fit all frameworks. We will create our own partial for rendering menu items, which will be fully compatible with Bootstrap 4. As you might know, October CMS uses the Twig templating engine.
Static Pages插件可以自动为菜单生成标记,但是默认标记不是特定于Bootstrap的-只是不可能具有适用于所有框架的通用标记格式。 我们将创建自己的用于渲染菜单项的partial ,它将与Bootstrap 4完全兼容。您可能知道,October CMS使用了Twig模板引擎 。
In the CMS area click Partials in the sidebar and then click Add to create a new partial. Enter menu-items in the File Name field and paste the following snippet to the Markup field. Make sure to save the partial when you finish.
在CMS区域点击侧边栏局部模板 ,然后单击添加以创建一个新的部分。 在“ 文件名”字段中输入菜单项 ,然后将以下代码段粘贴到“ 标记”字段中。 完成后,请确保保存部分。
<ul class="navbar-nav {{ class }}">
{% for item in items %}
<li class="
nav-item
{{ item.isActive or item.isChildActive ? 'active' : '' }}
{{ item.items ? 'dropdown' : '' }}
">
<a
class="nav-link {% if item.items %}dropdown-toggle{% endif %}"
{% if item.items %}data-toggle="dropdown"{% endif %}
href="{{ item.url }}"
>{{ item.title }}</a>
{% if item.items %}
<div class="dropdown-menu">
{% for subitem in item.items %}
<a class="dropdown-item" href="{{ subitem.url }}">{{ subitem.title }}</a>
{% endfor %}
</div>
{% endif %}
</li>
{% endfor %}
</ul>
The items and class variables are expected to be passed from outside the partial, which we will explain below. The items variable is a list (array) of menu items to render and the class variable specifies the CSS class we want to add to the navbar element. We will use the same partial to display 3 menus: the left side of the main menu, the right side of the main menu and the blog category list.
项目和类变量应该从局部变量外部传递,我们将在下面进行解释。 items变量是要呈现的菜单项的列表(数组),并且class变量指定我们要添加到navbar元素CSS类。 我们将使用同一部分来显示3个菜单:主菜单的左侧,主菜单的右侧和博客类别列表。
The class variable is needed to add the mr-auto class name to the top left menu. This class is a part of the Bootstrap layout system. Basically, it will push the top left menu to the left side, and the top right menu – to the right.
需要将class变量添加到左上方菜单中的mr-auto类名称。 此类是Bootstrap布局系统的一部分。 基本上,它将把左上方的菜单推到左侧,而右上方的菜单推到右侧。
The items array contains a list of menu items. You can find full API documentation of the Static Pages menus on the plugin’s documentation page.
items数组包含菜单项列表。 您可以在插件的文档页面上找到“静态页面”菜单的完整API文档。
Now we can finally display our menus on the page. Open the CMS editor, click Layouts in the sidebar and click our default layout. Replace the <!-- Menu contents will go here --> placeholder with the following line and save the template.
现在,我们终于可以在页面上显示菜单了。 打开CMS编辑器,单击边栏中的版式 ,然后单击我们的默认版式。 用以下行替换<!-- Menu contents will go here -->占位符,然后保存模板。
{% partial 'menu-items' items=topMenuLeft.menuItems class='mr-auto' %}The partial tag is a standard feature of the October CMS template engine. It takes the partial name and optional variables to pass to the partial. The code above renders the partial we just created. The items variable loads menu items from the Static Menu component with the alias topMenuLeft, which we created before. The class variable is just a static string with a value required by Bootstrap.
部分标记是October CMS模板引擎的标准功能。 它需要部分名称和可选变量才能传递给部分。 上面的代码呈现了我们刚刚创建的部分代码。 items变量从静态菜单组件加载具有我们之前创建的别名topMenuLeft的菜单项。 class变量只是一个静态字符串,具有Bootstrap所需的值。
Open the website preview again to see the rendered menu:
再次打开网站预览以查看呈现的菜单:

Currently, there are two problems with the menu – the Contact Us item is displayed on the left side, although according to our plan it must be on the right side. The other problem is that there is no Blog item on the menu. We will fix both problems in a minute.
当前,菜单存在两个问题-“联系我们”项显示在左侧,尽管根据我们的计划,该项必须在右侧。 另一个问题是菜单上没有Blog项。 我们将在一分钟内解决这两个问题。
First, let’s fix the Contact Us menu item. Go to the Pages section, click Pages item in the sidebar and click the Contact Us page. Click the small triangle icon on the right side of the editor to access the Settings form:
首先,让我们修复“联系我们”菜单项。 转到“ 页面”部分,单击边栏中的“ 页面”项,然后单击“ 联系我们”页面。 单击编辑器右侧的小三角形图标以访问“ 设置”表单:
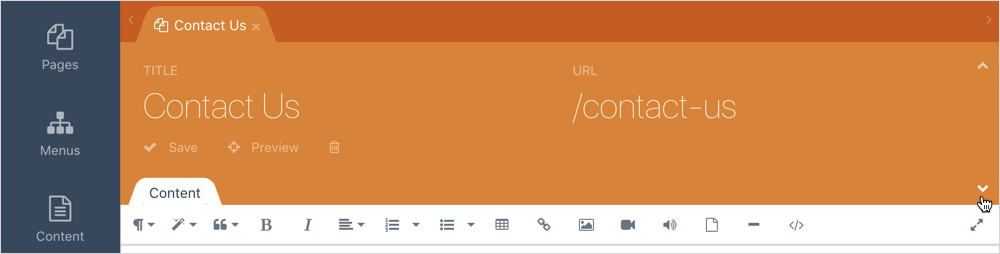
Enable the Hide in navigation option on the Settings form and save the static page. This will hide the Contact Us static page from the automatically generated menu.
在“ 设置”表单上启用“ 隐藏在导航中”选项,然后保存静态页面。 这将从自动生成的菜单中隐藏“联系我们”静态页面。

Let’s now create the right-side top menu. Click Menus on the sidebar and click Add to create a new menu. Enter Top menu – right in the Name field. Click Add item and enter Contact Us in the Title field. Select Static Page in the Type drop-down menu and select the Contact Us page in the Reference drop-down menu. Click Apply to save the menu item and also make sure to save the menu itself.
现在让我们创建右侧的顶部菜单。 单击侧栏上的菜单 ,然后单击添加以创建新菜单。 进入“ 顶部”菜单-在“ 名称”字段中。 单击添加项目,然后在标题字段中输入与我们联系 。 在类型下拉菜单中选择静态页面 ,然后在参考下拉菜单中选择联系我们页面。 单击“ 应用”保存菜单项,并确保保存菜单本身。

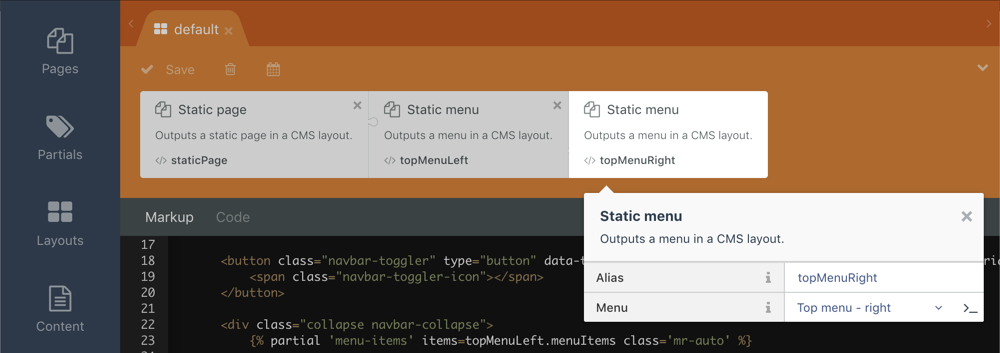
Return to the CMS area and open our default layout in the editor. Add another Static Menu component to the layout. Click the new component to show Inspector, enter topMenuRight in the Alias field and select Top menu – right in the Menu drop-down.
返回CMS区域并在编辑器中打开我们的默认布局。 将另一个“ 静态菜单”组件添加到布局。 单击新组件以显示Inspector,在Alias字段中输入topMenuRight ,然后在Menu下拉菜单中选择Top menu 。
Close Inspector and paste the following line to the Markup section, below the line which you have added for rendering the top left menu:
关闭检查器,并将以下行粘贴到“ 标记”部分,即您添加的用于渲染左上方菜单的行下方:
{% partial 'menu-items' items=topMenuRight.menuItems %}As you can see, we use the same partial as before, but this time we load menu items from the right top menu and do not pass any CSS class. Save the layout and preview the website again:
如您所见,我们使用了与以前相同的局部代码,但是这次我们从右上方的菜单加载菜单项,并且不传递任何CSS类。 保存布局并再次预览网站:

Congratulations, we are almost there! The last missing menu item is the Blog. Explaining how to add blog features to a website is out of the scope of this tutorial. You can read about creating Blog pages on the Blog plugin documentation page. Assuming that you have already created the blog post page, we can add a menu item to the top left menu.
恭喜,我们快到了! 最后缺少的菜单项是Blog。 解释如何向网站添加博客功能超出了本教程的范围。 您可以在Blog插件文档页面上阅读有关创建Blog页面的信息 。 假设您已经创建了博客文章页面,我们可以将菜单项添加到左上方的菜单中。
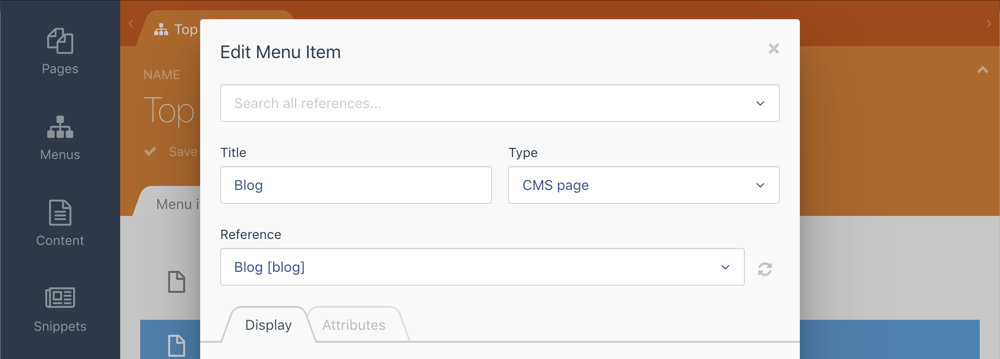
Open the Pages section and go to the Menus area. Click the Top menu – left menu and click Add Item. Enter Blog in the Title field and select CMS Page in the Type drop-down menu. Select your blog page in the Reference drop-down menu.
打开页面部分,然后转到菜单区域。 单击顶部菜单–左侧菜单,然后单击添加项目 。 在标题字段中输入博客 ,然后在类型下拉菜单中选择CMS页面 。 在参考下拉菜单中选择您的博客页面。
Do not close the menu item editor popup yet. We are going to show a trick that will help us to make the Blog menu item active programmatically on the Blog Category page. Click the Attributes tab in the menu item editor and click enter blog in the Code field. Save the menu item and then save the menu.
请勿关闭菜单项编辑器弹出窗口。 我们将展示一个技巧,它将帮助我们以编程方式在“博客类别”页面上使“博客”菜单项处于活动状态。 单击菜单项编辑器中的“ 属性”选项卡,然后在“ 代码”字段中单击“输入博客 ” 。 保存菜单项,然后保存菜单。
You can now refresh the website preview and see our new Blog item on the menu:
现在,您可以刷新网站预览,并在菜单上看到我们新的Blog项:

创建博客类别菜单 (Creating the blog category menu)
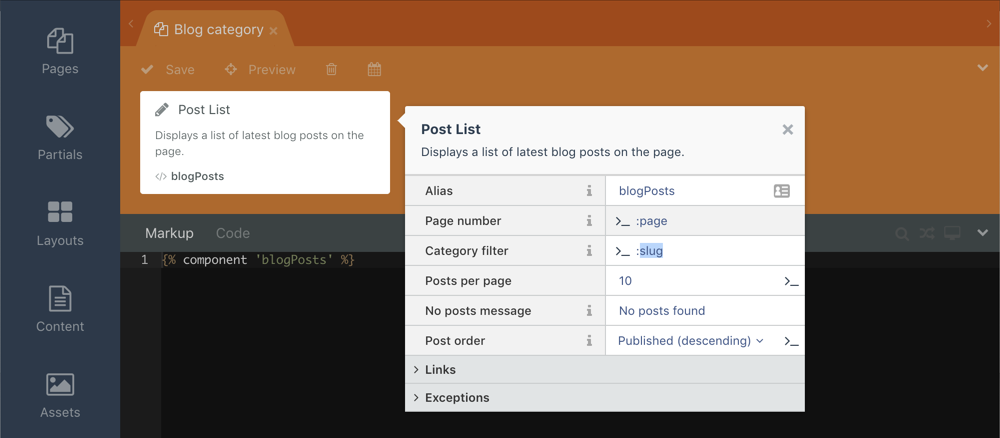
The only missing part of our demo website is the blog category menu. We assume that you have created the blog category CMS page by following the Blog plugin documentation. An important thing for making the blog categories page compatible with the Static Pages plugin is that the Post List component on the categories page must have the Category Filter property to be configured to read its value from the URL parameter:
我们的演示网站唯一缺少的部分是博客类别菜单。 我们假设您已按照Blog插件文档创建了Blog类别CMS页面。 使博客类别页面与“静态页面”插件兼容的重要一件事是,类别页面上的“ 发布列表”组件必须具有“ 类别过滤器”属性,该属性必须配置为从URL参数读取其值:
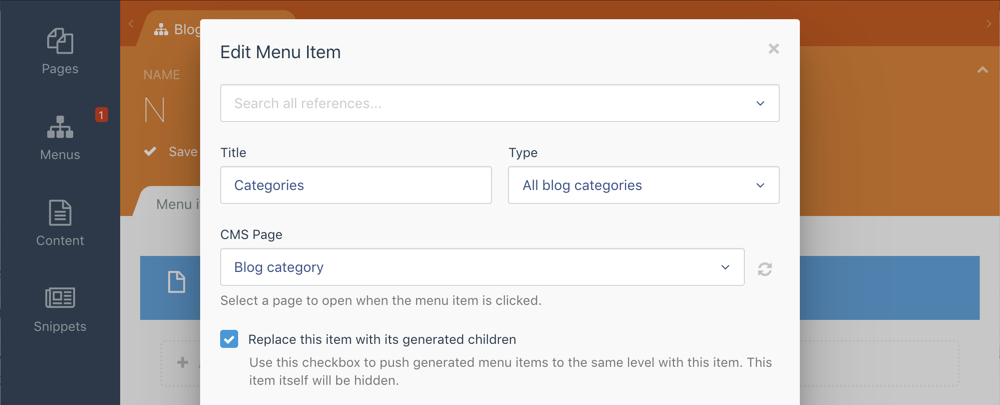
After configuring the blog category CMS page, click the Pages item in the main October CMS menu again and create a new Menu. Enter Blog categories to the Name field and click Add Item. In the menu item editor enter Categories in the Title field. This value does not really matter as this menu item is going to be replaced with menu items based on the blog categories. Select All blog categories in the Type drop-down menu. Select your blog categories CMS page in the CMS Page drop-down menu. Click the Replace this item with its generated children checkbox, save the menu item and save the menu.
在配置博客类别CMS页面之后,再次单击October CMS主菜单中的Pages项,然后创建一个新Menu 。 在名称字段中输入博客类别 ,然后单击添加项目 。 在菜单项编辑器中,在标题字段中输入类别 。 该值实际上并不重要,因为将根据博客类别将该菜单项替换为菜单项。 在类型下拉菜单中选择所有博客类别 。 在“ CMS页面”下拉菜单中选择您的博客类别CMS页面。 单击“ 用生成的子项替换此项目”复选框,保存菜单项并保存菜单。
We have already added two menus to the layout, the process of adding the third menu is the same. Click the CMS item in the main October menu, open the default layout and add the Static Menu component to the layout. Click the new component and enter blogCategories in the Alias field. Select the new menu Blog categories in the Menu drop-down list. Save the layout.
我们已经在布局中添加了两个菜单,添加第三个菜单的过程是相同的。 单击十月主菜单中的CMS项目,打开默认布局,然后将“ 静态菜单”组件添加到该布局中。 单击新组件, 然后在“ 别名”字段中输入blogCategories 。 在菜单下拉列表中选择新菜单博客类别 。 保存布局。
Now replace the comment <!-- Blog category list will go here --> with the partial tag:
现在用部分标记替换注释<!-- Blog category list will go here --> :
{% partial 'menu-items' items=blogCategories.menuItems class='flex-column' %}Save the layout again and preview the website. If you don’t see any items in the blog categories menu make sure that you have actually created any blog categories! Now the website looks exactly as we wanted.
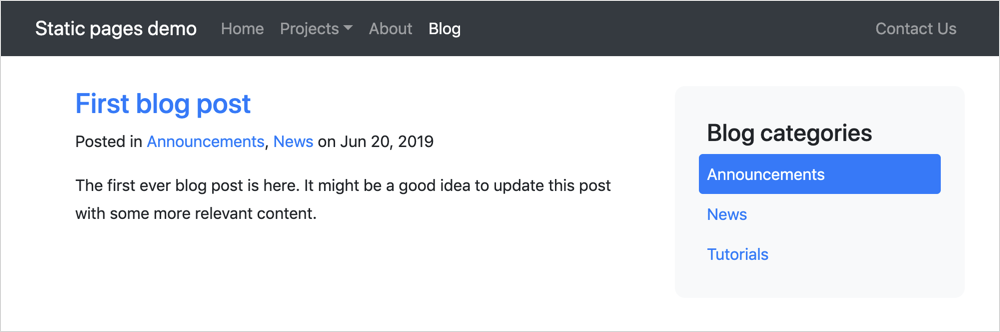
再次保存布局并预览网站。 如果您在博客类别菜单中没有看到任何项目,请确保您实际上已经创建了任何博客类别! 现在,该网站的外观完全符合我们的期望。
However, if you click any blog category you will notice that the Blog main menu item is not active. To fix this we will use the Static Pages API to make the menu item active programmatically. Open the Blog Categories page in the CMS editor and paste this little snippet to the Code editor:
但是,如果单击任何博客类别,您将注意到Blog主菜单项未处于活动状态。 为了解决这个问题,我们将使用静态页面API通过编程使菜单项处于活动状态。 在CMS编辑器中打开“博客类别”页面,然后将此小片段粘贴到代码编辑器中:
function onInit()
{
$this['activeMenuItem'] = 'blog';
}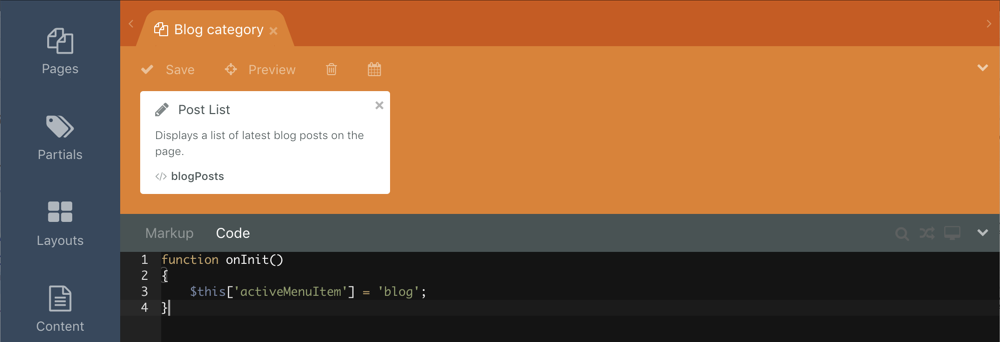
The blog value is the menu item code, which you have specified for the Blog item. And the activeMenuItem is a variable which the Static Pages plugin uses to determine what menu item is currently active. You can read more about the plugin API on the documentation page. Save the page and refresh the website preview — the Blog item is now active.
blog值是您为博客项目指定的菜单项代码。 而activeMenuItem是一个变量,Static Pages插件使用该变量来确定当前处于活动状态的菜单项。 您可以在文档页面上阅读有关插件API的更多信息。 保存页面并刷新网站预览-Blog项现在处于活动状态。
We hope you enjoyed this tutorial! It took a few hours to write this post, but the process of creating the demo website took as little as 15 minutes. Now you can create websites with mixed static and dynamic pages. You can find more useful plugins on the Marketplace and learn more tricks on the October CMS blog!
希望您喜欢本教程! 写这篇文章花了几个小时,但是创建演示网站的过程只花了15分钟。 现在,您可以创建包含静态和动态页面混合的网站。 您可以在Marketplace上找到更多有用的插件,并在October CMS博客上了解更多技巧!
See also:
也可以看看:
Static Pages plugin
静态页面插件
Blog plugin
博客插件
Plugins Marketplace
插件市场
Themes Marketplace
主题市场
October CMS documentation
十月CMS文档
October CMS blog
十月CMS博客
Facebook page
Facebook页面
Twitter
推特
翻译自: https://www.sitepoint.com/getting-started-with-october-cms-static-pages/
october cms
october cms_October CMS静态页面入门相关推荐
- .net如何将aspx生成html(cms静态页面原理)
相信大家都遇到过把web网站生成html发不到网上.也很好奇一些cms上都有这个功能,其实很简单 大体思路就是:在你的后台,做一html页面生成器.点击时.循环web目录下的aspx文件(这一点应该不 ...
- freemarker自动生成html页面,HTML+CSS入门 Freemarker如何生成HTML静态页面
本篇教程介绍了HTML+CSS入门 Freemarker如何生成HTML静态页面,希望阅读本篇文章以后大家有所收获,帮助大家HTML+CSS入门. < 做一个网址导航的项目,面向用户的就是一个首 ...
- Spring MVC入门示例教程--静态页面跳转
以下示例显示如何使用Spring MVC Framework编写一个简单的基于Web的应用程序,它可以使用<mvc:resources>标记访问静态页面和动态页面.首先使用Eclipse ...
- 【转】Vue.js入门教程(一)从静态页面到前后端分离开发
第一章:基础知识 我能看懂吗? 只要你现在能用html+css+js制作一个静态页面,相信我,你100%可以读懂这篇文章. 本文尤其适合那些想要了解前后端分离开发技术,或者刚刚脱离传统MVC开发模式的 ...
- 爬虫快速入门(一):静态页面爬取
在这个数据为王的时代,掌握一手好的模型炼丹技巧还远远不够,有时候就是那么一小撮数据,就会对模型性能产生至关重要的影响.虽说大一点的公司一般都有专门负责爬虫的同学,但求人不如求己,每一位炼丹师都应该掌握 ...
- .NET Core实战项目之CMS 第二章 入门篇-快速入门ASP.NET Core看这篇就够了
本来这篇只是想简单介绍下ASP.NET Core MVC项目的(毕竟要照顾到很多新手朋友),但是转念一想不如来点猛的(考虑到急性子的朋友),让你通过本文的学习就能快速的入门ASP.NET Core.既 ...
- Day210.服务端渲染技术NUXT、整合前台主页面、名师、课程静态页面、首页整合banner数据后端部分【创建banner微服务、接口、banner后台前端实现】 -谷粒学院
谷粒学院 服务端渲染技术NUXT 一.服务端渲染技术NUXT 1.什么是服务端渲染 服务端渲染又称SSR (Server Side Render)是在服务端完成页面的内容,而不是在客户端通过AJAX获 ...
- 静态页面和动态页面的区别
静态页面和动态页面的区别 一.静态web页面: 1.在静态Web程序中,客户端使用Web浏览器(IE.FireFox等)经过网络(Network)连接到服务器上,使用HTTP协议发起一个请求(Requ ...
- 生成静态页面的五种方案(转)
方案1: public static bool WriteFile(string strText,string strContent,string strAuthor) { string ...
- 生成静态页面的五种方案 收藏
方案1: public static bool WriteFile(string strText,string strContent,string strAuthor) { string ...
最新文章
- Maya创建科幻3D动画循环场景视频教程
- 性能测试应用领域分析
- 关于肠道菌群研究的7大事实和5大倡议
- leetcode算法题--奇偶链表
- 用Eclipse调试Java程序的一些小技巧
- sketch钢笔工具_Sketch和Figma,不同的工具等于不同的结果
- HTTPS是如何工作的
- (25)FPGA面试技能提升篇(TCP、UDP)
- n!的分解 soj 2666
- mysql 5.6特性_MySQL 5.6新特性概览
- 数学建模:线性规划—投资的收益和风险模型 (Python 求解)
- 打造淘宝极简包的轻量化框架
- Windows 控件 Microsoft.Office.Interop.Excel 复制sheet
- k8s集群二进制部署 1.17.3
- 「GoTeam 招聘时间」金山办公 WPS Go 中高级开发(广州/珠海)
- FlexRay 总线详细介绍
- HTML+JS实现浏览器前端下载图片
- 经典残局html,微信欢乐斗地主3月残局1-100关全攻略 3月残局图文攻略大全
- cv2.error: OpenCV(4.1.0)error: (-215:Assertion failed) !ssize.empty() in function ‘resize‘——记录解决方法
- 对局匹配(动态规划)