使用Spring Security保护GWT应用程序
在本教程中,我们将看到如何将GWT与Spring的安全模块(即Spring Security)集成在一起。 我们将看到如何保护GWT入口点,如何检索用户的凭据以及如何记录各种身份验证事件。 此外,我们将实现自定义身份验证提供程序,以便可以重用现有的身份验证方案。
如果您是JavaCodeGeeks的普通读者,那么现在您可能应该知道我们真的很喜欢GWT 。 过去,贾斯汀(Justin)在GWT上写了一些杀手G的文章: 如何将GWT与Spring和Hibernate(JPA)集成以及如何在混合中添加Eclipse和Maven 。 此外,我已经写了关于如何在GWT应用程序中添加JSON功能 , 如何为GWT添加CAPTCHA以及如何开始使用SmartGWT的文章 。 最后,Pat写了有关构建自己的GWT Spring Maven原型并集成GWT,EJB3,Maven和JBoss的文章 。
因此,我们现在开始使用Spring的Security模块就不足为奇了。 如官方站点所述, Spring Security是一个功能强大且高度可定制的身份验证和访问控制框架。 它是用于保护基于Spring的应用程序的实际标准 。 Spring Security是Acegi框架的演变,该框架在后台使用Spring以便主要为Web应用程序提供安全性。 但是,Spring Security现在是一个完善的安全框架,它不仅包含针对Web的功能,而且还包含针对LDAP集成和ACL创建的功能。 在开始本教程之前,最好先阅读一下Spring Security参考文档并准备好Spring Security API Javadocs 。
在本教程中,我将使用GWT 2.1.0和Spring Security 3.0.5。 您可以在此处下载最新的生产版本。 您可能已经猜到了,还需要Spring核心框架中的一些库。 您可以在此处下载框架。
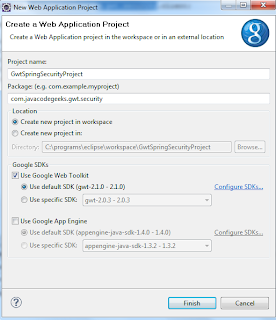
让我们开始在Eclipse中创建一个新的Web应用程序项目(我想您已经安装了Eclipse的Google插件,并且已经部署了GWT)。 我为该项目的名称选择了深奥的名称“ GwtSpringSecurityProject”。 Eclipse屏幕如下所示:
将Spring安全性添加到我们的项目的第一步是在“ web.xml”文件中声明一个过滤器。 这个过滤器是FilterChainProxy类的实例,它将拦截所有传入的请求,并将请求的控件委派给适当的Spring处理程序。 相关的Web声明文件片段如下:
…
<filter><filter-name>springSecurityFilterChain</filter-name><filter-class>org.springframework.web.filter.DelegatingFilterProxy</filter-class>
</filter><filter-mapping><filter-name>springSecurityFilterChain</filter-name><url-pattern>/*</url-pattern>
</filter-mapping>
...
我们还必须在“ web.xml”中定义一个ContextLoaderListener以便引导Spring上下文。 这是通过以下代码段完成的:
…<listener><listener-class>org.springframework.web.context.ContextLoaderListener</listener-class></listener>
...
接下来,我们在“ war / WEB-INF”文件夹中创建一个名为“ applicationContext.xml”的文件。 在那里,我们声明了Spring Security相关信息。 最重要的元素是“ http ”,它可以用来定义应在哪些URL上应用安全性,以及用户应具有哪些角色才能访问特定资源。 在我们的示例中,代码段如下:
…
<http auto-config="true"><intercept-url pattern="/gwtspringsecurityproject/**" access="ROLE_USER"/><intercept-url pattern="/gwt/**" access="ROLE_USER"/><intercept-url pattern="/**/*.html" access="ROLE_USER"/><intercept-url pattern="/**" access="IS_AUTHENTICATED_ANONYMOUSLY" />
</http>
...
简而言之,上述内容要求角色“ ROLE_USER”才能访问“ gwt”和“ gwtspringsecurityproject”文件夹(与GWT相关的资源所在)下的文件。 同样,所有HTML文件(如GWT的入口点)都需要相同的角色。 “ IS_AUTHENTICATED_ANONYMOUSLY”意味着所有用户都可以访问特定资源,而不必成为特定角色的一部分。 通过简单地使用“ http ”元素,Spring将使用默认的登录页面和注销URL。
所有身份验证请求均由AuthenticationManager处理,因此必须在文件中声明其实例。 更具体地说,通常将请求委托给AuthenticationProvider 。 可以使用一些已经创建的实现,例如DaoAuthenticationProvider (与DB中定义的角色和用户一起使用时)或LdapAuthenticationProvider (根据LDAP服务器对用户进行身份验证)。 但是,出于本教程的目的,我们将创建一个自定义身份验证提供程序,并将其与spring的安全基础结构集成。
在深入研究应用程序的代码之前,我们必须首先处理依赖项。 这是必须添加到项目的类路径中的JAR:
- org.springframework.context-3.0.5.RELEASE.jar
- Spring安全核心-3.0.5.RELEASE.jar
- spring-security-web-3.0.5.RELEASE.jar
好的,现在我们准备好了。 我们的提供程序非常简单,仅使用静态Map来存储用户及其相应的密码。 这是代码:
package com.javacodegeeks.gwt.security.server.auth;import java.util.HashMap;
import java.util.Map;import org.springframework.security.authentication.AuthenticationProvider;
import org.springframework.security.authentication.BadCredentialsException;
import org.springframework.security.authentication.UsernamePasswordAuthenticationToken;
import org.springframework.security.core.Authentication;
import org.springframework.security.core.AuthenticationException;
import org.springframework.security.core.userdetails.UsernameNotFoundException;public class CustomAuthenticationProvider implements AuthenticationProvider {private static Map<String, String> users = new HashMap<String, String>();static {users.put("fabrizio", "javacodegeeks");users.put("justin", "javacodegeeks");}@Overridepublic Authentication authenticate(Authentication authentication) throws AuthenticationException {String username = (String) authentication.getPrincipal();String password = (String)authentication.getCredentials();if (users.get(username)==null)throw new UsernameNotFoundException("User not found");String storedPass = users.get(username);if (!storedPass.equals(password))throw new BadCredentialsException("Invalid password");Authentication customAuthentication = new CustomUserAuthentication("ROLE_USER", authentication);customAuthentication.setAuthenticated(true);return customAuthentication;}@Overridepublic boolean supports(Class<? extends Object> authentication) {return UsernamePasswordAuthenticationToken.class.isAssignableFrom(authentication);}}
让我们从头开始对该代码进行详细说明。 supports方法定义了此提供程序提供的身份验证的类型。 在我们的例子中, UsernamePasswordAuthenticationToken是我们希望处理的那个。 该实现旨在简化用户名和密码的显示。
实现了authenticate方法,并在其中检索登录表单中提供的用户名(通过getPrincipal方法)以及随附的密码(通过getCredentials方法)。 首先,我们检查特定的用户名是否存在,如果不存在,则抛出UsernameNotFoundException 。 同样,如果用户名存在但密码不正确, 则会引发BadCredentialsException 。 请注意,这两个异常都扩展了父AuthenticationException类。
如果用户名和密码均正确,我们将对用户进行身份验证。 为此,我们必须返回Authentication接口的具体实例。 在这种情况下,我们必须封装已知的用户信息(凭证等)以及用户所具有的角色(权限)。 请注意,分配的角色(ROLE_USER)与“ applicationContext.xml”文件中声明的角色匹配。 另外,必须调用setAuthenticated方法(以true作为参数),以向其余身份验证链指示特定用户已成功通过我们的模块进行身份验证。 让我们看看在这种情况下如何定义自定义身份验证对象:
package com.javacodegeeks.gwt.security.server.auth;import java.util.ArrayList;
import java.util.Collection;import org.springframework.security.core.Authentication;
import org.springframework.security.core.GrantedAuthority;
import org.springframework.security.core.authority.GrantedAuthorityImpl;public class CustomUserAuthentication implements Authentication {private static final long serialVersionUID = -3091441742758356129L;private boolean authenticated;private GrantedAuthority grantedAuthority;private Authentication authentication;public CustomUserAuthentication(String role, Authentication authentication) {this.grantedAuthority = new GrantedAuthorityImpl(role);this.authentication = authentication;}@Overridepublic Collection<GrantedAuthority> getAuthorities() {Collection<GrantedAuthority> authorities = new ArrayList<GrantedAuthority>();authorities.add(grantedAuthority);return authorities;}@Overridepublic Object getCredentials() {return authentication.getCredentials();}@Overridepublic Object getDetails() {return authentication.getDetails();}@Overridepublic Object getPrincipal() {return authentication.getPrincipal();}@Overridepublic boolean isAuthenticated() {return authenticated;}@Overridepublic void setAuthenticated(boolean authenticated) throws IllegalArgumentException {this.authenticated = authenticated;}@Overridepublic String getName() {return this.getClass().getSimpleName();}}
在构造函数中,我们传递用户的角色和原始的Authentication对象。 在已实现的方法中,最重要的一个是getAuthorities ,它返回已授予主体的权限。 该信息在GrantedAuthority对象的集合内提供。
现在让我们看看“ applicationContext.xml”的样子:
<?xml version="1.0" encoding="UTF-8"?><beans:beans xmlns="http://www.springframework.org/schema/security"xmlns:beans="http://www.springframework.org/schema/beans"xmlns:xsi="http://www.w3.org/2001/XMLSchema-instance"xsi:schemaLocation="http://www.springframework.org/schema/beans http://www.springframework.org/schema/beans/spring-beans-3.0.xsdhttp://www.springframework.org/schema/security http://www.springframework.org/schema/security/spring-security-3.0.xsd"><beans:bean id="customAuthListener" class="com.javacodegeeks.gwt.security.server.auth.CustomAuthListener"/><http auto-config="true"><intercept-url pattern="/gwtspringsecurityproject/**" access="ROLE_USER"/><intercept-url pattern="/gwt/**" access="ROLE_USER"/><intercept-url pattern="/**/*.html" access="ROLE_USER"/><intercept-url pattern="/**" access="IS_AUTHENTICATED_ANONYMOUSLY" /></http><beans:bean id="customAuthenticationProvider" class="com.javacodegeeks.gwt.security.server.auth.CustomAuthenticationProvider" /> <authentication-manager alias="authenticationManager"><authentication-provider ref="customAuthenticationProvider"/></authentication-manager></beans:beans>除“ CustomAuthListener”外,声明文件的每个元素均已定义。 作为Spring框架的一部分,Spring Security允许应用程序开发人员提供回调,这些回调将在应用程序生命周期的特定部分被调用。 因此,当发生特定的身份验证事件时,我们可以注册要调用的方法。 在我们的例子中,我们将创建一个侦听器,该侦听器接收AbstractAuthorizationEvent ,即所有与安全拦截有关的事件。 让我们看看这是如何实现的:
package com.javacodegeeks.gwt.security.server.auth;import org.apache.commons.logging.Log;
import org.apache.commons.logging.LogFactory;
import org.springframework.context.ApplicationListener;
import org.springframework.security.authentication.event.AbstractAuthenticationEvent;
import org.springframework.security.authentication.event.AbstractAuthenticationFailureEvent;public class CustomAuthListener implements ApplicationListener<AbstractAuthenticationEvent> {private static final Log logger = LogFactory.getLog(CustomAuthListener.class);@Overridepublic void onApplicationEvent(AbstractAuthenticationEvent event) {final StringBuilder builder = new StringBuilder();builder.append("Authentication event ");builder.append(event.getClass().getSimpleName());builder.append(": ");builder.append(event.getAuthentication().getName());builder.append("; details: ");builder.append(event.getAuthentication().getDetails());if (event instanceof AbstractAuthenticationFailureEvent) {builder.append("; exception: ");builder.append(((AbstractAuthenticationFailureEvent) event).getException().getMessage());}logger.warn(builder.toString());}}
在我们的实现中,我们仅记录所有成功和不成功的身份验证事件(基于LoggerListener类),但是在此处提供您自己的业务逻辑显然很简单。
最后,我们将创建一个GWT异步服务器端服务,该服务将向客户端提供有关用户及其登录用户名的信息。 如果您最熟悉GWT,那么理解代码就不会有任何问题。 这是两个接口以及该服务的具体实现:
验证服务
package com.javacodegeeks.gwt.security.client;import com.google.gwt.user.client.rpc.RemoteService;
import com.google.gwt.user.client.rpc.RemoteServiceRelativePath;/*** The client side stub for the RPC service.*/
@RemoteServiceRelativePath("auth")
public interface AuthService extends RemoteService {String retrieveUsername();
}
AuthServiceAsync
package com.javacodegeeks.gwt.security.client;import com.google.gwt.user.client.rpc.AsyncCallback;/*** The async counterpart of <code>AuthService</code>.*/
public interface AuthServiceAsync {void retrieveUsername(AsyncCallback<String> callback);
}
AuthServiceImpl
package com.javacodegeeks.gwt.security.server;import org.springframework.security.core.Authentication;
import org.springframework.security.core.context.SecurityContextHolder;import com.google.gwt.user.server.rpc.RemoteServiceServlet;
import com.javacodegeeks.gwt.security.client.AuthService;@SuppressWarnings("serial")
public class AuthServiceImpl extends RemoteServiceServlet implements AuthService {@Overridepublic String retrieveUsername() {Authentication authentication =SecurityContextHolder.getContext().getAuthentication();if (authentication==null){System.out.println("Not logged in");return null;}else {return (String) authentication.getPrincipal();}}}
代码很简单。 我们使用SecurityContextHolder类来检索当前的SecurityContext ,然后使用getAuthentication方法来获取对基础Authentication对象的引用。 然后,我们通过getPrincipal方法检索用户名(如果有)。
当然,我们必须在应用程序“ web.xml”文件中声明特定的servlet。 这里是:
...
<servlet><servlet-name>authServlet</servlet-name><servlet-class>com.javacodegeeks.gwt.security.server.AuthServiceImpl</servlet-class>
</servlet><servlet-mapping><servlet-name>authServlet</servlet-name><url-pattern>/gwtspringsecurityproject/auth</url-pattern>
</servlet-mapping>
...
这是整个网络声明文件:
<?xml version="1.0" encoding="UTF-8"?>
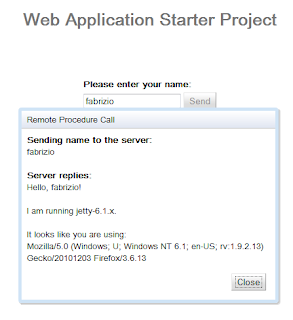
<!DOCTYPE web-appPUBLIC "-//Sun Microsystems, Inc.//DTD Web Application 2.3//EN""http://java.sun.com/dtd/web-app_2_3.dtd"><web-app><filter><filter-name>springSecurityFilterChain</filter-name><filter-class>org.springframework.web.filter.DelegatingFilterProxy</filter-class></filter><filter-mapping><filter-name>springSecurityFilterChain</filter-name><url-pattern>/*</url-pattern></filter-mapping><listener><listener-class>org.springframework.web.context.ContextLoaderListener</listener-class></listener><!-- Servlets --><servlet><servlet-name>greetServlet</servlet-name><servlet-class>com.javacodegeeks.gwt.security.server.GreetingServiceImpl</servlet-class></servlet><servlet-mapping><servlet-name>greetServlet</servlet-name><url-pattern>/gwtspringsecurityproject/greet</url-pattern></servlet-mapping><servlet><servlet-name>authServlet</servlet-name><servlet-class>com.javacodegeeks.gwt.security.server.AuthServiceImpl</servlet-class></servlet><servlet-mapping><servlet-name>authServlet</servlet-name><url-pattern>/gwtspringsecurityproject/auth</url-pattern></servlet-mapping><!-- Default page to serve --><welcome-file-list><welcome-file>GwtSpringSecurityProject.html</welcome-file></welcome-file-list></web-app>让我们看看如何在应用程序的入口点中使用此服务。 我们在onModuleLoad方法结束之前添加以下代码片段:
authService.retrieveUsername(new AsyncCallback<String>() {public void onFailure(Throwable caught) {dialogBox.setText("Remote Procedure Call - Failure");}public void onSuccess(String result) {nameField.setText(result);}}
);
启动应用程序之前的最后一步是处理运行时依赖项。 Spring需要大量的库来执行其DI魔术,因此,这是在“ war / WEB-INF / lib”文件夹中必须存在的JAR列表:
- org.springframework.aop-3.0.5.RELEASE.jar
- org.springframework.asm-3.0.5.RELEASE.jar
- org.springframework.beans-3.0.5.RELEASE.jar
- org.springframework.context-3.0.5.RELEASE.jar
- org.springframework.core-3.0.5.RELEASE.jar
- org.springframework.expression-3.0.5.RELEASE.jar
- org.springframework.web-3.0.5.RELEASE.jar
- 弹簧安全配置-3.0.5.RELEASE.jar
- Spring安全核心-3.0.5.RELEASE.jar
- spring-security-web-3.0.5.RELEASE.jar
复制以上所有内容之后,启动Eclipse项目配置并尝试访问默认URL:
http://127.0.0.1:8888/GwtSpringSecurityProject.html?gwt.codesvr=127.0.0.1:9997
Spring Security将拦截该请求,并为您提供默认的登录页面。 提供如下有效凭证:
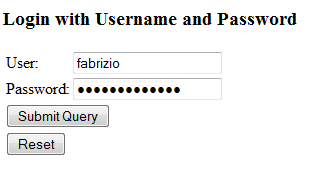
提交表单数据,您将被重定向到原始URL。 请注意,该文本字段将填充用于登录的用户名。
返回到Eclipse控制台视图,并检查在那里打印的各种日志。 您应该看到类似以下的内容:
2010年12月12日8:45:49 PM com.javacodegeeks.gwt.security.server.auth.CustomAuthListener onApplicationEvent
警告:身份验证事件AuthenticationSuccessEvent:CustomUserAuthentication; 详细信息:org.springframework.security.web.authentication.WebAuthenticationDetails@fffdaa08:RemoteIpAddress:127.0.0.1; SessionId:im1fdjvdu7yw
2010年12月12日8:45:49 PM com.javacodegeeks.gwt.security.server.auth.CustomAuthListener onApplicationEvent
警告:身份验证事件InteractiveAuthenticationSuccessEvent:CustomUserAuthentication; 详细信息:org.springframework.security.web.authentication.WebAuthenticationDetails@fffdaa08:RemoteIpAddress:127.0.0.1; SessionId:im1fdjvdu7yw
那是所有人。 您可以在这里找到创建的Eclipse项目。 玩得开心!
- GWT 2 Spring 3 JPA 2 Hibernate 3.5教程
- SmartGWT入门,提供出色的GWT界面
- 建立自己的GWT Spring Maven原型
- GWT 2 Spring 3 JPA 2 Hibernate 3.5教程– Eclipse和Maven 2展示
- 使用Spring使用Java发送电子邮件– GMail SMTP服务器示例
翻译自: https://www.javacodegeeks.com/2010/12/securing-gwt-apps-with-spring-security.html
使用Spring Security保护GWT应用程序相关推荐
- gwt格式_使用Spring Security保护GWT应用程序的安全
gwt格式 在本教程中,我们将看到如何将GWT与Spring的安全模块(即Spring Security)集成. 我们将看到如何保护GWT入口点,如何检索用户的凭据以及如何记录各种身份验证事件. 此外 ...
- tomcat使用ssl_使用SSL和Spring Security保护Tomcat应用程序的安全
tomcat使用ssl 如果您看过我的上一个博客,您会知道我列出了Spring Security可以做的十件事 . 但是,在开始认真使用Spring Security之前,您真正要做的第一件事就是确保 ...
- 使用SSL和Spring Security保护Tomcat应用程序的安全
如果您看过我的上一个博客,您会知道我列出了Spring Security可以做的十件事 . 但是,在认真开始使用Spring Security之前,您真正要做的第一件事就是确保您的Web应用使用正确的 ...
- 使用Spring Security保护REST服务
总览 最近,我正在一个使用REST服务层与客户端应用程序(GWT应用程序)进行通信的项目中. 因此,我花了很多时间来弄清楚如何使用Spring Security保护REST服务. 本文介绍了我找到的解 ...
- Spring Boot + Spring Security + JWT + 微信小程序登录
Spring Boot + Spring Security + JWT + 微信小程序登录整合教程 参考文章 文章目录 整合思想 整合步骤 1. AuthenticationToken 2. Auth ...
- 使用带有OAuth的Spring Security保护资源
1.简介 在本教程中,我们将研究如何使用Spring Security和OAuth来基于路径模式( / api / ** )保护服务器上的管理资源. 我们配置的另一个路径模式( / oauth / t ...
- spring security:第一个程序
spring security虽然已经简化了,但配置还是要小心翼翼的.这里运行起第一个spring security程序. 环境: spring 4.2.4 spring security 4.0.4 ...
- spring security:第一个程序解析
上一篇在一个项目里配置了spring security,这里大致说一些这些配置的作用. pom.xml 文件解析 <!-- spring security --><!-- sprin ...
- 使用JWT和Spring Security保护REST API
通常情况下,把API直接暴露出去是风险很大的,不说别的,直接被机器攻击就喝一壶的.那么一般来说,对API要划分出一定的权限级别,然后做一个用户的鉴权,依据鉴权结果给予用户开放对应的API.目前,比较主 ...
最新文章
- JS子窗口调用父窗口中的函数
- C++——运算符重载operator
- ACM基础题 - 求矩形个数
- Go gin文件上传
- 6.6 rsync:文件同步工具
- concurrent: Callable用法
- 成为更优秀的程序员:退后一步看问题
- python回归分析实验_python线性回归实验
- linux资源异常无法fork,linux 下 fork 后的文件资源处理问题
- wait()和sleep()区别(常见面试题)
- smartadmin官网_smartadmin api_smartadmin 下载
- 白苹果了怎么办_iOS更新白苹果处理及第三方售后吐槽
- 华为路由器时区以及时间配置
- android menu 键值,Android KeyCode安卓手机按键对应键码键值
- 使用在线UML制作工具Freedgo Design设计uml例子
- mysql locate索引_MYSQL索引优化
- idea 回车, 加号在行首
- Python3 数字组合
- python代码实现局域网电脑文件传输
- QT:颜色拾取器的实现