Spark内核解析1
概述
Spark 内核泛指 Spark 的核心运行机制,包括 Spark 核心组件的运行机制、Spark 任务调度机制、Spark 内存管理机制、Spark 核心功能的运行原理。
核心组件
Driver
Spark 驱动器节点,用于执行 Spark 任务中的 main 方法,负责实际代码的执行工作。Driver 在 Spark 作业执行时主要负责:
将用户程序转化为任务(job);
在 Executor 之间调度任务(task);
跟踪 Executor 的执行情况;
通过 UI 展示查询运行情况;
Executor
Spark Executor 节点是一个 JVM 进程,负责在 Spark 作业中运行具体任务,任务彼此之间相互独立。Spark 应用启动时, Executor 节点被同时启动, 并且始终伴随着整个 Spark 应用的生命周期而存在。如果有 Executor 节点发生了故障或崩溃,Spark 应用也可以继续执行, 会将出错节点上的任务调度到其他 Executor 节点上继续运行。
Executor 有两个核心功能:
负责运行组成 Spark 应用的任务,并将结果返回给驱动器进程;
它们通过自身的块管理器( Block Manager)为用户程序中要求缓存的 RDD提供内存式存储。RDD 是直接缓存在 Executor 进程内的,因此任务可以在运行时充分利用缓存数据加速运算。
运行流程

Spark 通用运行流程, 不论 Spark 以何种模式进行部署, 任务提交后, 都会先启动 Driver 进程,随后 Driver 进程向集群管理器注册应用程序,之后集群管理器根据此任务的配置文件分配 Executor 并启动,当 Driver 所需的资源全部满足后,
Driver 开始执行 main 函数, Spark 查询为懒执行, 当执行到 action 算子时开始反向推算,根据宽依赖进行 stage 的划分,随后每一个 stage 对应一个 taskset,taskset 中有多个 task,根据本地化原则, task 会被分发到指定的 Executor 去执行,在任务执行的过程中, Executor 也会不断与 Driver 进行通信,报告任务运行情况。
部署模式
Standalone
Standalone 集群有四个重要组成部分, 分别是:
Driver: 是一个进程,我们编写的 Spark 应用程序就运行在 Driver 上, 由Driver 进程执行;
Master:是一个进程,主要负责资源的调度和分配,并进行集群的监控等职责;
Worker:是一个进程,一个 Worker 运行在集群中的一台服务器上,主要负责两个职责,一个是用自己的内存存储 RDD 的某个或某些 partition;另一个是启动其他进程和线程(Executor) ,对 RDD 上的 partition 进行并行的处理和计算。
Executor:是一个进程, 一个 Worker 上可以运行多个 Executor, Executor 通过启动多个线程( task)来执行对 RDD 的 partition 进行并行计算,也就是执行我们对 RDD 定义的例如 map、flatMap、reduce 等算子操作。
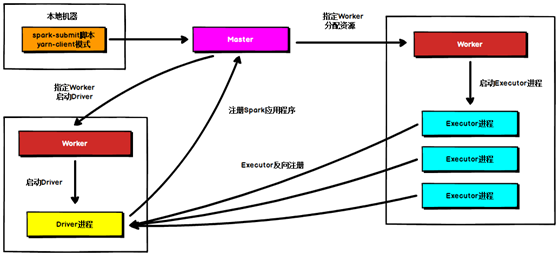
Standalone Client

Standalone Client 模式下,Driver 在任务提交的本地机器上运行,Driver 启动后向 Master 注册应用程序,Master 根据 submit 脚本的资源需求找到内部资源至少可以启动一个 Executor 的所有 Worker,然后在这些 Worker 之间分配 Executor,Worker 上的 Executor 启动后会向 Driver 反向注册,所有的 Executor 注册完成后,Driver 开始执行 main 函数,之后执行到 Action 算子时,开始划分 stage,每个 stage 生成对应的 taskSet,之后将 task 分发到各个 Executor 上执行。
Standalone Cluster
Standalone Cluster 模式下,任务提交后,Master 会找到一个 Worker 启动 Driver进程, Driver 启动后向 Master 注册应用程序, Master 根据 submit 脚本的资源需求找到内部资源至少可以启动一个 Executor 的所有 Worker,然后在这些 Worker 之间分配 Executor,Worker 上的 Executor 启动后会向 Driver 反向注册,所有的 Executor 注册完成后,Driver 开始执行 main 函数,之后执行到 Action 算子时,开始划分 stage,每个 stage 生成对应的 taskSet,之后将 task 分发到各个 Executor 上执行。
注意, Standalone 的两种模式下( client/Cluster) , Master 在接到 Driver 注册
Spark 应用程序的请求后,会获取其所管理的剩余资源能够启动一个 Executor 的所有 Worker, 然后在这些 Worker 之间分发 Executor, 此时的分发只考虑 Worker 上的资源是否足够使用,直到当前应用程序所需的所有 Executor 都分配完毕, Executor 反向注册完毕后,Driver 开始执行 main 程序。
YARN Client
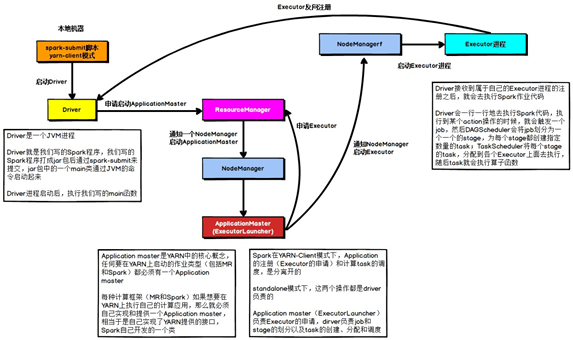
在 YARN Client 模式下,Driver 在任务提交的本地机器上运行,Driver 启动后会和 ResourceManager 通讯申请启动 ApplicationMaster, 随后 ResourceManager 分配 container , 在 合 适 的 NodeManager 上启动 ApplicationMaster ,此时的
ApplicationMaster 的功能相当于一个 ExecutorLaucher, 只负责向 ResourceManager 申请 Executor 内存。
ResourceManager 接到 ApplicationMaster 的资源申请后会分配 container,然后ApplicationMaster 在资源分配指定的 NodeManager 上启动 Executor 进程, Executor 进程启动后会向 Driver 反向注册, Executor 全部注册完成后 Driver 开始执行 main 函数,之后执行到 Action 算子时,触发一个 job,并根据宽依赖开始划分 stage,每个 stage 生成对应的 taskSet,之后将 task 分发到各个 Executor 上执行。
YARN Cluster
在 YARN Cluster 模式下, 任务提交后会和 ResourceManager 通讯申请启动ApplicationMaster, 随后 ResourceManager 分配 container,在合适的 NodeManager上启动 ApplicationMaster,此时的 ApplicationMaster 就是 Driver。
Driver 启动后向 ResourceManager 申请 Executor 内存, ResourceManager 接到ApplicationMaster 的资源申请后会分配 container,然后在合适的 NodeManager 上启动 Executor 进程,Executor 进程启动后会向 Driver 反向注册, Executor 全部注册完成后 Driver 开始执行 main 函数,之后执行到 Action 算子时,触发一个 job,并根据宽依赖开始划分 stage,每个 stage 生成对应的 taskSet,之后将 task 分发到各个Executor 上执行。
通讯架构
Spark2.x 版本使用 Netty 通讯框架作为内部通讯组件。spark 基于 netty 新的 rpc框架借鉴了 Akka 的中的设计, 它是基于Actor 模型。
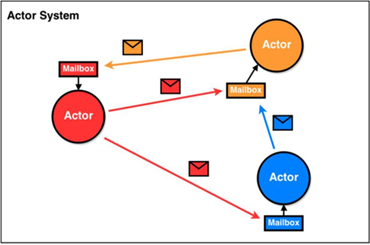
Scala里面处理通信采用Actor架构,Actor架构其实就是一个邮局模型, AKKA为给予Actor模型的工程实现。Akka不同版本之间无法通信,存在兼容性问题。用户使用Akka与Spark中的Akka存在冲突。Spark对Akka没有自身维护,需要新功能时只能等待新版本,比较牵制Spark发展。因此在Spark2中已经抛弃了Akka。
Spark早期版本中采用Akka作为内部通信部件。
Spark1.3中引入Netty通信框架,为了解决Shuffle的大数据传输问题使用
Spark1.6中Akka和Netty可以配置使用。Netty完全实现了Akka在Spark中的功能。
Spark2系列中,Spark抛弃Akka,使用Netty。
Spark 通讯框架中各个组件( Client/Master/Worker)可以认为是一个个独立的实体,各个实体之间通过消息来进行通信。具体各个组件之间的关系图如下:
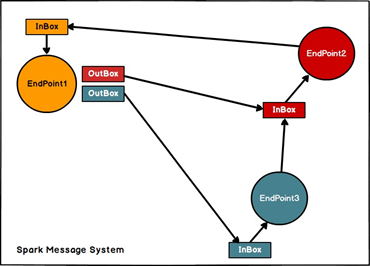
Endpoint( Client/Master/Worker)有 1 个 InBox 和 N 个 OutBox( N>=1,N 取决于当前 Endpoint 与多少其他的 Endpoint 进行通信, 一个与其通讯的其他 Endpoint 对应一个 OutBox), Endpoint 接收到的消息被写入 InBox, 发送出去的消息写入OutBox 并被发送到其他 Endpoint 的 InBox 中。
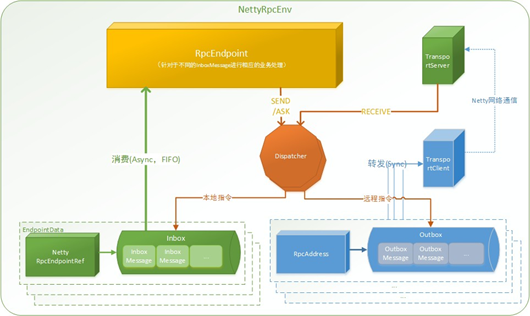
1) RpcEndpoint:RPC 端点,Spark 针对每个节点( Client/Master/Worker)都称之为一个 Rpc 端点,且都实现 RpcEndpoint 接口,内部根据不同端点的需求,设计不同的消息和不同的业务处理,如果需要发送(询问)则调用 Dispatcher;
2) RpcEnv: RPC 上下文环境, 每个 RPC 端点运行时依赖的上下文环境称为RpcEnv;
3) Dispatcher:消息分发器,针对于 RPC 端点需要发送消息或者从远程 RPC 接收到的消息,分发至对应的指令收件箱/发件箱。如果指令接收方是自己则存入收件箱,如果指令接收方不是自己,则放入发件箱;
4) Inbox:指令消息收件箱,一个本地 RpcEndpoint 对应一个收件箱,Dispatcher 在每次向 Inbox 存入消息时, 都将对应 EndpointData 加入内部 ReceiverQueue 中, 另外 Dispatcher 创建时会启动一个单独线程进行轮询 ReceiverQueue,进行收件箱消息消费;
5) RpcEndpointRef:RpcEndpointRef 是对远程 RpcEndpoint 的一个引用。当我们需要向一个具体的 RpcEndpoint 发送消息时,一般我们需要获取到该 RpcEndpoint 的引用,然后通过该应用发送消息。
6) OutBox : 指令消息发件箱 , 对于当前 RpcEndpoint 来说 , 一个目标RpcEndpoint 对应一个发件箱, 如果向多个目标 RpcEndpoint 发送信息, 则有多个OutBox。当消息放入 Outbox 后,紧接着通过 TransportClient 将消息发送出去。消息放入发件箱以及发送过程是在同一个线程中进行;
7) RpcAddress: 表示远程的 RpcEndpointRef 的地址, Host + Port。
8) TransportClient:Netty 通信客户端,一个 OutBox 对应一个 TransportClient,TransportClient 不断轮询 OutBox,根据 OutBox 消息的 receiver 信息,请求对应的远程 TransportServer;
9) TransportServer : Netty通信服务端 , 一 个 RpcEndpoint 对应一个TransportServer,接受远程消息后调用Dispatcher 分发消息至对应收发件箱;
RpcEndPoint就代表一个通信端点, 一个端点就有一个inbox, 一个 transportServer 一个 Dispatcher, 根据你通信的其他端点的数目,就有多个Outbox, 一个outbox有一个 transportClient, transportClient主要负责和 transportServer来通信。

在我们的传统认知中,多个端点要通信,中间要有一个节点类似于总的路由,节点之间的通信靠中间的“路由”,而 Spark没有中间的这个“路由”,如果中间的“路由”存在一定会存在瓶颈问题。Spark很巧妙的把中间的“路由”拆分到各个节点上。
高层视图

12345678910111213141516171819202122232425262728293031 |
private[spark] trait RpcEndpoint {

  /**   * The [[RpcEnv]] that this [[RpcEndpoint]] is registered to.   */  val rpcEnv: RpcEnv   ....}

 /**   * Process messages from [[RpcEndpointRef.send]] or [[RpcCallContext.reply)]]. If receiving a   * unmatched message, [[SparkException]] will be thrown and sent to `onError`.   */  def receive: PartialFunction[Any, Unit] = {    case _ => throw new SparkException(self + " does not implement 'receive'")  }

 /**   * Process messages from [[RpcEndpointRef.ask]]. If receiving a unmatched message,   * [[SparkException]] will be thrown and sent to `onError`.   */  def receiveAndReply(context: RpcCallContext): PartialFunction[Any, Unit] = {    case _ => context.sendFailure(new SparkException(self + " won't reply anything"))  }

  /**   * Invoked before [[RpcEndpoint]] starts to handle any message.   */  def onStart(): Unit = {    // By default, do nothing.  }
|
RpcEndpoint 注意三个方法,
1、receive 改方法被子类实现,用于接收其他节点发送的消息。
2、receiveAndReply 该方法被子类实现,用于接收并回复其他节点发送的消息。
3、onStart 该方法被子类实现,该方法在端口启动的时候自动调用。
我们查看以下RpcEnv的实现发现实现是NettyRpcEnv
1234567891011121314151617181920212223242526272829303132333435363738394041424344454647484950515253545556575859606162636465666768697071727374757677787980818283848586878889909192 |
private[netty] class NettyRpcEnv(    val conf: SparkConf,    javaSerializerInstance: JavaSerializerInstance,    host: String,    securityManager: SecurityManager) extends RpcEnv(conf) with Logging {

  private[netty] val transportConf = SparkTransportConf.fromSparkConf(    conf.clone.set("spark.rpc.io.numConnectionsPerPeer", "1"),    "rpc",    conf.getInt("spark.rpc.io.threads", 0))

  // 设置一个消息分发器  private val dispatcher: Dispatcher = new Dispatcher(this)

  private val streamManager = new NettyStreamManager(this)

  private val transportContext = new TransportContext(transportConf,    new NettyRpcHandler(dispatcher, this, streamManager))

  private def createClientBootstraps(): java.util.List[TransportClientBootstrap] = {    if (securityManager.isAuthenticationEnabled()) {      java.util.Arrays.asList(new SaslClientBootstrap(transportConf, "", securityManager,        securityManager.isSaslEncryptionEnabled()))    } else {      java.util.Collections.emptyList[TransportClientBootstrap]    }  }

  private val clientFactory = transportContext.createClientFactory(createClientBootstraps())

  /**   * A separate client factory for file downloads. This avoids using the same RPC handler as   * the main RPC context, so that events caused by these clients are kept isolated from the   * main RPC traffic.   *   * It also allows for different configuration of certain properties, such as the number of   * connections per peer.   */  @volatile private var fileDownloadFactory: TransportClientFactory = _

  val timeoutScheduler = ThreadUtils.newDaemonSingleThreadScheduledExecutor("netty-rpc-env-timeout")

  // Because TransportClientFactory.createClient is blocking, we need to run it in this thread pool  // to implement non-blocking send/ask.  // TODO: a non-blocking TransportClientFactory.createClient in future  private[netty] val clientConnectionExecutor = ThreadUtils.newDaemonCachedThreadPool(    "netty-rpc-connection",    conf.getInt("spark.rpc.connect.threads", 64))

  @volatile private var server: TransportServer = _

  private val stopped = new AtomicBoolean(false)

  /**   * A map for [[RpcAddress]] and [[Outbox]]. When we are connecting to a remote [[RpcAddress]],   * we just put messages to its [[Outbox]] to implement a non-blocking `send` method.   */    // 多个地址对应的发件箱  private val outboxes = new ConcurrentHashMap[RpcAddress, Outbox]()

  /**   * Remove the address's Outbox and stop it.   */  private[netty] def removeOutbox(address: RpcAddress): Unit = {    val outbox = outboxes.remove(address)    if (outbox != null) {      outbox.stop()    }  }  // 启动TransportServer来接收远程消息  def startServer(bindAddress: String, port: Int): Unit = {    val bootstraps: java.util.List[TransportServerBootstrap] =      if (securityManager.isAuthenticationEnabled()) {        java.util.Arrays.asList(new SaslServerBootstrap(transportConf, securityManager))      } else {        java.util.Collections.emptyList()      }    server = transportContext.createServer(bindAddress, port, bootstraps)    dispatcher.registerRpcEndpoint(      RpcEndpointVerifier.NAME, new RpcEndpointVerifier(this, dispatcher))  }

  @Nullable  override lazy val address: RpcAddress = {    if (server != null) RpcAddress(host, server.getPort()) else null  }

  // 注册当前端点  override def setupEndpoint(name: String, endpoint: RpcEndpoint): RpcEndpointRef = {    dispatcher.registerRpcEndpoint(name, endpoint)  }....
|
我们似乎没有看到Inbox在哪里点击Dispatcher
123456 |
private class EndpointData( val name: String, val endpoint: RpcEndpoint, val ref: NettyRpcEndpointRef) { val inbox = new Inbox(ref, endpoint)}
|
启动脚本
start-all.sh
12345678910111213141516 |
# Start all spark daemons.# Starts the master on this node.# Starts a worker on each node specified in conf/slaves

if [ -z "${SPARK_HOME}" ]; then  #如果没有发现Spark环境变量  export SPARK_HOME="$(cd "`dirname "$0"`"/..; pwd)" # 获得当前的目录把当前目录设置为SPARK_HOMEfi

# Load the Spark configuration. "${SPARK_HOME}/sbin/spark-config.sh" #加载 spark-config.sh配置

# Start Master"${SPARK_HOME}/sbin"/start-master.sh

# Start Workers"${SPARK_HOME}/sbin"/start-slaves.sh
|
spark-config.sh
1234567891011121314151617 |
# included in all the spark scripts with source command# should not be executable directly# also should not be passed any arguments, since we need original $*

# symlink and absolute path should rely on SPARK_HOME to resolveif [ -z "${SPARK_HOME}" ]; then  export SPARK_HOME="$(cd "`dirname "$0"`"/..; pwd)"fi

export SPARK_CONF_DIR="${SPARK_CONF_DIR:-"${SPARK_HOME}/conf"}" #设置 SPARK_CONF_DIR 目录# Add the PySpark classes to the PYTHONPATH:if [ -z "${PYSPARK_PYTHONPATH_SET}" ]; then  export PYTHONPATH="${SPARK_HOME}/python:${PYTHONPATH}"  export PYTHONPATH="${SPARK_HOME}/python/lib/py4j-0.10.4-src.zip:${PYTHONPATH}"  export PYSPARK_PYTHONPATH_SET=1fiexport JAVA_HOME=/opt/module/jdk1.8.0_162
|
start-master.sh
12345678910111213141516171819202122232425262728293031323334353637383940414243444546474849505152535455 |
# Unless required by applicable law or agreed to in writing, software# distributed under the License is distributed on an "AS IS" BASIS,# WITHOUT WARRANTIES OR CONDITIONS OF ANY KIND, either express or implied.# See the License for the specific language governing permissions and# limitations under the License.#

# Starts the master on the machine this script is executed on.

if [ -z "${SPARK_HOME}" ]; then  export SPARK_HOME="$(cd "`dirname "$0"`"/..; pwd)"fi

# NOTE: This exact class name is matched downstream by SparkSubmit.# Any changes need to be reflected there.CLASS="org.apache.spark.deploy.master.Master"  #调用Master

if [[ "$@" = *--help ]] || [[ "$@" = *-h ]]; then  echo "Usage: ./sbin/start-master.sh [options]"  pattern="Usage:"  pattern+="\|Using Spark's default log4j profile:"  pattern+="\|Registered signal handlers for"

  "${SPARK_HOME}"/bin/spark-class $CLASS --help 2>&1 | grep -v "$pattern" 1>&2  exit 1fi

ORIGINAL_ARGS="$@"

. "${SPARK_HOME}/sbin/spark-config.sh"

. "${SPARK_HOME}/bin/load-spark-env.sh" #加载环境变量

if [ "$SPARK_MASTER_PORT" = "" ]; then # 如果没有端口 默认7077  SPARK_MASTER_PORT=7077fi

if [ "$SPARK_MASTER_HOST" = "" ]; then  case `uname` in      (SunOS)           # 如果没有设置HOST 则把/usr/sbin/check-hostname作为主机名          SPARK_MASTER_HOST="`/usr/sbin/check-hostname | awk '{print $NF}'`"          ;;      (*)          SPARK_MASTER_HOST="`hostname -f`"          ;;  esacfi

if [ "$SPARK_MASTER_WEBUI_PORT" = "" ]; then  SPARK_MASTER_WEBUI_PORT=8080fi

"${SPARK_HOME}/sbin"/spark-daemon.sh start $CLASS 1 \  --host $SPARK_MASTER_HOST --port $SPARK_MASTER_PORT --webui-port $SPARK_MASTER_WEBUI_PORT \  $ORIGINAL_ARGS
|
1234567891011 |
def main(argStrings: Array[String]) { // 1、初始化log对象 Utils.initDaemon(log) // 2、加载SparkConf val conf = new SparkConf // 3、解析Master启动参数 val args = new MasterArguments(argStrings, conf) // 4、启动RPC框架端点 val (rpcEnv, _, _) = startRpcEnvAndEndpoint(args.host, args.port, args.webUiPort, conf) rpcEnv.awaitTermination()}
|
start-slaves.sh
123456789101112131415161718192021222324252627 |
# Starts a slave instance on each machine specified in the conf/slaves file.

if [ -z "${SPARK_HOME}" ]; then  export SPARK_HOME="$(cd "`dirname "$0"`"/..; pwd)" #获取当前的目录fi

. "${SPARK_HOME}/sbin/spark-config.sh". "${SPARK_HOME}/bin/load-spark-env.sh" #加载配置

# Find the port number for the masterif [ "$SPARK_MASTER_PORT" = "" ]; then  SPARK_MASTER_PORT=7077fi

if [ "$SPARK_MASTER_HOST" = "" ]; then  case `uname` in      (SunOS)          SPARK_MASTER_HOST="`/usr/sbin/check-hostname | awk '{print $NF}'`"          ;;      (*)          SPARK_MASTER_HOST="`hostname -f`"          ;;  esacfi

# Launch the slaves 调用了start-slave.sh"${SPARK_HOME}/sbin/slaves.sh" cd "${SPARK_HOME}" \; "${SPARK_HOME}/sbin/start-slave.sh" "spark://$SPARK_MASTER_HOST:$SPARK_MASTER_PORT"
|
start-slave.sh
123456789101112131415161718192021222324252627282930313233343536373839404142434445464748495051525354555657585960616263646566676869707172 |
# Starts a slave on the machine this script is executed on.## Environment Variables##   SPARK_WORKER_INSTANCES  The number of worker instances to run on this#                           slave.  Default is 1.#   SPARK_WORKER_PORT       The base port number for the first worker. If set,#                           subsequent workers will increment this number.  If#                           unset, Spark will find a valid port number, but#                           with no guarantee of a predictable pattern.#   SPARK_WORKER_WEBUI_PORT The base port for the web interface of the first#                           worker.  Subsequent workers will increment this#                           number.  Default is 8081.

if [ -z "${SPARK_HOME}" ]; then  export SPARK_HOME="$(cd "`dirname "$0"`"/..; pwd)"fi

# NOTE: This exact class name is matched downstream by SparkSubmit.# Any changes need to be reflected there.CLASS="org.apache.spark.deploy.worker.Worker"

if [[ $# -lt 1 ]] || [[ "$@" = *--help ]] || [[ "$@" = *-h ]]; then  echo "Usage: ./sbin/start-slave.sh [options] <master>"  pattern="Usage:"  pattern+="\|Using Spark's default log4j profile:"  pattern+="\|Registered signal handlers for"

  "${SPARK_HOME}"/bin/spark-class $CLASS --help 2>&1 | grep -v "$pattern" 1>&2  exit 1fi

. "${SPARK_HOME}/sbin/spark-config.sh"

. "${SPARK_HOME}/bin/load-spark-env.sh"

# First argument should be the master; we need to store it aside because we may# need to insert arguments between it and the other argumentsMASTER=$1shift

# Determine desired worker portif [ "$SPARK_WORKER_WEBUI_PORT" = "" ]; then  SPARK_WORKER_WEBUI_PORT=8081fi

# Start up the appropriate number of workers on this machine.# quick local function to start a workerfunction start_instance {  WORKER_NUM=$1  shift

  if [ "$SPARK_WORKER_PORT" = "" ]; then    PORT_FLAG=    PORT_NUM=  else    PORT_FLAG="--port"    PORT_NUM=$(( $SPARK_WORKER_PORT + $WORKER_NUM - 1 ))  fi  WEBUI_PORT=$(( $SPARK_WORKER_WEBUI_PORT + $WORKER_NUM - 1 ))   #调用org.apache.spark.deploy.worker.Worker  "${SPARK_HOME}/sbin"/spark-daemon.sh start $CLASS $WORKER_NUM \     --webui-port "$WEBUI_PORT" $PORT_FLAG $PORT_NUM $MASTER "$@" }

if [ "$SPARK_WORKER_INSTANCES" = "" ]; then  start_instance 1 "$@"else  for ((i=0; i<$SPARK_WORKER_INSTANCES; i++)); do    start_instance $(( 1 + $i )) "$@"  donefi
|
workerMain方法
12345678 |
def main(argStrings: Array[String]) { Utils.initDaemon(log) val conf = new SparkConf val args = new WorkerArguments(argStrings, conf) val rpcEnv = startRpcEnvAndEndpoint(args.host, args.port, args.webUiPort, args.cores, args.memory, args.masters, args.workDir, conf = conf) rpcEnv.awaitTermination() }
|
任务提交
spark-submit
12345678 |
if [ -z "${SPARK_HOME}" ]; then  source "$(dirname "$0")"/find-spark-homefi

# disable randomized hash for string in Python 3.3+export PYTHONHASHSEED=0

exec "${SPARK_HOME}"/bin/spark-class org.apache.spark.deploy.SparkSubmit "$@"
|
spark-class
123456789101112131415161718192021222324252627282930313233343536373839404142434445464748495051525354555657585960616263646566676869707172737475767778 |
if [ -z "${SPARK_HOME}" ]; then  source "$(dirname "$0")"/find-spark-homefi

. "${SPARK_HOME}"/bin/load-spark-env.sh

# Find the java binaryif [ -n "${JAVA_HOME}" ]; then  RUNNER="${JAVA_HOME}/bin/java"else  if [ "$(command -v java)" ]; then    RUNNER="java"  else    echo "JAVA_HOME is not set" >&2    exit 1  fifi

# Find Spark jars.if [ -d "${SPARK_HOME}/jars" ]; then  SPARK_JARS_DIR="${SPARK_HOME}/jars"else  SPARK_JARS_DIR="${SPARK_HOME}/assembly/target/scala-$SPARK_SCALA_VERSION/jars"fi

if [ ! -d "$SPARK_JARS_DIR" ] && [ -z "$SPARK_TESTING$SPARK_SQL_TESTING" ]; then  echo "Failed to find Spark jars directory ($SPARK_JARS_DIR)." 1>&2  echo "You need to build Spark with the target \"package\" before running this program." 1>&2  exit 1else  LAUNCH_CLASSPATH="$SPARK_JARS_DIR/*"fi

# Add the launcher build dir to the classpath if requested.if [ -n "$SPARK_PREPEND_CLASSES" ]; then  LAUNCH_CLASSPATH="${SPARK_HOME}/launcher/target/scala-$SPARK_SCALA_VERSION/classes:$LAUNCH_CLASSPATH"fi

# For testsif [[ -n "$SPARK_TESTING" ]]; then  unset YARN_CONF_DIR  unset HADOOP_CONF_DIRfi

# The launcher library will print arguments separated by a NULL character, to allow arguments with# characters that would be otherwise interpreted by the shell. Read that in a while loop, populating# an array that will be used to exec the final command.## The exit code of the launcher is appended to the output, so the parent shell removes it from the# command array and checks the value to see if the launcher succeeded.build_command() {  "$RUNNER" -Xmx128m -cp "$LAUNCH_CLASSPATH" org.apache.spark.launcher.Main "$@"  printf "%d\0" $?}

CMD=()while IFS= read -d '' -r ARG; do  CMD+=("$ARG")done < <(build_command "$@")

COUNT=${#CMD[@]}LAST=$((COUNT - 1))LAUNCHER_EXIT_CODE=${CMD[$LAST]}

# Certain JVM failures result in errors being printed to stdout (instead of stderr), which causes# the code that parses the output of the launcher to get confused. In those cases, check if the# exit code is an integer, and if it's not, handle it as a special error case.if ! [[ $LAUNCHER_EXIT_CODE =~ ^[0-9]+$ ]]; then  echo "${CMD[@]}" | head -n-1 1>&2  exit 1fi

if [ $LAUNCHER_EXIT_CODE != 0 ]; then  exit $LAUNCHER_EXIT_CODEfi

CMD=("${CMD[@]:0:$LAST}")exec "${CMD[@]}"
|
查看SparkSubmit
1234567891011121314151617181920212223242526272829303132333435363738394041424344454647484950515253545556575859606162636465 |
object SparkSubmit {

  // Cluster managers  private val YARN = 1  private val STANDALONE = 2  private val MESOS = 4  private val LOCAL = 8  private val ALL_CLUSTER_MGRS = YARN | STANDALONE | MESOS | LOCAL

  // Deploy modes  private val CLIENT = 1  private val CLUSTER = 2  private val ALL_DEPLOY_MODES = CLIENT | CLUSTER

  // Special primary resource names that represent shells rather than application jars.  private val SPARK_SHELL = "spark-shell"  private val PYSPARK_SHELL = "pyspark-shell"  private val SPARKR_SHELL = "sparkr-shell"  private val SPARKR_PACKAGE_ARCHIVE = "sparkr.zip"  private val R_PACKAGE_ARCHIVE = "rpkg.zip"

  private val CLASS_NOT_FOUND_EXIT_STATUS = 101

  // scalastyle:off println  // Exposed for testing  private[spark] var exitFn: Int => Unit = (exitCode: Int) => System.exit(exitCode)  private[spark] var printStream: PrintStream = System.err  private[spark] def printWarning(str: String): Unit = printStream.println("Warning: " + str)  private[spark] def printErrorAndExit(str: String): Unit = {    printStream.println("Error: " + str)    printStream.println("Run with --help for usage help or --verbose for debug output")    exitFn(1)  }  private[spark] def printVersionAndExit(): Unit = {    printStream.println("""Welcome to      ____              __     / __/__  ___ _____/ /__    _\ \/ _ \/ _ `/ __/  '_/   /___/ .__/\_,_/_/ /_/\_\   version %s      /_/                        """.format(SPARK_VERSION))      printStream.println("Using Scala %s, %s, %s".format(      Properties.versionString, Properties.javaVmName, Properties.javaVersion))    printStream.println("Branch %s".format(SPARK_BRANCH))    printStream.println("Compiled by user %s on %s".format(SPARK_BUILD_USER, SPARK_BUILD_DATE))    printStream.println("Revision %s".format(SPARK_REVISION))    printStream.println("Url %s".format(SPARK_REPO_URL))    printStream.println("Type --help for more information.")    exitFn(0)  }  // scalastyle:on println

  def main(args: Array[String]): Unit = {    val appArgs = new SparkSubmitArguments(args)    if (appArgs.verbose) {      // scalastyle:off println      printStream.println(appArgs)      // scalastyle:on println    }    appArgs.action match {      case SparkSubmitAction.SUBMIT => submit(appArgs)      case SparkSubmitAction.KILL => kill(appArgs)      case SparkSubmitAction.REQUEST_STATUS => requestStatus(appArgs)    }  }
|
spark-shell
1234567891011121314151617181920212223242526272829303132333435363738394041424344454647484950515253545556575859606162636465666768697071727374 |
# Shell script for starting the Spark Shell REPL

cygwin=falsecase "$(uname)" in  CYGWIN*) cygwin=true;;esac

# Enter posix mode for bashset -o posix

if [ -z "${SPARK_HOME}" ]; then  source "$(dirname "$0")"/find-spark-homefi

export _SPARK_CMD_USAGE="Usage: ./bin/spark-shell [options]"

# SPARK-4161: scala does not assume use of the java classpath,# so we need to add the "-Dscala.usejavacp=true" flag manually. We# do this specifically for the Spark shell because the scala REPL# has its own class loader, and any additional classpath specified# through spark.driver.extraClassPath is not automatically propagated.SPARK_SUBMIT_OPTS="$SPARK_SUBMIT_OPTS -Dscala.usejavacp=true"

function main() {  if $cygwin; then    # Workaround for issue involving JLine and Cygwin    # (see http://sourceforge.net/p/jline/bugs/40/).    # If you're using the Mintty terminal emulator in Cygwin, may need to set the    # "Backspace sends ^H" setting in "Keys" section of the Mintty options    # (see https://github.com/sbt/sbt/issues/562).    stty -icanon min 1 -echo > /dev/null 2>&1    export SPARK_SUBMIT_OPTS="$SPARK_SUBMIT_OPTS -Djline.terminal=unix"    "${SPARK_HOME}"/bin/spark-submit --class org.apache.spark.repl.Main --name "Spark shell" "$@"    stty icanon echo > /dev/null 2>&1  else    export SPARK_SUBMIT_OPTS    "${SPARK_HOME}"/bin/spark-submit --class org.apache.spark.repl.Main --name "Spark shell" "$@"  fi  }

# Copy restore-TTY-on-exit functions from Scala script so spark-shell exits properly even in# binary distribution of Spark where Scala is not installedexit_status=127saved_stty=""

# restore stty settings (echo in particular)function restoreSttySettings() {  stty $saved_stty  saved_stty=""}

function onExit() {  if [[ "$saved_stty" != "" ]]; then    restoreSttySettings  fi  exit $exit_status}

# to reenable echo if we are interrupted before completing.trap onExit INT

# save terminal settingssaved_stty=$(stty -g 2>/dev/null)# clear on error so we don't later try to restore themif [[ ! $? ]]; then  saved_stty=""fi

main "$@" #调用的main函数 最终执行的依旧是spark-submi

# record the exit status lest it be overwritten:# then reenable echo and propagate the code.exit_status=$?onExit
|
12345678910111213141516171819202122232425262728293031323334353637383940414243444546474849505152535455565758596061626364656667686970717273747576777879808182838485868788 |
package org.apache.spark.repl

object Main extends Logging {

  initializeLogIfNecessary(true)  Signaling.cancelOnInterrupt()

  val conf = new SparkConf()  val rootDir = conf.getOption("spark.repl.classdir").getOrElse(Utils.getLocalDir(conf))  val outputDir = Utils.createTempDir(root = rootDir, namePrefix = "repl")

  var sparkContext: SparkContext = _  var sparkSession: SparkSession = _  // this is a public var because tests reset it.  var interp: SparkILoop = _

  private var hasErrors = false

  private def scalaOptionError(msg: String): Unit = {    hasErrors = true    Console.err.println(msg)  }

  def main(args: Array[String]) {    doMain(args, new SparkILoop)  }

  // Visible for testing  private[repl] def doMain(args: Array[String], _interp: SparkILoop): Unit = {    interp = _interp    val jars = Utils.getUserJars(conf, isShell = true).mkString(File.pathSeparator)    val interpArguments = List(      "-Yrepl-class-based",      "-Yrepl-outdir", s"${outputDir.getAbsolutePath}",      "-classpath", jars    ) ++ args.toList

    val settings = new GenericRunnerSettings(scalaOptionError)    settings.processArguments(interpArguments, true)

    if (!hasErrors) {      interp.process(settings) // Repl starts and goes in loop of R.E.P.L      Option(sparkContext).map(_.stop)    }  }

  def createSparkSession(): SparkSession = {    val execUri = System.getenv("SPARK_EXECUTOR_URI")    conf.setIfMissing("spark.app.name", "Spark shell")    // SparkContext will detect this configuration and register it with the RpcEnv's    // file server, setting spark.repl.class.uri to the actual URI for executors to    // use. This is sort of ugly but since executors are started as part of SparkContext    // initialization in certain cases, there's an initialization order issue that prevents    // this from being set after SparkContext is instantiated.    conf.set("spark.repl.class.outputDir", outputDir.getAbsolutePath())    if (execUri != null) {      conf.set("spark.executor.uri", execUri)    }    if (System.getenv("SPARK_HOME") != null) {      conf.setSparkHome(System.getenv("SPARK_HOME"))    }

    val builder = SparkSession.builder.config(conf)    if (conf.get(CATALOG_IMPLEMENTATION.key, "hive").toLowerCase == "hive") {      if (SparkSession.hiveClassesArePresent) {        // In the case that the property is not set at all, builder's config        // does not have this value set to 'hive' yet. The original default        // behavior is that when there are hive classes, we use hive catalog.        sparkSession = builder.enableHiveSupport().getOrCreate()        logInfo("Created Spark session with Hive support")      } else {        // Need to change it back to 'in-memory' if no hive classes are found        // in the case that the property is set to hive in spark-defaults.conf        builder.config(CATALOG_IMPLEMENTATION.key, "in-memory")        sparkSession = builder.getOrCreate()        logInfo("Created Spark session")      }    } else {      // In the case that the property is set but not to 'hive', the internal      // default is 'in-memory'. So the sparkSession will use in-memory catalog.      sparkSession = builder.getOrCreate()      logInfo("Created Spark session")    }    sparkContext = sparkSession.sparkContext    sparkSession  }

}
|
123456789101112131415161718192021222324252627282930313233343536373839404142434445464748495051525354555657585960616263646566676869707172737475767778798081828384858687888990919293949596979899100101102103104105106107108109110111112113114115116117118119120121122123124125126127128129130131132133134135136137138139140141142143144145146147148149 |
private[repl] trait SparkILoopInit {  self: SparkILoop =>

  /** Print a welcome message */  def printWelcome() {    echo("""Welcome to      ____              __     / __/__  ___ _____/ /__    _\ \/ _ \/ _ `/ __/  '_/   /___/ .__/\_,_/_/ /_/\_\   version %s      /_/""".format(SPARK_VERSION))    import Properties._    val welcomeMsg = "Using Scala %s (%s, Java %s)".format(      versionString, javaVmName, javaVersion)    echo(welcomeMsg)    echo("Type in expressions to have them evaluated.")    echo("Type :help for more information.")   }

  protected def asyncMessage(msg: String) {    if (isReplInfo || isReplPower)      echoAndRefresh(msg)  }

  private val initLock = new java.util.concurrent.locks.ReentrantLock()  private val initCompilerCondition = initLock.newCondition() // signal the compiler is initialized  private val initLoopCondition = initLock.newCondition()     // signal the whole repl is initialized  private val initStart = System.nanoTime

  private def withLock[T](body: => T): T = {    initLock.lock()    try body    finally initLock.unlock()  }  // a condition used to ensure serial access to the compiler.  @volatile private var initIsComplete = false  @volatile private var initError: String = null  private def elapsed() = "%.3f".format((System.nanoTime - initStart).toDouble / 1000000000L)

  // the method to be called when the interpreter is initialized.  // Very important this method does nothing synchronous (i.e. do  // not try to use the interpreter) because until it returns, the  // repl's lazy val `global` is still locked.  protected def initializedCallback() = withLock(initCompilerCondition.signal())

  // Spins off a thread which awaits a single message once the interpreter  // has been initialized.  protected def createAsyncListener() = {    io.spawn {      withLock(initCompilerCondition.await())      asyncMessage("[info] compiler init time: " + elapsed() + " s.")      postInitialization()    }  }

  // called from main repl loop  protected def awaitInitialized(): Boolean = {    if (!initIsComplete)      withLock { while (!initIsComplete) initLoopCondition.await() }    if (initError != null) {      // scalastyle:off println      println("""        |Failed to initialize the REPL due to an unexpected error.        |This is a bug, please, report it along with the error diagnostics printed below.        |%s.""".stripMargin.format(initError)      )      // scalastyle:on println      false    } else true  }  // private def warningsThunks = List(  //   () => intp.bind("lastWarnings", "" + typeTag[List[(Position, String)]], intp.lastWarnings _),  // )

  protected def postInitThunks = List[Option[() => Unit]](    Some(intp.setContextClassLoader _),    if (isReplPower) Some(() => enablePowerMode(true)) else None  ).flatten  // ++ (  //   warningsThunks  // )  // called once after init condition is signalled  protected def postInitialization() {    try {      postInitThunks foreach (f => addThunk(f()))      runThunks()    } catch {      case ex: Throwable =>        initError = stackTraceString(ex)        throw ex    } finally {      initIsComplete = true

      if (isAsync) {        asyncMessage("[info] total init time: " + elapsed() + " s.")        withLock(initLoopCondition.signal())      }    }  }

  def initializeSpark() {    intp.beQuietDuring {      command("""        @transient val spark = org.apache.spark.repl.Main.interp.createSparkSession()        @transient val sc = {          val _sc = spark.sparkContext          if (_sc.getConf.getBoolean("spark.ui.reverseProxy", false)) {            val proxyUrl = _sc.getConf.get("spark.ui.reverseProxyUrl", null)            if (proxyUrl != null) {              println(s"Spark Context Web UI is available at ${proxyUrl}/proxy/${_sc.applicationId}")            } else {              println(s"Spark Context Web UI is available at Spark Master Public URL")            }          } else {            _sc.uiWebUrl.foreach {              webUrl => println(s"Spark context Web UI available at ${webUrl}")            }          }          println("Spark context available as 'sc' " +            s"(master = ${_sc.master}, app id = ${_sc.applicationId}).")          println("Spark session available as 'spark'.")          _sc        }        """)      command("import org.apache.spark.SparkContext._")      command("import spark.implicits._")      command("import spark.sql")      command("import org.apache.spark.sql.functions._")    }  }

  // code to be executed only after the interpreter is initialized  // and the lazy val `global` can be accessed without risk of deadlock.  private var pendingThunks: List[() => Unit] = Nil  protected def addThunk(body: => Unit) = synchronized {    pendingThunks :+= (() => body)  }  protected def runThunks(): Unit = synchronized {    if (pendingThunks.nonEmpty)      logDebug("Clearing " + pendingThunks.size + " thunks.")

    while (pendingThunks.nonEmpty) {      val thunk = pendingThunks.head      pendingThunks = pendingThunks.tail      thunk()    }  }}
|
Spark内核解析1相关推荐
- 05_大数据技术之Spark内核解析(1.1)
1. Spark 内核概述 Spark内核泛指Spark的核心运行机制,包括Spark核心组件的运行机制.Spark任务调度机制.Spark内存管理机制.Spark核心功能的运行原理等,熟练掌握Spa ...
- Spark内核解析之一:内核概述
Spark 内核概述 Spark 内核泛指 Spark 的核心运行机制,包括 Spark 核心组件的运行机制.Spark任务调度机制.Spark 内存管理机制.Spark 核心功能的运行原理等,熟练掌 ...
- Spark内核解析之四:Spark 任务调度机制
前言 在生产环境下,Spark集群的部署方式一般为YARN-Cluster模式,之后的内核分析内容中我们默认集群的部署方式为YARN-Cluster模式. Spark任务提交流程 在前面我们讲解了Sp ...
- Spark内核解析2
Spark的交互流程- - -节点启动: Master启动时首先创一个RpcEnv对象,负责管理所有通信逻辑 Master通过RpcEnv对象创建一个Endpoint,Master就是一个Endpoi ...
- Spark内核解析之五:Spark Shuffle解析
Shuffle的核心要点 1. ShuffleMapStage与ResultStage 在划分stage时,最后一个stage称为finalStage,它本质上是一个ResultStage对象,前面的 ...
- Spark内核解析之三:Spark 通讯架构
Spark通信架构概述 Spark2.x版本使用Netty通讯框架作为内部通讯组件.spark 基于netty新的rpc框架借鉴了Akka的中的设计,它是基于Actor模型,如下图所示: Spark通 ...
- 编写一个脚本判断某个用户是否处在活动模式_大数据技术之Spark内核解析(二)Spark 部署模式...
Spark支持3种集群管理器(Cluster Manager),分别为: 1. Standalone:独立模式,Spark原生的简单集群管理器,自带完整的服务,可单独部署到一个集群中,无需依赖任何其他 ...
- Spark内核解析之七:核心组件解析
BlockManager数据存储与管理机制 BlockManager是整个Spark底层负责数据存储与管理的一个组件,Driver和Executor的所有数据都由对应的BlockManager进行管理 ...
- Spark内核解析之六:Spark 内存管理
前言 在执行Spark 的应用程序时,Spark 集群会启动 Driver 和 Executor 两种 JVM 进程,前者为主控进程,负责创建 Spark 上下文,提交 Spark 作业(Job),并 ...
最新文章
- sklearn使用FeatureHasher处理字符串特征
- java基础---JVM---java内存区域与内存溢出问题
- python官网没有中文-python 检查是否为中文字符串的方法
- java中的乐活锁_(转)[乐活]别抱怨了,Shit happens!
- [剑指offer][JAVA][面试题第13题][机器人的运动][DFS][BFS]
- 销售管理如何构成闭环?帆软大屏看板让销售数据转起来,不再分散
- 使用DOM4J解析XML及采用Schema校验的方法
- 2015年 4月2号的日志
- 单链表删除指定节点c语言,在单链表删除指定节点之后的节点
- 架构 全局负载均衡与CDN网络简介
- H3CNE综合小实验
- 利用百度身份证识别服务和python语言实现身份证信息的提取和保存
- kafka-生产者消息发送流程
- vue项目中-打印页面中部分区域的内容
- Java 模拟斗地主发牌
- IDM +百度网盘不限速
- win10系统连打印机服务器中,win10连不上打印机怎么回事_win10系统连接不上打印机如何解决...
- 中国大学慕课C语言第六讲作业
- 小红书笔记怎么推广?笔记关键词有什么需要注意?
- 高考英语真题网络计算机话题,2019高考英语十大热门话题