AppLinks使用详解
1. 简介
官方介绍Android App Links内容是:
Android App Links are a special type of deep link that allow your website URLs to immediately open thecorresponding content in your Android app (without requiring the user to select the app).To add Android App Links to your app, define intent filters that open your app content using HTTP URLs (as
described in [Create Deep Links to App Content]), and verify that you own both your app and the website
URLs (as described in this guide). If the system successfully verifies that you own the URLs, the system
automatically routes those URL intents to your app.
意思就是AppLinks是一个特殊的DeepLink,它可以让你的应用和你的网站URL进行绑定,这样当你在点击你网站链接的时候(非浏览器中)就能调起你的App,而不是出现选择界面,使用方法如下
Create Deep Links to App Content
这种绑定不是在点击的时候才核对链接,下面会介绍在什么情况下核对这种绑定的。
2. 与DeepLink的区别
官方是这样介绍DeepLink的。
A [deep link] is an intent filter that allows users to directly enter a specific activity in your Android app.
Clicking one of these links might open a disambiguation dialog, which allows the user to select one of
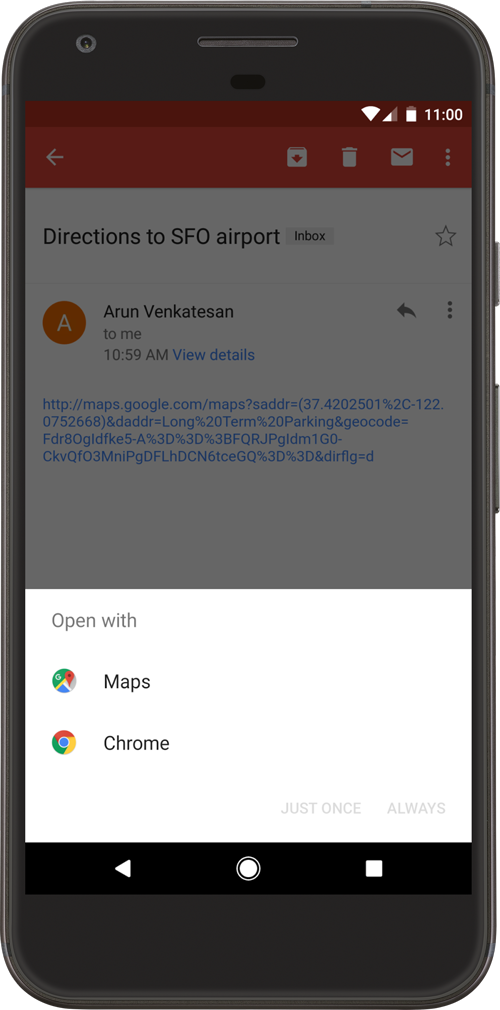
multiple apps (including yours) that can hande the given URL. For example, figure 1 shows the
disambiguation dialog after the user clicks a map link, asking whether to open the link in Maps or Chrome.Deeplink是一个intent过滤器,他可以使用户直接进入某个Activity页面。但是有个不好的是当匹配到多个intent时就会弹一个让用户选择的框。官方给了下面一张图,而AppLinks就不会有这个弹框:
具体区别官方也列了以下:
| Item | Deep links | App links |
|---|---|---|
| Intent URL | scheme http, https, or a custom scheme | Requires http or https |
| Intent action | Any action | Requires android.intent.action.VIEW |
| Intent category | Any category | Requires android.intent.category.BROWSABLE and android.intent.category.DEFAULT |
| Link verification | None | Requires a Digital Asset Links file served on you website with HTTPS |
| User experience | May show a disambiguation dialog for the user to select which app to open the link | No dialog; your app opens to handle your website links |
| Compatibility | All Android versions | Android 6.0 and higher |
3.使用步骤
官方给的步骤如下Handling Android App Links
3.1 在manifest中开启autoVerify
<activity ...><intent-filter android:autoVerify="true"><action android:name="android.intent.action.VIEW" /><category android:name="android.intent.category.DEFAULT" /><category android:name="android.intent.category.BROWSABLE" /><data android:scheme="http" android:host="www.example.com" /><data android:scheme="https" /></intent-filter></activity>这里注意下,开启autoVerify的activity中的
3.2 支持多hosts的绑定。
<intent-filter>...<data android:scheme="https" android:host="www.example.com" /><data android:scheme="app" android:host="open.my.app" />
</intent-filter>
上面在同一个
3.3 在网站上创建assetlinks.json文件
具体格式如下:
[{"relation": ["delegate_permission/common.handle_all_urls"],"target": {"namespace": "android_app","package_name": "com.example","sha256_cert_fingerprints":["14:6D:E9:83:C5:73:06:50:D8:EE:B9:95:2F:34:FC:64:16:A0:83:42:E6:1D:BE:A8:8A:04:96:B2:3F:CF:44:E5"]}
}]
其中package_name就是应用的包名,sha256_cert_fingerprints为正式版的签名。上传时修改这两个属性值。如果一个应用对于多个网站时,可以配置多个对象,配置如下:
[{"relation": ["delegate_permission/common.handle_all_urls"],"target": {"namespace": "android_app","package_name": "com.example.puppies.app","sha256_cert_fingerprints":["14:6D:E9:83:C5:73:06:50:D8:EE:B9:95:2F:34:FC:64:16:A0:83:42:E6:1D:BE:A8:8A:04:96:B2:3F:CF:44:E5"]}},{"relation": ["delegate_permission/common.handle_all_urls"],"target": {"namespace": "android_app","package_name": "com.example.monkeys.app","sha256_cert_fingerprints":["14:6D:E9:83:C5:73:06:50:D8:EE:B9:95:2F:34:FC:64:16:A0:83:42:E6:1D:BE:A8:8A:04:96:B2:3F:CF:44:E5"]}
}]
然后将该文件放在网站的.well-known目录下,放了之后要试试能不能用:
https://domain.name/.well-known/assetlinks.json提交完后确定以下几个是否正确:
Be sure of the following:*   The `assetlinks.json` file is served with content-type `application/json`.
*   The `assetlinks.json` file must be accessible over an HTTPS connection, regardless of whether your app's intent filters declare HTTPS as the data scheme.
*   The `assetlinks.json` file must be accessible without any redirects (no 301 or 302 redirects) and be accessible by bots (your `robots.txt` must allow crawling `/.well-known/assetlinks.json`).
*   If your app links support multiple host domains, then you must publish the `assetlinks.json` file on each domain. See [Supporting app linking for multiple hosts](https://developer.android.com/training/app-links/verify-site-associations.html#multi-host).
*   Do not publish your app with dev/test URLs in the manifest file that may not be accessible to the public (such as any that are accessible accessible only with a VPN). A work-around in such cases is to [configure build variants](https://developer.android.com/studio/build/build-variants.html) to generate a different manifest file for dev builds
还有AppLinks仅支持https的网站。
3.4 测试AppLinks
- 测试json文件是否正确,请看 Statement List Generator and Tester
也可以采用以下链接进行验证:
https://digitalassetlinks.googleapis.com/v1/statements:list?source.web.site=https://domain.name:optional_port&relation=delegate_permission/common.handle_all_urls- 测试intent是否正确
可以使用adb进行测试,命令如下:
adb shell am start -a android.intent.action.VIEW \-c android.intent.category.BROWSABLE \-d "http://domain.name:optional_port"下面命令测试已经存在的绑定:
adb shell dumpsys package domain-preferred-apps上面命令等价于:
adb shell dumpsys package d如果存在绑定的会显示如下结果:
Package: com.android.vending
Domains: play.google.com market.android.com
Status: always : 200000002
参数含义如下:
* Package - Identifies an app by its package name, as declared in its manifest.
* Domains - Shows the full list of hosts whose web links this app handles, using blank spaces as delimiters.
* Status - Shows the current link-handling setting for this app. An app that has passed verification, and
whose manifest contains android:autoVerify="true", shows a status of always. The hexadecimal number after
this status is related to the Android system's record of the user’s app linkage preferences. This value does
not indicate whether verification succeeded.
4. 总结
优点:
- 不会弹选择框
- 可以直接通过url跳到对应的activity
缺点:
- 网站需要支持https
- 有个校验过程,步骤麻烦些。
使用该机制可以直接绕过intent方式,直接通过url就能打开对应的界面。不过在设置中还是能关闭这个。目前支持该功能的应用和网站还是很少。
AppLinks使用详解相关推荐
- 从命令行到IDE,版本管理工具Git详解(远程仓库创建+命令行讲解+IDEA集成使用)
首先,Git已经并不只是GitHub,而是所有基于Git的平台,只要在你的电脑上面下载了Git,你就可以通过Git去管理"基于Git的平台"上的代码,常用的平台有GitHub.Gi ...
- JVM年轻代,老年代,永久代详解
秉承不重复造轮子的原则,查看印象笔记分享连接↓↓↓↓ 传送门:JVM年轻代,老年代,永久代详解 速读摘要 最近被问到了这个问题,解释的不是很清晰,有一些概念略微模糊,在此进行整理和记录,分享给大家.在 ...
- docker常用命令详解
docker常用命令详解 本文只记录docker命令在大部分情境下的使用,如果想了解每一个选项的细节,请参考官方文档,这里只作为自己以后的备忘记录下来. 根据自己的理解,总的来说分为以下几种: Doc ...
- 通俗易懂word2vec详解词嵌入-深度学习
https://blog.csdn.net/just_so_so_fnc/article/details/103304995 skip-gram 原理没看完 https://blog.csdn.net ...
- 深度学习优化函数详解(5)-- Nesterov accelerated gradient (NAG) 优化算法
深度学习优化函数详解系列目录 深度学习优化函数详解(0)– 线性回归问题 深度学习优化函数详解(1)– Gradient Descent 梯度下降法 深度学习优化函数详解(2)– SGD 随机梯度下降 ...
- CUDA之nvidia-smi命令详解---gpu
nvidia-smi是用来查看GPU使用情况的.我常用这个命令判断哪几块GPU空闲,但是最近的GPU使用状态让我很困惑,于是把nvidia-smi命令显示的GPU使用表中各个内容的具体含义解释一下. ...
- Bert代码详解(一)重点详细
这是bert的pytorch版本(与tensorflow一样的,这个更简单些,这个看懂了,tf也能看懂),地址:https://github.com/huggingface/pytorch-pretr ...
- CRF(条件随机场)与Viterbi(维特比)算法原理详解
摘自:https://mp.weixin.qq.com/s/GXbFxlExDtjtQe-OPwfokA https://www.cnblogs.com/zhibei/p/9391014.html C ...
- pytorch nn.LSTM()参数详解
输入数据格式: input(seq_len, batch, input_size) h0(num_layers * num_directions, batch, hidden_size) c0(num ...
- Java集合详解之Map
一.首先看看集合框架体系图 从图中可以看到,Map接口扩展了Iterator接口,关于Iterator接口详解请移步:Iterator接口详解 二.Map是什么? Map<k,v>使用键值 ...
最新文章
- 【AS3代码】访问/修改XML子元素和属性
- python3.6 asyncio paramiko_Python开发【第六篇】:模块
- CTFshow 爆破 web22
- html万年历闹钟怎么取消,万年历如何取消整点报时,他上面有四个键,分...
- 安装VS2013的离线MSDN帮助文档
- golang | 使用结构体抄的学生信息管理系统
- 自动适配autolayout
- 必看!!作为电工,你为什么要学PLC?
- 其他人的爱情 VS 程序员的爱情
- C++递归实现栈逆序
- QQ/微信里被禁止访问的网页怎么处理 如何检测域名是否被QQ/微信 屏蔽
- 将优盘的FAT32格式改为NTFS
- linux加密压缩文件gpg,linux文件--GPG 加密解密
- 名帖308 梁诗正 行书《行书帖选》
- 深度学习基础:深入理解Squeeze-and-Excitation (SE)网络
- 一款不错的流式布局LayoutManager-FlowLayout
- JS 解决sort字母排序的问题
- 稳压二极管和普通二极管的区别
- vue 若依系统单点登录
- 两种GPU计算平台:CUDA 与 OpenCL