cisco服务器设置步骤_设置您自己的邮件服务器的10个步骤
cisco服务器设置步骤
A simple guide to setup your own mail server using MailCow, DigitalOcean and Docker
使用MailCow,DigitalOcean和Docker设置自己的邮件服务器的简单指南
Setting a mail server is easy and hard at the same time. What an irony! Let’s begin with a simple explanation of what is a mail server, why we would want to create one instead of using one of the many paid mail services out there and how much maintenance it requires.
小号 ETTING邮件服务器是容易的,难在同一时间。 真是讽刺! 让我们从一个简单的解释开始,什么是邮件服务器,为什么我们要创建一个而不是使用那里的许多付费邮件服务之一,以及它需要多少维护。
A mail server is the technological equivalent of a post office. It will handle incoming mail by storing or delivering it to the addressed person. This service can be broken in two different types of servers:
邮件服务器在技术上等同于邮局。 它会通过将收到的邮件存储或传递给收件人来处理收到的邮件。 可以在两种不同类型的服务器中破坏此服务:
- Outgoing mail servers (STMP protocol)寄出邮件伺服器(STMP通讯协定)
- Incoming mail servers (POP3 or IMAP protocol)传入邮件服务器(POP3或IMAP协议)

There are either two/three steps depending on the domain name.
根据域名,有两个/三个步骤。
- The user writes an email, clicks send and it’s pushed to the smtp server.用户写一封电子邮件,单击“发送”,然后将其推送到smtp服务器。
If the domain name of all users is the same (michael@dundermifflin.com → dwight@dundermifflin.com) it will send directly the mail to the POP/IMAP server. If not, it will search the internet looking for the ip address with the domain name @princeFamilyPaper — 172.16.254.1 for example, send the mail to that user’s server and then pushes it to their mailbox.
如果所有用户的域名都相同(michael@dundermifflin.com→dwight@dundermifflin.com),它将直接将邮件发送到POP / IMAP服务器。 如果不是,它将在互联网上搜索域名为@princeFamilyPaper的ip地址—例如172.16.254.1 ,将邮件发送到该用户的服务器,然后将其推送到其邮箱。
Now that we begin to grasp how this process “kind of” works, let us dissect a mail server and take a look to each piece.
现在,我们开始了解此过程是如何工作的,让我们剖析邮件服务器并逐一查看。
邮件服务器 (Email server)
The server on which the email processes run. We already said that we can distinguish between outgoing and incoming mail servers and their respective protocols.
运行电子邮件进程的服务器。 我们已经说过,我们可以区分传出和传入邮件服务器及其各自的协议。
Smtp和Pop3 / Imap (Smtp & Pop3/Imap)
These are the protocols used to handle the email transport. Smtp is used to transport outgoing emails, from user to server, and it verifies the success of the email delivery, while pop/imap protocols ensure this process in the oposite direction, from server to user.
这些是用于处理电子邮件传输的协议。 Smtp用于将传出的电子邮件从用户传输到服务器,并验证电子邮件传递是否成功,而pop / imap协议可确保从服务器到用户的相反方向进行此过程。
Mta (Mta)
Or Mail Transfer Agent handles the routing of the email between other MTA services or computer senders. It’s main function is forwarding the incoming messages to the correct user.
或邮件传输代理处理其他MTA服务或计算机发件人之间的电子邮件路由。 它的主要功能是将传入消息转发给正确的用户。
建立 (Setup)

For our mail service we will use mailcow, which runs on top of docker. And will also use a digital ocean droplet in order to host the application. These are the steps we will follow
对于我们的邮件服务,我们将使用在docker之上运行的mailcow 。 并且还将使用数字海洋滴来托管应用程序。 这些是我们将要遵循的步骤
Register a domain
注册域名
Start a droplet
开始液滴
Set the firewall configuration
设置防火墙配置
Install docker
安装泊坞窗
Create dns and record settings
创建DNS并记录设置
Start mailcow
启动mailcow
Adding a Domain
添加域
Creating the DKIM key
创建DKIM密钥
Adding a mailbox
添加邮箱
Testing the service
测试服务
注册域名 (Register a domain)
First things first, let’s get a free domain to try on the mail server. You can get a free domain at Freenom, I will be using mytestmail.ml for this post.
首先,让我们获得一个免费的域来试用邮件服务器。 您可以在Freenom上获得免费域,我将在此帖子中使用mytestmail.ml 。
开始液滴 (Start a droplet)
Let’s get a droplet up and going. Go to Digital ocean and start a droplet with these characteristics:
让我们飞起来吧。 转到数字海洋 ,开始具有以下特征的液滴:
- Distribution: Ubuntu 18.04.4 LTS发行:Ubuntu 18.04.4 LTS
- Plan: Shared计划:共享
- Virtual machine: 10$ (2gb — 1cpu — 50gb ssd — 2tb transfer)虚拟机:10美元(2GB — 1cpu — 50gb ssd — 2tb传输)
- Select your closest datacenter/region选择最近的数据中心/区域
Choose a hostname: mail.mytestmail.ml (remember to append “mail” to the droplet hostname)
选择一个主机名: mail.mytestmail.ml (请记住在Droplet主机名后附加“ mail”)
防火墙配置 (Firewall configuration)
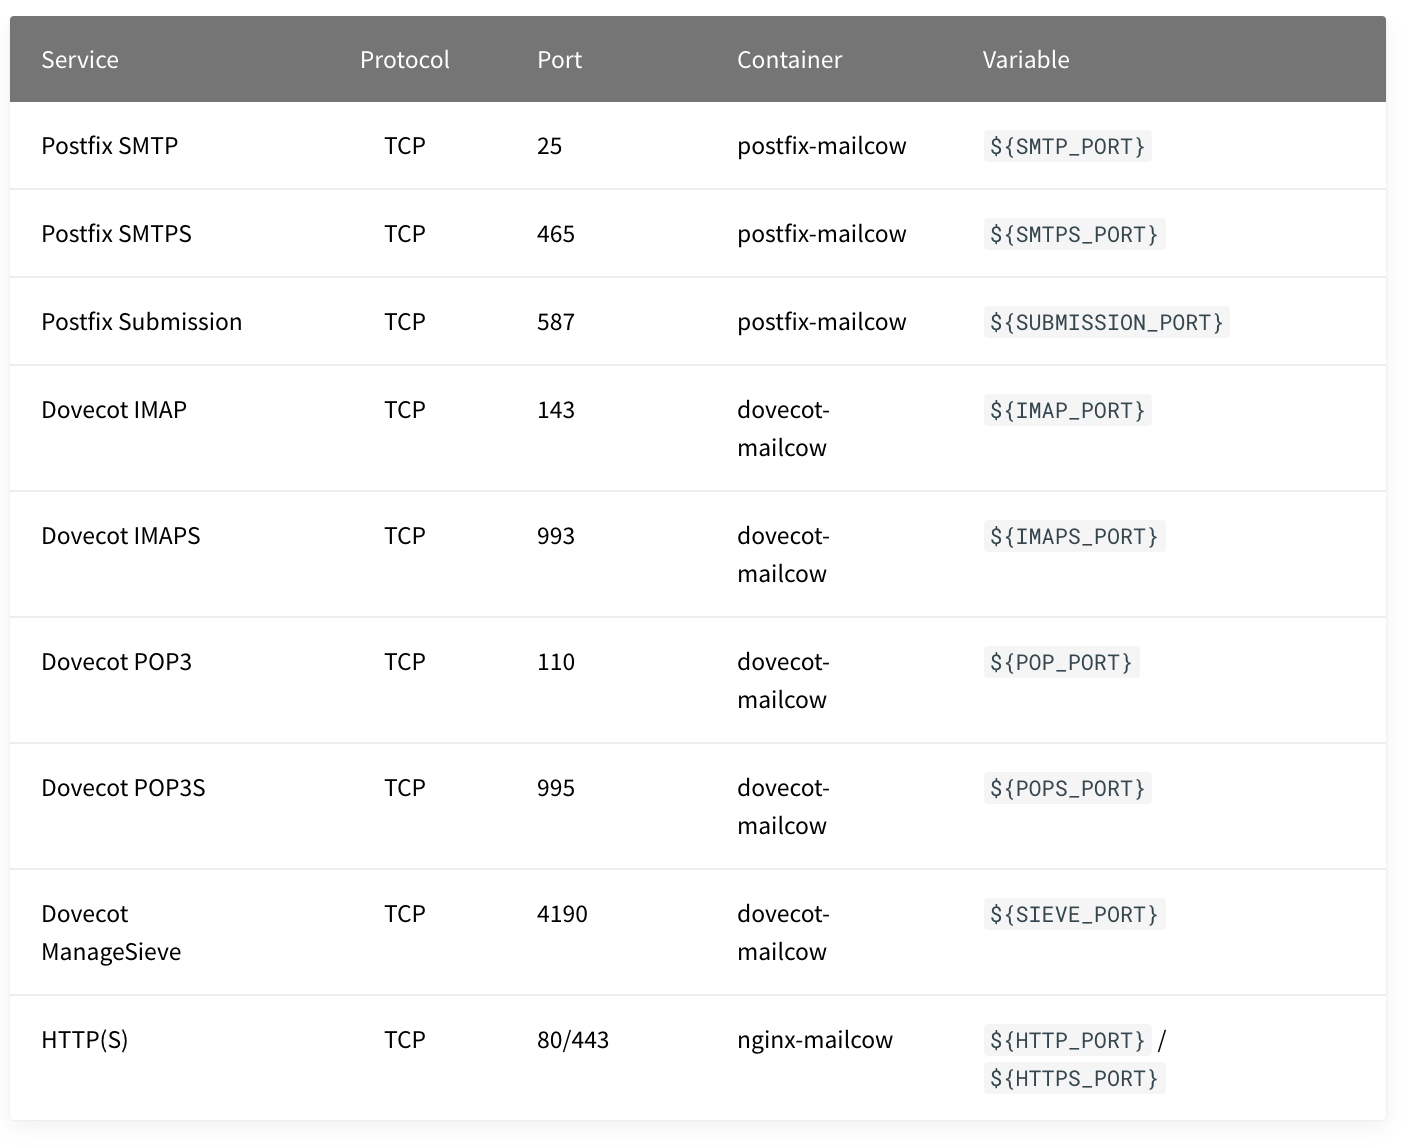
Once you click on the droplet details, there’s a menu on the left, and under networking you will find the Firewall settings. Create a new firewall called Mail, and open the following ports.
单击Droplet详细信息后,左侧会显示一个菜单,在网络下方,您会找到防火墙设置。 创建一个名为Mail的新防火墙,并打开以下端口。
安装Docker (Install Docker)
Ssh into your droplet with root@<droplet’s-public-ip> and follow these commands
使用root @ <droplet's-public-ip>进入您的Droplet,并遵循以下命令
#!/bin/bash # Updating serversudo apt-get update sudo apt-get upgrade -y# Installing dependenciessudo apt-get install -y curl vim

# Installing Dockersudo curl -fsSL https://get.docker.com -o get-docker.shsudo sh get-docker.sh # Installing Docker-composecurl -L https://github.com/docker/compose/releases/download/1.25.4/docker-compose-`uname -s`-`uname -m` -o /usr/local/bin/docker-composechmod +x /usr/local/bin/docker-compose
It will take a few minutes, but by the end the server will have docker and docker-compose installed. Once the installation is finished check if any of the ports used by mailcow are been used.
这将需要几分钟,但是最终服务器将安装docker和docker-compose。 安装完成后,检查是否已使用mailcow使用的任何端口。
ss -tlpn | grep -E -w '25|80|110|143|443|465|587|993|995|4190'创建DNS并记录设置 (Create dns and record settings)
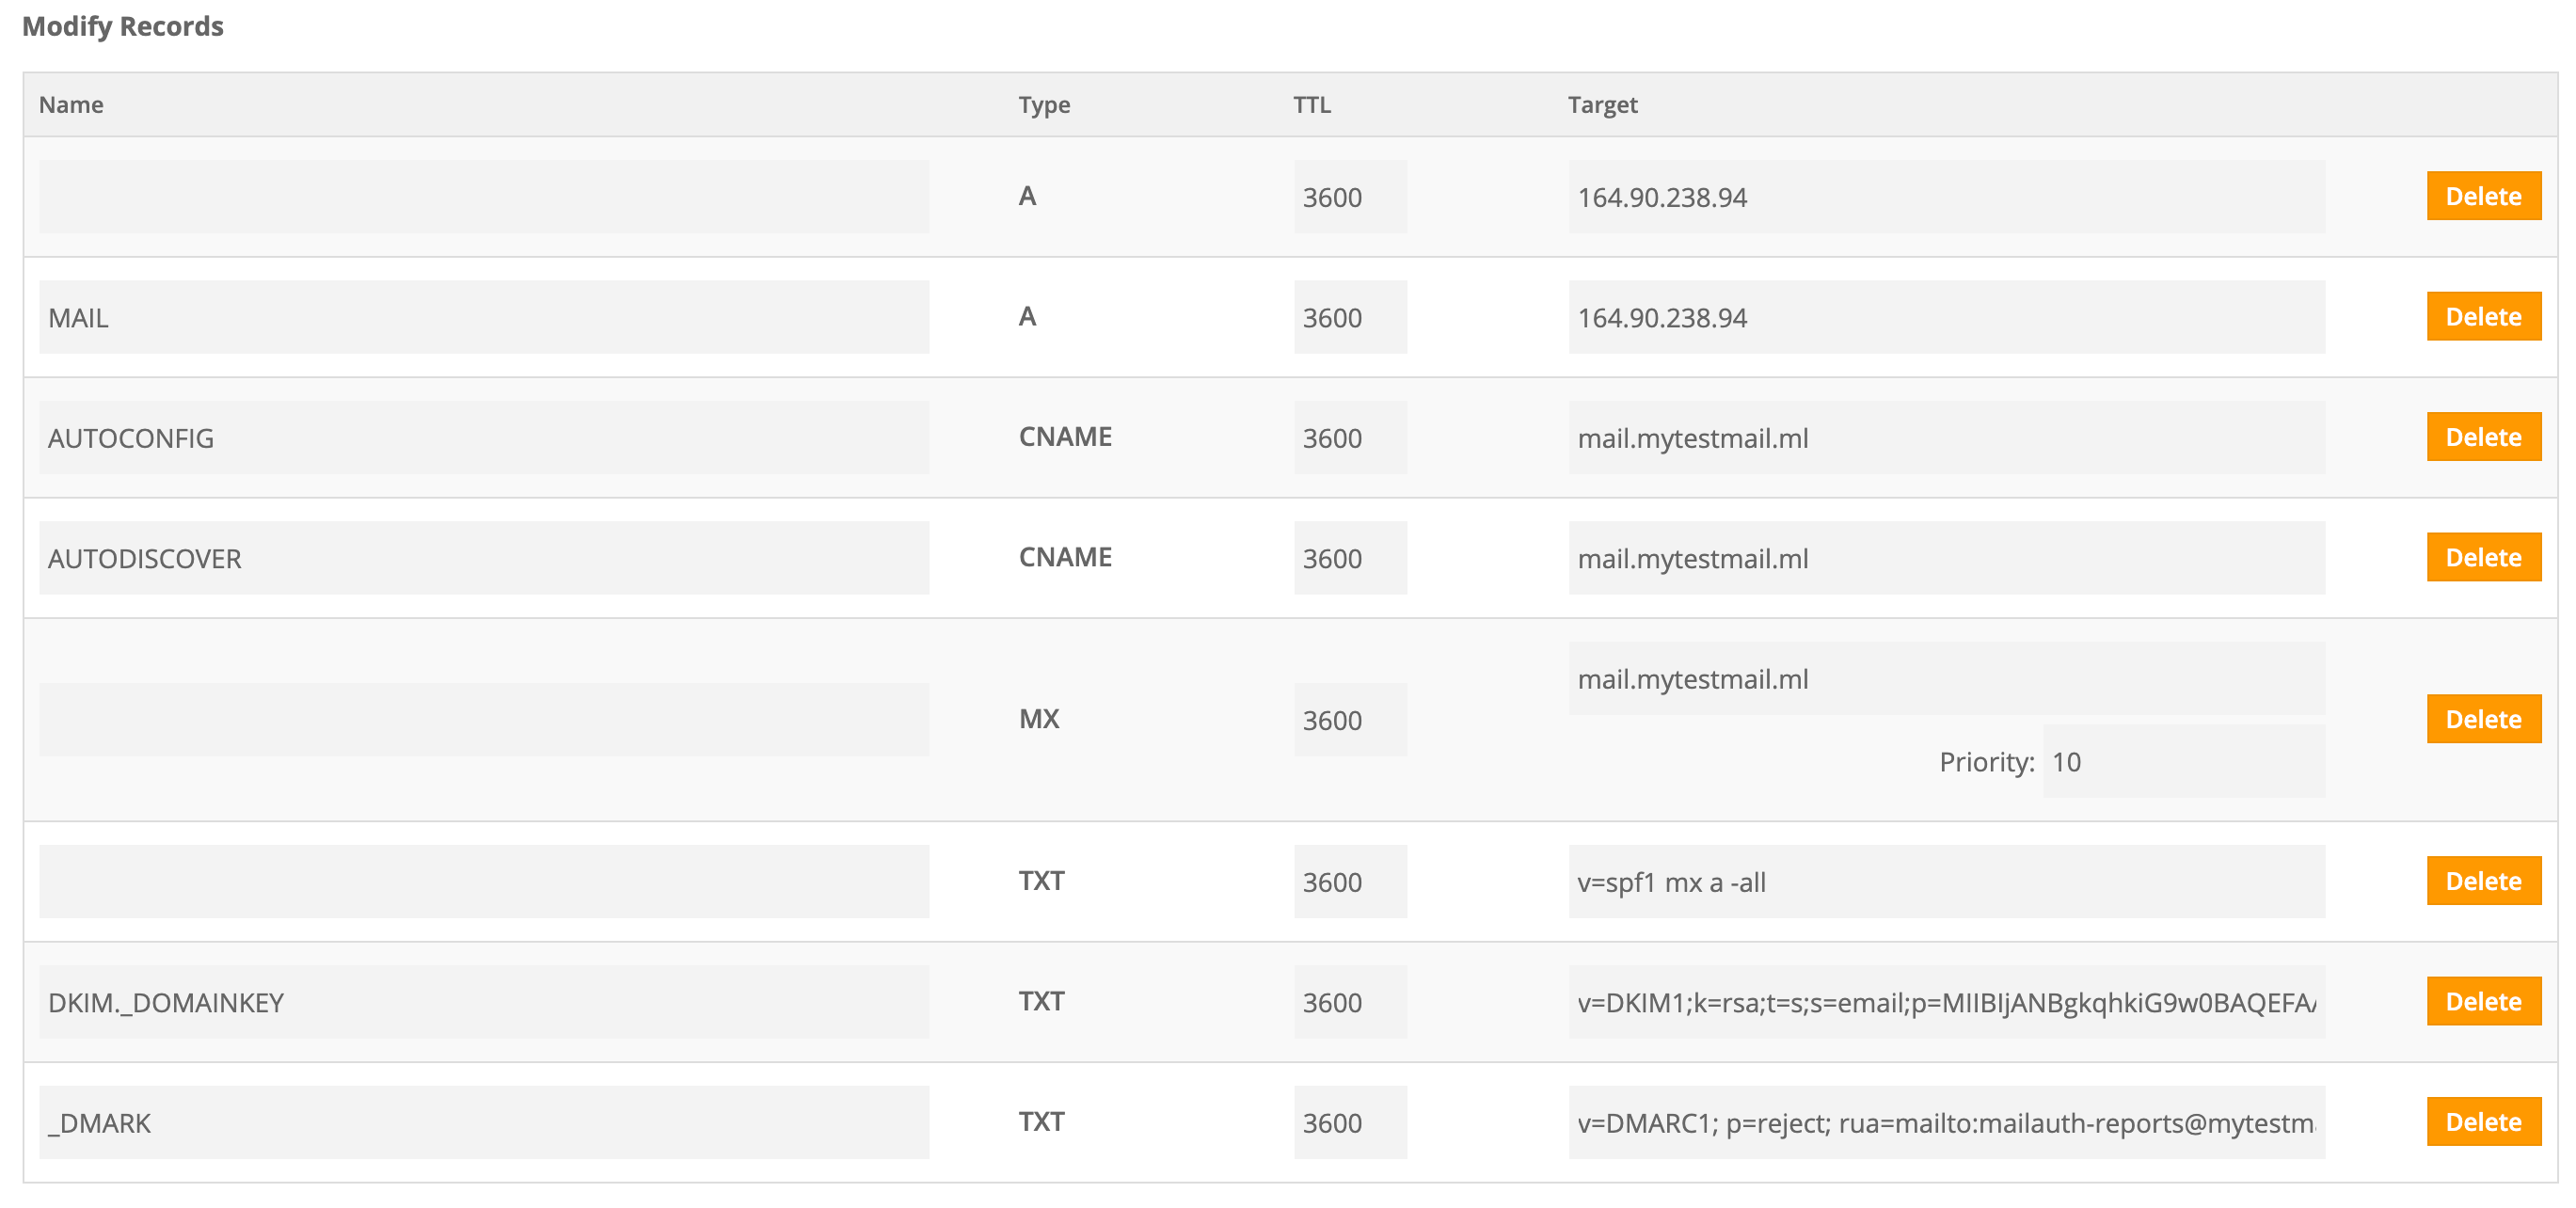
Time to go to back to Freenom! Under “client area → manage freenom dns” we will set a series of records that will allow our email server to be found, certified and verified. The DKIM key will be generated once the mail server is up, so you can either let it blank or fill it temporarily. You can copy the fields and get more information in the mailcow prerequisites guide.
是时候回到Freenom了! 在“客户区域→管理freenom dns”下,我们将设置一系列记录,以使我们的电子邮件服务器可以找到,认证和验证。 邮件服务器启动后,将生成DKIM密钥,因此您可以将其空白或暂时填充它。 您可以复制字段并在mailcow先决条件指南中获取更多信息。
启动mailcow (Start mailcow)
First go to your opt folder and check that you have root permisions by running the umask command. Once this is confirmed pull the mailcow repository.
首先转到opt文件夹,然后通过运行umask命令检查是否具有root用户权限。 一旦确认,请拉出mailcow信息库。
# It is recommended to do the installation in the opt folder# And that your umask is 0022cd /optumask# Clone the github repositorygit clone https://github.com/mailcow/mailcow-dockerizedcd mailcow-dockerizedOnce it’s installed, start the configuration process. Here I dissabled ClamAv because it’s a small project and there isn’t enough space on the server. The timezone would be your Continent/city.
安装完成后,开始配置过程。 在这里,我禁用了ClamAv,因为它是一个很小的项目,并且服务器上没有足够的空间。 时区将是您的大陆/城市。
# Start the configuration settings./generate_config.sh# Configuration1. Mail server hostname: mail.mytestmail.ml2. Time zone: Europe/madrid - Please! Write YOUR time zone3. Do you want to disable ClamAV now: yFinal step, pull and compose up the project!
最后一步,拉动并组成项目!
# Start the docker setupdocker-compose pull docker-compose up -d添加域 (Adding a domain)
Go to the hostnames website “mail.mytestmail.ml” and log as:
转到主机名网站“ mail.mytestmail.ml”并登录为:
user: adminpassword: moohooChange your password clicking the Edit button.
单击编辑按钮更改密码。

Then, the next step is adding a domain. To do this, go to configuration → mail setup and add a domain. You should be fine by adding by setting the domain as: mytestmail.ml (no mail prefix) and clicking the Add domain and restart Sogo button.
然后,下一步是添加域。 为此,请转到配置→邮件设置并添加域。 您可以通过将域设置为mytestmail.ml(无邮件前缀)并单击添加域并重新启动Sogo按钮来进行添加。
创建DKIM密钥 (Creating the DKIM key)
In order to allow posting emails we need to add our DKIM key to the dns manager. Go to the control panel and under configuration → configuration → ARC/DKIM keys and create a DKIM key:
为了允许发布电子邮件,我们需要将DKIM密钥添加到dns管理器中。 转到控制面板,然后在配置→配置→ARC / DKIM密钥下创建一个DKIM密钥:
- Domain/s: mytestmail.ml域:mytestmail.ml
- Length: 2048长度:2048
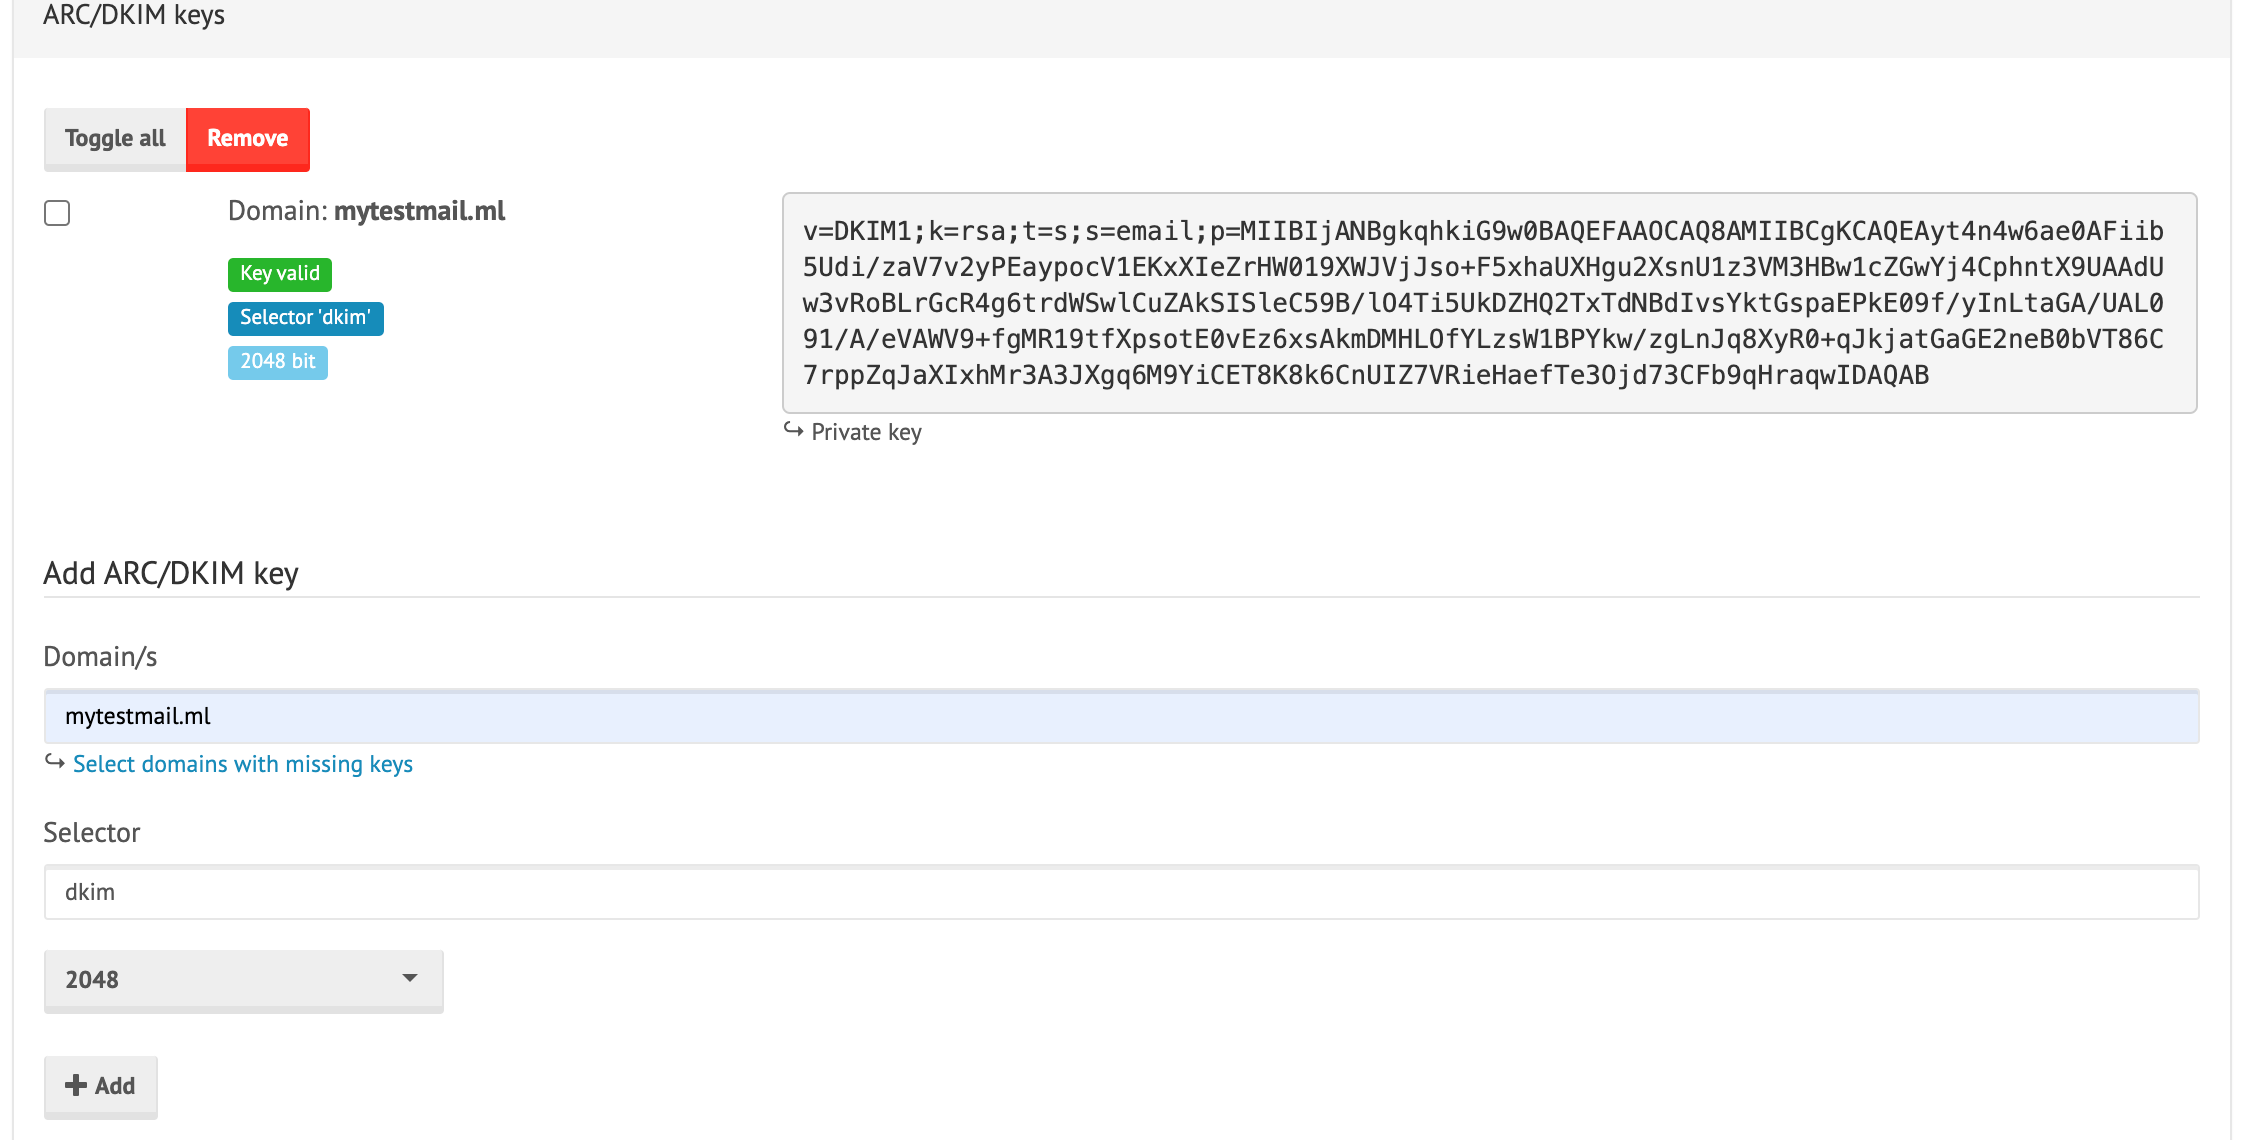
Go to Freenom and paste the private key on the DKIM._DOMAINKEY txt record.
转到Freenom,然后将私钥粘贴到DKIM._DOMAINKEY txt记录上。
添加邮箱 (Adding a mailbox)
Once it’s complete go again to configuration → mail setup → mailboxes and add new mailbox.
完成后,再次转到配置→邮件设置→邮箱并添加新邮箱。

After it’s created go to the webmail, sign as admin@mytestmail.ml, try to send and receive an email to check if it is working properly. If your mail goes to the spam folder you can go to Mail-tester and check which fields can be improved.
创建完成后,请转到网络邮件,以admin@mytestmail.ml身份登录,尝试发送和接收电子邮件以检查其是否正常运行。 如果您的邮件转到垃圾邮件文件夹,则可以转到Mail-tester并检查可以改进哪些字段。
翻译自: https://medium.com/swlh/setting-your-own-mail-server-in-10-steps-56bcf9b88c7d
cisco服务器设置步骤
http://www.taodudu.cc/news/show-2930122.html
相关文章:
- 思科配置成网站服务器,思科路由器的配置NTP服务器的基本方法
- cisco服务器网关自动清空,监控、重置和删除Cisco CallManager的MGCP网关
- 【华为思科】访问web服务器
- cisco在服务器编辑首页信息,cisco设置
- dhcp服务器自动分配地址思科,cisco dhcp服务器设置方法
- 思科服务器怎么看型号,通过型号快速识别思科路由器,交换机,服务器等设备
- 思科http服务器显示设置,思科里面的服务器怎么设置
- 思科FTP服务器基本配置
- CISCO服务器配置RAID步骤
- 思科服务器的dns如何配置文件,思科在服务器上配置dns
- 思科虚拟服务器修改域名,思科域名服务器设置
- 思科服务器如何配置文件,思科服务器的配置方法
- 思科无线认证服务器,思科服务器认证配置
- 思科的服务器困局:投资增长,还是退出?
- python局域网通信_python如何实现网络通信
- 局域网即时通讯软件怎么部署
- Ubuntu 局域网通信工具之信使(iptux)安装及自动隐藏的解决方法
- esp8266局域网内的TCP通信实验
- 鸽传书2007是一个局域网通信软件
- 局域网即时通讯软件可以保护数据安全吗?
- (Arduino)ESP8266通过局域网通信控制LED
- 计算机网络与通信之局域网
- linux局域网通信软件iptux,ipmsg
- 局域网即时通信软件
- 基于linux用C语言编写的局域网通信软件(在ubuntu上正常运行)
- 局域网通信软件MTalk
- 局域网多点通信模型
- 中小型局域网设计
- Arduino设置esp8266实现局域网通信
- 局域网通信软件源码--无服务器,可传文件
cisco服务器设置步骤_设置您自己的邮件服务器的10个步骤相关推荐
- winmail 数据库设置_Windows - 2003下搭建邮件服务器教程和使用 - Winmail - Server - 轻松架设邮件服务器 - 图文...
Windows 2003邮件服务器配置全攻略 在windows2003下架设邮件服务器的过程跟XP系统类似,可以用系统自带的POP3及SMTP服务建立,也可以借助第三方软件实现.适用环境不同自然采取的 ...
- 设置安装使用动态IP+MDaemon架设邮件服务器
废话就不多说了,开始... 近最和几个友人前以在捣鼓MDaemon,在慢慢看程教跟探索的情况下,了解了MD最基本的一些应用,面上我们就一步一步来做,标目是建立一个能发收外网的有拥顶级名域的部内件邮务服 ...
- linux服务器搭建_基于LINUX系统的邮件服务器搭建和详细部署(POSTFIX)
linux master调度所有的程序: master-->pickup/cleanup-->rewrite..... /etc/postfix/master.cf # ls /etc/p ...
- 如何应对java服务器宕机_代码中如何应对缓存服务器宕机的情况
今天在演练这样一个场景--假如所有缓存服务器都宕机,而且不能很快恢复,并且假设数据库服务器能够支撑,在代码中如何应对这样的情况? 之前的做法是在读缓存的地方捕获异常并写入日志,然后直接从数据库读取数据 ...
- 物流服务器维护,物流企业网络维护与管理 Email邮件服务器的基本配置 任务3-3 创建电子邮件服务器.doc...
PAGE PAGE 26 <物流网络维护与管理>实训与实践 任务3-3创建电子邮件服务器 [实验目的] 了解电子邮件系统的构成和工作流程: 掌握电子邮件服务器的架设方法: 了解电子邮件服务 ...
- python 邮件服务器地址_Salmon---一个基于Python语言的邮件服务器
Python部落(python.freelycode.com)组织翻译,禁止转载,欢迎转发. Salmon是使用纯Python语言开发的邮件服务器,旨在以Web框架的形式创建健壮和复杂的邮件应用程序. ...
- 虚拟邮箱怎么设置方法_腾讯企业邮箱邮件列表白名单设置方法
商务合作伙伴经常收到腾讯企业邮箱邮件群组账号退信,这个邮件群组中的所有邮箱无法收到邮件,由于收到退信方是群发邮件,一封邮件要发给很多个邮箱,腾讯企业邮箱系统判断为垃圾邮件,直接拒收,这就耽误事了,都无 ...
- java calendar 设置时区_设置calendar时区
iOS - Swift NSTimeZone时区 前言 public class NSTimeZone : NSObject, NSCopying, NSSecureCoding NSTimeZone ...
- 设置网格_设置一个自动运行网格条件单
如何设置一个能够自动运行策略的网格条件单呢? 首先我们可以选择一个标的(哪些是适合的,这个做相信在手动网格的朋友一定再清楚不过,咱们这里先跳过,下次再讲) 1. 选择好标的以后,输入代码 2. 设置好 ...
最新文章
- 突然想自己做个平衡车了
- 表表达式,Substring, CharIndex, 多行数据变同一行的用法
- iOS - 修改 UITextField 的 clearButtton 样式
- SmartQuery WebPart 2.0 发布。
- Java黑皮书课后题第8章:*8.23(游戏:找到翻转的单元格)假定给定一个填满0和1的6*6矩阵,所有的行和列都有偶数个1。让用户翻转一个单元,编写一个程序找到哪个单元格被翻转了
- 因此,您是一名新软件工程师。 让我们面对一些事实,揭穿一些神话。
- JeeWx 微信开发公开课(Jeewx-API 专题),今晚8点不见不散
- Apache Zookeeper入门1
- redis报错解决,MISCONF Redis is configured to save RDB snapshots
- webpack4.x实战七,生产模式和开发模式分开打包
- 部分UCI数据集分享
- 线性回归之最小二乘法公式推导和原理介绍
- 多源信息融合技术研究综述
- linux下QT工程调用opencv、libtorch,并用cmake编译,及其遇到的一些问题的解决方法
- vue子组件获取祖先组件值的方法
- python笔记5 - 字符串格式化表达式,while语句嵌套,for循环,break,continue,死循环
- 金融数据智能峰会 | 数据规模爆炸性增长,企业如何进行精准决策?云原生数据仓库数据化运营实战分享
- oracle中的Insert into
- Android P 如何挂载system镜像到根目录
- ubuntu更新源修改更新源