python 仪表盘图片读数_OpenCV 表盘指针自动读数的示例代码
前段时间参加了一个表盘指针读数的比赛,今天来总结一下
数据集一共有一千张图片:
方法一:径向灰度求和
基本原理:
将图像以表盘圆心转换成极坐标,然后通过矩阵按行求和找到二值图最大值即为指针尖端
导入需要用到的包
import cv2 as cv
import numpy as np
import math
from matplotlib import pyplot as plt
import os
图像预处理
去除背景:利用提取红色实现
def extract_red(image):
"""
通过红色过滤提取出指针
"""
red_lower1 = np.array([0, 43, 46])
red_upper1 = np.array([10, 255, 255])
red_lower2 = np.array([156, 43, 46])
red_upper2 = np.array([180, 255, 255])
dst = cv.cvtColor(image, cv.COLOR_BGR2HSV)
mask1 = cv.inRange(dst, lowerb=red_lower1, upperb=red_upper1)
mask2 = cv.inRange(dst, lowerb=red_lower2, upperb=red_upper2)
mask = cv.add(mask1, mask2)
return mask

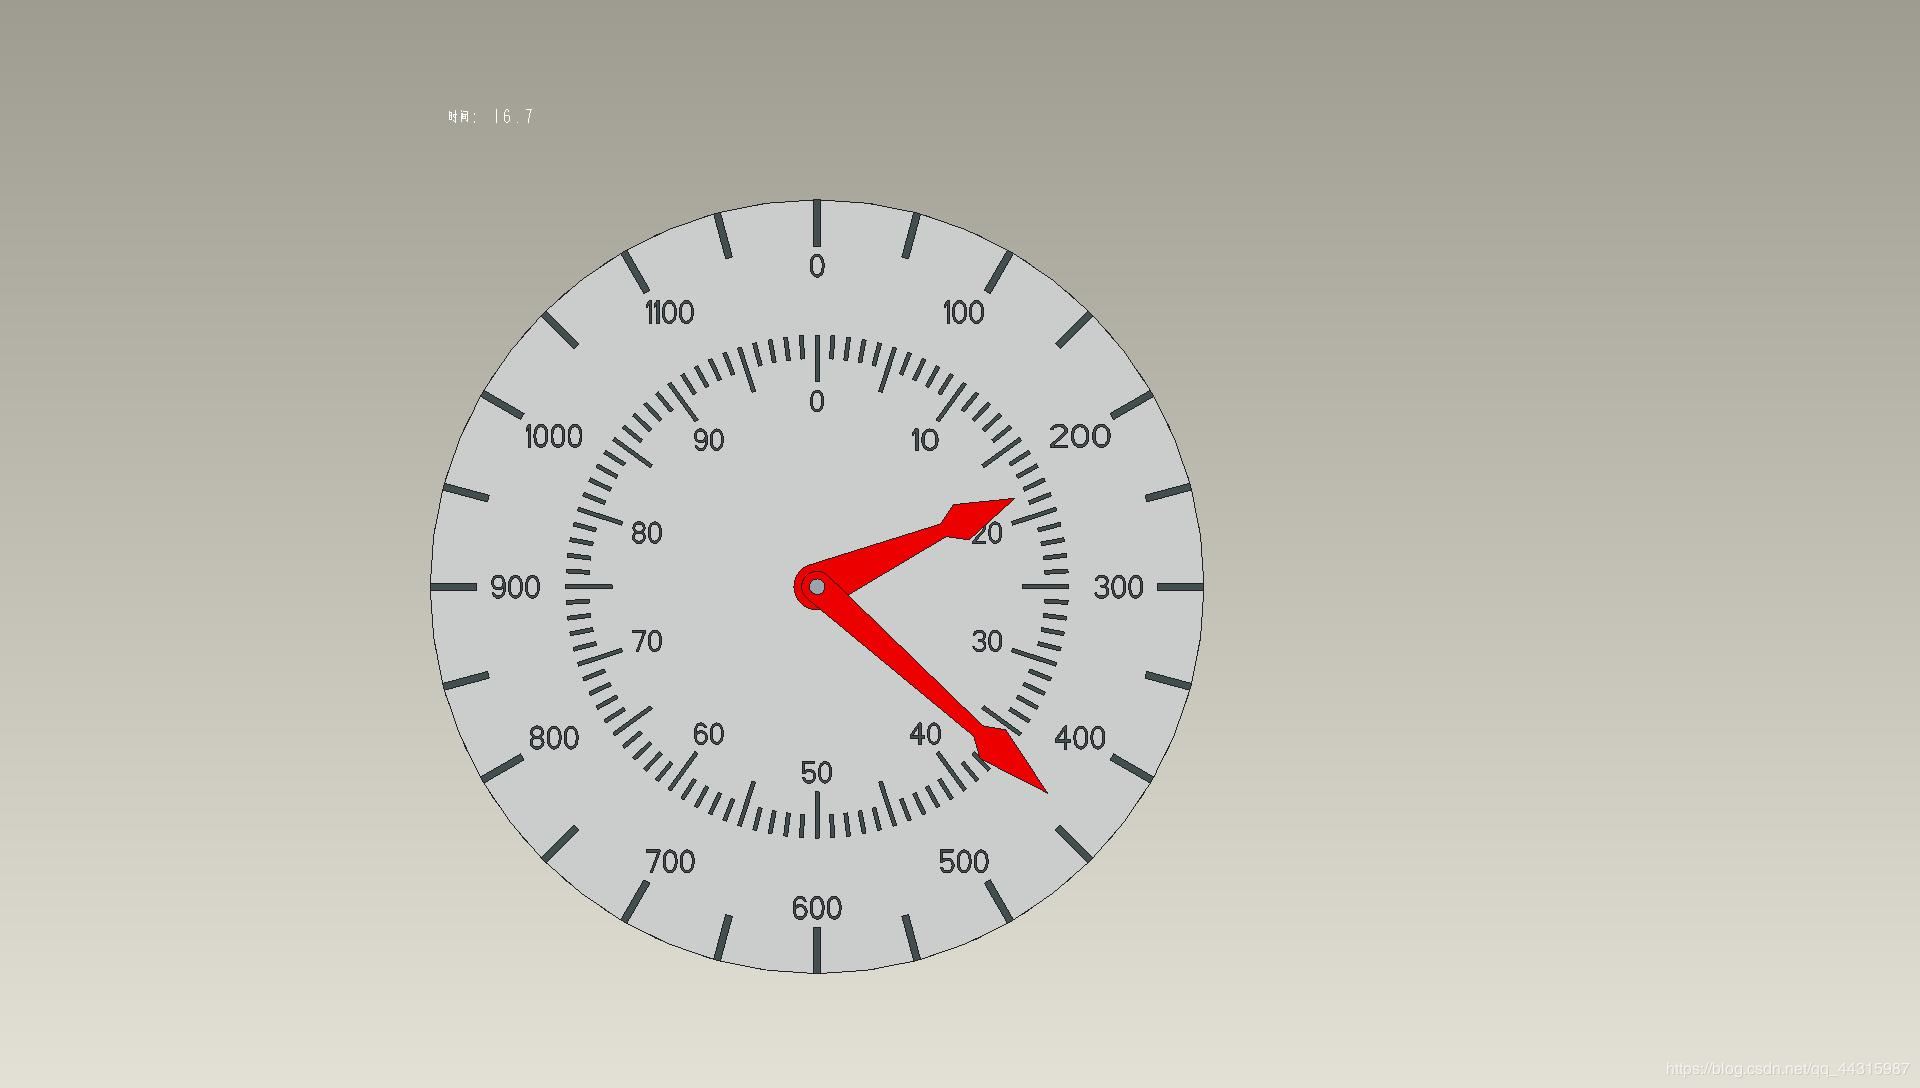
获得钟表中心:轮廓查找,取出轮廓的外接矩形,根据矩形面积找出圆心
def get_center(image):
"""
获取钟表中心
"""
edg_output = cv.Canny(image, 100, 150, 2) # canny算子提取边缘
cv.imshow('dsd', edg_output)
# 获取图片轮廓
contours, hireachy = cv.findContours(edg_output, cv.RETR_TREE, cv.CHAIN_APPROX_SIMPLE)
center = []
cut=[0, 0]
for i, contour in enumerate(contours):
x, y, w, h = cv.boundingRect(contour) # 外接矩形
area = w * h # 面积
if area < 100 or area > 4000:
continue
cv.rectangle(image, (x, y), (x + w, y + h), (255, 0, 0), 1)
cx = w / 2
cy = h / 2
cv.circle(image, (np.int(x + cx), np.int(y + cy)), 1, (255, 0, 0)) ## 在图上标出圆心
center = [np.int(x + cx), np.int(y + cy)]
break
return center[::-1]
由上面的图像可以看出,圆心定位还是非常准确的
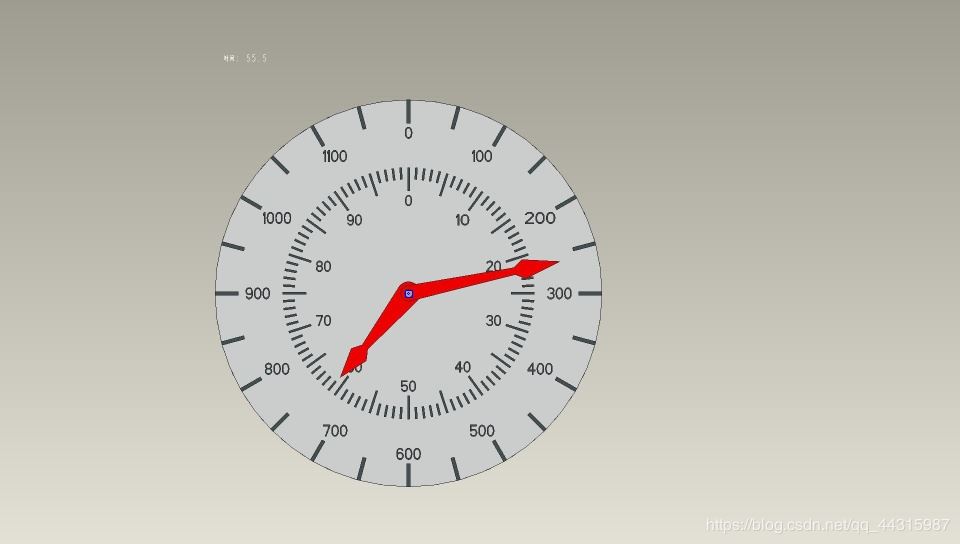
图片裁剪
def ChangeImage(image):
"""
图像裁剪
"""
# 指针提取
mask = extract_red(image)
mask = cv.medianBlur(mask,ksize=5)#去噪
# 获取中心
center = get_center(mask)
# 去除多余黑色边框
[y, x] = center
cut = mask[y-300:y+300, x-300:x+300]
# 因为mask处理后已经是二值图像,故不用转化为灰度图像
return cut
剪裁后的图像如下图所示:
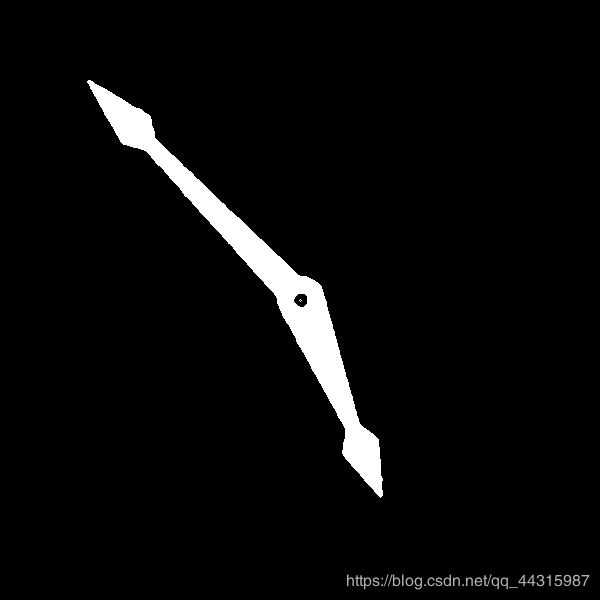
极坐标转换
注意:需要将图片裁剪成正方形
def polar(image):
"""
转换成极坐标
"""
x, y = 300, 300
maxRadius = 300*math.sqrt(2)
linear_polar = cv.linearPolar(image, (y, x), maxRadius, cv.WARP_FILL_OUTLIERS + cv.INTER_LINEAR)
mypolar = linear_polar.copy()
#将图片调整为从0度开始
mypolar[:150, :] = linear_polar[450:, :]
mypolar[150:, :] = linear_polar[:450, :]
cv.imshow("linear_polar", linear_polar)
cv.imshow("mypolar", mypolar)
return mypolar

由图像就可以很容易发现指针的顶点
计算角度
def Get_Reading(sumdata):
"""
读数并输出
"""
peak = []
# s记录遍历时波是否在上升
s = sumdata[0] < sumdata[1]
for i in range(599):
# 上升阶段
if s==True and sumdata[i] > sumdata[i+1] and sumdata[i] > 70000:
peak.append(sumdata[i])
s=False
# 下降阶段
if s==False and sumdata[i] < sumdata[i+1]:
s=True
peak.sort()
a = sumdata[0]
b = sumdata[-1]
if not peak or max(a,b) > peak[-1]:
peak.append(max(a,b))
longindex = (sumdata.index(peak[-1]))%599
longnum = (longindex + 1)//25*50
# 先初始化和长的同一刻度
#shortindex = longindex
shortnum = round(longindex / 6)
try:
shortindex = sumdata.index(peak[-2])
shortnum = round(shortindex / 6)
except IndexError:
i=0
while i<300:
i += 1
l = sumdata[(longindex-i)%600]
r = sumdata[(longindex+i)%600]
possibleshort = max(l,r)
# 在短指针可能范围内寻找插值符合条件的值
if possibleshort > 80000:
continue
elif possibleshort < 60000:
break
else:
if abs(l-r) > 17800:
shortindex = sumdata.index(possibleshort) - 1
shortnum = round(shortindex / 6)
break
return [longnum,shortnum%100]
def test():
"""
RGS法测试
"""
image = cv.imread("./BONC/1_{0:0>4d}".format(400) + ".jpg")
newimg = ChangeImage(image)
polarimg = polar(newimg)
psum = polarimg.sum(axis=1, dtype = 'int32')
result = Get_Reading(list(psum))
print(result)
if __name__ == "__main__":
test()
k = cv.waitKey(0)
if k == 27:
cv.destroyAllWindows()
elif k == ord('s'):
cv.imwrite('new.jpg', src)
cv.destroyAllWindows()
[1050, 44]
方法二:Hough直线检测
原理:利用Hough变换检测出指针的两条边,从而两条边的中线角度即为指针刻度
数据预处理与上面的方法类似
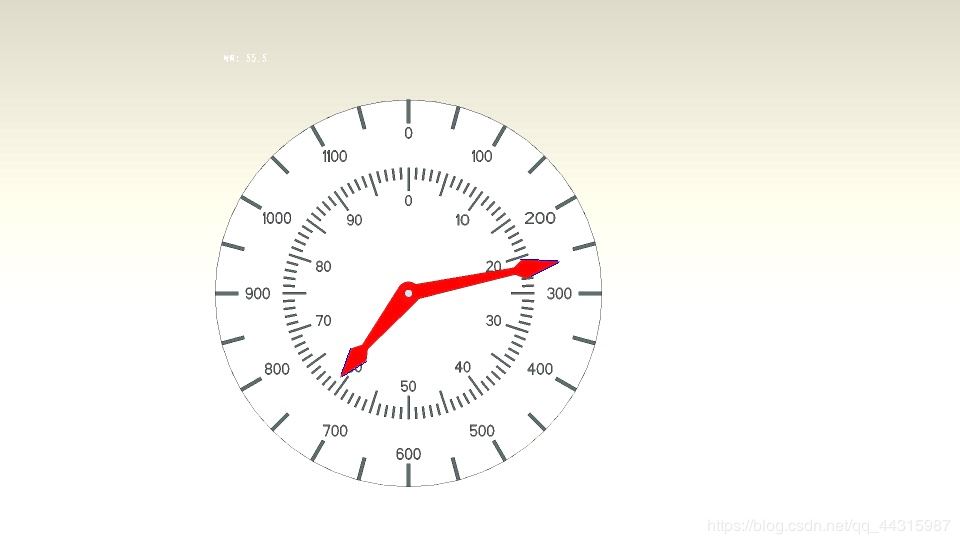
可以看到分别检测出了两个指针的左右两条边,然后可以由这四个角度算出两个指针中线的角度,具体计算过程写的有点复杂
class Apparatus:
def __init__(self, name):
self.name = name
self.angle = []
self.src = cv.imread(name)
def line_detect_possible_demo(self, image, center, tg):
'''
:param image: 二值图
:param center: 圆心
:param tg: 直线检测maxLineGap
'''
res = {} # 存放线段的斜率和信息
edges = cv.Canny(image, 50, 150, apertureSize=7)
cv.imshow("abcdefg", edges)
lines = cv.HoughLinesP(edges, 1, np.pi/360, 13, minLineLength=20, maxLineGap=tg)
for line in lines:
x_1, y_1, x_2, y_2 = line[0]
# 将坐标原点移动到圆心
x1 = x_1 - center[0]
y1 = center[1] - y_1
x2 = x_2 - center[0]
y2 = center[1] - y_2
# 计算斜率
if x2 - x1 == 0:
k = float('inf')
else:
k = (y2-y1)/(x2-x1)
d1 = np.sqrt(max(abs(x2), abs(x1)) ** 2 + (max(abs(y2), abs(y1))) ** 2) # 线段长度
d2 = np.sqrt(min(abs(x2), abs(x1)) ** 2 + (min(abs(y2), abs(y1))) ** 2)
# 将长指针与短指针做标记
if d1 < 155 and d1 > 148 and d2 > 115:
res[k] = [1]
elif d1 < 110 and d1 > 100 and d2 > 75:
res[k] = [2]
else:
continue
res[k].append(1) if (x2 + x1) /2 > 0 else res[k].append(0) # 将14象限与23象限分离
cv.line(self.src, (x1 + center[0], center[1] - y1), (x2 + center[0], center[1] - y2), (255, 0, 0), 1)
cv.imshow("line_detect-posssible_demo", self.src)
# 计算线段中点的梯度来判断是指针的左侧线段还是右侧线段
middle_x = int((x_1 + x_2) / 2)
middle_y = int((y_1 + y_2) / 2)
grad_mat = image[middle_y-5:middle_y+6, middle_x-5:middle_x+6]
cv.imshow("grad_mat", grad_mat)
grad_x = cv.Sobel(grad_mat, cv.CV_32F, 1, 0)
grad_y = cv.Sobel(grad_mat, cv.CV_32F, 0, 1)
gradx = np.max(grad_x) if np.max(grad_x) != 0 else np.min(grad_x)
grady = np.max(grad_y) if np.max(grad_y) != 0 else np.min(grad_y)
if ((gradx >=0 and grady >= 0) or (gradx <= 0 and grady >= 0)) and res[k][1] == 1:
res[k].append(1) # 右测
elif ((gradx <= 0 and grady <= 0) or (gradx >= 0 and grady <= 0)) and res[k][1] == 0:
res[k].append(1)
else:
res[k].append(0) # 左侧
# 计算角度
angle1 = [i for i in res if res[i][0] == 1]
angle2 = [i for i in res if res[i][0] == 2]
# 长指针
a = np.arctan(angle1[0])
b = np.arctan(angle1[1])
if a * b < 0 and max(abs(a), abs(b)) > np.pi / 4:
if a + b < 0:
self.angle.append(math.degrees(-(a + b) / 2)) if res[angle1[1]][1] == 1 else self.angle.append(
math.degrees(-(a + b) / 2) + 180)
else:
self.angle.append(math.degrees(np.pi - (a + b) / 2)) if res[angle1[1]][1] == 1 else self.angle.append(
math.degrees(np.pi - (a + b) / 2) + 180)
else:
self.angle.append(math.degrees(np.pi / 2 - (a + b) / 2)) if res[angle1[1]][1] == 1 else self.angle.append(math.degrees(np.pi / 2 - (a + b) / 2) + 180)
print('长指针读数:%f' % self.angle[0])
# 短指针
a = np.arctan(angle2[0])
b = np.arctan(angle2[1])
if a * b < 0 and max(abs(a), abs(b)) > np.pi / 4:
if a + b < 0:
self.angle.append(math.degrees(-(a + b) / 2)) if res[angle2[1]][1] == 1 else self.angle.append(
math.degrees(-(a + b) / 2) + 180)
else:
self.angle.append(math.degrees(np.pi - (a + b) / 2)) if res[angle2[1]][1] == 1 else self.angle.append(
math.degrees(np.pi - (a + b) / 2) + 180)
else:
self.angle.append(math.degrees(np.pi / 2 - (a + b) / 2)) if res[angle2[1]][1] == 1 else self.angle.append(math.degrees(np.pi / 2 - (a + b) / 2) + 180)
print('短指针读数:%f' % self.angle[1])
def get_center(self, mask):
edg_output = cv.Canny(mask, 66, 150, 2)
cv.imshow('edg', edg_output)
# 外接矩形
contours, hireachy = cv.findContours(edg_output, cv.RETR_TREE, cv.CHAIN_APPROX_SIMPLE)
center = []
for i, contour in enumerate(contours):
x, y, w, h = cv.boundingRect(contour) # 外接矩形
area = w * h # 面积
if area > 1000 or area < 40:
continue
#print(area)
# cv.circle(src, (np.int(cx), np.int(cy)), 3, (255), -1)
cv.rectangle(self.src, (x, y), (x + w, y + h), (255, 0, 0), 1)
cx = w / 2
cy = h / 2
cv.circle(self.src, (np.int(x + cx), np.int(y + cy)), 1, (255, 0, 0))
center.extend([np.int(x + cx), np.int(y + cy)])
break
cv.imshow('center', self.src)
return center
def extract(self, image):
red_lower1 = np.array([0, 43, 46])
red_lower2 = np.array([156, 43, 46])
red_upper1 = np.array([10, 255, 255])
red_upper2 = np.array([180, 255, 255])
frame = cv.cvtColor(image, cv.COLOR_BGR2HSV)
mask1 = cv.inRange(frame, lowerb=red_lower1, upperb=red_upper1)
mask2 = cv.inRange(frame, lowerb=red_lower2, upperb=red_upper2)
mask = cv.add(mask1, mask2)
mask = cv.bitwise_not(mask)
cv.imshow('mask', mask)
return mask
def test(self):
self.src = cv.resize(self.src, dsize=None, fx=0.5, fy=0.5) # 此处可以修改插值方式interpolation
mask = self.extract(self.src)
mask = cv.medianBlur(mask, ksize=5) # 去噪
# 获取中心
center = self.get_center(mask)
# 去除多余黑色边框
[y, x] = center
mask = mask[x - 155:x + 155, y - 155:y + 155]
cv.imshow('mask', mask)
#self.find_short(center, mask)
try:
self.line_detect_possible_demo(mask, center, 20)
except IndexError:
try:
self.src = cv.imread(self.name)
self.src = cv.resize(self.src, dsize=None, fx=0.5, fy=0.5) # 此处可以修改插值方式interpolation
self.src = cv.convertScaleAbs(self.src, alpha=1.4, beta=0)
blur = cv.pyrMeanShiftFiltering(self.src, 10, 17)
mask = self.extract(blur)
self.line_detect_possible_demo(mask, center, 20)
except IndexError:
self.src = cv.imread(self.name)
self.src = cv.resize(self.src, dsize=None, fx=0.5, fy=0.5) # 此处可以修改插值方式interpolation
self.src = cv.normalize(self.src, dst=None, alpha=200, beta=10, norm_type=cv.NORM_MINMAX)
blur = cv.pyrMeanShiftFiltering(self.src, 10, 17)
mask = self.extract(blur)
self.line_detect_possible_demo(mask, center, 20)
if __name__ == '__main__':
apparatus = Apparatus('./BONC/1_0555.jpg')
# 读取图片
apparatus.test()
k = cv.waitKey(0)
if k == 27:
cv.destroyAllWindows()
elif k == ord('s'):
cv.imwrite('new.jpg', apparatus.src)
cv.destroyAllWindows()
长指针读数:77.070291
短指针读数:218.896747
由结果可以看出精确度还是挺高的,但是这种方法有三个缺点:
当两个指针重合时候不太好处理
有时候hough直线检测只能检测出箭头的一条边,这时候就会报错,可以利用图像增强、角点检测和图像梯度来辅助解决,但是效果都不太好
计算角度很复杂!!(也可能是我想复杂了,不过这段代码确实花了大量时间)
代码里可能还有很多问题,希望大家多多指出
到此这篇关于OpenCV 表盘指针自动读数的示例代码的文章就介绍到这了,更多相关OpenCV 表盘自动读数内容请搜索脚本之家以前的文章或继续浏览下面的相关文章希望大家以后多多支持脚本之家!
python 仪表盘图片读数_OpenCV 表盘指针自动读数的示例代码相关推荐
- python自动化简历_python+selenium实现简历自动刷新的示例代码
本文用到的文件的下载地址 百度网盘链接: https://pan.baidu.com/s/1tmpdEfAZKff5TOMAitUXqQ 提取码: e6at 1 安装Python 和 selenium ...
- python自动导出数据脚本_使用python生成一个导出数据库的bat脚本文件的示例代码...
这篇文章分享使用python生成一个导出数据库的bat脚本文件的示例代码 实例如下:# 环境: python3.x def getExportDbSql(db, index): # 获取导出一个数据库 ...
- Python pandas 保存Excel自动调整列宽的方法及示例代码
本文主要介绍Python中,使用pandas.ExcelWriter保存Excel文件数据时,自动判断调整列的宽度方法,以及相关的示例代码. 原文地址:Python pandas 保存Excel自动调 ...
- python写算法求最短路径,Python实现迪杰斯特拉算法并生成最短路径的示例代码
def Dijkstra(network,s,d):#迪杰斯特拉算法算s-d的最短路径,并返回该路径和代价 print("Start Dijstra Path--") path=[ ...
- python爬虫获取服务器信息,通过python自动化获取服务器信息,并写入到excel(示例代码)...
简介这篇文章主要介绍了通过python自动化获取服务器信息,并写入到excel(示例代码)以及相关的经验技巧,文章约943字,浏览量170,点赞数4,值得参考! 博主目前在电信外包工作,比较坑,因为涉 ...
- python人像绘制_python实现人像动漫化的示例代码
利用百度api实现人像动漫化 百度API地址:https://ai.baidu.com/tech/imageprocess/selfie_anime 技术文档:https://ai.baidu.com ...
- python算法实现源码_python 实现A_算法的示例代码
python 实现A_算法的示例代码 来源:中文源码网 浏览: 次 日期:2018年9月2日 [下载文档: python 实现A_算法的示例代码.txt ] (友情提示:右键点上行txt ...
- python省市区三级联动_Django Admin实现三级联动的示例代码(省市区)
通过自定义Admin的模板文件实现省市区的三级联动.要求创建记录时,根据省>市>区的顺序选择依次显示对应数据. 修改记录时默认显示已存在的数据. Model class Member(mo ...
- python淘宝秒杀_Python 实现淘宝秒杀的示例代码
新手学习Python,之前在网上看见一位朋友写的40行Python代码搞定京东秒杀,想在淘宝上帮女朋友抢玩偶,所以就照猫画虎的写了下淘宝的秒杀脚本,经自己实验可行.直接上代码: #-*- coding ...
最新文章
- 学自动化必知:20个传感器原理及应用动图
- python无法处理特别大的数据文件_Python实现快速大文件比较代码解析
- 20145209 实验三 《敏捷开发与XP实践》 实验报告
- 学习 redux 源码整体架构,深入理解 redux 及其中间件原理
- ASP.NET Core中HTTP管道和中间件的二三事
- 洛谷——P1546 最短网络 Agri-Net
- java三大框架增删改查_Java_Web三大框架之Hibernate增删改查
- 使用sklearn进行数据挖掘
- python爬取收费音乐_想下载的歌曲太多?嫌麻烦?要付费?戳这,帮你解决---Python爬取酷狗音乐...
- 数字签名的原理及其应用
- 中国天气网城市对应城市id
- ArcGIS裁剪shp时输出结果为空
- Ueditor基本用法-kityformula-上传图片-手写公式myscript
- [Js] Js实现继承的5种方式
- React全家桶详细讲解-图文并茂
- 深度解析大快DKadoop大数据运维管理平台功能
- 程序员的呓语---萎缩的情商
- 推荐引擎 - Summary Analysis
- Final Cut Pro X 10.4.8 Apple出品的专业视频非线性编辑软件
- java实战:邮件群发推广微信公众号(一),内含java操作mail.jar和activateon.jar