A wizard’s guide to Adversarial Autoencoders: Part 2, Exploring latent space with Adversarial Autoen
“This article is a continuation fromA wizard’s guide to Autoencoders: Part 1, if you haven’t read it but are familiar with the basics of autoencoders then continue on. You’ll need to know a little bit about probability theory which can be foundhere.”
Part 1: Autoencoder?
We left off part 1 by passing a value (0, 0) to our trained decoder (which has 2 neurons at the input) and finding its output. It looked blurry and didn’t represent a clear digit leaving us with the conclusion that the output of the encoder h(also known as the latent code) was not distributed evenly in a particular space.
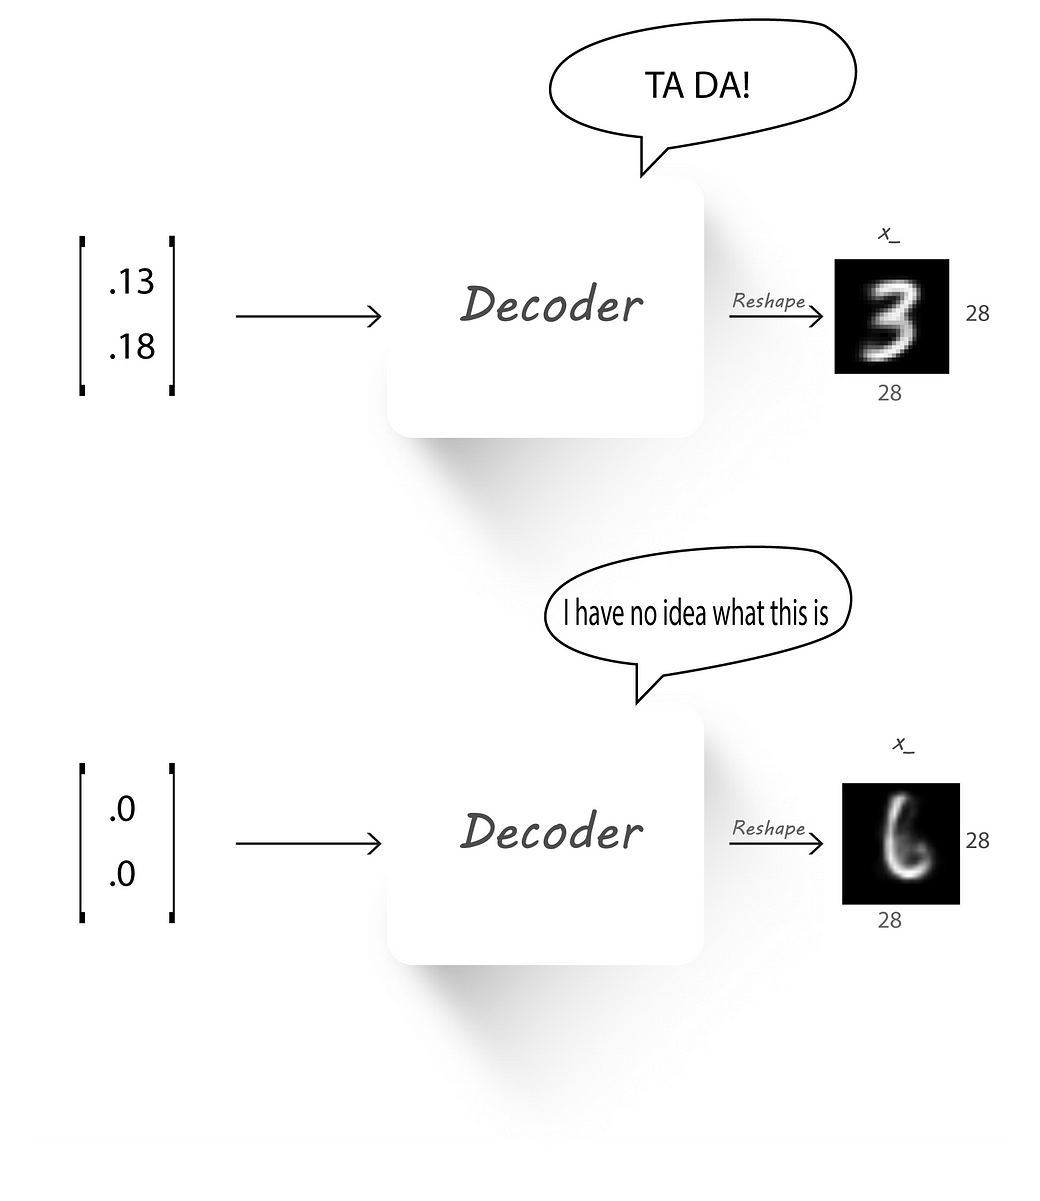
So, our main aim in this part will be to force the encoder output to match a given prior distribution, this required distribution can be a normal (Gaussian) distribution, uniform distribution, gamma distribution… . This should then cause the latent code (encoder output) to be evenly distributed over the given prior distribution, which would allow our decoder to learn a mapping from the prior to a data distribution (distribution of MNIST images in our case).
If you understood absolutely nothing from the above paragraph.
Let’s say you’re in college and have opted to take up Machine Learning (I couldn’t think of another course :p) as one of your courses. Now, if the course instructor doesn’t provide a syllabus guide or a reference book then, what will you study for your finals? (assume your classes weren’t helpful).
You could be asked questions from any subfield of ML, what would you do? Makeup stuff with what you know??
This is what happens if we don’t constrain our encoder output to follow some distribution, the decoder cannot learn a mapping from any number to an image.
But, if you are given a proper syllabus guide then, you can just go through the materials before the exam and you’ll have an idea of what to expect.
Similarly, if we force the encoder output to follow a known distribution like a Gaussian, then it can learn to spread the latent code to cover the entire distribution and learn mappings without any gap.
Good or Bad?
We now know that an autoencoder has two parts, each performing a completely opposite task.
Two people of similar nature can never get alone, it takes two opposites to harmonize.
— Ram Mohan
The encoder which is used to get a latent code (encoder output) from the input with the constraint that the dimension of the latent code should be less than the input dimension and secondly, the decoder that takes in this latent code and tries to reconstruct the original image.
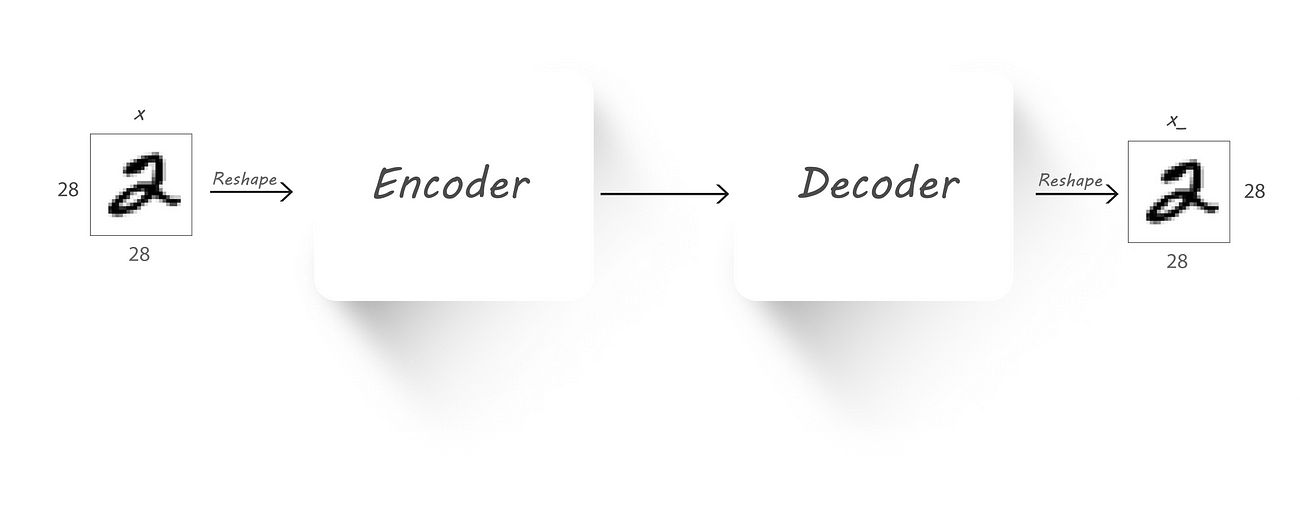
Autoencoder Block diagram
Let’s see how the encoder output was distributed when we previously implemented our autoencoder (checkout part 1):
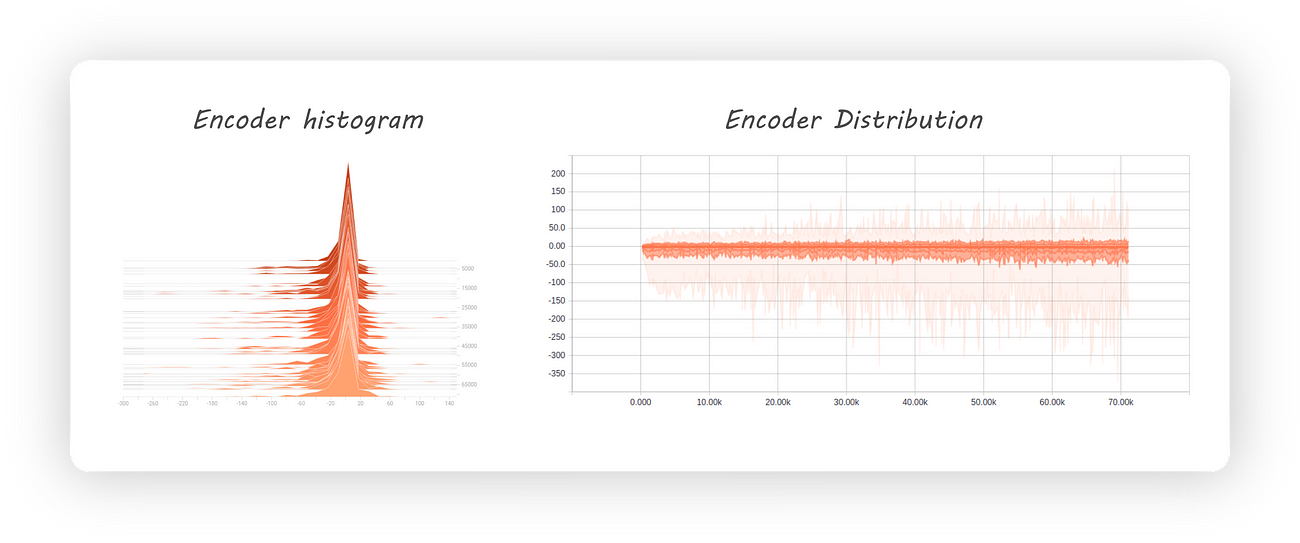
Encoder histogram and distribution
From the distribution graph (which is towards the right) we can clearly see that our encoder’s output distribution is all over the place. Initially, it appears as though the distribution is centred at 0 with most of the values being negative. At later stages during training the negative samples are distributed farther away from 0 when compared to the positive ones (also, we might not even get the same distribution if we run the experiment again). This leads to large amounts of gaps in the encoder distribution which isn’t a good thing if we want to use our decoder as a generative model.
But, why are these gaps a bad thing to have in our encoder distribution?
If we give an input that falls in this gap to a trained decoder then it’ll give weird looking images which don’t represent digits at its output (I know, 3rd time).
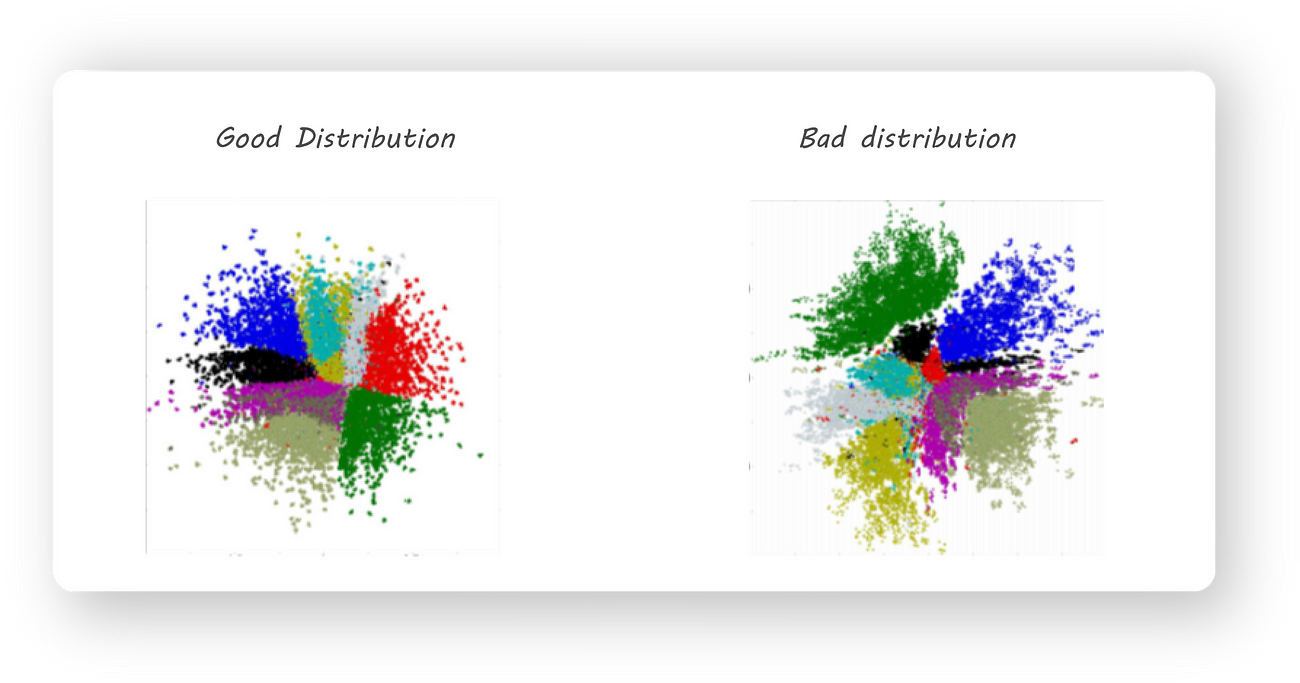
Another important observation that was made is that training an autoencoder gives us latent codes with similar images (for example all 2s or 3s ..) being far from each other in the euclidean space. This, for example, can cause all the 2s in our dataset to be mapped to different regions in space. We want the latent code to have a meaningful representation by keeping images of similar digits close together. Some thing like this:

A good 2D distribution
Different colored regions represent one class of images, notice how the same colored regions are close to one another.
We now look at Adversarial Autoencoders that can solve some of the above mentioned problems.
An Adversarial autoencoder is quite similar to an autoencoder but the encoder is trained in an adversarial manner to force it to output a required distribution.
Understanding Adversarial Autoencoders (AAEs) requires knowledge of Generative Adversarial Networks (GANs), I have written an article on GANs which can be found here:
“This article assumes the reader is familiar with Neural networks and using Tensorflow. If not, we would request you to…medium.com
If you already know about GANs here’s a quick recap (feel free to skip this section if you remember the next two points):
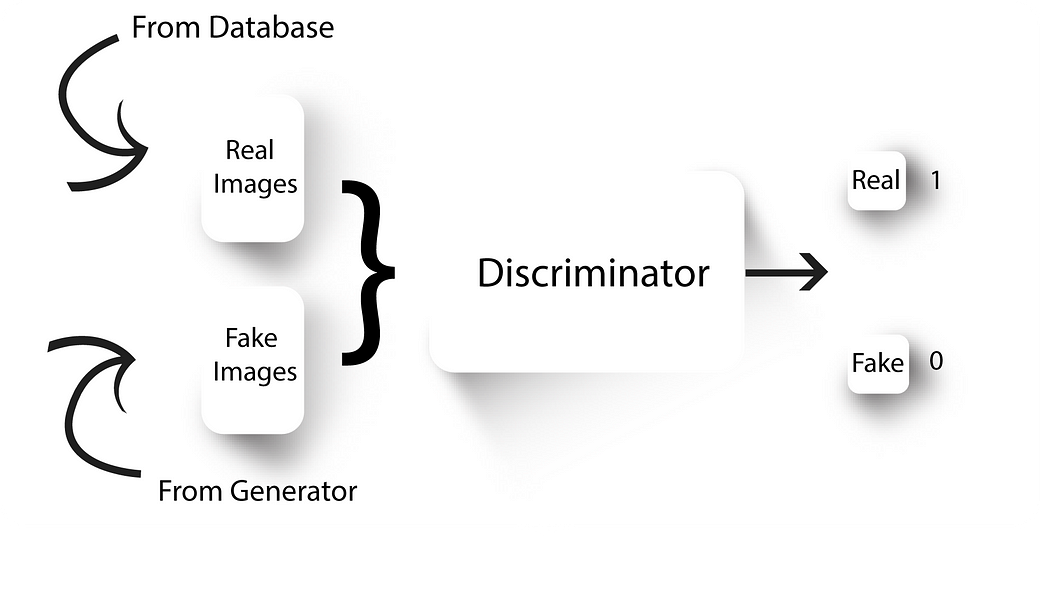
Discriminator
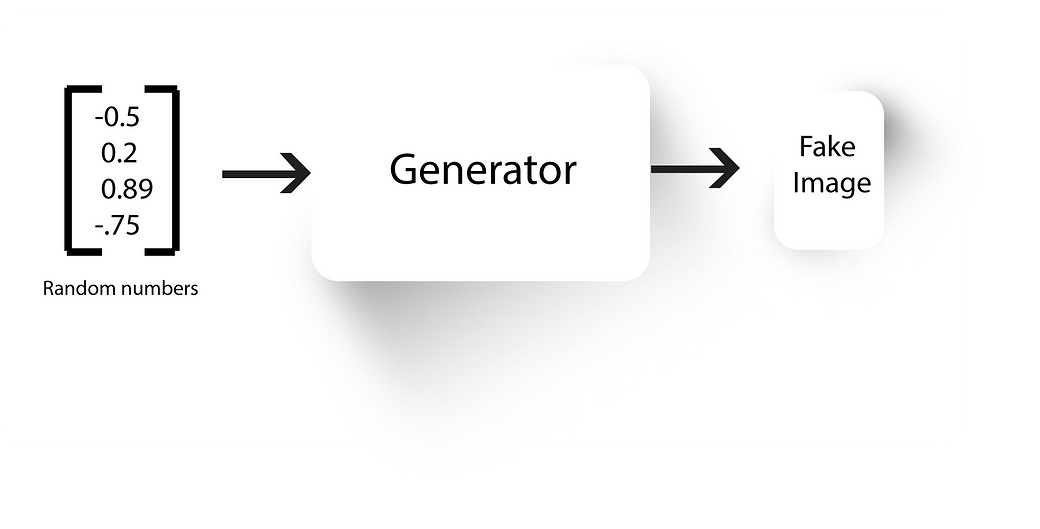
Generator
- GANs have two neural nets, a generator and a discriminator.
- Generator, well generates fake images. We train the discriminator to tell apart real images from our dataset with the fake ones generated by our generator.
- The generator initially generates some random noise (because it’s weights will be random). After training our discriminator to discriminate this random noise and real images, we’ll connect our generator to our discriminator and backprop only through the generator with the constraint that the discriminator output should be 1 (i.e, the discriminator should classify the output of the generator as real images).
- We’ll again train our discriminator to now tell apart the new fake images from our generator and the real ones from our database. This is followed by training the generated to generate better fake looking images.
- We’ll continue this process until the generator becomes so good at generating fake images that the discriminator is no longer able to tell real images from fake ones.
- At the end, we’ll be left with a generator which can produce real looking fake images given a random set of numbers as its input.
Here’s a block diagram of an Adversarial Autoencoder:
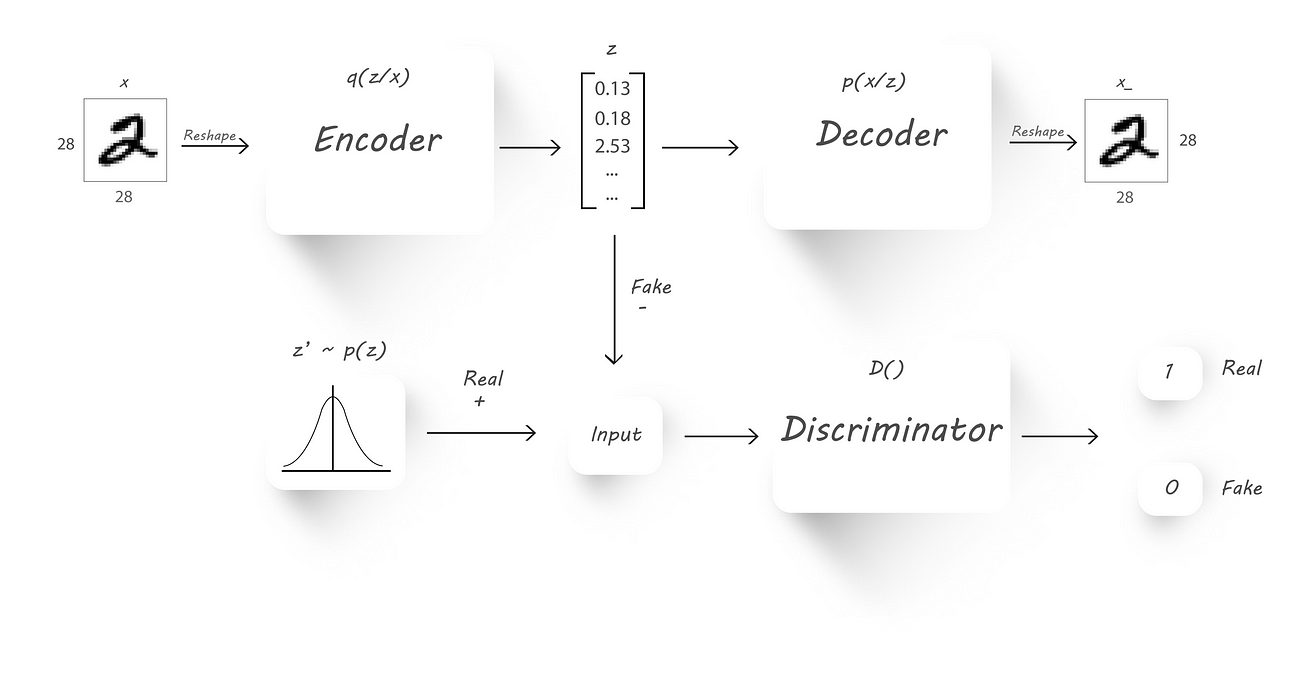
AAE block diagram
- x → Input image
- q(z/x) → Encoder output given input x
- z → Latent code (fake input), z is drawn from q(z/x)
- z’ → Real input with the required distribution
- p(x/z) →Decoder output given z
- D() → Discriminator
- x_ →Reconstructed image
Again, our main is to force the encoder to output values which have a given prior distribution (this can be normal, gamma .. distributions). We’ll use the encoder (q(z/x)) as our generator, the discriminator to tell if the samples are from a prior distribution (p(z)) or from the output of the encoder (z) and the decoder (p(x/z)) to get back the original input image.
To get an understanding of how this architecture could be used to impose a prior distribution on the encoder output, lets have a look at how we go about training an AAE.
Training an AAE has 2 phases:
- Reconstruction phase:
We’ll train both the encoder and the decoder to minimize the reconstruction loss (mean squared error between the input and the decoder output images, checkout part 1 for more details). Forget that the discriminator even exists in this phase (I’ve greyed out the parts that aren’t required in this phase).
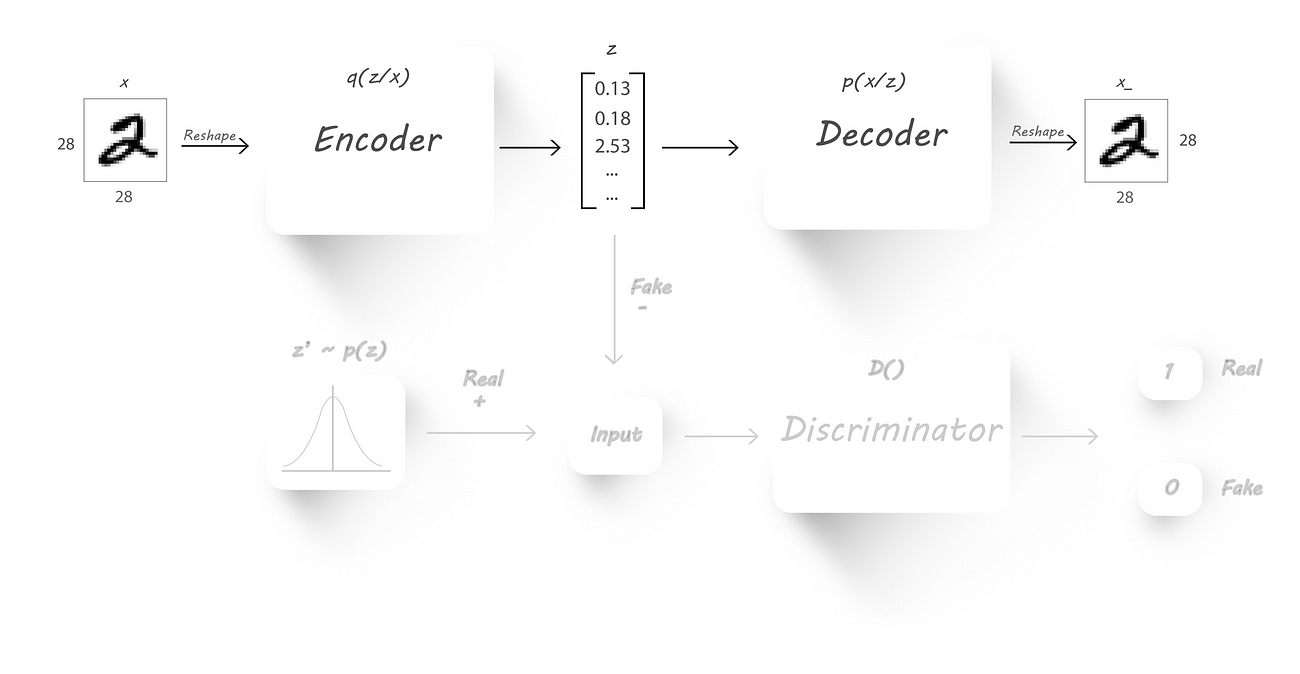
Reconstruction Phase
As usual we’ll pass inputs to the encoder which will give us our latent code, later, we’ll pass this latent code to the decoder to get back the input image. We’ll backprop through both the encoder and the decoder weights so that reconstruction loss will be reduced.
- Regularization phase:
In this phase we’ll have to train the discriminator and the generator (which is nothing but our encoder). Just forget that the decoder exists.
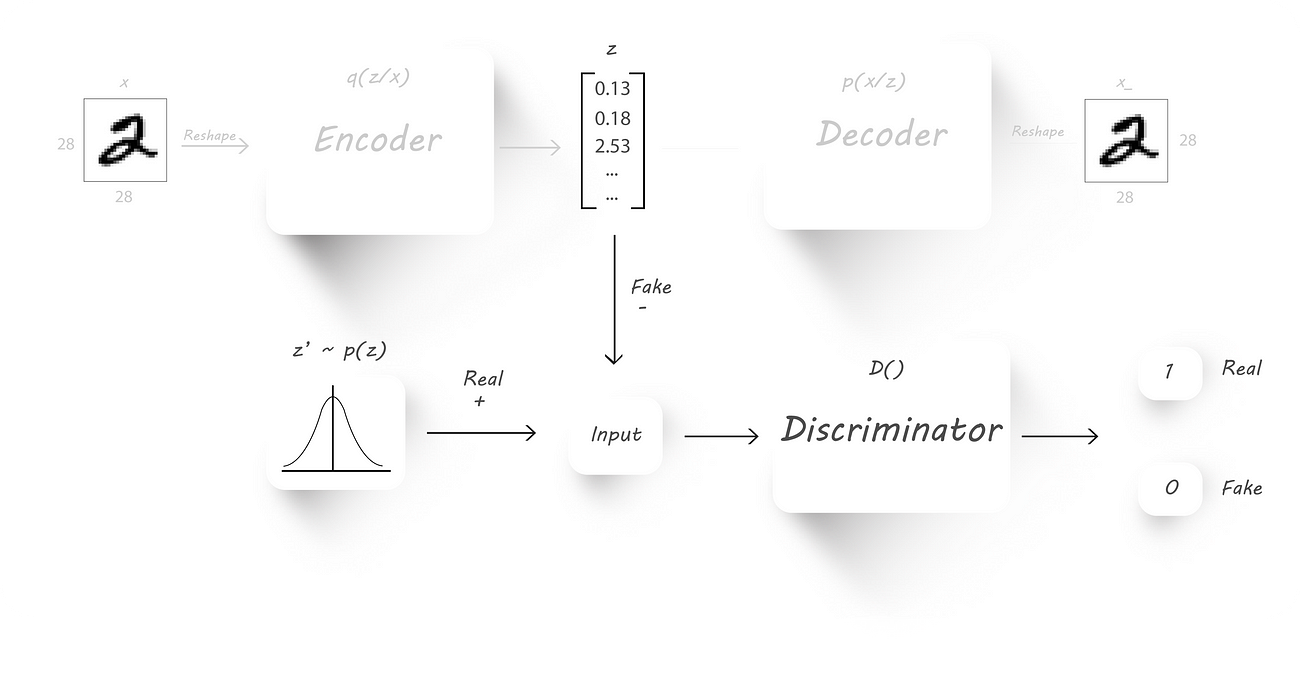
Training the discriminator
First, we train the discriminator to classify the encoder output (z) and some random input(z’, this will have our required distribution). For example, the random input can be normally distributed with a mean of 0 and standard deviation of 5.
So, the discriminator should give us an output 1 if we pass in random inputs with the desired distribution (real values) and should give us an output 0 (fake values) when we pass in the encoder output. Intuitively, both the encoder output and the random inputs to the discriminator should have the same size.
The next step will be to force the encoder to output latent code with the desired distribution. To accomplish this we’ll connect the encoder output as the input to the discriminator:
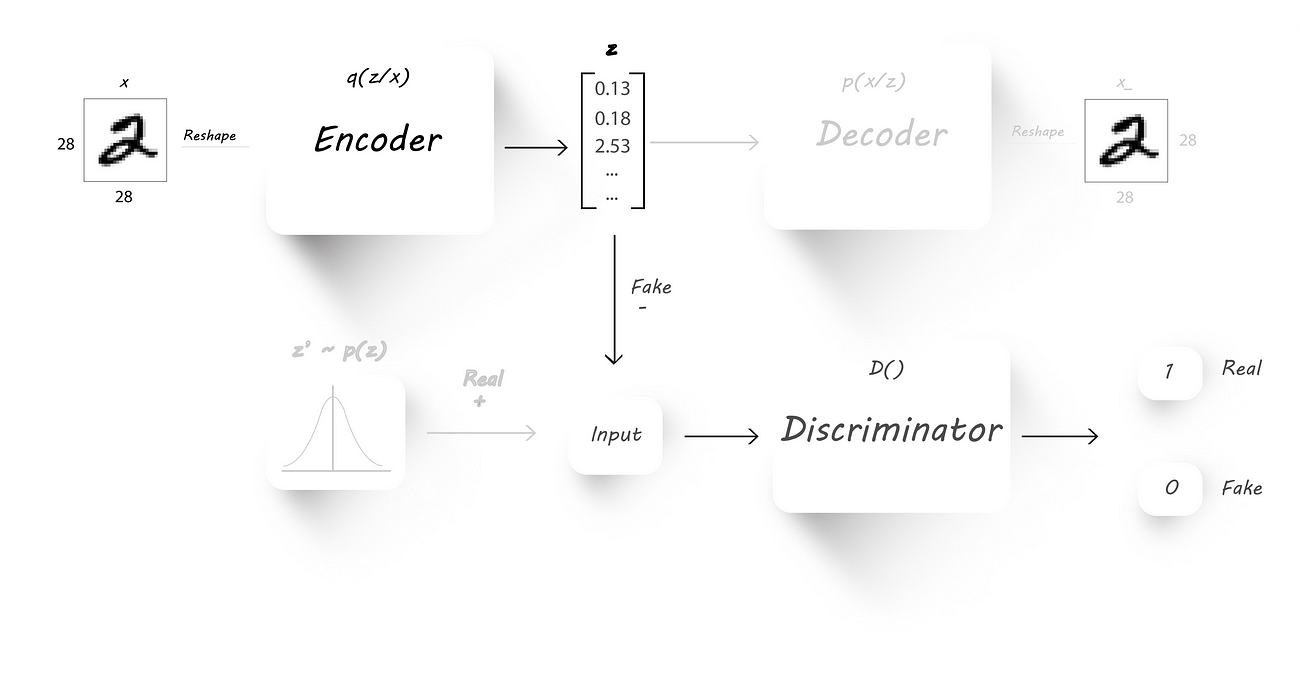
We’ll fix the discriminator weights to whatever they are currently (make them untrainable) and fix the target to 1 at the discriminator output. Later, we pass in images to the encoder and find the discriminator output which is then used to find the loss (cross-entropy cost function). We’ll backprop only through the encoder weights, which causes the encoder to learn the required distribution and produce output which’ll have that distribution (fixing the discriminator target to 1 should cause the encoder to learn the required distribution by looking at the discriminator weights).
Now that the theoretical part of out of the way, let’s have a look at how we can implement this using tensorflow.
Here’s the entire code for Part 2 (It’s very similar to what we’ve discussed in Part 1):
Adversarial_Autoencoder - A wizard's guide to Adversarial Autoencodersgithub.com
As usual we have our helper dense() :
I haven’t changed the encoder and the decoder architectures:
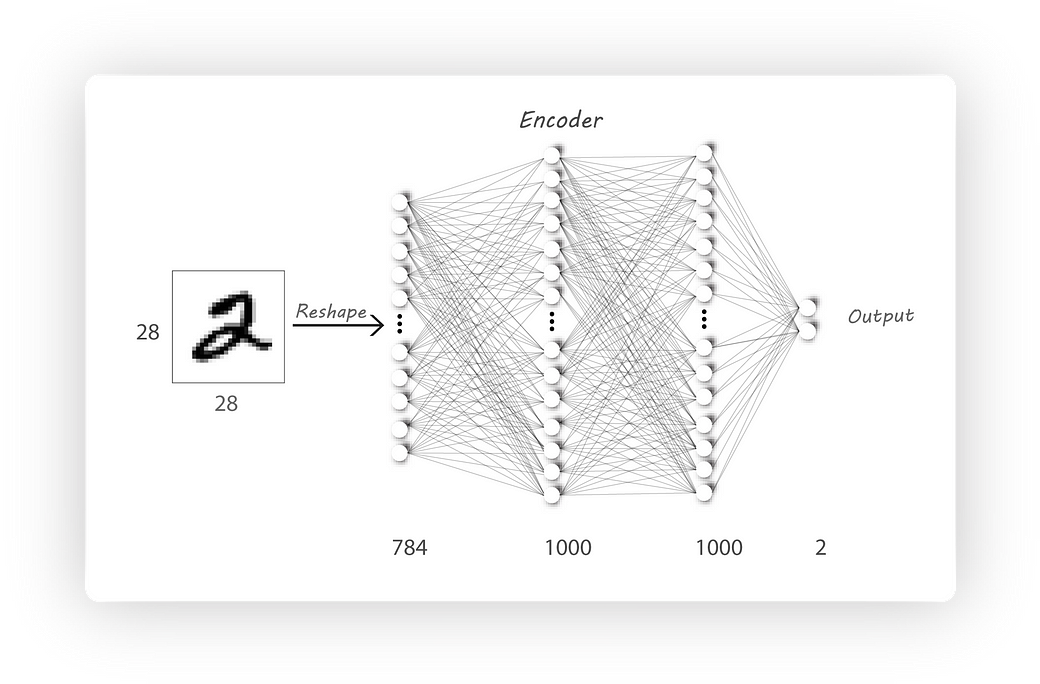
Encoder Architecture
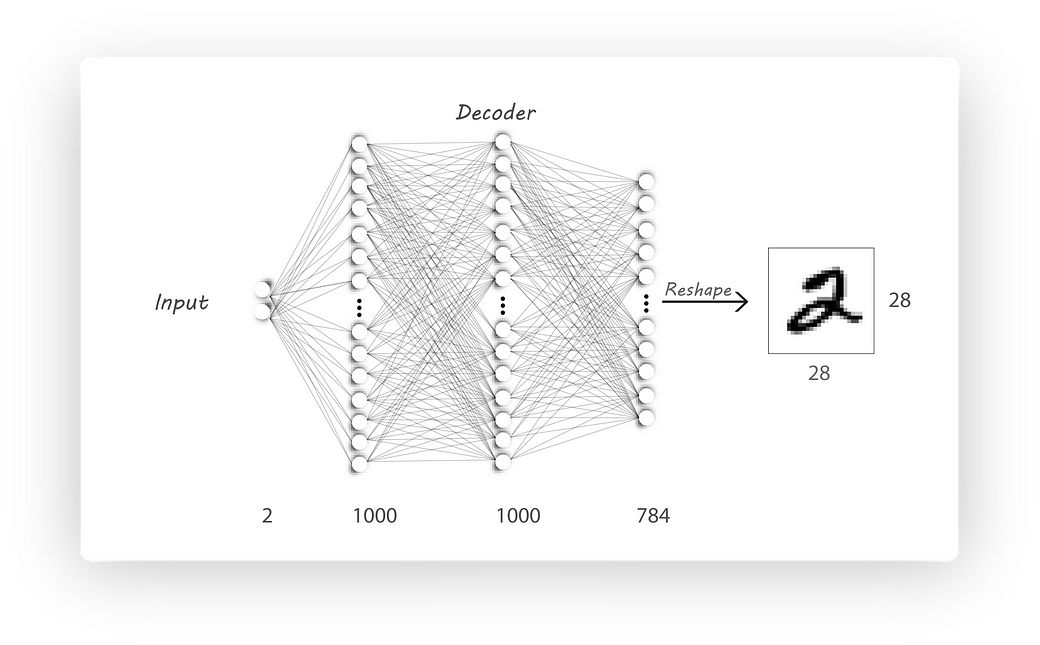
Decoder Architecture
Here’s the discriminator architecture:
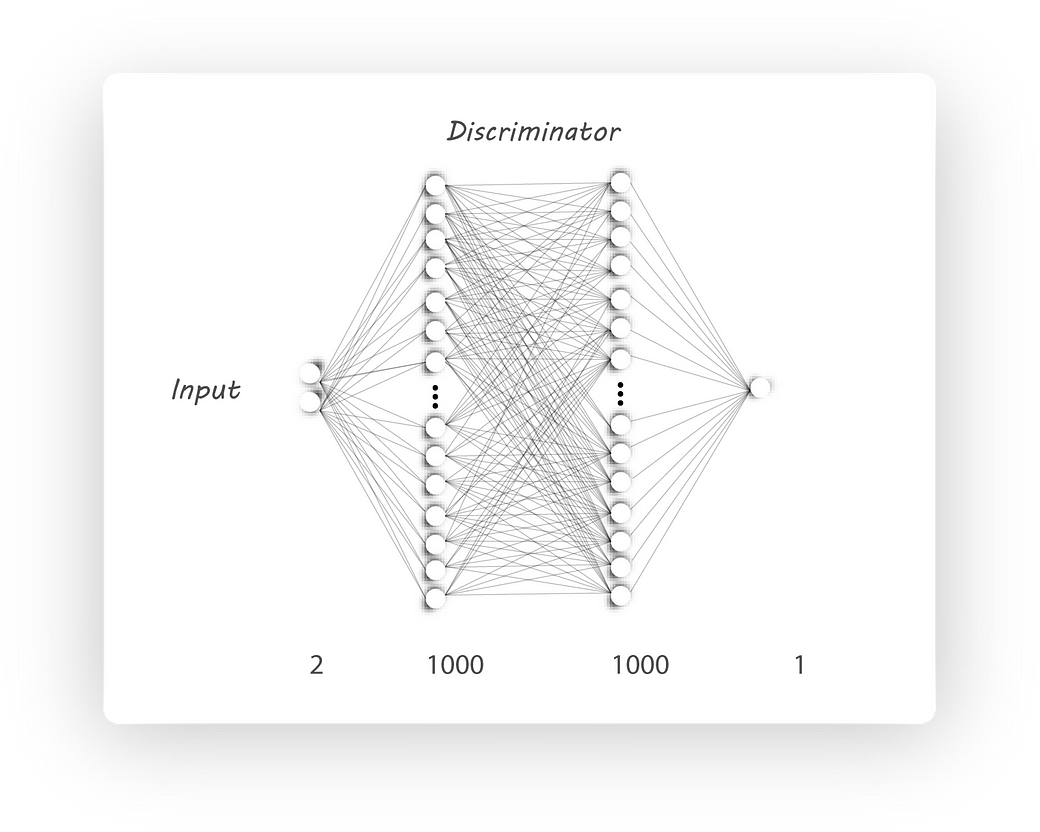
Discriminator Architecture
It’s similar to our encoder architecture, the input shape is z_dim (batch_size, z_dim actually) and the output has a shape of 1 (batch_size, 1 ).
Note that I’ve used the prefixes e_ , d_ and dc_ while defining the dense layers for the encoder, decoder and discriminator respectively. Using these notations help us collect the weights to be trained easily:
We now know that training an AAE has two parts, first being the reconstruction phase (we’ll train our autoencoder to reconstruct the input) and the regularization phase (first the discriminator is trained followed by the encoder).
We’ll begin the reconstruction phase by connecting our encoder output to the decoder input:
I’ve used tf.variable_scope(tf.get_variable_scope()) each time I call any of our defined architectures as it’ll allow us to share the weights among all function calls (this happens only if reuse=True ).
The loss function as usual is the Mean Squared Error (MSE), which we’ve come across in part 1.
Similar to what we did in part 1, the optimizer (which’ll update the weights to reduce the loss[hopefully]) is implemented as follows:
I couldn’t help it :P
That’s it for the reconstruction phase, next we move on to the regularization phase:
We’ll first train the discriminator to distinguish between the real distribution samples and the fake ones from the generator (encoder in this case).
real_distributionis a placeholder which I’ve used to pass in values with the required distribution to the discriminator (this will be our real input).encoder_outputis connected to the discriminator which’ll give us our discriminator output for fake inputsd_fake.- Here
reuse=Truesince we want the same discriminator weights in the second call (if this is not specified, then tensorflow creates new set of randomly initialized weights [but since I’ve usedget_variable()to create the weights it’ll through an error]).
The loss function I’ve used to train the discriminator is:
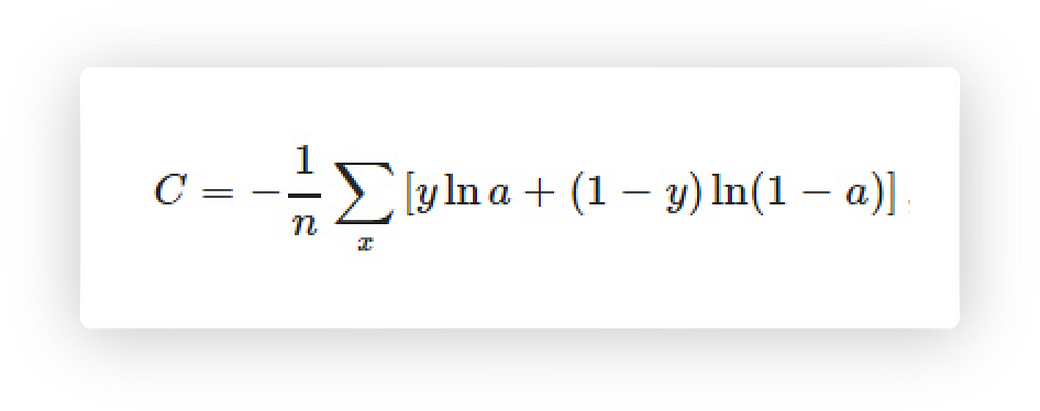
Cross entropy cost
This can easily be implemented in tensorflow as follows:
Next step will be to train the generator (encoder) to output a required distribution. As we have discussed, this requires the discrminator’s target to be set to 1 and the d_fake variable (the encoder connected to the discriminator [go back and look]). The generator loss is again cross entropy cost function.
To update only the required weights during training we’ll need to pass in all those collected weights to the var_list parameter under minimize() . So, I’ve passed in the discriminator variables (dc_var) and the generator (encoder) variables (en_var) during their training phases.
We’re almost done, all we have left is to pass our MNIST images as the input and as target along with random numbers of size batch_size, z_dim as inputs to the discriminator (this will form the required distribution).
The training part might look intimidating, but stare at it for a while you’ll find out that it’s quite intuitive.
The parameters I’ve used during training are as follows:
I trained the model for 300 epochs with required distribution begin a normal (Gaussian) having mean 0 and 5 as it’s standard distribution. Here’s the encoder output and the required distributions along with their histograms:
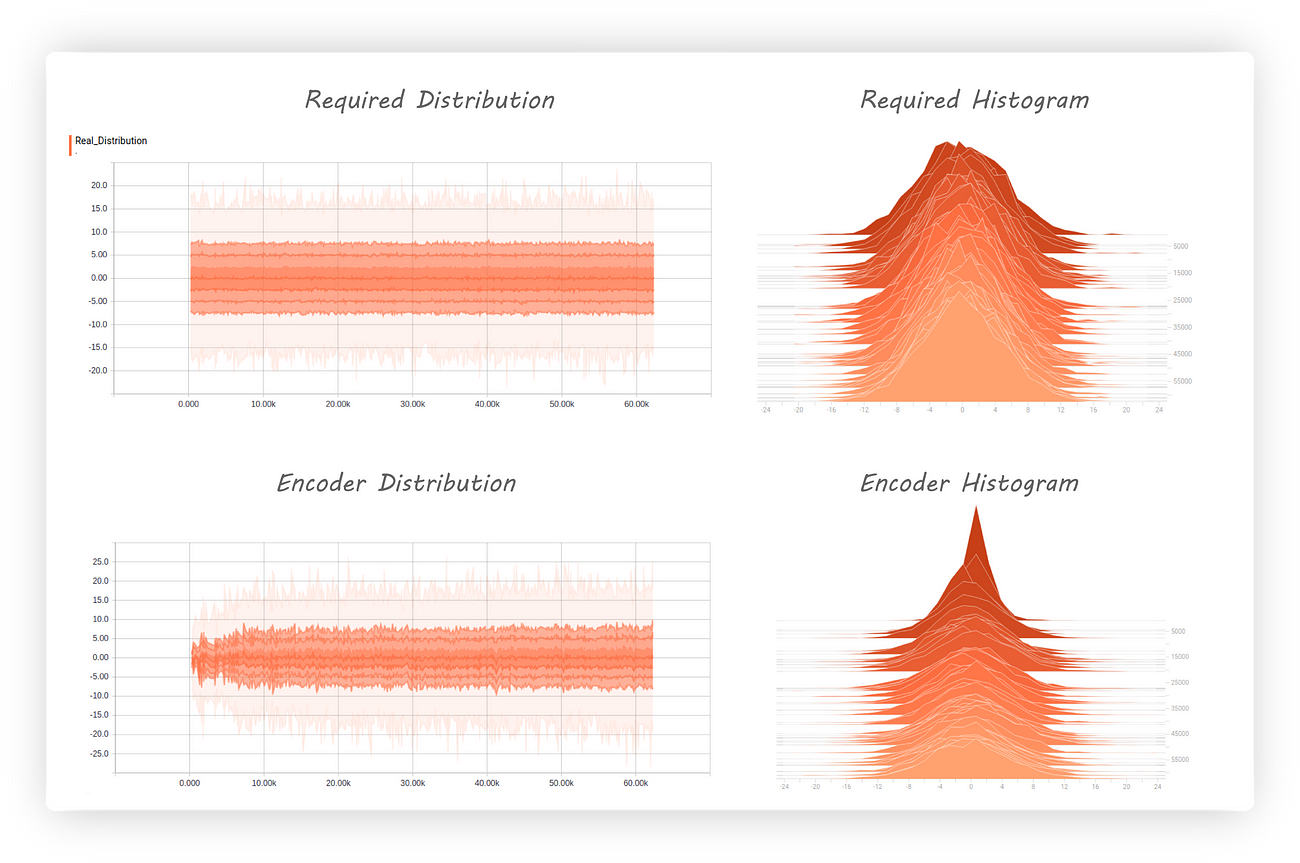
The encoder distribution almost matches the required distribution and the histogram shows us that it’s centred at zero. Great, but what about the discriminator, how well has it fared?
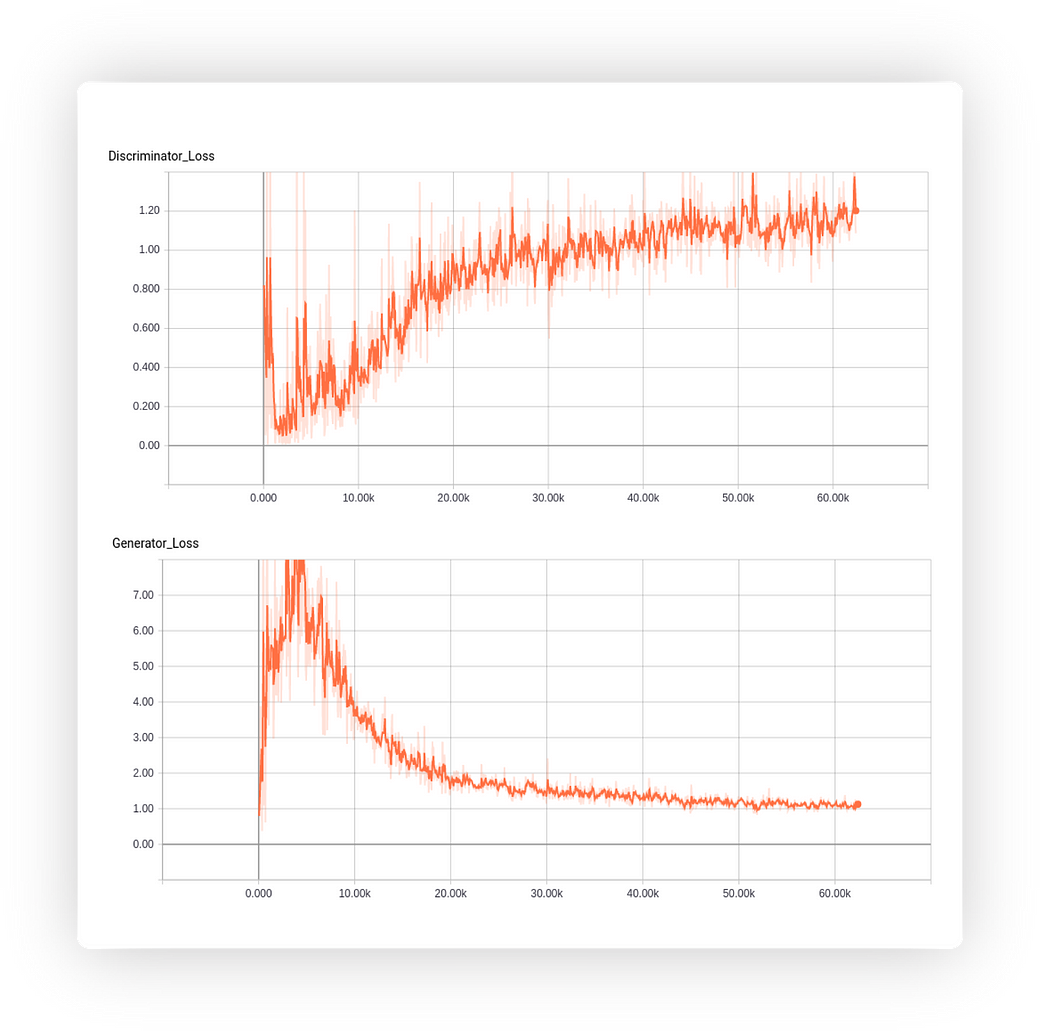
Good news, the discriminator loss is increasing (getting worst) which tells us it’s having a hard time telling apart real and fake inputs.
Lastly, since we have our z_dim=2 (2D values) we can pass in random inputs which fall under the required distribution to our trained decoder and use it as a generator (I know, I was calling encoder as the generator all this while as it was generating fake inputs to the discriminator, but since the decoder has learn’t to map these fake inputs to get digits at its output we can call our decoder as a generator). I’ve passed values from (-10, -10) to (10, 10) at regular intervals to the decoder and stored its outputs here’s how the digits have been distributed:
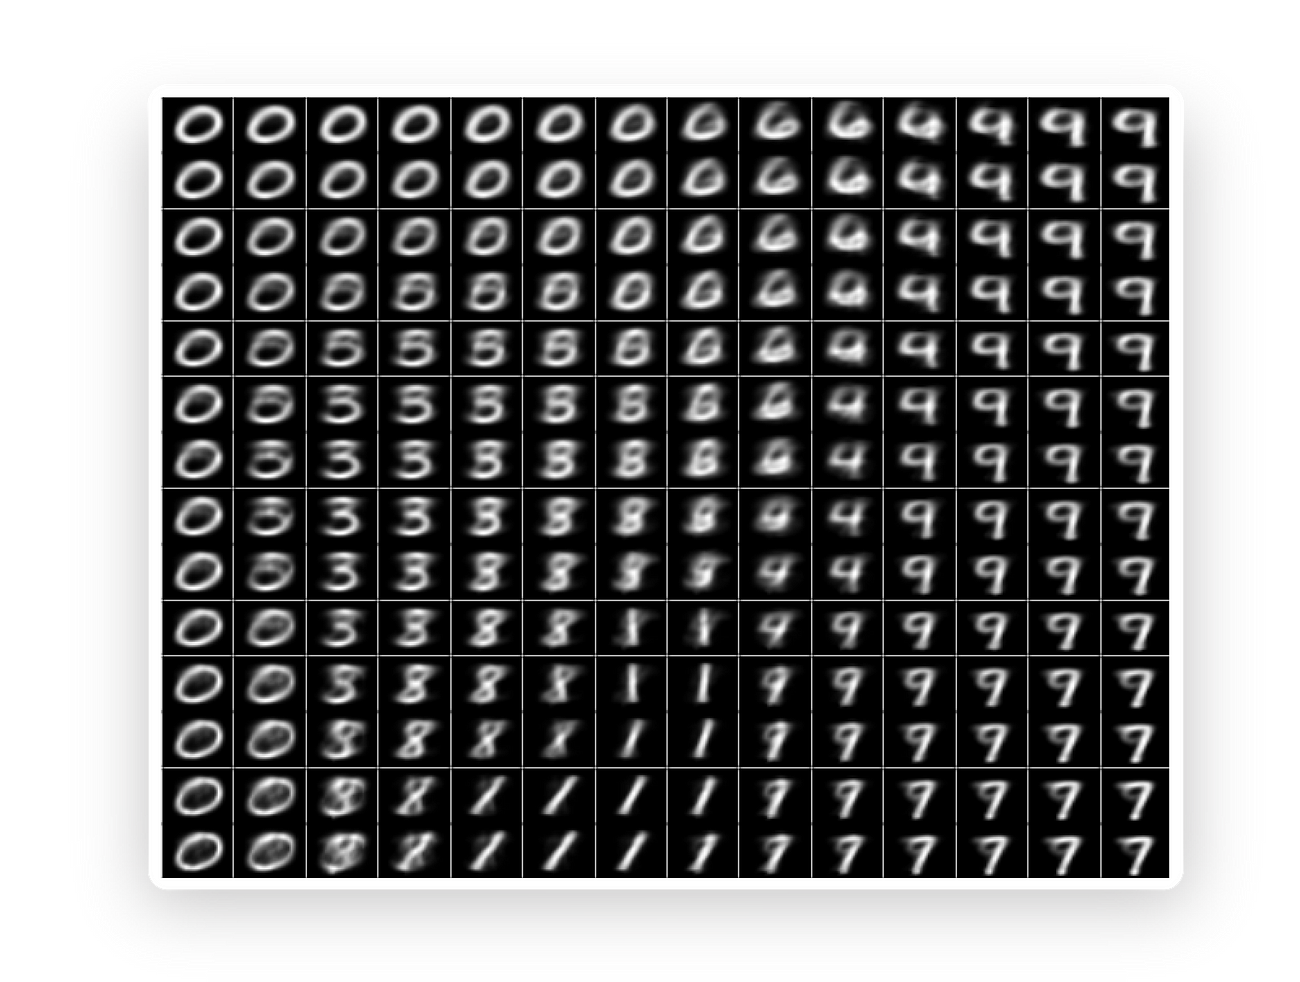
The above figure shows a clear clustering of digits and their transition as we explore values that the decoder is trained at. An AAE has cause the gaps in the encoder output distribution to get closer which allowed us to use the decoder as a generator.
That’s it!. We’ll focus on how we can use AAE to separate image style from it’s content in the next part. It’s quite easy to implement it since we are done most of the relatively tough parts.
Hope you liked this article on AAEs. I would openly encourage any criticism or suggestions to improve my work.
原文地址:https://medium.com/towards-data-science/a-wizards-guide-to-adversarial-autoencoders-part-2-exploring-latent-space-with-adversarial-2d53a6f8a4f9
A wizard’s guide to Adversarial Autoencoders: Part 2, Exploring latent space with Adversarial Autoen相关推荐
- A wizard’s guide to Adversarial Autoencoders: Part 3, Disentanglement of style and content.
"If you've read the previous two parts you'll feel right at home implementing this one." ← ...
- A wizard’s guide to Adversarial Autoencoders: Part 1, Autoencoder?
"If you know how to write a code to classify MNIST digits using Tensorflow, then you are all se ...
- 深度学习(四十六)Adversarial Autoencoders学习笔记
- 系统学习机器学习之弱监督学习(三)--Adversarial Autoencoders
转自:https://blog.csdn.net/hjimce/article/details/54411244
- 读《Adversarial Autoencoders》
2016 (虽然算是比较老的论文了,但是本来一方面我就只是拿来用到一个小环节中,这这里纠结太久了,另一方面也是在paperwithcode上看了一圈的代码,到这终于能运行出来东西了
- 【ECCV2020】接收论文列表part1
ECCV2020将于2020年8月23-28日在线上举行,今年共接受了1361篇论文,本文是接收论列表的第一部分,第二部见链接 Paper ID Paper Title Category 267 Qu ...
- 表情识别综述论文《Deep Facial Expression Recognition: A Survey》中文翻译
本篇博客为论文<Deep Facial Expression Recognition: A Survey>的中文翻译,如有翻译错误请见谅,同时希望您能为我提出改正建议,谢谢! 论文链接:h ...
- 联邦学习本身+机器视觉中深度学习所面临的对抗攻击
目录 联邦学习本身 对抗攻击中的一些术语: 现有攻击方法(实验室) 针对分类阶段 Box-constrained L-BFGS Fast Gradient Sign Method (FGSM) Bas ...
- ECCV2020 收录论文汇总(持续更新中)附打包下载
2020极市计算机视觉开发者榜单已于2020年7月20日开赛,8月31日截止提交,基于火焰识别.电动车头盔识别.后厨老鼠识别.摔倒识别四个赛道,47000+数据集,30万奖励等你挑战!点击这里报名 极 ...
最新文章
- 平衡不完全区组设计 数据分析的SAS实践
- Error querying database.Cause:java.sql.SQLSyntaxErrorException:ORA-00911:invalid character
- [No0000F4]C# 枚举(Enum)
- WordPress同Kyma成功建立连接后,存放在mysql里的Kyma entry
- [html] 能否做到禁止打印页面?如果可以那要怎么做?
- 【牛客 - 283E】贪心只能过样例(模拟)
- python封装c接口_用C为python3.1封装mysql接口(一)
- Springboot整合RabbitMQ,包含direct,topic,fanout三种模式的整合
- Jakarta EE 9 企业版本合规性
- Julia: Beginning deep learning with 500 lines of Julia
- Linux下mysql数据库的自动备份与还原 远程备份和本地备份
- 远程预付费电能监测系统设计与应用
- Unix编程艺术-原则
- plsql 通过 excel 创建表
- 绿色版Mysql数据库快速搭建
- 了解一下银行科技信息岗
- 各行业程序员年薪分析
- UserScript 改变网页颜色
- verilog实现设计3*8译码器
- 看到这类代码,别再说你不认识了!手把手带你认识初阶结构体(结构体类型的声明、初始化、成员访问与传参,全在这篇文章里)
热门文章
- 由 Session 和 Cookie 的区别说起
- 【转】获取命名空间、类名、方法名
- Linux Network Administrators Guide
- webstorm+nodejs+JetBrains IDE Support+chrome打造前端开发神器
- 施密特出售Google股票套现3.27亿美元
- 用服务器控件在后台调用前台客户端JS方法
- mybatis的工作原理
- 论文阅读:Learnable pooling with Context Gating for video classification
- 【笔记】Comparison of Object Detection and Patch-Based Classification Deep Learning Models on Mid- to La
- [云炬创业基础笔记]第六章商业模式测试12
