A wizard’s guide to Adversarial Autoencoders: Part 3, Disentanglement of style and content.
“If you’ve read the previous two parts you’ll feel right at home implementing this one.”
← Part 2: Exploring latent space with Adversarial Autoencoders.
Parts 1 and 2 were mainly concerned with getting started on Autoencoders and Adversarial Autoencoders. We began with a simple AE (vanilla one) made some changes to its architecture and training algorithm to end up with an AAE. This part continues that trend by changing AAE’s architecture along with a small change in the way it’s trained.
I have created all the python files in my repo such that each one required for a part can be obtained from the previous one with some minor modifications. I would recommend you to read the theoretical aspects from this post and try to modify the code from part 2 to implement part 3.
Each and every one of us have our own unique style of writing, be it writing a letter or even a signature. The way in which we write certain characters, words we use often to create sentences, even the amount of pressure one exerts on paper are all characteristics which define a unique handwriting. With all these things coming into play, forging a handwriting can become very difficult and expensive. Let’s try to learn the style of writing from the MNIST dataset and use that to output images which all have the same style. We’ll only focus on the style of writing and not on the way sentences are framed or the thought process a writer goes through.
To get a clear picture of what style and content is, look at the image below:
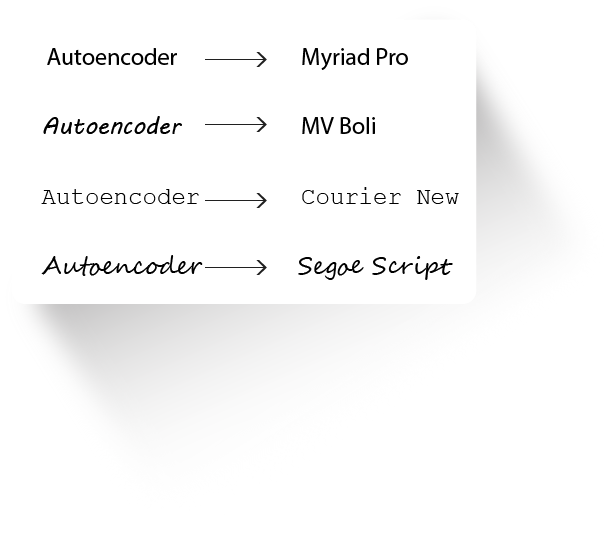
Style and Content
Each of the texts has the same content “ Autoencoder”, but are in different styles. We now have the task of separating the style (Myriad Pro, MV Boil,…) and content from the images.
Disentanglement of various features is very important in representation learning (More on it here).
The Autoencoder and Adversarial Autoencoder we have come across are all trained in an unsupervised manner (there weren’t any labels used during training). Using the label info from an image allows an AAE to focus on learning to extract the style in an image without considering its content. Making use of image labels makes it a supervised model.
The architecture we’ll need to accomplish this is very similar to what we’ve seen in Part 2.
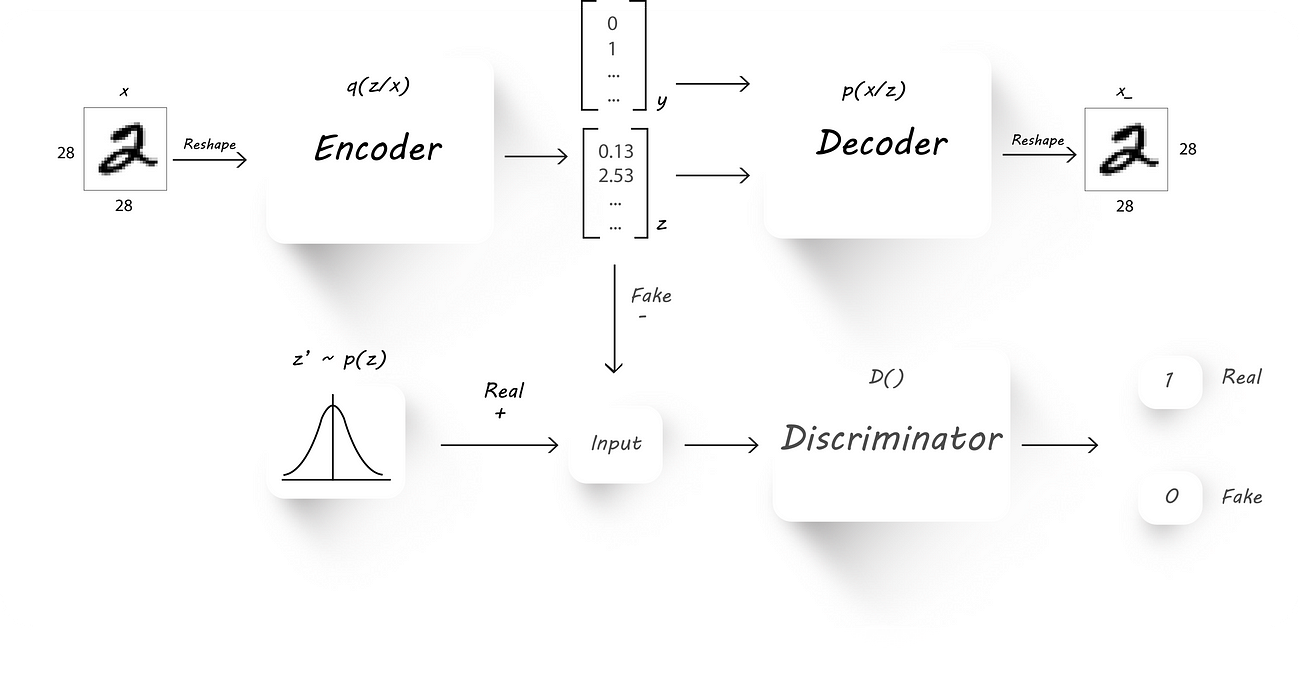
AAE Architecture
Here, instead of directly using the latent code z (output of the encoder) to recover the input image (x) at the decoder, we pass in the image labels (y) as well. Now, the input to the decoder has two parts:
- The latent codezfrom the encoder.
- One hot representation of the image label (let’s call it y).
We train the AAE as usual with a little modification made to the reconstruction phase:
- Reconstruction Phase: We pass in the input image to the encoder to get a latent code z and later, combine the latent code (z, output of the encoder) and the image label (y) to get a bigger column vector, which is then fed to our decoder. We train the AE to minimize the reconstruction loss as usual. Since the image label is being fed to the decoder, the encoder learns the style of an image during training and the decoder uses the content info from the label and the style info from the encoder to reconstruct the input image.
- Regularization Phase: Exactly similar to what we’ve seen in Part 2.
Now, let’s just add the image label to our AAE and check out the results.
Since we need one hot image labels the decoder architecture will have a larger number of input neurons [10 + z_dim] (10 cause we have ten classes and z_dim is the size of the encoder output, for example, z_dim can be 2).
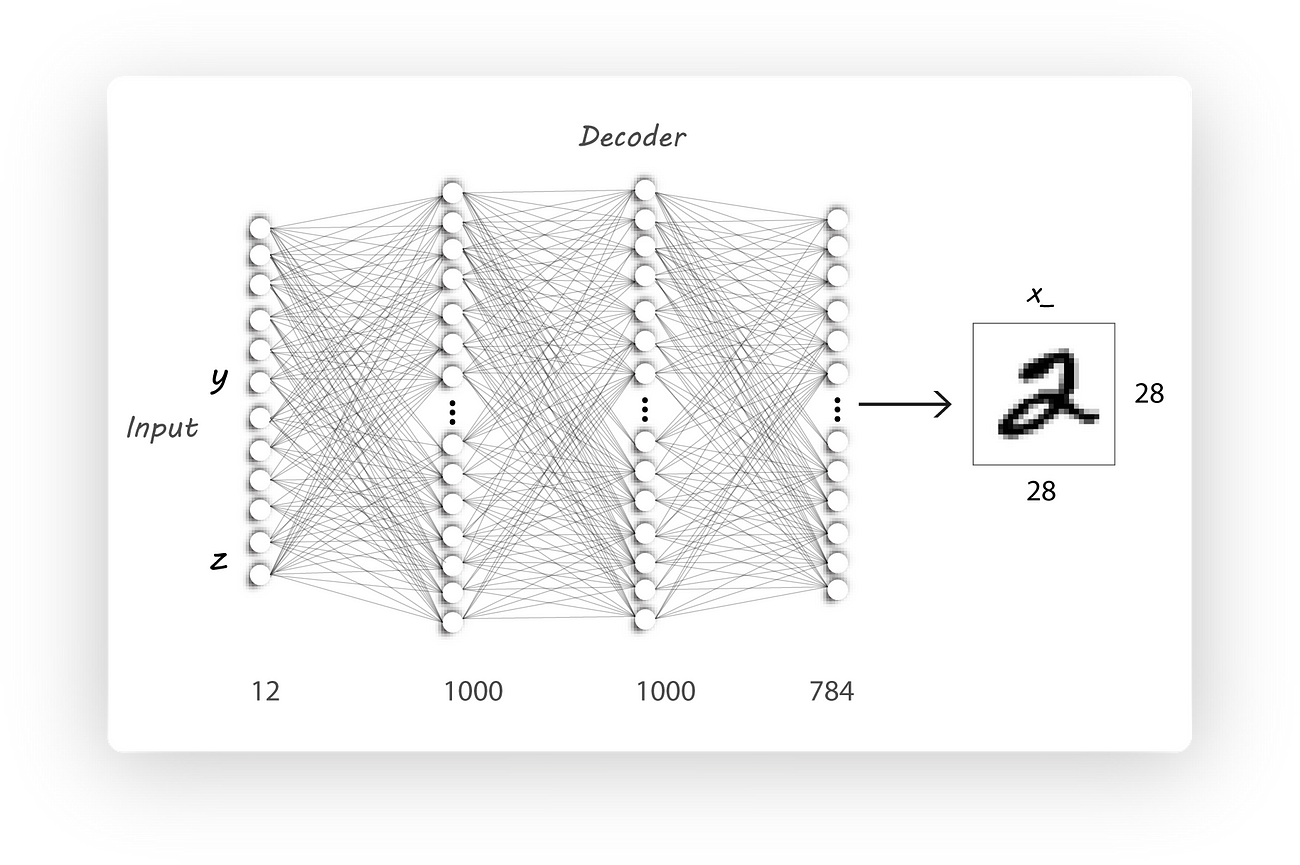
Decoder Architecture
Now would be the time to stop reading and modify the code from part 2. Come back later to have a look at the code and the results.
Modified Decoder architecture:
We’ll also need to feed in the image labels during training which is super easy:
I’ve just replaced _ with batch_y when calling the mnist_train_next_batch() function and used these labels as inputs to the y_input placeholder.
I’ve trained the AE with the following parameters:
Note that I have used z_dim=15 instead of 2 unlike the previous implementations as the result were visually pleasing.
Similar to Part 2, I’ve maintained the standard deviation of the prior Gaussian distribution to be 5.0 and a mean of 0.
To generate images having the same style but with a different character we’ll pass in a random input as z(z_dimis 15 in this case) and change the one hot vector yto the desired value. Here I’ve passed in 10 random values for zand changed yto represent numbers from 0 to 9:
Have a look at generate_image_grid() for it’s implementation.
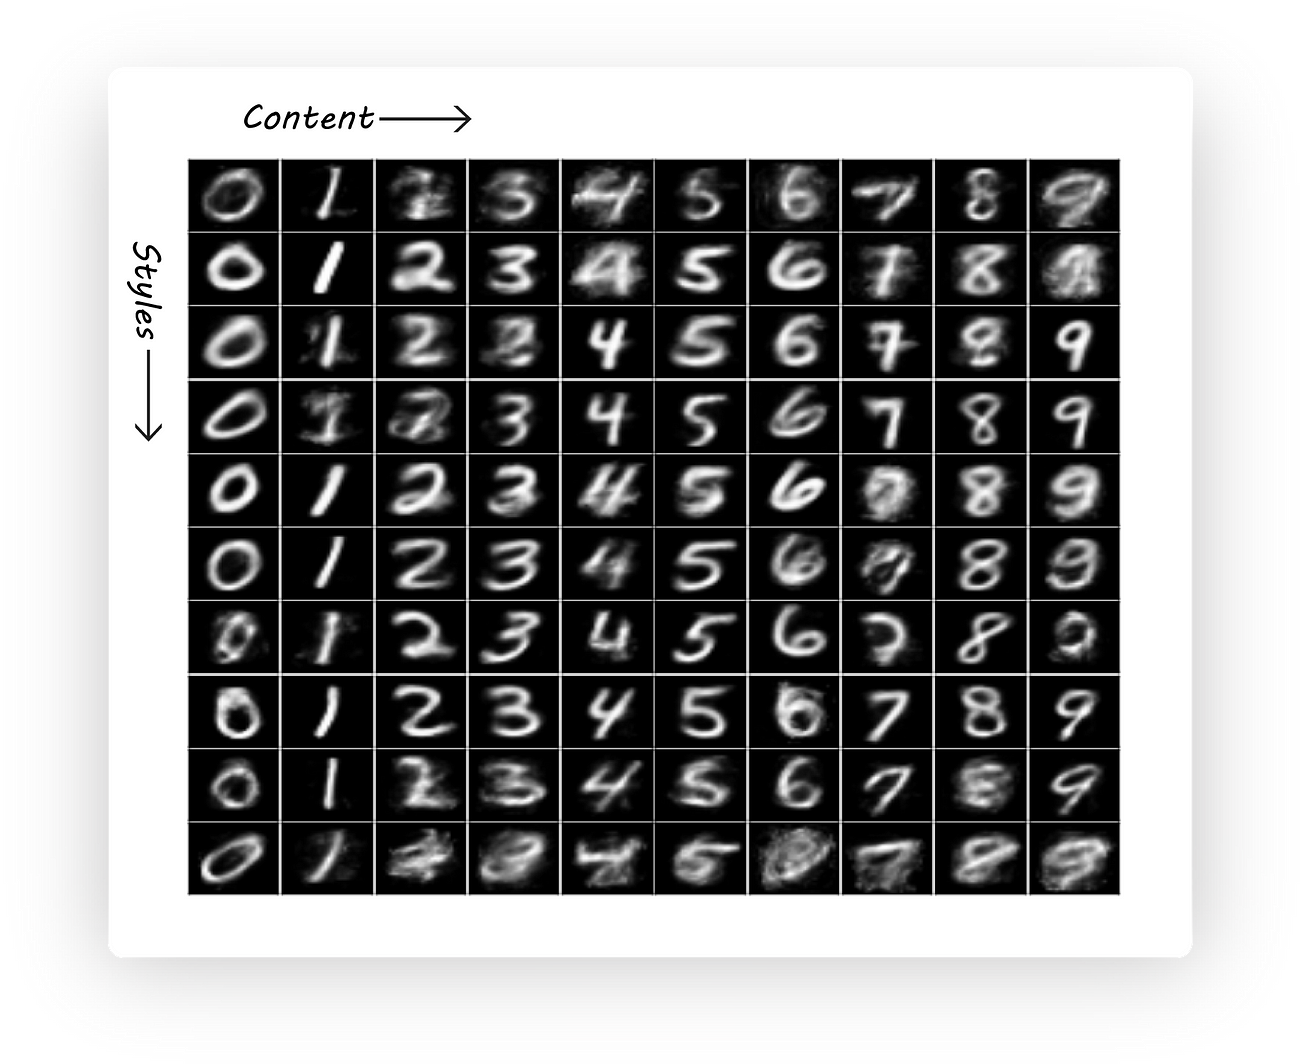
Style and content Disentanglement
As a sanity check let’s have a look at the encoder output distribution to check if it’s still what we want it to be:
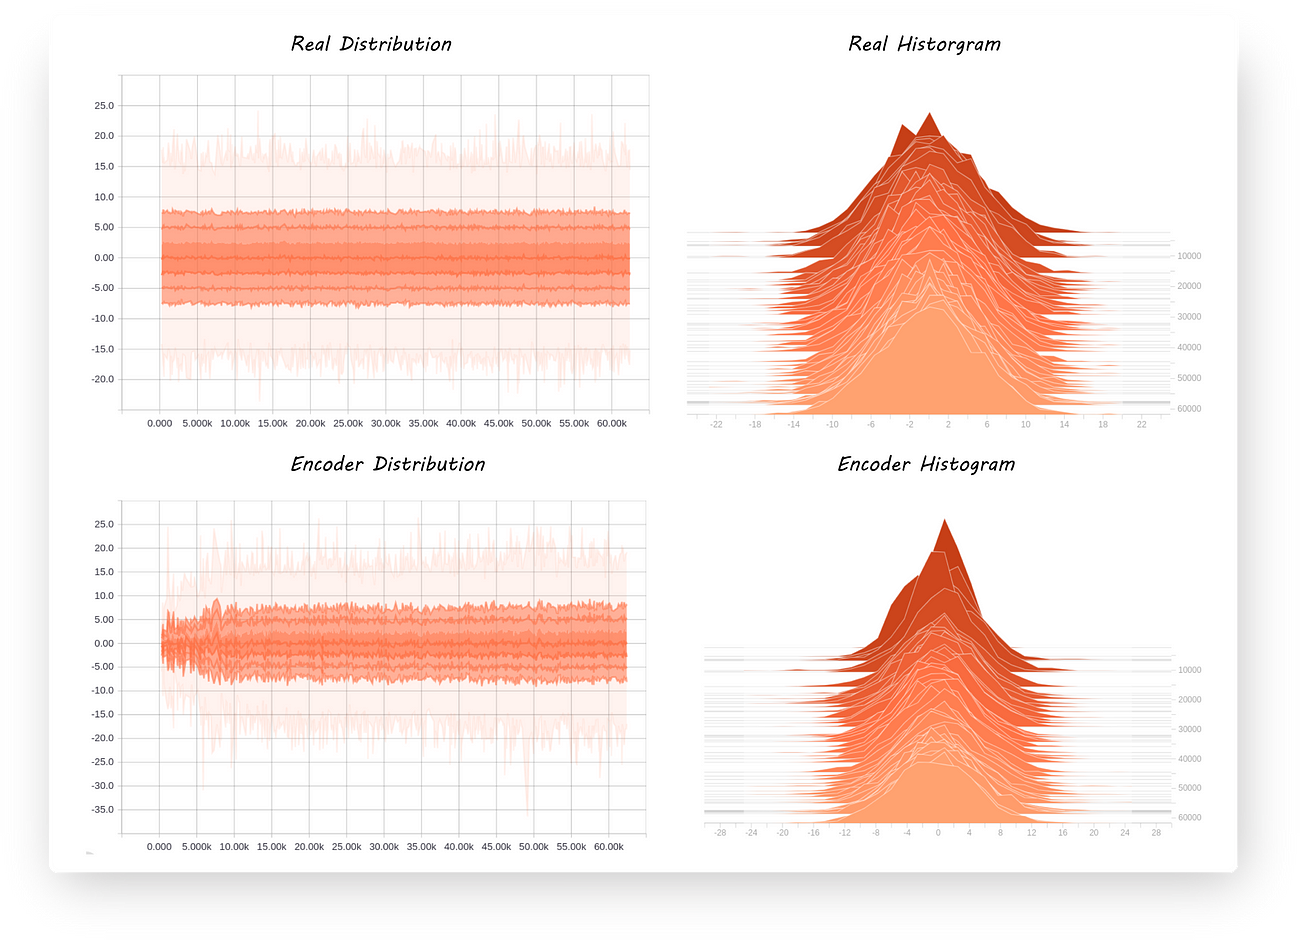
Yup, that completes part 3!
We’ll again build on what we have in this part to classify images using a limited number of labeled ones while still disentangling style and content.
I’ve reduced the reading time for this article just to check if it would affect the read ratio on medium
A wizard’s guide to Adversarial Autoencoders: Part 3, Disentanglement of style and content.相关推荐
- A wizard’s guide to Adversarial Autoencoders: Part 1, Autoencoder?
"If you know how to write a code to classify MNIST digits using Tensorflow, then you are all se ...
- A wizard’s guide to Adversarial Autoencoders: Part 2, Exploring latent space with Adversarial Autoen
"This article is a continuation fromA wizard's guide to Autoencoders: Part 1, if you haven't re ...
- 深度学习(四十六)Adversarial Autoencoders学习笔记
- 系统学习机器学习之弱监督学习(三)--Adversarial Autoencoders
转自:https://blog.csdn.net/hjimce/article/details/54411244
- 读《Adversarial Autoencoders》
2016 (虽然算是比较老的论文了,但是本来一方面我就只是拿来用到一个小环节中,这这里纠结太久了,另一方面也是在paperwithcode上看了一圈的代码,到这终于能运行出来东西了
- 对抗自编码器指南之一:自编码器
如果你知道如何编写Tensorflow代码来对MNIST数字进行分类,那么阅读本文就不会有太多障碍,否则我会强烈建议你先阅读Tensorflow网站上的这篇 文章. 我们不再需要任何重大的新突破就可以 ...
- 53_Auto-Encoders和Variational AutoEncoders(VAE)、PCA降维和Auto-Encoders降维的比较、Auto-Encoders变种、pytorch实现等
1.53.Auto-Encoders和Variational AutoEncoders(VAE) 1.53.1.无监督学习 1.53.2.Auto-Encoders 1.53.3.How to Tra ...
- GAN异常检测论文笔记(一)《GANomaly: Semi-Supervised Anomaly Detection via Adversarial Training》
0 Abstract: 通过使用一个联合学习高维图像空间的生成和潜伏空间的推理的生成对抗性网络,引入了这种新型的异常检测模型.在生成器网络中采用编码器-解码器-编码器子网络,使模型能够将输入图像映射为 ...
- 对抗自编码器(adversarial autoencoder)
目录 前言 实验 1 导入必要库函数并设置随机数等配置 2 加载并可视化MNIST数据 3 模型定义 4 模型训练 5 随机正态分布数据生成MNIST合成数据 参考资料 前言 自编码器,通常由编码器 ...
最新文章
- luogu P2759 奇怪的函数 二分答案+数论
- ViewPager+Fragment懒加载
- python将数字转为0010_用Python将HTML转为PDF。
- 转:c/c++ 运行库
- 关于application title一直是untitled的问题
- dtm文件生成等高线 lisp_南方cass如何用图面高程点生成等高线
- Spring @Import
- MySql的基本操作流程-SAE的MySQL-PHP
- My.Ioc 代码示例——如何使用默认构造参数,以及如何覆盖默认构造参数
- TypeScript:函数进阶
- linux在VM下分辨率的问题
- The Biggest Water Problem【牛客网】
- CnPack20090801更新包
- javascript监听输入框_js与jquery实时监听输入框值的oninput与onpropertychange方法
- 低配置电脑最适合系统—win10企业版2016长期服务版本密钥和激活方法
- RecyclerView 之notifyDataSetChanged的暴躁
- 计算机代码画玫瑰,如何用代码画一朵玫瑰花
- 获取QQ邮箱的授权码
- Office 2003: 使用Excel去除重复数据
- 火狐浏览器打不开淘宝首页的解决办法