从压缩文件将数据导入SQL Server
介绍 (Introduction)
I have seen many organizations receive data from various sources and import into SQL Server. You might receive data in various formats and want to import into SQL Server. We can prepare a ETL (Extract-Transform-Load) process to import data into the SQL Server. In doing so, might receive data in a compressed file, which helps to send data over the network using a ZIP file format because it reduces the file size significantly. If we are receiving a ZIP file to import into SQL Server, we need to unzip it and then only we can import data. We might need to create a ZIP file as well from the existing files.
我已经看到许多组织从各种来源接收数据并将其导入SQL Server。 您可能会收到各种格式的数据,并想导入到SQL Server中。 我们可以准备一个ETL(提取,转换,加载)过程,以将数据导入SQL Server。 这样做可能会接收压缩文件中的数据,这有助于使用ZIP文件格式通过网络发送数据,因为它可以大大减小文件大小。 如果我们接收到要导入到SQL Server的ZIP文件,则需要解压缩该文件,然后才可以导入数据。 我们可能还需要从现有文件中创建一个ZIP文件。
总览 (Overview)
In this article, we will first look out the following tasks
在本文中,我们将首先找出以下任务
- Prepare a compressed file using an SSIS package 使用SSIS包准备压缩文件
- Unzip files using SSIS package 使用SSIS包解压缩文件
- Import data into SQL Server tables using a ZIP file 使用ZIP文件将数据导入SQL Server表
一步步 (Step-by-step)
We have the following excel file, and we want to ZIP the file using the SSIS package.
我们有以下excel文件,并且我们想使用SSIS包对文件进行ZIP处理。
We need to do the following steps to ZIP this file:
我们需要执行以下步骤来压缩该文件:
We need to open Visual Studio 2017 with SQL Server Data Tools to prepare the SSIS package. If we do have it installed, you can go to Install SSDT with Visual Studio 2017 and download required setup files. We need to install SQL Server Integration Services feature during the installation.
我们需要使用SQL Server数据工具打开Visual Studio 2017以准备SSIS包。 如果已安装,则可以转到使用Visual Studio 2017安装SSDT并下载所需的安装文件。 在安装过程中,我们需要安装SQL Server Integration Services功能。
In Visual Studio 2017, go to File -> New -> Project.
在Visual Studio 2017中,转到文件->新建->项目。
It opens the new project wizard. In Business Intelligence templates, click on Integration Services and Integration Service Project.
它打开新的项目向导。 在Business Intelligence模板中,单击Integration Services和Integration Service项目。
As shown in the image above, we can provide the SSIS package name and location to create the SSIS package solution. It creates a solution in the directory.
如上图所示,我们可以提供SSIS包名称和位置来创建SSIS包解决方案。 它在目录中创建一个解决方案。
In the Control Flow, drag Execute Process Task in SSIS configuration.
在“控制流”中,拖动SSIS配置中的“ 执行过程任务” 。
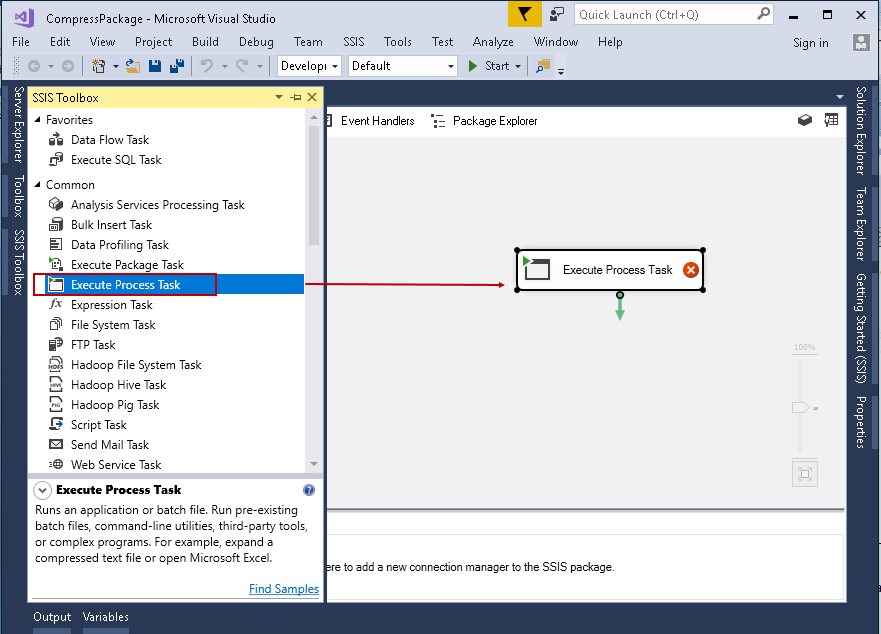
Right click on the Execute Process Task and Rename it to File ZIP Task.
右键单击Execute Process Task并将其重命名为File ZIP Task 。
We can see renamed task in the following image.
我们可以在下图中看到重命名的任务。
It opens the Execute Process Task Editor.
它打开执行流程任务编辑器 。
In this article, we are going to use the open source tool with compression to prepare the compressed files into the .7z extension. It is available with the Windows by default. You can find this utility in C:\Program Files\7-Zip directory.
在本文中,我们将使用带有压缩功能的开源工具将压缩文件准备为.7z扩展名。 Windows默认情况下可用。 您可以在C:\ Program Files \ 7-Zip目录中找到此实用程序。
In the Execute Process Task Editor, click on Process.
在执行流程任务编辑器中 ,单击“ 流程” 。
In the Executable, we need to specify the path for the 7z.exe. You can browse to the directory or paste the complete path here as shown in the following image.
在Executable中 ,我们需要指定7z.exe的路径。 您可以浏览到目录或在此处粘贴完整的路径,如下图所示。
In the Arguments, we need to type following command.
在参数中,我们需要键入以下命令。
a -t7z “C:\sqlshack\Draft articles\Data\Inventory.zip” “C:\sqlshack\Draft articles\Data\Inventory.xlsx”
-t7z“ C:\ sqlshack \ Draft文章\ Data \ Inventory.zip”“ C:\ sqlshack \ Draft文章\ Data \ Inventory.xlsx”
Let me explain these arguments.
让我解释这些论点。
- A – This argument specifies a file to add to the archive A –此参数指定要添加到存档中的文件
- t7z – It specifies the archive type. In this article, we want to create a t7z archive file t7z –它指定档案类型。 在本文中,我们要创建一个t7z存档文件
- Destination zip filename and directory: In the next argument, specify the ZIP file name along with the absolute path that we want to create 目标zip文件名和目录 :在下一个参数中,指定ZIP文件名以及我们要创建的绝对路径
- Source file path and file name: In the last argument, we need to specify the absolute file path for the file we want to ZIP 源文件路径和文件名:在最后一个参数中,我们需要为要ZIP的文件指定绝对文件路径
In the Working directory, we can specify the directory for 7z executable file.
在工作目录中,我们可以指定7z可执行文件的目录。
Click OK, and We can see that File ZIP Task is ready to execute.
点击OK ,我们可以看到File ZIP Task准备执行了。
Press F5 or click on the Start to run this File ZIP Task. It opens a command prompt with the 7z.exe compression utility. You can see the ZIP file progress status as well in this command prompt. You might not notice this command prompt if file size is small.
按F5或单击“ 开始”以运行此File ZIP Task。 它使用7z.exe压缩实用程序打开命令提示符。 您还可以在此命令提示符下查看ZIP文件的进度状态。 如果文件很小,您可能不会注意到此命令提示符。
We can see a green tick icon on File Zip Task once it is successfully executed.
成功执行后,我们可以在File Zip Task上看到一个绿色的勾号图标。
Click on Progress, and you can see progress message of the File ZIP task.
单击进度 ,您可以看到File ZIP任务的进度消息。
Now let us go to the destination path that we specified in argument. In the following image, you can see Inventory.zip file for the excel file. You can notice the size difference as well.
现在,让我们转到在参数中指定的目标路径。 在下图中,您可以看到excel文件的Inventory.zip文件。 您还可以注意到大小差异。
- Microsoft Excel file size: 5,192 KB (Without compression) Microsoft Excel档案大小:5,192 KB(不压缩)
- Compressed files size: 582 KB 压缩文件大小:582 KB
Now let us place two files in the same folder.
现在,让我们将两个文件放在同一文件夹中。
We want to create a ZIP file containing both the files in it. We do not need to create two ZIP task in the SSIS package. Open the File Zip Task in the SSIS package we created earlier. We can specify the below argument. In this argument, we specified the source file paths ‘C:\sqlshack\Draft articles\Data\*.*”‘ . It takes all the files in the source path and zips them into a single file.
我们要创建一个包含两个文件的ZIP文件。 我们不需要在SSIS包中创建两个ZIP任务。 在我们之前创建的SSIS包中打开File Zip Task。 我们可以指定以下参数。 在此参数中,我们指定了源文件路径'C:\ sqlshack \ Draft article \ Data \ *。*”' 。 它获取源路径中的所有文件并将其压缩为一个文件。
a -t7z “C:\sqlshack\Draft articles\Data\CompressDemo.zip” “C:\sqlshack\Draft articles\Data\*.*”
-t7z“ C:\ sqlshack \ Draft文章\ Data \ CompressDemo.zip”“ C:\ sqlshack \ Draft文章\ Data \ *。*”
Now execute the package again. In the command prompt window, we can see it is adding 2 files into an archive.
现在再次执行该程序包。 在命令提示符窗口中,我们可以看到它正在将2个文件添加到存档中。
Let us go to the destination path, and you can see a single compressed file.
让我们转到目标路径,您可以看到一个压缩文件。
For the verification purpose, right click on the compressed ZIP file and extract the file using the option Extract to ‘CompressDemo\’
出于验证目的,右键单击压缩的ZIP文件,然后使用选项“提取到'CompressDemo \'”提取文件
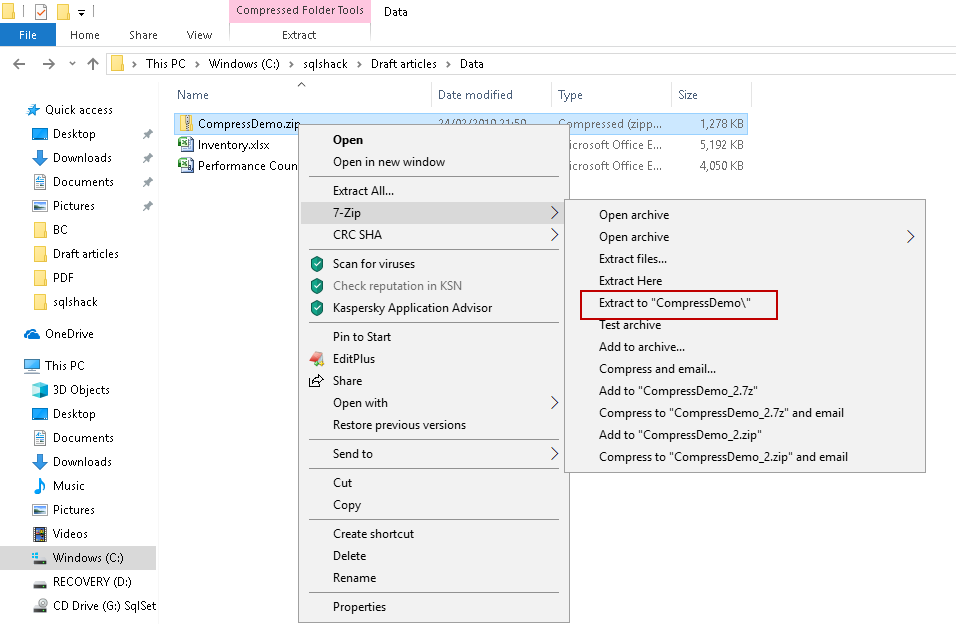
We can see both the files in the extracted file as shown below.
我们可以在提取的文件中看到两个文件,如下所示。
使用SSIS包提取文件 (Extract files using the SSIS Package)
We have explored the process to create a compressed file using a SSIS package. Suppose we received a ZIP file to import into SQL Server table. This ZIP file contains an Excel file. We cannot import data from a ZIP file directly into SQL Server. We need to extract the file first and then import the excel file into SQL Server and extract the files into a different folder using the SSIS package only.
我们已经探索了使用SSIS包创建压缩文件的过程。 假设我们收到一个要导入到SQL Server表中的ZIP文件。 该ZIP文件包含一个Excel文件。 我们无法将数据从ZIP文件直接导入SQL Server。 我们需要先提取文件,然后将excel文件导入SQL Server,然后仅使用SSIS包将文件提取到其他文件夹中。
We have the following ZIP file into our source path.
我们在源路径中包含以下ZIP文件。
Now let us create the SSIS package into two steps.
现在,让我们将SSIS包分为两个步骤。
- Unzip the file 解压缩文件
- Import the file into the SQL Server. 将文件导入到SQL Server。
We can unzip a file using the execute process task. Rename the execute process task as File Unzip Task.
我们可以使用执行过程任务来解压缩文件。 将执行过程任务重命名为“文件解压缩任务”。
Double click on File Unzip Task and in the argument, we need to specify the argument for extract the ZIP file.
双击File Unzip Task ,在参数中,我们需要指定参数以提取ZIP文件。
e “C:\sqlshack\Draft articles\Data\Inventory.zip”
e“ C:\ sqlshack \ Draft文章\ Data \ Inventory.zip”
In this argument, e instructs to extract the files.
在此参数中, e指示提取文件。
It extracts files in the working directory folder. Let us execute this task to see if Unzip is working fine or not. It unzips the files very quickly. You might not notice the extract process since it completes in a fraction of second. It might take longer if the compressed file size is enormous.
它将文件提取到工作目录文件夹中。 让我们执行此任务,以查看解压缩是否正常工作。 它非常快速地解压缩文件。 您可能不会注意到提取过程,因为它仅需一秒钟即可完成。 如果压缩文件很大,则可能需要更长的时间。
In the Visual Studio, we can see that File Unzip task is also completed successfully.
在Visual Studio中,我们可以看到文件解压缩任务也已成功完成。
Let go to the working directory folder, and as per the following screenshot, we can see the extracted file is present here.
让我们转到工作目录文件夹,然后按照以下屏幕截图,我们可以看到此处存在提取的文件。
将压缩文件数据导入SQL Server (Import compressed file data into SQL Server)
We want to load data from ZIP file into SQL Server table, therefore, add a Data Flow Task and connect it with the File Unzip Task.
我们想将ZIP文件中的数据加载到SQL Server表中,因此,添加一个Data Flow Task ,并将其与File Unzip Task连接。
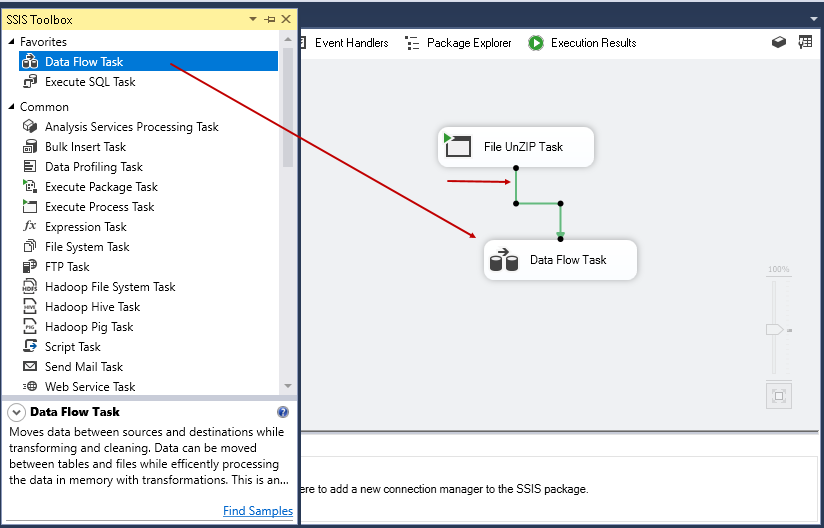
Rename Data Flow Task to Import Excel into SQL Server.
重命名数据流任务以将Excel导入SQL Server 。
Double click on the Import Excel into SQL Server. It opens data flow page in which we need to define the source and destination connections.
双击将Excel导入SQL Server。 它会打开数据流页面,我们需要在其中定义源连接和目标连接。
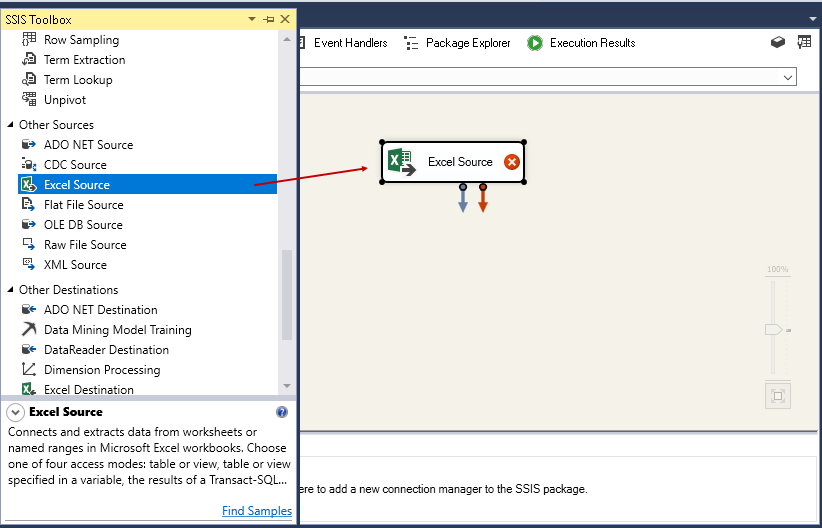
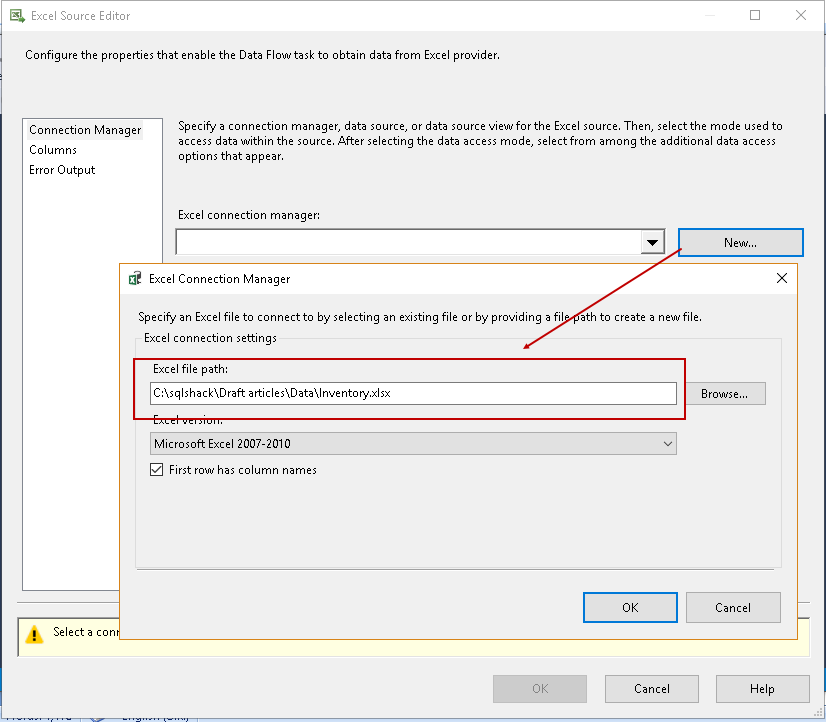
In the Excel Source, specify the excel file path. This path should be the working directory in Unzip File Task.
在Excel Source中,指定excel文件路径。 该路径应该是“ 解压缩文件任务”中的工作目录。
Click Ok and specify the sheet name.
单击确定,然后指定工作表名称。
We can view these columns from the right side menu option Columns.
我们可以从右侧菜单选项“ 列”中查看这些列。
Click Ok, and we can see Excel source in the following image.
单击确定 ,我们可以在下图中看到Excel源。
Now add an OLE DB destination and connect it to the Excel Source.
现在添加一个OLE DB目标并将其连接到Excel Source。
We need to configure the OLE DB Destination now. Double click on this destination and we need to specify the OLE DB connection manager. If we do not have the existing connection, click on New and specify the destination connection manager.
我们需要立即配置OLE DB目标。 双击此目标,我们需要指定OLE DB连接管理器。 如果我们没有现有的连接,请单击“ 新建”并指定目标连接管理器。
If we have a table already present, we can select table from the drop-down list. If destination table does not exist, click on New in front of Name of the table or the view. It automatically shows script to create the destination table with valid data types.
如果已经有一个表,则可以从下拉列表中选择表。 如果目标表不存在,请单击表或视图名称前面的“ 新建” 。 它会自动显示脚本以创建具有有效数据类型的目标表。
Specify table name as per the requirement.
根据要求指定表名称。
Click OK, and we can see that table as highlighted in the following screenshot.
点击OK ,我们可以在下面的屏幕截图中看到该表。
Now click on Mappings to do the mapping between source and destination. It automatically creates mapping; however, we can change mapping if required.
现在单击“ 映射”以在源和目标之间进行映射。 它会自动创建映射; 但是,如果需要,我们可以更改映射。
Click OK, and we can see the configured data flow task.
点击OK ,我们可以看到配置好的数据流任务。
Save the package and verify that the source folder contains the ZIP file.
保存该软件包,并验证源文件夹中包含ZIP文件。
We can see the below configured to Control Flow task.
我们可以看到以下配置为“控制流”任务。
Let us execute this package now. We can track each task status in Visual Studio.
现在让我们执行该程序包。 我们可以在Visual Studio中跟踪每个任务状态。
We can see that FileUnZip Task is completed successfully. We can verify this from the working directory. We have the unzipped file as shown in the following image.
我们可以看到FileUnZip Task已成功完成。 我们可以从工作目录中对此进行验证。 我们具有解压缩的文件,如下图所示。
We can see that the package is executed successfully.
我们可以看到该程序包已成功执行。
Let us go to the SQL Server table in which we imported data from a compressed excel file.
让我们转到SQL Server表,从压缩的Excel文件中导入数据。
SELECT count(*) as NumberofRecords
FROM [FileStreamDemoDB_test].[dbo].[DemoDatafromZip]
In the following screenshot, we can see that the number of records is 1046801. It shows that we have successfully imported data using the compressed excel file into the SQL Server table.
在下面的屏幕快照中,我们可以看到记录数为1046801。这表明我们已经使用压缩的excel文件成功将数据导入了SQL Server表。
结论 (Conclusion)
In this article, we explored the way to import data from a compressed file into SQL Server tables. It provides us with flexibility, avoids manual task for unzipping the file, and then imports it. In the next article, we will explore the use of Python for importing ZIP file data into SQL Server.
在本文中,我们探讨了将数据从压缩文件导入SQL Server表的方法。 它为我们提供了灵活性,避免了手动解压缩文件然后导入的任务。 在下一篇文章中,我们将探讨如何使用Python将ZIP文件数据导入SQL Server。
目录 (Table of contents)
| Using Python SQL scripts for Importing Data from Compressed files |
| Importing Data into SQL Server from Compressed Files |
| 使用Python SQL脚本从压缩文件中导入数据 |
| 从压缩文件将数据导入SQL Server |
翻译自: https://www.sqlshack.com/importing-data-into-sql-server-from-compressed-files/
从压缩文件将数据导入SQL Server相关推荐
- 使用SSIS包将多个Excel文件中的数据导入SQL Server表中
This article explores an SSIS package for importing multiple Excel files data into SQL Server tables ...
- 将Excel数据导入SQL Server数据库
遇到了一个需求,需要将Excel中的数据导入SQL Server数据库中,当然,不是使用企业管理器之类的直接导入数据的那种,而是要做到程序中.本来我最初的考虑是将Excel中的数据读到dataset中 ...
- python怎么导入sql数据库,##使用python将excel表中数据导入sql server数据库
如何用python将excel数据导入到postgresql数据库中 把excel表格另存为csv文件 python将exce文件含有多个sheet同时l导入sqlserver数据库 需要使用xlrd ...
- net以execl做数据库_C#.NET Excel文件数据导入SQL Server数据库完整代码
展开全部 在日常的项目中,Excel,Word,txt等格式的数62616964757a686964616fe58685e5aeb931333337626235据导入到数据库中是很常见 这里将分为.n ...
- 极限挑战—C#100万条数据导入SQL SERVER数据库仅用4秒 (附源码)
实际工作中有时候需要把大量数据导入数据库,然后用于各种程序计算,本实验将使用5中方法完成这个过程,并详细记录各种方法所耗费的时间. 本实验中所用到工具为VS2008和SQL SERVER 2000.S ...
- odata数据绑定_如何使用用于SQL Server集成服务的OData源将数据导入SQL Server数据库
odata数据绑定 介绍 ( Introduction ) A few days back I was looking at ways to access raw data from within M ...
- 不用代码快速将Excel的数据导入SQL Server数据库中
主要通过SQL Server的导入功能 直接写流程 1.首先获取一份符合格式的Excel表(能导入数据库Excel的格式是97-2003) 字段名就是你要导入数据库表的字段名(导入后这个表只作为临时表 ...
- BULK INSERT如何将大量数据高效地导入SQL Server
转载自:http://database.51cto.com/art/201108/282631.htm BULK INSERT如何将大量数据高效地导入SQL Server 本文我们详细介绍了BULK ...
- BULK INSERT如何将大量数据高效地导入SQL Server(转)
在实际的工作需要中,我们有时候需将大量的数据导入到数据库中.这时候我们不得不考虑的就是效率问题.本文我们就介绍了一种将大量数据高效地导入SQL Server数据库的方法,该方法是使用BULK INSE ...
最新文章
- SubVersion(SVN) 服务器Windows安装指南
- 太厉害了!目前 Redis 可视化工具最全的横向评测
- linux之用户态和内核态
- java 枚举类 enum
- python分子化学模拟_python简单实现gillespie模拟
- 关于Nand ECC 错误
- [Swagger2]配置Swagger
- python3123_使用sox和python,基于时间戳列表对音频区域进行静音处理
- c++ 转bcd码_8421BCD码转换为十进制
- Android p Sign Tool
- XP共享拒绝访问,全面解决
- apache在线升级yum_linux yum安装apache
- Python 十六进制数与ascii码的转换
- pythondjango网页制作_python+django加载静态网页模板解析
- 2021年复盘总结发现了C站博主缺少的赚钱之路
- Python 根据出生日期判断星座
- 网站流量分析的整体思路(大数据)
- *item_search_similar - 搜索相似的商品**
- 电脑基础:键盘F1~F12你会用吗?天天都看到,但会用的真没几个!
- jdon(jdong)
热门文章
- xwpython aui 子窗口-Python/wxPython:AUI管理器,防止面板离开Fram
- anaconda moviepy_002从零开始学Python—Anaconda下载与安装
- webdriver高级应用- 操作日期控件
- ugui用户定义操作按键
- Easyui在form表单提交的时候,如果有datebox报 Uncaught SyntaxError: Unexpected token 的解决...
- python模块之logging
- sql server分布式事务解决方案
- LeetCode(999)——车的可用捕获量(JavaScript)
- JWT(JSON Web Token)的基本原理
- 【Vue】—解构插槽 Prop以及具名插槽的缩写