CUDA入门3.2——使用CUDA实现鱼眼转全景图(CUDA环节)1227更
算法
算法借鉴了Converting a fisheye image into a panoramic, spherical or perspective projection,核心内容如下:
Software: fish2sphere
Usage: fish2sphere [options] tgafile
Options
-w n sets the output image size, default: 4 fisheye image width
-a n sets antialiasing level, default: 2
-s n fisheye aperture (degrees), default: 180
-c x y fisheye center, default: center of image
-r n fisheye radius, default: half the fisheye image width
-x n tilt camera, default: 0
-y n roll camera, default: 0
-z n pan camera, default: 0
-b n n longitude range for blending, default: no blending
-o n create a textured mesh as OBJ model, three types: 0,1,2
-d debug mode
Updates July/August 2016
Added export of textured hemisphere as OBJ file.
Added variable order of rotations, occur in the order they appear in the command line.
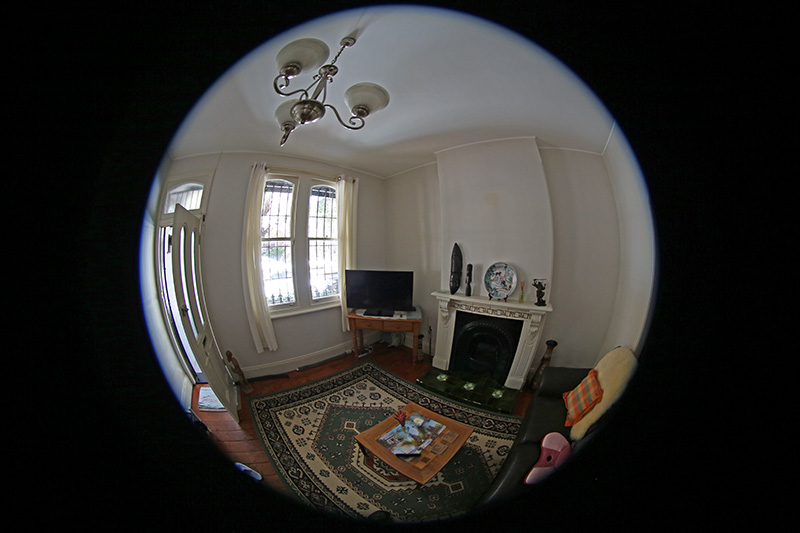
Source fisheye image.
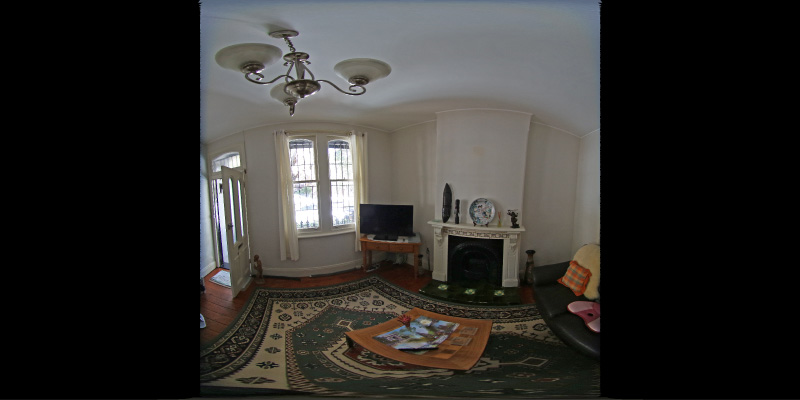
Transformation using the default settings. Since a 180 degree (in this case) fisheye captures half the visible universe from a single position, so it makes sense that it occupies half of a spherical (equirectangular) projection, which captures the entire visible universe from a single position.
In this case the camera is not perfectly horizontal, this and other adjustments can be made. In the example here the lens was pointing downwards slightly, the correction results in more of the south pole being visible and less of the north pole.
Note that the fisheye angle is not limited to 180 degrees, indeed one application for this is in the pipeline to create 360 spherical panoramas from 2 cameras, each with a fisheye lens with a field of view greater than 180 to provide a blend zone.
This can be readily implemented in the OpenGL Shader Language, the following example was created in the Quartz Composer Core Image Filter.
// Fisheye to spherical conversion
// Assumes the fisheye image is square, centered, and the circle fills the image.
// Output (spherical) image should have 2:1 aspect.
// Strange (but helpful) that atan() == atan2(), normally they are different.kernel vec4 fish2sphere(sampler src)
{vec2 pfish;float theta,phi,r;vec3 psph;float FOV = 3.141592654; // FOV of the fisheye, eg: 180 degreesfloat width = samplerSize(src).x;float height = samplerSize(src).y;// Polar anglestheta = 2.0 * 3.14159265 * (destCoord().x / width - 0.5); // -pi to piphi = 3.14159265 * (destCoord().y / height - 0.5);  // -pi/2 to pi/2// Vector in 3D spacepsph.x = cos(phi) * sin(theta);psph.y = cos(phi) * cos(theta);psph.z = sin(phi);// Calculate fisheye angle and radiustheta = atan(psph.z,psph.x);phi = atan(sqrt(psph.x*psph.x+psph.z*psph.z),psph.y);r = width * phi / FOV; // Pixel in fisheye spacepfish.x = 0.5 * width + r * cos(theta);pfish.y = 0.5 * width + r * sin(theta);return sample(src, pfish);
}
The transformation can be performed in realtime using warp mesh files for software such as warpplayer or the VLC equivalent VLCwarp. A sample mesh file is given here: fish2sph.data. Showing the result in action is below.
文中算法的数学意义是将全景图(Equirectangular投影)中的像素转换成角度,然后依据角度转换成一个完美半球上的坐标点,再将这个坐标点转换成鱼眼画面中的某个像素,至此实现鱼眼画面转全景图的目的。

在使用的时候需要注意上文算法所使用的是左手坐标系,在实际使用的时候可能需要转换。
CUDA实现
1 第一个并行代码——实现两张图叠加
看似简单的图片叠加实际上会牵扯到线程并行,块并行,显存/内存拷贝,内存溢出等问题。
首先在头文件中添加 CI_RESULT overlyTwoImg(Mat &img1 , Mat &img2)接口:
#include <stdio.h>
#include "include_openCV\opencv2\opencv.hpp"using namespace cv;typedef enum {CI_OK,CI_ERROR
}CI_RESULT;class input_engine {
public:CI_RESULT initCUDA();CI_RESULT overlyTwoImg(Mat &img1 , Mat &img2);
private:char* err_str;
};
#endif // !_CUDA_H_
然后在CUDA文件中写具体实现,关键代码如下:
__global__ void overlyImg(uchar* a, uchar* b, const int width , const int height) {int x = threadIdx.x + blockIdx.x*blockDim.x;int y = threadIdx.y + blockIdx.y*blockDim.y;if ((x >= width) || (y >= height)) { return; }int t = (int)(a[(x + y*width) * 3 + 0] + b[(x + y*width) * 3 + 0]);(t > 255) ? (a[(x + y*width) * 3 + 0] = 0xff) : (a[(x + y*width) * 3 + 0] += b[(x + y*width) * 3 + 0]);t = (int)(a[(x + y*width) * 3 + 1] + b[(x + y*width) * 3 + 1]);(t > 255) ? (a[(x + y*width) * 3 + 1] = 0xff) : (a[(x + y*width) * 3 + 1] += b[(x + y*width) * 3 + 1]);t = (int)(a[(x + y*width) * 3 + 2] + b[(x + y*width) * 3 + 2]);(t > 255) ? (a[(x + y*width) * 3 + 2] = 0xff) : (a[(x + y*width) * 3 + 2] += b[(x + y*width) * 3 + 2]);}CI_RESULT input_engine::overlyTwoImg(Mat& img1, Mat& img2) {//定义数据uchar *img1data = NULL;uchar *img2data = NULL;cudaError_t cudaStatus;//检查第一块显卡是否可用cudaStatus = cudaSetDevice(0);if (cudaStatus != cudaSuccess) {fprintf(stderr, "cudaSetDevice failed!  Do you have a CUDA-capable GPU installed?");goto Error;}//分配显存cudaStatus = cudaMalloc((void**)&img1data, img1.cols*img1.rows * 3 * sizeof(uchar));if (cudaStatus != cudaSuccess) {fprintf(stderr, "img1data cudaMalloc failed! ");goto Error;}cudaStatus = cudaMalloc((void**)&img2data, img2.cols*img2.rows * 3 * sizeof(uchar));if (cudaStatus != cudaSuccess) {fprintf(stderr, "img2data cudaMalloc failed! ");goto Error;}cudaStatus = cudaMemcpy(img1data, img1.data, img1.cols*img1.rows * 3 * sizeof(uchar), cudaMemcpyHostToDevice);if (cudaStatus != cudaSuccess) {fprintf(stderr, "img1data cudaMemcpy failed! ");goto Error;}cudaStatus = cudaMemcpy(img2data, img2.data, img2.cols*img2.rows * 3 * sizeof(uchar), cudaMemcpyHostToDevice);if (cudaStatus != cudaSuccess) {fprintf(stderr, "img2data cudaMemcpy failed! ");goto Error;}//分配并行运算dim3 thread_nbr(32, 32);dim3 block_nbr(img1.cols / thread_nbr.x + 1, img1.rows / thread_nbr.y + 1);overlyImg << <block_nbr, thread_nbr >> > (img1data,img2data,img1.cols,img1.rows);//拷贝数据至内存cudaStatus = cudaMemcpy(img1.data, img1data, img1.cols * img1.rows * 3 * sizeof(uchar), cudaMemcpyDeviceToHost);if (cudaStatus != cudaSuccess) {fprintf(stderr, "cudaMemcpy failed! ");goto Error;}Error:cudaFree(img1data);cudaFree(img2data);return CI_OK;
}
1.1 _ global__ void overlyImg()
在CUDA中有三种函数前缀:device,global,host,device是定义代码只能在GPU中执行,global是可由CPU和GPU共同执行,host是只能由CPU执行。这里的代码是由CPU传参后交给GPU处理,所以得用global前缀。前缀的具体内容可见:cuda 函数前缀:device/global/host 相关问题 。
1.2 CUDA常规处理流程
定义数据->分配显存空间(cudaMalloc)->将数据拷贝至显存(cudaMemcpy->cudaMemcpyHostToDevice)->分配并行运算(dim3,block,thread)->将数据拷贝到内存(cudaMemcpy->cudaMemcpyDeviceToHost)这里学习了CUDA从入门到精通里面的方法。cudaError_t挺好用的。
1.3 thread分配限制
thread的分配限制最大是1024,得慎用,具体情况具体分析。
1.4 并行运算的逻辑
这里有两块代码分别是:
//分配并行运算dim3 thread_nbr(32, 32);dim3 block_nbr(img1.cols / thread_nbr.x + 1, img1.rows / thread_nbr.y + 1);overlyImg << <block_nbr, thread_nbr >> > (img1data,img2data,img1.cols,img1.rows);这部分代码先是定义了32x32的thread矩阵,可以想象成将图片以32*32个像素为一个子切片处理。然后block做的事情就是定义了这个图片有多少个子切片(也是NxM的矩阵)。这样处理的结果就是将一张图切割成多块来并行处理。关于block和thread可以查看GPU CUDA编程中threadIdx, blockIdx, blockDim, gridDim之间的区别与联系 和CUDA笔记2:概念理解。
block_nbr中需要对img1.cols / thread_nbr.x的结果+1,是为了防止边界溢出。
__global__ void overlyImg(uchar* a, uchar* b, const int width , const int height) {int x = threadIdx.x + blockIdx.x*blockDim.x;int y = threadIdx.y + blockIdx.y*blockDim.y;if ((x >= width) || (y >= height)) { return; }这部分代码的效果就是你得到了某一个像素的所在位置(x,y)。这里加了一个判断是为了防止溢出。
1.5 图像叠加算法
由于图像是8位的jpg格式,有三个通道,并且由OpenCV的Mat接口得到图像数据,那得到的图像数据实际上是BGRBGRBGRBGR……..排列的uchar类型数据(我也纳闷为什么是BGR),那每一个像素所对应的数就有三个。
__global__ void overlyImg(uchar* a, uchar* b, const int width , const int height) {int x = threadIdx.x + blockIdx.x*blockDim.x;int y = threadIdx.y + blockIdx.y*blockDim.y;if ((x >= width) || (y >= height)) { return; }a[x*3 + y*width*3 + 0] += b[x*3 + y*width*3 + 0] ;a[x*3 + y*width*3 + 1] += b[x*3 + y*width*3 + 1] ;a[x*3 + y*width*3 + 2] += b[x*3 + y*width*3 + 2] ;}a[x*3 + y*width*3 + 0]的目的是对当前的uchar数据做处理,+0则是B通道数据,+1是G通道数据。以上代码是最初的写法,得到的结果如下图:

看起来像地理伪色图,明显是错的,而且深究为什么如此就很有意思了。
uchar类型的值是0–255( 0–0xFF ),如果让两张图的当前uchar相加,则会容易导致内存溢出,从而影响上一段uchar数据,比如:

有一个像素,BGR三通道二进制值如图,如果这时候给R通道的uchar加上2,我们原希望的结果是R通道变成1111 1111,其他通道不变,实际上则整个像素会变成

因此我写了另一种算法
if (b[(x + y*width) * 3 + 0] >= (0xff - a[(x + y*width) * 3 + 0])) {a[(x + y*width) * 3 + 0] = 0xff;}else{a[(x + y*width) * 3 + 0] += b[(x + y*width) * 3 + 0];}if (b[(x + y*width) * 3 + 1] >= (0xff - a[(x + y*width) * 3 + 1])) {a[(x + y*width) * 3 + 1] = 0xff;}else{a[(x + y*width) * 3 + 1] += b[(x + y*width) * 3 + 1];}if (b[(x + y*width) * 3 + 2] >= (0xff - a[(x + y*width) * 3 + 2])) {a[(x + y*width) * 3 + 2] = 0xff;}else{a[(x + y*width) * 3 + 2] += b[(x + y*width) * 3 + 2];}运行后结果是预期的,但代码太丑了。最后改成现在的方法:通过一个int类型接uchar数据然后判断。感谢公司大牛帮忙。
int t = (int)(a[(x + y*width) * 3 + 0] + b[(x + y*width) * 3 + 0]);(t > 255) ? (a[(x + y*width) * 3 + 0] = 0xff) : (a[(x + y*width) * 3 + 0] += b[(x + y*width) * 3 + 0]);t = (int)(a[(x + y*width) * 3 + 1] + b[(x + y*width) * 3 + 1]);(t > 255) ? (a[(x + y*width) * 3 + 1] = 0xff) : (a[(x + y*width) * 3 + 1] += b[(x + y*width) * 3 + 1]);t = (int)(a[(x + y*width) * 3 + 2] + b[(x + y*width) * 3 + 2]);(t > 255) ? (a[(x + y*width) * 3 + 2] = 0xff) : (a[(x + y*width) * 3 + 2] += b[(x + y*width) * 3 + 2]);结果如图

补充的入口代码
int main() {
input_engine cudainput;
Mat img1 = imread(“img1.jpg”);
imshow(“img1”, img1);
Mat img2 = imread(“img2.jpg”);
imshow(“img2”, img2);
cudainput.overlyTwoImg(img1, img2);
imshow(“outImg”, img1);
waitKey(0);
destroyWindow(“outImg”);
START:
if (‘q’ != _getch()) {
goto START;
}
return 0;
}
12.27更新
现在用CUDA实现上述公式。
添加头文件
CI_RESULT fisheye2panorama(Mat iImg,Mat& oImg);我希望用一张inputImage和一张outImage来做这件事情。
添加CUDA实现
__global__ void cuda_convertImage(uchar* cuIBuffer,int iwidth, int iheight, uchar* cuOBuffer,int owidth , int oheight) {int x = threadIdx.x + blockIdx.x*blockDim.x;int y = threadIdx.y + blockIdx.y*blockDim.y;if ((x >= owidth) || (y >= oheight)) { return; }//计算Equirectangular投影模型上每个顶点的角度theta和phifloat theta = IHC_PI*(float(x) / float(owidth) - 0.5f);float phi = IHC_PI*(float(y) / float(oheight) - 0.5f);//计算三维空间坐标float x3d = sin(theta)*cos(phi);float y3d = sin(phi);float z3d = cos(theta)*cos(phi); //计算鱼眼角度float itheta = atan2f(y3d, x3d);float iphi = atan2f(sqrtf(x3d*x3d + y3d*y3d),z3d);//计算半径float FOV = IHC_PI; //FOV = 180float radius = (float)iwidth * iphi / FOV;//鱼眼空间的像素坐标float ix = radius*cos(itheta) + (float)iwidth *0.5f;float iy = radius*sin(itheta) + (float)iwidth *0.5f;cuOBuffer[x * 3 + y*owidth * 3 + 0] = cuIBuffer[(int)ix * 3 + (int)iy*iwidth * 3 + 0];cuOBuffer[x * 3 + y*owidth * 3 + 1] = cuIBuffer[(int)ix * 3 + (int)iy*iwidth * 3 + 1];cuOBuffer[x * 3 + y*owidth * 3 + 2] = cuIBuffer[(int)ix * 3 + (int)iy*iwidth * 3 + 2];}这是GPU处理环节,用了上文提出的算法。等你复制完运行成功后应该就能发现这个算法的问题。具体后面再说。
CI_RESULT input_engine::fisheye2panorama(Mat iImg, Mat& oImg) {int iwidth, iheight, owidth, oheight;iwidth = iImg.cols;iheight = iImg.rows;owidth = oImg.cols;oheight = oImg.rows;uchar* indata;uchar* outdata;cudaError_t cudaStatus;//分配显存空间cudaStatus = cudaMalloc((void**)&indata, iwidth*iheight * 3 * sizeof(uchar));cudaStatus = cudaMalloc((void**)&outdata, owidth*oheight * 3 * sizeof(uchar));//拷贝数据至分配的显存cudaStatus = cudaMemcpy(indata, iImg.data, iwidth*iheight * 3 * sizeof(uchar),cudaMemcpyHostToDevice);cudaStatus = cudaMemcpy(outdata, oImg.data, owidth*oheight * 3 * sizeof(uchar), cudaMemcpyHostToDevice);//设置并行参数dim3 thread(32, 32);dim3 block(owidth / 32 + 1, oheight / 32 + 1);cuda_convertImage<<<block,thread>>>(indata, iwidth, iheight, outdata, owidth, oheight);//将处理完的数据拷贝到内存cudaStatus = cudaMemcpy(oImg.data, outdata, owidth*oheight * 3 * sizeof(uchar), cudaMemcpyDeviceToHost);//清除临时数据以防显存溢出cudaFree(indata);cudaFree(outdata);return CI_OK;}这里只要记住CUDA编程的核心逻辑:
分配显存空间->拷贝数据至分配的显存->设置并行参数并计算->将处理完的数据拷贝到内存->清除临时数据
缺少任何一步都可能导致异常。
添加入口
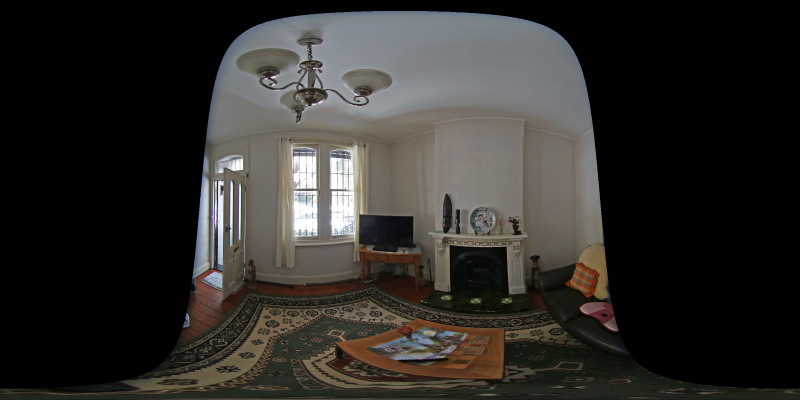
input_engine cudainput;cudainput.initCUDA();printf_usage();opencv_hander opencvhander;Mat imgdata;opencvhander.GetImgData(imgdata);imshow("imgdata", imgdata);waitKey();Mat outImage = Mat::zeros(1024, 1024, CV_8UC3);cudainput.fisheye2panorama(imgdata, outImage);imshow("outImage", outImage);waitKey();我定义了一张1024*1024的输出图像outImage。
运行后查看结果:

算法存在的问题
上述算法虽然可以得到看似正确的结果,而且还可以改变鱼眼镜头的FOV。但它假设了一个完美情况:
1,鱼眼画面是标准半球
2,鱼眼画面完美的包含在一个正方形贴图上
3,鱼眼画面的中心点在贴图的正中心
实际上,除了数学有可能存在完美,其他都不能。比如鱼眼画面,实际情况很可能是这样:

还有更奇怪的

在实际使用中要考虑相机畸变矫正,畸变校正的方法有很多,需要注意的是如果百度鱼眼畸变矫正,很可能得到的结果很可能是无效的,坑后续会提。
至此,用CUDA做鱼眼畸变的热身完毕。
CUDA入门3.2——使用CUDA实现鱼眼转全景图(CUDA环节)1227更相关推荐
- CUDA入门需要知道的东西
CUDA刚学习不久,做毕业要用,也没时间研究太多的东西,我的博客里有一些我自己看过的东西,不敢保证都特别有用,但是至少对刚入门的朋友或多或少希望对大家有一点帮助吧,若果你是大牛请指针不对的地方,如果你 ...
- cuda入门——改良第一个 CUDA程序
cuda入门--改良第一个 CUDA程序 在上篇中,我们做了一个计算一大堆数字的平方和的程序.不过,我们也提到这个程序的执行效率并不理想.当然,实际上来说,如果只是要做计算平方和的动作,用 CPU 做 ...
- 最全与最好的——CUDA入门教程
开篇一张图,后面听我编 1. 知识准备 1.1 中央处理器(CPU) 中央处理器(CPU,Central Processing Unit)是一块超大规模的集成电路,是一台计算机的运算核心(Core)和 ...
- 中文领域最详细的Python版CUDA入门教程
本系列为英伟达GPU入门介绍的第二篇,主要介绍CUDA编程的基本流程和核心概念,并使用Python Numba编写GPU并行程序.为了更好地理解GPU的硬件架构,建议读者先阅读我的第一篇文章. GPU ...
- 风辰的CUDA入门系列教程
风辰的CUDA入门系列教程 1. CUDA简介 GPU是图形处理单元(Graphic Processing Unit)的简称,最初主要用于图形渲染.自九十年代开始,GPU的发展产生了较大的变化,NVI ...
- CPU和GPU及CUDA入门基础概念
CPU与GPU 1 CPU与GPU的关系:smile: 1.1 CPU与GPU各自特点 2 一些零碎的CUDA入门知识:blush: 2.1 函数修饰符 2.2 线程.线程快.线程格 2.3 什么是核 ...
- cuda入门——记录
学习目标: cuda入门学习 记录一下看到的比较好的文章(个人记录用) 学习内容: 一些比较好的文章链接 例如: Cuda入门 Cuda入门 CUDA实现矩阵加法 CUDA实现矩阵加法 [CUDA编程 ...
- 入门必看 | 如何高效实现矩阵乘?万文长字带你CUDA入门
作者 | 张译 编辑 | 机器之心 点击下方卡片,关注"自动驾驶之心"公众号 ADAS巨卷干货,即可获取 点击进入→自动驾驶之心[模型部署]技术交流群 后台回复[CUDA]获取C ...
- CUDA系列学习(一)An Introduction to GPU and CUDA
本文从软硬件层面讲一下CUDA的结构,应用,逻辑和接口.分为以下章节: (一).GPU与CPU (二).CUDA硬件层面 (三).CUDA安装 (四).CUDA 结构与接口 4.1 Kernels 4 ...
- pytorch测试报错:RuntimeError: cuda runtime error (10) : invalid device ordinal at torch/csrc/cuda/Module
模型在服务器多gpu上训练,测试在自己台式机上进行,只有一块gpu,测试报错: File "/home/fuxueping/sdb/PycharmProjects/face_recognit ...
最新文章
- php 图片地址用变量,php使用ob_start()实现图片存入变量的方法
- 广东发展银行系统分析师面试问题
- [转载]什么是 Design Hackathon?
- the train of thought of collaborative filtering matrix factarization
- 你有多温柔,就有多强大
- IPMI从驱动到应用(下篇 )
- 【CCCC】L2-027 名人堂与代金券 (25分),模拟水题
- 如何在验证集加噪声_图像去噪:如何去其糟粕,取其精华?
- 新闻发布系统,我学会了什么?
- 《华为交换机学习指南》学习笔记·二
- 计算机网络延展-令牌环网
- 电脑爱好者 2008年第24期 12月下
- 记账时,如何对开销进行分类
- 武汉工程大学matlab,Lorenz系统动力学行为的MATLAB仿真与分析[1]
- HTML从入门到入土 - CSS基础
- 仿uniapp - 时间轴组件
- 计算机文化基础课程实验,计算机文化基础课程实验.doc
- 10_OpenCV读取原始raw(raw10和raw8),转换成rgb和灰度图,并显示
- 【计算机毕业设计】437物流管理系统设计与实现
- 京东商品详情页前端开发宝典


