Linux系统备份工具 REAR (RELAX-AND-RECOVER)
LINUX系统备份工具 REAR
HTTP://RELAX-AND-RECOVER.ORG/DOWNLOAD/
HTTPS://ACCESS.REDHAT.COM/DOCUMENTATION/EN-US/RED_HAT_ENTERPRISE_LINUX/7/HTML/SYSTEM_ADMINISTRATORS_GUIDE/CH-RELAX-AND-RECOVER_REAR
CHAPTER 28. RELAX-AND-RECOVER (REAR)
- booting a rescue system on the new hardware
- replicating the original storage layout
- restoring user and system files
rear recovercommand, which starts the recovery process. During this process, ReaR replicates the partition layout and filesystems, prompts for restoring user and system files from the backup created by backup software, and finally installs the boot loader. By default, the rescue system created by ReaR only restores the storage layout and the boot loader, but not the actual user and system files.
28.1. Basic ReaR Usage
28.1.1. Installing ReaR
~]# yum install rear genisoimage syslinux28.1.2. Configuring ReaR
/etc/rear/local.conf file. Specify the rescue system configuration by adding these lines:
OUTPUT=output format
OUTPUT_URL=output location
ISO for an ISO disk image or USB for a bootable USB.
file:///mnt/rescue_system/ for a local filesystem directory orsftp://backup:password@192.168.0.0/ for an SFTP directory.
Example 28.1. Configuring Rescue System Format and Location
/mnt/rescue_system/ directory, add these lines to the /etc/rear/local.conf file:
OUTPUT=ISO
OUTPUT_URL=file:///mnt/rescue_system/
ISO-specific Configuration
/var/lib/rear/output/-rear's default output location/mnt/rescue_system/HOSTNAME/rear-localhost.iso- output location specified inOUTPUT_URL
/etc/rear/local.conf:
OUTPUT=ISO
BACKUP=NETFS
OUTPUT_URL=null
BACKUP_URL="iso:///backup"
ISO_DIR="output location"
28.1.3. Creating a Rescue System
~]# rear -v mkrescue
Relax-and-Recover 1.17.2 / Git
Using log file: /var/log/rear/rear-rhel7.log
mkdir: created directory '/var/lib/rear/output'
Creating disk layout
Creating root filesystem layout
TIP: To login as root via ssh you need to set up /root/.ssh/authorized_keys or SSH_ROOT_PASSWORD in your configuration file
Copying files and directories
Copying binaries and libraries
Copying kernel modules
Creating initramfs
Making ISO image
Wrote ISO image: /var/lib/rear/output/rear-rhel7.iso (124M)
Copying resulting files to file location
/mnt/rescue_system/. Because the system's host name is rhel7, the backup location now contains directory rhel7/ with the rescue system and auxiliary files:
~]# ls -lh /mnt/rescue_system/rhel7/
total 124M
-rw-------. 1 root root  202 Jun 10 15:27 README
-rw-------. 1 root root 166K Jun 10 15:27 rear.log
-rw-------. 1 root root 124M Jun 10 15:27 rear-rhel7.iso
-rw-------. 1 root root  274 Jun 10 15:27 VERSION
28.1.4. Scheduling ReaR
/etc/crontab file:
minute hour day_of_month month day_of_week root /usr/sbin/rear mkrescue
Example 28.2. Scheduling ReaR
/etc/crontab file:
0 22 * * 1-5 root /usr/sbin/rear mkrescue
28.1.5. Performing a System Rescue
- Boot the rescue system on the new hardware. For example, burn the ISO image to a DVD and boot from the DVD.
- In the console interface, select the "Recover" option:

Figure 28.1. Rescue system: menu
- You are taken to the prompt:
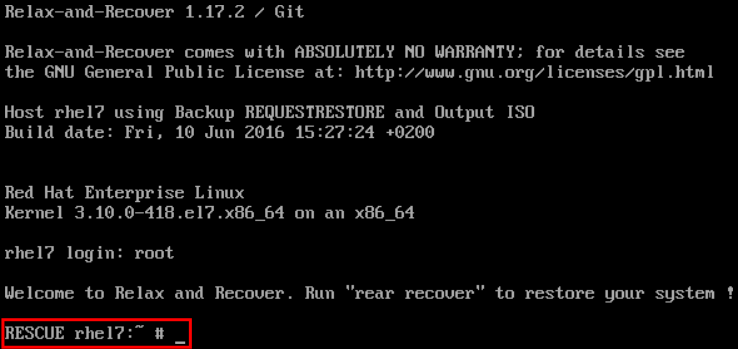
Figure 28.2. Rescue system: prompt
Warning
Once you have started recovery in the next step, it probably cannot be undone and you may lose anything stored on the physical disks of the system.- Run the
rear recovercommand to perform the restore or migration. The rescue system then recreates the partition layout and filesystems: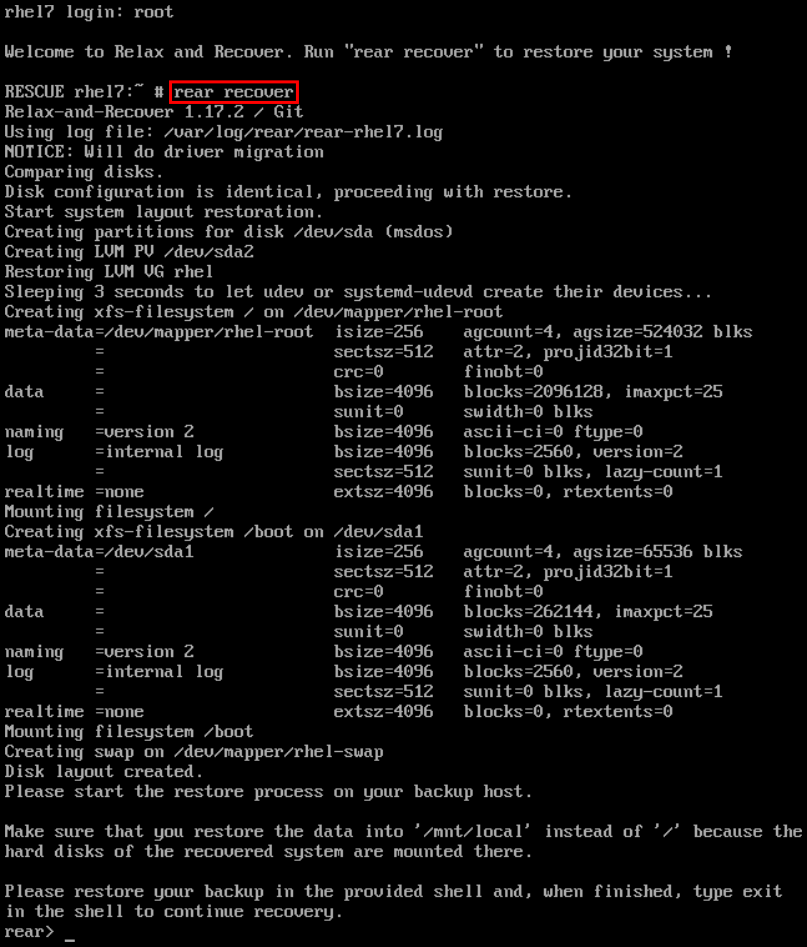
Figure 28.3. Rescue system: running "rear recover"
- Restore user and system files from the backup into the
/mnt/local/directory.Example 28.3. Restoring User and System Files
In this example, the backup file is a tar archive created per instructions inSection 28.2.1.1, “Configuring the Internal Backup Method”. First, copy the archive from its storage, then unpack the files into/mnt/local/, then delete the archive:~]#
scp root@192.168.122.7:/srv/backup/rhel7/backup.tar.gz /mnt/local/~]#tar xf /mnt/local/backup.tar.gz -C /mnt/local/~]#rm -f /mnt/local/backup.tar.gzThe new storage has to have enough space both for the archive and the extracted files. - Verify that the files have been restored:
~]#
ls /mnt/local/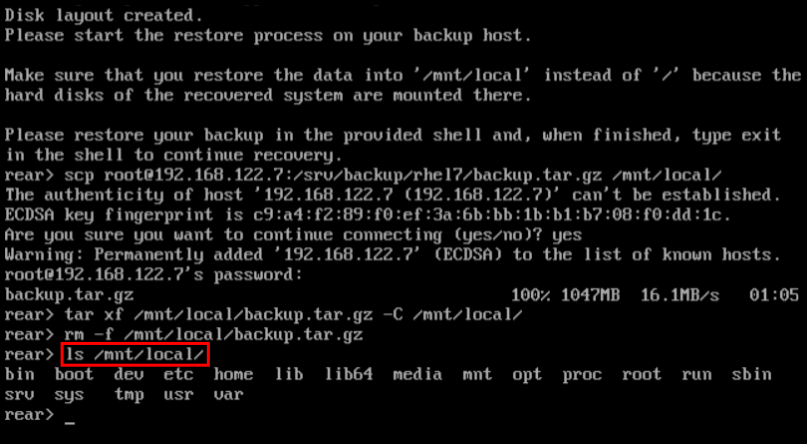
Figure 28.4. Rescue system: restoring user and system files from the backup
- Ensure that SELinux relabels the files on the next boot:
~]#
touch /mnt/local/.autorelabelOtherwise you may be unable to log in the system, because the/etc/passwdfile may have the incorrect SELinux context. - Finish the recovery by entering
exit. ReaR will then reinstall the boot loader. After that, reboot the system: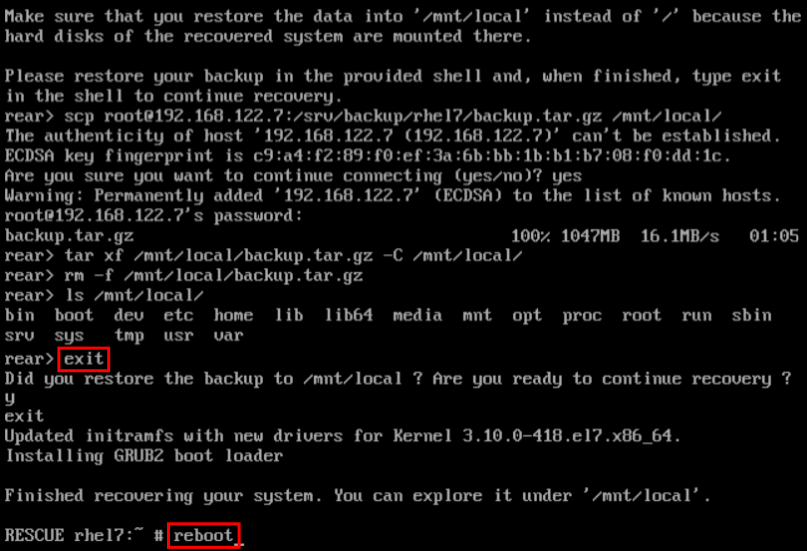
Figure 28.5. Rescue system: finishing recovery
Upon reboot, SELinux will relabel the whole filesystem. Then you will be able to log in to the recovered system.
====================================================================================================
28.2. INTEGRATING REAR WITH BACKUP SOFTWARE
28.2.1. The Built-in Backup Method
- a rescue system and a full-system backup can be created using a single
rear mkbackupcommand - the rescue system restores files from the backup automatically
28.2.1.1. Configuring the Internal Backup Method
/etc/rear/local.conf:
BACKUP=NETFS
BACKUP_URL=backup location
tar command. Substitute backup location with one of the options from the "Backup Software Integration" section of the rear(8) man page. Make sure that the backup location has enough space.
Example 28.4. Adding tar Backups
/srv/backup/ directory:
OUTPUT=ISO
OUTPUT_URL=file:///mnt/rescue_system/
BACKUP=NETFS
BACKUP_URL=file:///srv/backup/
- To keep old backup archives when new ones are created, add this line:
NETFS_KEEP_OLD_BACKUP_COPY=y
- By default, ReaR creates a full backup on each run. To make the backups incremental, meaning that only the changed files are backed up on each run, add this line:
BACKUP_TYPE=incremental
This automatically setsNETFS_KEEP_OLD_BACKUP_COPYtoy. - To ensure that a full backup is done regularly in addition to incremental backups, add this line:
FULLBACKUPDAY="Day"
Substitute "Day" with one of the "Mon", "Tue", "Wed", "Thu". "Fri", "Sat", "Sun". - ReaR can also include both the rescue system and the backup in the ISO image. To achieve this, set the
BACKUP_URLdirective toiso:///backup/:BACKUP_URL=iso:///backup/
This is the simplest method of full-system backup, because the rescue system does not need the user to fetch the backup during recovery. However, it needs more storage. Also, single-ISO backups cannot be incremental.Example 28.5. Configuring Single-ISO Rescue System and Backups
This configuration creates a rescue system and a backup file as a single ISO image and puts it into the/srv/backup/directory:OUTPUT=ISO OUTPUT_URL=file:///srv/backup/ BACKUP=NETFS BACKUP_URL=iso:///backup/
Note
The ISO image might be large in this scenario. Therefore, Red Hat recommends creating only one ISO image, not two. For details, see the section called “ISO-specific Configuration”. - To use
rsyncinstead oftar, add this line:BACKUP_PROG=rsync
Note that incremental backups are only supported when usingtar.
28.2.1.2. Creating a Backup Using the Internal Backup Method
BACKUP=NETFS set, ReaR can create either a rescue system, a backup file, or both.
- To create a rescue system only, run:
rear mkrescue
- To create a backup only, run:
rear mkbackuponly
- To create a rescue system and a backup, run:
rear mkbackup
Note
BACKUP=NETFS setting expects the backup to be present before executing rear recover. Hence, once the rescue system boots, copy the backup file into the directory specified inBACKUP_URL, unless using a single ISO image. Only then runrear recover.
~]# rear checklayout
~]# echo $?
Important
rear checklayout command does not check whether a rescue system is currently present in the output location, and can return 0 even if it is not there. So it does not guarantee that a rescue system is available, only that the layout has not changed since the last rescue system has been created.
Example 28.6. Using rear checklayout
~]# rear checklayout || rear mkrescue28.2.2. Supported Backup Methods
28.2.3. Unsupported Backup Methods
- The rescue system prompts the user to manually restore the files. This scenario is the one described in "Basic ReaR Usage", except for the backup file format, which may take a different form than a tar archive.
- ReaR executes the custom commands provided by the user. To configure this, set the
BACKUPdirective toEXTERNAL. Then specify the commands to be run during backing up and restoration using theEXTERNAL_BACKUPandEXTERNAL_RESTOREdirectives. Optionally, also specify theEXTERNAL_IGNORE_ERRORSandEXTERNAL_CHECKdirectives. See/usr/share/rear/conf/default.conffor an example configuration.
28.2.4. Creating Multiple Backups
BACKUP=NETFS(internal method)BACKUP=BORG(external method)
-C option of the rearcommand. The argument is a basename of the additional backup configuration file in the /etc/rear/ directory. The method, destination, and the options for each specific backup are defined in the specific configuration file, not in the main configuration file.
Procedure 28.1. Basic recovery of the system
- Create the ReaR recovery system ISO image together with a backup of the files of the basic system:
~]#
rear -C basic_system mkbackup - Back the files up in the
/homedirectories:~]#
rear -C home_backup mkbackuponly
/boot, /root, and/usr.
Procedure 28.2. Recovery of the system in the rear recovery shell
~]#
rear -C basic_system recover~]#
rear -C home_backup restoreonly
Linux系统备份工具 REAR (RELAX-AND-RECOVER)相关推荐
- linux备份软件rear,linux系统 备份与还原
linux 系统备份与还原 备份系统: 1. 成为 root 用户: su root 2. 进入根目录: cd / 3. 用tar命令打包压缩: tar cvpjf 压缩包名.tar.bz2 --ex ...
- linux硬盘对拷 再生龙,再生龙恢复linux系统备份教程
教程1 再生龙备份恢复 说明:准备两个u盘,一个做再生龙的启动盘,一个做存储镜像文件的盘 1. 下载再生龙 2. 下载工具tuxboot制作u启 (1) https://sourceforge.net ...
- Linux备份检查工具,6种优化Linux系统备份的应用与技巧
原标题:6种优化Linux系统备份的应用与技巧 当转为使用Linux时,你可能会注意到你所使用的版本会带有一个默认的备份工具.然而,可能该工具并没有被设置好去备份你系统中所有重要的部分.而且,使用该默 ...
- 利用系统工具进行服务器备份,服务器系统备份工具
服务器系统备份工具 内容精选 换一换 GPU加速型p2(physical.p2.large规格)裸金属服务器创建成功后,需安装NVIDIA GPU驱动和CUDA工具包,从而实现计算加速功能.已绑定弹性 ...
- 服务器系统备份文档,服务器系统备份工具
服务器系统备份工具 内容精选 换一换 建议不要在分析任务执行过程中卸载,否则可能出现异常.IDE插件只支持以Web模式卸载工具,不支持以CLI模式卸载工具.没有正在运行中的任务.配置参数后单击&quo ...
- 如何在linux系统中还原系统版本,系统还原也简单 常用Linux系统还原工具推荐
据调查发现,一直以来,计算机用户都会被电脑死机.硬盘崩溃和内存芯片损耗过量等问题困扰,而最好的解决方式便是系统还原."系统还原"的目的是在不需要重新安装操作系统,也不会破坏数据文件 ...
- linux怎么用启动u盘恢复系统,一种U盘引导下的linux系统备份还原方法与流程
本发明涉及的是一种U盘引导下的linux系统备份还原方法. 背景技术: 在现有技术中,公知的技术是数据信息时代数据迅速的增长趋势,需要对已有数据进行有效备份,以便故障发生后能快速有效的对系统进行恢复. ...
- 使用tar或dd等完成Linux系统备份恢复
2019独角兽企业重金招聘Python工程师标准>>> 使用tar或dd等完成Linux系统备份恢复 本文提供一个简明常用的系统备份方法,使你可以迅速完成最常用最基本的备份工作. 需 ...
- Linux系统安全工具之:Sxid和Skey(转)
Linux系统安全工具之:Sxid和Skey(转)[@more@]本文仅做参考 下面介绍一些可以用于 Linux 的安全工具,这些工具对于固化您的服务器将起到一定的作用,可以解决各方面的问题.我们的重 ...
- linux系统备份方案--ghost网络篇(转)
linux系统备份方案--ghost网络篇(转)[@more@] 一.前言 一直以来,系统备份都是网络管理的必备环节.系统备份的方案有很多,各自有各自的优点和缺点,本文给大家提供一种新的选择.使用no ...
最新文章
- 比尔.盖茨11点忠告
- sys.argv[]学习
- python存储numpy数据为文件_numpy.savetxt是否将数组保存到文件中的特定位置?
- Oracle 10G DataGuard搭建
- PolarMask:单阶段实例分割框架,FCOS进阶!
- Django框架深入了解_05 (Django中的缓存、Django解决跨域流程(非简单请求,简单请求)、自动生成接口文档)(一)
- Java与.NET的WebServices相互调用
- 文本编辑器查看 cprintf颜色_airWriter for mac(文本编辑软件)
- oracle path函数,自定义类似 sys_connect_by_path 功能的函数
- jquery给title标签赋值
- java获取汉字的拼音首字母_java获取汉字的拼音首字母
- vector 简单使用
- 仿直播礼物涂鸦/屏幕礼物涂鸦动画
- Linux编程基础 5.2:消息队列
- 谷歌浏览器怎么长截图怎么截_Google浏览器如何截取网页长图 - 里维斯社
- 丢掉Axure,大厂PM最通用的原型设计工具
- 文献笔记:Plasmonic metagratings for simultaneous determination of Stokes parameters
- u盘坏了数据可以恢复吗?实用小方法
- 小程序 朋友圈,点赞 ,评论,发布动态,功能,上传图片 -----发布动态
- python 上传图片到七牛云上