ios swiftui_ios swiftui中的本地化
ios swiftui
本土化 (Localisation)
Localisation is the process of making your app support another language. Adopting new languages is one of the easiest way to increase the market audience of your app.
本地化是使您的应用支持另一种语言的过程。 采用新语言是增加应用市场份额的最简单方法之一。
There are more factors to take into account when targeting an audience from another region other than the language. For example in Arabic they read and write right-to-left where as in Latin based languages they do it left-to-right.
指定语言以外的其他地区的受众时,还有更多因素需要考虑。 例如,在阿拉伯语中,他们从右到左阅读和书写,而在拉丁语中,他们是从左到右。
The purpose of this tutorial is to show you how to support a new language in your iOS SwiftUI app. Other factors such as writing orientation are out of scope of this article.
本教程的目的是向您展示如何在iOS SwiftUI应用程序中支持新语言。 其他因素(例如写作方向)不在本文讨论范围之内。
In this article we’ll start by creating a new iOS SwiftUI application. The app created from template displays “Hello, world!”. We’ll take the template based app and add support for Spanish. Our app will then display “Hola mundo!” when the users preferred language is set to Spanish.
在本文中,我们将从创建一个新的iOS SwiftUI应用程序开始。 通过模板创建的应用显示“ Hello,world!”。 我们将使用基于模板的应用程序,并添加对西班牙语的支持。 然后我们的应用程序将显示“ Hola mundo!” 当用户将首选语言设置为西班牙语时。
We’ll take a deep dive into the app structure to see what are the implications of supporting multiple languages in our apps and how the localisation works at runtime.
我们将深入研究应用程序结构,以了解在我们的应用程序中支持多种语言的含义以及本地化在运行时的工作方式。
For this post I assume you know the very basics of SwiftUI and the basics of iOS and Swift.
对于本文,我假设您了解SwiftUI的基础知识以及iOS和Swift的基础知识。
I have used Swift 5.2.4 and Xcode 12.0 beta whilst writing this article.
在撰写本文时,我使用了Swift 5.2.4和Xcode 12.0 beta。
如何支持一种新语言 (How to support a new language)
In this section we’ll create a new SwiftUI app from scratch. We’ll then localise the app to Spanish.
在本节中,我们将从头开始创建一个新的SwiftUI应用。 然后,我们将应用本地化为西班牙语。
We will:
我们会:
- Create a new SwiftUI app创建一个新的SwiftUI应用
- Add Spanish support to the project为项目添加西班牙语支持
- Add Spanish translation in the app在应用程序中添加西班牙语翻译
- Adapt the app to use the correct language at runtime使应用程序适应运行时使用正确的语言
1.创建一个新的SwiftUI应用 (1. Create a new SwiftUI app)
Let’s begin by creating a new SwiftUI app for iOS. Open Xcode and then from menu select File > New > Project…
让我们开始为iOS创建一个新的SwiftUI应用。 打开Xcode,然后从菜单中选择File > New > Project…
Next from iOS template select App. Click Next.
接下来从iOS模板中选择App 。 单击下一步 。
Then on “Choose options for your new project” prompt call the app SwiftUILocalisation. Make sure the “Interface:” option is SwiftUI, “Life Cycle:” is SwiftUI App and finally the “Language:” is set to Swift. All checkboxes can be left unchecked. Click Next.
然后在“ 为新项目选择选项 ”上,提示应用程序SwiftUILocalisation 。 确保“ 界面:”选项为SwiftUI ,“ 生命周期:”为SwiftUI App ,最后将“ 语言:”设置为Swift 。 所有复选框都可以不选中。 单击下一步 。

Then navigate to a folder where you’d like to store your project. Finally click Create.
然后导航到要存储项目的文件夹。 最后单击创建 。

2.在项目中添加西班牙语支持 (2. Add Spanish support in the project)
The first step to support a new language in your app is to configure the entire project Localisations settings. This will tell Xcode that all targets within the project are to support Spanish.
在您的应用中支持新语言的第一步是配置整个项目的“本地化”设置。 这将告诉Xcode项目中的所有目标都将支持西班牙语。
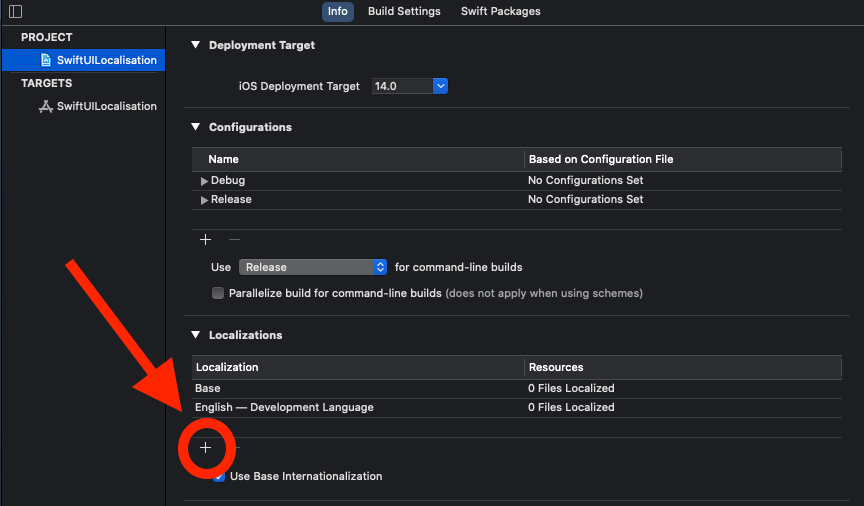
Open the project navigator, from menu select View > Navigators > Project. Next click on the SwiftUILocalisation with the blue icon on project navigator pane.
打开项目导航器,从菜单中选择“ 视图” >“ 导航器” >“ 项目” 。 接下来,在项目导航器窗格上单击带有蓝色图标的SwiftUILocalisation 。
Then under PROJECT select the SwiftUILocalisation project traget.
然后在PROJECT下选择SwiftUILocalisation项目traget 。
Next under the Info tab Localizations section click the plus icon (+) to add a new language.
接下来,在“信息”选项卡“ 本地化”部分下,单击加号( + )以添加新的语言。
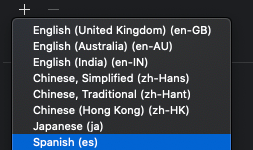
Then from the list select Spanish (es).
然后从列表中选择“ 西班牙语” 。
With this our app now ready to support Spanish.
有了这个,我们的应用程序现在准备支持西班牙语。
3.在应用程序中添加西班牙语翻译 (3. Add Spanish translation in the app)
From template your project has file named ContentView.swift which contains the following code:
在模板中,您的项目具有名为ContentView.swift文件,其中包含以下代码:
struct ContentView: View {var body: some View { Text("Hello, world!").padding() }}The code above has the text “Hello, world!” harcoded. This means the text “Hello, world!” won’t change at runtime.
上面的代码具有文本“ Hello,world!”。 陷入困境。 这意味着文本“你好,世界!” 在运行时不会更改。
To support our hello world message in both English and Spanish we need to retrieve the message in the correct language at runtime.
为了支持英文和西班牙文的hello world消息,我们需要在运行时以正确的语言检索消息。
We need some mechanism to first know which languages the user prefers. Then we need to display the app in the language which the user prefers most. That is if they both prefer Spanish and English — in that order — then we must display the app in Spanish. Once we know which language we must display we must then fetch the correct values for that language.
我们需要某种机制来首先了解用户喜欢哪种语言。 然后,我们需要以用户最喜欢的语言来显示应用。 也就是说,如果他们都喜欢西班牙语和英语(按顺序),那么我们必须以西班牙语显示该应用程序。 一旦知道了必须显示的语言,就必须获取该语言的正确值。
Sounds complicated? Worry not. Apple offers a very simple mechanism that does all of that for us in a single function call!
听起来复杂吗? 不用担心 Apple提供了一种非常简单的机制,可通过一个函数调用为我们完成所有这些工作!
First we’ll add a new strings file to the project. From menu select File > New > File…
首先,我们将一个新的字符串文件添加到项目中。 从菜单中选择文件 > 新建 > 文件…
From template search and select for Strings File then click Next.
从模板搜索中选择“ 字符串文件”,然后单击“ 下一步” 。
The strings file will contain the values for a specific language. We’ll have a strings file per language. However for now we’ll create only a single file.
字符串文件将包含特定语言的值。 我们将为每种语言提供一个字符串文件。 但是,现在我们仅创建一个文件。
Next name the file Localizable then click Create.
接下来,将文件命名为Localizable,然后单击Create 。
Once Localizable.strings is open add the following line to it:
打开Localizable.strings之后,向其添加以下行:
"hello_world" = "Hello, world!";This file will be used for the English language support in the app.
该文件将用于应用程序中的英语支持。
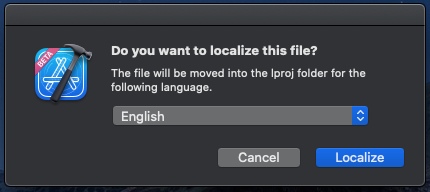
Next from menu select View > Inspectors > File. On the right hand side of Xcode a pane will open up (if not already open). Then click on the Localize… button on the file inspector pane under Localzation section.
接下来,从菜单中选择“ 视图” >“ 检查器” >“ 文件” 。 在Xcode的右侧,将打开一个窗格(如果尚未打开)。 然后单击“文件”检查器窗格中“ 本地化”部分下的“ 本地化...”按钮。
When prompted “Do you want to localize this file?”, select English from the dropdown menu and then click Localize.
当出现提示“ 您要本地化此文件吗? ”,从下拉菜单中选择英语 ,然后单击本地化 。
What we have done in the previous action is tell Xcode that the Localizable.strings file is file used for localisation. Specifically we have told Xcode that the file we created is the English translation of the app. Furthermore Xcode will create a folder named en.lproj in our project and move the Localizable.strings their.
我们在上一个操作中所做的是告诉Xcode Localizable.strings文件是用于Localizable.strings文件。 具体来说,我们告诉Xcode,我们创建的文件是该应用程序的英文翻译。 此外Xcode中会创建一个文件夹名为en.lproj在我们的项目和移动Localizable.strings他们。
The project structure before Localizing the file:
本地化文件之前的项目结构:
SwiftUILocalisation├── SwiftUILocalisation│ ├── ...│ ├── Localizable.strings...After:
后:
SwiftUILocalisation├── SwiftUILocalisation│ ├── ...│ └── en.lproj│ └── Localizable.strings...On the right hand side pane under Localization section you’ll notice a change.
在“ 本地化”部分下的右侧窗格中,您会看到一个更改。
Where before we had a button now we have the languages supported. Currently there is only Localizable.strings file for English. Next let’s support Spanish. Check the Spanish box in the File inspector pane under the Localization section.
现在在拥有按钮之前,我们已经支持了各种语言。 当前只有英语的Localizable.strings文件。 接下来,让我们支持西班牙语。 选中“文件”检查器窗格中“ 本地化”部分下的西班牙语框。

With this Xcode will automatically create a folder named es.lproj that will contain all the localized files for the Spanish support. Furthermore Xcode will create automatically a Localizable.strings file inside it.
Xcode会自动创建一个名为es.lproj的文件夹,其中将包含所有西班牙语支持的本地化文件。 此外,Xcode会在其中自动创建一个Localizable.strings文件。
Project structure after including Spanish localisation for the Localizable.strings file:
在为Localizable.strings文件包括西班牙语本地化之后的项目结构:
SwiftUILocalisation├── SwiftUILocalisation│ ├── ...│ ├── en.lproj│ │ └── Localizable.strings│ └── es.lproj│ └── Localizable.strings...Next let’s add the Spanish translation. Go over to the project navigation pane on the left side of Xcode (from menu select View > Navigators > Project). Notice Localizable.strings file has a disclosure icon. Click on the icon and Xcode will disclose Localizable.strings (English) and Localizable.strings (Spanish) files under Localizable.strings. Click on Localizable.strings (Spanish).
接下来,让我们添加西班牙语翻译。 转到Xcode左侧的项目导航窗格(从菜单中选择View > Navigators > Project )。 注意Localizable.strings文件具有一个公开图标。 单击该图标,Xcode将在Localizable.strings下显示Localizable.strings Localizable.strings (English)和Localizable.strings (Spanish)文件。 单击Localizable.strings (Spanish) 。
Next change the value for the hello_world key to Hola mundo!.
接下来,将hello_world键的值更改为Hola mundo! 。
4.修改应用程序以在运行时使用正确的语言 (4. Adapt the app to use the correct language at runtime)
Next we’ll make use of the strings file created in the previous step. Currently our code renders the text “Hello, World!” which is specified in code. Here we want to tell the system to retrieve the hello_world message localised for the users preferred language. If none of the users preferred language is supported by the app then the system will use the app’s base language (English).
接下来,我们将利用上一步中创建的字符串文件。 目前,我们的代码呈现了文本“ Hello,World!”。 在代码中指定。 在这里,我们要告诉系统检索针对用户首选语言本地化的hello_world消息。 如果该应用程序不支持任何用户的首选语言,则系统将使用该应用程序的基本语言(英语)。
Open ContentView.swift. Then change the following code:
打开ContentView.swift 。 然后更改以下代码:
struct ContentView: View {var body: some View { Text("Hello, world!").padding() }}to:
至:
struct ContentView: View {var body: some View { Text(NSLocalizedString("hello_world", comment: "")).padding() }}The function NSLocalizedString is the mechanism offered by Apple to ease the selection and display of the most appropriate language for the individual user. NSLocalizedString function will first solve which language to use and then fetch the value for hello_world key from the language specific Localizable.strings file.
功能NSLocalizedString是Apple提供的机制,可以简化针对单个用户的最合适语言的选择和显示。 NSLocalizedString函数将首先NSLocalizedString要使用的语言,然后从特定于语言的Localizable.strings文件中获取hello_world键的值。
Note you can use a different file name other than Localizable.strings file if you prefer. However you’ll have to specify the tableName parameter of the function. The default file name NSLocalizedString function will look for is Localizable.strings.
请注意,如果愿意,可以使用不同于Localizable.strings文件的文件名。 但是,您必须指定函数的tableName参数。 NSLocalizedString函数将查找的默认文件名是Localizable.strings 。
Run the app in a simulator. To test out Spanish change the simulator language to Spanish and see the effect.
在模拟器中运行该应用程序。 要测试西班牙语,请将模拟器语言更改为西班牙语并查看效果。
摘要 (Summary)
In this tutorial we learnt:
在本教程中,我们学习了:
- how to localise an app如何本地化应用
- how to add and fetch translations for a key如何添加和获取密钥的翻译
最后的笔记 (Final notes)
You can find the full source code for this tutorial in my Github repository:
您可以在我的Github存储库中找到本教程的完整源代码:
There hasn’t been any change on how to localise your app from UIKit to SwiftUI using the NSLocalizedString function. However with UIKit you also have the option to do Storyboard localisation. I still use UIKit on day to day basis however I do not make use of Storyboards since I do not prefer them in a complex projects.
使用NSLocalizedString函数将应用程序从UIKit本地化到SwiftUI的方式没有任何变化。 但是,使用UIKit,您还可以选择对Storyboard进行本地化。 我仍然每天都使用UIKit,但是由于我在复杂的项目中不喜欢使用Storyboard,所以我不使用Storyboard。
For more on iOS development follow me on Twitter or Medium!
有关iOS开发的更多信息,请在Twitter或Medium中关注我!
翻译自: https://medium.com/@anuragajwani/localisation-in-ios-swiftui-270de558f2eb
ios swiftui
http://www.taodudu.cc/news/show-4372243.html
相关文章:
- 关于Ai打开图片,颜色变色问题
- Python 通过URL打开图片的几种方式
- 使用Python调用opencv学习(-)打开图片,显示图片
- C++ MFC打开图片并进行简单算法处理
- python用图片浏览器打开图片
- Python下openCV打开图片的几种方式/适应窗口大小
- 微积分Z2 J2 典型函数
- 微信指数批量采集、导出
- 华为张小军:期待区块链应用落地,加速推进区块链产业商用 | FBEC 2019
- 华为云首批通过可信区块链评测
- 有没有什么大学生搜题比较好用的网站或APP
- 基于PHP大学生英语在线教学网
- 元器件中电容的小小知识 2021-09-06
- sr锁存器 数电_数字电路
- 北京理工大学汇编语言复习重点(可打印)
- 克劳德・香农(Claude Shannon)于1937年发表《对继电器和开关电路中的符号分析》
- 单片机双字节数乘法运算实验_单片机入门——单片机的基本构成及工作原理(1)...
- 锁定放大器
- 2021年电赛仪器仪表类常用模块
- 单片机双字节数乘法运算实验_单片机究竟是如何构成的呢
- MSP430X1XX系列硬件乘法器,比较器,flash讲解
- 应用计算机测定磁敏电阻特性讨论,磁敏电阻工作原理及特性_磁敏电阻的电路符号与应用...
- 大武口计算机考试培训,大武口电脑培训地址
- 广西现代职业技术学院的计算机怎么样,广西现代职业技术学院宿舍条件
- 计算机专科学校云南公办,开远计算机科学技术专科学校
- 合理运用计算机技术学校,浅议在学校管理中计算机技术合理应用
- 再谈P2P技术:网络拓扑结构、核心技术分析
- matlab 图像处理技术
- 董树义 近代微波测量技术_潘时龙:28岁推开微波光子学大门
- 人工智能技术发展概述
ios swiftui_ios swiftui中的本地化相关推荐
- ios swiftui_iOS 14中的SwiftUI网格
ios swiftui SwiftUI's second iteration didn't give us an out-of-the-box implementation for UICollect ...
- iOS 16 中 CoreData 托管对象发生变化但其衍生 (Derived) 属性在 SwiftUI 中不刷新的解决
引子 今天偶然发现 iOS 16 SwiftUI 开发中的一个问题. 具体情景为: 一个 SwiftUI + CoreData 的项目,使用 Xcode 14正式版开发.CoreData 数据库的 F ...
- iOS 15.0+ 中 SwiftUI 顶部或底部悬浮功能小面板的极简实现
功能需求 我们有时需要在 App 主视图的顶部或底部固定悬浮放置一个功能视图: 如上图所示,我们将一个列表项目输入小面板按需放在主视图的顶部或底部: 当放置在顶部时,解决了其对导航栏(Navigati ...
- 【IOS开发】SwiftUI中的反斜杠\含义以及用法
1.@Environment(\.colorScheme)中的\是什么意思? 在 SwiftUI 中,使用 \(反斜杠)可以访问环境中的键路径(key path),这样你就可以获取环境变量的值.键路径 ...
- swift和swiftui_在swiftui中查看布局和演示
swift和swiftui 您一直在等待的完整SwiftUI 2文档 (The Complete SwiftUI 2 Documentation You've Been Waiting For) At ...
- SwiftUI 中的水平条形图
水平条形图以矩形条的形式呈现数据类别,其宽度与它们所代表的数值成正比.本文展示了如何在垂直条形图的基础上创建一个水平柱状图. 水平条形图不是简单的垂直条形图的旋转.在 Numbers 等应用程序中,水 ...
- 如何在 SwiftUI 中以编程方式滚动列表?
看起来在当前的工具/系统中,刚刚发布的 Xcode 11.4/iOS 13.4 中将没有 SwiftUI 原生支持"滚动到"功能List.因此,即使他们,Apple,将在下一个主要 ...
- 【Swift开发】SwiftUI中使用MapKit实现地图功能
前言 ios中可以直接使用苹果官方提供的map--MapKit.在SwiftUI中如何使用MapKit网上有也有不少文章,但是大部分不详细,大部分只是简单的展示出地图.所以本文来详细的讲解一下如何使用 ...
- 提高应用在 iOS App Store 中排名的 20 条技巧
刚刚超过 200 万个应用程序并且还在增加.这是目前 iOS App Store 中的应用程序数量,每个类别和子类别都有数以千计的类似应用程序. 话虽如此,应用程序开发和设计是一个利润丰厚的市场,仅去 ...
最新文章
- 深度学习 | 反卷积/转置卷积 的理解 transposed conv/deconv
- generator自动生成mybatis的xml配置
- Hark的数据结构与算法练习之简单选择排序
- 关于ibatis.net 和 Nhibernate的选择
- 整数划分问题的递归算法-c语言,简单的整数划分问题(递归)
- DIV中文字不换行解决办法
- YASnippet - emacs 的代码片段管理工具
- 醒醒吧!送给那些盲目自学的人
- 前端开发 网络图片的下载与切图操作 0228 需操作
- Python里的++和--不是运算符
- android+adb+push到系统下,Android adb push 应用到app/system
- python开发sqlite3完整_python开发_sqlite3_绝对完整
- Qt之Ubuntu18.04安装(一)
- (11) python 使用baostock获取历史A股K线数据
- Qt之QThread基本用法
- 激光打标机二次开发C#实例分享(附带实例源码)
- 关于unity easy touch 再次进入场景后报错问题
- 【音乐】火速收藏!KTV新歌 +老歌10000首+点歌系统支持手机点歌1.6t音乐文件
- 传奇服务器容易受到什么攻击,怎么防御攻击?
- labelme_json_to_dataset不能转换关键点的问题