如何将现有的DigitalOcean资产导入Terraform
介绍 (Introduction)
Terraform is an infrastructure as code tool created by HashiCorp that helps developers with deploying, updating, and removing different assets of their infrastructure in an efficient and more scalable way.
Terraform是由HashiCorp创建的基础结构即代码工具,可帮助开发人员以高效且可扩展的方式部署,更新和删除基础结构中的不同资产。
Developers can use Terraform to organize different environments, track changes through version control, and automate repetitive work to limit human error. It also provides a way for teams to collaborate on improving their infrastructure through shared configurations.
开发人员可以使用Terraform来组织不同的环境,通过版本控制来跟踪更改,并自动执行重复性工作以减少人为错误。 它还为团队提供了一种通过共享配置协作改进基础架构的方法。
In this tutorial you’ll import existing DigitalOcean infrastructure into Terraform. By the end of this tutorial you’ll be able to use Terraform for all of your existing infrastructure in addition to creating new assets.
在本教程中,您将把现有的DigitalOcean基础结构导入Terraform。 在本教程结束时,除了创建新资产外,您还可以将Terraform用于所有现有基础架构。
先决条件 (Prerequisites)
A DigitalOcean Personal Access Token. To create this, you can follow the How To Create a Personal Access Token guide.
DigitalOcean个人访问令牌。 为此,您可以按照“ 如何创建个人访问令牌”指南进行操作。
A DigitalOcean Droplet with a tag. You can use the following guide on How To Create a Droplet from the DigitalOcean Control Panel.
带标签的DigitalOcean Droplet。 您可以使用有关如何从DigitalOcean控制面板创建液滴的以下指南。
A DigitalOcean Cloud Firewall applied to your Droplet. You can use the guide How To Create Firewalls.
DigitalOcean云防火墙已应用于您的Droplet。 您可以使用指南如何创建防火墙 。
The DigitalOcean Command Line Client installed on your local machine by following the install instructions on the
doctlGitHub page. You can read the following tutorial for guidance on How To Use Doctl, the official DigitalOcean Command-Line Client.按照
doctlGitHub页面上的安装说明,将DigitalOcean命令行客户端安装在本地计算机上 。 您可以阅读以下教程,以获取有关如何使用Doctl(官方DigitalOcean命令行客户端)的指南 。
第1步-本地安装Terraform (Step 1 — Installing Terraform Locally)
In this first step you’ll install Terraform on your local machine. This step details the installation of the Linux binary. If you use Windows or Mac, you can check the Download Terraform page on the Terraform website.
在第一步中,您将在本地计算机上安装Terraform。 此步骤详细介绍了Linux二进制文件的安装。 如果使用Windows或Mac,则可以查看Terraform网站上的“下载Terraform”页面 。
Move to the folder you want to download Terraform to on your local machine, then use the wget tool to download the Terraform 0.12.12 binary:
移至您要在本地计算机上下载Terraform的文件夹,然后使用wget工具下载Terraform 0.12.12二进制文件:
cd /tmp
cd / tmp
wget https://releases.hashicorp.com/terraform/0.12.12/terraform_0.12.12_linux_amd64.zip
wget https://releases.hashicorp.com/terraform/ 0.12.12 / terraform_ 0.12.12 _linux_amd64.zip
To check if the sha256 checksum is the same value provided on the Terraform website, you’ll download the checksum file with the following command:
要检查sha256校验和是否与Terraform网站上提供的值相同,请使用以下命令下载校验和文件:
wget -q https://releases.hashicorp.com/terraform/0.12.12/terraform_0.12.12_SHA256SUMS
wget -q https://releases.hashicorp.com/terraform/ 0.12.12 / terraform_ 0.12.12 _SHA256SUMS
Then run the following command to verify the checksums:
然后运行以下命令来验证校验和:
sha256sum -c --ignore-missing terraform_0.12.12_SHA256SUMS
sha256sum -c-忽略地表 _ 0.12.12 _SHA256SUMS
The SHA256SUMS file you downloaded lists the filenames and their hashes. This command will look for the same file terraform_0.12.12_SHA256SUMS locally and then check that the hashes match by using the -c flag. Since this file has more than one filename and its platform listed, you use the --ignore-missing flag to avoid errors in your output because you don’t have a copy of the other files.
您下载的SHA256SUMS文件列出了文件名及其哈希值。 该命令将在本地查找相同的文件terraform_ 0.12.12 _SHA256SUMS ,然后使用-c标志检查哈希值是否匹配。 由于此文件具有多个文件名,并且列出了其平台,因此您可以使用--ignore-missing标志来避免输出错误,因为您没有其他文件的副本。
You will see output like the following:
您将看到如下输出:
Output
terraform_0.12.12_linux_amd64.zip: OK
Use unzip to extract the binary:
使用unzip来提取二进制文件:
sudo unzip terraform_0.12.12_linux_amd64.zip -d /usr/local/bin/
sudo解压缩terraform_ 0.12.12 _linux_amd64.zip -d / usr / local / bin /
Now check if Terraform is installed properly by checking the version:
现在,通过检查版本来检查Terraform是否正确安装:
- terraform version terraform版本
You’ll see output similar to the following:
您将看到类似于以下内容的输出:
Output
Terraform v0.12.12
You’ve installed Terraform to your local machine, you’ll now prepare the configuration files.
您已经将Terraform安装到本地计算机上,现在将准备配置文件。
步骤2 —准备Terraform配置文件 (Step 2 — Preparing Terraform Configuration Files)
In this step you’ll import your existing assets into Terraform by creating a project directory and writing configuration files. Since Terraform doesn’t support generating configs from the import command at this time, you need to create those configurations manually.
在此步骤中,您将通过创建项目目录并编写配置文件将现有资产导入Terraform。 由于Terraform目前不支持通过import命令生成配置,因此您需要手动创建这些配置。
Run the following command to create your project directory:
运行以下命令来创建您的项目目录:
mkdir -p do_terraform_import
mkdir -p do_terraform_import
Then move into that directory with:
然后使用以下命令进入该目录:
cd do_terraform_import
cd do_terraform_import
Within this step you’ll create three additional files that will contain the required configurations. Your directory structure for this project will look like the following:
在此步骤中,您将创建三个其他文件,其中将包含必需的配置。 该项目的目录结构如下所示:
├── digitalocean_droplet.tf
├── digitalocean_firewall.tf
└── provider.tf
To begin you’ll create the file provider.tf to define your DigitalOcean Access Token as an environment variable instead of hardcoding it into your configuration.
首先,您将创建文件provider.tf以将DigitalOcean访问令牌定义为环境变量,而不是将其硬编码到您的配置中。
Warning: Your access token gives access to your complete infrastructure with unrestricted access, so treat it as such. Be sure that you’re the only one who has access to the machine where that token is stored.
警告 :您的访问令牌会以不受限制的访问权限访问您完整的基础架构,因此应这样对待。 确保您是唯一有权访问存储该令牌的计算机的人。
Besides your access token, you’ll also specify which provider you want to use. In this tutorial that’s digitalocean. For a full list of available Data Sources and Resources for DigitalOcean with Terraform, visit the Providers page on their website.
除了访问令牌之外,您还将指定要使用的提供程序。 在本教程中,这是digitalocean 。 有关带Terraform的DigitalOcean的可用数据源和资源的完整列表,请访问其网站上的Providers页面 。
Create and edit provider.tf with the following command:
使用以下命令创建和编辑provider.tf :
- nano provider.tf 纳米提供商
Add the following content into the provider.tf file:
将以下内容添加到provider.tf文件中:
variable "do_token" {}provider "digitalocean" {token = "${var.do_token}"version = "1.9.1"}In this file you add your DigitalOcean Access Token as a variable, which Terraform will use as identification for the DigitalOcean API. You also specify the version of the DigitalOcean provider plugin. Terraform recommends that you specify which version of the provider you’re using so that future updates don’t potentially break your current setup.
在此文件中,您将DigitalOcean访问令牌添加为变量,Terraform将其用作DigitalOcean API的标识。 您还可以指定DigitalOcean提供程序插件的版本。 Terraform建议您指定使用的提供商的版本,以免将来的更新不会破坏您当前的设置。
Now you’ll create the digitalocean_droplet.tf file. Here you’ll specify the resource that you’re going to use, in this case: droplet.
现在,您将创建digitalocean_droplet.tf文件。 在这里,您将指定要使用的资源,在这种情况下: droplet 。
Create the file with the following command:
使用以下命令创建文件:
- nano digitalocean_droplet.tf 纳米digitalocean_droplet.tf
Add the following configuration:
添加以下配置:
resource "digitalocean_droplet" "do_droplet" {name   = "testing-terraform"region = "fra1"tags   = ["terraform-testing"]count  = "1"
}
Here you specify four parameters:
在此指定四个参数:
name: The Droplet name.name:Droplet名称。region: The region that the Droplet is located in.region:Droplet所在的区域。tags: A list of the tags that are applied to this Droplet.tags:应用于此Droplet的标签的列表。count: The number of resources needed for this configuration.count:此配置所需的资源数量。
Next you’ll create a configuration file for your firewall. Create the file digitalocean_firewall.tf with the following command:
接下来,您将为防火墙创建一个配置文件。 使用以下命令创建文件digitalocean_firewall.tf :
- nano digitalocean_firewall.tf 纳米digitalocean_firewall.tf
Add the following content to the file:
将以下内容添加到文件中:
resource "digitalocean_firewall" "do_firewall" {name  = "testing-terraform-firewall"tags  = ["terraform-testing"]count = "1"
}
Here you specify the name of the firewall you wish to import and the tags of the Droplets to which the firewall rules apply. Finally the count value of 1 defines the required number of the particular resource.
在这里,您可以指定要导入的防火墙的名称以及应用防火墙规则的Droplet的标签。 最后, count数值1定义了特定资源的所需数量。
Note: You can include firewall resources in the digitalocean_droplet.tf file as well, however if you have multiple environments where multiple Droplets share the same firewall, it’s a good idea to separate it in case you only want to remove a single Droplet. This will then leave the firewall unaffected.
注意 :您也可以在digitalocean_droplet.tf文件中包含防火墙资源,但是,如果您有多个Droplet共享同一防火墙的多个环境,则最好将其分开以防万一您只想删除一个Droplet。 然后,这将使防火墙不受影响。
Now it’s time to initialize those changes so Terraform can download the required dependencies. You will use the terraform init command for this, which will allow you to initialize a working directory containing Terraform configuration files.
现在是时候初始化这些更改,以便Terraform可以下载所需的依赖项了。 您将为此使用terraform init命令,这将允许您初始化包含Terraform配置文件的工作目录。
Run this command from your project directory:
从项目目录运行以下命令:
- terraform init 地形初始化
You’ll see the following output:
您将看到以下输出:
Output
Terraform has been successfully initialized!
Terraform has successfully prepared the working directory by downloading plugins, searching for modules, and so on. Next you’ll begin importing your assets to Terraform.
Terraform通过下载插件,搜索模块等成功地准备了工作目录。 接下来,您将开始将资产导入Terraform。
第3步-将资产导入Terraform (Step 3 — Importing Your Assets to Terraform)
In this step, you’ll import your DigitalOcean assets to Terraform. You’ll use doctl to find the ID numbers of your Droplets before importing your assets. You’ll then check the import configuration with the terraform show and terraform plan commands.
在此步骤中,您将把DigitalOcean资产导入Terraform。 在导入资产之前,您将使用doctl查找Droplet的ID号。 然后,您将使用terraform show和terraform plan命令检查导入配置。
To begin, you’ll export your DigitalOcean Access Token as an environment variable, which you’ll then inject into Terraform during runtime.
首先,将您的DigitalOcean访问令牌导出为环境变量,然后在运行时将其注入Terraform。
Export it as an environment variable into your current shell session with the following command:
使用以下命令将其作为环境变量导出到当前的shell会话中:
export DO_TOKEN="YOUR_TOKEN"
出口DO_TOKEN =“ YOUR_TOKEN ”
In order to import your existing Droplet and firewall you’ll need their ID numbers. You can use doctl, the command line interface for the DigitalOcean API. Run the following command to list your Droplets and access their IDs:
为了导入现有的Droplet和防火墙,您将需要它们的ID号。 您可以使用doctl (DigitalOcean API的命令行界面)。 运行以下命令以列出您的Droplet并访问其ID:
- doctl compute droplet list doctl计算液滴列表
You’ll see output similar to the following:
您将看到类似于以下内容的输出:
Output
ID           Name                     Public IPv4        Private IPv4     Public IPv6    Memory    VCPUs    Disk    Region    Image                       Status    Tags    Features              Volumes
DROPLET-ID    DROPLET-NAME                          DROPLET-IPv4                 1024      1        25      fra1      Ubuntu 18.04.3 (LTS) x64              active
DROPLET-ID    DROPLET-NAME                          DROPLET-IPv4                 2048      1        50      fra1      Ubuntu 18.04.3 (LTS) x64           active
DROPLET-ID    DROPLET-NAME                          DROPLET-IPv4                 1024      1        25      fra1      Ubuntu 18.04.3 (LTS) x64
Now you’ll import your existing Droplet and firewall into Terraform:
现在,您将现有的Droplet和防火墙导入Terraform:
terraform import -var "do_token=${DO_TOKEN}" digitalocean_droplet.do_droplet DROPLET_IDterraform import -var“ do_token = $ {DO_TOKEN}” digitalocean_droplet.do_droplet DROPLET_ID
You use the -var flag to specify your DigitalOcean Access Token value that you previously exported to your shell session. This is needed so the DigitalOcean API can verify who you are and apply changes to your infrastructure.
您可以使用-var标志来指定您先前导出到Shell会话的DigitalOcean访问令牌值。 这是必需的,因此DigitalOcean API可以验证您的身份并将更改应用于基础架构。
Now run the same command for your firewall:
现在为您的防火墙运行相同的命令:
terraform import -var "do_token=${DO_TOKEN}" digitalocean_firewall.do_firewall FIREWALL_ID
terraform import -var“ do_token = $ {DO_TOKEN}” digitalocean_firewall.do_firewall FIREWALL_ID
You’ll check that the import was successful by using the terraform show command. This command provides human-readable output of your infrastructure state. It can be used to inspect a plan to ensure that wanted changes are going to be executed, or to inspect the current state as Terraform sees it.
您将使用terraform show命令检查导入是否成功。 此命令提供了人类可读的基础结构状态输出。 它可用于检查计划以确保将要执行所需的更改,或用于检查Terraform看到的当前状态。
In this context state refers to the mapping of your DigitalOcean assets to the Terraform configuration that you’ve written and the tracking of metadata. This allows you to confirm that there’s no difference between existing DigitalOcean assets that you want to import and assets that Terraform is keeping track of:
在这种情况下, 状态是指DigitalOcean资产到您已编写的Terraform配置的映射以及元数据的跟踪。 这使您可以确认要导入的现有DigitalOcean资产与Terraform跟踪的资产之间没有区别:
- terraform show 地貌秀
You’ll see output similar to this:
您将看到类似于以下的输出:
Output
. . .
# digitalocean_droplet.do_droplet:
resource "digitalocean_droplet" "do_droplet" {backups            = falsecreated_at         = "2020-02-03T16:12:02Z"disk               = 25id                 = "DROPLET-ID"image              = "DROPLET-IMAGE"ipv4_address       = "DROPLET-IP"ipv6               = falselocked             = falsememory             = 1024monitoring         = falsename               = "testing-terraform-0"price_hourly       = 0.00744price_monthly      = 5private_networking = falseregion             = "fra1"resize_disk        = truesize               = "s-1vcpu-1gb"status             = "active"tags               = ["terraform-testing",]urn                = "DROPLET-URN"vcpus              = 1volume_ids         = []
. . .
}
You’ll see two resources in the output along with their attributes.
您将在输出中看到两个资源及其属性。
After you import your Droplet and firewall into Terraform state, you need to make sure that configurations represent the current state of the imported assets. To do this, you’ll specify your Droplet’s image and its size. You can find these two values in the output of terraform show for digitalocean_droplet.do_droplet resource.
将Droplet和防火墙导入Terraform状态后,需要确保配置代表导入资产的当前状态。 为此,您将指定Droplet的image及其size 。 您可以在terraform show的输出中找到digitalocean_droplet.do_droplet资源的这两个值。
Open the digitalocean_droplet.tf file:
打开digitalocean_droplet.tf文件:
- nano digitalocean_droplet.tf 纳米digitalocean_droplet.tf
In this tutorial:
在本教程中:
The operating system image used for our existing Droplet is
ubuntu-16-04-x64.我们现有的Droplet使用的操作系统映像是
ubuntu-16-04-x64。The region your Droplet is located in is
fra1.您的Droplet所在的区域是
fra1。The Droplet tag for your existing Droplet is
terraform-testing.您现有的Droplet的Droplet标签是
terraform-testing。
The Droplet you imported using the configuration in digitalocean_droplet.tf will look like this:
使用digitalocean_droplet.tf的配置导入的Droplet如下所示:
resource "digitalocean_droplet" "do_droplet" {image   = "ubuntu-16-04-x64"name    = "testing-terraform"region  = "fra1"size    = "s-1vcpu-1gb"tags    = ["terraform-testing"]
}
Next you’ll add in the firewall rules. In our example, open ports for inbound traffic are 22, 80, and 443. All ports are opened for outbound traffic. You can adjust this configuration accordingly to your open ports.
接下来,您将添加防火墙规则。 在我们的例子中,入站流量开放的端口是22 , 80 ,和443 。 打开所有端口以进行出站流量。 您可以根据打开的端口相应地调整此配置。
Open digitalocean_firewall.tf:
打开digitalocean_firewall.tf :
- nano digitalocean_firewall.tf 纳米digitalocean_firewall.tf
Add the following configuration:
添加以下配置:
resource "digitalocean_firewall" "do_firewall" {name  = "testing-terraform-firewall"tags  = ["terraform-testing"]count = "1"inbound_rule {protocol                = "tcp"port_range              = "22"source_addresses        = ["0.0.0.0/0", "::/0"]}inbound_rule {protocol                = "tcp"port_range              = "80"source_addresses        = ["0.0.0.0/0", "::/0"]}inbound_rule {protocol                = "tcp"port_range              = "443"source_addresses        = ["0.0.0.0/0", "::/0"]}outbound_rule {protocol                = "tcp"port_range              = "all"destination_addresses   = ["0.0.0.0/0", "::/0"]}outbound_rule {protocol                = "udp"port_range              = "all"destination_addresses   = ["0.0.0.0/0", "::/0"]}outbound_rule {protocol                = "icmp"destination_addresses   = ["0.0.0.0/0", "::/0"]}
}
These rules replicate the state of the existing example firewall. If you’d like to limit traffic to different IP addresses, different ports, or different protocol, you can adjust the file to replicate your existing firewall.
这些规则复制了现有示例防火墙的状态。 如果要将流量限制为不同的IP地址,不同的端口或不同的协议,则可以调整文件以复制现有的防火墙。
After you’ve updated your Terraform files, you’ll use the plan command to see if changes you made replicate state of existing assets on DigitalOcean.
更新Terraform文件后,将使用plan命令查看所做的更改是否复制了DigitalOcean上现有资产的状态。
The terraform plan command is used as a dry run. With this command you can check if changes Terraform is going to make are the changes you want to make. It is a good idea to always run this command for confirmation before applying changes.
terraform plan命令用作terraform plan运行。 使用此命令,您可以检查Terraform将要进行的更改是否是您要进行的更改。 最好在应用更改之前始终运行此命令进行确认。
Run terraform plan with the following:
使用以下命令运行terraform plan :
- terraform plan -var "do_token=$DO_TOKEN" terraform计划-var“ do_token = $ DO_TOKEN”
You’ll see output similar to the following output:
您将看到类似于以下输出的输出:
Output
No changes. Infrastructure is up-to-date.
You’ve successfully imported existing DigitalOcean assets in Terraform, and now you can make changes to your infrastructure through Terraform without the risk of accidentally deleting or modifying existing assets.
您已经在Terraform中成功导入了现有DigitalOcean资产,现在您可以通过Terraform对基础结构进行更改,而不会意外删除或修改现有资产。
第4步-通过Terraform创建新资产 (Step 4 — Creating New Assets via Terraform)
In this step you’ll add two additional Droplets to your existing infrastructure. Adding assets in this way to your existing infrastructure can be useful, for example, if you have a live website and don’t want to make any potentially breaking changes to that website while working on it. Instead you can add one more Droplet to use as a development environment and work on your project in the same environment as the production Droplet, without any of the potential risk.
在此步骤中,您将向现有基础架构中添加两个额外的Droplet。 以这种方式将资产添加到现有基础结构中可能很有用,例如,如果您有一个活动的网站,并且不想在使用该网站时对该网站进行任何可能破坏性的更改。 相反,您可以再添加一个Droplet用作开发环境,并在与生产Droplet相同的环境中处理项目,而没有任何潜在的风险。
Now open digitalocean_droplet.tf to add the rules for your new Droplets:
现在打开digitalocean_droplet.tf为新的Droplet添加规则:
- nano digitalocean_droplet.tf 纳米digitalocean_droplet.tf
Add the following lines to your file:
将以下行添加到您的文件:
resource "digitalocean_droplet" "do_droplet" {image   = "ubuntu-16-04-x64"name    = "testing-terraform"region  = "fra1"size    = "s-1vcpu-1gb"tags    = ["terraform-testing"]count   = "1"
}resource "digitalocean_droplet" "do_droplet_new" {image   = "ubuntu-18-04-x64"name    = "testing-terraform-${count.index}"region  = "fra1"size    = "s-1vcpu-1gb"tags    = ["terraform-testing"]count   = "2"
}
You use the count meta-argument to tell Terraform how many Droplets with the same specifications you want. These new Droplets will also be added to your existing firewall as you specify the same tag as per your firewall.
您可以使用count元参数来告诉Terraform您想要多少个具有相同规格的Droplet。 当您指定与防火墙相同的标签时,这些新的Droplet也将添加到您现有的防火墙中。
Apply these rules to check the changes you’re specifying in digitalocean_droplet.tf:
应用这些规则来检查您在digitalocean_droplet.tf指定的更改:
- terraform plan -var "do_token=$DO_TOKEN" terraform plan -var“ do_token = $ DO_TOKEN”
Verify that the changes you want to make are replicated in the output of this command.
验证要进行的更改是否已在此命令的输出中复制。
You’ll see output similar to the following:
您将看到类似于以下内容的输出:
Output
. . .
# digitalocean_droplet.do_droplet_new[1] will be created+ resource "digitalocean_droplet" "do_droplet_new" {+ backups              = false+ created_at           = (known after apply)+ disk                 = (known after apply)+ id                   = (known after apply)+ image                = "ubuntu-18-04-x64"+ ipv4_address         = (known after apply)+ ipv4_address_private = (known after apply)+ ipv6                 = false+ ipv6_address         = (known after apply)+ ipv6_address_private = (known after apply)+ locked               = (known after apply)+ memory               = (known after apply)+ monitoring           = false+ name                 = "testing-terraform-1"+ price_hourly         = (known after apply)+ price_monthly        = (known after apply)+ private_networking   = true+ region               = "fra1"+ resize_disk          = true+ size                 = "s-1vcpu-1gb"+ status               = (known after apply)+ tags                 = [+ "terraform-testing",]+ urn                  = (known after apply)+ vcpus                = (known after apply)+ volume_ids           = (known after apply)}Plan: 2 to add, 1 to change, 0 to destroy.
Once you’re satisfied with the output, use the terraform apply command to apply the changes you’ve specified to the state of the configuration:
对输出感到满意后,请使用terraform apply命令将您指定的更改应用于配置状态:
- terraform apply -var "do_token=$DO_TOKEN" terraform apply -var“ do_token = $ DO_TOKEN”
Confirm the changes by entering yes on the command line. After successful execution, you’ll see output similar to the following:
通过在命令行上输入yes确认更改。 成功执行后,您将看到类似于以下的输出:
Output
. . .
digitalocean_droplet.do_droplet_new[1]: Creating...
digitalocean_droplet.do_droplet_new[0]: Creating...
digitalocean_firewall.do_firewall[0]: Modifying... [id=FIREWALL-ID]
digitalocean_firewall.do_firewall[0]: Modifications complete after 1s [id=FIREWALL-ID]
digitalocean_droplet.do_droplet_new[0]: Still creating... [10s elapsed]
digitalocean_droplet.do_droplet_new[1]: Still creating... [10s elapsed]
digitalocean_droplet.do_droplet_new[0]: Creation complete after 16s [id=DROPLET-ID]
digitalocean_droplet.do_droplet_new[1]: Still creating... [20s elapsed]
digitalocean_droplet.do_droplet_new[1]: Creation complete after 22s [id=DROPLET-ID]Apply complete! Resources: 2 added, 1 changed, 0 destroyed.
You’ll see two new Droplets in your DigitalOcean web panel:
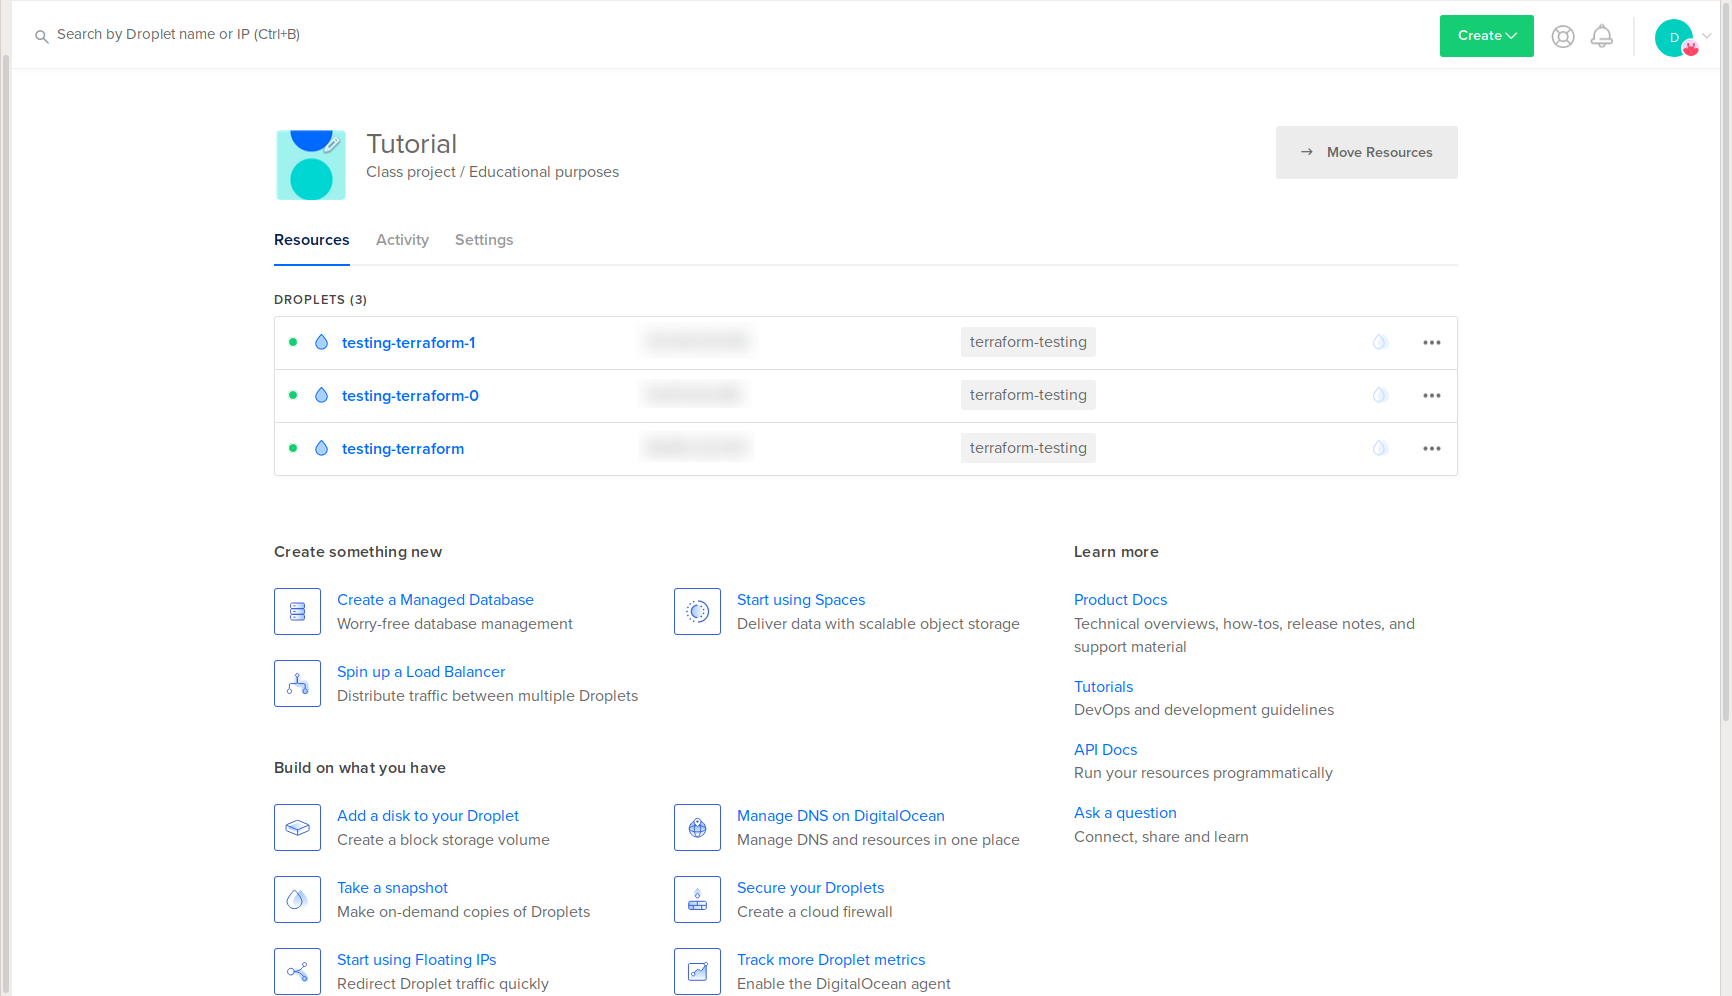
您将在DigitalOcean Web面板中看到两个新的Droplet:
You’ll also see them attached to your existing firewall:
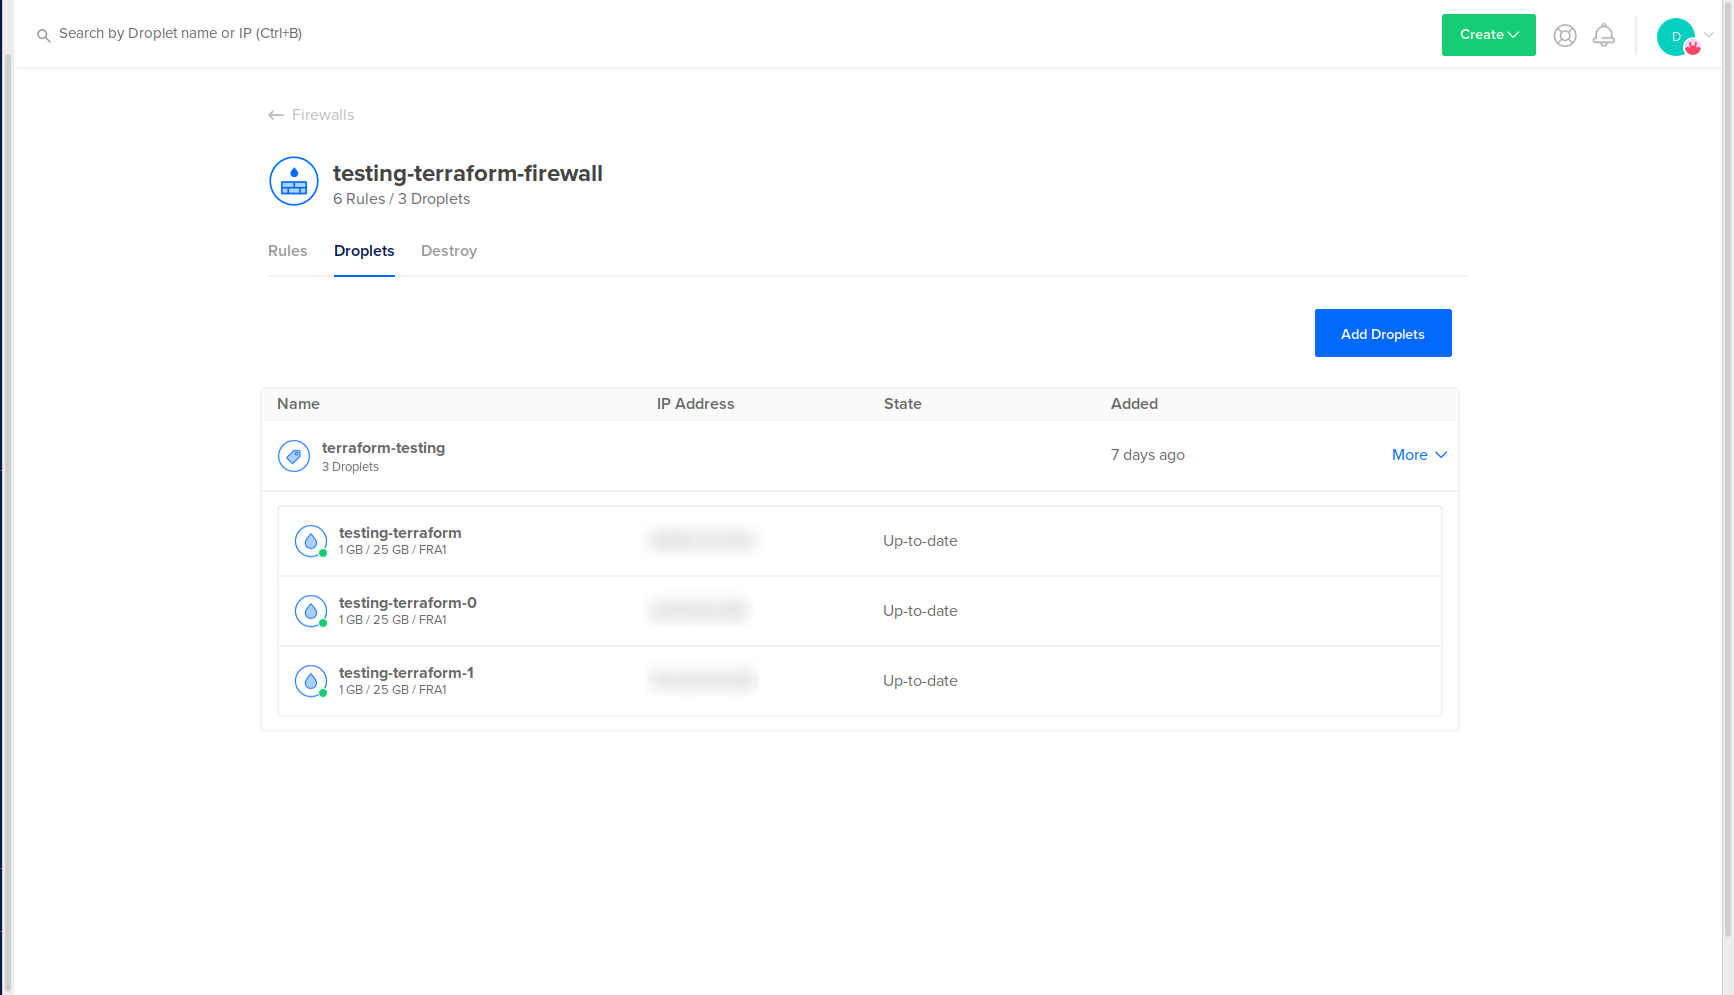
您还将看到它们连接到现有防火墙:
You’ve created new assets with Terraform using your existing assets. To learn how to destroy these assets you can optionally complete the next step.
您已经使用现有资产通过Terraform创建了新资产。 要了解如何销毁这些资产,您可以选择完成下一步。
第5步-销毁导入和创建的资产(可选) (Step 5 — Destroying Imported and Created Assets (Optional))
In this step, you’ll destroy assets that you’ve imported and created by adjusting the configuration.
在此步骤中,您将通过调整配置来销毁已导入和创建的资产。
Begin by opening digitalocean_droplet.tf:
首先打开digitalocean_droplet.tf :
- nano digitalocean_droplet.tf 纳米digitalocean_droplet.tf
In the file, set the count to 0 as per the following:
在文件中,将count设置为0,如下所示:
resource "digitalocean_droplet" "do_droplet" {image   = "ubuntu-16-04-x64"name    = "testing-terraform"region  = "fra1"size    = "s-1vcpu-1gb"tags    = ["terraform-testing"]count   = "0"
}resource "digitalocean_droplet" "do_droplet_new" {image   = "ubuntu-18-04-x64"name    = "testing-terraform-${count.index}"region  = "fra1"size    = "s-1vcpu-1gb"tags    = ["terraform-testing"]count   = "0"
}
Save and exit the file.
保存并退出文件。
Open your firewall configuration file to alter the count as well:
同时打开防火墙配置文件以更改count :
- nano digitalocean_firewall.tf 纳米digitalocean_firewall.tf
Set the count to 0 like the following highlighted line:
将count设置为0如以下突出显示的行所示:
resource "digitalocean_firewall" "do_firewall" {name  = "testing-terraform-firewall"tags  = ["terraform-testing"]count = "0"inbound_rule {protocol                = "tcp"port_range              = "22"source_addresses        = ["0.0.0.0/0", "::/0"]}inbound_rule {protocol                = "tcp"port_range              = "80"source_addresses        = ["0.0.0.0/0", "::/0"]}inbound_rule {protocol                = "tcp"port_range              = "443"source_addresses        = ["0.0.0.0/0", "::/0"]}outbound_rule {protocol                = "tcp"port_range              = "all"destination_addresses   = ["0.0.0.0/0", "::/0"]}outbound_rule {protocol                = "udp"port_range              = "all"destination_addresses   = ["0.0.0.0/0", "::/0"]}outbound_rule {protocol                = "icmp"destination_addresses   = ["0.0.0.0/0", "::/0"]}
}
Save and exit the file.
保存并退出文件。
Now apply those changes with the following command:
现在,使用以下命令应用这些更改:
- terraform apply -var "do_token=${DO_TOKEN}" terraform apply -var“ do_token = $ {DO_TOKEN}”
Terraform will ask you to confirm if you wish to destroy the Droplets and firewall. This will destroy all assets you imported and created via Terraform, so ensure you verify that you wish to proceed before typing yes.
Terraform将要求您确认是否要销毁Droplet和防火墙。 这将销毁您通过Terraform导入和创建的所有资产,因此请确保在输入yes之前确认要继续。
You’ll see output similar to:
您将看到类似于以下内容的输出:
Output
. . .
digitalocean_droplet.do_droplet[0]: Destroying... [id=YOUR-DROPLET-ID]]
digitalocean_droplet.do_droplet_new[0]: Destroying... [id=YOUR-DROPLET-ID]
digitalocean_droplet.do_droplet_new[1]: Destroying... [id=YOUR-DROPLET-ID]
digitalocean_firewall.do_firewall[0]: Destroying... [id=YOUR-FIREWALL-ID]
digitalocean_firewall.do_firewall[0]: Destruction complete after 1s
digitalocean_droplet.do_droplet_new[1]: Still destroying... [id=YOUR-DROPLET-ID, 10s elapsed]
digitalocean_droplet.do_droplet[0]: Still destroying... [id=YOUR-DROPLET-ID, 10s elapsed]
digitalocean_droplet.do_droplet_new[0]: Still destroying... [id=YOUR-DROPLET-ID, 10s elapsed]
digitalocean_droplet.do_droplet_new[1]: Still destroying... [id=YOUR-DROPLET-ID, 20s elapsed]
digitalocean_droplet.do_droplet_new[0]: Still destroying... [id=YOUR-DROPLET-ID, 20s elapsed]
digitalocean_droplet.do_droplet[0]: Still destroying... [id=YOUR-DROPLET-ID, 20s elapsed]
digitalocean_droplet.do_droplet_new[1]: Destruction complete after 22s
digitalocean_droplet.do_droplet[0]: Destruction complete after 22s
digitalocean_droplet.do_droplet_new[0]: Destruction complete after 22sApply complete! Resources: 0 added, 0 changed, 4 destroyed.
You’ve deleted all assets managed by Terraform. This is a useful workflow if you no longer need an asset or are scaling down.
您已删除了Terraform管理的所有资产。 如果您不再需要资产或按比例缩小规模,这将是一个有用的工作流程。
结论 (Conclusion)
In this tutorial you installed Terraform, imported existing assets, created new assets, and optionally destroyed those assets. You can scale this workflow to a larger project, such as deploying a production-ready Kubernetes cluster. Using Terraform you could manage all of the nodes, DNS entries, firewalls, storage, and other assets, as well as use version control to track changes and collaborate with a team.
在本教程中,您安装了Terraform,导入了现有资产,创建了新资产,并有选择地销毁了这些资产。 您可以将此工作流程扩展到更大的项目,例如部署可用于生产环境的Kubernetes集群。 使用Terraform,您可以管理所有节点,DNS条目,防火墙,存储和其他资产,还可以使用版本控制来跟踪更改并与团队合作。
To explore further features of Terraform read their documentation. You can also read DigitalOcean’s Terraform content for further tutorials and Q&A.
要探索Terraform的更多功能,请阅读其文档 。 您也可以阅读DigitalOcean的Terraform内容,以获取更多教程和问答。
翻译自: https://www.digitalocean.com/community/tutorials/how-to-import-existing-digitalocean-assets-into-terraform
如何将现有的DigitalOcean资产导入Terraform相关推荐
- oracle 导入sql文件 汉字乱码_将现有的sql脚本导入 Oracle 数据库,中文乱码问题...
将现有的sql 脚本导入 Oracle数据库 比如 在windows 系统下,可以写一个 bat 来实现直接导入 如:bat 中的内容如下,logs.log 将会记录执行日志 sqlplus user ...
- 如何在DigitalOcean中使用Terraform
介绍 (Introduction) Terraform is a tool for building and managing infrastructure in an organized way. ...
- Bridge资产导入 材质实例参数细节调整简单介绍
在bridge导入时 对材质实例的调整参数 这里只介绍项目中经常需要使用到的参数 首先在bridge资产中 导入的材质实例一般都具有以下参数 这里随机导入一个资产进行介绍 1.00.Global 一般 ...
- Qt Creator导入3D资产Importing 3D Assets
Qt Creator导入3D资产 导入3D资产 导入3D资产 您可以从Qt Marketplace下载Qt Bridge .它使您能够导入使用3D图形应用程序创建并以几种广泛使用的格式存储的文件,例如 ...
- 如何在DigitalOcean上使用Packer和Terraform构建Hashicorp Vault服务器
介绍 (Introduction) Vault, by Hashicorp, is an open-source tool for securely storing secrets and sensi ...
- 摄影测量计算机视觉领域_死亡之书:摄影测量资产,树木,视觉特效
摄影测量计算机视觉领域 In this blog series, we will go over every aspect of the creation of our demo "Book ...
- PE学习(四)第四章:导入表
第四章:导入表 windos加载器会一并加载导入表中的dll,并修改相应指令调用的函数地址. IMAGE_NT_HEADERS STRUCT{ Signature DWORD ? FileHead ...
- Qt Creator从Maya导出3D资产
Qt Creator从Maya导出3D资产 从Maya导出3D资产 从Maya导出3D资产 您可以从Maya以FBX格式导出图形.通常默认情况下会启用必要的插件,但是您可以在插件管理器中进行检查. M ...
- android studio 自动生成对象,在Android Studio中快速导入可绘制对象的方法?
在Android Studio中快速导入可绘制对象的方法? 在Android项目中的某个时候,您将需要在res/drawable目录中导入一些可绘制对象-工具栏图标,图像,UI功能. 大多数情况下,您 ...
最新文章
- 爱立信:SDN/NFV助力面向5G以及工业互联网的ICT转型
- 【linux】查看内存使用情况
- 智慧交通day02-车流量检测实现10:多目标追踪实现
- 【内部资源】这份Java全能手册在字节传疯了!
- Task 6.1 校友聊之NABCD模型分析
- iPhone的Push(推送通知)功能原理浅析
- 薪水太低的你,为什么不跳槽?
- 【Android开发】之Android环境搭建及HelloWorld
- python播放WAVE文件
- 首次在matable中安装libsvm碰到的问题和解决方法---- mxGetIr 已过时 错误
- 计算机考研408二战
- VirtualLab初学者教程-2.搭建一个光学系统
- 【.Net实用方法总结】 整理并总结System.IO中Path类及其方法介绍
- 多媒体计算机音乐大赛评分表,歌唱比赛的评分标准
- 远程实时读取海康威视4G网络摄像头视频
- Python 3 字符串 ljust( ) 方法
- 1.7Hadoop-HDFS命令
- 什么是 Kubernetes?
- 儿童php钢板设计原理,儿童股骨干中段骨折:弹性髓内钉优于钢板固定
- C语言handler类作用,Handle的原理(Looper、Handler、Message三者关系)