Normal map (Bump mapping) 法线贴图(凹凸映射) Standard Shader系列10
Normal map (Bump mapping) 法线贴图(凹凸映射)
本文档主要是对Unity官方手册的个人理解与总结(其实以翻译记录为主:>)
仅作为个人学习使用,不得作为商业用途,欢迎转载,并请注明出处。
文章中涉及到的操作都是基于Unity2018.3版本
参考链接:https://docs.unity3d.com/Manual/StandardShaderMaterialParameterNormalMap.html
Normal maps are a type of Bump Map. They are a special kind of texture that allow you to add surface detail such as bumps, grooves, and scratches to a model which catch the light as if they are represented by real geometry.
法线贴图是凹凸贴图的一种。它们是一种特殊的纹理,允许您添加表面细节,如凹凸、凹槽和划痕到模型上,在计算光照后,就好像它们是由真实的几何体表示的。
For example, you might want to show a surface which has grooves and screws or rivets across the surface, like an aircraft hull. One way to do this would be to model these details as geometry, as shown below.
例如,您可能想要显示一个表面有凹槽和螺钉或铆钉的表面,如飞机外壳。一种方法是将这些细节建模为几何体,如下所示。

A sheet of aircraft metal with details modeled as real geometry.
一种飞机金属薄片,其细节被制作成真实的几何体。
Depending on the situation it is not normally a good idea to have such tiny details modelled as “real” geometry. On the right you can see the polygons required to make up the detail of a single screwhead. Over a large model with lots of fine surface detail this would require a very high number of polygons to be drawn. To avoid this, we should use a normal map to represent the fine surface detail, and a lower resolution polygonal surface for the larger shape of the model.
根据不同的情况,将这些微小的细节建模为“真实的”几何形状通常不是一个好主意。在右边,你可以看到组成一个螺丝钉的细节所需的多边形。在一个拥有大量精细表面细节的大型模型上,这需要绘制大量的多边形。为了避免这种情况,我们应该使用法线贴图来表示精细的表面细节,对于较大的模型形状,使用分辨率较低的多边形表面。
If we instead represent this detail with a bump map, the surface geometry can become much simpler, and the detail is represented as a texture which modulates how light reflects off the surface. This is something modern graphics hardware can do extremely fast. Your metal surface can now be a low-poly flat plane, and the screws, rivets, grooves and scratches will catch the light and appear to have depth because of the texture.
如果我们用凹凸贴图来表示这个细节,那么表面的几何体就会变得简单得多,并且这个细节可以用纹理来表示,它可以调节光线在表面上的反射方式。现代图形硬件可以非常快地完成。你的金属表面现在可以是一个低多边形的平面,螺丝,铆钉,凹槽和划痕会捕捉到光照,并且由于纹理的原因看起来会有深度效果。

The screws, grooves and scratches are defined in a normalmap, which modifies how light reflects off the surface of this low-poly plane, giving the impression of 3D detail. As well as the rivets and screws, a texture allows us to include far more detail like subtle bumps and scratches.
螺丝、凹槽和划痕被定义在一个法线贴图中,它修改了光线在这个低多边形平面表面的反射方式,给人以3D细节的印象。除了铆钉和螺丝,纹理还允许我们加入更多细节,比如细微的碰撞和划痕。
In modern game development art pipelines, artists will use their 3D modelling applications to generate normal maps based on very high resolution source models. The normal maps are then mapped onto a lower-resolution game-ready version of the model, so that the original high-resolution detail is rendered using the normalmap.
在现代游戏开发美术管线中,美术将使用他们的3D建模应用程序来生成基于高分辨率源模型的法线贴图。然后将法线贴图映射到低分辨率游戏使用的模型版本,以便使用法线贴图渲染出原始的高分辨率细节。
How to create and use Bump Maps 如何生成和使用法线贴图
Bump mapping is a relatively old graphics technique, but is still one of the core methods required to create detailed realistic realtime graphics. Bump Maps are also commonly referred to as Normal Maps or Height Maps, however these terms have slightly different meanings which will be explained below.
凹凸贴图是一种比较古老的图形技术,但仍然是创建写实细节的实时图形所需的核心方法之一。凹凸贴图通常也被称为法线贴图或高度贴图,但是这些术语的含义略有不同,下文将对此进行解释。
What are Surface Normals? 什么是表面法线
To really explain how normal mapping works, we will first describe what a “normal” is, and how it is used in realtime lighting. Perhaps the most basic example would be a model where each surface polygon is lit simply according to the surface angles relative to the light. The surface angle can be represented as a line protruding in a perpendicular direction from the surface, and this direction (which is a vector) relative to the surface is called a “surface normal”, or simply, a normal.
为了真正解释法线贴图是如何工作的,我们将首先描述什么是“法线”,以及它如何在实时照明中使用。也许最基本的例子是一个模型,在这个模型中,每个表面多边形仅仅根据相对于光的表面角度被照亮。表面角度可以表示为一条从表面垂直方向伸出的直线,这个方向(它是一个矢量)相对于表面被称为“表面法线”,或者简单地说,法线。

Two 12-sided cylinders, on the left with flat shading, and on the right with smoothed shading
两个12面的圆柱体,左边是平面着色,右边是平滑着色
In the image above, the left cylinder has basic flat shading, and each polygon is shaded according to its relative angle to the light source. The lighting on each polygon is constant across the polygon’s area because the surface is flat. Here are the same two cylinders, with their wireframe mesh visible:
在上面的图像中,左圆柱体有基本的平面着色,每个多边形根据其相对于光源的角度进行着色处理。每个多边形上的光照在整个多边形区域内是恒定的,因为表面是平的。这是相同的两个圆柱体,它们的线框网格是可见的:

Two 12-sided cylinders, on the left with flat shading, and on the right with smoothed shading
两个12面的圆柱体,左边是平面着色,右边是平滑着色
The model on the right has the same number of polygons as the model on the left, however the shading appears smooth - the lighting across the polygons gives the appearance of a curved surface. Why is this? The reason is that the surface normal at each point used for reflecting light gradually varies across the width of the polygon, so that for any given point on the surface, the light bounces as if that surface was curved and not the flat constant polygon that it really is.
右边的模型和左边的模型有相同数量的多边形,但是着色看起来很平滑——多边形上的灯光看起来像一个曲面。这是为什么呢?原因是用于反射光的每个点的表面法线在多边形的宽度上逐渐变化,因此对于表面上的任何给定点,光的反射就好像这个表面是弯曲的,而不是它真正的平面常量多边形。
Viewed as a 2D diagram, three of the surface polygons around the outside of the flat-shaded cylinder would look like this:
从2D图上看,平面着色圆柱外部的三个表面多边形是这样的:

Flat shading on three polygons, viewed as a 2D diagram
三个平面的平面着色,作为2D图解
The surface normals are represented by the orange arrows. These are the values used to calculate how light reflects off the surface, so you can see that light will respond the same across the length of each polygon, because the surface normals point in the same direction. This gives the “flat shading”, and is the reason the left cylinder’s polygons appear to have hard edges.
表面法线用橙色箭头表示。这些是用来计算光如何反射到表面的值,所以你可以看到,光在每个多边形的长度上会有相同的响应,因为表面法线指向相同的方向。这就产生了“平面着色”,这也是为什么左圆柱的多边形看起来有坚硬的边缘。
For the smooth shaded cylinder however, the surface normals vary across the flat polygons, as represented here:
然而,对于光滑的平面圆柱,表面法线在平面多边形上变化,如下图所示:

Smooth shading on three polygons, viewed as a 2D diagram
在三个多边形上的平滑着色,作为一个二维图解
The normal directions gradually change across the flat polygon surface, so that the shading across the surface gives the impression of a smooth curve (as represented by the greeen line). This does not affect the actual polygonal nature of the mesh, only how the lighting is calculated on the flat surfaces. This apparent curved surface is not really present, and viewing the faces at glancing angles will reveal the true nature of the flat polygons, however from most viewing angles the cylinder appears to have a smooth curved surface.
法线方向在平面的多边形表面上逐渐改变,因此在表面上的着色给人一种平滑曲线的印象(如绿线所示)。这并不影响网格的实际多边形性质,只影响如何在平面上计算光照。这种表观曲面并不是真实存在的,以掠角观察表面将显示出平面多边形的真实性质,然而从大多数视角来看,圆柱表面似乎是光滑的曲面。
Using this basic smooth shading, the data determining the normal direction is actually only stored per vertex, so the changing values across the surface are interpolated from one vertex to the next. In the diagram above, the red arrows indicate the stored normal direction at each vertex, and the orange arrows indicate examples of the interpolated normal directions across the area of the polygon.
使用这种基本的平滑着色,决定法线方向的数据实际上只存储在每个顶点上,因此整个表面的变化值从一个顶点插值到下一个顶点。在上图中,红色箭头表示在每个顶点处存储的法线方向,橙色箭头表示在多边形区域内插值的法线方向。
What is Normal mapping? 什么是法线贴图
Normal mapping takes this modification of surface normals one step further, by using a texture to store information about how to modify the surface normals across the model. A normal map is an image texture mapped to the surface of a model, similar to regular colour textures, however each pixel in the texture of the normal map (called a texel) represents a deviation in surface normal direction away from the “true” surface normal of the flat (or smooth interpolated) polygon.
通过使用纹理来存储关于如何在整个模型中修改表面法线的信息,法线贴图(Normal mapping)又进一步修改了表面法线。法线贴图是一种图像纹理映射到模型的表面,类似于普通颜色纹理,然而每个像素纹理的法线贴图(称为纹素)代表一个曲面法线方向远离偏移“正常”的平面(或光滑插值多边形)的表面法线。

Normal mapping across three polygons, viewed as a 2D diagram
跨越三个多边形的法线贴图,作为2D图解
In this diagram, which is again a 2D representation of three polygons on the surface of a 3D model, each orange arrow corresponds to a pixel in the normalmap texture. Below, is a single-pixel slice of a normalmap texture. In the centre, you can see the normals have been modified, giving the appearance of a couple of bumps on the surface of the polygon. These bumps would only be apparent due to the way lighting appears on the surface, because these modified normals are used in the lighting calculations.
在这个图中,同样是3D模型表面三个多边形的2D表示,每个橙色箭头对应于法线贴图中的一个像素。下面是一个法线贴图纹理的单像素切片。在中央,你可以看到法线被修改了,在多边形的表面出现了一些凸起。这些凸起只会由于光照在其表面而显现出来,因为这些修改后的法线用于光照计算。
The colours visible in a raw normal map file typically have a blueish hue, and don’t contain any actual light or dark shading - this is because the colours themselves are not intended to be displayed as they are. Instead, the RGB values of each texel represent the X,Y & Z values of a direction vector, and are applied as a modification to the basic interpolated smooth normals of the polygon surfaces.
在一个原始法线贴图文件中可见的颜色通常有一个蓝色的色调,并且不包含任何实际的明暗着色——这是因为颜色本身并没有打算显示它们本来的样子。相反,每个texel的RGB值表示方向向量的X、Y和Z值,并被应用于对多边形表面的平滑法线做基本插值修改。

An example normal map texture
This is a simple normal map, containing the bump information for some raised rectangles and text. This normal map can be imported into Unity and placed into Normal Map slot of the Standard Shader. When combined in a material with a colour map (the Albedo map) and applied to the surface of of the cylinder mesh above, the result looks like this:
这是一个简单的法线贴图,包含一些凸起的矩形和文本的凹凸信息。这个法线贴图可以导入到Unity中,并放置到标准着色器的法线贴图槽中。当与颜色贴图(反照率贴图)结合并应用到柱面网格的表面时,结果如下:

The example normal map applied to the surface of the cylinder mesh used above
Again, this does not affect the actual polygonal nature of the mesh, only how the lighting is calculated on the surfaces. This apparent raised lettering and shapes on the surface are not really present, and viewing the faces at glancing angles will reveal the true nature of the flat surface, however from most viewing angles the cylinder now appears to have embossed detail raised off the surface.
同样,这并不影响网格的实际多边形性质,只影响如何在表面上计算光照。表面上这种明显的凸起的字体和形状并不是真实存在的,从斜视角度观察表面将揭示平面的真实性质,然而,从大多数视角来看,圆柱体现在似乎已经凸出表面的浮雕细节。
How do I get or make normal maps? 怎么制作法线贴图
Commonly, Normal Maps are produced by 3D or Texture artists in conjunction with the model or textures they are producing, and they often mirror the layout and contents of the Albedo map. Sometimes they are produced by hand, and sometimes they are rendered out from a 3D application.
通常,法线贴图是由3D或纹理艺术家结合他们正在制作的模型或纹理制作的,它们经常反映反照率贴图的布局和内容。有时它们是手工制作的,有时它们是从3D应用程序中渲染出来的。
How to render normal maps from a 3D application is beyond the scope of this documentation, however the basic concept is that a 3D artist would produce two versions of a model - a very high resolution model containing all detail as polygons, and a lower-res “game ready” model. The high res model would be too detailed to run optimally in a game (too many triangles in the mesh), but it is used in the 3D modelling application to generate the normal maps. The lower-res version of model can then omit the very fine level of geometry detail that is now stored in the normal maps, so that it can be rendered using the normal mapping instead. A typical use case for this would be to show the bumped detail of creases, buttons, buckles and seams on a characters clothing.
如何从一个3D应用程序渲染法线贴图超出了本文档的范围,然而,基本的概念是,一个3D艺术家将产生一个模型的两个版本-一个非常高的分辨率模型,包含所有细节作为多边形,和一个低分辨率的“游戏版本”模型。高分辨率模型过于详细,无法在游戏中最佳运行(网格中有太多的三角形),但它在3D建模应用程序中用于生成法线贴图。模型的低分辨率版本可以忽略现在存储在法线映射中的非常精细的几何细节,这样就可以使用法线映射来渲染它。一个典型的用例是显示角色衣服上的褶皱、纽扣、纽扣扣和接缝的凹凸细节。
There are some software packages which can analyse the lighting in a regular photographic texture, and extract a normalmap from it. This works by assuming the original texture is lit from a constant direction, and the light and dark areas are analysed and assumed to correspond with angled surfaces. However, when actually using a bump map, you need to make sure that your Albedo texture does not have lighting from any particular direction in the image - ideally it should represent the colours of the surface with no lighting at all - because the lighting information will be calculated by Unity according to the light direction, surface angle and bump map information.
有一些软件包可以分析光线在一个常规的摄影纹理,并提取一个法线贴图。它的工作原理是假设原始纹理是从一个恒定的方向被照亮的,然后对光照和暗区进行分析,并假设它们与有角度的表面相对应。然而,当使用一个凹凸贴图,你需要确保你的反照率纹理是没有从任何特定方向照明的图像——理想情况下它应该代表的颜色表面没有照明,因为照明信息将根据光的方向,表面角和凹凸贴图信息计算。
Here are two examples, one is a simple repeating stone wall texture with its corresponding normal map, and one is a character’s texture atlas with its corresponding normal map:
这里有两个例子,一个是简单的重复石墙纹理及其对应的法线贴图,另一个是角色的贴图集及其对应的法线贴图:

A stone wall texture and its corresponding normal map texture
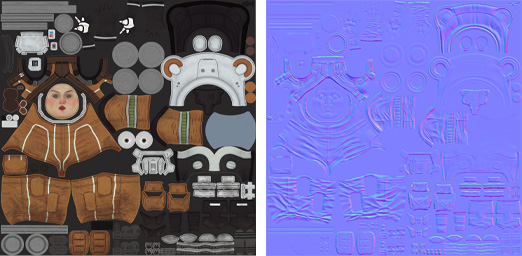
A character texture atlas, and its corresponding normal map texture atlas
What’s the difference between Bump Maps, Normal Maps and Height Maps?
Normal Maps and Height Maps are both types of Bump Map. They both contain data for representing apparent detail on the surface of simpler polygonal meshes, but they each store that data in a different way.
法线贴图和高度贴图都是凹凸贴图的类型。它们都包含了表示简单多边形网格表面的表面细节的数据,但是它们以不同的方式存储这些数据。

On the left, a height map for bump mapping a stone wall. On the right, a normal map for bump mapping a stone wall.
Above, on the left, you can see a height map used for bump mapping a stone wall. A height map is a simple black and white texture, where each pixel represents the amount that point on the surface should appear to be raised. The whiter the pixel colour, the higher the area appears to be raised.
上面,在左边,你可以看到一个高度贴图,用于凹凸贴图一个石墙。高度贴图是一种简单的黑白纹理,其中每个像素表示表面上应该出现的凸起点的数量。像素颜色越白,显示的区域越高。
A normal map is an RGB texture, where each pixel represents the difference in direction the surface should appear to be facing, relative to its un-modified surface normal. These textures tend to have a bluey-purple tinge, because of the way the vector is stored in the RGB values.
法线贴图是一种RGB纹理,其中每个像素表示相对于未修改的表面法线,表面应该呈现的方向的差异。由于矢量存储在RGB值中的方式,这些纹理往往带有蓝紫色。
Modern realtime 3D graphics hardware rely on Normal Maps, because they contain the vectors required to modify how light should appear to bounce of the surface. Unity can also accept Height Maps for bump mapping, but they must be converted to Normal Maps on import in order to use them.
现代实时3D图形硬件依赖于法线贴图,因为它们包含修改光在表面的反射方式所需的矢量。Unity也可以接受凹凸贴图的高度贴图,但是它们必须在导入时转换为法线贴图才能使用。
Why the bluey-purple colours?
Understanding this is not vital for using normal maps! It’s ok to skip this paragraph. However if you really want to know: The RGB colour values are used to store the X,Y,Z direction of the vector, with Z being “up” (contrary to Unity’s usual convention of using Y as “up”). In addition, the values in the texture are treated as having been halved, with 0.5 added. This allows vectors of all directions to be stored. Therefore to convert an RGB colour to a vector direction, you must multiply by two, then subtract 1. For example, an RGB value of (0.5, 0.5, 1) or #8080FF in hex results in a vector of (0,0,1) which is “up” for the purposes of normal-mapping - and represents no change to the surface of the model. This is the colour you see in the flat areas of the “example” normal map earlier on this page.
理解这一点对于使用法线贴图来说并不重要!跳过这段没关系。然而,如果你真的想知道:RGB颜色值是用来存储向量的X,Y,Z方向,Z是“向上”(与Unity通常使用Y作为“向上”的惯例相反)。此外,纹理中的值被视为已经减半,并添加了0.5。这允许存储所有方向的向量。因此,要将RGB颜色转换成矢量方向,必须乘以2,然后减去1。例如,在十六进制中,RGB值为(0.5、0.5、1)或#8080FF将产生一个向量(0,0,1),该向量对于法线贴图来说是“上”的,并且表示模型的表面没有变化。这是您在本页前面的“示例”法线贴图的平坦区域中看到的颜色。

A normal map using only #8080FF, which translates to a normal vector of 0,0,1 or “straight up”. This applies no modification to the surface normal of the polygon, and therefore produces no change to the lighting. Any pixels which are different to this colour results in a vectors that point in a different direction - which therefore modify the angle that is used to calculate light bounce at that point.
只使用#8080FF的法线映射,它转换成一个0、0、1或“垂直向上”的法线向量。这不会对多边形的表面法线进行任何修改,因此不会对光线产生任何变化。任何不同于这种颜色的像素都会产生指向不同方向的向量——从而改变用于计算该点的光反射的角度。
A value of (0.43, 0.91, 0.80) gives a vector of (–0.14, 0.82, 0.6), which is quite a steep modification to the surface. Colours like this can be seen in the bright cyan areas of the stone wall normal map at the top of some of the stone edges. The result is that these edges catch the light at a very different angle to the flatter faces of the stones.
值(0.43,0.91,0.80)得到的向量是(-0.14,0.82,0.6),这是对曲面的一个很大的修正。像这样的颜色可以在一些石头边缘顶部的石墙法线图的亮青色区域中看到。其结果是,这些边缘以不同的角度捕捉到光线,与石头的平面形成不同的角度。
The bright cyan areas in the normalmap for these stones show a steep modification to the polygon’s surface normals at the top edge of each stone, causing them to catch the light at the correct angle.
在这些石头的法线贴图中明亮的青色区域显示了对每个石头顶部边缘的多边形表面法线的陡峭修改,使它们以正确的角度捕捉光线。

A stone wall with no bumpmap effect. The edges and facets of the rock do not catch the directional sun light in the scene.
没有bumpmap效果的石墙。岩石的边缘和侧面在场景中无法捕捉到定向的阳光。

The same stone wall with bumpmapping applied. The edges of the stones facing the sun reflect the directional sun light very differently to the faces of the stones, and the edges facing away.
相同的石墙加上bumpmapping应用。面向太阳的石头的边缘反射方向的太阳光与面向太阳的石头的边缘反射方向的太阳光非常不同。

The same bumpmapped stone wall, in a different lighting scenario. A point light torch illuminates the stones. Each pixel of the stone wall is lit according to how the light hits the angle of the base model (the polygon), adjusted by the vectors in the normal maps. Therefore pixels facing the light are bright, and pixels facing away from the light are darker, or in shadow.
同样的石头墙,在不同的照明场景。点光源照亮石头。每一个像素的石墙是根据光线如何击中的角度的基础模型(多边形),调整由矢量在法线地图。因此,面向光的像素是亮的,而背向光的像素是暗的,或在阴影中。
How to import and use Normal Maps and Height Maps
A normal map can be imported by placing the texture file in your assets
folder, as usual. However, you need to tell Unity that this texture is a normal map. You can do this by changing the “Texture Type” setting to “Normal Map” in the import inspector settings.
法线贴图可以通过在你的资产中放置纹理文件来导入。然而,你需要告诉Unity这个纹理是一个法线贴图。您可以通过在导入检查器设置中将“纹理类型”设置更改为“法线贴图”来做到这一点。
 To import a black and white heightmap as a normal map, the process is almost identical, except you need to check the “Create from Greyscale” option.
要将黑白高度贴图导入为法线贴图,过程几乎是相同的,只是您需要勾选“从灰度创建”选项。
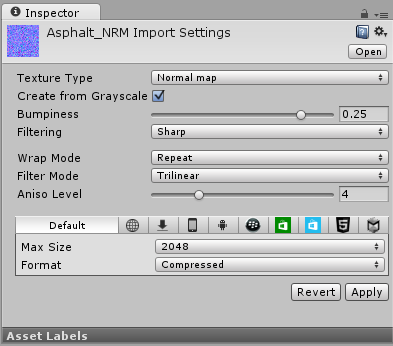
With “Create From Greyscale” selected, a Bumpiness slider will appear in the inspector. You can use this to control how steep the angles in the normalmap are, when being converted from the heights in your heightmap. A low bumpiness value will mean that even sharp contrast in the heightmap will be translated to gentle angles and bumps. A high value will create exaggerated bumps and very high contrast lighting responses to the bumps.
选择“从灰度创建”,检查器中将出现一个Bumpiness的滑块。你可以用这个来控制法线贴图中的角度有多陡,当从你的高度贴图中转换的时候。低颠簸值意味着即使高度图中的强烈对比也会转化为平缓的角度和颠簸。高值会产生夸张的凹凸和非常高的对比度光照响应凹凸。
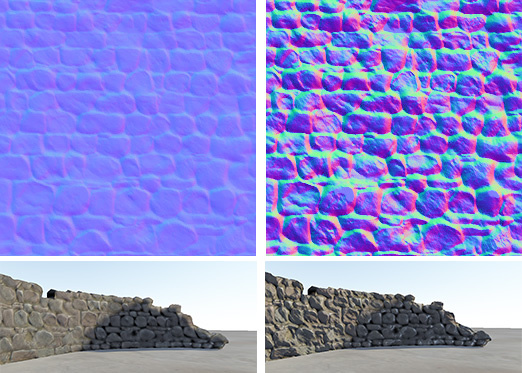
Low and High Bumpiness settings when importing a height map as a normal map, and the resulting effect on the model.
将高度贴图导入为法线贴图时的高和低凹凸度设置,以及对模型的影响。
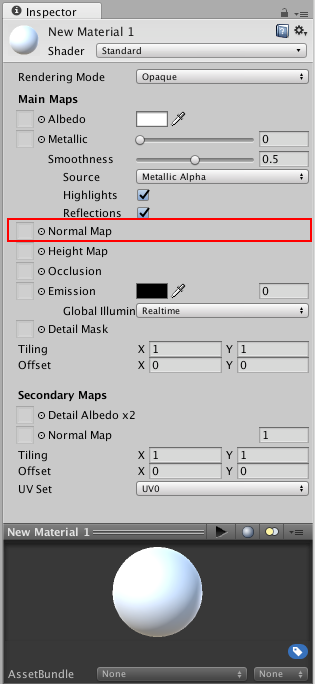
Once you have a normalmap in your assets, you can place it into the Normal Map slot of your Material in the inspector. The Standard Shader has a normal map slot, and many of the older legacy shaders also support normal maps.
一旦你在你的资产中有了一个法线贴图,你可以把它放到检查器中材质的法线贴图槽中。标准的着色器有一个法线贴图插槽,许多旧的着色器也支持法线贴图。
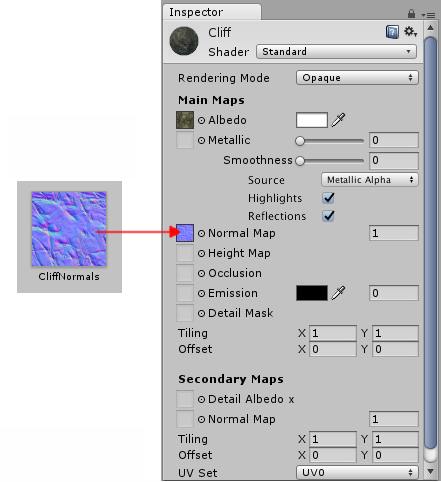
Placing a normal map texture into the correct slot in a material using the Standard Shader
使用标准着色器将法线贴图纹理放置到材质的正确槽中
If you imported a normalmap or heightmap, and did not mark it as a normal map (By selecting Texture Type: Normal Map as described above), the Material inspector will warn you about this and offer to fix it, as so:
如果您导入了一个normalmap或heightmap,但没有将其标记为一个normalmap(通过选择纹理类型:normalmap,如上所述),材质检查器将对此发出警告并提供修复,如下所示:

The “Fix Now” warning appears when trying to use a normalmap that has not been marked as such in the inspector.
当尝试使用检查器中未标记为normalmap时,将出现“Fix Now”警告。
Clicking “Fix Now” has the same effect as selecting Texture Type: Normal Map in the texture inspector settings. This will work if your texture really is a normal map. However if it is a greyscale heightmap, it will not automatically detect this - so for heightmaps you must always select the “Create from Greyscale” option in the texture’s inspector window.
点击“Fix Now”和在纹理检查器设置中选择纹理类型:Normal Map具有相同的效果。这将工作,如果你的纹理真的是一个法线贴图。然而,如果它是一个灰度高度贴图,它不会自动检测到这个,所以对于高度贴图,你必须总是在纹理检查窗口中选择“从灰度创建”选项。
Secondary Normal Maps 细节法线贴图
You may also notice that there is a second Normal Map slot further down in the Material inspector for the Standard Shader. This allows you to use an additional normal map for creating extra detail. You can add a normal map into this slot in the same way as the regular normal map slot, but the intention here is that you should use a different scale or frequency of tiling so that the two normal maps together produce a high level of detail at different scales. For example, your regular normal map could define the details of panelling on a wall or vehicle, with groves for the panel edges. A secondary normal map could provide very fine bump detail for scratches and wear on the surface which may be tiled at 5 to 10 times the scale of the base normal map. These details could be so fine as to only be visible when examined closely. To have this amount of detail on the base normal map would require the base normal map to be incredibly large, however by combining two at different scales, a high overall level of detail can be achieved with two relatively small normal map textures.
你也可能会注意到在材质检查器中有第二个法线贴图槽。这允许您使用一个额外的法线贴图来创建额外的细节。你可以添加一个法线贴图到这个位置以同样的方式作为正常的法线贴图位置,但是这里的意图是,你应该使用一个不同的规模和频率的块,这样两个法线贴图在一起产生一个高水平的细节在不同的尺度上。例如,您的常规法线贴图可以定义墙壁或车辆上镶板的细节,以及镶板边缘的纹路。细节法线贴图可以提供非常精细的凹凸细节的划痕和磨损的表面,在基础法线贴图的比例上可以平铺5至10倍。这些细节非常精细,只有仔细观察才能看到。要在基法线贴图上有这么多的细节,需要基法线贴图非常大,但是通过在不同的尺度上组合两个法线贴图,可以用两个相对较小的法线贴图纹理实现一个高的整体细节水平。
Normal map (Bump mapping) 法线贴图(凹凸映射) Standard Shader系列10相关推荐
- Unity Shader - 切线空间的法线贴图应用(T2W W2T)
法线贴图 法线贴图(或是法线纹理)其实就是一张图片中的RGB通道分别存储着法线方向的纹理(有些为了数据压缩将X,Y存储在RG通道,Z是通过1-dot(xy,xy)来近似计算). 它的由来是因为高模运行 ...
- Real-Time Rendering——6.7.1 Blinn’s Methods 6.7.2 Normal Mapping法线映射
6.7.1 Blinn's Methods Blinn's original bump mapping method stores two signed values, bu and bv, at e ...
- 凹凸贴图(Bump Map)实现原理以及与法线贴图(Normal Map)的区别
凹凸贴图(Bump Map)实现原理 以及与法线贴图(Normal Map)的区别 1 前言 翻译这篇教程的目的是为了帮助那些对图形渲染技术有兴趣却又苦于找不到免费中文学习资料的人.在我的身边没有任何 ...
- 凹凸贴图(Bump Mapping)
凹凸贴图是什么? 我们首先来看low-poly(多边形数较少)mesh和high-poly(多边形数量较多)mesh之间的不同.首先,最明显的不同就是high-poly能够表现出更多细节,但high- ...
- Unity Shader法线贴图(Normal Map)及其原理
简介 以前经常听说"模型不好看啊,怎么办啊?"答曰"加法线","做了个高模,准备烘一下法线贴图","有的美术特别屌,直接画法线贴图 ...
- OpenGL 法线贴图Normal Mapping
OpenGL法线贴图Normal Mapping 法线贴图Normal Mapping简介 法线贴图 切线空间 手工计算切线和副切线 切线空间法线贴图 复杂物体 最后一件事 法线贴图Normal Ma ...
- 中法线如何反转_凹凸贴图、法线贴图、置换贴图傻傻分不清?
太长不看全文版: 凹凸贴图:适用于凹凸起伏小的材质,不影响模型外观. 法线贴图:适用于有起伏,但起伏不是很大的材质,用于表现如面部细节.小衣服纹理等细节,可以高效节约资源,不影响模型外观. 置换贴图: ...
- 凹凸贴图与法线贴图的区别
我翻译这篇教程的目的是为了帮助那些对图形渲染技术有兴趣却又苦于找不到免费中文学习资料的人.在我的身边没有任何一位从事计算机专业的前辈,从刚学会WINDOWS的基本操作到现在,我的计算机技术完全都是一步 ...
- Three.js凹凸贴图bumpMap和法线贴图.normalMap
凹凸贴图bumpMap和法线贴图.normalMap 本文是Three.js电子书的8.6节 一个复杂的曲面模型,往往模型顶点数量比较多,模型文件比较大,为了降低模型文件大小,法线贴图.normalM ...
最新文章
- seaborn系列 (7) | 核函数密度估计图kdeplot()
- 231 Power of Two 2的幂
- C++中类的组合和继承关系
- 利用btrace在线监控java程序状态
- 【深度学习】Keras vs PyTorch vs Caffe:CNN实现对比
- android安装类型,Android 获得已安装的程序并且区分类型
- error while loading shared libraries: libiconv.so.2: cannot open shared object file
- 网信办拟规定:平台未经用户同意不得强制订阅关注账号;Twitter回应大范围宕机;Krita 4.4.0发布|极客头条
- JS计算GridView里的TextBox
- python实现一个简单的tftp客户端
- c#实现文件转base64和base64转文件(文件为任意格式)
- html——页面内跳转
- CS231n 课程(笔记内容 by Aries.Y)
- 快速读懂CAN报文 DBC文件 解析文件
- 第3章 内核编程语言与环境(2)
- PS3视频媒体播放基本说明
- 类微信界面框架的搭建
- 网站广告1像素1元,超有创意的百万像素网站
- Python小炼(1):初识Python
- 刷爆了国外朋友圈的英文漫画:人生的意义
热门文章
- 风控大佬的一天从这两张报表开始(搬砖)了
- [LiteratureReview]ORB-SLAM2: an Open-Source SLAM System for Monocular, Stereo and RGB-D Cameras
- 2022年全球白帽常用工具排行榜
- plot.figue中设置图片的大小
- 视频损坏修复后卡顿声音画面口型不同步处理解决方法
- 爬虫之request模块
- 老年机按键串号_手机拨号键盘上的*号和#号到底有什么用?一般人只知道前三个...
- 【Storm】介绍--最火的流式处理框架
- K8s系列之: lookup bigdata1 on 8.8.8.8:53: no such host
- 学习3D前需要了解的一些基础