【Linux】一万七千字详解 —— 基本指令(二)
文章目录
- 前言
- man 指令
- cp 指令
- mv 指令
- echo 指令(含输出重定向)
- cat 指令(含输入重定向)
- wc 指令
- more 指令
- less 指令
- head 和 tail 指令(含管道用法)
- date 指令
- cal 指令
- sort 指令
- find 和 which 和 whereis 指令
- alias 指令
- grep 指令
- top 指令
- zip 和 unzip 指令
- 结语
前言
今天的主要内容为 21个基本指令、几个重定向、管道用法 的讲解。内容相比前一篇指令博客更加丰富,当然难度也会高一些,我们现在开始学习。
man 指令
语法: man [选项] 命令
功能:man 指令可以查阅 Linux 的联机手册
root下安装 man 指令:
yum intall -y man-pages
通过 sudo 来为普通用户安装(普通用户使用sudo):
sudo yum intall -y man-pages
man 可以查阅指令或库函数等内容… 我们先查阅一下 man 指令本身如何使用:
![]()
查找手册介绍:
| 序号 | 英文 | 中文 |
|---|---|---|
| 1☆ | Executable programs or shell commands | 普通的命令 |
| 2☆ | System calls (functions provided by the kernel) | 系统调用 |
| 3☆ | Library calls (functions within program libraries) | (C语言)库函数 |
| 4 | Special files (usually found in /dev) | 特殊文件 |
| 5 | File formats and conventions, e.g. /etc/passwd | 文件格式 |
| 6 | Games | 游戏 |
| 7☆ | Miscellaneous (including macro packages and conventions), e.g. man(7), groff(7) | 附件和变量 |
| 8 | System administration commands (usually only for root) | 系统管理命令(通常为root使用) |
| 9 | Kernel routines [Non standard] | 内核例程(非标准) |
注:☆ 为常用手册。
man 默认从1号手册开始查找 man 后的内容,按照手册顺序依次向后查找,找到就显示,找不到就是找不到
按 q 退出查阅
查找 printf 指令:
[root@VM-4-3-centos ~]# man printf
![]()
(注:Linux 下也有 printf 指令,在 1号手册 中)
在 Linux 下使用 printf 指令:
[root@VM-4-3-centos lesson3]# printf "%d:%s\n" 10 "hello printf"
10:hello printf
使用 man 在 3号手册(C语言库函数) 查找 printf:
[root@VM-4-3-centos lesson3]# man 3 printf
![]()
cp 指令
语法:cp [选项] 源文件或目录 目标文件或目录
功能: cp —— copy,顾名思义就是拷贝,复制文件或目录
常用选项:
-f 或 --force 强行复制文件或目录, 不论目的文件或目录是否已经存在
-i 或 --interactive 覆盖文件之前先询问用户
-r递归处理,将指定目录下的文件与子目录一并处理。若源文件或目录的形态,不属于目录或符号链
接,则一律视为普通文件处理
-R 或 --recursive递归处理,将指定目录下的文件及子目录一并处理
拓展:
cp指令用于复制文件或目录,如同时指定两个以上的文件或目录,且最后的目的地是一个已经存在的目录,则它会把前面指定的所有文件或目录复制到此目录中。若同时指定多个文件或目录,而最后的目的地并非一个已存在的目录,则会出现错误信息。
cp 为拷贝的操作,cp 指令默认拷贝的文件
cp 文件名 路径:拷贝文件
将 testcp2 中文件拷贝到 上级目录 lesson3 中:
[root@VM-4-3-centos lesson3]# cd testcp2
[root@VM-4-3-centos testcp2]# touch file.txt
[root@VM-4-3-centos testcp2]# cp file.txt ..
[root@VM-4-3-centos testcp2]# ll ..
total 8
-rw-r--r-- 1 root root    0 Nov 19 00:59 file.txt
drwxr-xr-x 3 root root 4096 Nov 19 00:50 testcp1
drwxr-xr-x 3 root root 4096 Nov 19 00:58 testcp2
cp -r 目录名 路径:r 为递归,递归拷贝文件,即拷贝目录
将 testcp1 目录拷贝到 test2cp2目录:
[root@VM-4-3-centos lesson3]# tree
.
|-- testcp1
|   `-- a
|       |-- b
|       |   `-- c
|       |       `-- d
|       `-- test.txt
`-- testcp26 directories, 1 file
[root@VM-4-3-centos lesson3]# cp -r testcp1 testcp2
[root@VM-4-3-centos lesson3]# tree
.
|-- testcp1
|   `-- a
|       |-- b
|       |   `-- c
|       |       `-- d
|       `-- test.txt
`-- testcp2`-- testcp1`-- a|-- b|   `-- c|       `-- d`-- test.txt11 directories, 2 files
cp -f 文件名 路径:强制拷贝。平常状况下,路径下有同名目录会给出覆盖提示;-f 为暴力,为不给是否覆盖提示,直接覆盖
但是实际上这里的不给提示是有歧义的,我们可以测试一下:
![]()
那么这是为什么?我第一次测试时,以为是系统错误了,但是反复登入几次测试结果都是这个。我就联想到了是不是 cp 本身的问题,所以我用 alias 查看了它的别名:
[root@VM-4-3-centos f1]# alias cp
alias cp='cp -i'
这里的 cp -i 我们上面见过,它的意思是覆盖文件之前先询问用户,所以 cp 本质是 cp -i ,无论怎样都会先提问用户,比如我们的 cp -f 其实就被转换为了**cp -i -f**,这里我们可以通过 取消别名 的方式,来解决这个问题:
[root@VM-4-3-centos f1]# unalias cp
取消别名后:
[root@VM-4-3-centos f1]# ll ..
total 16
drwxr-xr-x 2 root root 4096 Nov 19 01:33 f1
drwxr-xr-x 2 root root 4096 Nov 19 01:33 f2
-rw-r--r-- 1 root root    0 Nov 19 01:34 file.txt
drwxr-xr-x 3 root root 4096 Nov 19 00:50 testcp1
drwxr-xr-x 4 root root 4096 Nov 19 01:08 testcp2
[root@VM-4-3-centos f1]# ll
total 0
-rw-r--r-- 1 root root 0 Nov 19 01:33 file.txt
[root@VM-4-3-centos f1]# cp -f file.txt .. // 没有给提示了
恢复别名:
[root@VM-4-3-centos f1]# alias cp='cp -i'
[root@VM-4-3-centos f1]# alias cp
alias cp='cp -i'
mv 指令
mv —— move,可以 剪切文件/目录 或者 重命名文件/目录。
语法: mv [选项] 源文件或目录 目标文件或目录
功能:
当第二个参数类型是文件时,mv命令完成文件重命名,此时,源文件只能有一个(也可以是源目录名),它
将所给的源文件或目录重命名为给定的目标文件名。当第二个参数是已存在的目录名称时,源文件或目录参数可以有多个,mv命令将各参数指定的源文件均移至
目标目录中。
常用选项:
- -f :f —— force 强制的意思,如果目标文件已经存在,不会询问直接覆盖。
- -i :若目标文件已经存在时,就会询问是否覆盖!
剪切:
mv 文件名 路径:剪切文件到指定路径
剪切 mydir 中的 file.txt 到上级目录 lesson3 中:
[root@VM-4-3-centos mydir]# ll
total 0
-rw-r--r-- 1 root root 0 Nov 19 02:01 file.txt
[root@VM-4-3-centos mydir]# mv file.txt ..
[root@VM-4-3-centos mydir]# ll ..
total 12
-rw-r--r-- 1 root root    0 Nov 19 02:01 file.txt
drwxr-xr-x 2 root root 4096 Nov 19 02:01 mydir
drwxr-xr-x 3 root root 4096 Nov 19 00:50 testcp1
drwxr-xr-x 4 root root 4096 Nov 19 01:08 testcp2
mv 目录名 路径:剪切目录到指定路径
剪切 mydir 中的 mydirdir 目录到 上级目录 lesson3 中:
[root@VM-4-3-centos lesson3]# ll
total 12
-rw-r--r-- 1 root root    0 Nov 19 02:01 file.txt
drwxr-xr-x 2 root root 4096 Nov 19 02:01 mydir
drwxr-xr-x 3 root root 4096 Nov 19 00:50 testcp1
drwxr-xr-x 4 root root 4096 Nov 19 01:08 testcp2
[root@VM-4-3-centos lesson3]# cd mydir
[root@VM-4-3-centos mydir]# mkdir mydirdir // 创建目录
[root@VM-4-3-centos mydir]# mv mydirdir .. // 剪切到上级目录
[root@VM-4-3-centos mydir]# ll ..
total 16
-rw-r--r-- 1 root root    0 Nov 19 02:01 file.txt
drwxr-xr-x 2 root root 4096 Nov 19 02:03 mydir
drwxr-xr-x 2 root root 4096 Nov 19 02:03 mydirdir
drwxr-xr-x 3 root root 4096 Nov 19 00:50 testcp1
drwxr-xr-x 4 root root 4096 Nov 19 01:08 testcp2
[root@VM-4-3-centos mydir]#
重命名:
mv 可以重命名文件或目录
mv 文件名 新的文件名:文件重命名。如果当前面目录并没有这个名字,且不是一个存在的目录,shell会判定它是一个新的文件名
把 file.txt 重命名为 newname.txt:
[root@VM-4-3-centos lesson3]# ll
total 16
-rw-r--r-- 1 root root    0 Nov 19 02:01 file.txt
drwxr-xr-x 2 root root 4096 Nov 19 02:03 mydir
drwxr-xr-x 2 root root 4096 Nov 19 02:03 mydirdir
drwxr-xr-x 3 root root 4096 Nov 19 00:50 testcp1
drwxr-xr-x 4 root root 4096 Nov 19 01:08 testcp2
[root@VM-4-3-centos lesson3]# mv file.txt newname.txt
[root@VM-4-3-centos lesson3]# ll
total 16
drwxr-xr-x 2 root root 4096 Nov 19 02:03 mydir
drwxr-xr-x 2 root root 4096 Nov 19 02:03 mydirdir
-rw-r--r-- 1 root root    0 Nov 19 02:01 newname.txt
drwxr-xr-x 3 root root 4096 Nov 19 00:50 testcp1
drwxr-xr-x 4 root root 4096 Nov 19 01:08 testcp2
mv 文件名 路径 新文件名:剪切文件到指定路径并重命名
将 lesson3 下的 newname.txt 剪切到 testcp1 并重命名为 newnew.txt :
[root@VM-4-3-centos lesson3]# ll
total 16
drwxr-xr-x 2 root root 4096 Nov 19 02:03 mydir
drwxr-xr-x 2 root root 4096 Nov 19 02:03 mydirdir
-rw-r--r-- 1 root root    0 Nov 19 02:01 newname.txt // 存在
drwxr-xr-x 3 root root 4096 Nov 19 00:50 testcp1
drwxr-xr-x 4 root root 4096 Nov 19 01:08 testcp2
[root@VM-4-3-centos lesson3]# mv newname.txt testcp1/newnew.txt
[root@VM-4-3-centos lesson3]# ll testcp1 // 剪切并重命名到testcp1
total 4
drwxr-xr-x 3 root root 4096 Nov 19 00:50 a
-rw-r--r-- 1 root root    0 Nov 19 02:01 newnew.txt
[root@VM-4-3-centos lesson3]# ll
total 16
drwxr-xr-x 2 root root 4096 Nov 19 02:03 mydir
drwxr-xr-x 2 root root 4096 Nov 19 02:03 mydirdir    // 删除掉了
drwxr-xr-x 3 root root 4096 Nov 19 02:57 testcp1
drwxr-xr-x 4 root root 4096 Nov 19 01:08 testcp2
总结:
- mv 文件名 不存在文件名:重命名
- mv 文件名 路径:剪切
- mv 文件名 目录 + 不存在文件名:剪切并重命名文件
- mv 目录名 目录 + 不存在目录名:剪切并重命名目录
echo 指令(含输出重定向)
echo "字符串":可以把字符串打印到屏幕上
[root@VM-4-3-centos lesson3]# echo "hello Linux"
hello Linux
echo 在打印的时候默认是向显示器打印的。
echo "字符串" > 文件名:将字符串写入文件中,若文件不存在会创建文件,为输出重定向
将 “aaa bbb ccc”,输出重定向 到 mylog.txt 中:
[root@VM-4-3-centos lesson3]# echo "aaa bbb ccc" > mylog.txt
[root@VM-4-3-centos lesson3]# ll
total 20
drwxr-xr-x 2 root root 4096 Nov 19 02:03 mydir
drwxr-xr-x 2 root root 4096 Nov 19 02:03 mydirdir
-rw-r--r-- 1 root root   12 Nov 19 03:18 mylog.txt // 文件被创建
drwxr-xr-x 3 root root 4096 Nov 19 02:57 testcp1
drwxr-xr-x 4 root root 4096 Nov 19 01:08 testcp2
[root@VM-4-3-centos lesson3]# cat mylog.txt // 被写入
aaa bbb ccc
测试 多次输出重定向 文件:
[root@VM-4-3-centos lesson3]# cat mylog.txt
aaa bbb ccc
[root@VM-4-3-centos lesson3]# echo "aaa" > mylog.txt
[root@VM-4-3-centos lesson3]# cat mylog.txt
aaa
[root@VM-4-3-centos lesson3]# echo "bbb" > mylog.txt
[root@VM-4-3-centos lesson3]# cat mylog.txt
bbb
[root@VM-4-3-centos lesson3]# echo "ccc" > mylog.txt
[root@VM-4-3-centos lesson3]# cat mylog.txt
ccc
每次重定向后,文件中的内容为最后一次重定向的结果。覆盖式写入(准备写入之前,先清空文件)
说了这么久,那么 输出重定向到底是什么意思?
这里的 >为 输出重定向,echo 默认是打印到屏幕上的。
如果 > 对应的 目标文件不存在 ,则会 自动创建 ,并把本来应该显示到显示器上面的文本,写入到 文件 中,这一过程,就叫 输出重定向 。
拓展一下:
显示数据到显示器上,就是向显示器打印,可以理解为向显示器写入,可以把显示器看做一种文件。
我们的C程序获取数据,比如 scanf、cin 都是从键盘读取到的,所以键盘也可以看做一种文件。
内存从键盘获取数据的过程,也就是 read ,对应着 input(输入)到程序中;内存显示数据到显示器的过程,也就是 write,对应着 output(输出) 到显示器上。这一过程就是IO。
示意图:
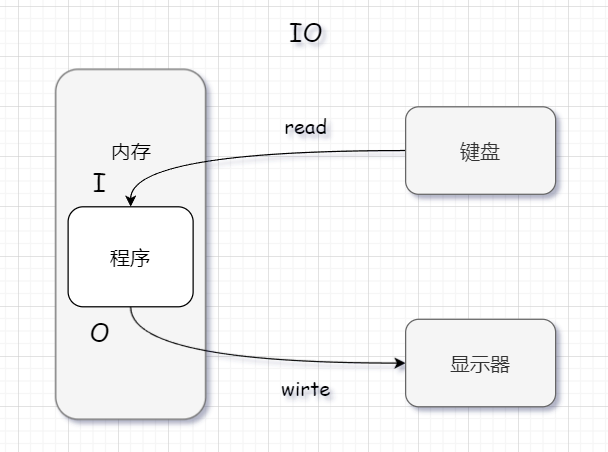
之前我们学习C语言文件操作时,读写方法是对于文件的。所以我们可以抽象拓展出一个概念:Linux下一切皆文件 !!!
所以,输出重定向就是把原本写入到 显示器文件 的内容写入到文件中!
echo "字符串" >> 文件名:将字符串内容追加到文件中,为 追加重定向
例如追加字符串到 mylog.txt 中:
[root@VM-4-3-centos lesson3]# cat mylog.txt
ccc
[root@VM-4-3-centos lesson3]# echo "hello" >> mylog.txt
[root@VM-4-3-centos lesson3]# cat mylog.txt
ccc
hello
[root@VM-4-3-centos lesson3]# echo "Linux" >> mylog.txt
[root@VM-4-3-centos lesson3]# cat mylog.txt
ccc
hello
Linux
追加自带换行,不断向目标文件中新增内容
cat 指令(含输入重定向)
语法:cat [选项] [文件]
功能: 查看目标文件的内容
常用选项:
- -b 对非空输出行编号
- -n 对输出的所有行编号
- -s 不输出多行空行
cat 打印文件的内容到屏幕上,其实就是查看文件内容。
我们 nano 一个文件,使用 cat 查看内容:
[root@VM-4-3-centos lesson3]# nano mylog.txt
[root@VM-4-3-centos lesson3]# cat mylog.txt
aaaaaaa
bbbbbbbccccccc
ssssssssaaaaaaaa
ddddddddd
cccccccc
aaaaaaaaaaaaaaaaa
cat -s 文件名:省略多余空行 查看文件内容,说白了就是指令之间最多输出一个空行
[root@VM-4-3-centos lesson3]# cat -s mylog.txt
aaaaaaa
bbbbbbbccccccc
ssssssssaaaaaaaa
ddddddddd
cccccccc
aaaaaaaaaaaaaaaaa
cat -sn 文件名:-n 是对输出行编号,-sn组合使用就是省略空行输出编号并打印内容
很清晰的看到省略了空行。
[root@VM-4-3-centos lesson3]# cat -sn mylog.txt1 aaaaaaa2 bbbbbbb3 4 ccccccc5 ssssssss6 7 aaaaaaaa8 ddddddddd9 cccccccc10 aaaaaaaaaaaaaaaaa11
cat 会把文件内容读取到程序里,然后打印出来。
cat < 文件名:输入重定向,将文件中内容读取到 cat 中,并打印
[root@VM-4-3-centos lesson3]# cat <  mylog.txt
aaaaaaa
bbbbbbbccccccc
ssssssssaaaaaaaa
ddddddddd
cccccccc
aaaaaaaaaaaaaaaaa
如果 cat 后不跟任何内容,那么就会 默认从键盘中读数据:
[root@VM-4-3-centos lesson3]# cat
hello
hello
Linux
Linux
aaa
aaa
bbb
bbb
所以,输入重定向就是改变原先从键盘上读取数据的方式,改为从其他文件中读取数据
其实这里使用 cat mylog.txt 和 cat < mylog.txt 的效果是一样的,但是还是有些区别:第一个是通过命令行参数获得文件名,第二个是通过重定向获得文件名。
这里简单了解一下就可以。
wc 指令
语法:wc [-lwm]
功能:统计文件的行数、单词数、字符数
常用选项:
- -l :仅列出行
- -w :仅列出多少字(英文单字)
- -m :多少字符
wc -l 文件名:显示文本文件有多少行和文件名
显示文件有多少行,并文件名
[root@VM-4-3-centos lesson3]# wc -l mylog.txt
12 mylog.txt
wc -l < 文件名:输入重定向,显示文本文件行数不显示文件名
[root@VM-4-3-centos lesson3]# wc -l < mylog.txt
12
more 指令
语法:more [选项] [文件]
功能:more命令,功能类似 cat
常用选项:
- -n 对输出的所有行编号
- q 退出more
测试 more 指令前,我们先写一个命令行脚本:
cnt=0; while [ $cnt -le 1000 ]; do echo "hello $cnt"; let cnt++; done > mylog.txt
意思是往 mylog.txt 中写入 hello 1 ~ hello 1000。
使用 cat 查看一下:
![]()
cat 只看到了结尾部分,说明 cat 适用于观看短文本。
长文本可以使用 more 指令观看:
more 文件名:从头部查看文本内容,按回车逐行翻阅。
![]()
less 指令
语法: less [参数] 文件
功能:
less与more类似,但使用less可以 随意浏览文件,而more仅能向前移动,却不能向后移动,而且less在查看之前不会加载整个文件。
常用选项:
- -i 忽略搜索时的大小写
- -N 显示每行的行号
- /字符串:向下搜索“字符串”的功能
- ?字符串:向上搜索“字符串”的功能
- n:重复前一个搜索(与 / 或 ? 有关)
- N:反向重复前一个搜索(与 / 或 ? 有关)
- q:quit 退出
补充:
- less 工具是对文件或其它输出进行分页显示的工具,应该说是linux查看文件内容的工具,功能强大。
- less 的用法比起 more 更加的有弹性。在 more 的时候,我们并没有办法向前面翻, 只能往后面看。
- 使用 less,就可以使用 [pageup] [pagedown] 等按键的功能来往前往后翻看文件,更容易用来查看一个文件的内容。
- less 拥有更多的搜索功能,不止可以向下搜,也可以向上搜。
less 文件名:查看文件内容支持上下翻阅

↑ 向上翻阅,↓ 向下翻阅,q 退出
less 支持查阅功能,方法为 / + 查阅内容,在一次查阅后,无法查阅到上次查阅内容前面的内容:
样例:
先查阅带9的内容,然后查阅带1的内容。上次查阅结果为带9的内容,9前面的内容无法被查阅。查阅带1的内容是从10开始查阅的。
![]()
head 和 tail 指令(含管道用法)
head
语法: head [参数]… [文件]…
功能:
head 用来显示档案的开头至标准输出中,默认head命令打印其相应文件的开头10 行。
选项:
- -n<行数> 显示的行数
head -n5 文件名:显示前五行,写成 head -5
[root@VM-4-3-centos lesson3]# head -n5 mylog.txt
hello 0
hello 1
hello 2
hello 3
hello 4
tail
语法: tail[必要参数] [选择参数] [文件]
功能: 用于显示指定文件末尾内容,不指定文件时,作为输入信息进行处理。常用查看日志文件。
选项:
- -f 循环读取
- -n<行数> 显示行数
tail 默认打印尾部十行内容。
tail -n5 文件名:显示文件尾部五行内容
[root@VM-4-3-centos lesson3]# tail -n5 mylog.txt
hello 996
hello 997
hello 998
hello 999
hello 1000
学习了 head 和 tail,我们能否获取 mylog.txt 中间部分的 第500 - 520 行?
法1:借助中间文件 + 重定向
step 1:head -520 mylog.txt > tmp.txt —— 将前520内容重定向到 tmp.txt 中
[root@VM-4-3-centos lesson3]# head -520 mylog.txt > tmp.txt
step2:tail -20 tmp.txt —— tail 截取 tmp.txt 的后20行
[root@VM-4-3-centos lesson3]# tail -20 tmp.txt
hello 500
hello 501
hello 502
hello 503
hello 504
hello 505
hello 506
hello 507
hello 508
hello 509
hello 510
hello 511
hello 512
hello 513
hello 514
hello 515
hello 516
hello 517
hello 518
hello 519
法2:管道
首先,介绍一下管道。我们生活中,管道是用来传输资源的,对于Linux中的管道也是。
| 就是管道的标志。计算机中最重要的资源是数据,| 就会被 shell 解释为链接两条指令用来传输数据的指令。我们可以把管道也当做一种文件。
先看两个管道的例子:
我们原本 统计行 需要用 wc -l mylog.txt,并且会打印文件名:
[root@VM-4-3-centos lesson3]# wc -l mylog.txt
1001 mylog.txt
但是学习了管道后,我们可以使用 cat mylog.txt | wc -l ,把 cat 的数据写到管道里,之后用 wc-l 到管道中读取,这样也不显示文件名。
[root@VM-4-3-centos lesson3]# cat mylog.txt | wc -l
1001
好了,介绍完管道和用法,我们回到正题:>
cat mylog.txt 将内容放到管道中,head -520 截取文件中前520行,再把这些放入管道中,tail -20 截取这些的后20行
指令为:cat mylog.txt | head -520 | tail -20
[root@VM-4-3-centos lesson3]# cat mylog.txt | head -520 | tail -20
hello 500
hello 501
hello 502
hello 503
hello 504
hello 505
hello 506
hello 507
hello 508
hello 509
hello 510
hello 511
hello 512
hello 513
hello 514
hello 515
hello 516
hello 517
hello 518
hello 519
管道意义:集联多条指令,做数据的不断加工。
date 指令
date 指定格式显示时间: date +%Y:%m:%d
date 用法:date [OPTION]… [+FORMAT]
在显示方面,使用者可以设定显示的格式,格式设定为 一个加号后接数个标记,其中常用的标记列表如下:
- %H : 小时(00…23)
- %M : 分钟(00…59)
- %S : 秒(00…61)
- %X : 相当于 %H:%M:%S
- %d : 日 (01…31)
- %m : 月份 (01…12)
- %Y : 完整年份 (0000…9999)
- %F : 相当于 %Y-%m-%d
在设定时间方面:
- date -s //设置当前时间,只有root权限才能设置,其他只能查看。
- date -s 20080523 //设置成20080523,这样会把具体时间设置成空00:00:00
- date -s 01:01:01 //设置具体时间,不会对日期做更改
- date -s “01:01:01 2008-05-23″ //这样可以设置全部时间
- date -s “01:01:01 20080523″ //这样可以设置全部时间
- date -s “2008-05-23 01:01:01″ //这样可以设置全部时间
- date -s “20080523 01:01:01″ //这样可以设置全部时间
时间戳:
时间->时间戳:date +%s
时间戳->时间:date -d@1508749502
Unix时间戳(英文为Unix epoch, Unix time, POSIX time 或 Unix timestamp)是从1970年1月1日(UTC/GMT的午夜)开始所经过的秒数,不考虑闰秒。
date +%Y-%m:%d/%H:%M:%S:特殊格式显示时间
[root@VM-4-3-centos lesson3]# date +%Y-%m:%d/%H:%M:%S
2022-11:19/15:25:32
date +%s:显示时间戳时间
[root@VM-4-3-centos lesson3]# date +%s
1668842769
date +%Y-%m:%d/%H:%M:%S -d@时间戳:将时间戳转换为格式时间
[root@VM-4-3-centos lesson3]# date +%Y-%m:%d/%H:%M:%S -d@1668842769
2022-11:19/15:26:09
cal 指令
语法: cal [参数] [月份] [年份]
功能: 用于查看日历等时间信息,如只有一个参数,则表示年份(1-9999),如有两个参数,则表示月份和年份
常用选项:
- -3 显示系统前一个月,当前月,下一个月的月历
- -j 显示在当年中的第几天(一年日期按天算,从1月1号算起,默认显示当前月在一年中的天数)
- -y 显示当前年份的日历
cal:默认查看本月日历
[root@VM-4-3-centos lesson3]# calNovember 2022
Su Mo Tu We Th Fr Sa1  2  3  4  56  7  8  9 10 11 12
13 14 15 16 17 18 19
20 21 22 23 24 25 26
27 28 29 30
cal 年份:查看一年的日历
[root@VM-4-3-centos lesson3]# cal 20222022                               January               February                 March
Su Mo Tu We Th Fr Sa   Su Mo Tu We Th Fr Sa   Su Mo Tu We Th Fr Sa1          1  2  3  4  5          1  2  3  4  52  3  4  5  6  7  8    6  7  8  9 10 11 12    6  7  8  9 10 11 129 10 11 12 13 14 15   13 14 15 16 17 18 19   13 14 15 16 17 18 19
16 17 18 19 20 21 22   20 21 22 23 24 25 26   20 21 22 23 24 25 26
23 24 25 26 27 28 29   27 28                  27 28 29 30 31
30 31April                   May                   June
Su Mo Tu We Th Fr Sa   Su Mo Tu We Th Fr Sa   Su Mo Tu We Th Fr Sa1  2    1  2  3  4  5  6  7             1  2  3  43  4  5  6  7  8  9    8  9 10 11 12 13 14    5  6  7  8  9 10 11
10 11 12 13 14 15 16   15 16 17 18 19 20 21   12 13 14 15 16 17 18
17 18 19 20 21 22 23   22 23 24 25 26 27 28   19 20 21 22 23 24 25
24 25 26 27 28 29 30   29 30 31               26 27 28 29 30July                  August                September
Su Mo Tu We Th Fr Sa   Su Mo Tu We Th Fr Sa   Su Mo Tu We Th Fr Sa1  2       1  2  3  4  5  6                1  2  33  4  5  6  7  8  9    7  8  9 10 11 12 13    4  5  6  7  8  9 10
10 11 12 13 14 15 16   14 15 16 17 18 19 20   11 12 13 14 15 16 17
17 18 19 20 21 22 23   21 22 23 24 25 26 27   18 19 20 21 22 23 24
24 25 26 27 28 29 30   28 29 30 31            25 26 27 28 29 30
31October               November               December
Su Mo Tu We Th Fr Sa   Su Mo Tu We Th Fr Sa   Su Mo Tu We Th Fr Sa1          1  2  3  4  5                1  2  32  3  4  5  6  7  8    6  7  8  9 10 11 12    4  5  6  7  8  9 109 10 11 12 13 14 15   13 14 15 16 17 18 19   11 12 13 14 15 16 17
16 17 18 19 20 21 22   20 21 22 23 24 25 26   18 19 20 21 22 23 24
23 24 25 26 27 28 29   27 28 29 30            25 26 27 28 29 30 31
30 31
cal -3:显示系统前一个月,当前月,下一个月的月历
[root@VM-4-3-centos lesson3]# cal -3October 2022          November 2022         December 2022
Su Mo Tu We Th Fr Sa  Su Mo Tu We Th Fr Sa  Su Mo Tu We Th Fr Sa1         1  2  3  4  5               1  2  32  3  4  5  6  7  8   6  7  8  9 10 11 12   4  5  6  7  8  9 109 10 11 12 13 14 15  13 14 15 16 17 18 19  11 12 13 14 15 16 17
16 17 18 19 20 21 22  20 21 22 23 24 25 26  18 19 20 21 22 23 24
23 24 25 26 27 28 29  27 28 29 30           25 26 27 28 29 30 31
30 31
sort 指令
对文本内容进行排序,排序后的顺序类似于类似于strcmp的比较,按照 ascii码值 排序,排序默认升序,-r 选项降序。
sort 文件名:按 ascii 码值排序文件内容并打印,不会影响到文件本身
[root@VM-4-3-centos lesson3]# nano test.c
[root@VM-4-3-centos lesson3]# sort test.caaaaaaaaa
aaaaaaaaa
bbb
bbbbbbb
cccccccc
ccccccccc
ggg
hhhhhhhh
jjjjjjjj
sort -r 文件名:倒序排序
[root@VM-4-3-centos lesson3]# sort -r test.c
jjjjjjjj
hhhhhhhh
ggg
ccccccccc
cccccccc
bbbbbbb
bbb
aaaaaaaaa
aaaaaaaaa
sort 文件名 | uniq:uniq 是对相邻文本内容进行去重,将 sort 文件名的内容放到 管道 中,使用uniq进行去重。
[root@VM-4-3-centos lesson3]# sort test.c | uniqaaaaaaaaa // 另一句内容被去除
bbb
bbbbbbb
cccccccc
ccccccccc
ggg
hhhhhhhh
jjjjjjjj
find 和 which 和 whereis 指令
find
语法: find pathname -options
功能: 用于在文件树种查找文件,并作出相应的处理(可能访问磁盘)
常用选项:
- name 按照文件名查找文件。
拓展:
- Linux下find命令在目录结构中搜索文件,并执行指定的操作。
- Linux下find命令提供了相当多的查找条件,功能很强大。由于find具有强大的功能,所以它的选项也很多,其中大部分选项都值得我们花时间来了解一下。
- 即使系统中含有网络文件系统(NFS),find命令在该文件系统中同样有效,只你具有相应的权限。
- 在运行一个非常消耗资源的find命令时,很多人都倾向于把它放在后台执行,因为遍历一个大的文件系
- 统可能会花费很长的时间(这里是指30G字节以上的文件系统)。
find在查找时,第一次查找较慢,第二次很快,Linux会把查找的结果缓存起来。
find 路径 -name 查找名称:把从这个路径开始的所有 带有查找名称 的文件查找出来
查找 test.txt:
[root@VM-4-3-centos lesson3]# find ./testcp2 -name test.txt
./testcp2/testcp1/a/test.txt
which
which 指令: 可以查看指令路径
比如查看 clear 的路径:
[root@VM-4-3-centos lesson3]# which clear
/usr/bin/clear
我们常用的指令都在 /usr/bin 位置:
![]()
whereis
whereis 搜索指定名称的文件/程序/归档文件
[root@VM-4-3-centos lesson3]# whereis ls
ls: /usr/bin/ls /usr/share/man/man1/ls.1.gz /usr/share/man/man1p/ls.1p.gz
alias 指令
当一条指令过于复杂时,可以使用alias 为文件起别名。
`alias 别名=‘指令’:为指令起别名,起别名后,使用别名就相当于这条指令
例如给 ls -a -l -i -n 起别名:
[root@VM-4-3-centos lesson3]# ls -a -l -i -n
total 48
655920 drwxr-xr-x  6 0 0 4096 Nov 19 15:40 .
393219 dr-xr-x---. 9 0 0 4096 Nov 17 23:45 ..
656003 drwxr-xr-x  2 0 0 4096 Nov 19 02:03 mydir
656511 drwxr-xr-x  2 0 0 4096 Nov 19 02:03 mydirdir
656513 -rw-r--r--  1 0 0 9901 Nov 19 14:06 mylog.txt
656516 -rw-r--r--  1 0 0   74 Nov 19 15:41 test.c
655867 drwxr-xr-x  3 0 0 4096 Nov 19 02:57 testcp1
655966 drwxr-xr-x  4 0 0 4096 Nov 19 16:06 testcp2
656512 -rw-r--r--  1 0 0 5090 Nov 19 14:54 tmp.txt
[root@VM-4-3-centos lesson3]# alias myls='ls -a -l -i -n'
[root@VM-4-3-centos lesson3]# myls
total 48
655920 drwxr-xr-x  6 0 0 4096 Nov 19 15:40 .
393219 dr-xr-x---. 9 0 0 4096 Nov 17 23:45 ..
656003 drwxr-xr-x  2 0 0 4096 Nov 19 02:03 mydir
656511 drwxr-xr-x  2 0 0 4096 Nov 19 02:03 mydirdir
656513 -rw-r--r--  1 0 0 9901 Nov 19 14:06 mylog.txt
656516 -rw-r--r--  1 0 0   74 Nov 19 15:41 test.c
655867 drwxr-xr-x  3 0 0 4096 Nov 19 02:57 testcp1
655966 drwxr-xr-x  4 0 0 4096 Nov 19 16:06 testcp2
656512 -rw-r--r--  1 0 0 5090 Nov 19 14:54 tmp.txt
unalias 别名:取消别名
再为 alias 取消别名:
[root@VM-4-3-centos lesson3]# alias myls
alias myls='ls -a -l -i -n'
[root@VM-4-3-centos lesson3]# unalias myls
[root@VM-4-3-centos lesson3]# alias myls
-bash: alias: myls: not found // 取消成功
grep 指令
语法: grep [选项] 搜寻字符串 文件
功能: 在文件中搜索字符串,将找到的行打印出来
常用选项:
- -i :忽略大小写的不同,所以大小写视为相同
- -n :顺便输出行号
- -v :反向选择,亦即显示出没有 ‘搜寻字符串’ 内容的那一行
grep 为文本行过滤,说白了就是将指定文本内容,按照特定关键字,按行筛选。
grep ‘字符串’ 文件:筛选出 含有该字符串 的内容
例如在文件中匹配 aaa
[root@VM-4-3-centos mydir]# cat test.txt
aaaaaa
bbbbb
bbbaaaabbb
cccccc
vvvvv
aaaaa
ccccccc[root@VM-4-3-centos mydir]# grep 'aaa' test.txt
aaaaaa
bbbaaaabbb
aaaaa
grep -v ‘字符串’ 文件:筛选出 不含有该字符串 的内容
[root@VM-4-3-centos mydir]# grep -v 'aaa' test.txt
bbbbb
cccccc
vvvvv
ccccccc
grep -i ‘字符串’ 文件:忽略大小写 正向匹配
[root@VM-4-3-centos mydir]# grep -i 'aaa' test.txt
aAaaa
bbbaaaabbb
AAAaaa
grep -ivn '字符串' 文件:忽略大小写反向匹配并给上行号
[root@VM-4-3-centos mydir]# grep -ivn 'aaa' test.txt
2:bbbbb
4:cccccc
5:vvvvv
7:ccccccc
8:
cat test.txt | grep 'aaa': 通过管道来匹配 aaa
[root@VM-4-3-centos mydir]# cat test.txt | grep 'aaa'
aAaaa
bbbaaaabbb
AAAaaa
top 指令
top:相当于 windows 中的任务管理器
![]()
zip 和 unzip 指令
语法: zip 压缩文件.zip 目录或文件
功能: 将目录或文件压缩成zip格式
常用选项:
- -r 递归处理,将指定目录下的所有文件和子目录一并处理
zip -r 压缩文件.zip 目录或文件名:压缩一个文件
[root@VM-4-3-centos lesson3]# zip -r testcp1.zip testcp1adding: testcp1/ (stored 0%)adding: testcp1/newnew.txt (stored 0%)adding: testcp1/a/ (stored 0%)adding: testcp1/a/b/ (stored 0%)adding: testcp1/a/b/c/ (stored 0%)adding: testcp1/a/b/c/d/ (stored 0%)adding: testcp1/a/test.txt (stored 0%)
[root@VM-4-3-centos lesson3]# ll
total 44
drwxr-xr-x 2 root root 4096 Nov 19 16:34 mydir
drwxr-xr-x 2 root root 4096 Nov 19 02:03 mydirdir
-rw-r--r-- 1 root root 9901 Nov 19 14:06 mylog.txt
-rw-r--r-- 1 root root   74 Nov 19 15:41 test.c
drwxr-xr-x 3 root root 4096 Nov 19 02:57 testcp1
-rw-r--r-- 1 root root 1110 Nov 19 17:16 testcp1.zip //打包成功
drwxr-xr-x 4 root root 4096 Nov 19 16:06 testcp2
-rw-r--r-- 1 root root 5090 Nov 19 14:54 tmp.txt
unzip 压缩文件:解包到当前路径
[root@VM-4-3-centos lesson3]# cp testcp1.zip /root // 拷贝文件到上一路径
[root@VM-4-3-centos lesson3]# ll ..
total 16
drwxr-xr-x 2 root root 4096 Nov 17 15:13 dir
drwxr-xr-x 2 root root 4096 Nov 17 15:47 lesson2
drwxr-xr-x 6 root root 4096 Nov 19 17:17 lesson3
-rw-r--r-- 1 root root 1110 Nov 19 17:18 testcp1.zip
[root@VM-4-3-centos lesson3]# cd ..
[root@VM-4-3-centos ~]# unzip testcp1.zip // 解包
Archive:  testcp1.zipcreating: testcp1/extracting: testcp1/newnew.txt      creating: testcp1/a/creating: testcp1/a/b/creating: testcp1/a/b/c/creating: testcp1/a/b/c/d/extracting: testcp1/a/test.txt
[root@VM-4-3-centos ~]# tree testcp1 // 解包成功
testcp1
|-- a
|   |-- b
|   |   `-- c
|   |       `-- d
|   `-- test.txt
`-- newnew.txt4 directories, 2 files
打包压缩的意义:防止数据丢失并节省空间。
结语
到这里,本篇博客就到此结束了。本篇博客干货还是很多的,如果认真看下来相信你一定会有收获。对于指令的学习还是要实践,多敲指令,毕竟实践是检验真理的唯一标准嘛!
如果觉得anduin写的还不错的话,还请一键三连!如有错误,还请指正!
我是anduin,一名C语言初学者,我们下期见!
![]()
【Linux】一万七千字详解 —— 基本指令(二)相关推荐
- 一万五千字详解HTTP协议
点击上方蓝色字体,选择"设为星标" 回复"资源"获取更多资源 本篇文章篇幅比较长,先来个思维导图预览一下. 一.概述 1.计算机网络体系结构分层 2.TCP/I ...
- 五千字详解消息通知!
临近春节,各大app年底冲刺,消息推送应该要开始泛滥了,本文对运营三宝之一的push(其他两宝短信.小红点暂不展开)进行一些梳理,看看如何在合适的时间,把合适的内容推给合适的人,真正发挥push的价值 ...
- 谷歌官方正式发布了Go1.20稳定版「8千字详解」
Go1.20 变化不少,该版本依然保持 Go1 兼容性,我们可以升级到 Go1.20,而不需要做任何代码改动. 可以使用你任何喜欢的方式升级: 比如:go install golang.org/dl/ ...
- 为什么你挖不到漏洞,阿里P8架构师亲授秘籍(五千字详解)
你为什么挖不到漏洞 你是不是在为学不会安全而烦恼? 你是不是在为挖不到漏洞而沮丧? 你是不是为实战挖洞毫无思路而丧失信心? 不要悲伤,不要心急忧郁的日子总会过去.假如生活欺骗了了你,不要沮丧,因为生活 ...
- Mysql安装配置和Mysql使用六千字详解!!
目录 课前导读 一.Mysql的安装和配置 二.数据库简介: 1.数据库中典型代表: 2.数据库类型: 3.Mysql简介: 4.客户端和服务器简介: 三.初始MySQL 四.数据库操作 五.表的基本 ...
- 千字详解:“Java性能调优六大工具”之JConsole工具
JConsole工具是JDK自带的图形化性能监控工具. 通过JConsole工具, 可以查看Java应用程序的运行概况, 并监控堆信息. 永久区使用情况及类的加载情况等. 本文主要介绍JConsole ...
- 1万七千字精讲,JDK8 的 Lambda、Stream、LocalDate 骚技能
小Hub领读: 本篇主要讲述是 Java 中 JDK1.8 的一些新语法特性使用,主要是 Lambda.Stream 和 LocalDate 日期的一些使用讲解. 作者:虚无境 来源:cnblogs. ...
- 原根与NTT 五千字详解
欧拉定理 若 m,a互质 则 阶的概念 若a,m互质,使得的最小正整数n称为a模m意义下的阶,记作 原根的概念 若,即a的阶等于m的欧拉函数,则称a为原根 阶的性质 在模m意义下两 ...
- 八道超经典指针面试题(三千字详解)
目录 第一题: 第二题: 第三题: 第四题: 第五题: 第六题: 第七题: 第八题: 第一题: int main() {int a[5] = { 1, 2, 3, 4, 5 };int *ptr = ...
- Linux中/proc目录下文件详解 /proc/devices文件 /proc/modules文件
http://blog.chinaunix.net/uid-10449864-id-2956854.html 原来对linux系统中的/proc目录不是很了解,只知道可以查看cpu,内存等相关的信息, ...
最新文章
- Java中的50个关键字
- PyTorch常用代码段整理合集,建议收藏!
- 从架构演进的角度聊聊Spring Cloud都做了些什么?
- iOS12系统应用发送邮件中的附件
- textContent、innerHTML、innerText、outerText、outerHTML、nodeValue使用场景和区别
- java中集合的区别_Java中的集合与集合之间的区别
- python 系统学习笔记(十二)---os os.path os.walk
- Mybatis sqlsession解析
- 第十章 VLAN间路由
- JavaIO流——文件的读取与传输
- python汉语叫什么意思_Python是什么-百度经验
- 激光电视的优缺点说明,激光电视与投影有什么区别
- Adobe Xd快捷键(Win 10)-UI设计更便捷
- 基于VB的Picture绘图
- 信息学奥林匹克竞赛-编程语言
- python 空数组判断
- 湖南高中计算机专业考生,湖南18人被保送清华,分别来自6所重点高中,长郡中学升学率最高...
- 【翻译1】Multivariate Time Series Forecasting with LSTMs in Keras——PM2.5
- 苹果应用中含有第三方支付怎么办?
- 人工智能加速抗生素发现