Nginx学习日记第五篇 -- upstream及fastcgi
一、Nginx upstream
Ngx_http_upstream_module模块可实现七层负载均衡,定义的服务器组可被proxy_pass、fastcgi_pass、uwsgi_pass、scgi_pass和memcached_pass所引用。
1、实验场景
Nginx upstream IP:192.168.0.110
apache node1 IP:192.168.0.40
apache node2 IP:192.168.0.30
2、Nginx upstream配置(结合proxy为例)
|
1
2
3
4
5
6
7
8
9
10
11
12
13
14
15
16
17
18
19
20
21
22
23
24
25
26
27
28
29
30
31
32
33
34
35
36
37
38
39
40
41
42
43
44
|
1.在http区段定义服务器组
[root@Nginx conf]# grep -Ev "#|^$" nginx.conf
worker_processes 1;
worker_rlimit_nofile 65535;
events {
worker_connections 20480;
}
http {
include mime.types;
default_type application/octet-stream;
upstream nodeserver{
server 192.168.0.30;
server 192.168.0.40;
}
sendfile on;
keepalive_timeout 65;
include server.conf;
}
2.在location区段的proxy_pass中引用服务器组
[root@Nginx conf]# grep -Ev "#|^$" server.conf
server {
listen 80;
server_name localhost;
location / {
root html/xn1;
index index.html;
}
location /user {
proxy_pass http://nodeserver;
proxy_set_header Host $host;
proxy_set_header X-Real-IP $remote_addr;
}
error_page 500 502 503 504 /50x.html;
location = /50x.html {
root html;
}
}
注意:在upstream定义的服务器组中,server可配置多种形式的服务器,在proxy_pass中引用服务器
填入服务器组名即可。
|
3、测试
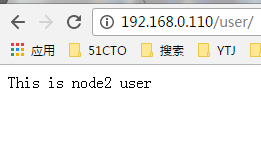
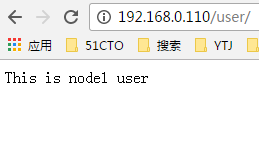
4、主要附加参数说明
server 192.168.0.30 weight=2;此处的weight为权重,默认为1;
主要算法,rr,wrr,ip_hash等,可在upstream中定义;
server 192.168.0.30 max_files=3 fail_timeout=30s;此处的max_files,fail_timeout为健康状态检测,超过3次未响应,超时30s,就从server列表中移除。
server 192.168.0.30 backup;标记为备份
server 192.168.0.30 down;标记为不可用,与ip_hash算法一同使用
更多用法,比如基于sticky的三种绑定方法等详见官方站点:
http://nginx.org/en/docs/http/ngx_http_upstream_module.html
二、Nginx fastcgi
1、fastcgi全称为高速的通用网关接口,是HTTP服务器与动态脚本语言之间通信的接口,其工作模式与反向代理差不多,实现客户端请求的动静分离。
2、LNMP简单安装
|
1
2
3
4
5
6
7
8
9
10
11
12
13
14
15
16
17
18
19
20
21
22
23
24
25
26
27
28
29
30
31
32
33
34
35
36
37
38
39
40
41
42
43
44
45
46
47
48
49
50
51
52
53
54
55
56
57
58
59
60
61
62
63
64
|
PHP主机配置
1.安装php-fpm
[root@Nginx conf]# yum install php-fpm
2.如果php与nginx不在同一台主机,则修改/etc/php-fpm.conf中的监听地址,我这里在一起,不用修改
3.启动php
[root@Nginx conf]# service php-fpm start
Nginx主机配置
1.Nginx配置,启用了默认的PHP配置
[root@Nginx conf]# grep -Ev "#|^$" server.conf
server {
listen 80;
server_name localhost;
add_header X-Via $server_addr;
location / {
root html/xn1;
index index.html;
}
location /user {
proxy_pass http://nodeserver;
proxy_set_header Host $host;
proxy_set_header X-Real-IP $remote_addr;
add_header X-Cache $upstream_cache_status;
}
error_page 500 502 503 504 /50x.html;
location = /50x.html {
root html;
}
location ~ \.php$ {
root html;
fastcgi_pass 127.0.0.1:9000;
fastcgi_index index.php;
fastcgi_param SCRIPT_FILENAME /scripts$fastcgi_script_name;
include fastcgi_params;
}
}
2.配置fastcgi_params
[root@Nginx conf]# grep -Ev "#|^$" fastcgi_params
fastcgi_param GATEWAY_INTERFACE CGI/1.1;
fastcgi_param SERVER_SOFTWARE nginx;
fastcgi_param QUERY_STRING $query_string;
fastcgi_param REQUEST_METHOD $request_method;
fastcgi_param CONTENT_TYPE $content_type;
fastcgi_param CONTENT_LENGTH $content_length;
fastcgi_param SCRIPT_FILENAME $document_root$fastcgi_script_name;
fastcgi_param SCRIPT_NAME $fastcgi_script_name;
fastcgi_param REQUEST_URI $request_uri;
fastcgi_param DOCUMENT_URI $document_uri;
fastcgi_param DOCUMENT_ROOT $document_root;
fastcgi_param SERVER_PROTOCOL $server_protocol;
fastcgi_param REMOTE_ADDR $remote_addr;
fastcgi_param REMOTE_PORT $remote_port;
fastcgi_param SERVER_ADDR $server_addr;
fastcgi_param SERVER_PORT $server_port;
fastcgi_param SERVER_NAME $server_name;
3.重启nginx
[root@Nginx conf]# nginx -s reload
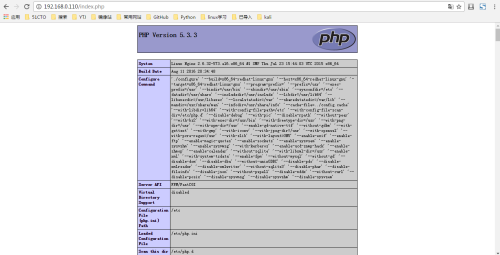
4.给出php页面
[root@Nginx html]# vim index.php
<?php
phpinfo();
?>
|
3、测试
4、安装php-mysql驱动mysql(都在本机,不在同一机器更改监听端口即可)
|
1
2
3
4
5
6
7
8
9
10
11
12
13
14
15
16
17
18
19
20
21
22
23
24
25
26
27
28
29
30
31
32
33
34
35
36
37
38
39
40
41
42
43
44
|
1.安装php-mysql
[root@Nginx conf]# yum install php-mysql
2.安装mysql
[root@Nginx conf]# yum install mysql-server
3.重启php,启动mysql
[root@Nginx conf]# service php-fpm restart
停止 php-fpm: [确定]
正在启动 php-fpm: [确定]
[root@Nginx conf]# service mysqld start
初始化 MySQL 数据库: Installing MySQL system tables...
OK
Filling help tables...
OK
To start mysqld at boot time you have to copy
support-files/mysql.server to the right place for your system
PLEASE REMEMBER TO SET A PASSWORD FOR THE MySQL root USER !
To do so, start the server, then issue the following commands:
/usr/bin/mysqladmin -u root password 'new-password'
/usr/bin/mysqladmin -u root -h Nginx password 'new-password'
Alternatively you can run:
/usr/bin/mysql_secure_installation
which will also give you the option of removing the test
databases and anonymous user created by default. This is
strongly recommended for production servers.
See the manual for more instructions.
You can start the MySQL daemon with:
cd /usr ; /usr/bin/mysqld_safe &
You can test the MySQL daemon with mysql-test-run.pl
cd /usr/mysql-test ; perl mysql-test-run.pl
Please report any problems with the /usr/bin/mysqlbug script!
[确定]
正在启动 mysqld: [确定]
|
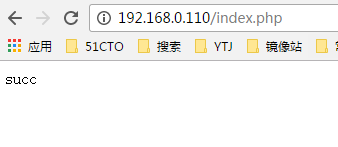
5、测试LNMP连接
|
1
2
3
4
5
6
7
8
9
|
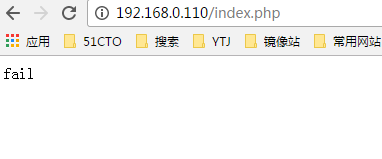
[root@Nginx conf]# vim /usr/local/nginx/html/index.php
<?php
$conn = mysql_connect('127.0.0.1','root','');
if ($conn)
echo succ;
else
echo fail;
mysql_close();
?>
|
|
1
2
|
[root@Nginx conf]# service mysqld stop
停止 mysqld: [确定]
|
更多fastcgi模块属性详见:http://nginx.org/en/docs/http/ngx_http_fastcgi_module.html
本文转自 元婴期 51CTO博客,原文链接:http://blog.51cto.com/jiayimeng/1895585
Nginx学习日记第五篇 -- upstream及fastcgi相关推荐
- 安卓开发学习日记第五天——奇怪的bug出现了(VT-x说没就没)_莫韵乐的欢乐日记
安卓开发学习日记第五天--奇怪的bug出现了(VT-x说没就没) 前情提要: 安卓开发学习日记第一天_Android Studio3.6安装 安卓开发学习日记第二天_破坏陷阱卡之sync的坑 安卓开发 ...
- 用计算机学数学日记,数学日记汇编五篇
数学日记汇编五篇 时间过得真快,一天又将结束了,相信你有很多感悟吧,不妨坐下来好好写写日记吧.那如何写一篇漂亮的日记呢?下面是小编收集整理的数学日记5篇,欢迎阅读,希望大家能够喜欢. 数学日记 篇1 ...
- Python学习日记-day1基础篇 字符 输出 注释
Python学习日记-day1基础篇 字符 输出 注释 by北栀一刺 # -*- coding: utf-8 -*- """ Spyder EditorThis is a ...
- Rust学习日记番外篇——代码写诗
Rust学习日记番外篇--代码写诗 中秋节即将来临啦~~提前祝大家月饼节快乐.今天看到了掘金的文章,有个代码写诗的活动,那我就小露一手了. 0x01 选定诗句 在掘金有下面几句诗可选. 举头望明月,低 ...
- python学习[第十五篇] 文件系统
python学习[第十五篇] 文件系统 对文件系统访问大多数都通过os模块实现. os 模块文件/目录访问函数 文件处理 mkfifo() 创建命名通道只用于linux remove(path)/un ...
- Android学习笔记第五篇--网络连接与云服务(一)
Android学习笔记第五篇–网络连接与云服务 第一章.无线连接设备 除了能够在云端通讯,Android的无线API也允许在同一局域网内的设备通讯,**甚至没有连接网络,而是物理具体相近,也可以相 ...
- Java学习日记:UI篇(6)--谢尔宾斯基地毯图
Java学习日记:UI篇(6)–谢尔宾斯基地毯图 引言:谢尔宾斯基地毯是数学家谢尔宾斯基提出的一个分形图形,谢尔宾斯基地毯和谢尔宾斯基三角形基本类似,不同之处在于谢尔宾斯基地毯采用的是正方形进行分形构 ...
- 日语学习日记之先导篇 20211130
日语学习日记之先导篇 20211130 日语n1考试考点被取消了,虽然很无奈,但是学习依旧没有停止,反而有更多的时间来学习了.之前为了备考只复习了N1相关内容. 现在从今天开始,系统地从N5开始复习加 ...
- 托攻击的多种攻击方式-----WZW托攻击学习日记(五)
这一次,介绍几种托攻击模型.托攻击是什么? 托攻击就是恶意用户或竞争对手公司可能试图在用户-项目矩阵中插入假的个人资料,以影响预测的评级或降低系统的性能. 接博客<托攻击检测基础知识-----W ...
最新文章
- SpringMVC权限管理
- 【Android】MTK Android 源码开发环境搭建
- 前端学习(2226):react之状态
- SOLOv2论文简读
- ${ctx} 的那些事
- linux下ceontab不起作用,linux下crontab 不能执行的原因
- php 字符串含有下划线,PHP-我的会话ID中有下划线
- postgres报错:FATAL: Peer authentication failed for user “zabbix“ Previous connection kept
- 循环遍历和迭代器遍历简单操作
- 单片机c语言编程实训报告,单片机实训报告范文
- sql server 2008 r2 序列号密钥实测可用20210906
- 纪念盘古工坊开发的一款手机游戏正式发布
- 一个小时学会画网络拓扑图(附标准素材)
- 读书笔记:《人类简史:从动物到上帝》
- web前端面试总结(自认为还算全面哈哈哈哈哈!!!!)
- Redisson(4)分布式锁之RedLock
- 2. ZK客户端与服务端建立连接的过程(基于NIO)
- html vertical-align:middle垂直居中 的方法
- pikachu暴力破解
- NDK开发——Android Studio+CMake实现QQ变声效果