android闹钟实现原理
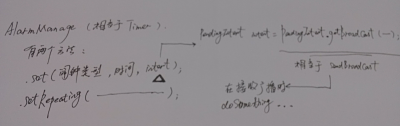
闹钟的原理可用下面我自己画的一幅图来概括:(不对的地方,尽管吐槽 )
)
我们来看看新建闹钟到闹钟响铃的步骤:
1、新建一个闹钟:
|
1
2
3
4
5
6
7
8
9
10
11
12
13
14
15
16
17
18
19
20
21
22
23
24
|
// 获得AlarmManager实例
final AlarmManager am = (AlarmManager) getSystemService(ALARM_SERVICE);
// 实例化Intent
Intent intent = new Intent();
// 设置Intent action属性
intent.setAction("com.test.BC_ACTION");
intent.putExtra("msg", "该去开会啦!");
// 实例化PendingIntent
final PendingIntent pi = PendingIntent.getBroadcast(MainActivity.this, 0,
intent, 0);
// 获得系统时间
final long time = System.currentTimeMillis();
am.set(AlarmManager.RTC_WAKEUP, time+5000, sender);//5秒后闹铃
// 设置按钮单击事件
setBtn.setOnClickListener(new OnClickListener() {
@Override
public void onClick(View v) {
// 重复提示,从当前时间开始,间隔5秒
am.setRepeating(AlarmManager.RTC_WAKEUP, time,
5 * 1000, pi);
}
});
|
在AndroidMainfest.xml里注册广播接收器
|
1
2
3
4
5
|
<receiverandroid:name="MyReceiver">
<intent-filter>
<actionandroid:name="com.test.BC_ACTION"/>
</intent-filter>
</receiver>
|
2、定义一个AlarmReceiver extends BroadcastReceiver接收广播,并弹出闹钟提醒视图。
上面用到一个AlarmManage,我们分别来看看它的处理闹钟流程和作用及例子。
处理闹钟流程:对应AlarmManage有一个AlarmManagerServie服务程序,该服务程序才是正真提供闹铃服务的,它主要遍历闹铃列表并设置即将触发的闹铃给闹铃设备,并且一直监听闹铃设备,一旦有闹铃触发或者是闹铃事件发生,AlarmManagerServie服务程序就会遍历闹铃列表找到相应的注册闹铃并发出广播。
作用及例子:AlarmManage中文名闹钟,或者叫做“全局定时器”更合适,它的作用和Timer类似,有两种使用方法:1、在特定时长后(特定时间)执行某任务;2、周期性的执行某任务,AlarmManager对象配合Intent使用,可以定时的开启一个Activity,发送一个BroadCast,或者开启一个Service.
(1)在指定时长后(特定时间)执行某项操作
|
1
2
3
4
5
6
7
8
9
10
11
12
13
14
15
16
17
|
//操作:发送一个广播,广播接收后Toast提示定时操作完成
Intent intent =newIntent(Main.this, alarmreceiver.class);
intent.setAction("short");
PendingIntent sender=
PendingIntent.getBroadcast(Main.this,0, intent,0);
//设定一个五秒后的时间
Calendar calendar=Calendar.getInstance();
calendar.setTimeInMillis(System.currentTimeMillis());
calendar.add(Calendar.SECOND,5);
AlarmManager alarm=(AlarmManager)getSystemService(ALARM_SERVICE);
alarm.set(AlarmManager.RTC_WAKEUP, calendar.getTimeInMillis(), sender);
//或者以下面方式简化
//alarm.set(AlarmManager.RTC_WAKEUP, System.currentTimeMillis()+5*1000, sender);
Toast.makeText(Main.this,"五秒后alarm开启", Toast.LENGTH_LONG).show();
|
(2)周期性的执行某项操作
|
1
2
3
4
5
6
7
8
9
10
11
12
|
Intent intent =new Intent(Main.this, alarmreceiver.class);
intent.setAction("repeating");
PendingIntent sender=PendingIntent
.getBroadcast(Main.this, 0, intent, 0);
//开始时间
long firstime=SystemClock.elapsedRealtime();
AlarmManager am=(AlarmManager)getSystemService(ALARM_SERVICE);
//5秒一个周期,不停的发送广播
am.setRepeating(AlarmManager.ELAPSED_REALTIME_WAKEUP
, firstime, 5*1000, sender);
|
AlarmManager的取消:(其中需要注意的是取消的Intent必须与启动Intent保持绝对一致才能支持取消AlarmManager)
|
1
2
3
4
5
6
|
Intent intent =newIntent(Main.this, alarmreceiver.class);
intent.setAction("repeating");
PendingIntent sender=PendingIntent
.getBroadcast(Main.this,0, intent,0);
AlarmManager alarm=(AlarmManager)getSystemService(ALARM_SERVICE);
alarm.cancel(sender);
|
AlarmManager还将闹钟分为五种类型:
|
1
|
public staticfinalintELAPSED_REALTIME
|
//当系统进入睡眠状态时,这种类型的闹铃不会唤醒系统。直到系统下次被唤醒才传递它,该闹铃所用的时间是相对时间,是从系统启动后开始计时的,包括睡眠
时间,可以通过调用SystemClock.elapsedRealtime()获得。系统值是3 (0x00000003)。
|
1
|
publicstaticfinalintELAPSED_REALTIME_WAKEUP
|
//能唤醒系统,用法同ELAPSED_REALTIME,系统值是2 (0x00000002) 。
|
1
|
public static final int RTC
|
//当系统进入睡眠状态时,这种类型的闹铃不会唤醒系统。直到系统下次被唤醒才传递它,该闹铃所用的时间是绝对时间,所用时间是UTC时间,可以通过调用
System.currentTimeMillis()获得。系统值是1 (0x00000001) 。
|
1
|
publicstaticfinalintRTC_WAKEUP
|
//能唤醒系统,用法同RTC类型,系统值为 0 (0x00000000) 。
|
1
|
PublicstaticfinalintPOWER_OFF_WAKEUP
|
//能唤醒系统,它是一种关机闹铃,就是说设备在关机状态下也可以唤醒系统,所以我们把它称之为关机闹铃。使用方法同RTC类型,系统值为4 (0x00000004)。
综上所述,感觉AlarmManage和NotificationManager差不多,NotificationManager例子请见文章http://my.oschina.net/helu/blog/141728
转载于:https://www.cnblogs.com/Free-Thinker/p/6402361.html
android闹钟实现原理相关推荐
- android 闹钟管理,android闹钟实现原理
闹钟的原理可用下面我自己画的一幅图来概括:(不对的地方,尽管吐槽 ) 我们来看看新建闹钟到闹钟响铃的步骤: 1.新建一个闹钟: // 获得AlarmManager实例 final AlarmManag ...
- android 闹钟运行原理,简单 闹钟 实现 原理
参考 自文献 http://jakend.iteye.com/blog/1980842 简单 闹钟 原理 就是 利用 AlarmManager 设置一个时间, 时间到了 发出一个广播,接收到广播 ...
- Android Touch事件原理加实例分析
Android中有各种各样的事件,以响应用户的操作.这些事件可以分为按键事件和触屏事件.而Touch事件是触屏事件的基础事件,在进行Android开发时经常会用到,所以非常有必要深入理解它的原理机制. ...
- Android 插件化原理学习 —— Hook 机制之动态代理
前言 为了实现 App 的快速迭代更新,基于 H5 Hybrid 的解决方案有很多,由于 webview 本身的性能问题,也随之出现了很多基于 JS 引擎实现的原生渲染的方案,例如 React Nat ...
- 【Android 安全】DEX 加密 ( Application 替换 | Android 应用启动原理 | ActivityThread 后续分析 | Application 替换位置 )
文章目录 一.ActivityThread 后续分析 二.ActivityThread 相关源码 三.Application 替换位置 dex 解密时 , 需要将 代理 Application 替换为 ...
- 手机内存解读以及android刷机原理
手机内存分为:机身内存.RAM.ROM 机身内存:相当于 电脑的硬盘 这个一般可以外加SD卡扩充: RAM:相当于 电脑的内存条 可读写,掉电清空 ROM:相当于 电脑的 BIOS ROM 原则上只读 ...
- Android 插件化原理解析——Activity生命周期管理
之前的 Android插件化原理解析 系列文章揭开了Hook机制的神秘面纱,现在我们手握倚天屠龙,那么如何通过这种技术完成插件化方案呢?具体来说,插件中的Activity,Service等组件如何在A ...
- Android代码入侵原理解析(一)
Original 2017-05-06 付超红 滴滴安全应急响应中心 2017年初,在滴滴安全沙龙上,滴滴出行安全专家--付超红,针对App的攻与防进行了分享.会后大家对这个议题反响热烈,纷纷求详情求 ...
- Android 插件化原理解析——Hook机制之AMSPMS
在前面的文章中我们介绍了DroidPlugin的Hook机制,也就是代理方式和Binder Hook:插件框架通过AOP实现了插件使用和开发的透明性.在讲述DroidPlugin如何实现四大组件的插件 ...
最新文章
- uboot引导kernel - 3 -uboot给内核传参详解
- html中字体响应式怎么写,css字体单位之间的区分以及字体响应式实现_html/css_WEB-ITnose...
- win7桌面图片不显示缩略图问题
- 《深入分析Linux内核源代码》读书、私藏笔记大放送
- 利用Hexo搭建个人博客-博客发布篇
- 变量独立与不相关的区别
- Windows活动目录(域服务器)经典系列图文教程
- rabbitmq 安装 windows
- 周六讲的题~C组木有Java组有的
- 喜讯 | 大势智慧获得全球软件领域最高权威CMMI5认证
- KAIOS软件下载-自己做的
- 业务太忙,真的是没时间搞自动化理由吗?
- C++经典编程题目(九)玩火柴棍游戏
- java模拟登陆京东_使用httpclient模拟登录京东帐户并抓取帐户信息
- html表单中怎么写年份,HTML表单
- Kt学习笔记(九)数据类、封闭类
- this.$refs.proup is not a function
- save-ps-to-svg1.0百度网盘资源
- Oracle--初学小白基础篇(第一版)
- mysql 分销提成计算_销售人员工资计算表-2017销售人员工资提成计算表免费版-东坡下载...