siege 测试post_使用Siege进行Web App性能测试:计划,测试,学习
siege 测试post
This article was peer reviewed by Ivan Enderlin and Wern Ancheta. Thanks to all of SitePoint’s peer reviewers for making SitePoint content the best it can be!
本文由Ivan Enderlin和Wern Ancheta进行了同行评审。 感谢所有SitePoint的同行评审人员使SitePoint内容达到最佳状态!
Building a simple web application today isn’t that hard. The web development community is friendly, and there are lots of discussions on Stack Overflow or similar platforms, and various sites with lessons and tutorials.
今天构建一个简单的Web应用程序并不难。 Web开发社区非常友好,并且在Stack Overflow或类似平台上有很多讨论,并且在许多站点上都有课程和教程 。
Almost anyone can build an app locally, deploy it to a server, and proudly show it to your friends. I hope you’ve already done all of this, and your project went viral, so you’re obviously here because you want to learn how to make sure your app is ready for some high traffic.
几乎任何人都可以在本地构建应用程序 ,将其部署到服务器上,并自豪地将其展示给您的朋友。 我希望您已经完成了所有这些工作,并且您的项目发展得很成功,所以您显然在这里,因为您想学习如何确保您的应用已为高流量做好了准备。
If we think about a web app as a black box, things are quite simple: the app waits for a request, processes it, and returns the response presentation of a resource (HTML, JSON, XML, etc.). One could think: “Yeah, that’s simple, we should be able to scale our app with ease.” Sadly, the world of web development ain’t all sunshine and rainbows, and you’ll encounter a lot of performance issues while your traffic grows! You’ll learn and improve both your skills and the app over time. In this article, designed to speed this process up, I’ll cover the basic concepts of testing the app (regression, load, and stress testing) with Siege and some tips and tricks I like to use when I’m testing my own web apps.
如果我们将Web应用程序视为黑匣子,那么事情就非常简单:该应用程序等待请求,对其进行处理,然后返回资源(HTML,JSON,XML等)的响应表示。 可能会想到:“是的,很简单,我们应该能够轻松扩展应用程序。” 可悲的是,Web开发的世界并非一尘不染,随着流量的增长,您将遇到很多性能问题! 随着时间的推移,您将学习并提高您的技能和应用程序。 在本文中,旨在加快此过程的速度,我将介绍使用Siege测试应用程序的基本概念(回归,负载和压力测试)以及一些我在测试自己的Web时喜欢使用的提示和技巧。应用。

测试类型 (The Types of Testing)
Let’s say we want to achieve the daily goal of 1 million unique users. How should we prepare for that amount of traffic? How do we make sure nothing will break under normal traffic or peaks? This type of testing is called load testing, since we know exactly how much traffic we want our app to endure — the load. If you want to push your app to its limits and beyond until it breaks, you’re stress testing your app.
假设我们要实现100万唯一用户的每日目标。 我们应该如何为那么多的流量做准备? 我们如何确保在正常流量或高峰期没有任何破坏? 这种测试称为负载测试,因为我们确切地知道我们希望我们的应用程序承受多少流量-负载。 如果您想将应用程序推到极限并超越它,直到它崩溃,您就要对应用程序进行压力测试。
In addition to those, are you aware of how code changes you’ve deployed might affect performance? One simple update can degrade or improve the performance of a high traffic web app to a large extent, and you won’t even know what happened or why until the storm is over. To make sure an app is performing the same before and after a change, we’re doing regression testing.
除此之外,您是否知道已部署的代码更改可能会如何影响性能? 一个简单的更新可以在很大程度上降低或提高高流量Web应用程序的性能,直到风暴结束,您甚至都不知道发生了什么或为什么。 为了确保应用在更改前后的性能相同,我们正在进行回归测试。
Another great motivation for regression testing is infrastructure change: for whatever reason, you might want to move from provider A to provider B (or switch from Apache to nginx). You know that your app is usually handling N requests per minute (on average) and what its normal traffic is (a quick look at analytics would do the job). You’re expecting that your app will behave the same (or better) once deployed provider B’s server. Are you sure, though? Would you take that risk? You already have all the data you need, don’t guess! Test your new setup before deploying and sleep better!
回归测试的另一个重要动机是基础架构的变化:无论出于何种原因,您都可能希望从提供程序A迁移到提供程序B(或从Apache切换到nginx)。 您知道您的应用通常每分钟(平均)每分钟处理N个请求及其正常流量(快速查看分析即可完成工作)。 您期望一旦部署了提供程序B的服务器,您的应用程序的行为就会相同(或更佳)。 你确定吗? 你会冒险吗? 您已经拥有了所需的所有数据,不要猜测! 在部署之前测试您的新设置,让您睡得更好!
Before you start randomly hitting your app with virtual requests, you should know that testing is not an easy job, and the numbers you’ll get from Siege or any other testing tool should be used as a reference to analyze relative changes. Running both Siege and the app locally for five minutes and concluding your app can handle a few hundred or thousand requests within a few seconds is not something I’d recommend.
在开始使用虚拟请求随机访问您的应用程序之前,您应该知道测试不是一件容易的事,并且应该将您从Siege或任何其他测试工具获得的数字用作分析相对变化的参考 。 我不建议您在本地运行Siege和该应用程序五分钟,并断定您的应用程序可以在几秒钟内处理数百或数千个请求。
成功测试的步骤 (The Steps for Successful Testing)
Plan
计划
Think about what you want to test. and what you expect. How much traffic, on which URLs, with what payload? Define parameters up front, don’t just randomly hit your app.
考虑一下您要测试的内容。 以及您的期望。 多少流量,哪些URL以及哪些有效负载? 预先定义参数,不要只是随机点击您的应用程序。
Prepare
准备
Make sure your environments are as isolated as possible: use the same environment for testing, for every test run. A good guide on how to accomplish this can be found in this book about setting up PHP environments.
确保您的环境尽可能隔离:每次测试运行都使用相同的环境进行测试。 可以在本书中找到有关如何设置PHP环境的良好指南。
Analyze and Learn
分析和学习
Learn something from the numbers and make educated decisions. Results should always be evaluated within their context: don’t jump to conclusions; check everything at least twice.
从数字中学到一些东西并做出有根据的决定。 结果应始终在其范围内进行评估:不要下结论。 至少检查两次。
攻城入门 (Getting Started with Siege)
Siege is an awesome tool for benchmarking and testing web apps. It simulates concurrent users requesting resources at a given URL (or multiple URLs) and lets the user heavily customize the testing parameters. Run siege --help to see all available options; we’ll cover some of them in detail below.
Siege是用于基准测试和测试Web应用程序的强大工具。 它模拟并发用户在给定URL(或多个URL)上请求资源,并允许用户大量自定义测试参数。 运行siege --help查看所有可用选项; 我们将在下面详细介绍其中的一些。
准备测试应用 (Preparing the Test App)
With Siege, you can test an app’s stability, performance, and improvements between code (or infrastructure) changes. You can also use it to make sure your WordPress website can handle the peak you’re expecting after publishing a viral photo of a cat, or to set up and evaluate the benefits of an HTTP cache system such as Varnish.
使用Siege,您可以测试应用程序的稳定性,性能以及代码(或基础结构)更改之间的改进。 您还可以使用它来确保您的WordPress网站在发布猫的病毒照片后可以处理您期望的峰值,或者用于设置和评估HTTP缓存系统(例如Varnish)的好处。
For the tests in this article, I’ll be using a slightly modified Symfony Demo application deployed to one Digital Ocean node in Frankfurt, and SIEGE 4.0.2 installed on a second Digital Ocean node in New York.
对于本文中的测试,我将使用稍作修改的Symfony Demo应用程序 ,该应用程序部署到法兰克福的一个Digital Ocean节点,而SIEGE 4.0.2安装在纽约的另一个Digital Ocean节点。
As I said earlier, it’s crucial to have both the app and test server isolated whenever possible. If you’re running any of them on your local machine, you can’t guarantee the same environment because there are other processes (email client, messaging tools, daemons) running which may affect performance; even with high quality virtual machines like Homestead Improved, resource availability isn’t 100% guaranteed (though these isolated VMs are a valid option if you don’t feel like spending money on the load testing phase of your app).
就像我之前说的,尽可能将应用程序和测试服务器隔离是至关重要的。 如果要在本地计算机上运行它们中的任何一个,则不能保证使用同一环境,因为正在运行的其他进程(电子邮件客户端,消息传递工具,守护程序)可能会影响性能。 即使使用Homestead Enhanced这样的高质量虚拟机,也无法100%保证资源可用性(尽管如果您不想在应用程序的负载测试阶段花钱,这些隔离的VM是一个有效的选择)。
The Symfony Demo application is pretty simple and fast when used out of the box. In real life, we’re dealing with complex and slow apps, so I decided to add two modules to the sidebar of a single post page: Recent posts (10 latest posts) and Popular posts (10 posts with most comments). By doing so, I’ve added more complexity to the app which is now querying the DB at least three times. The idea is to get as real a situation as possible. The database has been populated with 62,230 dummy articles and ~1,445,505 comments.
开箱即用时,Symfony演示应用程序非常简单且快速。 在现实生活中,我们正在处理复杂而缓慢的应用程序,因此,我决定在单个帖子页面的侧栏中添加两个模块: 最近发布的帖子 (最新发布的10条)和热门发布的帖子 (具有最多评论的10条帖子)。 这样,我为应用程序增加了更多的复杂性,该应用程序现在至少查询数据库3次。 这个想法是使实际情况尽可能的好。 该数据库已填充了62,230条虚拟文章和约1,445,505条评论。
学习基础 (Learning the Basics)
Running the command siege SOME-URL will make Siege start testing the URL with default parameters. After the initial message …
运行siege SOME-URL命令siege SOME-URL将使Siege开始使用默认参数测试URL。 在初始消息之后……
** Preparing 25 concurrent users for battle.
The server is now under siege…
… the screen will start to fill with information about sent requests. Your immediate reflex would probably be to stop execution by pressing CTRL + C, at which point it will stop testing and give output results.
…屏幕将开始填充有关已发送请求的信息。 您的直接React可能是通过按CTRL + C停止执行,这时它将停止测试并给出输出结果。
Before we go on, there is one thing you should keep in mind when testing/benchmarking a web app. Think about the lifecycle of a single HTTP request sent towards the Symfony demo app blog page — /en/blog/. The server will generate an HTTP response with a status 200 (OK) and HTML in the body with content and references to images and other assets (stylesheets, JavaScript files, …). The web browser processes those references, and requests all assets needed to render a web page in the background. How many HTTP requests in total do we need?
在继续进行之前,测试/基准测试Web应用程序时应牢记一件事。 考虑发送到Symfony演示应用程序博客页面- /en/blog/的单个HTTP请求的生命周期。 服务器将在体内生成状态为200(OK)和HTML的HTTP响应,其中包含内容以及对图像和其他资产(样式表,JavaScript文件等)的引用。 网络浏览器处理这些引用,并请求在后台呈现网页所需的所有资产。 我们总共需要多少个HTTP请求?
To get the answer, let’s ask Siege to run a single test and analyze the result. I’m having my app’s access log open (tail -f var/logs/access.log) in the terminal as I run siege -c=1 --reps=1 http://sfdemo.loc/en/blog/. Basically, I’m telling Siege: “Run test once (–reps=1) with one user (-c=1) for URL http://sfdemo.loc/en/blog/”. I can see the requests in both the log and Siege’s output.
为了得到答案,让我们让Siege运行一个测试并分析结果。 当我运行siege -c=1 --reps=1 http://sfdemo.loc/en/blog/ ,我正在终端中打开应用程序的访问日志( tail -f var/logs/access.log )。 基本上,我告诉Siege:“使用一个用户(-c = 1)对URL http://sfdemo.loc/en/blog/运行一次测试(–reps = 1)。” 我可以在日志和围攻的输出中看到请求。
siege -c=1 --reps=1 http://sfdemo.loc/en/blog/
** Preparing 1 concurrent users for battle.
The server is now under siege...
HTTP/1.1 200     1.85 secs:   22367 bytes ==> GET  /en/blog/
HTTP/1.1 200     0.17 secs:    2317 bytes ==> GET  /js/main.js
HTTP/1.1 200     0.34 secs:   49248 bytes ==> GET  /js/bootstrap-tagsinput.min.js
HTTP/1.1 200     0.25 secs:   37955 bytes ==> GET  /js/bootstrap-datetimepicker.min.js
HTTP/1.1 200     0.26 secs:   21546 bytes ==> GET  /js/highlight.pack.js
HTTP/1.1 200     0.26 secs:   37045 bytes ==> GET  /js/bootstrap-3.3.7.min.js
HTTP/1.1 200     0.44 secs:  170649 bytes ==> GET  /js/moment.min.js
HTTP/1.1 200     0.36 secs:   85577 bytes ==> GET  /js/jquery-2.2.4.min.js
HTTP/1.1 200     0.16 secs:    6160 bytes ==> GET  /css/main.css
HTTP/1.1 200     0.18 secs:    4583 bytes ==> GET  /css/bootstrap-tagsinput.css
HTTP/1.1 200     0.17 secs:    1616 bytes ==> GET  /css/highlight-solarized-light.css
HTTP/1.1 200     0.17 secs:    7771 bytes ==> GET  /css/bootstrap-datetimepicker.min.css
HTTP/1.1 200     0.18 secs:     750 bytes ==> GET  /css/font-lato.css
HTTP/1.1 200     0.26 secs:   29142 bytes ==> GET  /css/font-awesome-4.6.3.min.css
HTTP/1.1 200     0.44 secs:  127246 bytes ==> GET  /css/bootstrap-flatly-3.3.7.min.css
Transactions:                  15 hits
Availability:              100.00 %
Elapsed time:                5.83 secs
Data transferred:            0.58 MB
Response time:                0.37 secs
Transaction rate:            2.57 trans/sec
Throughput:                0.10 MB/sec
Concurrency:                0.94
Successful transactions:          15
Failed transactions:               0
Longest transaction:            1.85
Shortest transaction:            0.16
The access log looks like this:
访问日志如下所示:
107.170.85.171 - - [04/May/2017:05:35:15 +0000] "GET /en/blog/ HTTP/1.1" 200 22701 "-" "Mozilla/5.0 (unknown-x86_64-linux-gnu) Siege/4.0.2"
107.170.85.171 - - [04/May/2017:05:35:17 +0000] "GET /js/main.js HTTP/1.1" 200 2602 "-" "Mozilla/5.0 (unknown-x86_64-linux-gnu) Siege/4.0.2"
107.170.85.171 - - [04/May/2017:05:35:17 +0000] "GET /js/bootstrap-tagsinput.min.js HTTP/1.1" 200 49535 "-" "Mozilla/5.0 (unknown-x86_64-linux-gnu) Siege/4.0.2"
107.170.85.171 - - [04/May/2017:05:35:17 +0000] "GET /js/bootstrap-datetimepicker.min.js HTTP/1.1" 200 38242 "-" "Mozilla/5.0 (unknown-x86_64-linux-gnu) Siege/4.0.2"
107.170.85.171 - - [04/May/2017:05:35:18 +0000] "GET /js/highlight.pack.js HTTP/1.1" 200 21833 "-" "Mozilla/5.0 (unknown-x86_64-linux-gnu) Siege/4.0.2"
107.170.85.171 - - [04/May/2017:05:35:18 +0000] "GET /js/bootstrap-3.3.7.min.js HTTP/1.1" 200 37332 "-" "Mozilla/5.0 (unknown-x86_64-linux-gnu) Siege/4.0.2"
107.170.85.171 - - [04/May/2017:05:35:18 +0000] "GET /js/moment.min.js HTTP/1.1" 200 170938 "-" "Mozilla/5.0 (unknown-x86_64-linux-gnu) Siege/4.0.2"
107.170.85.171 - - [04/May/2017:05:35:19 +0000] "GET /js/jquery-2.2.4.min.js HTTP/1.1" 200 85865 "-" "Mozilla/5.0 (unknown-x86_64-linux-gnu) Siege/4.0.2"
107.170.85.171 - - [04/May/2017:05:35:19 +0000] "GET /css/main.css HTTP/1.1" 200 6432 "-" "Mozilla/5.0 (unknown-x86_64-linux-gnu) Siege/4.0.2"
107.170.85.171 - - [04/May/2017:05:35:19 +0000] "GET /css/bootstrap-tagsinput.css HTTP/1.1" 200 4855 "-" "Mozilla/5.0 (unknown-x86_64-linux-gnu) Siege/4.0.2"
107.170.85.171 - - [04/May/2017:05:35:19 +0000] "GET /css/highlight-solarized-light.css HTTP/1.1" 200 1887 "-" "Mozilla/5.0 (unknown-x86_64-linux-gnu) Siege/4.0.2"
107.170.85.171 - - [04/May/2017:05:35:20 +0000] "GET /css/bootstrap-datetimepicker.min.css HTTP/1.1" 200 8043 "-" "Mozilla/5.0 (unknown-x86_64-linux-gnu) Siege/4.0.2"
107.170.85.171 - - [04/May/2017:05:35:20 +0000] "GET /css/font-lato.css HTTP/1.1" 200 1020 "-" "Mozilla/5.0 (unknown-x86_64-linux-gnu) Siege/4.0.2"
107.170.85.171 - - [04/May/2017:05:35:20 +0000] "GET /css/font-awesome-4.6.3.min.css HTTP/1.1" 200 29415 "-" "Mozilla/5.0 (unknown-x86_64-linux-gnu) Siege/4.0.2"
107.170.85.171 - - [04/May/2017:05:35:20 +0000] "GET /css/bootstrap-flatly-3.3.7.min.css HTTP/1.1" 200 127521 "-" "Mozilla/5.0 (unknown-x86_64-linux-gnu) Siege/4.0.2"
We can see that even though we told Siege to test the URL once, 15 transactions (requests) were executed. If you’re wondering what a transaction is, you should check out the GitHub page:
我们可以看到,即使我们告诉Siege一次测试URL,也执行了15个事务(请求)。 如果您想知道什么是交易,则应查看GitHub页面 :
A transaction is characterized by the server opening a socket for the client, handling a request, serving data over the wire and closing the socket upon completion.
事务的特征是服务器为客户端打开一个套接字,处理请求,通过电线提供数据,并在完成后关闭套接字。
Siege thus won’t only send a single HTTP GET request for the URL provided, it will generate HTTP GET requests for all related assets referenced by the resource at the given URL. We should still be aware that Siege isn’t evaluating JavaScript, therefore AJAX requests aren’t included here. We should also keep in mind that browsers are capable of caching static files (images, fonts, JS files).
因此,Siege不仅会针对提供的URL发送单个HTTP GET请求,还将为资源在给定URL处引用的所有相关资产生成HTTP GET请求。 我们仍然应该知道Siege不会评估JavaScript,因此这里不包括AJAX请求。 我们还应该记住,浏览器能够缓存静态文件(图像,字体,JS文件)。
This behavior can be changed since version 4.0 by updating the Siege configuration file located at ~/.siege/siege.conf and setting parser = false.
从版本4.0开始 ,可以通过更新位于~/.siege/siege.conf的Siege配置文件并设置parser = false来更改此行为。
Note: Default behavior may be different depending on the version of Seige you’re using, or even on the tool. If you’re using something other than Siege, check what exactly it considers to be a single test (is it single request for given URL, or a request for a given URL and sub-requests for all its resources?) before you come to conclusions.
注意:取决于您使用的Seige版本,甚至取决于工具,默认行为可能有所不同。 如果您使用的不是Siege,请先检查一下它到底是什么,认为它是单个测试(是给定URL的单个请求,还是给定URL的请求及其所有资源的子请求?)。结论。
From the test output above, we can see that Siege has generated 15 requests (transactions) in ~6 seconds, resulting in 0.58 MB of transferred data with 100% availability or 15/15 successful transactions – “Successful transactions is the number of times the server returned a code less than 400. Accordingly, redirects are considered successful transactions”.
从上面的测试输出中,我们可以看到Siege在大约6秒钟内生成了15个请求(事务),从而产生了0.58 MB的已传输数据,具有100%的可用性或15/15个成功的事务–“ 成功的事务是指服务器返回的代码少于400。因此,重定向被视为成功的事务 。
Response time is the average time needed to complete all requests and get responses. Transaction rate and throughput are telling us what the capacity of our app is (how much traffic our app can handle at a given time).
响应时间是完成所有请求并获得响应所需的平均时间。 交易率和吞吐量告诉我们应用程序的容量(在给定时间应用程序可以处理多少流量)。
Let’s repeat the test with 15 users:
让我们对15个用户重复测试:
siege --concurrent=15 --reps=1 sfdemo.loc/en/blog/
Transactions:                 225 hits
Availability:              100.00 %
Elapsed time:                6.16 secs
Data transferred:            8.64 MB
Response time:                0.37 secs
Transaction rate:           36.53 trans/sec
Throughput:                1.40 MB/sec
Concurrency:               13.41
Successful transactions:         225
Failed transactions:               0
Longest transaction:            1.74
Shortest transaction:            0.16
By increasing the test load, we’re allowing our app to show its full power. We can see that our app can handle a single request from 15 users on a blog page very well, with an average response time of 0.37 seconds. Siege by default delays requests randomly in the interval from 1 to 3 seconds. By setting the --delay=N parameter, we can affect the randomness of delays between requests (setting the maximum delay).
通过增加测试负载,我们允许我们的应用程序显示其全部功能。 我们可以看到我们的应用可以很好地处理博客页面上来自15个用户的单个请求,平均响应时间为0.37秒。 默认情况下,围困会在1到3秒的间隔内随机延迟请求。 通过设置--delay=N参数,我们可以影响请求之间的延迟的随机性(设置最大延迟)。
并发 (Concurrency)
Concurrency is probably the most confusing result attribute, so let’s explain it. The documentation says:
并发可能是最令人困惑的结果属性,所以让我们对其进行解释。 该文档说:
Concurrency is an average number of simultaneous connections, a number which rises as server performance decreases.
并发是同时连接的平均数量,该数量随着服务器性能下降而增加。
From the FAQ section, we can see how concurrency is calculated:
从“ 常见问题解答”部分,我们可以看到如何计算并发性:
Concurrency is the total transactions divided by total elapsed time. So if we completed 100 transactions in 10 seconds, our concurrency was 10.00.
并发是总事务数除以总经过时间。 因此,如果我们在10秒钟内完成了100笔交易,那么我们的并发率为10.00。
Another great explanation of concurrency is available on the official website:
并发的另一个很好的解释是在官方网站上 :
We can illustrate this point with an obvious example. I ran Siege against a two-node clustered website. My concurrency was 6.97. Then I took a node away and ran the same run against the same page. My concurrency rose to 18.33. At the same time, my elapsed time was extended 65%.
我们可以用一个明显的例子来说明这一点。 我对两个节点的群集网站进行了围攻。 我的并发是6.97 。 然后我移走了一个节点,并在同一页面上运行了相同的运行。 我的并发度提高到18.33 。 同时,我的消逝时间延长了65% 。
Let’s look at it from a different perspective: if you’re a restaurant owner aiming to measure business performance before doing some changes, you could measure the average number of open orders (i.e. orders waiting to be delivered — requests) over time. In the first example above, an average number of open orders was 7, but if you fire half of your kitchen staff (i.e. take a node away), your concurrency will rise to 18. Remember, we’re expecting tests to be conducted in an identical environment, so the number of guests and intensity of ordering should be the same. Waiters can accept orders at a high rate (like web servers can) but processing time is slow, and your kitchen staff (your app) is overloaded and sweating to deliver orders.
让我们从不同的角度来看待它:如果您是一家餐馆老板,目的是在进行一些更改之前先衡量其业务绩效,则可以衡量一段时间内未结订单 (即等待交付的订单-请求)的平均数量 。 在上面的第一个例子中,未完成订单的平均NU MB ER为7,但如果你火一半的厨房工作人员(即取一个节点的距离),您的并发性将上升到18。 请记住,我们希望测试在相同的环境中进行,因此客人人数和订购强度应相同。 服务员可以接受高速度的订单(就像Web服务器一样),但是处理时间很慢,而且您的厨房工作人员(您的应用程序)超负荷工作,不易交付订单。
攻城测试 (Performance Testing with Siege)
To get a real overview of our app’s performance, I’ll run Siege for 5 minutes with a different number of concurrent users and compare the results. Since the blog home page is a simple endpoint with a single database query, I’ll be testing single post pages in the following tests as they are slower and more complex.
为了真正了解我们应用的性能,我将使用不同数量的并发用户运行Siege 5分钟,然后比较结果。 由于博客主页是具有单个数据库查询的简单端点,因此,在以下测试中,我将测试单个帖子页面,因为它们速度较慢且更为复杂。
siege --concurrent=5 --time=5M http://sfdemo.loc/en/blog/posts/vero-iusto-fugit-sed-totam.`While tests are running, I can take a look at top on my app’s server to see the status. MySQL is working hard:
在测试运行期间,我可以在应用服务器的top查看状态。 MySQL正在努力:
%CPU %MEM     TIME+ COMMAND
96.3 53.2   1:23.80 mysqld
That was expected, since every time the app renders a single post page, it’s executing several non-trivial DB queries:
这是预料之中的,因为每次应用程序呈现单个帖子页面时,它都会执行几个非平凡的数据库查询:
- Fetch article with associated comments. 提取带有相关注释的文章。
- Fetch top 10 posts sorted descending by publication time.获取按发布时间降序排列的前10个帖子。
A
SELECTquery with a join between posts and the large comments table withCOUNTto get the 10 most popular articles.一个
SELECT查询,其中包含帖子和带有COUNT的大型评论表之间的连接,以获取10篇最受欢迎的文章。
The first test with five concurrent users is done, and the numbers aren’t that impressive:
对五个并发用户的第一个测试已经完成,但数字并没有那么令人印象深刻:
siege --concurrent=5 --time=5M http://sfdemo.loc/en/blog/posts/vero-iusto-fugit-sed-totam.
Transactions:                1350 hits
Availability:              100.00 %
Elapsed time:              299.54 secs
Data transferred:           51.92 MB
Response time:                1.09 secs
Transaction rate:            4.51 trans/sec
Throughput:                0.17 MB/sec
Concurrency:                4.91
Successful transactions:        1350
Failed transactions:               0
Longest transaction:           15.55
Shortest transaction:            0.16
Siege was able to get 1350 transactions complete in 5 minutes. Since we have 15 transactions/page load, we can easily calculate that our app was able to handle 90 page loads within 5 minutes or 18 page loads / 1 minute or 0,3 page loads / second. We calculate the same by dividing the transaction rate with a number of transactions per page 4,51 / 15 = 0,3.
攻城战能够在5分钟内完成1350笔交易。 由于我们每页面加载有15个事务,因此我们可以轻松地计算出我们的应用能够在5分钟内处理90个页面加载,或者在18分钟/ 1分钟或0.3页/秒内处理90个页面加载。 我们通过将交易速率除以每页交易次数4,51 / 15 = 0.3来计算相同金额。
Well… that’s not such a great throughput, but at least now we know where the bottlenecks are (DB queries) and we have reference to compare with once we optimize our app.
好吧……吞吐量并不是很高,但是至少现在我们知道瓶颈在哪里(数据库查询),并且我们在优化应用程序后可以与之进行比较。
Let’s run a few more tests to see how our app works under more pressure. This time we have the concurrent users set to 10 and within the first few minutes of testing we can see lots of HTTP 500 errors: the app started to fall apart under slightly bigger traffic. Let’s now compare how the app is performing under siege with 5, 10 and 15 concurrent users.
让我们再进行一些测试,看看我们的应用在更大的压力下如何工作。 这次我们将并发用户设置为10,并且在测试的前几分钟内,我们可以看到许多HTTP 500错误:该应用在流量稍大的情况下开始崩溃。 现在,让我们比较一下该应用在5、10和15个并发用户的围困下的表现。
siege --concurrent=10 --time=5M http://sfdemo.loc/en/blog/posts/vero-iusto-fugit-sed-totam.
Lifting the server siege…
Transactions:                 450 hits
Availability:               73.89 %
Elapsed time:              299.01 secs
Data transferred:           18.23 MB
Response time:                6.17 secs
Transaction rate:            1.50 trans/sec
Throughput:                0.06 MB/sec
Concurrency:                9.29
Successful transactions:         450
Failed transactions:             159
Longest transaction:           32.68
Shortest transaction:            0.16
siege --concurrent=10 --time=5M http://sfdemo.loc/en/blog/posts/vero-iusto-fugit-sed-totam.
Transactions: 0 hits
Availability: 0.00 %
Elapsed time: 299.36 secs
Data transferred: 2.98 MB
Response time: 0.00 secs
Transaction rate: 0.00 trans/sec
Throughput: 0.01 MB/sec
Concurrency: 14.41
Successful transactions: 0
Failed transactions: 388
Longest transaction: 56.85
Shortest transaction: 0.00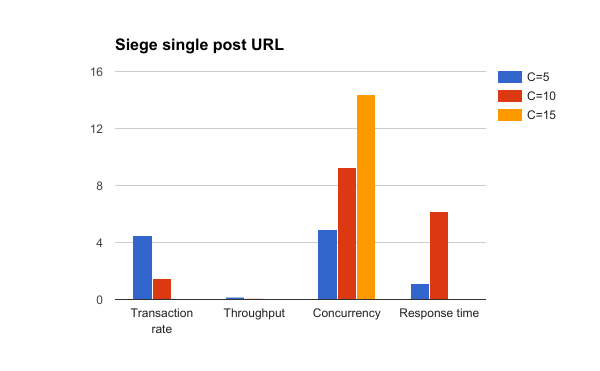
Siege result comparison with concurrency set to 5, 10 and 15
并发设置为5、10和15的围攻结果比较
Notice how concurrency rose as our app’s performance was dropping. The app was completely dead under siege with 15 concurrent users — i.e. 15 wild users is all it takes to take your fortress down! We’re engineers, and we’re not going to cry over challenges, we’re going to solve them!
请注意,随着我们的应用程序性能下降,并发性如何提高。 该应用程序在15个并发用户的包围下完全死光了-要删除堡垒,只需要15个野生用户! 我们是工程师,我们不会为挑战而哭泣,我们将解决它们!
Keep in mind that these tests are automated, and we’re putting our app under pressure. In reality, users aren’t just hitting the refresh button like maniacs, they are processing (i.e. reading) the content you present and therefore some delay between requests exists.
请记住,这些测试是自动进行的,我们正在使我们的应用程序承受压力。 实际上,用户不仅像疯子一样按下刷新按钮,他们还在处理(即读取)您呈现的内容,因此请求之间存在一定的延迟。
缓存到救援 (Cache to the Rescue)
We’re now aware of some problems with our app — we’re querying the database too much. Do we really need to get the list of popular and recent articles from the database on every single request? Probably not, so we can add a cache layer at the application level (e.g. Redis) and cache a list of popular and recent articles. This article isn’t about caching (for that, see this one), so we’re going to a add full response cache for the single post page.
现在,我们意识到我们的应用程序存在一些问题-我们对数据库的查询过多。 我们是否真的需要在每个请求中从数据库中获取热门和最新文章的列表? 可能不是,所以我们可以在应用程序级别(例如Redis)添加缓存层,并缓存热门和最新文章的列表。 本文不是关于缓存的(为此,请参阅参考资料 ),因此我们将为单个帖子页面添加完整的响应缓存。
The demo app already comes with Symfony HTTP Cache enabled, we just need to set the TTL header for the HTTP response we’re returning.
该演示应用程序已经启用了Symfony HTTP缓存 ,我们只需要为返回的HTTP响应设置TTL标头即可。
$response->setTtl(60);Let’s repeat the tests with 5, 10, and 15 concurrent users and see how adding a cache affects the performance. Obviously, we’re expecting app performance to increase after the cache warms up. We’re also waiting at least 1 minute for the cache to expire between the tests.
让我们对5个,10个和15个并发用户重复测试,看看添加缓存如何影响性能。 显然,我们期望在缓存预热后应用性能会提高。 我们还在等待至少1分钟,以便两次测试之间的缓存过期。
Note: Be careful with caching, especially IRT protected areas of a web app (oops example) and always remember that it’s one of the two hard things about computer science.
注意:在缓存时要特别小心,尤其是Web应用程序的IRT保护区域( 糟糕的例子 ),并始终牢记这是有关计算机科学的两大难题之一 。
On to results: by adding 60s of cache, the app’s stability and performance improved dramatically. Take a look at the results in the table and charts below.
结果:通过添加60年代的缓存,该应用程序的稳定性和性能得到了显着改善。 在下面的表格和图表中查看结果。
| C=5 | C=10 | C=15 | |
|---|---|---|---|
| Transactions | 4566 hits | 8323 hits | 12064 hits |
| Availability | 100.00 % | 100.00 % | 100.00 % |
| Elapsed time | 299.86 secs | 299.06 secs | 299.35 secs |
| Data transferred | 175.62 MB | 320.42 MB | 463.78 MB |
| Response time | 0.31 secs | 0.34 secs | 0.35 secs |
| Transaction rate | 15.23 trans/sec | 27.83 trans/sec | 40.30 trans/sec |
| Throughput | 0.59 MB/sec | 1.07 MB/sec | 1.55 MB/sec |
| Concurrency | 4.74 | 9.51 | 14.31 |
| Successful transactions | 4566 | 8323 | 12064 |
| Failed transactions | 0 | 0 | 0 |
| Longest transaction | 4.32 | 5.73 | 4.93 |
| C = 5 | C = 10 | C = 15 | |
|---|---|---|---|
| 交易次数 | 4566点击 | 8323点击 | 12064点击 |
| 可用性 | 100.00% | 100.00% | 100.00% |
| 经过时间 | 299.86秒 | 299.06秒 | 299.35秒 |
| 数据传输 | 175.62兆字节 | 320.42兆字节 | 463.78兆字节 |
| 响应时间 | 0.31秒 | 0.34秒 | 0.35秒 |
| 交易率 | 15.23转/秒 | 27.83转/秒 | 40.30 trans / sec |
| 通量 | 0.59 MB /秒 | 1.07 MB /秒 | 1.55 MB /秒 |
| 并发 | 4.74 | 9.51 | 14.31 |
| 成功交易 | 4566 | 8323 | 12064 |
| 交易失败 | 0 | 0 | 0 |
| 最长交易 | 4.32 | 5.73 | 4.93 |
Siege of a single post URL with HTTP cache ttl set to 60 seconds
使用HTTP缓存ttl设置为60秒的单个URL的围攻
The application was able to handle way more transactions with cache
该应用程序能够使用缓存处理更多事务
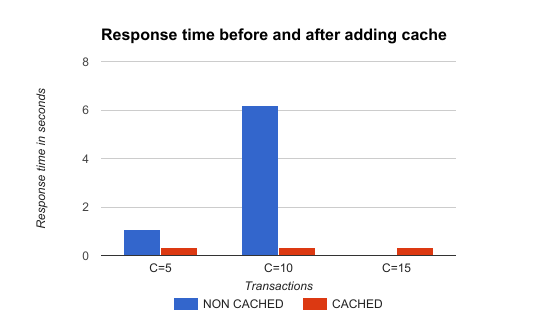
The response time after adding cache was decreased and stable regardless of traffic, as expected
如预期的那样,添加高速缓存后的响应时间减少且稳定,无论流量如何
真正的感觉 (The Real Feel)
If you want to get the real feel of using your app when it is under pressure, you can run Siege and use your app in the browser. Siege will put the app under pressure, and you’ll be able to the actual user experience. Even though this is a subjective method, I think it’s an eye-opening experience for a majority of developers. Try it.
如果您想获得在压力下使用应用程序的真实感觉,可以运行Siege并在浏览器中使用应用程序。 围攻将使应用程序承受压力,您将能够获得实际的用户体验。 尽管这是一种主观的方法,但我认为这对于大多数开发人员来说都是令人大开眼界的体验。 试试吧。
替代工具 (Alternative Tools)
Siege isn’t the only tool for load testing and benchmarking of web apps. Let’s quickly test the app with ab.
Siege并不是用于Web应用程序负载测试和基准测试的唯一工具。 让我们用ab快速测试该应用程序。
抗体 (Ab)
ab or Apache HTTP server benchmarking tool is another great tool. It is well documented and has lots of options, though it doesn’t support using URL files, parsing, and requesting referenced assets, nor random delays like Siege does.
ab或Apache HTTP服务器基准测试工具是另一个很棒的工具。 尽管它不支持使用URL文件,解析和请求引用的资产,也没有像Siege那样的随机延迟,但它有据可查并且有很多选择。
If I run ab against single post page (without cache), the result is:
如果我对单个帖子页(无缓存)运行ab,结果是:
ab -c 5 -t 300 http://sfdemo.loc/en/blog/posts/vero-iusto-fugit-sed-totam.
This is ApacheBench, Version 2.3 <$Revision: 1706008 $>
Copyright 1996 Adam Twiss, Zeus Technology Ltd, http://www.zeustech.net/
Licensed to The Apache Software Foundation, http://www.apache.org/
Benchmarking sfdemo.loc (be patient)
Finished 132 requests
Server Software:        Apache/2.4.18
Server Hostname:        sfdemo.loc
Server Port:            80
Document Path:          /en/blog/posts/vero-iusto-fugit-sed-totam.
Document Length:        23291 bytes
Concurrency Level:      5
Time taken for tests:   300.553 seconds
Complete requests:      132
Failed requests:        0
Total transferred:      3156000 bytes
HTML transferred:       3116985 bytes
Requests per second:    0.44 [#/sec] (mean)
Time per request:       11384.602 [ms] (mean)
Time per request:       2276.920 [ms] (mean, across all concurrent requests)
Transfer rate:          10.25 [Kbytes/sec] received
Connection Times (ms)
min  mean[+/-sd] median   max
Connect:       81   85   2.0     85      91
Processing:  9376 11038 1085.1  10627   13217
Waiting:     9290 10953 1084.7  10542   13132
Total:       9463 11123 1085.7  10712   13305
Percentage of the requests served within a certain time (ms)
50%  10712
66%  11465
75%  12150
80%  12203
90%  12791
95%  13166
98%  13302
99%  13303
100%  13305 (longest request)
And after we turn cache on, the result is:
在打开缓存后,结果是:
ab -c 5 -t 300 http://sfdemo.loc/en/blog/posts/vero-iusto-fugit-sed-totam.
This is ApacheBench, Version 2.3 <$Revision: 1706008 $>
Copyright 1996 Adam Twiss, Zeus Technology Ltd, http://www.zeustech.net/
Licensed to The Apache Software Foundation, http://www.apache.org/
Benchmarking sfdemo.loc (be patient)
Completed 5000 requests
Finished 5373 requests
Server Software:        Apache/2.4.18
Server Hostname:        sfdemo.loc
Server Port:            80
Document Path:          /en/blog/posts/vero-iusto-fugit-sed-totam.
Document Length:        23351 bytes
Concurrency Level:      5
Time taken for tests:   300.024 seconds
Complete requests:      5373
Failed requests:        0
Total transferred:      127278409 bytes
HTML transferred:       125479068 bytes
Requests per second:    17.91 [#/sec] (mean)
Time per request:       279.196 [ms] (mean)
Time per request:       55.839 [ms] (mean, across all concurrent requests)
Transfer rate:          414.28 [Kbytes/sec] received
Connection Times (ms)
min  mean[+/-sd] median   max
Connect:       81   85   2.1     85     106
Processing:   164  194 434.8    174   13716
Waiting:       83  109 434.8     89   13632
Total:        245  279 434.8    259   13803
Percentage of the requests served within a certain time (ms)
50%    259
66%    262
75%    263
80%    265
90%    268
95%    269
98%    272
99%    278
100%  13803 (longest request)
I love the way ab shows the timing breakdown and stats in the report! I can immediately see that 50% of our requests were served under 259ms (vs 10.712ms without cache) and 99% of them were under 278ms (vs 13.305ms without cache) which is acceptable. Again, the test results are evaluated within their context and relative to the previous state.
我喜欢ab在报告中显示时序明细和统计信息的方式! 我可以立即看到,我们的请求中有50%在259毫秒(没有缓存的情况下为10.712毫秒)下得到了响应,其中99%在278毫秒(没有缓存的情况下为13.305毫秒)下得到了响应。 同样,测试结果将在其上下文中并相对于先前状态进行评估。
使用围攻进行高级负载测试 (Advanced Load Testing with Siege)
Now that we have the basics of load and regression testing covered, it is time to take the next step. So far, we were hitting single URLs with generated requests, and we saw that once the response is cached, our app can handle lots of traffic with ease.
现在我们已经涵盖了负载和回归测试的基础知识,是时候采取下一步了。 到目前为止,我们只用生成的请求访问了单个URL,并且看到响应被缓存后,我们的应用程序可以轻松处理大量流量。
In real life, things are a bit more complex: users randomly navigate through the site, visiting URLs and processing the content. The thing I love the most about Siege is the possibility of using a URL file into which I can place multiple URLs to be randomly used during the test.
在现实生活中,事情要复杂一些:用户随机浏览网站,访问URL并处理内容。 我最喜欢Siege的地方是可以使用URL文件,在该文件中可以放置多个URL,以便在测试过程中随机使用这些URL。
步骤1:计划测试 (Step 1: Plan the Test)
We need to conduct the relevant test on a list of top URLs visited by our users. The second thing we should consider is the dynamic of users’ behavior — i.e. how fast they click links.
我们需要对用户访问的热门URL列表进行相关测试。 我们应该考虑的第二件事是用户行为的动态-即用户单击链接的速度。
I would create a URL file based on data from my analytics tool or server access log file. One could use access log parsing tools such as Web server access Log Parser to parse Apache access logs, and generate a list of URLs sorted by popularity. I would take the top N (20, 50, 100 …) URLs and place them in the file. If some of the URLs (e.g. landing page or viral article) are visited more often than others, we should adjust the probabilities so that siege requests those URLs more often.
我将根据我的分析工具或服务器访问日志文件中的数据创建一个URL文件。 可以使用诸如Web服务器访问日志解析器之类的访问日志解析工具来解析Apache访问日志,并生成按受欢迎程度排序的URL列表。 我将使用前N个(20、50、100…)URL并将其放置在文件中。 如果某些URL(例如,登录页面或病毒文章)的访问频率高于其他URL,则我们应调整概率,以便围攻更频繁地请求这些URL。
Let say we have following URLs with these visit counts over the last N days:
假设我们有以下URL,这些URL具有最近N天的访问量:
- Landing page / Home page – 30.000登陆页面/主页– 30.000
- Article A – 10.000条款A – 10.000
- Article B – 2.000B条– 2.000
- Article C – 50.000C条– 50.000
- About us – 3.000关于我们– 3.000
We can normalize the visits count and get a list like this:
我们可以将访问次数归一化,并获得如下列表:
- Landing page / Home page – 32% (30.000 / 95.000)到达网页/首页– 32%(30.000 / 95.000)
- Article A – 11% (10.000 / 95.000)条款A – 11%(10.000 / 95.000)
- Article B – 2% (2.000 / 95.000)B条– 2%(2.000 / 95.000)
- Article C – 52% (50.000 / 95.000)C条– 52%(50.000 / 95.000)
- About us – 3% (3.000 / 95.000)关于我们– 3%(3.000 / 95.000)
Now we can create a URL file with 100 URLs (lines) with 32 x Homepage URLs, 52 x Article C URLs etc. You can shuffle the final file to get more randomness, and save it.
现在,我们可以创建一个包含100个URL(行)的URL文件,其中包含32个Homepage URL,52个Article C URL等。您可以将最终文件改组以获得更多随机性,并将其保存。
Take the average session time and pages per session from your analytics tool to calculate the average delay between two requests. If average session duration is 2 minutes and users are visiting 8 pages per session on average, simple math gives us an average delay of 15 seconds (120 seconds / 8 pages = 15 seconds / page).
从分析工具中获取平均会话时间和每个会话的页面数,以计算两次请求之间的平均延迟。 如果平均会话持续时间为2分钟,并且用户平均每个会话访问8页,则简单的数学计算得出的平均延迟为15秒(120秒/ 8页= 15秒/页)。
Finally, we disable parsing and requesting of assets as I am caching static files in production and serving them from a different server. As mentioned above, the parser is turned off by setting parser = false in Siege’s config located at ~/.siege/siege.conf
最后,当我在生产中缓存静态文件并从其他服务器提供它们时,我们将禁用资产的解析和请求。 如上所述,通过在位于~/.siege/siege.conf Siege配置中将parser = false设置为关闭parser = false
步骤2:准备和运行测试 (Step 2: Prepare and Run Tests)
Since we’re now dealing with randomness, it would be a good idea to increase the duration of test so that we get more relevant results. I will be running Siege for 20 minutes with a maximum delay set to 15 seconds and 50 concurrent users. I will test the blog homepage and 10 articles with different probabilities.
由于我们现在正在处理随机性,因此最好增加测试持续时间,以便获得更多相关结果。 我将运行Siege 20分钟,最大延迟设置为15秒,并发用户数为50。 我将测试博客首页和10篇概率不同的文章。
Since I don’t expect that amount of traffic to hit the app with an empty cache, I will warm up the app’s cache by requesting every URL at least once before testing with
由于我不希望有这么多的流量会在缓存为空的情况下影响应用程序,因此我将通过至少一次请求每个URL来预热应用程序的缓存,然后再使用
siege -b --file=urls.txt -t 30S -c 1Now we’re ready to put our app under some serious pressure. If we use the --internet switch, Siege will select URL from the file randomly. Without the switch, Siege is selecting URLs sequentially. Let’s start:
现在,我们准备对我们的应用程序施加一些严重的压力。 如果使用--internet开关,Siege将从文件中随机选择URL。 没有切换,围攻将依次选择URL。 开始吧:
siege --file=urls.txt --internet --delay=15 -c 50 -t 30M
Lifting the server siege...
Transactions:               10931 hits
Availability:               98.63 %
Elapsed time:             1799.88 secs
Data transferred:          351.76 MB
Response time:                0.67 secs
Transaction rate:            6.07 trans/sec
Throughput:                0.20 MB/sec
Concurrency:                4.08
Successful transactions:       10931
Failed transactions:             152
Longest transaction:           17.71
Shortest transaction:            0.24
Or with 60 concurrent users during the siege:
或在包围期间有60个并发用户:
siege --file=urls.txt --delay=15 -c 60 -t 30M
Transactions:               12949 hits
Availability:               98.10 %
Elapsed time:             1799.20 secs
Data transferred:          418.04 MB
Response time:                0.69 secs
Transaction rate:            7.20 trans/sec
Throughput:                0.23 MB/sec
Concurrency:                4.99
Successful transactions:       12949
Failed transactions:             251
Longest transaction:           15.75
Shortest transaction:            0.21
We can see that the modified Symfony Demo app (with cache turned on) handled tests pretty well. On average, it was able to serve 7.2 requests per second within 0.7 seconds (note that we’re using a single core Digital Ocean droplet with only 512 MB of RAM). The availability was 98.10% due to 251 out of 13.200 requests having failed (the connection with the DB failed a few times).
我们可以看到修改后的Symfony Demo应用程序(打开了缓存)可以很好地处理测试。 平均而言,它能够在0.7秒内每秒处理7.2个请求 (请注意,我们使用的是只有512 MB RAM的单核Digital Ocean Droplet)。 由于13.200个请求中有251个失败(与数据库的连接几次失败),因此可用性为98.10% 。
使用围攻提交数据 (Submitting Data with Siege)
So far we’ve been sending only HTTP GET requests, which is usually enough to get an overview of an app’s performance. Often, it makes sense to submit data during load tests (e.g. testing API endpoints). With Siege, you can easily send data to your endpoint:
到目前为止,我们仅发送HTTP GET请求,通常这足以了解应用程序的性能。 通常,在负载测试期间提交数据是有意义的(例如,测试API端点)。 借助Siege,您可以轻松地将数据发送到端点:
siege --reps=1 -c 1 'http://sfdemo.loc POST foo=bar&baz=bash'You can also send the data in JSON format. By using --content-type parameter, we can specify the content type of a request.
您也可以以JSON格式发送数据。 通过使用--content-type参数,我们可以指定请求的内容类型。
siege --reps=1 -c 1 --content-type="application/json" 'http://sfdemo.loc POST {"foo":"bar","baz":"bash"}'We can also change the default user agent with --user-agent="MY USER AGENT" or specify multiple HTTP headers with --header="MY HEADER VALUE".
我们还可以使用--user-agent="MY USER AGENT"更改默认用户代理,或者使用--header="MY HEADER VALUE"指定多个HTTP标头。
Siege also can read the payload data from a file:
攻城还可以从文件中读取有效载荷数据:
cat payload.json
{
"foo":"bar",
"baz":"bash"
}
siege --reps=1 -c 1 --content-type="application/json" 'http://sfdemo.loc POST < payload.json'
You can also send cookies within tests by using the --header option:
您也可以使用--header选项在测试内发送cookie:
siege --reps=1 -c 1 --content-type="application/json" --header="Cookie: my_cookie=abc123" 'http://sfdemo.loc POST < payload.json'结论 (Conclusion)
Siege is a very powerful tool when it comes to load, stress, and regression testing of a web app. There are plenty of options you can use to make your tests behave as close as possible to a real life environment, which makes Siege my preferred tool over something like ab. You can combine different options Siege provides and even run multiple Siege processes in parallel if you want to test your app thoroughly.
当涉及到Web应用程序的负载,压力和回归测试时,Siege是一个非常强大的工具。 您可以使用许多选项来使测试的行为尽可能接近现实生活的环境,这使Siege成为了替代Ab之类的首选工具。 如果要彻底测试应用程序,则可以组合Siege提供的不同选项,甚至可以并行运行多个Siege进程。
It’s always a good idea to automate the testing process (a simple bash script will do the job) and visualize the results. I usually run multiple Siege processes in parallel testing read-only endpoints (i.e. sending only GET requests) at a high rate and submitting the data (i.e. posting comments, invalidating the cache, etc.) at a lower rate, according to real life ratios. Since you can’t specify dynamic payloads within one Siege test, you can set a bigger delay between two requests and run more Siege commands with different parameters.
自动化测试过程(一个简单的bash脚本即可完成工作)并可视化结果始终是一个好主意。 我通常会按照实际比率并行运行多个围攻进程,以较高的速率并行测试只读端点(即仅发送GET请求),并以较低的速率提交数据(即发布注释,使缓存无效等)。 。 由于您无法在一个Siege测试中指定动态有效负载,因此可以在两个请求之间设置更大的延迟,并使用不同的参数运行更多的Siege命令。
I’m also thinking about adding simple load testing to my CI pipeline just to make sure my app’s performance wouldn’t drop below an acceptable level for critical endpoints.
我还考虑在CI管道中添加简单的负载测试,以确保我的应用程序的性能不会低于关键端点的可接受水平。
翻译自: https://www.sitepoint.com/web-app-performance-testing-siege-plan-test-learn/
siege 测试post
siege 测试post_使用Siege进行Web App性能测试:计划,测试,学习相关推荐
- 软件测试-------Web(性能测试 / 界面测试 / 兼容性测试 / 安全性测试)
Web(性能测试 / 界面测试 / 兼容性测试 / 安全性测试) 一.Web性能测试:(压力测试.负载测试.连接速度测试) 1.压力测试: 并发测试 (如500人同时登录邮箱) 2.负载测试 ...
- Java Web项目性能测试 - JMeter测试网站吞吐量、反应时间百分比、流量
Java Web项目性能测试 - JMeter测试网站吞吐量.反应时间百分比.流量 为了衡量.调整.完成Java Web项目的性能指标,满足客户.用户对性能的要求,保证项目上线后能正常运行,以及了解项 ...
- APP性能测试——流量测试(二)
续上文:APP性能测试--流量测试(一),上篇文章介绍了如何通过代理工具抓网络请求,通过代理抓包我们可以抓到http和https请求的详细信息,由于代理我们需要连接wifi,很难抓取到4G网络下的流量 ...
- Web\App\接口自动测试常见面试题
一.Web自动化测试 1.Selenium中hidden或者是display = none的元素是否可以定位到? 不能,可以写JavaScript将标签中的hidden先改为0,再定位元素 2.Sel ...
- APP性能测试——流量测试(一)
写在前面: 第一期主要介绍如何通过anyproxy工具进行流量测试,二期介绍如何通过adb 命令实时监控wifi.4G下的上行以及下行流量值. app的流量测试是性能测 ...
- php安全测试工具,免费的高级Web应用程序安全测试工具
比起Appscan和webinspect以及WVS,还有国产的zwell开发的JSKY,SandCat这款工具可能稍微逊色了点,但是毕竟作为免费的工具比较少,下面就来介绍一下这个工具的功能界面如下: ...
- APP性能测试--帧率测试
一.FPS帧率测试概念 60fps作为衡量标准,即要求每一帧刷新的时间小于16ms,这样才能保证滑动中平滑的流畅度. 二.测试子项 界面过度绘制 屏幕滑动帧速率 屏幕滑动平滑度 三.测试方法 [1] ...
- APP性能测试--功耗测试
一.功耗测试基础 移动设备的电池电量是非常有限的,保持持久的续航能力尤为重要.另外,android的很多特性都比较耗电(如屏幕,GPS,sensor传感器,唤醒机制,CPU,连网等的使用),我们必须要 ...
- APP性能测试--内存测试
一. 内存占用 对于智能手机而言,内存大小是固定的:因此,如果单个app的内存占用越小,手机上可以安装运行的app就越多:或者说app的内存占用越小,在手机上运行就会越流畅.所以说,内存占用的大小,也 ...
- APP性能测试--流量测试
一.流量测试基本概念 目前的网络类型包含2G\3G\4G\wifi,其中还有不同运营商的区分,我们在APP的使用中经常遇到大资源,重复请求,调用响应慢,调用失败等各种情况.在不同的网络类型之下,我们 ...
最新文章
- redux rxjs_可观察的RxJS和Redux入门指南
- Python_第一堂课
- 【Android 逆向】ELF 文件格式 ( 程序头数据 | 节区头数据 | 动态符号表 )
- mysql8.0.20安装教程linux_Linux下安装mysql-8.0.20的教程详解
- 如何在Ubuntu 16.04上安装和配置GitLab
- 浅谈SSM框架原理及使用
- SSM + Ajax
- win10便签常驻桌面_win10技巧分享第六篇——win10自带的备忘录便签功能
- 五国启动税务执法联盟以解决加密货币网络犯罪威胁
- codeforces 897 D Ithea Plays With Chtholly(交互)
- 基于浏览器的http普通请求与ajax请求
- 解析数组里面包含数组的json格式的数据代码
- unity新特性_新的Unity论坛
- 近3万个斗图头像图片大全ACCESS\EXCEL
- 用python对某校园热水服务app进行测试,实现自动免费用水(仅供参考)
- qrcode生成固定大小的二维码
- 安装DB2v10.5Express-C
- Linux——华为云服务器重新挂载云硬盘,数据转移心得记录【建议收藏】
- 创新的功劳不属于某一个人---读《创新者》有感
- 计算机里的公共汽车(总线)
热门文章
- 拉格朗日松弛算法(一)——论文阅读笔记
- Python报错:IndentationError: unindent does not match any outer indentation level问题的解决办法及原因
- 使用canvas压缩图片大小
- [转载]浙江杭西高2011年5月高二地理(徐霞客游记TV版-
- 苹果手机无法连接wifi_手机信号太差?一键查看连接的WIFI离我们多少米
- Microsoft Excel 教程:如何在 Excel 中自动填充数据?
- vue项目 退出登录
- favicon.ico显示,favicon显示,favicon图标显示
- nested exception is java.lang.NumberFormatException: For input string: NaN
- 您的计算机存在远程桌面连接,远程桌面无法连接,详细教您电脑远程桌面无法连接怎么办...