Ogre天龙八部地形mesh部分的C++源码
Ogre的地形部分历来受人诟病,基本没什么用.听说将来的的Ogre1.7版本会重写地形.期待中...
在没有合适的地形可用的情况下,自己手动生成mesh来当地形是一个不错的选择.
由于很多人问我天龙八部地形方面的问题,我索性放出自己terrain类的源码.
先前我的部分源码有一些问题,这次是最新版本的.
以下源码只做交流用,其他用途本人一概不负责任.也负不起责啊~~~穷.
下面源码的头文件被我折叠了,打开就可以看


头文件:
/* ************************************************************************************************************** @fileName Terrain.h @remarks 用来创建地形,和保存地形相关信息 @author LYN 2009.10.1 *************************************************************************************************************** */ #pragma once#include "TLBB.h" #include <vector> using namespace Ogre; using std::vector;const uint TERRAIN_QUERY_MASK = 0x00000001; // 地形查询掩码 const unsigned short MAIN_BINDING = 0; // 主绑定/* 网格操作标志的枚举*/ enum Operate {FLIP_HORIZINTAL = 1, // 图片水平翻转,即左右翻转FLIP_VERTICAL = 2, // 图片垂直翻转,即上下翻转ANTICLOCKWISE_90 = 4, // 逆时针旋转90度FLIP_DIAGONAL = 8 // 三角形的对角线镜像,IndexOrder==0时就把左上的纹理坐标复制到右下,否则右上到左下 };/* 像素图信息 @remarks 保存的是每个网格的纹理图片ID和纹理坐标 */ struct PixMap {int textureId; Real left;Real top;Real right;Real bottom; };/* 高度图文件头信息*/ struct HeightMapHeader {DWORD nMagic;DWORD nVersion; // 版本号int nWidth;int nHeight; };/* 碰撞图文件头*/ struct WCollisionHeader {DWORD nVersion;DWORD nNumber; // 三角形数量 };/* 网格文件头信息*/ struct GridHeader {DWORD nMagic;DWORD nVersion;int nWidth;int nHeight; };/* 单个网格类 @remarks 1个网格就是一个正方,天龙八部的地形是根据网格信息拼接而成,但没有共享顶点,这样可以做很多层uv */ class GridInfo { public:// 第一层pixelmap的索引, 如果是7字节版本,读取后需交换高8位与低8位的值,// 需做如下操作 nFirstLayer = (nFirstLayer<<8)|(nFirstLayer>>8)short nFirstLayer;// 对nFirstLayer的操作, 取值是上面几个定义的宏, 可以互相组合BYTE nFirstLayerOp;// 第二层pixelmap的索引, 天龙八部的地表不算光照图有两层UV来融合short nSecondLayer;// 对nSecondLayer的操作,取值同nFirstLayerOpBYTE nSecondLayerOp;// 对格子的三角形的操作,可能取值如下, 0正常三角形索引, 1不同于正常的三角形索引BYTE IndexOrder; };/* TLBBTerrain类 @remarks 用来生成地形 */ class TLBBTerrain { public:/* 构造函数@param filename 地形文件名@param sceneMgr 场景管理器*/TLBBTerrain(const String& filename, SceneManager* sceneMgr);~TLBBTerrain(void);/* 生成地形@remarks 生成地形,直接调用此方法直接可以生成地形.*/void createTerrain(void);/* 获得地图X方向的缩放*/int getScaleX(void) const;/* 获得地图Y方向的缩放*/int getScaleY(void) const;/* 获得地图Z方向的缩放*/int getScaleZ(void) const;/* 获得地图X方向的大小*/int getXSize(void) const;/* 获得地图Z方向的大小*/int getZSize(void) const;/* 获得地图中心点*/const Vector3& getCentre(void) const;/* 获得高度图数据*/const vector<Real>& getHeightMapData(void) const;/* 获得手工材质的名字数组@remarks 手动生成的材质换图的时候需要手工清除,所以保留他们的名字*/const vector<String>& getManualMatData(void) const;/* 获得手工mesh的名字数组@remarks 手动生成的mesh换图的时候需要手工清除,所以保留他们的名字*/const vector<String>& getManualMeshData(void) const;/* 获得WCollision实体指针数组*/const vector<Entity*>& getWCollisionEntData(void) const;protected:/* 打开网格文件@remarks 二进制流载入@param filename 网格文件名@param groupName 资源组名字*/void openGridFile(const String& fileName, const String &groupName);/* 打开高度图文件@remarks 二进制流载入@param filename 高度图文件名@param groupName 资源组名字*/void openHeightMapFile(const String &fileName, const String &groupName);/* 翻转纹理图片@remarks 对纹理图片的操作*/void flipPicture(int op, Vector2& TL, Vector2& TR, Vector2& BL, Vector2& BR, int indexOrder);/* 查找此网格的材质是否已经生成了@remarks 如果存在就不用再生成@param gridinfo 资源组名字@param endIndex 结束的索引,控制查询范围@return 如果已经生成了,就返回含有此材质的那个网格的索引, 否则返回-1*/int findSameMaterial(GridInfo& gridinfo, int endIndex); /* 手工生成材质@remarks 克隆材质模板,再更改纹理别名即可*/void createManualMat(void); /* 获得顶点法线@remarks 为了简单,只获得网格法线,暂时没有求顶点法线,如果要想效果更好,求平均即可得到顶点法线@param x 顶点缩放后的x坐标@param z 顶点缩放后的z坐标@return 法线坐标*/Vector3 getNormalAt(Real x, Real z) const; /* 生成地形tile@remarks 直接操作硬件缓存生成地形mesh@param startx 没有缩放的x起点坐标@param startz 没有缩放的z起点坐标@param tileSizeX tile X方向的大小, 虽然天龙的tilesize都是32,但有的图不是tile整数倍,可以更改此值生成随意大小的tile,@param tileSizeZ tile Z方向的大小@param matName 材质名字*/bool createTileMesh(size_t startx, size_t startz, int tileSizeX, int tileSizeZ, const String& matName);/* 生成地形tile@remarks 用manualObject来做地形, 简单很多,经过测试和操作硬件缓存效率基本差不多,可以二选其一@param startx 没有缩放的x起点坐标@param startz 没有缩放的z起点坐标@param tileSizeX tile X方向的大小, 虽然天龙的tilesize都是32,但有的图不是tile整数倍,可以更改此值生成随意大小的tile,@param tileSizeZ tile Z方向的大小@param matName 材质名字*/void createTileManualObject(size_t startx, size_t startz, int tileSizeX, int tileSizeZ, const String& matName);/* 生成WCollision@remarks WCollision用来地形查询用,不用渲染出来,所以应该按区域分开生成多个WCollision,以减少查询的顶点数量@param fileName WCollision文件的名字@param groupName 资源组*/void createWCollision(const String &fileName , const String &groupName); protected:// 场景管理器SceneManager* mSceneMgr;// 地图分块大小int mTileSize;// 地图大小和缩放int mXSize;int mZSize;int mScaleX;int mScaleY;int mScaleZ;// 地图中心点位置Vector3 mCentre;// 是否有光照图bool mHasLightMap;// 光照图文件名String mLightMapName;// 材质数量size_t mMaterialNum; // 高度图vector<Real> mHeightMapData; // 网格信息vector<GridInfo> mGridData; // 纹理vector<String> mTextureData; // 像素映射图vector<PixMap> mPixMapData; // 材质模板, 存储顺序:第一层,第一层光照图,第二层,第二层光照图vector<String> mTemplateData; // 雾vector<String> mFogReplacementData; // 手动生成的材质vector<String> mManualMatData; // 地面实体(比如桥)的碰撞面数据vector<Vector3> mWCollisionData; // 手动生成的meshvector<String> mManualMeshData; // WCollisionvector<Entity*> mWCollisionEntData;// 地形文件名字String mFileName; };
源文件:
#include "stdafx.h" #include "Terrain.h" #include "Utils.h" #include <mmsystem.h> #include "TLBBFileBuffer.h" #include <string> using std::string;//-------------------------------------------------------------------------------------------------------- TLBBTerrain::TLBBTerrain(const String& filename, SceneManager* sceneMgr) :mMaterialNum(0), mHasLightMap(false), mSceneMgr(sceneMgr), mFileName(filename) {// 载入地形XML文件TiXmlDocument doc;TLBBFileBuffer fileBuffer(filename);doc.Parse((char*)fileBuffer.GetBuffer());// 获得地形的大小和分块等信息TiXmlElement* element = doc.FirstChildElement("Terrain");mTileSize = TLBBUtils::GetIntAttribute(element, "tileSize");mXSize = TLBBUtils::GetIntAttribute(element, "xsize");mZSize = TLBBUtils::GetIntAttribute(element, "zsize");// 遍历元素element = element->FirstChildElement();while (element){TLBB_TERRAIN_TYPE nodetype = TLBBUtils::GetTerrainType(element);switch (nodetype){case TERRAIN_SCALE:{mScaleX = TLBBUtils::GetIntAttribute(element, "x");mScaleY = TLBBUtils::GetIntAttribute(element, "y");mScaleZ = TLBBUtils::GetIntAttribute(element, "z");// 默认的地图中心点坐标mCentre = Vector3(-mXSize*mScaleX/2, 0, -mZSize*mScaleZ/2);}break;case TERRAIN_CENTRE:{if (mCentre != Vector3::ZERO){mCentre.x += TLBBUtils::GetRealAttribute(element, "x");mCentre.y += TLBBUtils::GetRealAttribute(element, "y");mCentre.z += TLBBUtils::GetRealAttribute(element, "z");}else{OGRE_EXCEPT(Exception::ERR_INVALID_STATE, "地图中心点Centre没有初始化", "TLBBTerrain::TLBBTerrain");}}break;case TERRAIN_HEIGHTMAP:{String fileName = TLBBUtils::GetStringAttribute(element, "filename");// UTF变ASCIIchar tmpStr[256] = {0};TLBBUtils::Utf8ToAscii((char*)fileName.c_str(), tmpStr);fileName = tmpStr;openHeightMapFile(fileName, "TLBB");}break;case TERRAIN_GRIDINFO:{String fileName = TLBBUtils::GetStringAttribute(element, "filename");// UTF变ASCIIchar tmpStr[256] = {0};TLBBUtils::Utf8ToAscii((char*)fileName.c_str(), tmpStr);fileName = tmpStr;openGridFile(fileName, "TLBB");}break;case TERRAIN_LIGHTMAP:{mLightMapName = TLBBUtils::GetStringAttribute(element, "filename");// UTF变ASCIIchar tmpStr[256] = {0};TLBBUtils::Utf8ToAscii((char*)mLightMapName.c_str(), tmpStr);mLightMapName = tmpStr;mHasLightMap = true;}break;case TERRAIN_TEXTURES:{TiXmlElement* elementTemp = element->FirstChildElement();while (elementTemp){// UTF变ASCIIchar tmpStr[256]={0};String str = TLBBUtils::GetStringAttribute(elementTemp, "filename");TLBBUtils::Utf8ToAscii((char*)str.c_str(), tmpStr);str = tmpStr;mTextureData.push_back(str);elementTemp = elementTemp->NextSiblingElement();}}break;case TERRAIN_PIXMAPS:{TiXmlElement* elementTemp = element->FirstChildElement();while (elementTemp){PixMap pixmap;pixmap.textureId = TLBBUtils::GetIntAttribute(elementTemp, "textureId");pixmap.left = TLBBUtils::GetRealAttribute(elementTemp, "left");pixmap.top = TLBBUtils::GetRealAttribute(elementTemp, "top");pixmap.right = TLBBUtils::GetRealAttribute(elementTemp, "right");pixmap.bottom = TLBBUtils::GetRealAttribute(elementTemp, "bottom");if (pixmap.left == -1){pixmap.left = 0;}if (pixmap.right == -1){pixmap.right = 1;}if (pixmap.top == -1){pixmap.top = 0;}if (pixmap.bottom == -1){pixmap.bottom = 1;}mPixMapData.push_back(pixmap);elementTemp = elementTemp->NextSiblingElement();}}break;case TERRAIN_MATERIALS:{TiXmlElement* elementTemp = element->FirstChildElement();String strValue = elementTemp->Value();while (elementTemp){if (strValue == "template"){String str = TLBBUtils::GetStringAttribute(elementTemp, "material");mTemplateData.push_back(str);}else{// 雾的材质}elementTemp = elementTemp->NextSiblingElement();}}break;}element = element->NextSiblingElement();} }//-------------------------------------------------------------------------------------------------------- TLBBTerrain::~TLBBTerrain(void) {}//-------------------------------------------------------------------------------------------------------- void TLBBTerrain::openHeightMapFile(const String &fileName , const String &groupName) {DataStreamPtr stream = ResourceGroupManager::getSingleton().openResource(fileName , groupName);if (stream.isNull()) { OGRE_EXCEPT(Exception::ERR_INTERNAL_ERROR, "打开高度图文件失败:"+fileName, "Terrain::openHeightMapFile");return ; }// 读取文件头, 16个字节的结构HeightMapHeader header;stream->read(&header , sizeof(header));// 设置高度图数组的大小int Width = header.nWidth;int Height = header.nHeight;size_t uCount = Width * Height;mHeightMapData.resize(uCount); // 循环读取for (size_t i = 0; i < uCount; ++ i){Real val = 0;stream->read((void*)&val, 4); mHeightMapData[i] = (Real)val; // 高度图数据是浮点表示的} }//-------------------------------------------------------------------------------------------------------- void TLBBTerrain::openGridFile(const String &fileName , const String &groupName) {DataStreamPtr stream = ResourceGroupManager::getSingleton().openResource(fileName , groupName);if (stream.isNull()) { OGRE_EXCEPT(Exception::ERR_INTERNAL_ERROR, "打开地形网格文件失败:"+fileName, "Terrain::openGridFile");return ; }// 读取文件头, 16个字节的结构GridHeader header;stream->read(&header , sizeof(header));int Width = header.nWidth;int Height = header.nHeight;bool largeVersion = false;// 看版本号大于这个,就表示后面跟着有个标记用来表示结构体的大小是7字节的版本还是5字节的版本if (header.nVersion >= 0x00100002){stream->read(&largeVersion , sizeof(largeVersion));}size_t uCount = Width * Height;mGridData.resize(uCount); BYTE byteValue;for (size_t i = 0 ; i < uCount ; ++ i){GridInfo &info = mGridData[i];if (largeVersion){stream->read(&info.nFirstLayer , 2);}else{stream->read(&byteValue , 1);info.nFirstLayer = byteValue;}// 这里减一是因为天龙里的这个id是从1开始的,0就代表这层不使用。 // 而c程序的数组索引是从0开始的,所以在载入时一次性减一,// 以便在使用的时候不需要再减一,而判断这层是否使用就改成用-1来判断,而不是原来的0info.nFirstLayer--; stream->read(&info.nFirstLayerOp , 1);if (largeVersion){stream->read(&info.nSecondLayer , 2);}else{stream->read(&byteValue , 1);info.nSecondLayer = byteValue;}info.nSecondLayer--;stream->read(&info.nSecondLayerOp , 1);stream->read(&info.IndexOrder , 1);} }//-------------------------------------------------------------------------------------------------------- int TLBBTerrain::findSameMaterial(GridInfo& gridinfo, int endIndex) {// 网格比较for (int i = 0; i < endIndex; ++ i){if (mGridData[i].nFirstLayer < 0 ){continue;}// 如果有第一层if (gridinfo.nFirstLayer >= 0){// 第一层的纹理图片相同if (mPixMapData[gridinfo.nFirstLayer].textureId == mPixMapData[mGridData[i].nFirstLayer].textureId){// 如果有第二层if (gridinfo.nSecondLayer >= 0){if (mGridData[i].nSecondLayer >= 0){ // 第二层的纹理图片相同if (mPixMapData[gridinfo.nSecondLayer].textureId == mPixMapData[mGridData[i].nSecondLayer].textureId){return i; // 一,二层的纹理图片都相同}}}else if (mGridData[i].nSecondLayer < 0){ return i; // 第一层的纹理图片相同}}}else{ // 如果第一层都没有纹理图片....用第0个网格的材质代替,不清楚为什么会没有纹理// 可能天龙有其他材质代替吧return 0;}}return -1; // 没有找到相同材质 }//-------------------------------------------------------------------------------------------------------- void TLBBTerrain::createManualMat(void) {// 先获得材质模板MaterialPtr materialTemplate1 = static_cast<MaterialPtr>(MaterialManager::getSingleton().getByName(mTemplateData[1]));MaterialPtr materialTemplate2 = static_cast<MaterialPtr>(MaterialManager::getSingleton().getByName(mTemplateData[3])); int tempIndex = -1;for (int i = 0; i < mXSize*mZSize; ++ i){// 如果此材质已经存在if ((tempIndex = findSameMaterial(mGridData[i], i)) >= 0){// 用已有材质存入数组mManualMatData.push_back(mManualMatData[tempIndex]);}else{ // 有第二层if (mGridData[i].nSecondLayer >= 0 && mGridData[i].nFirstLayer >= 0){ // 拷贝第二层材质String newMaterialName = "material"+StringConverter::toString(mMaterialNum); // 材质名字MaterialPtr newMaterial = materialTemplate2->clone(newMaterialName); // 克隆材质 AliasTextureNamePairList aliasList; // 存储纹理别名的二叉树 String textureName1 = mTextureData[mPixMapData[mGridData[i].nFirstLayer].textureId];String textureName2 = mTextureData[mPixMapData[mGridData[i].nSecondLayer].textureId];aliasList["<layer0>"] = textureName1;aliasList["<layer1>"] = textureName2;if (mHasLightMap){aliasList["<lightmap>"] = mLightMapName;}newMaterial->applyTextureAliases(aliasList); // 用纹理别名更改纹理 mManualMatData.push_back(newMaterialName); // 存入材质数组}else if (mGridData[i].nFirstLayer >= 0){// 拷贝第一层材质String newMaterialName = "material"+StringConverter::toString(mMaterialNum); // 材质名字MaterialPtr newMaterial = materialTemplate1->clone(newMaterialName); // 克隆材质 AliasTextureNamePairList aliasList; // 存储纹理别名的二叉树 String textureName1 = mTextureData[mPixMapData[mGridData[i].nFirstLayer].textureId];aliasList["<layer0>"] = textureName1;if (mHasLightMap){aliasList["<lightmap>"] = mLightMapName;}newMaterial->applyTextureAliases(aliasList); // 用纹理别名更改纹理 mManualMatData.push_back(newMaterialName); // 存入材质数组}++ mMaterialNum;}} }//-------------------------------------------------------------------------------------------------------- Vector3 TLBBTerrain::getNormalAt(Real x, Real z) const {int flip = 1;int index = x + z*(mXSize+1);Vector3 here(x, mHeightMapData[index], z);Vector3 right;Vector3 down;// 边界if (x >= mXSize){flip *= -1;right = Vector3(x-1, mHeightMapData[index-1], z);}else{right = Vector3(x+1, mHeightMapData[index+1], z);}if (z >= mZSize){flip *= -1;down = Vector3(x, mHeightMapData[index-mXSize-1], z-1);}else{down = Vector3(x, mHeightMapData[index+mXSize+1], z+1);}// 生成矢量right -= here;down -= here;// 矢量正交,注意方向Vector3 normal = flip * down.crossProduct(right);normal.normalise(); // 归一化return normal; }//-------------------------------------------------------------------------------------------------------- void TLBBTerrain::flipPicture(int op, Vector2& TL,Vector2& TR, Vector2& BL, Vector2& BR , int indexOrder) {// 用按位与的方式,可以简单的获得是否具有哪个属性,实现起来非常简单// 我太懒了,不想改了,这个函数是网友000提供的,虽然很烂,但是可用~~int OP[4];OP[0] = 1;OP[1] = 2;OP[2] = 4;OP[3] = 8;static int op_1 = OP[0],op_2 = OP[1],op_4 = OP[2], op_8 = OP[3];Real top = TL.y,left = TL.x,bottom = BL.y, right = TR.x;int ops[4]; if(op != op_1 && op != op_2 && op !=op_4 && op != op_8 ){for (int i = 3;i>=0;--i){ops[i] = -1;int del = op - OP[i];if(del>=0){op -= OP[i];ops[i] = OP[i];}}for (int i = 0;i<4;++i){if (ops[i] >0){flipPicture(ops[i],TL,TR,BL,BR,indexOrder);}}return;}switch(op){case 1:TL = Vector2(right,top); TR = Vector2(left,top);BL = Vector2(right,bottom); BR = Vector2(left,bottom);break;case 2:TL = Vector2(left,bottom); TR = Vector2(right,bottom);BL = Vector2(left,top); BR = Vector2(right,top);break;case 4:TL = Vector2(right,top); TR = Vector2(right,bottom);BL = Vector2(left,top); BR = Vector2(left,bottom);break;case 8:if(indexOrder == 0){ // 对角线镜像BR = TL;}else{BL = TR; }break;default:break;} }//-------------------------------------------------------------------------------------------------------- void TLBBTerrain::createTileManualObject(size_t startx, size_t startz, int tileSizeX, int tileSizeZ, const String& matName) {StringUtil::StrStreamType entName;entName << "tile[" << startz << "]" << "[" << startx << "]" << matName;ManualObject* mo = mSceneMgr->createManualObject(entName.str());mo->begin(matName);const Real width = 1;int k = 0;bool hasMesh = false;int endx = startx + tileSizeX;int endz = startz + tileSizeZ;for (int z = startz; z < endz; ++ z){for (int x = startx; x < endx; ++ x){// 转换成一维数组索引int index = x + z*mXSize; // 如果存在此材质if (mManualMatData[index] == matName && mGridData[index].nFirstLayer >= 0){hasMesh = true;// 高度图坐标转换int heightIndex = index + z;// 第一层纹理坐标int index1 = mGridData[index].nFirstLayer;Real left1 = mPixMapData[index1].left;Real right1 = mPixMapData[index1].right;Real top1 = mPixMapData[index1].top;Real bottom1 = mPixMapData[index1].bottom;Vector2 left_top_1(left1, top1);Vector2 right_top_1(right1, top1);Vector2 right_bottom_1(right1, bottom1);Vector2 left_bottom_1(left1, bottom1);// 图片翻转等操作if (mGridData[index].nFirstLayerOp != 0){flipPicture(mGridData[index].nFirstLayerOp, left_top_1, right_top_1, left_bottom_1, right_bottom_1, mGridData[index].IndexOrder);}// 第二层纹理坐标Vector2 left_top_2;Vector2 right_top_2;Vector2 right_bottom_2;Vector2 left_bottom_2;if (mGridData[index].nSecondLayer >= 0){int index2 = mGridData[index].nSecondLayer;Real left2 = mPixMapData[index2].left;Real right2 = mPixMapData[index2].right;Real top2 = mPixMapData[index2].top;Real bottom2 = mPixMapData[index2].bottom;left_top_2 = Vector2(left2, top2);right_top_2 = Vector2(right2, top2);right_bottom_2 = Vector2(right2, bottom2);left_bottom_2 = Vector2(left2, bottom2);if (mGridData[index].nSecondLayerOp != 0){flipPicture(mGridData[index].nSecondLayerOp, left_top_2, right_top_2, left_bottom_2, right_bottom_2, mGridData[index].IndexOrder);}}// 光照图纹理坐标Vector2 left_top_3;Vector2 right_top_3;Vector2 right_bottom_3;Vector2 left_bottom_3;if (mHasLightMap){Real left3 = (Real)x / (Real)mXSize; Real right3 = left3 + 1/(Real)mXSize;Real top3 = (Real)z / (Real)mZSize;Real bottom3 = top3 + 1/(Real)mZSize;left_top_3 = Vector2(left3, top3);right_top_3 = Vector2(right3, top3);right_bottom_3 = Vector2(right3, bottom3);left_bottom_3 = Vector2(left3, bottom3);}// 点0mo->position(x*mScaleX, mHeightMapData[heightIndex]*mScaleY, z*mScaleZ);mo->normal(getNormalAt(x, z));mo->textureCoord(left_top_1);if (mGridData[index].nSecondLayer >= 0){mo->textureCoord(left_top_2);}if (mHasLightMap){mo->textureCoord(left_top_3); // 光照图纹理坐标}// 点1mo->position((x+width)*mScaleX, mHeightMapData[heightIndex+1]*mScaleY, z*mScaleZ);mo->normal(getNormalAt(x+width, z));mo->textureCoord(right_top_1);if (mGridData[index].nSecondLayer >= 0){mo->textureCoord(right_top_2);}if (mHasLightMap){mo->textureCoord(right_top_3); // 光照图纹理坐标}// 点2mo->position((x+width)*mScaleX, mHeightMapData[heightIndex+mXSize+2]*mScaleY, (width+z)*mScaleZ);mo->normal(getNormalAt(x+width, z+width));mo->textureCoord(right_bottom_1);if (mGridData[index].nSecondLayer >= 0){mo->textureCoord(right_bottom_2);}if (mHasLightMap){mo->textureCoord(right_bottom_3); // 光照图纹理坐标}// 点3mo->position(x*mScaleX, mHeightMapData[heightIndex+mXSize+1]*mScaleY, (width+z)*mScaleZ);mo->normal(getNormalAt(x, z+width));mo->textureCoord(left_bottom_1);if (mGridData[index].nSecondLayer >= 0){mo->textureCoord(left_bottom_2);}if (mHasLightMap){mo->textureCoord(left_bottom_3); // 光照图纹理坐标}// 三角形索引顺序int offset = k * 4;if (mGridData[index].IndexOrder == 0){ // 正常顺序mo->triangle(offset+1, offset, offset+3);mo->triangle(offset+1, offset+3, offset+2);}else{mo->triangle(offset, offset+3, offset+2);mo->triangle(offset, offset+2, offset+1);}++ k;}}}mo->end();// 此tile含有数据才生成if (hasMesh){mSceneMgr->getRootSceneNode()->createChildSceneNode(mCentre)->attachObject(mo);mo->setCastShadows(false);mo->setQueryFlags(TERRAIN_QUERY_MASK);}else{mSceneMgr->destroyManualObject(entName.str());} }//-------------------------------------------------------------------------------------------------------- bool TLBBTerrain::createTileMesh(size_t startx, size_t startz, int tileSizeX, int tileSizeZ, const String& matName) {const Real width = 1;int k = 0;bool hasMesh = false;int endx = startx + tileSizeX;int endz = startz + tileSizeZ;// 先获得mesh顶点的数量size_t vCount = 0;bool hasSecondLayer = false;for (int z = startz; z < endz; ++ z){for (int x = startx; x < endx; ++ x){int index = x + z*mXSize; // 转换成一维数组索引// if (mManualMatData[index] == matName && mGridData[index].nFirstLayer >= 0){vCount += 4;// 此材质是否有第二层if (!hasSecondLayer){if (mGridData[index].nSecondLayer >= 0){hasSecondLayer = true;}}}}}if (vCount == 0){return false;}// 生成meshStringUtil::StrStreamType meshName;meshName << "gridMesh[" << startz << "]" << "[" << startx << "]" << matName;MeshPtr mesh = MeshManager::getSingleton().createManual(meshName.str(), "TLBB");mManualMeshData.push_back(meshName.str());// 子meshSubMesh* sm = mesh->createSubMesh();sm->useSharedVertices = false; // 不使用共享顶点sm->vertexData = new VertexData();sm->vertexData->vertexCount = vCount;// 顶点结构描述VertexDeclaration* decl = sm->vertexData->vertexDeclaration;size_t offset = 0;// 顶点位置decl->addElement(MAIN_BINDING, offset, VET_FLOAT3, VES_POSITION);offset += VertexElement::getTypeSize(VET_FLOAT3);// 法线decl->addElement(MAIN_BINDING, offset, VET_FLOAT3, VES_NORMAL);offset += VertexElement::getTypeSize(VET_FLOAT3);// 纹理坐标decl->addElement(MAIN_BINDING, offset, VET_FLOAT2, VES_TEXTURE_COORDINATES, 0); offset += VertexElement::getTypeSize(VET_FLOAT2);if (hasSecondLayer) // 如果有第二层{decl->addElement(MAIN_BINDING, offset, VET_FLOAT2, VES_TEXTURE_COORDINATES, 1);offset += VertexElement::getTypeSize(VET_FLOAT2);if (mHasLightMap){decl->addElement(MAIN_BINDING, offset, VET_FLOAT2, VES_TEXTURE_COORDINATES, 2);offset += VertexElement::getTypeSize(VET_FLOAT2);}}else{if (mHasLightMap){decl->addElement(MAIN_BINDING, offset, VET_FLOAT2, VES_TEXTURE_COORDINATES, 1);offset += VertexElement::getTypeSize(VET_FLOAT2);}}// 顶点缓存HardwareVertexBufferSharedPtr vbuf = HardwareBufferManager::getSingleton().createVertexBuffer(offset, vCount, HardwareBuffer::HBU_STATIC_WRITE_ONLY);// 获得顶点缓存的地址float* pReal = static_cast<float*>(vbuf->lock(HardwareBuffer::HBL_DISCARD));// 索引缓存sm->indexData->indexCount = (vCount/2)*3;sm->indexData->indexBuffer = HardwareBufferManager::getSingleton().createIndexBuffer(HardwareIndexBuffer::IT_16BIT, (vCount/2)*3, HardwareBuffer::HBU_STATIC_WRITE_ONLY);// 获得索引缓存的地址unsigned short* pI = static_cast<unsigned short*>(sm->indexData->indexBuffer->lock(HardwareBuffer::HBL_DISCARD));// 循环写入数据到硬件缓存AxisAlignedBox meshBounds; // AABB绑定盒Real meshRadius = 0; // 球体半径for (int z = startz; z < endz; ++ z){for (int x = startx; x < endx; ++ x){int index = x + z*mXSize; // 转换成一维数组索引// if (mManualMatData[index] == matName && mGridData[index].nFirstLayer >= 0){// 高度图坐标转换// 因为网格数量是192*192的话,顶点就是193*193int heightIndex = index + z;// 第一层纹理坐标int index1 = mGridData[index].nFirstLayer;Real left1 = mPixMapData[index1].left;Real right1 = mPixMapData[index1].right;Real top1 = mPixMapData[index1].top;Real bottom1 = mPixMapData[index1].bottom;Vector2 left_top_1(left1, top1);Vector2 right_top_1(right1, top1);Vector2 right_bottom_1(right1, bottom1);Vector2 left_bottom_1(left1, bottom1);// 图片翻转等操作if (mGridData[index].nFirstLayerOp != 0){flipPicture(mGridData[index].nFirstLayerOp, left_top_1, right_top_1, left_bottom_1, right_bottom_1, mGridData[index].IndexOrder);}// 第二层纹理坐标Vector2 left_top_2;Vector2 right_top_2;Vector2 right_bottom_2;Vector2 left_bottom_2;if (mGridData[index].nSecondLayer >= 0){int index2 = mGridData[index].nSecondLayer;Real left2 = mPixMapData[index2].left;Real right2 = mPixMapData[index2].right;Real top2 = mPixMapData[index2].top;Real bottom2 = mPixMapData[index2].bottom;left_top_2 = Vector2(left2, top2);right_top_2 = Vector2(right2, top2);right_bottom_2 = Vector2(right2, bottom2);left_bottom_2 = Vector2(left2, bottom2);if (mGridData[index].nSecondLayerOp != 0){flipPicture(mGridData[index].nSecondLayerOp, left_top_2, right_top_2, left_bottom_2, right_bottom_2, mGridData[index].IndexOrder);}}// 光照图纹理坐标Vector2 left_top_3;Vector2 right_top_3;Vector2 right_bottom_3;Vector2 left_bottom_3;if (mHasLightMap){Real left3 = (Real)x / (Real)mXSize; Real right3 = left3 + 1/(Real)mXSize;Real top3 = (Real)z / (Real)mZSize;Real bottom3 = top3 + 1/(Real)mZSize;left_top_3 = Vector2(left3, top3);right_top_3 = Vector2(right3, top3);right_bottom_3 = Vector2(right3, bottom3);left_bottom_3 = Vector2(left3, bottom3);}// 对mesh每个网格的个顶点编写数据// 点0// positionVector3 position(x*mScaleX, mHeightMapData[heightIndex]*mScaleY, z*mScaleZ);*pReal++ = position.x;*pReal++ = position.y;*pReal++ = position.z;meshBounds.merge(position); // update boundsmeshRadius = std::max(meshRadius, position.length()); // update bounds// normalVector3 normal = getNormalAt(x, z);*pReal++ = normal.x;*pReal++ = normal.y;*pReal++ = normal.z;// uv1*pReal++ = left_top_1.x;*pReal++ = left_top_1.y;// uv2if (mGridData[index].nSecondLayer >= 0){*pReal++ = left_top_2.x;*pReal++ = left_top_2.y;}// uv3if (mHasLightMap){*pReal++ = left_top_3.x;*pReal++ = left_top_3.y;}// 点1// positionposition = Vector3((x+width)*mScaleX, mHeightMapData[heightIndex+1]*mScaleY, z*mScaleZ);*pReal++ = position.x;*pReal++ = position.y;*pReal++ = position.z;meshBounds.merge(position); // update boundsmeshRadius = std::max(meshRadius, position.length()); // update bounds// normalnormal = getNormalAt(x+width, z);*pReal++ = normal.x;*pReal++ = normal.y;*pReal++ = normal.z;// uv1*pReal++ = right_top_1.x;*pReal++ = right_top_1.y;// uv2if (mGridData[index].nSecondLayer >= 0){*pReal++ = right_top_2.x;*pReal++ = right_top_2.y;}// uv3if (mHasLightMap){*pReal++ = right_top_3.x;*pReal++ = right_top_3.y;}// 点2// positionposition = Vector3((x+width)*mScaleX, mHeightMapData[heightIndex+mXSize+2]*mScaleY, (z+width)*mScaleZ);*pReal++ = position.x;*pReal++ = position.y;*pReal++ = position.z;meshBounds.merge(position); // update boundsmeshRadius = std::max(meshRadius, position.length()); // update bounds// normalnormal = getNormalAt(x+width, z+width);*pReal++ = normal.x;*pReal++ = normal.y;*pReal++ = normal.z;// uv1*pReal++ = right_bottom_1.x;*pReal++ = right_bottom_1.y;// uv2if (mGridData[index].nSecondLayer >= 0){*pReal++ = right_bottom_2.x;*pReal++ = right_bottom_2.y;}// uv3if (mHasLightMap){*pReal++ = right_bottom_3.x;*pReal++ = right_bottom_3.y;}// 点3// positionposition = Vector3(x*mScaleX, mHeightMapData[heightIndex+mXSize+1]*mScaleY, (z+width)*mScaleZ);*pReal++ = position.x;*pReal++ = position.y;*pReal++ = position.z;meshBounds.merge(position); // update boundsmeshRadius = std::max(meshRadius, position.length()); // update bounds// normalnormal = getNormalAt(x, z+width);*pReal++ = normal.x;*pReal++ = normal.y;*pReal++ = normal.z;// uv1*pReal++ = left_bottom_1.x;*pReal++ = left_bottom_1.y;// uv2if (mGridData[index].nSecondLayer >= 0){*pReal++ = left_bottom_2.x;*pReal++ = left_bottom_2.y;}// uv3if (mHasLightMap){*pReal++ = left_bottom_3.x;*pReal++ = left_bottom_3.y;}// 索引int off = k * 4;if (mGridData[index].IndexOrder == 0) // 正常索引顺序{*pI++ = 1 + off;*pI++ = 0 + off;*pI++ = 3 + off;*pI++ = 1 + off;*pI++ = 3 + off;*pI++ = 2 + off;}else{*pI++ = 0 + off;*pI++ = 3 + off;*pI++ = 2 + off;*pI++ = 0 + off;*pI++ = 2 + off;*pI++ = 1 + off;}++ k;}}}vbuf->unlock();sm->vertexData->vertexBufferBinding->setBinding(MAIN_BINDING, vbuf); // 绑定顶点缓存sm->indexData->indexBuffer->unlock();sm->setMaterialName(matName);// 设置绑定盒子和球体半径, 查询裁剪用//Real min = -10*mScaleY;//Real max = 25*mScaleY;//AxisAlignedBox meshBounds(// (Real)startx*mScaleX, // min, // (Real)startz*mScaleZ,// (Real)(endx - 1)*mScaleX, // max, // (Real)(endz - 1)*mScaleZ);//Real meshRadius = Math::Sqrt(// Math::Sqr(max - min) +// Math::Sqr((endx - 1 - startx) * mScaleX) +// Math::Sqr((endz - 1 - startz) * mScaleZ)) / 2;mesh->_setBounds(meshBounds);mesh->_setBoundingSphereRadius(meshRadius);mesh->load();return true; }//-------------------------------------------------------------------------------------------------------- void TLBBTerrain::createWCollision(const String &fileName , const String &groupName) {DataStreamPtr stream = ResourceGroupManager::getSingleton().openResource(fileName , groupName);// 读取文件头, 8个字节的结构WCollisionHeader header;stream->read(&header , sizeof(header));Vector3 vec3 = Vector3::ZERO;int col = 0;int row = 0;int preCol = 0; // 前一个数据块的列int preRow = 0; // 前一个数据块的行int number = 0;int k = 0;bool firstTime = true; // 第一次while (!stream->eof()){// 行列坐标, 决定WCollision的分块信息的// 如果把WCOliision做成一个mesh,每次都会全部查询,效率很低stream->read(&col, sizeof(row));stream->read(&row, sizeof(col));stream->read(&number, sizeof(number)); // 数据块的三角形数量// 读取此数据块的三角形顶点数据for (int i = 0; i < number * 3; ++ i){stream->read(&vec3, sizeof(vec3)); mWCollisionData.push_back(vec3);}if (mWCollisionData.size() == 0){break;}// 初始化if (firstTime){preCol = col;preRow = row;firstTime = false;} // 行列坐标相连,就做成一个meshif (col == preCol && (row - preRow) <= 1){preCol = col;preRow = row;}else{// 生成ManualObject mo("mo");mo.begin("", RenderOperation::OT_TRIANGLE_LIST);for(size_t i = 0; i < mWCollisionData.size(); i += 3){// 点1mo.position(mWCollisionData[i].x*mScaleX, mWCollisionData[i].y*mScaleY, mWCollisionData[i].z*mScaleZ);mo.colour(ColourValue(0, 0, 1));// 点2mo.position(mWCollisionData[i+1].x*mScaleX, mWCollisionData[i+1].y*mScaleY, mWCollisionData[i+1].z*mScaleZ);mo.colour(ColourValue(0, 0, 1));// 点3mo.position(mWCollisionData[i+2].x*mScaleX, mWCollisionData[i+2].y*mScaleY, mWCollisionData[i+2].z*mScaleZ);mo.colour(ColourValue(0, 0, 1));// 三角形索引顺序mo.triangle(i, i+1, i+2);}mo.end();String meshName = "WCollisionMesh"+StringConverter::toString(k);mo.convertToMesh(meshName, "TLBB");mManualMeshData.push_back(meshName);Entity* ent = mSceneMgr->createEntity("WCollison"+StringConverter::toString(k), meshName);mWCollisionEntData.push_back(ent); //ent->setCastShadows(false);ent->setQueryFlags(TERRAIN_QUERY_MASK);SceneNode* node = mSceneMgr->getRootSceneNode()->createChildSceneNode(mCentre);node->attachObject(ent);mWCollisionData.clear(); // firstTime = true;++ k;}} // end of while }//-------------------------------------------------------------------------------------------------------- void TLBBTerrain::createTerrain() {// 生成材质LogManager::getSingleton().logMessage(LML_CRITICAL, "开始生成材质......");createManualMat();// 生成WCollisionLogManager::getSingleton().logMessage(LML_CRITICAL, "开始生成WCollsion......");vector<String> vec;vec = StringUtil::split(mFileName, ".", 1);String tempStr = vec[0] + ".WCollision";createWCollision(tempStr, "TLBB");// 地形meshLogManager::getSingleton().logMessage(LML_CRITICAL, "开始生成地形mesh......");// 判断地形大小是否能被tile整除,不能整除就需要矫正每行每列最后一个tile的大小// 在循环外部判断,就不用每次循环都判断,效率更高if (mXSize % mTileSize != 0 || mZSize % mTileSize != 0){for (size_t matIndex = 0; matIndex < mMaterialNum; ++ matIndex){// 材质名字// toString和StrStreamType是用std::ostringstream来做的,非常消耗cpu,尽量减少循环数次// 或者用sprintf来做String matName = "material" + StringConverter::toString(matIndex);// 同材质的mesh按tile区域生成for (size_t i = 0; i < mZSize; i += mTileSize){for (size_t j = 0; j < mXSize; j += mTileSize){// 矫正tile大小int tielSizeZ = mTileSize;int tileSizeX = mTileSize;if (mZSize - i < mTileSize){tielSizeZ = mZSize - i;}if (mXSize - j < mTileSize){tileSizeX = mXSize - j;}// 第一种方法 // 现有的地形检测暂时不支持ManualObject,以后考虑添加//createTileManualObject(j, i, tileSizeX, tielSizeZ, matName);// 第二种方法if (createTileMesh(j, i, tileSizeX, tielSizeZ, matName)){StringUtil::StrStreamType entName;StringUtil::StrStreamType meshName;entName << "tile[" << i << "]" << "[" << j << "]" << matName;meshName << "gridMesh[" << i << "]" << "[" << j << "]" << matName;Entity* entity = mSceneMgr->createEntity(entName.str(), meshName.str());entity->setCastShadows(false);entity->setQueryFlags(TERRAIN_QUERY_MASK);mSceneMgr->getRootSceneNode()->createChildSceneNode(mCentre)->attachObject(entity);}}}}}else{for (size_t matIndex = 0; matIndex < mMaterialNum; ++ matIndex){// 材质名字// toString和StrStreamType是用std::ostringstream来做的,非常消耗cpu,尽量减少循环数次// 或者用sprintf来做String matName = "material" + StringConverter::toString(matIndex);// 同材质的mesh按tile区域生成for (size_t i = 0; i < mZSize; i += mTileSize){for (size_t j = 0; j < mXSize; j += mTileSize){// 第一种方法 // 现有的地形检测暂时不支持ManualObject,以后考虑添加//createTileManualObject(j, i, mTileSize, mTileSize, matName);// 第二种方法if (createTileMesh(j, i, mTileSize, mTileSize, matName)){StringUtil::StrStreamType entName;StringUtil::StrStreamType meshName;entName << "tile[" << i << "]" << "[" << j << "]" << matName;meshName << "gridMesh[" << i << "]" << "[" << j << "]" << matName;Entity* entity = mSceneMgr->createEntity(entName.str(), meshName.str());entity->setCastShadows(false);entity->setQueryFlags(TERRAIN_QUERY_MASK);mSceneMgr->getRootSceneNode()->createChildSceneNode(mCentre)->attachObject(entity);}}}}} }//----------------------------------------------------------------------------------------------------------------------- int TLBBTerrain::getScaleX(void) const {return mScaleX; }//----------------------------------------------------------------------------------------------------------------------- int TLBBTerrain::getScaleY(void) const {return mScaleY; }//----------------------------------------------------------------------------------------------------------------------- int TLBBTerrain::getScaleZ(void) const {return mScaleZ; }//----------------------------------------------------------------------------------------------------------------------- int TLBBTerrain::getXSize(void) const {return mXSize; }//----------------------------------------------------------------------------------------------------------------------- int TLBBTerrain::getZSize(void) const {return mZSize; }//----------------------------------------------------------------------------------------------------------------------- const Vector3& TLBBTerrain::getCentre(void) const {return mCentre; }//----------------------------------------------------------------------------------------------------------------------- const vector<Real>& TLBBTerrain::getHeightMapData(void) const {return mHeightMapData; }//----------------------------------------------------------------------------------------------------------------------- const vector<String>& TLBBTerrain::getManualMatData(void) const {return mManualMatData; }//----------------------------------------------------------------------------------------------------------------------- const vector<String>& TLBBTerrain::getManualMeshData(void) const {return mManualMeshData; }//----------------------------------------------------------------------------------------------------------------------- const vector<Entity*>& TLBBTerrain::getWCollisionEntData(void) const {return mWCollisionEntData; }
Ogre天龙八部地形mesh部分的C++源码相关推荐
- 1 WoWmapview:魔兽世界地形查看器,附带源码!(Author: ufoz)
// --- wowbbs.game.mop.com --- // 这是我在猫扑·魔兽世界中国·玩家论坛上发的帖子,整理到这里! 魔兽世界中国·玩家论坛 » 艾泽拉斯探索频道 | Azeroth D ...
- Ogre 天龙八部地形 Heightmap(高度图)+GridInfo(地表信息)初步结果
分享一下我老师大神的人工智能教程!零基础,通俗易懂!http://blog.csdn.net/jiangjunshow 也欢迎大家转载本篇文章.分享知识,造福人民,实现我们中华民族伟大复兴! 刚研究出 ...
- 天龙八部生成地形mesh的源码
有个网友说他把我csdn博客的零落代码拼起来搞了一周都没能够载入场景.... 真的蛮辛苦的....天龙的地形用mesh自己做就好的, 以前我的部分源码效率有问题,因为我低估了tostring函数的开销 ...
- (转)修改ETM,用Ogre实现《天龙八部》地形与部分场景详解(附源码)
本文主要讲的是<天龙八部>游戏的地形和一部分场景的具体实现,使用C++, Ogre1.6,我摸索了段时间,可能方法用的并不是最好的,但好歹实现了.文章可能讲得有点罗嗦,很多简单的东西都讲了 ...
- 修改ETM,用Ogre实现《天龙八部》地形与部分场景详解(附源码)
本文主要讲的是<天龙八部>游戏的地形和一部分场景的具体实现,使用C++, Ogre1.6,我摸索了段时间,可能方法用的并不是最好的,但好歹实现了.文章可能讲得有点罗嗦,很多简单的东西都讲了 ...
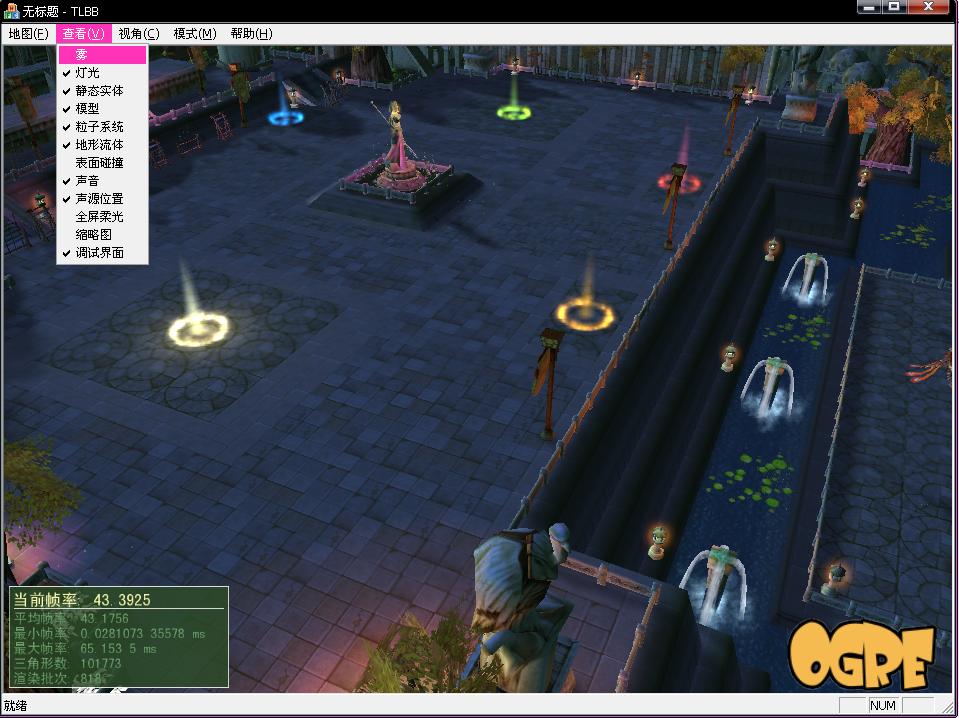
- Ogre 编辑器二(用Ogre的地形组件加载天龙八部地形)
主界面如上文设计完成后,场景刚开始添加了是Ogre例子里的,发现场景里实物太少,于是想到直接把天龙的场景拿下来,天龙网上有源码,参考了下,把天龙的地形用Ogre的地形组件完成了下,如下是效果图: 因为 ...
- 天龙八部GridInfo读取源码
转自:http://www.cppblog.com/mybios/archive/2008/03/09/44046.aspx 天龙八部GridInfo文件的格式已经有人公布了,在这里:http://w ...
- 菜鸟学习OGRE和天龙八部之十七: 修正部分地图载入的通用性问题,附源码
有的地图不是tile的整数倍,有的地图没有WCollision文件,有的地图有centre等 有的地图没有光照图等等 比如武当的地图不是tile的整数倍,那么就需要调整tile大小,其实只需要稍微改动 ...
- 【Unity3D】Unity3D开发《我的世界》之六、创建地形(视频 + 源码)
转载请注明出处:http://www.cnblogs.com/shamoyuu/p/unity_minecraft_06.html 一.引入LibNoise 虽然Unity3D里也有一个Mathf.P ...
最新文章
- python多项式运算_python – 用于计算“多项式系数”的numpy / scipy函数
- QML自定义IP地址输入框
- nginx模块_使用gdb调试nginx源码
- C#嵌套任务和子任务
- drawroundrect java_Canvas中drawRoundRect()方法介绍
- Node中的fs模块
- 漫步数学分析四——集合内部
- python 操作mysql_Python 操作MySQL
- http://renmin.cnblogs.com/archive/2006/03/03/341669.aspx
- ajax中加入if,如何添加if语句到Ajax
- HDU1850 Being a Good Boy in Spring Festival
- docker 重启gitlab_gitlab从入门到绝望
- 新海诚没有参与制作的作品_爱情可以是哪些样子——盘点新海诚和宫崎骏作品中的爱情故事...
- html作业word,Word实验作业——个人简历.doc
- Xshell远程连接服务器
- Ola VS Uber:从印度到伦敦的出行战争
- ChatGPT|微信快速接入ChatGPT
- 杭电考研经验贴———报考计算机专业,慎重!!!
- python rgb转整数,如何在Python中将RGB转换为CMYK和反之亦然?
- 省钱版----查找 IoT 设备TTL线序__未完待续