学习ios蓝牙技术,仿写lightblue
 bluetooth
上一次我们研究完iBeacon,发现iBeacon是基于蓝牙4.0的一个封装而已。那么,今天我们来研究ios的蓝牙4.0的应用。最出名的app当属lightblue,我们不妨来仿写一个lightblue,这样基本的ios蓝牙编程就算入门了。
基本理论
框架与概念
在ios中使用蓝牙技术,会用到CoreBluetooth框架。
里面对设备有2个定义:周边(peripeheral)设备 与 中央(central)设备。发送蓝牙信号的是周边设备,接收蓝牙信号的是中央设备。
可以这样理解,周边设备是服务端,中央设备是客户端。中央设备可以去搜索周边有哪些服务端,可以选择连接上其中一台,进行信息获取。
支持蓝牙4.0的手机,可以作为周边设备,也可以作为中央设备,但是不能同时既为周边设备又为中央设备。
类解读
中央设备用 CBCentralManager 这个类管理。
周边设备用 CBPeripheralManager 这个类管理;
周边设备里面还有服务类 CBService,服务里面有各种各样的特性类 CBCharacteristic。
仿写lightblue
基本流程
- 假设我们有2台以上可用设备。
- 其中一台作为调试机,用来搜索其它设备,并连接上去。所以,是中央设备
central。 - 其它设备设置为蓝牙发射器,即是周边设备
peripheral。 - 调试机先扫描周边设备,用UITableView展示所扫描到的周边设备。
- 点击其中一台设备,进行连接
connect。 - 连接上后,获取其中的所有服务
services。 - 对其中每个服务进行遍历,获取所有的特性
Characteristic。 - 读取每个特性,获取每个特性的值
value。
至此,lightblue基本的仿写思路就清晰列出来了。
1. 扫描设备
先包含头文件
1 |
|
然后添加协议 CBCentralManagerDelegate
接着定义2个属性, CBCentralManager用来管理我们的中央设备,NSMutableArray用来保存扫描出来的周边设备。
1 2 |
|
中央设备创建很简单,第一个参数代表 CBCentralManager 代理,第二个参数设置为nil,因为Peripheral Manager将Run在主线程中。如果你想用不同的线程做更加复杂的事情,你需要创建一个队列(queue)并将它放在这儿。
1 2 |
|
实现centralManagerDidUpdateState。当Central Manager被初始化,我们要检查它的状态,以检查运行这个App的设备是不是支持BLE。
1 2 3 4 5 6 7 8 9 10 11 12 13 |
|
-scanForPeripheralsWithServices:options:方法是中央设备开始扫描,可以设置为特定UUID来指,来差找一个指定的服务了。我们需要扫描周边所有设备,第一个参数设置为nil。
当发起扫描之后,我们需要实现 centralManager:didDiscoverPeripheral:advertisementData:RSSI: 通过该回调来获取发现设备。
这个回调说明着广播数据和信号质量(RSSI-Received Signal Strength Indicator)的周边设备被发现。通过信号质量,可以用判断周边设备离中央设备的远近。
1 2 3 4 5 6 7 8 9 |
|
BLEInfo是我新建的一个类,用来存储周边设备信息的,具体如下:
1 2 3 4 5 6 |
|
保存周边设备信息,并把它们显示到UITableView上:
1 2 3 4 5 6 7 8 9 10 11 12 13 14 |
|
扫描到的周边设备展示如下:
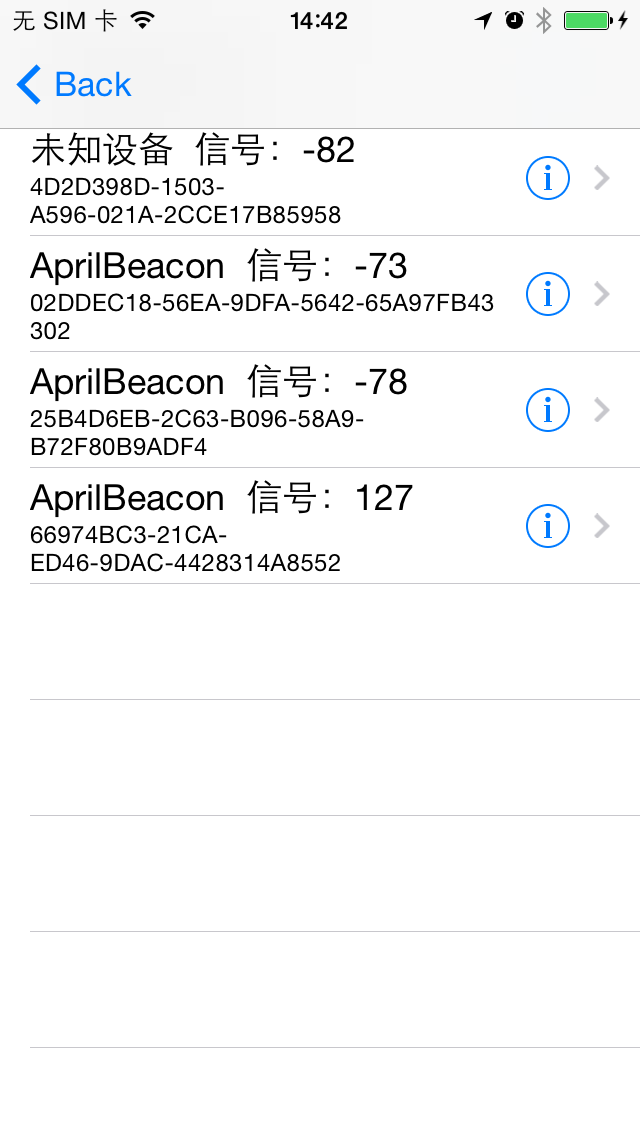 扫描到的周边设备
2. 连接设备
当我们点击其中一个设备,尝试进行连接。lightblue是点击后就立马连接的,然后在下一个UITableView来展示该周边设备的服务与特性。
而我是进入下一页UITableView才开始连接,差别不大。但是注意的是,一定要把我们之前的self.centralMgr传递到下一页的UITableView来使用,并且重新设置delegate。
用来展示服务和特性的UITableViewController:
1 2 3 4 5 6 7 8 9 10 11 12 13 14 15 16 17 18 19 20 |
|
记得把之前的centrlMgr传过来,记得要重新设置delegate:
1 2 3 4 5 6 7 8 9 10 11 12 |
|
其中,
[centralMgr connectPeripheral:discoveredPeripheral options:nil];
就是中央设备向周边设备发起连接。
我们可以实现下面的函数,如果连接失败,就会得到回调:
1 2 3 4 |
|
我们必须实现didConnectPeripheral,只要连接成功,就能回调到该函数,开始获取服务。
1 2 3 4 5 6 7 8 9 |
|
discoverServices就是查找该周边设备的服务。
3. 获取服务
当找到了服务之后,就能进入didDiscoverServices的回调。我们把全部服务都保存起来。
1 2 3 4 5 6 7 8 9 10 11 12 13 14 15 16 17 |
|
4. 获取特性
我们通过discoverCharacteristics来获取每个服务下的特性,通过下面的回调来获取。
1 2 3 4 5 6 7 8 9 10 11 12 13 14 |
|
5. 获取特性值
readValueForCharacteristic可以读取特性的值。
通过下面的回调,就能得到特性值。
1 2 3 4 5 6 7 8 9 10 11 12 13 14 15 16 17 18 19 20 21 22 23 24 25 26 27 28 29 30 31 32 33 |
|
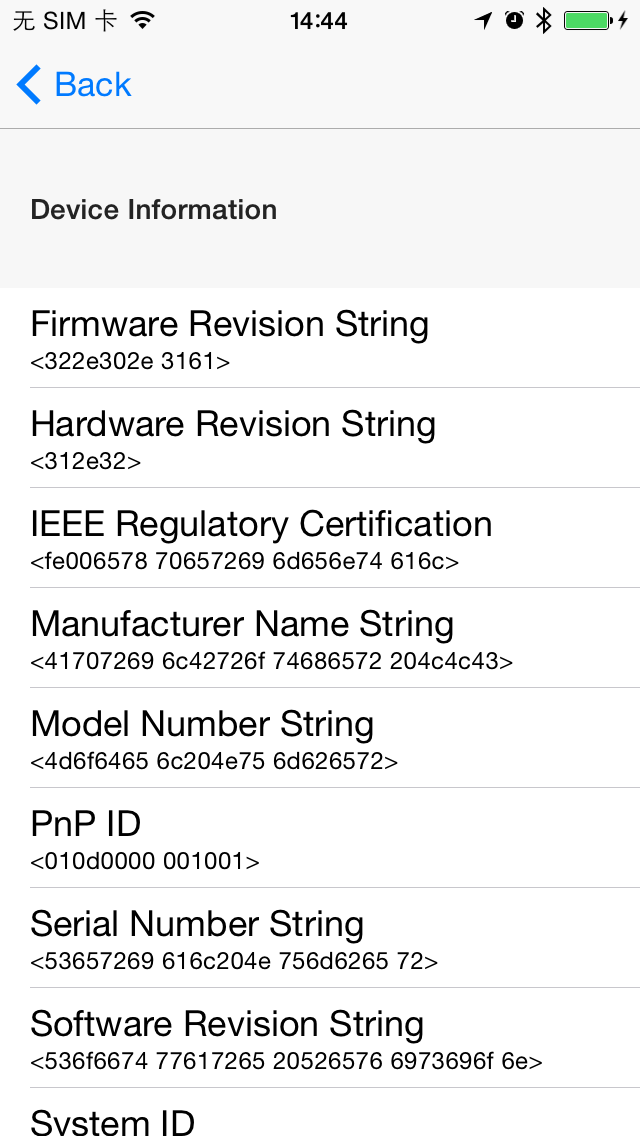 连接到周边设备获得的蓝牙信息
其它
本来苹果是提供了xcode5.0加ios7的模拟器来实现模拟器开启蓝牙的,本来连文章都给出了:https://developer.apple.com/library/ios/technotes/tn2295/_index.html
后来苹果把这文章给删了,还把ios7模拟器支持开启蓝牙给去掉。
那么,可以通过这个文章http://blog.csdn.net/zhenyu5211314/article/details/24399887,使用6.0的模拟器来调试。
参考文章
iOS CoreBluetooth 教程
藍牙 BLE CoreBluetooth 初探
蓝牙4.0 For IOS
学习ios蓝牙技术,仿写lightblue相关推荐
- iOS进阶--蓝牙技术
声明:这篇文章关于蓝牙的相关知识的笔记,文章中会其他网上作者的资料.由于有些文章只做参考或统计不足,如涉及版权请在评论区留言~,我会及时更改 当下蓝牙开发可谓是越来越火,不论是智能穿戴的兴起还是物联网 ...
- IOS学习之蓝牙4.0 BLE
转载请注明出处 http://blog.csdn.net/pony_maggie/article/details/26740237 作者:小马 IOS学习也一段时间了,该上点干货了.前段时间研究了一下 ...
- IOS学习之蓝牙4.0
转载请注明出处 作者:小马 IOS学习也一段时间了,该上点干货了.前段时间研究了一下IOS蓝牙通讯相关的东西,把研究的一个成果给大家分享一下. 一 项目背景 简单介绍一下做的东西,设备是一个金融刷卡器 ...
- iOS开发 蓝牙技术4.0详解
前言 前端时间,同学在做项目过程中遇到关于蓝牙方面的问题,今天我就给大家进行详细的进行讲解下蓝牙在iOS开发中的具体实现.在介绍蓝牙前,大家要搞清楚什么是蓝牙? 什么是蓝牙? 随着蓝牙低功耗技术BLE ...
- 尚医通项目仿写部分技术点总结
尚医通项目部分技术点总结 前言 技术点汇总 1.MybatisPlus 技术介绍 使用步骤 2.Excel表格的导入与导出 技术介绍 使用步骤 3.redis以注解的方式对数据字典进行缓存 技术介绍 ...
- 如何仿写iOS微信打飞机
仿写打飞机学习总结 一.Android微信打飞机与iOS微信打飞机的区别 1.Android打飞机,同一时间屏幕上不止存在一个子弹,可能有三颗或更多,而iOS上的打飞机任意时间屏幕上至多存在一个子弹. ...
- 礼物说仿写项目iOS源码
礼物说仿写(updating...) 源码下载: http://code.662p.com/view/14507.html api: 礼物说 首页精选 banner2: http://api.liwu ...
- 【iOS】—— 仿写计算器项目总结
仿写计算器 在完成这次仿写任务时,和以前所写的项目最大的区别时首次运用到了MVC模式和Masonry界面,并且在计算器使用的过程中运用了很多的算法知识,在整个过程中会出现特别多的error,以及很神奇 ...
- java 仿qq登录界面7.1_安卓开发学习笔记(七):仿写腾讯QQ登录注册界面
这段代码的关键主要是在我们的相对布局以及线性布局上面,我们首先在总体布局里设置为线性布局,然后再在里面设置为相对布局,这是一个十分常见的XML布局模式. 废话不多说,直接上代码: 一.activity ...
- iOS蓝牙学习(一)
最近在学蓝牙开发,就去网上收集了一些文章看,自己做了一个总结,下面就分享出来. 前提: iOS蓝牙开发使用的API是:Core Bluetooth 正常情况下需要两台真实的蓝牙4.0设备(当然也可以使 ...
最新文章
- 四则运算个人项目反思总结
- 缓存服务器syns to listen sockets drop导致创建socket失败
- mac搭建php审计环境,[php审计实战篇]Simple-Log v1.6 安装逻辑问题
- matlab光学远轴光的折射,光学课后习题
- Log4net使用简介
- locustio压力测试
- java 共享锁_Java锁--共享锁和ReentrantReadWriteLock
- c语言inline不起作用,C语言inline内联函数学习小结
- 信息检索 python_python-工程数据结构/信息检索和存储
- HTML画笔移出画布停止,html5 canvas画布无法清除
- Swing超市收银系统附图
- java severlet 例子_Java开发Servlet实例
- 网吧 电影系统 php,网吧电影服务器解决方案完全指南(一)
- 迅雷下载原理和P2p技术
- 错误: 找不到或无法加载主类 com.sxt.ceshi.Demo166
- 一张图片告诉你win10各版本之间的主要区别
- 20P27 Premiere预设70种超酷电影级白天黑夜调色预设模板
- glTexImage2D 函数详解
- Techstars携手Alphabit Fund与Launchpool,在伦敦推出专注于区块链的新加速器
- Oracle-安装客户端和服务端