OkHttp3 源码解读
转载请注明本文出自maplejaw的博客(http://blog.csdn.net/maplejaw_)
开源库地址:https://github.com/square/okhttp
解读版本:3.4.1
OkHttp是目前非常流行的网络请求库,出自Square公司。对于该库的使用,相信大家已经比较熟悉了。今天,我将从源码角度对OkHttp3进行剖析。
基本使用
Okhttp的使用可以分为四步:
初始化客户端(实际应用中应当保持单例)
//获取一个客户端OkHttpClient client = new OkHttpClient.Builder()....build();构建Request
//构建一个Request
Request request = new Request.Builder().url(url).build();
获取Call对象
//获取Call对象
Call call=client.newCall(request);
发送请求(execute同步/enqueue异步)
//同步调用
Response response = call.execute();//异步调用
call.enqueue(new Callback() {@Overridepublic void onFailure(Call call, IOException e) {}@Overridepublic void onResponse(Call call, Response response) throws IOException {}
});
当然,在使用类似POST等可以设置请求体的请求方法时,我们还可以如下构建请求体。
构建字符串,字节,文件请求体:
public static final MediaType TEXT = MediaType.parse("text/plain; charset=utf-8");
public static final MediaType STREAM = MediaType.parse("application/octet-stream");//构建字符串请求体RequestBody body1 = RequestBody.create(TEXT, string);//构建字节请求体RequestBody body2 = RequestBody.create(STREAM, byte);//构建文件请求体RequestBody body3 = RequestBody.create(STREAM, file);//将请求体设置给请求方法内Request request = new Request.Builder().url(url).post(xx)// xx表示body1,body2,body3中的某一个.build();
构建表单请求体:
//构建表单RequestBodyRequestBody formBody=new FormBody.Builder().add("name","maplejaw").add("age","18")... .build();构建分块表单请求体:
public static final MediaType STREAM = MediaType.parse("application/octet-stream");//构建表单RequestBodyRequestBody multipartBody=new MultipartBody.Builder().setType(MultipartBody.FORM)//指明为 multipart/form-data 类型.addFormDataPart("name","maplejaw") //添加表单数据.addFormDataPart("age","20") //添加表单数据.addFormDataPart("avatar","111.jpg",RequestBody.create(STREAM,file)) //添加文件,其中avatar为表单名,111.jpg为文件名。.addPart(..)//该方法用于添加自定义Part,一般来说以上已经够用.build();关于Okhttp的基本使用已经介绍完毕,在大多数情况下,只要掌握以上使用方法,就足以应付关于网络请求的日常使用。
接下来,将从源码角度剖析OkHttp这个网络框架,如果你到目前为止还弄不清请求行、状态行、请求头、响应头、请求体和响应体这些基本概念的话,建议先阅读你应该知道的HTTP基础知识这篇文章。
源码解读
初始化OkHttpClient
所谓初始化OkHttpClient,无非就是对其进行相关配置,在了解OkHttpClient相关配置前,先认识一下以下一些基本的类。
Proxy
代理类,默认有三种代理模式DIRECT(直连),HTTP(http代理),SOCKS(socks代理),这三种模式,折腾过科学上网的或多或少都了解一点吧。
ProxySelector
代理选择类,默认不使用代理,即使用直连方式,当然,我们可以自定义配置,以指定URI使用某种代理,类似代理软件的PAC功能。
Protocol
协议类,用来表示使用的协议版本,比如http/1.0,http/1.1,spdy/3.1,h2等
Dns
DNS这里就不用介绍了,用于根据主机名来查询对应的IP。
Cache
缓存类,内部使用了DiskLruCache来进行管理缓存,匹配缓存的机制不仅仅是根据url,而且会根据请求方法和请求头来验证是否可以响应缓存。此外,仅支持GET请求的缓存。
ConnectionSpec
连接规范,用于配置Socket连接层。对于HTTPS,还能配置安全传输层协议(TLS)版本和密码套件(CipherSuite)
Interceptor
拦截器,该类的功能还是比较强大的,通过拦截器可以监视、重写和重试请求。拦截器的源码如下:
public interface Interceptor {Response intercept(Chain chain) throws IOException;interface Chain {Request request();Response proceed(Request request) throws IOException;Connection connection();}
}拦截器的使用也非常简单,如果你只是想修改Request,那么就通过chain.request()获取原始的Request然后进行修改,比如添加cookie,代理等请求头,甚至还能修改请求方法和请求体。同理如果需要修改Response,则可以通过chain.proceed来获取Response后进行修改。此外我们还可以在其中进行打印日志等其他监视行为。
关于拦截器的使用例子如下:
//通过addInterceptor添加拦截器OkHttpClient client = new OkHttpClient.Builder()....addInterceptor(new MyInterceptor()).build();//自定义拦截器 class MyInterceptor implements Interceptor {@Override public Response intercept(Interceptor.Chain chain) throws IOException {//获取原始RequestRequest request = chain.request(); //构建新的RequestRequest newRequest=request.newBuilder()//使用newBuilder,在原来request基础上修改,当然如果暴力点,可以完全重写Request。.header("User-Agent", "OkHttp Example")....build();//获取ResponseResponse response = chain.proceed(newRequest);//构建新的ResponseResponse newResponse=response.newBuilder().header("Cache-Control", "max-age=60").....build();return newResponse;}} CookieJar
用来管理cookie,可以根据url保存cookie,也可以通过url取出相应cookie。默认的不做cookie管理。该接口中有两个抽象方法,用户可以自己实现该接口以对cookie进行管理。
//保存cookievoid saveFromResponse(HttpUrl url, List<Cookie> cookies);//根据Url导入保存的CookieList<Cookie> loadForRequest(HttpUrl url);SocketFactory
Socket工厂,通过createSocket来创建Socket。
SSLSocketFactory
安全套接层工厂,HTTPS相关,用于创建SSLSocket。一般配置HTTPS证书信任问题都需要从这里着手。对于不受信任的证书一般会提示javax.net.ssl.SSLHandshakeException异常。配置信任所有证书的源码如下:
OkHttpClient client = new OkHttpClient.Builder().sslSocketFactory(getTrustAllSSLSocketFactory())//配置SSL工厂.build();//获取信任所有证书的SSLSocketFactorypublic static SSLSocketFactory getTrustAllSSLSocketFactory() {// 信任所有证书TrustManager[] trustAllCerts = new TrustManager[]{new X509TrustManager() {@Overridepublic X509Certificate[] getAcceptedIssuers() {return new X509Certificate[]{};}@Overridepublic void checkClientTrusted(X509Certificate[] certs, String authType) {}@Overridepublic void checkServerTrusted(X509Certificate[] certs, String authType) {}}};try {SSLContext sslContext = SSLContext.getInstance("TLS");sslContext.init(null, trustAllCerts, null);return sslContext.getSocketFactory();} catch (Throwable ex) {}return null;}对于信任自证书的配置问题,可以参考Android Https相关完全解析 当OkHttp遇到Https。这篇文章。
CertificateChainCleaner
证书链清洁器,HTTPS相关,用于从Java的TLS API构建的原始数组中统计有效的证书链,然后清除跟TLS握手不相关的证书,提取可信任的证书以便可以受益于证书锁机制。
HostnameVerifier
主机名验证器,与HTTPS中的SSL相关,当握手时如果URL的主机名不是可识别的主机,就会要求进行主机名验证。
public interface HostnameVerifier {//通过session验证指定的主机名是否被允许boolean verify(String hostname, SSLSession session);
}
CertificatePinner
证书锁,HTTPS相关,用于约束哪些证书可以被信任,可以防止一些已知或未知的中间证书机构带来的攻击行为。如果所有证书都不被信任将抛出SSLPeerUnverifiedException异常。
其中用于检查证书是否被信任的源码如下:
//检查证书是否被信任public void check(String hostname, List<Certificate> peerCertificates)throws SSLPeerUnverifiedException {List<Pin> pins = findMatchingPins(hostname);//获取Pin(网址,hash算法,hash值)if (pins.isEmpty()) return;if (certificateChainCleaner != null) {//通过清洁器获取信任的证书peerCertificates = certificateChainCleaner.clean(peerCertificates, hostname);}for (int c = 0, certsSize = peerCertificates.size(); c < certsSize; c++) {//对证书进行比对hash值,如果配对失败就抛出SSLPeerUnverifiedException异常X509Certificate x509Certificate = (X509Certificate) peerCertificates.get(c);// Lazily compute the hashes for each certificate.ByteString sha1 = null;ByteString sha256 = null;for (int p = 0, pinsSize = pins.size(); p < pinsSize; p++) {Pin pin = pins.get(p);if (pin.hashAlgorithm.equals("sha256/")) {if (sha256 == null) sha256 = sha256(x509Certificate);if (pin.hash.equals(sha256)) return; // Success!} else if (pin.hashAlgorithm.equals("sha1/")) {if (sha1 == null) sha1 = sha1(x509Certificate);if (pin.hash.equals(sha1)) return; // Success!} else {throw new AssertionError();}}}// ...}
Authenticator
身份认证器,当连接提示未授权时,可以通过重新设置请求头来响应一个新的Request。状态码401表示远程服务器请求授权,407表示代理服务器请求授权。该认证器在需要时会被RetryAndFollowUpInterceptor触发。
public interface Authenticator {Authenticator NONE = new Authenticator() {@Override public Request authenticate(Route route, Response response) {return null;}};Request authenticate(Route route, Response response) throws IOException;
}
关于授权的源码实现如下:
class MyAuthenticator implements Authenticator {@Overridepublic Request authenticate(Route route, Response response) throws IOException {String credential = Credentials.basic(...)Request.Builder builder=response.request().newBuilder();if(response.code()==401){builder .header("Authorization", credential);}else if(response.code()==407){builder .header("Proxy-Authorization", credential);}return builder.build();}}ConnectionPool
连接池,用于管理HTTP和SPDY连接的复用以减少网络延迟,HTTP请求相同的Address时可以共享同一个连接。
Cache
见名之意,缓存类
Dispatcher
调度器,里面包含了线程池和三个队列(readyAsyncCalls:保存等待执行的异步请求;runningAsyncCalls:保存正在运行的异步请求;runningSyncCalls:保存正在执行的同步请求)。
//保存准备运行的异步请求(当运行请求超过限制数时会保存在此队列)private final Deque<AsyncCall> readyAsyncCalls = new ArrayDeque<>();//保存正在运行的异步请求private final Deque<AsyncCall> runningAsyncCalls = new ArrayDeque<>();//保存正在运行的同步请求private final Deque<RealCall> runningSyncCalls = new ArrayDeque<>();当请求执行完毕后,调用finished将请求从runningAsyncCalls队列中移除,并且检查readyAsyncCalls以继续提交在队列中准备的请求。
  //移除执行完毕的请求synchronized void finished(AsyncCall call) {if (!runningAsyncCalls.remove(call)) throw new AssertionError("AsyncCall wasn't running!");promoteCalls();//推进请求队列}//推进请求
private void promoteCalls() {if (runningAsyncCalls.size() >= maxRequests) return; //容量已满,不提交新请求if (readyAsyncCalls.isEmpty()) return; // 没有正在准备的请求,返回//从readyAsyncCalls中循环取出AsyncCall直到达到容量上限for (Iterator<AsyncCall> i = readyAsyncCalls.iterator(); i.hasNext(); ) {AsyncCall call = i.next();if (runningCallsForHost(call) < maxRequestsPerHost) {i.remove();runningAsyncCalls.add(call);executorService().execute(call);}if (runningAsyncCalls.size() >= maxRequests) return; // 达到上限后返回}}提交异步请求通过enqueue进行:
synchronized void enqueue(AsyncCall call) {//检查容量大小if (runningAsyncCalls.size() < maxRequests && runningCallsForHost(call) < maxRequestsPerHost) {runningAsyncCalls.add(call);//加入队列executorService().execute(call);//执行} else {//超过容量大小后,加入准备队列中readyAsyncCalls.add(call);}}对于同步请求,由于不需要提交到线程池中执行,因此只需通过executed将其加入runningSyncCalls队列中。
synchronized void executed(RealCall call) {runningSyncCalls.add(call);}阅读完上面的类后,对于OkHttpClient的构建就不会一脸蒙蔽了。OkHttpClient的Builder中的源码如下所示,可以了解一下默认值。当然这些值都可可以自行配置的。
public Builder() {//调度器dispatcher = new Dispatcher();//默认支持的协议列表protocols = DEFAULT_PROTOCOLS;//默认的连接规范connectionSpecs = DEFAULT_CONNECTION_SPECS;//默认的代理选择器(直连)proxySelector = ProxySelector.getDefault();//默认不进行管理cookiecookieJar = CookieJar.NO_COOKIES;socketFactory = SocketFactory.getDefault();//主机验证hostnameVerifier = OkHostnameVerifier.INSTANCE;//证书锁,默认不开启certificatePinner = CertificatePinner.DEFAULT;//默认不进行授权proxyAuthenticator = Authenticator.NONE;authenticator = Authenticator.NONE;//初始化连接池connectionPool = new ConnectionPool();//DNSdns = Dns.SYSTEM;followSslRedirects = true;followRedirects = true;retryOnConnectionFailure = true;//超时时间connectTimeout = 10_000;readTimeout = 10_000;writeTimeout = 10_000;}
构建Request
Request中主要有以下属性。
//请求的urlprivate final HttpUrl url;//请求方法,GET,POST等private final String method;//请求头private final Headers headers;//请求体private final RequestBody body;//该请求的标签private final Object tag;HttpUrl
其中HttpUrl用于规范普通的url连接,并解析url的组成成分。
先来了解一下url的构成;
scheme://username:password@host:port/pathSegment/pathSegment?queryParameter#fragment;
现通过如下例子来示范HttpUrl的使用:
https://www.google.com/search?q=maplejaw
使用parse解析url字符串:
HttpUrl url = HttpUrl.parse("https://www.google.com/search?q=maplejaw");通过构建者模式创建:
HttpUrl url = new HttpUrl.Builder().scheme("https").host("www.google.com").addPathSegment("search").addQueryParameter("q", "maplejaw").build();Headers
Headers用于配置请求头,对于请求头配置大家一定不陌生吧,比如Content-Type,User-Agent和Cache-Control等等。
创建Headers也有两种方式。如下:
of创建:传入的数组必须是偶数对,否则会抛出异常。
Headers.of("name1","value1","name2","value2",.....);构建者模式创建:
Headers mHeaders=new Headers.Builder().set("name1","value1")//set表示name1是唯一的,会覆盖掉已经存在的.add("name2","value2")//add不会覆盖已经存在的头,可以存在多个.build();Headers内部使用了一个数组进行保存private final String[] namesAndValues;,你可能会想,为什么不用map呢?因为map有一个致命的缺点,它的key是唯一的。
但是用数组取值方法吗?可以很严肃的告诉你,非常方便,内部已经封装好。
public String name(int index) {return namesAndValues[index * 2];}public String value(int index) {return namesAndValues[index * 2 + 1];}
最后,通过toString转为字符串,以便写入请求头:
@Override public String toString() {StringBuilder result = new StringBuilder();for (int i = 0, size = size(); i < size; i++) {result.append(name(i)).append(": ").append(value(i)).append("\n");}return result.toString();}RequestBody
RequestBody也就是请求体了,对于请求体的创建在前面已经介绍过了,这里就仅仅看下源码:
public abstract class RequestBody {//返回该请求体的 Content-Typepublic abstract MediaType contentType();//返回请求体的大小(字节数),-1表示未知public long contentLength() throws IOException {return -1;}//写入内容,BufferedSink是Okio中的类,类似于java中的OutputStreampublic abstract void writeTo(BufferedSink sink) throws IOException;...} MediaType这个类主要用于指定请求体的Content-Type的MIME类型,此外还能指定字符集,默认为utf-8。
创建MediaType如下般简单,;左边为MIME类型,右边为字符集编码。
MediaType.parse("text/plain; charset=utf-8")前面我们提到了表单和分块表单类型的请求体,现在来看一下对应的核心源码:
FormBody:
public final class FormBody extends RequestBody {private static final MediaType CONTENT_TYPE = MediaType.parse("application/x-www-form-urlencoded");@Override public MediaType contentType() {return CONTENT_TYPE;}@Overridepublic long contentLength() {return writeOrCountBytes(null, true);}@Overridepublic void writeTo(BufferedSink sink) throws IOException {writeOrCountBytes(sink, false);}...
} 可以看出Content_Type为application/x-www-form-urlencoded,且通过writeOrCountBytes来计算请求体大小和将请求体写入BufferedSink。
private long writeOrCountBytes(BufferedSink sink, boolean countBytes) {long byteCount = 0L;Buffer buffer;if (countBytes) {//计算大小buffer = new Buffer();} else {buffer = sink.buffer();}//写入表单内容(name1=value1&name2=value2&...)for (int i = 0, size = encodedNames.size(); i < size; i++) {if (i > 0) buffer.writeByte('&');buffer.writeUtf8(encodedNames.get(i));buffer.writeByte('=');buffer.writeUtf8(encodedValues.get(i));}if (countBytes) {//如果只是计算的话,请清空缓存byteCount = buffer.size();buffer.clear();}return byteCount;}MultipartBody和FormBody大体上相同,主要区别在于writeOrCountBytes方法,分块表单主要是将每个块的大小进行累加来求出请求体大小,如果其中有一个块没有指定大小,就会返回-1。所以分块表单中如果包含文件,默认是无法计算出大小的,除非你自己给文件的RequestBody指定contentLength。
private long writeOrCountBytes(BufferedSink sink, boolean countBytes) throws IOException {long byteCount = 0L;Buffer byteCountBuffer = null;if (countBytes) {//如果是计算大小的话,就new个sink = byteCountBuffer = new Buffer();}//循环块for (int p = 0, partCount = parts.size(); p < partCount; p++) {Part part = parts.get(p);//获取每个块的头Headers headers = part.headers;//获取每个块的请求体RequestBody body = part.body;//写 --xxxxxxxxxx 边界 sink.write(DASHDASH);sink.write(boundary);sink.write(CRLF);//写块的头if (headers != null) {for (int h = 0, headerCount = headers.size(); h < headerCount; h++) {sink.writeUtf8(headers.name(h)).write(COLONSPACE).writeUtf8(headers.value(h)).write(CRLF);}}//写块的Content_TypeMediaType contentType = body.contentType();if (contentType != null) {sink.writeUtf8("Content-Type: ").writeUtf8(contentType.toString()).write(CRLF);}//写块的大小long contentLength = body.contentLength();if (contentLength != -1) {sink.writeUtf8("Content-Length: ").writeDecimalLong(contentLength).write(CRLF);} else if (countBytes) {// We can't measure the body's size without the sizes of its components.//如果有个块没有这名大小,就返回-1.byteCountBuffer.clear();return -1L;}sink.write(CRLF);//如果是计算大小就累加,否则写入BufferedSinkif (countBytes) {byteCount += contentLength;} else {body.writeTo(sink);}sink.write(CRLF);}//写 --xxxxxxxxxx-- 结束边界sink.write(DASHDASH);sink.write(boundary);sink.write(DASHDASH);sink.write(CRLF);if (countBytes) {byteCount += byteCountBuffer.size();byteCountBuffer.clear();}return byteCount;}处理Response
为什么先介绍处理Response部分而不是newCall部分,是因为Request和Response相呼应,理解起来更加连贯一点。
Response类属性如下:
private final Request request;//获取到此次Response的最终Request(所谓最终Request是因为Reque可能被拦截器处理过)private final Protocol protocol;//协议版本private final int code;//响应码private final String message; //响应消息private final Handshake handshake;//TLS握手记录,保存了客户端和服务器的证书,TLS版本,密码套件等private final Headers headers;//响应头private final ResponseBody body;//响应体private final Response networkResponse;//从网络返回的Response,如果没有从网络读取,networkResponse值为Nullprivate final Response cacheResponse;//从缓存读取的Response,如果没有从缓存中取,为Nullprivate final Response priorResponse;//之前的Response,一般发生重定向或者重试时有值private final long sentRequestAtMillis;//记录发送Request的时间戳(如果响应来自缓存,返回的时间戳为原始请求的时间)private final long receivedResponseAtMillis;//记录接收Response的时间戳(如果响应来自缓存,返回原始的响应时间)
ResponseBody是一次性的流,所以不能重复读取,此外务必记得要关闭流。
ResponseBody中常用的读取方法有如下几种:
//获取InputStream,读取完后手动进行close,一般用于下载文件中public final InputStream byteStream() {return source().inputStream();}//获取字节,此方法无需close,因为已经写入内存中public final byte[] bytes() throws IOException {long contentLength = contentLength();if (contentLength > Integer.MAX_VALUE) {throw new IOException("Cannot buffer entire body for content length: " + contentLength);}BufferedSource source = source();byte[] bytes;try {bytes = source.readByteArray();} finally {Util.closeQuietly(source);}if (contentLength != -1 && contentLength != bytes.length) {throw new IOException("Content-Length and stream length disagree");}return bytes;}//获取String,此方法无需Close,已经写入内存中public final String string() throws IOException {return new String(bytes(), charset().name());}构建Call
现在再回到OkHttpClient这个类,如果你看过我之前关于Retrofit源码解读,那你一定知道OkHttpClient实现了Call.Factory接口,Call.Factory的作用之前已经介绍过了,抽象方法为Call newCall(Request request);,用于将Request转换为Call对象。
核心源码实现如下:
@Overridepublic Call newCall(Request request) {return new RealCall(this, request);}我们知道Call只是一个接口,而RealCall即为Call的一个实现。而我们最关心的无法在于两个点:同步调用,异步调用。
同步调用的源码如下:
@Override public Response execute() throws IOException {synchronized (this) {if (executed) throw new IllegalStateException("Already Executed");executed = true;}try {//加入Dispatcher中的runningSyncCalls队列client.dispatcher().executed(this);//通过拦截链获取ResponseResponse result = getResponseWithInterceptorChain();if (result == null) throw new IOException("Canceled");return result;} finally {//从runningSyncCalls队列中移除client.dispatcher().finished(this);}}可以看出,核心的源码在getResponseWithInterceptorChain中,通过责任链模式进行添加拦截器。
private Response getResponseWithInterceptorChain() throws IOException {//构建全栈拦截器List<Interceptor> interceptors = new ArrayList<>();interceptors.addAll(client.interceptors());//自定义拦截器interceptors.add(retryAndFollowUpInterceptor);//重试拦截器interceptors.add(new BridgeInterceptor(client.cookieJar()));//桥接拦截器interceptors.add(new CacheInterceptor(client.internalCache()));//缓存拦截器interceptors.add(new ConnectInterceptor(client));//连接拦截器if (!retryAndFollowUpInterceptor.isForWebSocket()) {interceptors.addAll(client.networkInterceptors());//用户预定义的网络拦截器}interceptors.add(new CallServerInterceptor(retryAndFollowUpInterceptor.isForWebSocket()));//调用服务拦截器//内部通过责任链模式来使用拦截器Interceptor.Chain chain = new RealInterceptorChain(interceptors, null, null, null, 0, originalRequest);return chain.proceed(originalRequest);//获取Response}RealInterceptorChain内部的责任链调用如下,可以看出,拦截器会依次对Chain进行处理。
public Response proceed(Request request, StreamAllocation streamAllocation, HttpStream httpStream,Connection connection) throws IOException {...//获取ChainRealInterceptorChain next = new RealInterceptorChain(interceptors, streamAllocation, httpStream, connection, index + 1, request);//获取当前拦截器Interceptor interceptor = interceptors.get(index);//拦截器通过Chain获取ResponseResponse response = interceptor.intercept(next);....return response;}异步调用和同步调用基本相同,也是通过getResponseWithInterceptorChain来获取Response,只不过该操作是放在AsyncCall(实现了Runable接口)中提交给dispatcher执行的。
在了解一系列的拦截器前,我们再来认识一下其他几个类。
HttpStream
一个接口,源码如下。对应的实现有Http1xStream、Http2xStream。分别对应HTTP/1.1、HTTP/2和SPDY协议。我们可以大约知道,通过writeRequestHeaders开始写入请求头到服务器,createRequestBody用于获取写入流来写入请求体。readResponseHeaders用于读取响应头,openResponseBody用于打开一个响应体。关于相应实现的源码这里就不分析了,比较简单,无非就是读写操作。
public interface HttpStream {int DISCARD_STREAM_TIMEOUT_MILLIS = 100;//返回一个output stream(如果RequestBody可以转为流)Sink createRequestBody(Request request, long contentLength);//写请求头void writeRequestHeaders(Request request) throws IOException;//Flush Requestvoid finishRequest() throws IOException;//读响应头Response.Builder readResponseHeaders() throws IOException;//返回一个ResponseBodyResponseBody openResponseBody(Response response) throws IOException;void cancel();
}
StreamAllocation
流分配器,该类用于协调连接、流和请求三者之间的关系。通过调用newStream可以获取一个HttpStream实现。
public HttpStream newStream(OkHttpClient client, boolean doExtensiveHealthChecks) {int connectTimeout = client.connectTimeoutMillis();int readTimeout = client.readTimeoutMillis();int writeTimeout = client.writeTimeoutMillis();boolean connectionRetryEnabled = client.retryOnConnectionFailure();try {//获取连接RealConnection resultConnection = findHealthyConnection(connectTimeout, readTimeout,writeTimeout, connectionRetryEnabled, doExtensiveHealthChecks);//初始化HttpStreamHttpStream resultStream;if (resultConnection.framedConnection != null) {//Http2xStreamresultStream = new Http2xStream(client, this, resultConnection.framedConnection);} else {//Http1xStreamresultConnection.socket().setSoTimeout(readTimeout);resultConnection.source.timeout().timeout(readTimeout, MILLISECONDS);resultConnection.sink.timeout().timeout(writeTimeout, MILLISECONDS);resultStream = new Http1xStream(client, this, resultConnection.source, resultConnection.sink);}synchronized (connectionPool) {stream = resultStream;return resultStream;}} catch (IOException e) {throw new RouteException(e);}}获取RealConnection的流程是这样的,首先尝试从连接池中获取可复用的连接,如果获取不到,才会初始化RealConnection开启一个新连接。
在了解了HttpStream和StreamAllocation后,现在来分析getResponseWithInterceptorChain中的所有的拦截器。
RetryAndFollowUpInterceptor
重试与重定向拦截器,用来实现重试和重定向功能,核心实现如下面源码,
不难发现,内部通过while(true)死循环来进行重试获取Response(有重试上限,超过会抛出异常)。followUpRequest主要用来根据响应码来判断属于哪种行为触发的重试和重定向(比如未授权,超时,重定向等),然后构建响应的Request进行下一次请求。当然,如果没有触发重新请求就会直接返回Response。
@Override public Response intercept(Chain chain) throws IOException {Request request = chain.request();//初始化流分配器 streamAllocation = new StreamAllocation(client.connectionPool(), createAddress(request.url()));int followUpCount = 0;Response priorResponse = null;while (true) {//死循环//..//省略了部分源码Response response = null;boolean releaseConnection = true;try {response = ((RealInterceptorChain) chain).proceed(request, streamAllocation, null, null);releaseConnection = false;} catch (Exception e) {//..//省略了部分源码releaseConnection = false;continue;} finally {if (releaseConnection) {streamAllocation.streamFailed(null);streamAllocation.release();}}//将上次的请求放入priorResponse中if (priorResponse != null) {response = response.newBuilder().priorResponse(priorResponse.newBuilder().body(null).build()).build();}//检查是否触发重定向重试等条件,并返回RequestRequest followUp = followUpRequest(response);if (followUp == null) {//null表示无需重试if (!forWebSocket) {streamAllocation.release();}return response;//返回response}//..//省略了部分源码request = followUp;priorResponse = response;//while循环进行下次请求}}BridgeInterceptor
桥接拦截器,用于完善请求头,比如Content-Type、Content-Length、Host、Connection、Accept-Encoding、User-Agent等等,这些请求头不用用户一一设置,如果用户没有设置该库会检查并自动完善。此外,这里会进行加载和回调cookie。
@Override public Response intercept(Chain chain) throws IOException {Request userRequest = chain.request();Request.Builder requestBuilder = userRequest.newBuilder();RequestBody body = userRequest.body();//将用户没有写入请求头的内容自动补充进去,比如Content-Type、Content-Length、Host、Connection、Accept-Encoding、User-Agent等等if (body != null) {MediaType contentType = body.contentType();if (contentType != null) {requestBuilder.header("Content-Type", contentType.toString());}//..}//获取cookie添加到请求头中List<Cookie> cookies = cookieJar.loadForRequest(userRequest.url());if (!cookies.isEmpty()) {requestBuilder.header("Cookie", cookieHeader(cookies));}//...Response networkResponse = chain.proceed(requestBuilder.build());//将响应cookie回调出去供用户保存HttpHeaders.receiveHeaders(cookieJar, userRequest.url(), networkResponse.headers());Response.Builder responseBuilder = networkResponse.newBuilder().request(userRequest);//...//省略了部分源码responseBuilder.headers(strippedHeaders);responseBuilder.body(new RealResponseBody(strippedHeaders, Okio.buffer(responseBody)));return responseBuilder.build();}CacheInterceptor
缓存拦截器,首先根据Request中获取缓存的Response,然后根据用于设置的缓存策略来进一步判断缓存的Response是否可用以及是否发送网络请求(CacheControl.FORCE_CACHE因为不会发送网络请求,所以networkRequest一定为空)。如果从网络中读取,此时再次根据缓存策略来决定是否缓存响应。
配置缓存策略的方法如下:
Request request = new Request.Builder().cacheControl(CacheControl.FORCE_NETWORK).url("http://publicobject.com/helloworld.txt").build();拦截器的核心实现如下:
@Override public Response intercept(Chain chain) throws IOException {//通过Request从缓存中获取ResponseResponse cacheCandidate = cache != null? cache.get(chain.request()): null;long now = System.currentTimeMillis();//根据请求头获取用户指定的缓存策略,并根据缓存策略来获取networkRequest,cacheResponse。cacheResponse为null表示当前策略就算有缓存也不读缓存CacheStrategy strategy = new CacheStrategy.Factory(now, chain.request(), cacheCandidate).get();Request networkRequest = strategy.networkRequest;//表示发往网络的request,不请求网络应为nullResponse cacheResponse = strategy.cacheResponse;//返回从缓存中读取的responseif (cache != null) {cache.trackResponse(strategy);}if (cacheCandidate != null && cacheResponse == null) {//cacheResponse表示不读缓存,那么cacheCandidate不可用,关闭它closeQuietly(cacheCandidate.body()); }//..//省略了部分源码//返回从缓存中读取的Responseif (networkRequest == null) {return cacheResponse.newBuilder().cacheResponse(stripBody(cacheResponse)).build();}Response networkResponse = null;//..//省略了部分源码//获取网络ResponsenetworkResponse = chain.proceed(networkRequest);Response response = networkResponse.newBuilder().cacheResponse(stripBody(cacheResponse)).networkResponse(stripBody(networkResponse)).build();if (HttpHeaders.hasBody(response)) {//如果可以缓存(用户允许,响应也允许)就进行缓存到本地CacheRequest cacheRequest = maybeCache(response, networkResponse.request(), cache);response = cacheWritingResponse(cacheRequest, response);}return response;}ConnectInterceptor
连接拦截器,用于打开一个连接到远程服务器。说白了就是通过StreamAllocation获取HttpStream和RealConnection对象,以便后续读写。
@Override public Response intercept(Chain chain) throws IOException {RealInterceptorChain realChain = (RealInterceptorChain) chain;Request request = realChain.request();StreamAllocation streamAllocation = realChain.streamAllocation();boolean doExtensiveHealthChecks = !request.method().equals("GET");//获取HttpStreamHttpStream httpStream = streamAllocation.newStream(client, doExtensiveHealthChecks);//获取RealConnectionRealConnection connection = streamAllocation.connection();return realChain.proceed(request, streamAllocation, httpStream, connection);}CallServerInterceptor
调用服务拦截器,拦截链中的最后一个拦截器,通过网络与调用服务器。通过HttpStream依次次进行写请求头、请求头(可选)、读响应头、读响应体。
@Override public Response intercept(Chain chain) throws IOException {HttpStream httpStream = ((RealInterceptorChain) chain).httpStream();StreamAllocation streamAllocation = ((RealInterceptorChain) chain).streamAllocation();Request request = chain.request();long sentRequestMillis = System.currentTimeMillis();//写请求头httpStream.writeRequestHeaders(request);if (HttpMethod.permitsRequestBody(request.method()) && request.body() != null) {//写请求体Sink requestBodyOut = httpStream.createRequestBody(request, request.body().contentLength());BufferedSink bufferedRequestBody = Okio.buffer(requestBodyOut);request.body().writeTo(bufferedRequestBody);bufferedRequestBody.close();}httpStream.finishRequest();//获取Response。Response response = httpStream.readResponseHeaders().request(request).handshake(streamAllocation.connection().handshake()).sentRequestAtMillis(sentRequestMillis).receivedResponseAtMillis(System.currentTimeMillis()).build();if (!forWebSocket || response.code() != 101) {response = response.newBuilder().body(httpStream.openResponseBody(response)).build();}//...return response;}最后
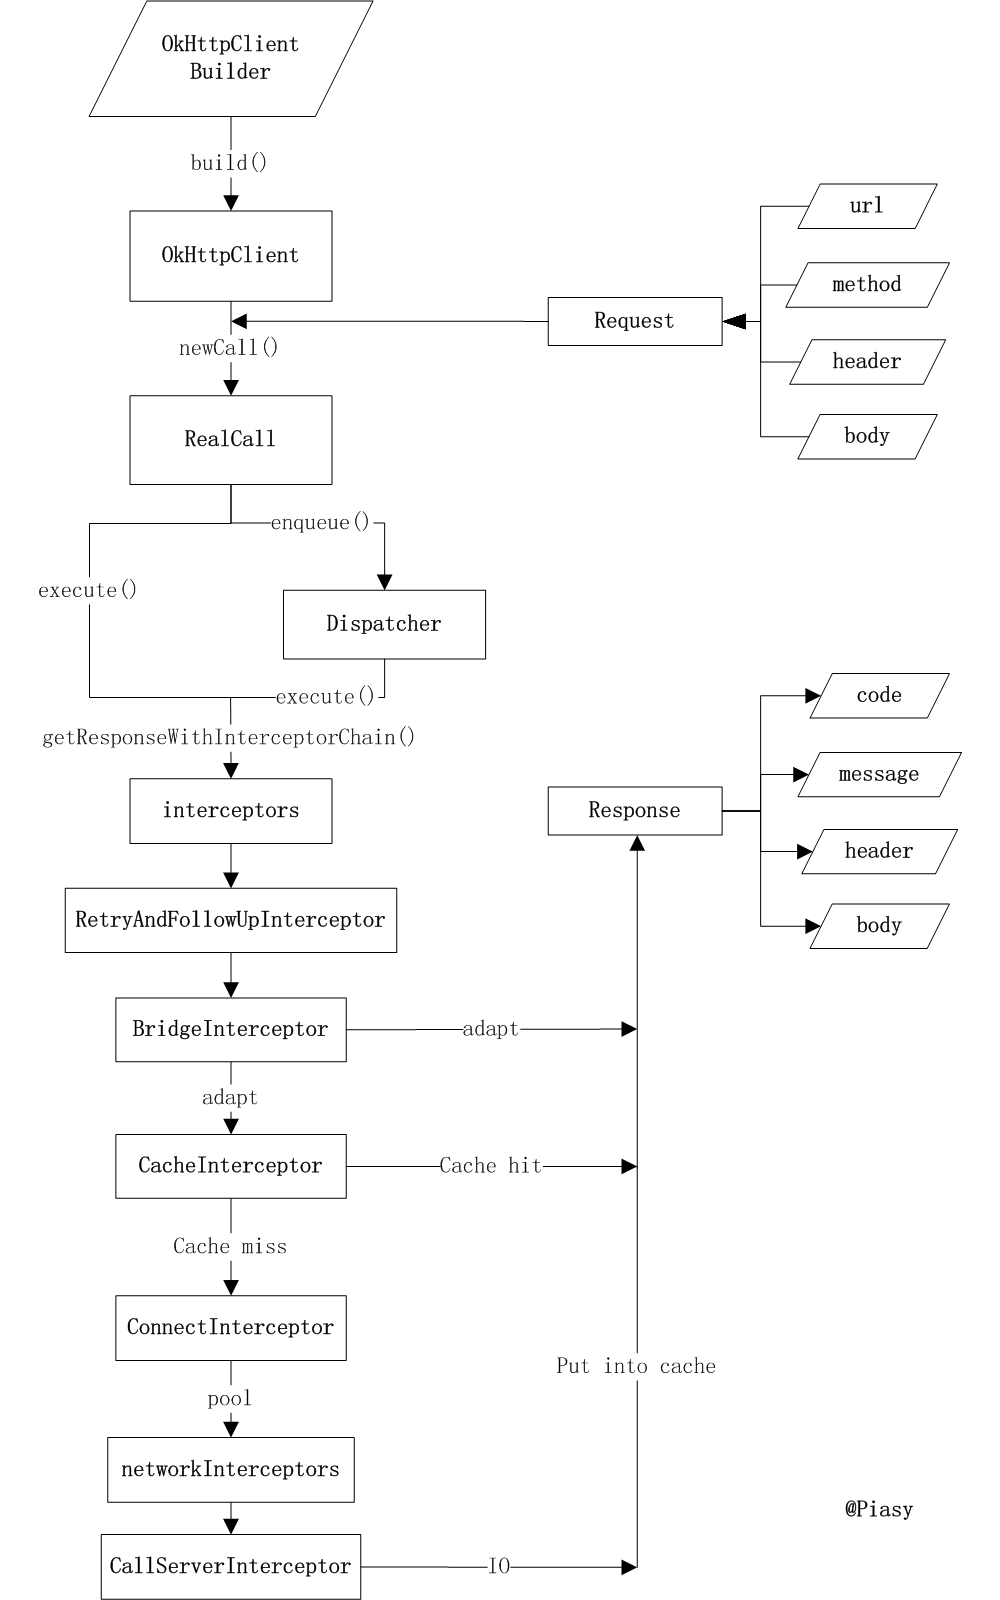
在网上发现一张关于OkHttp的完整工作流程图,画的非常好,偷了个懒直接拿来用了,感谢作者。图片出自http://blog.piasy.com/2016/07/11/Understand-OkHttp/
本期解读到此结束,如有错误之处,欢迎指出。下一期,RxJava。
OkHttp3 源码解读相关推荐
- Bert系列(二)——源码解读之模型主体
本篇文章主要是解读模型主体代码modeling.py.在阅读这篇文章之前希望读者们对bert的相关理论有一定的了解,尤其是transformer的结构原理,网上的资料很多,本文内容对原理部分就不做过多 ...
- Bert系列(三)——源码解读之Pre-train
https://www.jianshu.com/p/22e462f01d8c pre-train是迁移学习的基础,虽然Google已经发布了各种预训练好的模型,而且因为资源消耗巨大,自己再预训练也不现 ...
- linux下free源码,linux命令free源码解读:Procps free.c
linux命令free源码解读 linux命令free源码解读:Procps free.c 作者:isayme 发布时间:September 26, 2011 分类:Linux 我们讨论的是linux ...
- nodeJS之eventproxy源码解读
1.源码缩影 !(function (name, definition) { var hasDefine = typeof define === 'function', //检查上下文环境是否为AMD ...
- PyTorch 源码解读之即时编译篇
点击上方"AI遇见机器学习",选择"星标"公众号 重磅干货,第一时间送达 作者丨OpenMMLab 来源丨https://zhuanlan.zhihu.com/ ...
- OKHTTP3源码和设计模式(下篇)
在<OKHTTP3源码和设计模式(上篇)>,中整体介绍了 OKHttp3 的源码架构,重点讲解了请求任务的分发管理和线程池以及请求执行过程中的拦截器.这一章我们接着往下走认识一下 OK ...
- Alamofire源码解读系列(九)之响应封装(Response)
本篇主要带来Alamofire中Response的解读 前言 在每篇文章的前言部分,我都会把我认为的本篇最重要的内容提前讲一下.我更想同大家分享这些顶级框架在设计和编码层次究竟有哪些过人的地方?当然, ...
- Feflow 源码解读
Feflow 源码解读 Feflow(Front-end flow)是腾讯IVWEB团队的前端工程化解决方案,致力于改善多类型项目的开发流程中的规范和非业务相关的问题,可以让开发者将绝大部分精力集中在 ...
- spring-session源码解读 sesion
2019独角兽企业重金招聘Python工程师标准>>> spring-session源码解读 sesion 博客分类: java spring 摘要: session通用策略 Ses ...
- 前端日报-20160527-underscore 源码解读
underscore 源码解读 API文档浏览器 JavaScript 中加号操作符细节 抛弃 jQuery,拥抱原生 JS 从 0 开始学习 GitHub 系列之「加入 GitHub」 js实现克隆 ...
最新文章
- LeetCode 965 Univalued Binary Tree--判断二叉树的所有节点的值是否相同--python,java解法
- 安装 SQL Server 商业解决方案模板
- [题解]洛谷P1119 灾后重建
- stylus-loader (copy)
- wxWidgets:wxGridUpdateLocker类用法
- 职业寿命取决于营销理念
- php: +1天, +3个月, strtotime(): +1 day, +3 month
- php用asp文件js,asp下用fso生成js文件的代码
- Ros学习——roslaunch
- 测绘——AutoCAD教育版打印戳去除
- java速学堂,速学堂 JAVA300 第四章练习
- 快速入门Maxwell基本操作流程(2D部分)
- 2020年电工(初级)考试及电工(初级)考试平台
- 重复在学习中的重要性
- 计算机操作系统之设备管理思维导图
- Promise对象的基础入门学习
- BGP距离矢量动态路由协议
- 将NV21图像某一区域变黑色
- 北京市委书记蔡奇:元宇宙是一片“新蓝海”推动元宇宙产业聚集发展
- .net 查看程序集(*.dll)的PublicKeyToken