freehand8_在Illustrator和Freehand中创建仿制3D图形
freehand8
In this second article of our vector graphics series, we’ll take the basics that were covered in part one and make use of them in a fun application of vector graphics programs: Faux 3D Graphics.
在矢量图形系列的第二篇文章中,我们将采用第一部分中介绍的基础知识,并在矢量图形程序(Faux 3D Graphics)的有趣应用中使用它们。
There are plenty of powerful programs that create "true" 3D graphics — graphics that can have lighting and textures applied to their surfaces, and can be rotated in space. In fact, later versions of Adobe Illustrator and Macromedia Freehand have 3D capabilities that allow you to "extrude" shapes (e.g. take a 2D rectangle and turn it into a 3D box), rotate them, and apply different lighting. For more information on Illustrator and Freehand’s 3D functions, see the links at the end of this article.
有许多强大的程序可以创建“真实的” 3D图形,这些图形可以在其表面上应用照明和纹理,并且可以在空间中旋转。 实际上,更高版本的Adobe Illustrator和Macromedia Freehand具有3D功能,可让您“拉伸”形状(例如,将2D矩形变成3D框),旋转形状并应用不同的照明。 有关Illustrator和Freehand的3D功能的更多信息,请参见本文结尾处的链接。
So, if even Illustrator and Freehand have 3D graphics capabilities, why would anyone try to make vector graphics that "look" 3D, but aren’t truly 3D?
因此,即使Illustrator和Freehand都具有3D图形功能,为什么有人会尝试制作“看起来”为3D但不是真正的3D的矢量图形呢?
- Just for the challenge! There is something quite satisfying about a 3D-looking image that you’ve created yourself in Illustrator or Freehand. But if you don’t have anything to prove, these next reasons might be more compelling…只是为了挑战! 您在Illustrator或Freehand中创建的3D外观图像让人有些满意。 但是,如果您没有任何证据可以证明,那么接下来的这些原因可能会更加引人注目……
- To make fast buttons and other interface elements. Create round bullet-type buttons, beveled rectangular or rounded rectangular buttons, and other 3D-looking objects for your website or graphic user interface. Here’s an example:制作快速按钮和其他界面元素。 为您的网站或图形用户界面创建子弹型圆形按钮,斜角矩形或圆形矩形按钮以及其他3D外观的对象。 这是一个例子:

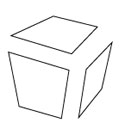
- To create stylized logos or images. Some illustration or logo projects might require a more stylized look, perhaps involving skewed edges, imperfect perspective, or non-linear lighting. Here’s an example of a "funky shape" that takes less than a minute to create in Illustrator or Freehand:创建风格化的徽标或图像。 一些插图或徽标项目可能需要更具风格的外观,可能涉及倾斜的边缘,不完善的透视图或非线性照明。 这是一个用不到一分钟的时间在Illustrator或Freehand中创建的“怪异形状”的示例:
- To make XP-style icons. This graphic of a computer is an example of a more complex vector graphic that looks 3D, but isn’t "truly" 3D. And it’s a graphic that can be created using a vector graphic program!制作XP样式的图标。 计算机的此图形是看起来更复杂的矢量图形的示例,该图形看起来像3D,但不是“真实的” 3D。 这是可以使用矢量图形程序创建的图形!

Are you convinced? Let’s get started! As you follow this tutorial, you’ll hone your skills with the use of gradients, and you might even pick up a few other skills, too.
你说服了吗? 让我们开始吧! 在学习本教程时,您将通过使用渐变来磨练自己的技能,甚至可能还会学到其他一些技能。
Note: I’ll be making my diagrams and commands using Adobe Illustrator 8. I’ll also add a few comments for people who use Macromedia Fireworks to make it easy for you to follow along.
注意:我将使用Adobe Illustrator 8制作图表和命令。我还将为使用Macromedia Fireworks的人员添加一些注释,以使您轻松进行后续操作。
人造3D圆形 (Faux 3D Round Shapes)
Creating imitation 3D round shapes is quite easy.
创建仿制3D圆形非常容易。
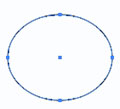
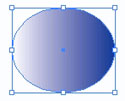
- Start with a round shape using the ellipse tool.使用椭圆工具从圆形开始。
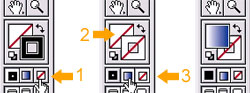
- Our current shape has no fill and a black stroke. We’ll change this to no stroke (1), then choose the fill square by clicking on it (2) and choose the gradient fill option (3). (You can skip #2 and just click on the gradient fill square if you wish.)我们当前的形状没有填充并且没有黑色笔触。 我们将其更改为无笔触(1),然后单击它选择填充正方形(2),然后选择渐变填充选项(3)。 (如果需要,您可以跳过#2并仅单击渐变填充方块。)
This fills the shape with a gradient:
这会用渐变填充形状:
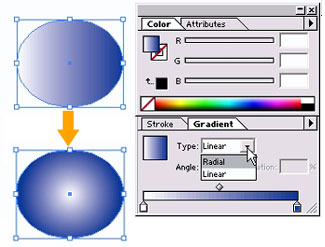
- Now, open the Gradient palette and change the type of fill from Linear to Radial.现在,打开“渐变”面板,并将填充类型从“线性”更改为“径向”。
- Choose the Gradient tool from the toolbar, or hit "g" for the keyboard shortcut.从工具栏中选择“渐变”工具,或点击“ g”以获取键盘快捷键。

- To make it look like the light source is coming from above and to the left, click in the upper left of the round shape, hold, and drag down to the bottom left to change the centering of the radial gradient.为了使它看起来像光源是从上方和左侧发出的,请单击圆形的左上角,按住并向下拖动到左下角以更改径向渐变的中心。

Easy! Now, remember that these are imitation 3D shapes. The shading and highlights won’t be perfect for round shapes that aren’t perfect circles.
简单! 现在,请记住,这些是仿3D形状。 阴影和高光不适用于不是完美圆形的圆形。
人造3D斜面形状 (Faux 3D Beveled Shapes)
Beveled shapes can be used to make buttons. Here, I’ll demonstrate how to make a round beveled button and a rectangular beveled button.
斜面形状可用于制作按钮。 在这里,我将演示如何制作圆形斜角按钮和矩形斜角按钮。
Start with two circles (see Create Vector Graphics in Illustrator and Freehand for tips on how to make two circles inside one another).
从两个圆圈开始(有关如何使两个圆圈彼此重叠的提示,请参见在Illustrator和Freehand中创建矢量图形 )。
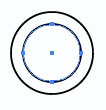
- Select the circles, set the stroke to "none", and the fill to a linear gradient fill.选择圆,将笔划设置为“无”,并将填充设置为线性渐变填充。
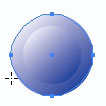
- Use the Gradient Tool to set the inner circle’s gradient in one direction and the outer circle’s gradient in the opposite direction. This makes it look as if the inside of the button is indented slightly, with a beveled edge.使用“渐变工具”可以设置一个方向上的内圆的渐变,以及设置相反方向上的外圆的渐变。 这使得按钮的内部看起来略微缩进,并且具有斜边。
-
OK, a round beveled button was pretty easy. But the creation of beveled shapes with "hard"-edged objects will take a few extra steps. In this demonstration, I’ll create a basic rectangular beveled shape.
好的,倒圆角的按钮非常简单。 但是使用“硬”边缘物体创建斜角形状将需要一些额外的步骤。 在此演示中,我将创建一个基本的矩形斜面形状。
- Let’s start with two rectangles.让我们从两个矩形开始。
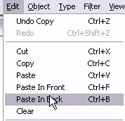
- Select the inner rectangle and Edit > Copy (Ctrl-C or Command-C). Then go to Edit > Paste In Back (Ctrl-B or Command-B).选择内部矩形,然后选择“编辑”>“复制”(Ctrl-C或Command-C)。 然后转到“编辑”>“向后粘贴”(Ctrl-B或Command-B)。
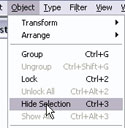
- With the inner rectangle selected, go to Object > Hide Selection (Ctrl-3 or Command-3). This now-hidden shape will eventually be our top "surface."选中内部矩形后,转到“对象”>“隐藏选择”(Ctrl-3或Command-3)。 现在隐藏起来的形状最终将成为我们最重要的“表面”。
Freehand side note: If you’re using Freehand, you’ll want to put the duplicate inner rectangle on its own layer, then hide the layer from view.
徒手画旁注:如果使用的是徒手画,则需要将重复的内部矩形放在其自己的图层上,然后从视图中隐藏该图层。
- Select the Scissors tool.选择剪刀工具。

Freehand side note: You’ll want to select the Knife tool.
徒手注意:您需要选择“刀”工具。
- Use the Scissors tool and click on each corner of the two rectangles. 使用剪刀工具,然后单击两个矩形的每个角。
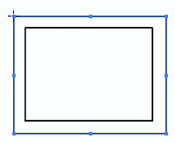
This cuts the shapes into eight individual line segments. It will still look like you have two rectangles until you try to use the black arrow tool; the individual line segments are now independent of each other.
这会将形状切成八个单独的线段。 除非您尝试使用黑色箭头工具,否则看起来仍然有两个矩形。 现在,各个线段彼此独立。
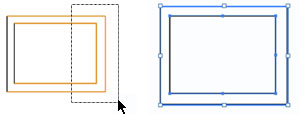
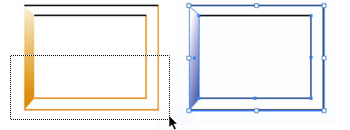
- Use the black arrow tool to select the line segments from three sides of the shape. In the diagram below, we’ve marked the line segments to select in orange so that you can see them clearly. The right side of the diagram shows what it looks like in Illustrator.使用黑色箭头工具从形状的三个侧面选择线段。 在下图中,我们将线段标记为橙色,以便您可以清楚地看到它们。 该图的右侧显示了它在Illustrator中的外观。
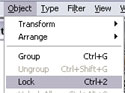
- Now, go to Object > Lock (Ctrl-2 or Command-2). This fixes the line segments in place so that you don’t select them by accident.现在,转到“对象”>“锁定”(Ctrl-2或Command-2)。 这会将线段固定在适当的位置,这样您就不会意外选择它们。
- Use the white arrow tool to select the top pair of endpoints.使用白色箭头工具选择最上面的一对端点。
- Go to Object > Path > Join (Ctrl-J or Command-J).转到对象>路径>联接(Ctrl-J或Command-J)。

This takes the two open endpoints and connects them with a line segment.
这将使用两个开放的端点,并将它们与线段连接。

Freehand note: Sometimes, using the Join command in Freehand doesn’t work as expected. If you’re having more trouble than you think it’s worth, use the Pen tool to connect the line segments together instead!
写意笔记:有时,在Freehand中使用Join命令无法正常工作。 如果遇到的麻烦超出了您的想象,那么请使用钢笔工具将线段连接在一起!
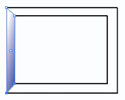
- Repeat the same process for the bottom endpoints (select with white arrow tool, then Join command), then set the Stroke to none and the Fill to a gradient. The first beveled edge is complete!对底部端点重复相同的过程(使用白色箭头工具选择,然后使用“加入”命令),然后将“笔触”设置为“无”,将“填充”设置为渐变。 第一斜面边缘已完成!
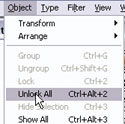
- We will repeat these steps to create the other beveled edges. First, unlock the other line segments by going to Object > Unlock All (Ctrl-Alt-2 or Command-Option-2).我们将重复这些步骤以创建其他斜角边缘。 首先,通过转到对象>全部解锁(Ctrl-Alt-2或Command-Option-2)来解锁其他线段。
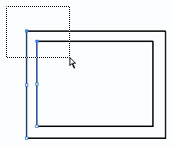
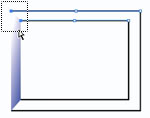
- Now, select everything but the two line segments that you want to work with and lock them (Ctrl-2 or Command-2). Again, I’ve colored the selected objects orange in the diagram below.现在,选择除要使用的两个线段以外的所有内容,然后将它们锁定(Ctrl-2或Command-2)。 同样,在下图中,我将选定的对象涂成橙色。
- Use the white arrow tool to select the endpoints, then Join them.使用白色箭头工具选择端点,然后连接它们。
- Repeat for the other side. You may then change the stroke and fill colors.重复另一面。 然后,您可以更改笔触和填充颜色。
- Continue the "Unlock > select > Lock > select points > Join > select other points > Join > change stroke and fill" sequence for the other sides. Here’s the result:另一侧继续执行“解锁>选择>锁定>选择点>连接>选择其他点>连接>更改笔触和填充”顺序。 结果如下:
- Now, let’s put the middle part back by selecting Object > Show All (Ctrl-Alt-3 or Command-Alt-3).现在,让我们通过选择“对象”>“全部显示”(Ctrl-Alt-3或Command-Alt-3)来放回中间部分。
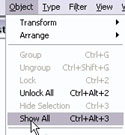
- The middle rectangle will reappear. You may then add a gradient fill to the middle area.中间的矩形将重新出现。 然后,您可以在中间区域添加渐变填充。
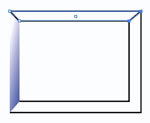
- Here’s our final beveled rectangle. I’ve split up the different shapes just for demonstration purposes:这是我们最后的斜角矩形。 我将不同的形状分开只是为了演示目的:

Feeling good about your imitation 3D shapes so far? Let’s move on to something more complex…
到目前为止,您对仿制3D形状感觉良好吗? 让我们继续进行更复杂的事情……
人造3D盒子形状 (Faux 3D Box Shapes)
Let’s try to create a "funky box shape" that you can use as a base for lots of other types of imitation 3D objects.
让我们尝试创建一个“ funky box shape”,您可以将其用作许多其他类型的仿制3D对象的基础。
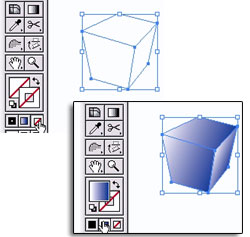
- Use the pen tool to create three different shapes that, lined up together, make a box shape.使用钢笔工具创建三个不同的形状,将它们排列在一起,形成一个盒子形状。
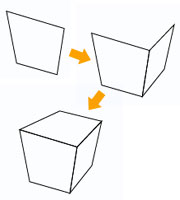
Here are the individual shapes, in case you’re wondering what they look like separately:
以下是各个形状,以防您想知道它们分别是什么样子:
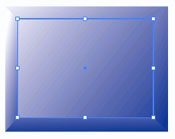
- Use the black arrow tool (selection tool) to select all of the shapes. Select the Stroke option in the tools palette, then click the "none" option to remove the black stroke. (You can also use the keyboard shortcut "/" to remove the stroke.) Then, click the gradient option to fill all three shapes with a gradient. (You can use the keyboard shortcut "." or ">" to select the gradient option.)使用黑色箭头工具(选择工具)选择所有形状。 在工具面板中选择“笔触”选项,然后单击“无”选项以删除黑色笔触。 (您也可以使用键盘快捷键“ /”来删除笔划。)然后,单击“渐变”选项以渐变填充所有三个形状。 (您可以使用键盘快捷键“。”或““>”来选择渐变选项。)
- Use the black arrow tool to select the individual shapes, then use the gradient tool to "fix" the coloring.使用黑色箭头工具选择单个形状,然后使用渐变工具“修复”颜色。
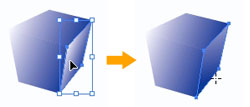
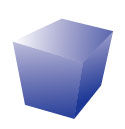
Here’s the result:
结果如下:
Is this box too boring for you? Let’s look at a couple ways that you can use this "funky box" for other purposes…
这个盒子对您来说太无聊了吗? 让我们看一下可以使用此“笨重的盒子”作其他用途的几种方法……
- Use the pen tool to create a distorted square on the front side of the box (roughly following the lines of that side) and fill it with a grey-white gradient. Can you see where this is going?使用钢笔工具在框的正面创建一个扭曲的正方形(大致沿着该边的线条),并用灰白色渐变填充它。 你能看到这是怎么回事吗?
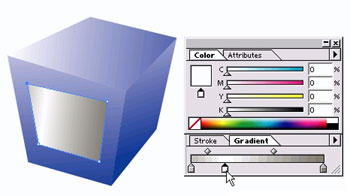
- Use the gradient tool, if necessary, to fix the direction of the gradient.如有必要,请使用渐变工具来固定渐变的方向。
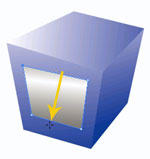
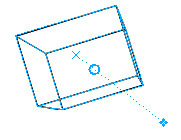
- Finally, use the pen tool to create two long, thin triangles to create a funky TV graphic. Just what you’ve always needed!最后,使用钢笔工具创建两个细长的三角形,以创建时髦的电视图形。 正是您一直需要的!

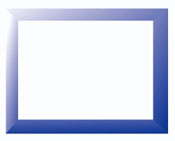
In the next example, we’ll take the funky box and lay text over it to use in a retro-style Website catalog as a "no product image available" placeholder.
在下一个示例中,我们将使用时髦的框并在其上方放置文本,以将其用作复古风格的网站目录中的“无可用产品图片”占位符。
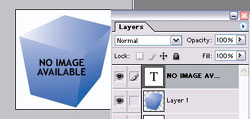
- First, copy and paste the box into Photoshop and create a text layer.首先,将框复制并粘贴到Photoshop中并创建文本层。
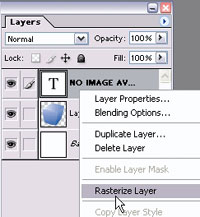
- Right-click on the text layer and choose Rasterize Layer.右键单击文本图层,然后选择栅格化图层。
- Go to Edit > Transform > Distort.转到“编辑”>“变换”>“扭曲”。
- Use the cursor to drag on the corners of the text so that it conforms to the same lines as the surface of the object.使用光标在文本的角上拖动,使其与对象表面的线条一致。
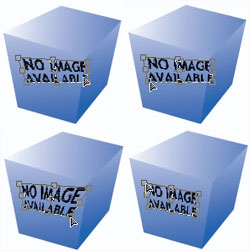
- Double-click inside the text area to commit your changes, then save for Web. Use it in your local retro or fun-and-funky-style Website.在文本区域内双击以提交更改,然后保存为Web。 在您的本地复古或趣味风格网站中使用它。

Side Note: If you have Illustrator 10+, you may use the Envelope Distort command to fit the text to the object. This tutorial shows you how to use the Envelope Distort command.
旁注:如果使用Illustrator 10+,则可以使用“信封扭曲”命令使文本适合对象。 本教程向您展示如何使用“信封扭曲”命令 。
Congratulations!
恭喜你!
You now know how to create common imitation 3D shapes:
现在,您知道如何创建常见的仿制3D形状:
- round shapes圆形
- beveled shapes斜面形状
- box shapes and variations盒子的形状和变化
And you’ve also realized that creating these 3D-looking 2D shapes really comes down to fancy use of the gradient tool. So, to use the gradient tool well, you’ll want to spend some time looking at photographs or real-life objects to see how lighting affects the shadows and shading of the object. Below are a few links to resources that might be helpful in understanding light and shadow.
您还已经意识到,创建这些看起来像3D的2D形状确实归因于渐变工具的花哨使用。 因此,要很好地使用渐变工具,您将需要花费一些时间查看照片或真实对象,以了解光照如何影响对象的阴影和阴影。 以下是一些资源链接,可能有助于理解光影。
a nice basic overview of lighting, shapes, and shadows
照明,形状和阴影的基本概述
shows how placing a light source at different positions affects shadows
展示了将光源放置在不同位置如何影响阴影
scrolling down a little bit gives some helpful basic 3D renderings of objects
向下滚动可提供一些有用的对象基本3D渲染
Furthermore, because these imitation 3D graphics simply combine shapes and gradients, you can use the same gradient tool techniques to create quick 3D-like graphics in Photoshop or Fireworks as well (using vector tools or selections!). Just remember that you’ll want to use vector graphics if there’s a chance that you’ll want to be able easily to resize and reuse the graphic later.
此外,由于这些仿制3D图形仅将形状和渐变组合在一起,因此您也可以使用相同的渐变工具技术在Photoshop或Fireworks中创建类似3D的快速图形(使用矢量工具或选择!)。 请记住,如果您希望以后可以轻松地调整大小和重新使用图形,则可能要使用矢量图形。
Finally, I mentioned earlier that later versions of Illustrator and Freehand have some 3D rendering capabilities. If you wanted to learn more about that, these links might be helpful:
最后,我之前提到过,Illustrator和Freehand的更高版本具有某些3D渲染功能。 如果您想了解更多有关这些的信息,这些链接可能会有所帮助:
a nice overview of the "2D Drawing Applications’ 3D Capabilities"
“ 2D绘图应用程序的3D功能”的概述
- Illustrator CS 3D effect tutorialsIllustrator CS 3D效果教程
Part 1: Extrusion and Bevel Basics
第1部分:挤压和倒角基础知识
Part 2: Custom Bevel Creation
第2部分:自定义斜角创建
Part 3: Creating Symmetrical 3D Objects Using Revolve
第3部分:使用旋转创建对称3D对象
Part 4: Creating a Glass Effect
第4部分:创建玻璃效果
翻译自: https://www.sitepoint.com/basic-imitation-3d-graphics/
freehand8
freehand8_在Illustrator和Freehand中创建仿制3D图形相关推荐
- CAD2019中创建基于3D图当前视图所有对象的二维表示
在CAD2019中打开现有3D图,或者绘制新3D图. 在CAD中输入现有3D图stp文件,如图所示: 选择stp文件后,等待转换完成. 将视角转到待投影面. CAD2019中创建基于3D图当前视图所有 ...
- Tridiv:基于 Web 的 CSS 编辑器,创建炫丽 3D 图形
Tridiv 是一个基于 Web 的编辑器,使用 CSS 创建 3D 形状.它提供了一个传统的四个面板的操作界面,给出了从每个平面的视图,以及一个预览窗格中示出的最终的效果.使用 Tridiv 可以创 ...
- away3d中创建中文3d字体
要实现中文字体 我们只能用矢量图 也就是将文字转化为矢量图 挤出类 TextExtrusion <maya中的挤出命令> demo: http://www.swfcabin.com/op ...
- 在Illustrator和手绘文章中创建矢量图形
使用路径和钢笔工具 (Working with Paths and the Pen Tool) Becoming comfortable with the Pen Tool often takes a ...
- illustrator下载_在Illustrator和手绘中创建矢量图形
illustrator下载 This article was written in 2009 and remains one of our most popular posts. If you're ...
- 如何在 Illustrator 中创建和编辑图层?
欢迎观看Illustrator教程,小编带大家学习Illustrator 2022的基本工具和使用技巧,了解如何在 Illustrator 图层 面板中创建新图层以组织项目中的内容. 学习使用层可以使 ...
- 在 Excel 中创建强大图表的三个技巧
Microsoft Excel 可以成为理解复杂数据集并使它们可视化的强大工具.通过在 Excel 中创建图表和图形,您可以快速轻松地识别数据中的趋势.模式和异常值.这可以帮助您获得有价值的见解并做出 ...
- Maya创建科幻3D动画循环场景视频教程
Maya创建科幻3D动画循环场景视频教程 Skillshare – Create a Sci-Fi 3D Animation Loop in Autodesk Maya 持续时间3h 27m 包括项目 ...
- 什么是.mogrt文件?如何在Premiere Pro软件中安装pr动态图形模板mogrt疑难解答
什么是动态图形模板(.mogrt 文件)? 动态图形模板是一种可在 After Effects 或 Premiere Pro 中创建的文件类型 (.mogrt). 通过动态图形模板,使用 After ...
最新文章
- 【操作系统】考研の内存管理方法(看不懂你来打我~!)
- Delphi编码及注释规范
- 高频变压器_变压器图案
- logisim优先编码器怎么用_变频电机为什么要用编码器?又该如何选型?
- B 站崩了,受害程序员聊聊
- mysql schema 定义_数据库 schema含义
- 常用的5种数据分析方法有哪些?
- Warning: Attempt to present * on * which is already presenting *
- 如何让iPad浏览器不再拒绝访问请求
- JavaScript连缀
- conda failed to create process
- php对mysql的增删改
- IDE/ATA与AHCI
- 特征工程-幅度调整-无量纲化(二):归一化和标准化案例,看不懂你打我
- 决策曲线拆解分析兼随机森林DCA绘制
- openGrok手动更新索引的方法
- 使用Ultra Libraian生成Altium Designer元件库
- 职称计算机考试IE浏览器的使用
- 安科瑞ACR10RH-D16外置罗氏线圈谐波表在分布式光伏并网柜的应用
- TextMate快捷键