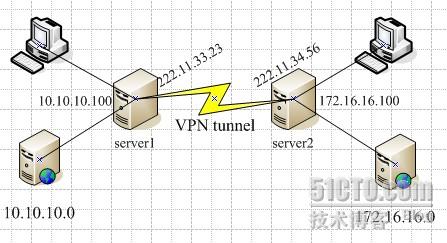
freebsd点到点的ipsec ***

-------------------------------
#要把 IPsec 支持放进内核, 应该在配置文件中加入下面的选项:
options IPSEC_ESP
device crypto
#如果需要 IPsec 的调试支持, 还应增加:
device gif # IPv6 and IPv4 tunneling
---------------------------------
#security/ipsec-tools安装
server1# cd ipsec-tools-0.8-alpha20090422
server1# ./configure
server1# make;make install
server1# ifconfig gif0 create
server1# ifconfig gif0 222.11.33.23 222.11.34.56
server1# ifconfig gif0 tunnel 10.10.10.100 172.16.16.100
server2# ifconfig gif0 create
server2# ifconfig gif0 222.11.34.56 222.11.33.23
server2# ifconfig gif0 tunnel 172.16.16.100 10.10.10.100
server1# ping 172.16.16.100
PING 172.16.16.100 (172.16.16.100): 56 data bytes
64 bytes from 172.16.16.100: icmp_seq=0 ttl=64 time=7.140 ms
64 bytes from 172.16.16.100: icmp_seq=1 ttl=64 time=7.268 ms
64 bytes from 172.16.16.100: icmp_seq=2 ttl=64 time=7.070 ms
64 bytes from 172.16.16.100: icmp_seq=3 ttl=64 time=7.020 ms
^C
--- 172.16.16.100 ping statistics ---
4 packets transmitted, 4 packets received, 0.0% packet loss
round-trip min/avg/max/stddev = 7.020/7.125/7.268/0.093 ms
server2# ping 10.10.10.100
PING 10.10.10.100 (10.10.10.100): 56 data bytes
64 bytes from 10.10.10.100: icmp_seq=0 ttl=64 time=7.186 ms
64 bytes from 10.10.10.100: icmp_seq=1 ttl=64 time=7.079 ms
64 bytes from 10.10.10.100: icmp_seq=2 ttl=64 time=7.001 ms
64 bytes from 10.10.10.100: icmp_seq=3 ttl=64 time=7.064 ms
64 bytes from 10.10.10.100: icmp_seq=4 ttl=64 time=6.989 ms
^C
--- 10.10.10.100 ping statistics ---
5 packets transmitted, 5 packets received, 0.0% packet loss
round-trip min/avg/max/stddev = 6.989/7.064/7.186/0.070 ms
server1:
server1# route add 172.16.16.0 172.16.16.100 255.255.255.0
server1# route add net 172.16.16.0: gateway 172.16.16.100
server2# route add 10.10.10.0 10.10.10.100 255.255.255.0
server2# route add net 10.10.10.0: gateway 10.10.10.100
server1# ping 172.16.16.23
PING 172.16.16.23 (172.16.16.23): 56 data bytes
64 bytes from 172.16.16.23: icmp_seq=0 ttl=64 time=7.140 ms
64 bytes from 172.16.16.23: icmp_seq=1 ttl=64 time=7.268 ms
64 bytes from 172.16.16.23: icmp_seq=2 ttl=64 time=7.070 ms
64 bytes from 172.16.16.23: icmp_seq=3 ttl=64 time=7.020 ms
^C
--- 172.16.16.23 ping statistics ---
4 packets transmitted, 4 packets received, 0.0% packet loss
round-trip min/avg/max/stddev = 7.020/7.125/7.268/0.093 ms
PING 10.10.10.100 (10.10.10.16): 56 data bytes
64 bytes from 10.10.10.16: icmp_seq=0 ttl=64 time=7.186 ms
64 bytes from 10.10.10.16: icmp_seq=1 ttl=64 time=7.079 ms
64 bytes from 10.10.10.16: icmp_seq=2 ttl=64 time=7.001 ms
64 bytes from 10.10.10.16: icmp_seq=3 ttl=64 time=7.064 ms
64 bytes from 10.10.10.16: icmp_seq=4 ttl=64 time=6.989 ms
^C
--- 10.10.10.16 ping statistics ---
5 packets transmitted, 5 packets received, 0.0% packet loss
round-trip min/avg/max/stddev = 6.989/7.064/7.186/0.070 ms
------------------------------------------------------
#使用 pre-shared(PSK)RSA 密钥对通道进行加密,保证数据的安全传输
#安装security/ipsec-tools
server1#
server1# vi /usr/local/etc/racoon/racoon.conf //两边文件差不多一样,只做稍许修改
log debug; #log verbosity setting: set to 'notify' when testing and debugging is complete
{
maximum_length 20;
randomize off;
strict_check off;
exclusive_tail off;
}
{
counter 5;
interval 20 sec;
persend 1;
# natt_keepalive 15 sec;
phase1 30 sec;
phase2 15 sec;
}
{
isakmp 222.11.33.23 [500];
isakmp_natt 222.11.33.23 [4500];
}
{
exchange_mode main,aggressive;
doi ipsec_doi;
situation identity_only;
my_identifier address 222.11.33.23;
peers_identifier address 222.11.34.56;
lifetime time 8 hour;
passive off;
proposal_check obey;
# nat_traversal off;
generate_policy off;
encryption_algorithm blowfish;
hash_algorithm md5;
authentication_method pre_shared_key;
lifetime time 30 sec;
dh_group 1;
}
}
{ # $network must be the two internal networks you are joining.
pfs_group 1;
lifetime time 36000 sec;
encryption_algorithm blowfish,3des,des;
authentication_algorithm hmac_md5,hmac_sha1;
compression_algorithm deflate;
}
server1# vi /usr/local/etc/racoon/setkey.conf
spdflush;
# To the home network
spdadd 10.10.10.0/24 172.16.16.0/24 any -P out ipsec esp/tunnel/222.11.33.23-222.11.34.56/use;
spdadd 172.16.16.0/24 10.10.10.0/24 any -P in ipsec esp/tunnel/222.11.34.56-222.11.33.23/use;
server1# /usr/local/sbin/racoon -F -f /usr/local/etc/racoon/racoon.conf
server2# /usr/local/sbin/racoon -F -f /usr/local/etc/racoon/racoon.conf
server1# tcpdump -i em0 host 222.11.33.23 and dst 222.11.34.56
------------------------------------------------
#ipfw设置
ipfw add 00202 allow log ah from any to any
ipfw add 00203 allow log ipencap from any to any
ipfw add 00204 allow log udp from any 500 to any
#pf设置
pass in quick proto ah from any to any
pass in quick proto ipencap from any to any
pass in quick proto udp from any port = 500 to any port = 500
pass in quick on gif0 from any to any
pass out quick proto esp from any to any
pass out quick proto ah from any to any
pass out quick proto ipencap from any to any
pass out quick proto udp from any port = 500 to any port = 500
pass out quick on gif0 from any to any
#允许机器初始化的时候开始 ××× 支持
ipsec_program="/usr/local/sbin/setkey"
ipsec_file="/usr/local/etc/racoon/setkey.conf" # allows setting up spd policies on boot
racoon_enable="yes"
转载于:https://blog.51cto.com/kerry/239106
freebsd点到点的ipsec ***相关推荐
- ensp模拟器使用USG6000V防火墙模拟搭建点到点的IPSec 隧道(web网页版)
ensp模拟器使用USG6000V防火墙模拟搭建点到点的IPSec 隧道(web网页版) 关于IPSec技术的基本原理及使用场景请参考: IPSec技术的基本原理详解及应用场景 本文主要是使用ensp ...
- 网络信息安全——网络阶段笔记总结--jf
网络信息安全--网络阶段笔记总结 基础知识: OSI七层模型: 应用层-表示层-会话层-传输层-网络层数据链路层-物理层 tcp/ip四层模型:应用层-传输层-网络层-网络接口层 tcp/ip五层模型 ...
- Cisco GETVPN
目录 GET VPN简介 GETVPN的优势 GETVPN技术分为以下几个核心组件: 实验 验证 GET VPN简介 CISCO的组加密传输VPN提出了一个名叫信任组的概念,不再使用点到点隧道来承载路 ...
- IPSEC实验(IPSECVPN点到点,DSVPN,IPSECVPN旁挂)
目录 一.复现实验 1.防火墙的IPSECVPN点到点实验 -1,拓扑图的搭建 -2,配置IP,开通ping,并且设置策略 -3,在网络中的IPSEC进行配置 第一阶段:发出的UDP500流量 第二阶 ...
- 安全防御--IPsec VPN点到点的实验
1,什么是数据认证 ,有什么作用,有哪些实现的技术手段? 在计算机和网络安全领域中,数据认证是指验证数据在传输和存储过程中的完整性.真实性和合法性的过程.数据在传输和存储过程中容易受到数据篡改.损坏或 ...
- 点到点 Ipsec *** 从一端能正常发起,另一端发起不成功的解决过程
集团总部用的cisco 5540防火墙,上面配置了2个动态***,若干L2L***.集团总部到各分公司直接用lan to lan ipsce ***连接,部分分公司到集团总部的***能够双向发起,部分 ...
- juniper SSG防火墙与飞塔防火墙配置点到点IPSEC ***
背景:公司办公区的网关防火使用的是飞塔防火墙,公司IDC机房使用的juniper SSG550M防火墙,现在想在办公网和机房生产网中间创建一条ipsec ***用于公司用户访问机房网络,公司网段为19 ...
- 华为点到点IPSec 虚拟专用网配置
配置相关接口IP地址及区域 [FW1-GigabitEthernet1/0/0]ip add 10.1.1.1 24 [FW1-GigabitEthernet1/0/0]service-manage ...
- SSL ×××与IPSec ×××特点比较
首先让我们从SSL ×××和IPSec ×××两个阵营出发做一个比较. 1 SSL ×××相对于IPSec ×××的优势 1.1 SSL ×××比IPSec ×××部署.管理成本低 首先我们先认识一下 ...
最新文章
- AI「复活」《延禧攻略》众生相
- MariaDB(MySQL)_MariaDB(Mysql)-主从搭建
- 调用摄像头_摄像头 | 浏览器调用摄像头并实现截图保存的效果
- SQL 单一用户(解决)
- Centos7换yum源
- Mounty for NTFS免费软件实现MAC OS X下对NTFS分区进行读写
- 《Hadoop MapReduce实战手册》一1.10 使用MapReduce监控UI
- mysql join 实践
- java实战 ——分类模块的开发
- 内存问题分析工具_valgrind之memcheck基本使用
- python深度学习——手写字符识别
- zemax中非序列添加相位面_zemax非序列照明技巧汇编
- 浅聊基于MUI框架的混合开发
- WiFi关联拒绝log分析以及代码流程 ASSOC_REJECT
- 智能家居的春天来临 曾经共患难的集成商如今能同享福吗?
- 快捷餐饮之店家后台厨艺秀实现
- python做一个登录注册界面_python做一个登录注册界面的方法
- Nyquist-Shannon采样定理的理解
- 爱否赢了?华为拍月亮方法已申请专利
- 网易云课堂web安全学习第七天——了解url跳转漏洞
