仿知乎悬浮功能按钮FloatingActionButton
前段时间在看属性动画,恰巧这个按钮的效果可以用属性动画实现,所以就来实践实践。效果基本出来了,大家可以自己去完善。
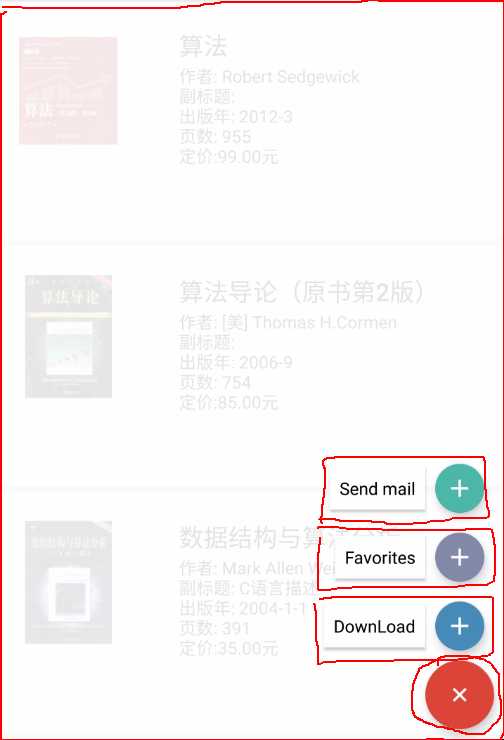
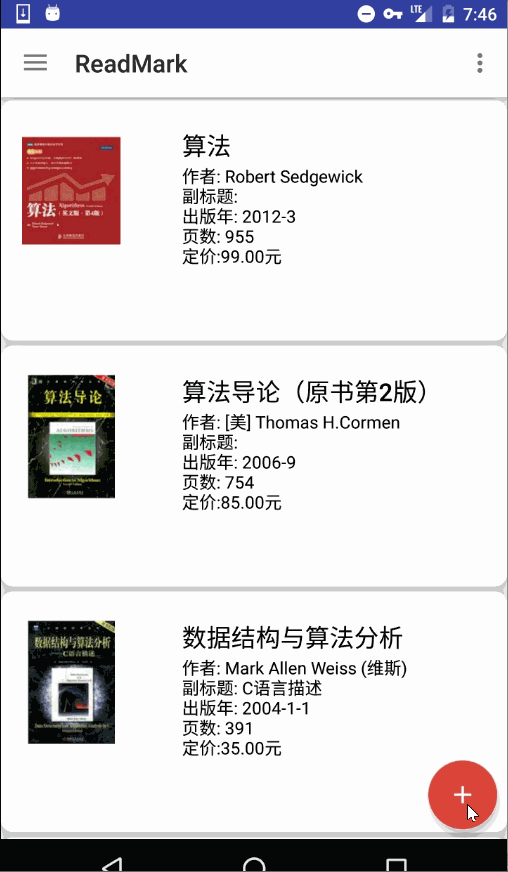
首先看一下效果图:
我们看到点击FloatingActionButton后会展开一些item,然后会有一个蒙板效果,这都是这个View的功能。那么这整个View肯定是个ViewGroup,我们一部分一部分来看。
首先是这个最小的Tag:
这个Tag带文字,可以是一个TextView,但为了美观,我们使用CardView,CardView是一个FrameLayout,我们要让它具有显示文字的功能,就继承CardView自定义一个ViewGroup。
public class TagView extends CardView
内部维护一个TextView,在其构造函数中我们实例化一个TextView用来显示文字,并在外部调用setTagText的时候把TextView添加到这个CardView中。
public class TagView extends CardView {private TextView mTextView;public TagView(Context context) {this(context, null);}public TagView(Context context, AttributeSet attrs) {this(context, attrs, 0);}public TagView(Context context, AttributeSet attrs, int defStyleAttr) {super(context, attrs, defStyleAttr);mTextView = new TextView(context);mTextView.setSingleLine(true);}protected void setTextSize(float size){mTextView.setTextSize(size);}protected void setTextColor(int color){mTextView.setTextColor(color);}//给内部的TextView添加文字protected void setTagText(String text){mTextView.setText(text);addTag();}//添加进这个layout中private void addTag(){LayoutParams layoutParams = new LayoutParams(ViewGroup.LayoutParams.WRAP_CONTENT, ViewGroup.LayoutParams.WRAP_CONTENT, Gravity.CENTER);int l = dp2px(8);int t = dp2px(8);int r = dp2px(8);int b = dp2px(8);layoutParams.setMargins(l, t, r, b);//addView会引起所有View的layoutaddView(mTextView, layoutParams);}private int dp2px(int value){return (int) TypedValue.applyDimension(TypedValue.COMPLEX_UNIT_DIP, value, getResources().getDisplayMetrics());}}
接下来我们看这个item,它是一个tag和一个fab的组合:
tag使用刚才我们自定义的TagView,fab就用系统的FloatingActionButton,这里显然需要一个ViewGroup来组合这两个子View,可以使用LinearLayout,这里我们就直接使用ViewGroup。
public class TagFabLayout extends ViewGroup
我们为这个ViewGroup设置自定义属性,是为了给tag设置text:
<declare-styleable name="FabTagLayout"><attr name="tagText" format="string" /></declare-styleable>
在构造器中获取自定义属性,初始化TagView并添加到该ViewGroup中:
public TagFabLayout(Context context, AttributeSet attrs, int defStyleAttr) {super(context, attrs, defStyleAttr);getAttributes(context, attrs);settingTagView(context);}private void getAttributes(Context context, AttributeSet attributeSet){TypedArray typedArray = context.obtainStyledAttributes(attributeSet, R.styleable.FabTagLayout);mTagText = typedArray.getString(R.styleable.FabTagLayout_tagText);typedArray.recycle();}private void settingTagView(Context context){mTagView = new TagView(context);mTagView.setTagText(mTagText);addView(mTagView);}
在onMeasure对该ViewGroup进行测量,这里我直接把宽高设置成wrap_content的了,match_parent和精确值感觉没有必要。TagView和FloatingActionButton横向排列,中间和两边留一点空隙。
@Overrideprotected void onMeasure(int widthMeasureSpec, int heightMeasureSpec) {super.onMeasure(widthMeasureSpec, heightMeasureSpec);int width = 0;int height = 0;int count = getChildCount();for(int i=0; i<count; i++){View view = getChildAt(i);measureChild(view, widthMeasureSpec, heightMeasureSpec);width += view.getMeasuredWidth();height = Math.max(height, view.getMeasuredHeight());}width += dp2px(8 + 8 + 8);height += dp2px(8 + 8);//直接将该ViewGroup设定为wrap_content的setMeasuredDimension(width, height);}
在onLayout中横向布局,tag在左,fab在右。
@Overrideprotected void onLayout(boolean changed, int l, int t, int r, int b) {//为子View布局View tagView = getChildAt(0);View fabView = getChildAt(1);int tagWidth = tagView.getMeasuredWidth();int tagHeight = tagView.getMeasuredHeight();int fabWidth = fabView.getMeasuredWidth();int fabHeight = fabView.getMeasuredHeight();int tl = dp2px(8);int tt = (getMeasuredHeight() - tagHeight) / 2;int tr = tl + tagWidth;int tb = tt + tagHeight;int fl = tr + dp2px(8);int ft = (getMeasuredHeight() - fabHeight) / 2;int fr = fl + fabWidth;int fb = ft + fabHeight;fabView.layout(fl, ft, fr, fb);tagView.layout(tl, tt, tr, tb);bindEvents(tagView, fabView);}
还要为这两个子View注册OnClickListener,这是点击事件传递的源头。
private void bindEvents(View tagView, View fabView){tagView.setOnClickListener(new OnClickListener() {@Overridepublic void onClick(View v) {if(mOnTagClickListener != null){mOnTagClickListener.onTagClick();}}});fabView.setOnClickListener(new OnClickListener() {@Overridepublic void onClick(View v) {if (mOnFabClickListener != null){mOnFabClickListener.onFabClick();}}});}
现在item的ViewGroup有了,我们还需要一个蒙板,一个主fab,那么我们来看最终的ViewGroup。
思路也很清楚,蒙板是match_parent的,主fab在右下角(当然我们可以自己设置,也可以对外提供接口来设置位置),三个item(也就是TagFabLayout)在主fab的上面。至于动画效果,在点击事件中触发。
public class MultiFloatingActionButton extends ViewGroup
这里我们还需要自定义一些属性,比如蒙板的颜色、主Fab的颜色、主Fab的图案(当然,你把主Fab直接写在xml中就可以直接定义这些属性)、动画的duaration、动画的模式等。
<attr name="animationMode"><enum name="fade" value="0"/><enum name="scale" value="1"/><enum name="bounce" value="2"/></attr><attr name="position"><enum name="left_bottom" value="0"/><enum name="right_bottom" value="1"/></attr><declare-styleable name="MultiFloatingActionButton"><attr name="backgroundColor" format="color"/><attr name="switchFabIcon" format="reference"/><attr name="switchFabColor" format="color"/><attr name="animationDuration" format="integer"/><attr name="animationMode"/><attr name="position"/></declare-styleable>
在构造器中我们同样是获取并初始化属性:
public MultiFloatingActionButton(Context context, AttributeSet attrs, int defStyleAttr) {super(context, attrs, defStyleAttr);//获取属性值getAttributes(context, attrs);//添加一个背景View和一个FloatingActionButtonsetBaseViews(context);}private void getAttributes(Context context, AttributeSet attrs){TypedArray typedArray = context.obtainStyledAttributes(attrs, R.styleable.MultiFloatingActionButton);mBackgroundColor = typedArray.getColor(R.styleable.MultiFloatingActionButton_backgroundColor, Color.TRANSPARENT);mFabIcon = typedArray.getDrawable(R.styleable.MultiFloatingActionButton_switchFabIcon);mFabColor = typedArray.getColorStateList(R.styleable.MultiFloatingActionButton_switchFabColor);mAnimationDuration = typedArray.getInt(R.styleable.MultiFloatingActionButton_animationDuration, 150);mAnimationMode = typedArray.getInt(R.styleable.MultiFloatingActionButton_animationMode, ANIM_SCALE);mPosition = typedArray.getInt(R.styleable.MultiFloatingActionButton_position, POS_RIGHT_BOTTOM);typedArray.recycle();}
接着我们初始化、添加蒙板和主fab。
private void setBaseViews(Context context){mBackgroundView = new View(context);mBackgroundView.setBackgroundColor(mBackgroundColor);mBackgroundView.setAlpha(0);addView(mBackgroundView);mFloatingActionButton = new FloatingActionButton(context);mFloatingActionButton.setBackgroundTintList(mFabColor);mFloatingActionButton.setImageDrawable(mFabIcon);addView(mFloatingActionButton);}
在onMeasure中,我们并不会对这个ViewGroup进行wrap_content的支持,因为基本上都是match_parent的吧,也不会有精确值,而且这个ViewGroup应该是在顶层的。我们看下onLayout方法,在这个方法中,我们对所有子View进行布局。
@Overrideprotected void onLayout(boolean changed, int l, int t, int r, int b) {if(changed){//布局背景和主FablayoutFloatingActionButton();layoutBackgroundView();layoutItems();}}
首先布局主Fab,它在右下角,然后添加点击事件,点击这个主Fab后,会涉及到旋转主Fab,改变蒙板透明度,打开或关闭items等操作,这些等下再说。
private void layoutFloatingActionButton(){int width = mFloatingActionButton.getMeasuredWidth();int height = mFloatingActionButton.getMeasuredHeight();int fl = 0;int ft = 0;int fr = 0;int fb = 0;switch (mPosition){case POS_LEFT_BOTTOM:case POS_RIGHT_BOTTOM:fl = getMeasuredWidth() - width - dp2px(8);ft = getMeasuredHeight() - height - dp2px(8);fr = fl + width;fb = ft + height;break;}mFloatingActionButton.layout(fl, ft, fr, fb);bindFloatingEvent();}
private void bindFloatingEvent(){mFloatingActionButton.setOnClickListener(new OnClickListener() {@Overridepublic void onClick(View v) {rotateFloatingButton();changeBackground();changeStatus();if (isMenuOpen) {openMenu();} else {closeMenu();}}});}
然后布局背景:
private void layoutBackgroundView(){mBackgroundView.layout(0, 0, getMeasuredWidth(), getMeasuredHeight());}
接着布局items,并为items添加点击事件。每个item都是TagFabLayout,可以为它setOnTagClickListener和setOnFabClickListener,以便我们点击这两块区域的时候都要能响应,并且我们让这两个回调函数中做同样的事情:旋转主Fab、改变背景、关闭items(因为能点击一定是展开状态)。此时还要在这个ViewGroup中设置一个接口OnFabItemClickListener,用于将点击的位置传递出去,例如Activity实现了这个接口,就可以在onTagClick和onFabClick方法中调用mOnFabItemClickListener.onFabItemClick()方法。说一下这里的布局,是累积向上的,注意坐标的计算。
private void layoutItems(){int count = getChildCount();for(int i=2; i<count; i++) {TagFabLayout child = (TagFabLayout) getChildAt(i);child.setVisibility(INVISIBLE);//获取自身测量宽高,这里说一下,由于TagFabLayout我们默认形成wrap_content,所以这里测量到的是wrap_content的最终大小int width = child.getMeasuredWidth();int height = child.getMeasuredHeight();// 获取主Fab测量宽高int fabHeight = mFloatingActionButton.getMeasuredHeight();int cl = 0;int ct = 0;switch (mPosition) {case POS_LEFT_BOTTOM:case POS_RIGHT_BOTTOM:cl = getMeasuredWidth() - width - dp2px(8);ct = getMeasuredHeight() - fabHeight - (i - 1) * height - dp2px(8);}child.layout(cl, ct, cl + width, ct + height);bindMenuEvents(child, i);prepareAnim(child);}
}
private void bindMenuEvents(final TagFabLayout child, final int pos){child.setOnTagClickListener(new TagFabLayout.OnTagClickListener() {@Overridepublic void onTagClick() {rotateFloatingButton();changeBackground();changeStatus();closeMenu();if(mOnFabItemClickListener != null){mOnFabItemClickListener.onFabItemClick(child, pos);}}});child.setOnFabClickListener(new TagFabLayout.OnFabClickListener() {@Overridepublic void onFabClick() {rotateFloatingButton();changeBackground();changeStatus();closeMenu();if (mOnFabItemClickListener != null){mOnFabItemClickListener.onFabItemClick(child, pos);}}});
}
现在所有的布局和点击事件都已经绑定好了,我们来看下rotateFloatingButton()、 changeBackground() 、 openMenu() 、closeMenu()这几个和属性动画相关的函数。
其实也很简单,rotateFloatingButton()对mFloatingActionButton的rotation这个属性进行改变,以菜单是否打开为判断条件。
private void rotateFloatingButton(){ObjectAnimator animator = isMenuOpen ? ObjectAnimator.ofFloat(mFloatingActionButton, "rotation", 45F, 0f) : ObjectAnimator.ofFloat(mFloatingActionButton, "rotation", 0f, 45f);animator.setDuration(150);animator.setInterpolator(new LinearInterpolator());animator.start();}
changeBackground()改变mBackgroundView的alpha这个属性,也是以菜单是否打开为判断条件。
private void changeBackground(){ObjectAnimator animator = isMenuOpen ? ObjectAnimator.ofFloat(mBackgroundView, "alpha", 0.9f, 0f) :ObjectAnimator.ofFloat(mBackgroundView, "alpha", 0f, 0.9f);animator.setDuration(150);animator.setInterpolator(new LinearInterpolator());animator.start();}
openMenu() 中根据不同的模式来实现打开的效果,看一下scaleToShow(),这里同时对scaleX、scaleY、alpha这3个属性进行动画,来达到放大显示的效果。
private void openMenu(){switch (mAnimationMode){case ANIM_BOUNCE:bounceToShow();break;case ANIM_SCALE:scaleToShow();}}
private void scaleToShow(){for(int i = 2; i<getChildCount(); i++){View view = getChildAt(i);view.setVisibility(VISIBLE);view.setAlpha(0);ObjectAnimator scaleX = ObjectAnimator.ofFloat(view, "scaleX", 0f, 1f);ObjectAnimator scaleY = ObjectAnimator.ofFloat(view, "scaleY", 0f, 1f);ObjectAnimator alpha = ObjectAnimator.ofFloat(view, "alpha", 0f, 1f);AnimatorSet set = new AnimatorSet();set.playTogether(scaleX, scaleY, alpha);set.setDuration(mAnimationDuration);set.start();}
}
差不多达到我们要求的效果了,但是还有一个小地方需要注意一下,在menu展开的时候,如果我们点击menu以外的区域,即蒙板上的区域,此时ViewGroup是不会拦截任何Touch事件,如果在这个FloatingActionButton下面有可以被点击响应的View,比如ListView,就会在蒙板显示的情况下进行响应,正确的逻辑应该是关闭menu。
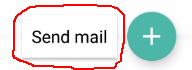
那么我们需要在onInterceptTouchEvent中处理事件的拦截,这里判断的方法是:如果menu是打开的,我们在DOWN事件中判断x,y是否落在了a或b区域,如下图
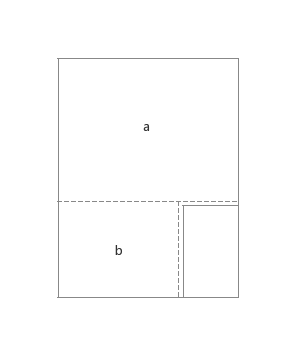
如果是的话,该ViewGroup应该拦截这个事件,交由自身的onTouchEvent处理。
@Overridepublic boolean onInterceptTouchEvent(MotionEvent ev) {boolean intercepted = false;int x = (int)ev.getX();int y = (int)ev.getY();if(isMenuOpen){switch (ev.getAction()){case MotionEvent.ACTION_DOWN:if(judgeIfTouchBackground(x, y)){intercepted = true;}intercepted = false;break;case MotionEvent.ACTION_MOVE:intercepted = false;break;case MotionEvent.ACTION_UP:intercepted = false;break;}}return intercepted;}private boolean judgeIfTouchBackground(int x, int y){Rect a = new Rect();Rect b = new Rect();a.set(0, 0, getWidth(), getHeight() - getChildAt(getChildCount() - 1).getTop());b.set(0, getChildAt(getChildCount() - 1).getTop(), getChildAt(getChildCount() - 1).getLeft(), getHeight());if(a.contains(x, y) || b.contains(x, y)){return true;}return false;}
在onTouchEvent中做关闭menu等操作。
@Overridepublic boolean onTouchEvent(MotionEvent event) {if(isMenuOpen){closeMenu();changeBackground();rotateFloatingButton();changeStatus();return true;}return super.onTouchEvent(event);}
再看一下,效果不错。

由于我做的小app中涉及到切换夜间模式,这个ViewGroup的背景色应该随着主题改变,设置该View的背景色为
app:backgroundColor="?attr/myBackground"
重写ViewGroup的 setBackgroundColor方法,这里所谓的背景色其实就是蒙板的颜色。
public void setBackgroundColor(int color){mBackgroundColor = color;mBackgroundView.setBackgroundColor(color);
}
基本功能到这里全部完成了,问题还有很多,比如没有提供根据不同的position进行布局、没有提供根据不同mode设置menu开闭的效果,但是后续我还会继续改进和完善^ ^。欢迎交流。如果大家需要源码,可以去我源码里的customview里面自取。在这里
仿知乎悬浮功能按钮FloatingActionButton相关推荐
- android悬浮 按钮列表,Android悬浮菜单按钮FloatingActionButton实现
[实例简介] Android悬浮菜单按钮FloatingActionButton实现,可直接拿到项目中集成使用.希望大家多多关注我的博客:https://blog.csdn.net/k57103983 ...
- Android开发动态圆形浮动菜单按钮,Android编程:悬浮菜单按钮FloatingActionButton实例...
Android编程:悬浮菜单按钮FloatingActionButton实例 环境: 主机:WIN10 开发环境:Android Studio 2.2 Preview 3 说明: 用第三方库Float ...
- Android悬浮菜单按钮FloatingActionButton实现
今天给大家讲解的是如何打造悬浮式按钮 程序截图 点击+号展开(这个按钮我全用白色代替的) 获取点击状态 小伙伴们,效果是不是你们想要的?是不是很棒棒呢? 项目截图,因为电脑卡,就没开as,这里使用es ...
- php 自动加载 知乎,wordpress复制文章自动添加版权和原文链接 仿知乎版权功能
为了找这段功能的代码,试过很多文章的效果,但存在各种问题,比如复制内容不全,或者干脆就是粘贴上一次的内容,为了增加更好的体验,WordPress本来就是一个讲究分享体验的事,不让复制显然有违博客的分享 ...
- android仿知乎按钮动效,Android仿知乎客户端关注和取消关注的按钮点击特效实现思路详解...
先说明一下,项目代码已上传至github,不想看长篇大论的也可以先去下代码,对照代码,哪里不懂点哪里. 代码在这https://github.com/zgzczzw/ZHFollowButton 前几 ...
- Flutter 悬浮按钮 FloatingActionButton 的详细配置使用
志在巅峰的攀登者,不会陶醉在沿途的某个脚印之中,在码农的世界里,优美的应用体验,来源于程序员对细节的处理以及自我要求的境界,年轻人也是忙忙碌碌的码农中一员,每天.每周,都会留下一些脚印,就是这些创作的 ...
- autojs之悬浮窗按钮暂停脚本~一种很笨的方法,但是可以实现暂停脚本的功能
一种 很简单很笨很低级的 悬浮窗按钮暂停脚本 的方法 文章目录 先看效果 一.悬浮窗 二.代码 1.悬浮窗设置 2.按钮点击 3.脚本暂停运行 控制检测函数 4.主线程 三.完整代码 总结 先看效果 ...
- FloatingActionButton悬浮菜单按钮的实现
FloatingActionButton悬浮菜单按钮的实现 先看下效果: 可以在github上搜FloatingActionButton 我在这里使用的是 下面是链接: https://github. ...
- iOS精仿唱吧下载按钮、仿知乎日报、自定义提示视图、过渡动画、记录应用等源码
iOS精选源码 IOS之分段控制器OC/Swift通用 Swift4.0_组件化:APP启动引导页页 精仿唱吧App音乐下载按钮,完美快速集成使用 iOS指纹解锁和手势解锁源码 OC _纯代码颜色选择 ...
- iOS精仿唱吧下载按钮、仿知乎日报、自定义提示视图、过渡动画、记录应用等源码...
iOS精选源码 IOS之分段控制器OC/Swift通用 Swift4.0_组件化:APP启动引导页页 精仿唱吧App音乐下载按钮,完美快速集成使用 iOS指纹解锁和手势解锁源码 OC _纯代码颜色选择 ...
最新文章
- 121-Best Time to Buy and Sell Stock
- go微服务框架-gomicro试用
- Linux目录、文件的创建与删除
- 模拟windows任务管理器列举系统进程,并关闭进程......
- 职高计算机自我鉴定800字,中专生自我鉴定800字与中专生计算机专业自我鉴定汇编...
- Gridview一次更新所有记录
- Linux 链接文件讲解
- java蓝桥杯省赛第十届_2019年第十届蓝桥杯省赛-迷宫(BFS/Excel大法)
- Android 开发常用ADB命令集合
- 项目开发文档编写规范【附文档模板】
- GDI与DirectX对比
- 办公软件 excle word 技巧 教程 电子书 免费 下载
- 英语单词拼写游戏开发纪录
- 【每日函数】每日函数(2021.08.22)
- 尚学堂视频笔记六:多线程
- spacy POS 和 Syntactic Dependency Parsing 的标记
- 数据可视化之小提琴图(原理+Python代码)
- 重装Ubuntu(Linux)后快速搭建工作环境(深度学习环境)
- android系统 PowerManager深入分析(非常详细)
- 移动硬盘不被系统识别的处理