【译】Chrome 扩展 : 入门
引子
按照 Chrome 扩展 : 扩展是什么?中引导,接着就是入门教程。
原文:Getting started
版本:Updated on Wednesday, November 18, 2020
源库:developer.chrome.com GitHub
Origin
My GitHub
入门
扩展由不同但内聚的组件组成。组件可以包括后台脚本、内容脚本、选项页、UI 元素和各种逻辑文件。扩展组件是使用 web 开发技术创建的:HTML、CSS 和 JavaScript 。扩展的组件将取决于其功能,可能不需要所有选项。
刚开始,创建一个新文件夹用来存放扩展的文件。
完整的扩展可以在这里下载。
创建 manifest
扩展从 manifest 开始。创建一个名为 manifest.json 文件并包含以下代码。
{"name": "Getting Started Example","description": "Build an Extension!","version": "1.0","manifest_version": 3
}
在当前状态下,可以在开发人员模式下将包含 manifest 文件的目录添加为扩展。
- 导航到
chrome://extensions打开扩展管理页面。- 或者点击扩展菜单按钮,选择菜单底部的 Manage Extensions 打开这个页面。
- 或者点击 Chrome 菜单,悬浮在 More Tools 之后选择 Extensions 。
- 点击 Developer mode 旁边的开关,开启开发者模式。
- 点击 Load unpacked 按钮,并选择扩展文件夹。
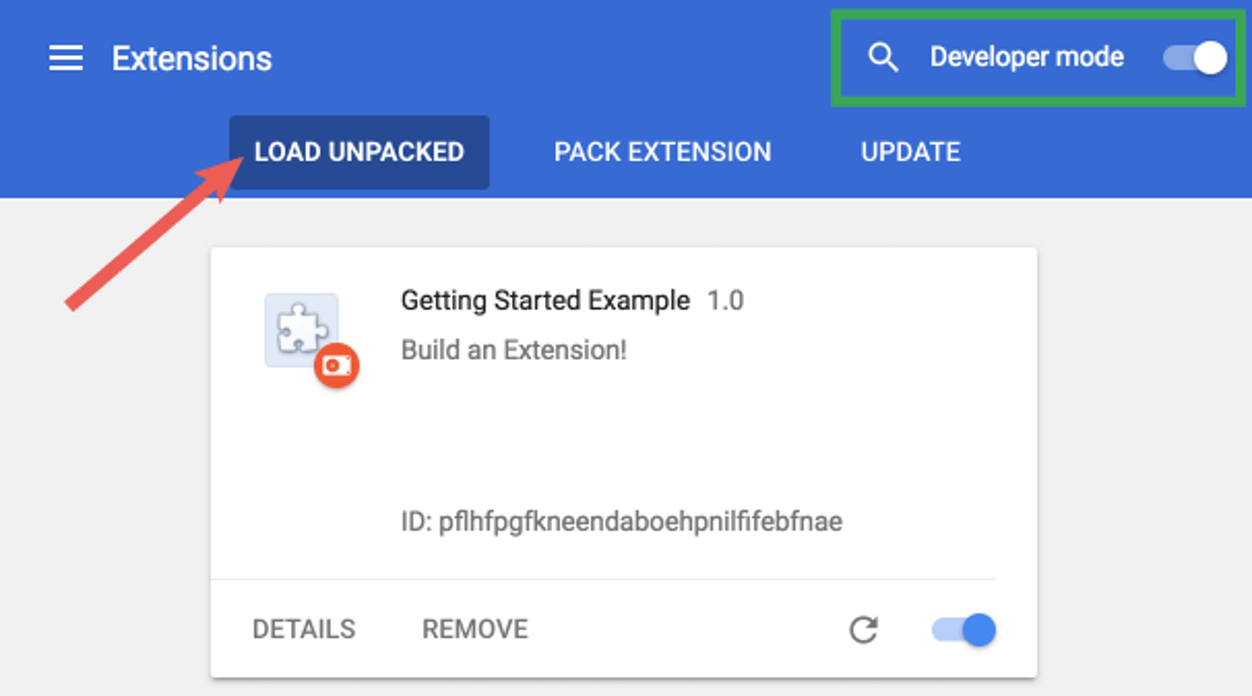
嗒嗒!已成功安装扩展。因为在 manifest 中没有包含图标,所以将为扩展创建一个通用图标。
添加功能
现在已经安装了扩展,但是它现在什么做不了,因为我们还没有告诉它做什么或者什么时候做。我们通过添加一些代码来存储背景色值来解决这个问题。
为此,我们需要创建一个后台脚本并将其添加到扩展的 manifest 中。首先在扩展的目录中创建一个名为 background.js 的文件。
{"name": "Getting Started Example","description": "Build an Extension!","version": "1.0","manifest_version": 3,
+ "background": {
+   "service_worker": "background.js"
+ }
}
与许多其它重要组件一样,后台脚本必须在 manifest 中注册。在 manifest 中注册一个后台脚本会告诉扩展要引用哪个文件,以及该文件的行为。
Chrome 现在意识到扩展包含一个服务。当你重新加载扩展时,Chrome 将扫描指定的文件以获取附加指令,例如需要侦听的重要事件。
这个扩展一旦安装,就需要来自持久变量的信息。首先在后台脚本中包含一个对 runtime.onInstalled 的监听。在 onInstalled 侦听器中,扩展将使用 storage API 设置一个值。这将允许多个扩展组件访问该值并更新它。
let color = '#3aa757';chrome.runtime.onInstalled.addListener(() => {chrome.storage.sync.set({ color });console.log('Default background color set to %cgreen', `color: ${color}`);
});
大多数的 API ,包括 storage API ,必须在 manifest 中的 permissions 字段下注册,扩展才能使用它们。
{"name": "Getting Started Example","description": "Build an Extension!","version": "1.0","manifest_version": 3,"background": {"service_worker": "background.js"},
+ "permissions": ["storage"]
}
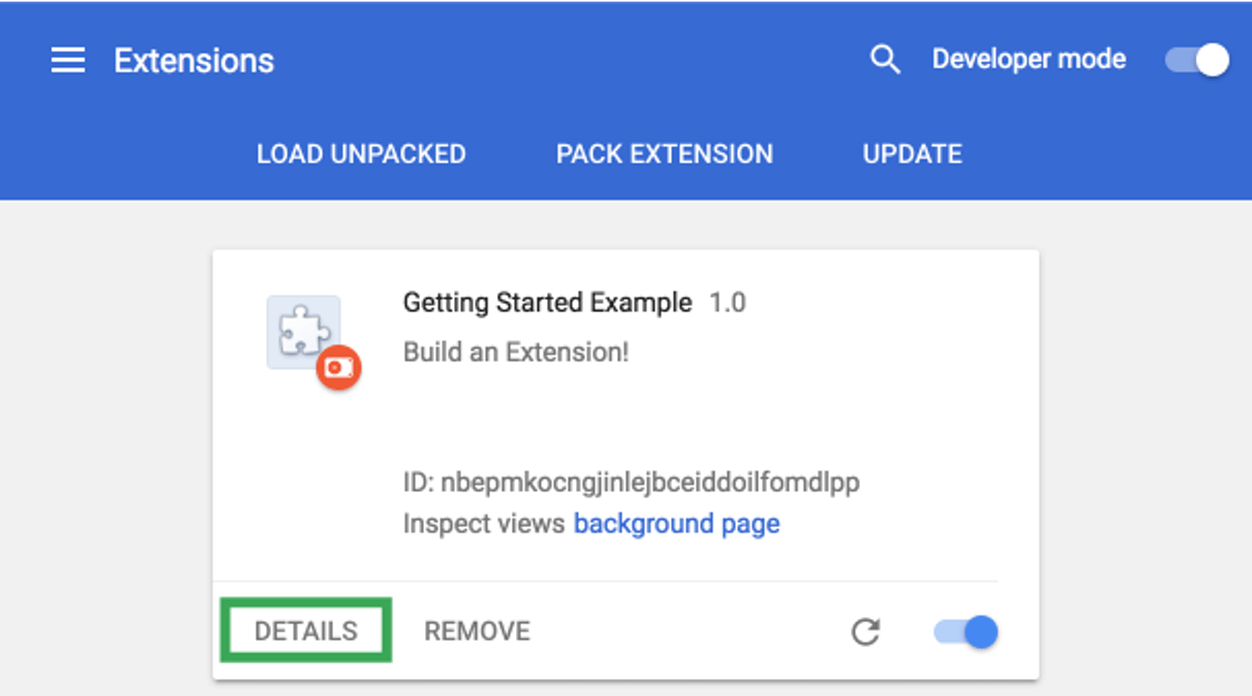
返回到扩展管理页面,点击 Reload 链接。一个新的字段 Inspect views 可用,它有一个蓝色的链接:background page 。

点击链接查看后台脚本输出的日志:“Default background color set to green”
译者备注
在 Chrome 版本 90.0.4430.85(正式版本) (x86_64) 中试了一下,发现有些出入的地方:
- 可点击的链接是 Service Worker ,而且在一定的时间后会变成 无效,所以需要点击 Reload 链接。

引入用户界面
扩展可以有多种形式的用户界面;这一种将使用 popup 。创建并添加名为 popup.html 的文件到扩展的目录。此扩展使用按钮更改背景色。
<!DOCTYPE html>
<html><head><link rel="stylesheet" href="button.css"></head><body><button id="changeColor"></button></body>
</html>
与后台脚本一样,这个文件必须在 manifest 中声明,以便 Chrome 在扩展弹出窗口中显示它。为此,向 manifest 添加一个 action 对象并设置 popup.html 作为 action 的 default_popup 属性值。
{"name": "Getting Started Example","description": "Build an Extension!","version": "1.0","manifest_version": 3,"background": {"service_worker": "background.js"},"permissions": ["storage"],
+ "action": {
+   "default_popup": "popup.html"
+ }
}
这个弹出窗口的 HTML 引用了一个名为 button.css 的 CSS 文件。 将另一个文件添加到扩展的目录中,适当地命名它,并添加以下代码。
button {height: 30px;width: 30px;outline: none;margin: 10px;border: none;border-radius: 2px;
}button.current {box-shadow: 0 0 0 2px white,0 0 0 4px black;
}
工具栏图标的指定也包含在 action 的 default_icons 字段下。在这里下载图片文件,解压它,并将它放在扩展的目录中。更新 manifest ,使扩展知道如何使用图片。
{"name": "Getting Started Example","description": "Build an Extension!","version": "1.0","manifest_version": 3,"background": {"service_worker": "background.js"},"permissions": ["storage"],"action": {"default_popup": "popup.html",
+   "default_icon": {
+     "16": "/images/get_started16.png",
+     "32": "/images/get_started32.png",
+     "48": "/images/get_started48.png",
+     "128": "/images/get_started128.png"
+   }}
}
扩展还可以在扩展管理页、权限警告和 favicon 上显示图像。这些图像在 manifest 的 icons 字段下指定。
{"name": "Getting Started Example","description": "Build an Extension!","version": "1.0","manifest_version": 3,"background": {"service_worker": "background.js"},"permissions": ["storage"],"action": {"default_popup": "popup.html","default_icon": {"16": "/images/get_started16.png","32": "/images/get_started32.png","48": "/images/get_started48.png","128": "/images/get_started128.png"}},
+ "icons": {
+   "16": "/images/get_started16.png",
+   "32": "/images/get_started32.png",
+   "48": "/images/get_started48.png",
+   "128": "/images/get_started128.png"
+ }
}
如果在此阶段重新加载扩展,它将包含提供的图标而不是默认占位符,单击该操作将打开一个带有默认颜色按钮的弹出窗口。
![]()
弹出 UI 的最后一步是向按钮添加颜色。在扩展目录中创建名 popup.js 的文件,并添加以下代码。
// Initialize button with user's preferred color
let changeColor = document.getElementById("changeColor");chrome.storage.sync.get("color", ({ color }) => {changeColor.style.backgroundColor = color;
});
这个代码从 popup.html 中抓取按钮,并从存储中请求颜色值。然后将颜色作为按钮的背景。在 popup.html 中添加一个指向 popup.js 脚本标签。
<!DOCTYPE html>
<html><head><link rel="stylesheet" href="button.css"></head><body><button id="changeColor"></button>
+   <script src="popup.js"></script></body>
</html>
重新加载扩展查看绿色按钮。
逻辑层
扩展现在有一个自定义图标和一个弹出窗口,它根据保存到扩展存储中的值为弹出窗口按钮着色。接下来,它需要进一步的用户交互逻辑。在 popup.js 文件末尾添加以下内容 。
// When the button is clicked, inject setPageBackgroundColor into current page
changeColor.addEventListener("click", async () => {let [tab] = await chrome.tabs.query({ active: true, currentWindow: true });chrome.scripting.executeScript({target: { tabId: tab.id },function: setPageBackgroundColor,});
});// The body of this function will be executed as a content script inside the
// current page
function setPageBackgroundColor() {chrome.storage.sync.get("color", ({ color }) => {document.body.style.backgroundColor = color;});
}
更新后的代码向按钮添加了一个 click 事件监听器,该监听器触发一个以编程方式注入的内容脚本。这将使页面的背景色与按钮的颜色相同。使用编程注入允许用户调用内容脚本,而不是将不需要的代码自动插入网页。
manifest 将需要 activeTab 权限来允许扩展临时访问当前页,并且需要 scripting 权限来使用脚本 API 的 executeScript 方法。
{"name": "Getting Started Example",...
+ "permissions": ["storage", "activeTab", "scripting"],...
}
扩展现在功能完成了!重新加载扩展,刷新此页面,打开弹出窗口并单击按钮将其变为绿色!但是,有些用户可能希望将背景更改为不同的颜色。
为用户提供选项
该扩展目前只允许用户将背景更改为绿色。包含一个选项页面可以让用户更好地控制扩展的功能,进一步定制他们的浏览体验。
首先在目录创建一个名 options.html 的文件并包含以下代码。
<!DOCTYPE html>
<html><head><link rel="stylesheet" href="button.css"></head><body><div id="buttonDiv"></div><div><p>Choose a different background color!</p></div></body><script src="options.js"></script>
</html>
在 manifest 中登记选项页面。
{"name": "Getting Started Example",...
+ "options_page": "options.html"
}
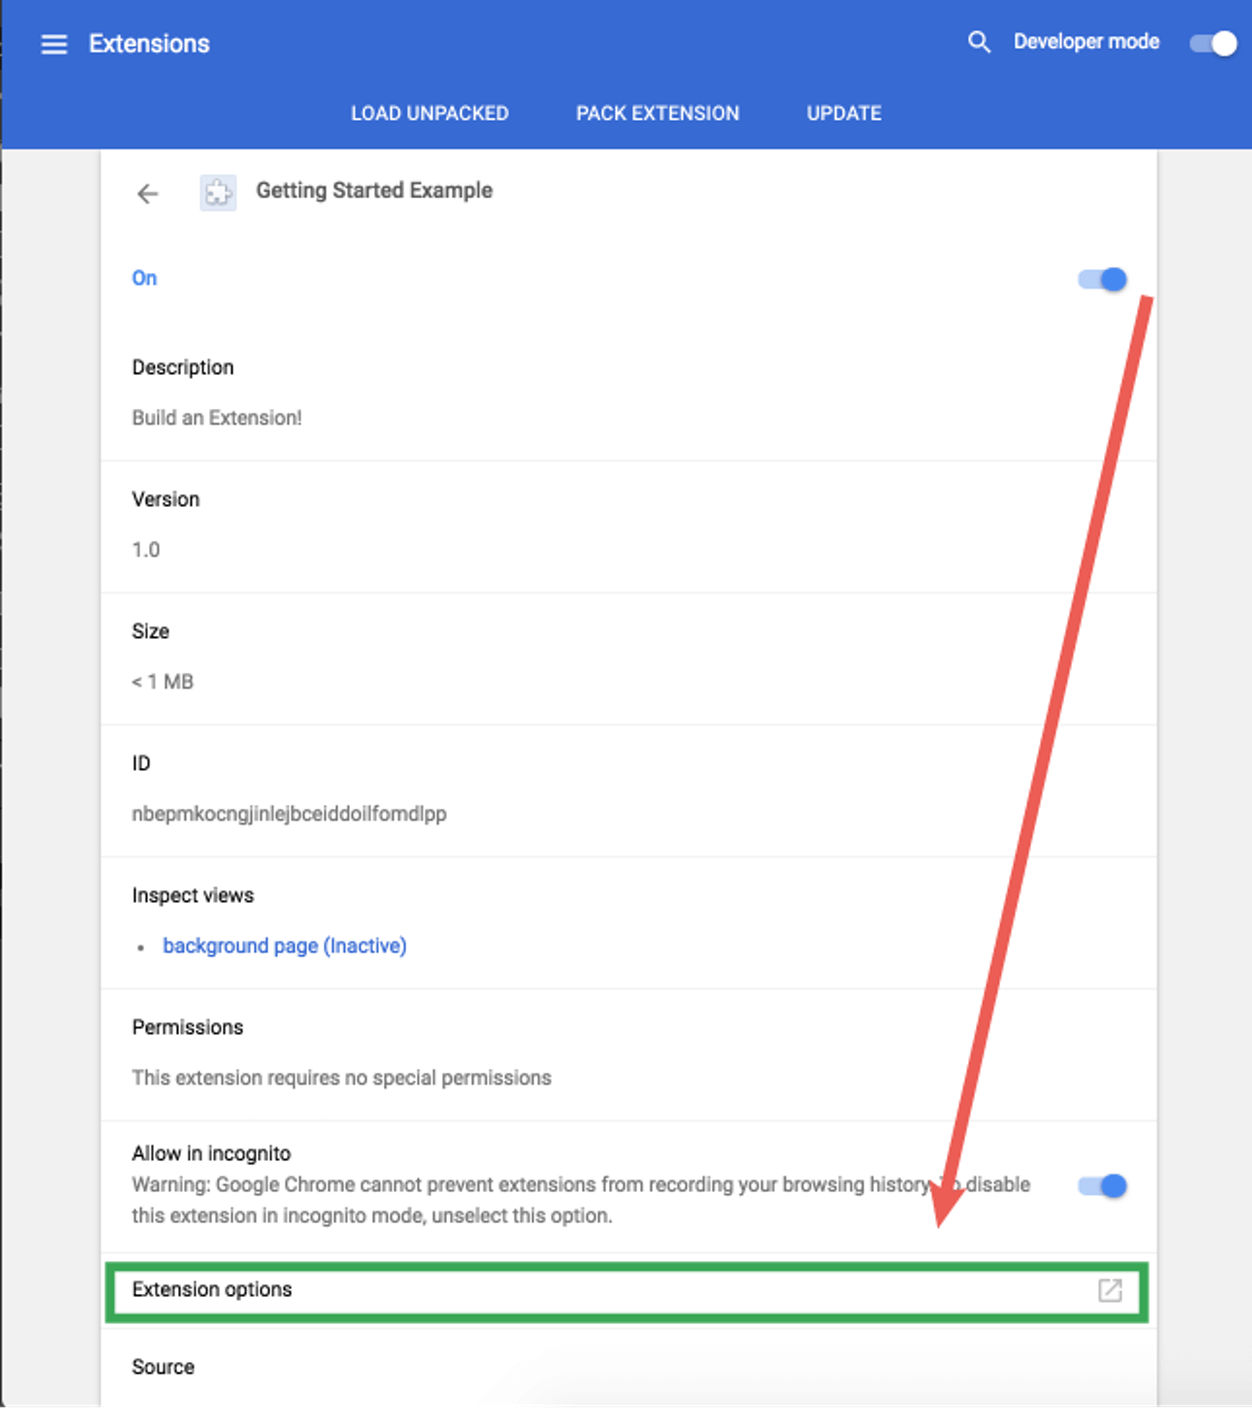
重新加载并点击 DETAILS 。
向下滚动详情页面并选择 Extension options 以查看选项页面。
最后一步是添加选项逻辑。在扩展的目录中创建一个名为 options.js 的文件并添加以下代码。
let page = document.getElementById("buttonDiv");
let selectedClassName = "current";
const presetButtonColors = ["#3aa757", "#e8453c", "#f9bb2d", "#4688f1"];// Reacts to a button click by marking the selected button and saving
// the selection
function handleButtonClick(event) {// Remove styling from the previously selected colorlet current = event.target.parentElement.querySelector(`.${selectedClassName}`);if (current && current !== event.target) {current.classList.remove(selectedClassName);}// Mark the button as selectedlet color = event.target.dataset.color;event.target.classList.add(selectedClassName);chrome.storage.sync.set({ color });
}// Add a button to the page for each supplied color
function constructOptions(buttonColors) {chrome.storage.sync.get("color", (data) => {let currentColor = data.color;// For each color we were provided…for (let buttonColor of buttonColors) {// …create a button with that color…let button = document.createElement("button");button.dataset.color = buttonColor;button.style.backgroundColor = buttonColor;// …mark the currently selected color…if (buttonColor === currentColor) {button.classList.add(selectedClassName);}// …and register a listener for when that button is clickedbutton.addEventListener("click", handleButtonClick);page.appendChild(button);}});
}// Initialize the page by constructing the color options
constructOptions(presetButtonColors);
提供四种颜色选项,然后在选项页上生成带有 onclick 事件侦听器的按钮。当用户单击按钮时,它会更新扩展存储中的颜色值。由于扩展的所有文件都从该存储中提取颜色信息,因此不需要更新其它值。
下一步
祝贺!这个目录现在拥有一个功能完整的 Chrome 扩展,尽管它过于简单。
下一步呢?
- Chrome Extension Overview 提供了一些支持,并填充了很多关于扩展架构的细节,以及一些开发人员希望熟悉的特定概念。
- 在 debugging tutorial 中了解可用于调试扩展的选项。
- Chrome 扩展可以访问强大的 API ,而不仅仅是开放 web 上的 API。chrome.*API 文档介绍了所有的 API 。
- developer’s guide 中有几十个关于创建高级扩展的相关文档附加链接。
参考资料
- Chrome Extensions : Getting started
【译】Chrome 扩展 : 入门相关推荐
- 【译】Chrome 扩展 : 扩展是什么?
引子 按照 Chrome 扩展 : 欢迎中的引导,接触到的相关介绍. 原文:What are extensions? 版本:Last updated: Friday, March 12, 2021 源 ...
- chrome扩展插件二:chrome插件开发入门
一个扩展插件由不同的组件构成.组件包括backgroud script.content script.选项页.ui元素及其它逻辑文件.插件的开发技术包括HTML,CSS及javascript.扩展插件 ...
- WEB之浏览器使用入门--chrome扩展插件安装及好用的扩展插件小集合
chrome插件 chrome本身是浏览器,提供最基本的谷歌提供的浏览器相关的功能.但是仅仅有基本的chrome本体在很多时候使用还是会感到力不从心,对浏览器本身通过安装一些常用的扩展(extenti ...
- 【资讯】1177- 速看!2021 年 Google 最热门 Chrome 扩展程序名单出炉!
技术编辑:MissD丨发自 思否编辑部 公众号:SegmentFault 文章地址:https://mp.weixin.qq.com/s/uSNnmMLOv6NNu7yJtJ1vyg 近日,谷歌公布了 ...
- chrome扩展官方文档(中文版)—— 开始
传送门:chrome扩展官方文档(中文版) 原文地址:Welcome 欢迎 了解如何为 Chrome 开发扩展 2020 年 11 月 9 日,星期一发布 这些页面包含想要创建 Chrome 浏览器扩 ...
- chrome插件开发入门教程
点击上方蓝字"优派编程"选择"加为星标",第一时间关注原创干货 原文地址 http://wp.fang1688.cn/study/539.html 这次我在ch ...
- chrome扩展crx构建_如何构建您的第一个Chrome扩展程序
chrome扩展crx构建 "Sit up straight!" my mom used to yell at me when I am fixated on my laptop ...
- 使用libFuzzer fuzz Chrome V8入门指南
本文讲的是使用libFuzzer fuzz Chrome V8入门指南, 什么是V8? V8(也称为Chrome V8)是由Chromium Project开发的用于Google Chrome浏览器 ...
- chrome扩展推荐:有我,你又省了一个ssh客户端 --- Secure Shell
严格上说这并不是一个扩展,而是一个chrome的应用,它比扩展能实现的东东更多,是个可以单独运行的application. 还是先上图,然后再说话. 和现在阿里云和腾讯云的web控制台差不多,是一个s ...
最新文章
- Putty 工具 保存配置的 小技巧
- 【ACM】杭电OJ 2063
- 中provide的用法_英语词法:中考动词用法系统梳理下
- Webpack按需加载秒开应用
- Java-小技巧-004-jdk时间,jdk8时间,joda,calendar,获取当前时间前一周、前一月、前一年的时间...
- 欢乐纪中某B组赛【2019.1.29】
- 罗技 连点 脚本_罗技推出多款《英雄联盟》联名外设 看了就忍不住想要
- vc编译器编译linux平台拷贝的源码问题
- java 线程的销毁_Java如何检查线程组是否已被销毁?
- python字典没有长度限制_python-字典更新序列元素#0的长度为15; 2个为必填项
- wxpython2.8_wxPython 2.8 Application Development Cookbook英文pdf版
- [排错] Status error 2850
- PyTorch:tensor-基本操作
- Pytorch各种损失函数
- Beini FeedingBottle[小巧的无线密码破解系统]
- db2 jdbc驱动参数_db2的jdbc驱动安装及例子
- 笛卡尔心形函数表达式_如何用几何画板画笛卡尔心形函数
- 计算机网络计算1g等于多少MB,1g是多少mb(1g等于多少兆)
- ln: ‘ ‘: hard link not allowed for directory
- 《周一清晨的领导课》--司机与乘客 - [读书笔记]