构建开发环境 构建demo_构建自己的wotsapp第1部分
构建开发环境 构建demo
I should start this article with a disclaimer: It is based on iOS 13, Swift 5, and Xcode 11.x. If you’re reading this and those numbers look dated, be forewarned.
我应该以免责声明开头:它基于iOS 13,Swift 5和Xcode11.x。 如果您正在阅读本文,并且那些数字看起来过时,请提前警告。
I should also warn you that notifications—principally remote ones—involve Apple’s infrastructure, which means you will need an Apple Developer account to use them. Of course, you also need one to use CloudKit.
我还应该警告您,通知(主要是远程通知)涉及Apple的基础架构,这意味着您将需要Apple Developer帐户才能使用它们。 当然,您还需要使用CloudKit。
Finally, this is going to be a series. You won’t be building your own WotsApp in 20 minutes. I’m going to be flying by the seat my pants mostly. It will take at least ten chapters, with this article covering the first two.
最后,这将是一个系列。 您将不会在20分钟内构建自己的WotsApp。 我主要是要坐在我的裤子旁边的座位上。 至少需要十章,本文涵盖了前两章。
Let’s get down to business. You can find quite a few articles on coding notifications under Swift, although you’ll soon discover that they’re all incomplete. No, I kid you not. In my view, they’re incomplete because they’re missing a chapter explaining how to post remote notifications under iOS. I have never come across a tutorial that discusses how to post notifications in Swift. They all tell you to use third-party utilities. So I investigated the subject and wrote my own.
让我们转到工作上。 您可以在Swift下找到很多关于编码通知的文章,尽管您很快就会发现它们都不完整。 不,我不骗你。 在我看来,它们是不完整的,因为它们缺少一章来解释如何在iOS下发布远程通知。 我从未见过讨论如何在Swift中发布通知的教程。 它们都告诉您使用第三方实用程序。 因此,我调查了主题并写了自己的主题。
Is it a missing link or a conspiracy? Regardless, I’m going to try and cover the whole story as I describe how to build your own WhatsApp app with it.
是缺少联系还是阴谋? 无论如何,在描述如何使用它构建自己的WhatsApp应用程序时,我将尝试覆盖整个故事。
第1章 (Chapter 1)
So what are notifications? Well, they come in two flavors: local and remote. You create and post local notifications in the same app. Remote notifications are created on a server or second iOS device and sent to the same and/or another iOS device. They are very special pieces in the iOS armory because they can run both in the foreground and the background.
那么什么是通知? 好吧,它们有两种风格:本地和远程。 您可以在同一应用中创建和发布本地通知。 远程通知是在服务器或第二台iOS设备上创建的,并发送到同一台和/或另一台iOS设备。 它们在iOS军械库中是非常特别的作品,因为它们既可以在前台也可以在后台运行。
There are several types of notifications under iOS 13. The important ones are alerts, badges, and sounds. We will explore what they all do in code.
iOS 13下有几种类型的通知。重要的是警报,徽章和声音。 我们将探讨它们在代码中的作用。
Local notifications, although not guaranteed, will almost always arrive. Remote notifications are inherently less reliable. Local notifications also have no limitations in numbers, but remote ones do. One aspect that they both have in common is linked to duplicates. By default, they’ll never arrive. So if you send the same notification twice, it will only show once.
本地通知尽管不能保证,但几乎总是会到达。 远程通知本质上不太可靠。 本地通知的数量也没有限制,但是远程通知有。 它们共同的一个方面是链接到重复项。 默认情况下,它们永远不会到达。 因此,如果您发送两次相同的通知,则只会显示一次。
Enough theory already. Let’s start by creating a new application. I am going to call it WotsApp. You should use SwiftUI too since I am going to. We start with permissions, of course, which come in two levels. At the top, you can enable/disable all notifications. One level down, you can differentiate between the types.
理论已经足够了。 让我们开始创建一个新的应用程序。 我将其称为WotsApp。 您也应该使用SwiftUI,因为我将要使用。 当然,我们从权限开始,分为两个级别。 在顶部,您可以启用/禁用所有通知。 向下一层,您可以区分两种类型。
OK, the first thing we need to do in our code is to ask permission to use notifications. Open your AppDelegate and create an extension to it. Make it a delegate of UNUserNotificationCenterDelegate.
好的,我们需要在代码中做的第一件事就是征求使用通知的许可。 打开您的AppDelegate并为其创建扩展。 使它成为UNUserNotificationCenterDelegate的委托。
Add this code and make sure you call it from your didFinishLaunchingWithOptions method.
添加此代码,并确保您从didFinishLaunchingWithOptions方法调用它。
Next, create a new class and call it LocalNotification.swift. Add this code to it:
接下来,创建一个新类,并将其LocalNotification.swift 。 将此代码添加到它:
This creates a basic local notification object and then posts it to the local device using a simple timing trigger of four seconds in our case. To call it, we need to move over to our ContentView.swift file and add this code:
这将创建一个基本的本地通知对象,然后使用本例中的四秒钟的简单定时触发器将其发布到本地设备。 要调用它,我们需要移到ContentView.swift文件并添加以下代码:
This will create a button that you can press to fire your local notification. Run and compile it and see what happens.
这将创建一个按钮,您可以按该按钮来触发本地通知。 运行并编译它,看看会发生什么。
What? Nothing happened. What did you do wrong?
什么? 什么都没有发生。 你做错了什么?
Nothing. This iOS behavior is intentional. Notifications are not intended to be things that you bring up while your app is in the foreground, and they won’t appear by default. You need to make another change to your AppDelegate.swift extension to see it fire. Add this code to it:
没有。 这种iOS行为是故意的。 通知并不是要在您的应用程序处于前台状态时显示的内容,默认情况下不会显示。 您需要对AppDelegate.swift扩展名进行另一处更改,以使其启动。 将此代码添加到它:
Compile and run it again. It should work like a charm this time.
编译并再次运行。 这次它应该像魅力一样工作。
OK, so you have local notifications working. That’s a good start. But wait… what we need are remote notifications. These are notifications that are fired via a server or maybe another iOS device. How do they work?
确定,因此您可以使用本地通知。 这是一个好的开始。 但是等等……我们需要的是远程通知。 这些是通过服务器或其他iOS设备触发的通知。 它们如何工作?
Firstly, you need to get permission to show notifications—the same permission that you need for local ones, so you can tick that box. The next step for remote notifications is to get the ID of the device you’re running on. You need this to tell Apple where it needs to send remote notifications. You can start the ball rolling with this code that you’ll need to add to your appDelegate.swift:
首先,您需要获得显示通知的权限-与本地通知相同的权限,因此可以在该框中打勾。 远程通知的下一步是获取您正在运行的设备的ID。 您需要这样做来告诉Apple它需要在哪里发送远程通知。 您可以使用添加到appDelegate.swift以下代码开始滚动:
This will produce a 64-character string that identifies your device to Apple for notifications. But be warned: If you delete and reinstall your app, it will be a different 64-character string. The second point of caution that I discovered while writing this app is that Apple has moved the goalposts on this. So this will work on iOS 13, but I never tested it on iOS 12 and it may break on iOS 14. Check with Stack Overflow, which is always an excellent source to figure these sorts of things out.
这将产生一个64个字符的字符串,用于向Apple标识您的设备以进行通知。 但请注意:如果您删除并重新安装您的应用程序,它将是一个不同的64个字符的字符串。 我在编写此应用程序时发现的第二点警告是,苹果已将其上的球门柱移开了。 因此,这将在iOS 13上运行,但我从未在iOS 12上对其进行过测试,并且可能会在iOS 14上崩溃。
But before you try it, you need to add the capability to receive push notifications. Click on the target of your Xcode project, move across to Signing and Capabilities, and add (with the plus sign next to the word “Capabilities”) Push notifications.
但是在尝试之前,您需要添加接收推送通知的功能。 单击您的Xcode项目的目标,移至“签名和功能”,然后添加(在“功能”一词旁边加上加号)推送通知。
Once done, you can compile and run the project. This time, you should get a 64-character hexadecimal code in the console. OK, this is where most guides cop out by telling you to download an app to test it. I’m not going to do that. We’re all programmers here. We want code—not to use other people’s apps.
完成后,您可以编译并运行项目。 这次,您应该在控制台中获得64个字符的十六进制代码。 好的,这是大多数指南中告诉您下载应用程序进行测试的地方。 我不会那样做。 我们都是程序员。 我们需要代码,而不要使用其他人的应用程序。
第2章 (Chapter 2)
Now you need to test that hex you got. We need to start by logging into your Apple account and getting a private key that you’ll be using as part of your request to post notifications. Open a web browser and sign in to your Apple Developer account. On the Overview page, you’ll see the tab we’re after called Certificates, Identifiers & Profiles.
现在,您需要测试您得到的十六进制。 首先,我们需要登录您的Apple帐户并获取一个私钥,您将在请求中使用私钥来发布通知。 打开网络浏览器并登录到您的Apple Developer帐户。 在“概述”页面上,您将看到名为“证书,标识符和配置文件”的标签。
Click on it and then click on the item called Keys in the left-hand tab. Once there, you can click on the white plus in the blue circle. You should find yourself looking at a configuration screen that looks much like this. Note that you can only create two APNS-type keys, so use them wisely.
单击它,然后单击左侧选项卡中名为“键”的项目。 到达那里后,您可以单击蓝色圆圈中的白色加号。 您应该会发现自己看起来像这样的配置屏幕。 请注意,您只能创建两个APNS类型的密钥,因此请明智地使用它们。
Click on Register and wait a moment. Having registered it, take special note of the Key ID that will appear on the page. You’ll need it later.
单击注册,稍等片刻。 注册后,请特别注意将显示在页面上的密钥ID。 稍后您将需要它。
OK, now download your signature. It will be contained in a file with a .p8 extension. None of the apps on a standard OS X understand what a .p8 file is and you will not be able to open it normally. But we’re winging it here and I need the contents of the .p8 to move forward. Go to Downloads, right-click the file, and open it with the TextEdit app. No, it isn’t a recommended app to open .p8 files. You’ll have to force its hand. Of course, if you’re a really old-fashioned guy like me, you can use something like the vi editor in the terminal app to open it too.
好的,现在下载您的签名。 它将包含在扩展名为.p8的文件中。 标准OS X上的所有应用程序都无法识别.p8文件是什么,您将无法正常打开它。 但是我们在这里使用它,我需要.p8的内容才能继续前进。 转到下载,右键单击文件,然后使用TextEdit应用程序将其打开。 不,不建议您打开.p8文件。 您将不得不用力。 当然,如果您是像我这样的老派人物,则也可以在终端应用程序中使用诸如vi编辑器之类的工具来打开它。
Once you open it, you see contents like this.
打开它后,您将看到类似的内容。
-----BEGIN PRIVATE KEY-----MIGTAgVAMBMGByqGSM49AgEGCCqGSM49AwEHBHkwdwIBAQQgl8Kij2y6acAgp1FZBHqI6T/Bv4bBgndxuVr1IfuYhemgBgYIKoZIzj0DAQehRANCAASweAt5jGR5H1VfQmlPyVVa2hn8jPLxdg0wHyP/xpXbJ5kGunlkXomLh8k+d31tWKKQF2QTzPCzckyip0aHWAWG-----END PRIVATE KEY-----This is the secret private key that you’ll use to encrypt messages you send to Apple. OK, back to coding. Reopen your WotsApp project and create another class called RemoteNotifications.swift. Add the two pieces of data we just extracted to it:
这是秘密私钥,将用于加密发送给Apple的消息。 好,回到编码。 重新打开WotsApp项目并创建另一个名为RemoteNotifications.swift类。 将我们刚刚提取的两个数据添加到其中:
Yes, that is three quotes. You’ll need the whole shebang. Now on to what I think some readers may find the scariest part. We’re going to need a third-party library to do this. The library we’re after was written by IBM. Google “swift jwt library.” You should come back with this link. Click on the link and you should find yourself within GitHub looking at this repository:
是的,那是三个引号。 您将需要整个shebang。 现在我想一些读者可能会发现最可怕的部分。 我们将需要第三方库来执行此操作。 我们需要的库是由IBM编写的。 谷歌“ swift jwt库”。 您应该返回此链接 。 单击链接,您将在GitHub中查看此存储库:
Copy the URL and move back to the Xcode project. Click on the blue PROJECT icon and then the Swift Packages tab.
复制URL并移回Xcode项目。 单击蓝色的PROJECT图标,然后单击Swift Packages选项卡。
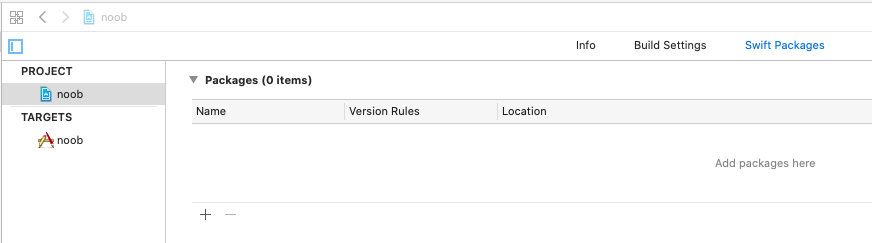
Click on the + and paste the name of the IBM-Swift/Swift-JWT package in the dialog box that will come up.
单击+,然后在将出现的对话框中粘贴IBM-Swift / Swift-JWT软件包的名称。

Click next, wait, and watch it verify everything. Finally, click on the Finish button.
单击下一步,等待,然后观看它验证所有内容。 最后,单击完成按钮。
Assuming it all worked like clockwork, your project should now include the SwiftJWT library. Go back to the RemoteNotifications class and import your new library. Compile it just to check that everything worked. You should get no errors. Don’t worry, that was the most nerve-racking part. Now it should be all smooth sailing.
假设所有工作都像发条一样,您的项目现在应该包含SwiftJWT库。 返回到RemoteNotifications类并导入新库。 编译它只是为了检查一切是否正常。 您应该不会出错。 不用担心,这是最令人费解的部分。 现在应该一切顺利。
The next step is to create a payload we can post to the Apple Notification server. A JSON payload. Here’s one for your project:
下一步是创建可发布到Apple Notification Server的有效负载。 JSON有效负载。 这是您的项目之一:
Yes, it is another magic number of sorts we’re adding. Don’t worry, I am just doing this to get things going. Now for good measure, to make sure you didn’t mistype anything here, add this code to your RemoteNotification class:private var jsonObject: [String: Any] = ["aps":["badge":2,"category":"mycategory","alert":["title":"What, where, who, when, how","body":"You must be kidding"]]]Create an instance of your RemoteNotification class in the ContentView.swift—as you did with the LocalNotification class—and run it just to make sure everything is in order. You can create a second button for it too. You should get a message in the console confirming that your JSON nugget is valid:
就像在LocalNotification类中所做的那样,在ContentView.swift创建RemoteNotification类的实例,然后运行它以确保一切正常。 您也可以为其创建第二个按钮。 您应该在控制台中收到一条消息,确认您的JSON块有效:
Now you’re ready to use the IBM library. Define two of the three parts that make up a JSON Web Token by adding this code to your RemoteNotification.swift postNotification method:
现在,您可以使用IBM库了。 通过将此代码添加到RemoteNotification.swift postNotification方法中,定义构成JSON Web令牌的三个部分中的两个:
There are two fields here that need different values to the code shown. kid: is Key ID of your private key, which we described earlier. And the iss: attribute is your team ID that you should be able to find under the Apple account membership page.
这里有两个字段需要与所示代码不同的值。 kid:是您的私钥的密钥ID,我们之前已经介绍过。 iss:属性是您的团队ID,您应该可以在Apple帐户成员资格页面下找到该ID。
Having defined the first two parts, you now need to use your private key to build the third part. That is your JSON Web Token.
定义了前两部分后,您现在需要使用私钥来构建第三部分。 那就是您的JSON Web令牌。
The final step in this puzzle is to make a call to the APNS service at Apple. A few additional notes:
这个难题的最后一步是致电Apple的APNS服务。 一些其他注意事项:
- The URL shown in the code is for the sandbox. You need to use a slightly different one for production.代码中显示的URL用于沙箱。 您需要使用稍有不同的产品进行生产。
- The token mentioned here is that 64-character string we fetched when we registered our device with Apple in chapter 1.这里提到的令牌是在第一章中向Apple注册设备时获取的64个字符的字符串。
The
apns-topicis the bundle identifier of your project and thejwtStringis the JSON Web Token we just built.apns-topic是项目的捆绑包标识符,而jwtString是我们刚刚构建的JSON Web令牌。
Compile it and resolve the errors for homework. OK, I’m kidding. There should be only one error—the need to make the RemoteNotifications class a URLSessionDelegate. The final piece of this code:
编译它并解决作业中的错误。 好,我在开玩笑。 应该只有一个错误-需要使RemoteNotifications类成为URLSessionDelegate 。 该代码的最后一部分:
class PostController: NSObject,URLSessionDelegate {All you need to do now is call your new RemoteNotification class from your SwiftUI interface. The code shown below is for completeness:
您现在需要做的就是从SwiftUI界面调用新的RemoteNotification类。 下面显示的代码是出于完整性考虑:
Run the app on a real device and press the remote button. You should get a notification that looks like this:
在真实设备上运行该应用,然后按远程按钮。 您应该收到如下所示的通知:
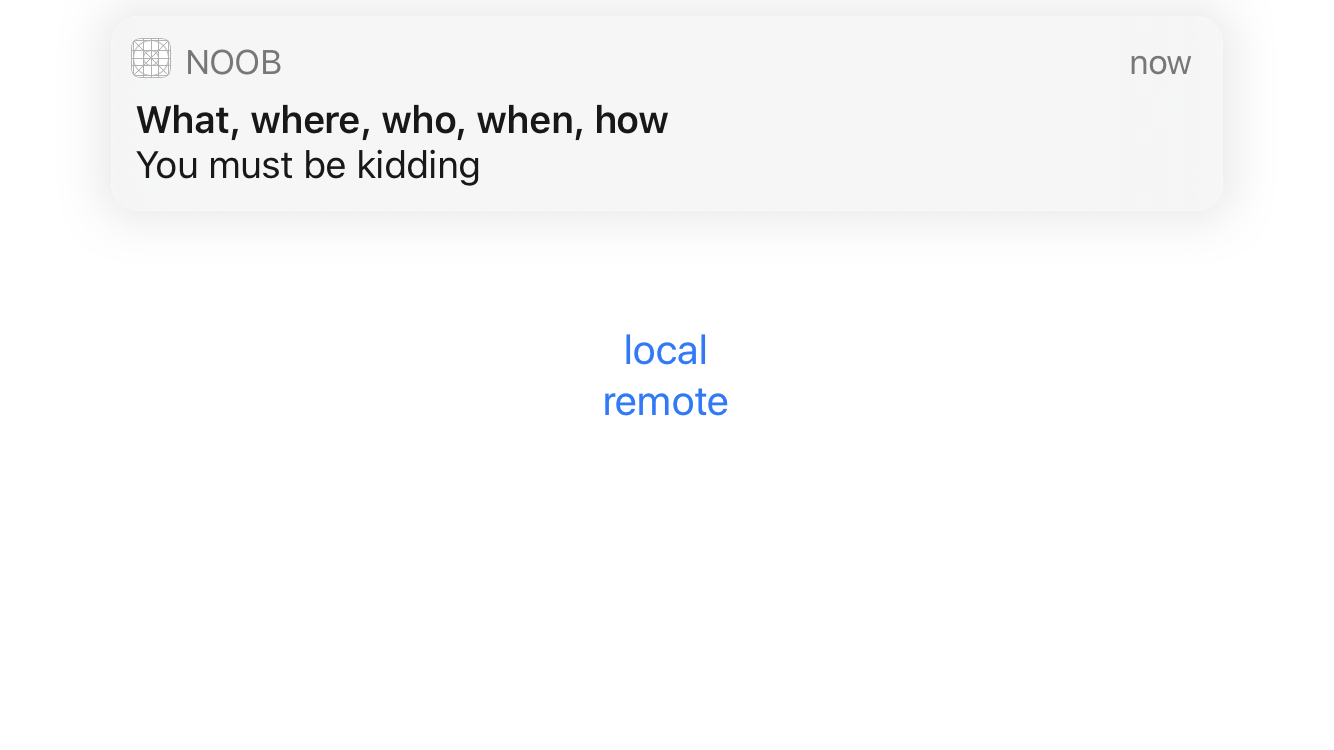
Obviously, the notification won’t be from Noob. It’ll be from WotsApp. Just in case something went wrong and you didn’t get that magical 200 Success error code back when you posted it, here’s a table to help you debug what you got:
显然,通知不会来自Noob。 它将来自WotsApp。 万一出了什么问题,并且在发布时没有得到神奇的200 Success错误代码,请使用下表帮助您调试所得到的内容:
- 200 — Success.200-成功。
- 400 — Bad request.400-错误的请求。
- 403 — There was an error with the certificate or with the provider authentication token.403 —证书或提供者身份验证令牌出错。
405 — The request used a bad
:methodvalue. Only POST requests are supported.405 —请求使用了错误的
:method值。 仅支持POST请求。- 410 — The device token is no longer active for the topic.410-该主题的设备令牌不再有效。
- 413 — The notification payload was too large.413 —通知有效负载太大。
- 429 — The server received too many requests for the same device token.429-服务器收到了太多有关同一设备令牌的请求。
- 500 — Internal server error.500内部服务器错误。
- 503 — The server is shutting down and unavailable.503 —服务器正在关闭并且不可用。
结论 (Conclusion)
I am going to post Chapter 3 in the coming days. We have lots to do to bring this WotsApp up to production. Read on.
我将在未来几天发布第3章。 为了使此WotsApp投入生产,我们还有很多工作要做。 继续阅读。
翻译自: https://medium.com/better-programming/build-your-own-wotsapp-part-1-1275abba645f
构建开发环境 构建demo
http://www.taodudu.cc/news/show-7071197.html
相关文章:
- [转载]理解PYTHON中的装饰器
- [python-flask笔记1]python加载配置的五种方式
- Python命令行创建工具包——Click(1)
- Cheating Engine
- 用按键精灵理解线程和进程
- 如何查找相关资料
- 学习相关资料
- 其他参考资料
- 数据库相关的资料
- 网站资料
- 资料网站~~
- 相关资料站点
- 常用资料
- 网络相关资料与问题
- 一些相关资料
- 资料大全
- ChatGPT 相关资料收集
- C语言快速入门和相关资料
- 工程招标书模板
- 抖音 快手 视频号算法机制对比
- 视频号、抖音、快手各侧重的是哪方面,有什么不同?
- 疫情之下,如何靠抖音和快手自救?
- 全新抖音快手微信取图小程序 壁纸小程序源码 全开源
- 同种产品分析报告(抖音和快手)
- c/c++游戏编程之扫雷
- C# 扫雷
- windows api 扫雷游戏
- C++桌面程序 扫雷教学
- 扫雷-c#
- 2015年上半年信息系统项目管理师上午真题及答案
构建开发环境 构建demo_构建自己的wotsapp第1部分相关推荐
- 构建开发环境 构建demo_构建自己的wotsapp第6部分
构建开发环境 构建demo I should start this article with a disclaimer: It is based on iOS 13, Swift 5, and Xco ...
- 构建开发环境 构建demo_科技构建了我们的现实
构建开发环境 构建demo 重点 (Top highlight) What Stories Are True in Your Universe? Examining the words of the ...
- Lightly 自动构建开发环境
对一般的编辑器或集成开发环境而言,由于系统不同以及依赖出现差异,许多人往往面临开发好的项目在部署或协作时,面临功能失常的情况. 通常,构建开发环境耗时长达数小时.以团队协作为例,项目组加入新成员时,往 ...
- 利用Docker构建开发环境
最近接触PAAS相关的知识,在研发过程中开始使用Docker搭建了自己完整的开发环境,感觉生活在PAAS时代的程序员真是幸福,本文会简要介绍下Docker是什么,如何利用Docker来搭建自己的开发环 ...
- 生死簿后台管理系统(一)——使用Docker构建开发环境
最近有个段子非常火,说有个程序员梦见自己被阎王召见,让他帮忙开发一个后台管理系统.在一笑而过之后,我觉得如果要是能把这个系统做出来,应该颇具娱乐性,也顺便了解一下高并发以及大数据的相关技术--每天要上 ...
- iPhone Three20软件引擎之构建开发环境与HelloWorld
1:原文摘自:http://blog.csdn.net/xys289187120/article/details/7017432 雨松MOMO原创文章如转载,请注明:转载自雨松MOMO的博客原文地址: ...
- java手机游戏开发如何_用JAVA开发手机游戏需要如何构建开发环境?
使用NetBeans进行J2ME开发 1.首先安装jdk-6-windows-i586.exe软件,路径假设为D:\java\jdk1.6.0. 安装过程系统会自动再安装一个虚拟环境路程:D:\jav ...
- 构建JSE 开发环境(图文并茂)
前言 学习 Java 程序设计,同样需要方便易用的开发工具.Java 的开发工具很多,而且各有优缺点,初学者往往不知道有哪些常用的开发工具,或者由于面临的选择比较多而产生困惑. 要建立 Java 开发 ...
- XamarinForms教程构建XamarinForms开发环境
构建XamarinForms开发环境 所谓Xamarin.Forms的开发环境,就是指在基本硬件和数字软件的基础上,为支持系统软件和应用软件的工程化开发和维护而使用的一组软件,简称SDE.对于任何的程 ...
最新文章
- 学界 |《nature》杂志:我们有义务搞懂我们所创造出来的技术
- gRPC学习记录(六)--客户端连接池
- ThinkPad紧凑型蓝牙键盘(0B47189)鼠标滚轮用法,F1到F12功能键的功能切换以及其他技巧
- UVa12166 Equilibrium Mobile修改天平(二叉树+dfs)
- 图深度学习前沿工作汇总与解析
- java 僵尸进程_Linux 僵尸进程
- LGBM分类模型预测
- docker 网络设置
- 暗藏 15 年,Linux 惊曝 3 大 Bug 直取 root 权限!
- html如何动态添加样式表,JavaScript动态插入CSS的方法
- 贝叶斯网络、马尔可夫模型、马尔可夫过程、马尔可夫链、马尔可夫网络基本概念
- 16/4/4二代支付硬盘故障处理
- 软件工程之结构化方法
- 简述linux操作系统的功能是什么,什么是Linux操作系统及其功能
- 10计算机管理员权限获得,Win10永久获取管理员权限的方法
- 向量维数与向量空间维数的区别
- Windows10更新后耳机没声音
- json.loads与json.load的区别
- 关于校园霸凌,刚刚发生(第四天的进展)
- 服务器看门狗芯片电路图,SP706看门狗芯片SP706应用电路图.pdf