基于RabbitMQ RPC实现的主机异步管理
README:
1、需求
- [ ] 利用RibbitMQ进行数据交互
- [ ] 可以对多台服务器进行批量操作
- [ ] 执行命令后不等待命令的执行结果,而是直接让输入下一条命令,结果出来后自动打印
- [ ] 实现异步操作备注- [ ] RabbitMQ队列:
                    ①执行命令时,队列名为“rpc_queue2”
                    ②查询数据时,用的是回调时随机生成的callback_queue名
                            ③conf/settings——Rabbitmq地址“192.168.17.102”,端口:5672,用户名:admin,密码:admin
- [ ] SSH:
                RPC_Server/server.py——paramiko操作连接的测试Linux默认端口22,用户名:root,密码:123456
- [ ] threading多线程:
                    实现命令执行后不等待执行结果,依然可以输入新的指令- [ ] 执行命令格式:
                 -->>run ifconfig host 192.168.20.22 192.168.20.23
                        dir     server端要执行的命令
                        host    host后可跟一个或多个可以通过rabbitMQ的服务器地址- [ ] 查看后台所有的TASK_ID信息:
                 -->>check_task
     显示结果样式:TASK_ID【76786】    HOST【192.168.20.22】    COMMAND【dir】
                  TASK_ID【10307】    HOST【192.168.20.23】    COMMAND【dir】- [ ] 查看TASK_ID对应的执行结果:
                 -->>get_task 10307
程序目录结构:
├── README.md
├── RPC_Client
│   ├── bin
│   │   ├── __init__.py
│   │   └── start.py  #客户端启动程序
│   ├── conf
│   │   ├── __init__.py
│   │   ├── __pycache__
│   │   │   ├── __init__.cpython-36.pyc
│   │   │   └── settings.cpython-36.pyc
│   │   └── settings.py
│   ├── core
│   │   ├── __init__.py
│   │   ├── main.py
│   │   └── __pycache__
│   │       ├── __init__.cpython-36.pyc
│   │       └── main.cpython-36.pyc
│   └── modules
│       ├── client.py
│       ├── __init__.py
│       └── __pycache__
│           ├── client.cpython-36.pyc
│           └── __init__.cpython-36.pyc
└── RPC_Server
    ├── conf
    │   ├── __pycache__
    │   │   └── settings.cpython-36.pyc
    │   └── settings.py
    └── server.py #server端启动程序程序启动:
    客户端启动:RPC_Client/bin/start.py
    服务端启动:RPC_Server/server.py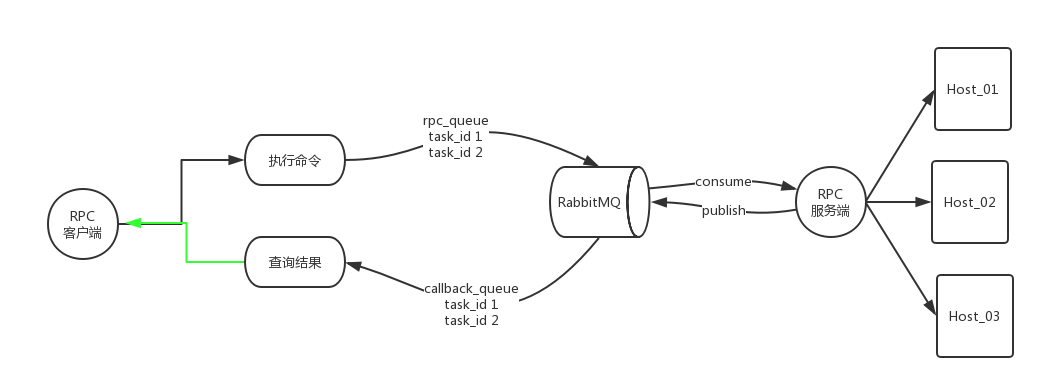
RPC 客户端bin目录start.py
import os,sys,platformif platform.system() == 'Windows':BASE_DIR = '\\'.join(os.path.abspath(os.path.dirname(__file__)).split('\\')[:-1])
else:BASE_DIR = '/'.join(os.path.abspath(os.path.dirname(__file__)).split('/')[:-1])sys.path.append(BASE_DIR)from core import mainif __name__ == "__main__":handle = main.Handle()handle.start()
RPC客户度conf目录 settings.py
import os,sys,platformif platform.system() == 'Windows':BASE_DIR = '\\'.join(os.path.abspath(os.path.dirname(__file__)).split('\\')[:-1])
else:BASE_DIR = '/'.join(os.path.abspath(os.path.dirname(__file__)).split('/')[:-1])sys.path.append(BASE_DIR)
RabbitmqHost = '192.168.17.102'
RabbitmqUser = 'admin'
RabbitmqPwd = 'admin'
credentails = pika.PlainCredentials(RabbitmqUser,RabbitmqPwd)
RPC客户端主程序core/main.py
import pika
import random
import threading
from modules import client
from conf import settingsclass Handle(object):def __init__(self):# 建立连接,指定服务器的ip地址self.connection = pika.BlockingConnection(pika.ConnectionParameters(host=settings.RabbitmqHost,credentials=settings.credentails))# 建立一个会话,每个channel代表一个会话任务self.channel = self.connection.channel()def run_cmd(self,cmd, host):rpc_client = client.Client(self.connection,self.channel)task_id = str(random.randint(1000,9999))  #生成4位的Correlation idresponse = rpc_client.call(cmd, host)self.corr_id = response[1]print('Task_ID',task_id)self.info[task_id] = [self.corr_id,host,cmd,response[0],response[1]]def start(self):self.info = {}  #task 返回任务信息字典help = '''命令格式执行系统命令:run command host  eg: run ls 10.10.0.10查看所有执行任务:check_task查看指定任务结果:get_task id eg:get_task 6723'''print(help)while True:msg = input(">> ").strip()if msg.startswith('run') and len(msg.split()) >= 3:cmd = msg.split()[1]#多线程运行th_join = []for host in msg.split()[2:]:th = threading.Thread(target=self.run_cmd,args=(cmd,host,))th.start()th_join.append(th)for t in th_join:t.join()elif msg == 'check_task':if not self.info:print("没有任务队列")continueelse:for taskid,task in self.info.items():print('TaskID [%s]     Host [%s]     COMMAND [%s]'%(taskid,task[1],task[2]))elif msg.startswith('get_task'):rpc_client = client.Client(self.connection,self.channel)if msg.split()[1] in self.info:task_id = msg.split()[1]callback_queue = self.info[task_id][3]correlation_id = self.info[task_id][4]task_result = rpc_client.get_task(callback_queue,correlation_id)del self.info[task_id]print(task_result.decode().strip())else:print('输入的task ID不存在!')continueelif not msg:continueelse:print('输入错误,请重新输入!')continue
RPC客户端modules
import pika
import random
import uuid
class Client(object):def __init__(self,connection,channel):self.connection = connectionself.channel = channel# 对回调队列中的响应进行处理的函数def on_response(self, ch, method, props, body):if self.correlation_id == props.correlation_id:self.response = bodych.basic_ack(delivery_tag=method.delivery_tag)def get_task(self,callback_queue,correlation_id):# 初始化 responseself.response = Noneself.correlation_id = correlation_id# 客户端订阅回调队列,当回调队列中有响应时,调用`on_response`方法对响应进行处理;self.channel.basic_consume(self.on_response,queue=callback_queue)while self.response is None:self.connection.process_data_events()return self.response# 发出RPC请求def call(self,cmd,host):# 声明回调队列,再次声明的原因是,服务器和客户端可能先后开启,该声明是幂等的,多次声明,但只生效一次result = self.channel.queue_declare(exclusive=True)# 将次队列指定为当前客户端的回调队列self.callback_queue = result.method.queuemsg = cmd + " " + "".join(host)self.corr_id = str(uuid.uuid4())#self.corr_id = corr_id# 发送RPC请求内容到RPC请求队列`rpc_queue`,同时发送的还有`reply_to`和`correlation_id`self.channel.basic_publish(exchange='',routing_key='rpc_queue2',properties=pika.BasicProperties(reply_to=self.callback_queue,correlation_id=self.corr_id,),body=msg)return self.callback_queue,self.corr_id
RPC服务器settings.py
RabbitmqHost = '192.168.17.102'
RabbitmqUser = 'admin'
RabbitmqPwd = 'admin'
credentails = pika.PlainCredentials(RabbitmqUser,RabbitmqPwd)
RPC服务端主程序:
#!/usr/bin/env python
import pika
import paramiko
import os,sys,platformif platform.system() == 'Windows':BASE_DIR = '\\'.join(os.path.abspath(os.path.dirname(__file__)).split('\\')[:-1])
else:BASE_DIR = '/'.join(os.path.abspath(os.path.dirname(__file__)).split('/')[:-1])sys.path.append(BASE_DIR)
from conf import  settings# 建立连接,服务器地址为localhost,可指定ip地址
connection = pika.BlockingConnection(pika.ConnectionParameters(host=settings.RabbitmqHost,credentials=settings.credentails))
# 建立会话
channel = connection.channel()# 声明RPC请求队列
channel.queue_declare(queue='rpc_queue2')# 数据处理方法
def exec_cmd(cmd,host):ssh = paramiko.SSHClient()ssh.set_missing_host_key_policy(paramiko.AutoAddPolicy())ssh.connect(hostname=host, port=22, username='root', password='123456',timeout=10)stdin, stdout, stderr = ssh.exec_command(cmd)stdout_result = stdout.read()stderr_result = stderr.read()result = stdout_result if stdout_result else stderr_resultreturn result.decode()ssh.close()# 对RPC请求队列中的请求进行处理
def on_request(ch, method, props, body):cmd = body.split()[0]host = body.split()[1]# 调用数据处理方法response = exec_cmd(cmd,host)# 将处理结果(响应)发送到回调队列ch.basic_publish(exchange='',routing_key=props.reply_to,properties=pika.BasicProperties(correlation_id = props.correlation_id),body=str(response))ch.basic_ack(delivery_tag=method.delivery_tag)channel.basic_consume(on_request, queue='rpc_queue2')
print(" [x] Awaiting RPC requests")
channel.start_consuming()基于RabbitMQ RPC实现的主机异步管理相关推荐
- 〖Demo〗-- 基于RabbitMQ rpc实现的主机管理
[基于RabbitMQ rpc实现的主机管理] 要求: 文件分布: 流程图: import pika import os import socketclass Server(object):def _ ...
- 基于RabbitMQ+XXLJob+EventBus的进件平台设计与实现
业务背景及需求 根据业务发展,需要一个进件平台,该平台提供统一的第三方渠道接入接口规范和公司内部业务系统接入规范,第三方渠道和公司内部业务系统根据接入规范接入到进件平台,进件申请由进件平台做相应处理后 ...
- 《Windows Server 2012 Hyper-V虚拟化管理实践》——3.2 Hyper-V主机日常管理
本节书摘来自异步社区<Windows Server 2012 Hyper-V虚拟化管理实践>一书中的第3章,第3.2节,作者: 王淑江 更多章节内容可以访问云栖社区"异步社区&q ...
- spring boot 事务_一个基于 RabbitMQ 的可复用的分布式事务消息架构方案!
作者:Throwable | https://www.cnblogs.com/throwable/p/12266806.html 前提 分布式事务是微服务实践中一个比较棘手的问题,在笔者所实施的微服务 ...
- SpringAMQP(基于RabbitMQ)知识点总结
文章目录 前言 一.Basic Queue 简单队列模型 1.1消息发送 1.2消息接收 1.3测试 二.WorkQueue 2.1消息发送 2.2消息接收 2.3测试 2.4能者多劳 2.5总结 三 ...
- 基于 RabbitMQ 的实时消息推送
博主新开公众号"不太灵光的程序员" , 关注公众号,每日八点有干货推送 1 实现服务器端推送的几种方式 Web 应用都是基于 HTTP 协议的请求/响应模式,无法像 TCP 协议那 ...
- NET Core微服务之路:自己动手实现Rpc服务框架,基于DotEasy.Rpc服务框架的介绍和集成...
原文:NET Core微服务之路:自己动手实现Rpc服务框架,基于DotEasy.Rpc服务框架的介绍和集成 本篇内容属于非实用性(拿来即用)介绍,如对框架设计没兴趣的朋友,请略过. 快一个月没有写博 ...
- 基于SCVMM对虚拟化服务器与虚拟机管理权限分配用户角色
基于SCVMM对虚拟化服务器与虚拟机管理权限 分配用户角色 随着云计算时代的来临,越来越多的企业已经将IT环境迁移到虚拟化环境中,那么企业如何来统一管理如此多的虚拟化主机与虚拟机,通过管理平台是否能实 ...
- ASP.NET Core Web API下事件驱动型架构的实现(三):基于RabbitMQ的事件总线
在上文中,我们讨论了事件处理器中对象生命周期的问题,在进入新的讨论之前,首先让我们总结一下,我们已经实现了哪些内容.下面的类图描述了我们已经实现的组件及其之间的关系,貌似系统已经变得越来越复杂了. 其 ...
- 实战:基于RabbitMQ的TTL以及死信队列,实现延迟付款,手动补偿案例
实现延迟付款,手动补偿(基于RabbitMQ的TTL以及死信队列) 实战要求: 基于RabbitMQ的TTL以及死信队列,使用SpringBoot实现延迟付款,手动补偿操作 1.用户下单后展示等待付款 ...
最新文章
- Winform中设置ZedGraph的X轴的刻度根据曲线获取
- SAP Hybris使用recipe进行安装时,是如何执行ant命令的?
- JavaOne 2012:非阻塞数据结构如何工作?
- 并发–顺序线程和原始线程
- 【树莓派学习笔记】八、两步安装VS Code (Visual Studio Code)
- mysql高级查询教程_MYSQL高级查询
- python连接mysql用哪个模块_pymysql模块使用---Python连接MySQL数据库
- 从零开始学前端:OPPO商城轮播图 --- 今天你学习了吗?(CSS:Day23)
- Maven学习总结(35)——Maven项目错误 JAX-RS (REST Web Services) 2.0 can not be installed问题...
- 2018深圳国际零售信息化暨无人售货展
- pytorch ImageFolder
- Spark机器学习数据流水线
- matlab程序改写python3
- 深入理解vsto,开发word插件的利器
- 树莓派-电视盒子-投影
- 软件工程需求分析阶段_正在进行的过程的7个阶段:需求工程
- 经典语录大全微信小程序源码下载多种分类语录多流量主模式
- swagger注解的使用
- Rust + GO 大战 C/CPP + JAVA
- SparkSQL in中使用子查询耗时高如何优化