Tensorflow学习笔记1----基础分类模型
神经网络模型简介
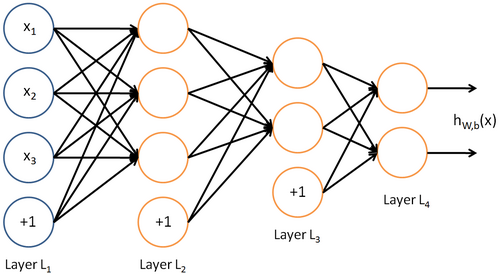
神经网络基础简介,复习这篇笔记,模型可以总结如下:基础的神经网络,可以视为以层为单位,前一层的输出是下一层的输入(这类似Linux的管道),每一层的输出需要经过一个激活函数。
代码简介
神经网络部分
Tensorflow神经网络训练模型的基本步骤,总结如下:
导入数据 => 构建神经网络模型 => 配置模型的训练方式 => 输入数据到网络 => 训练模型 => 评估模型 => 使用模型进行预测
学习的时候,要时刻记住自己所处的阶段;同时要明白,对初学者或者AI基础应用工程来说,核心时搭建正确的神经网络和输入正确的数据。
以下内容从官网学习:https://www.tensorflow.org/tutorials/keras/basic_classification
导入数据
fashion_mnist = keras.datasets.fashion_mnist
(train_images, train_labels), (test_images, test_labels) = fashion_mnist.load_data()
这是个固定的模式,直接导入即可。之后构建自己的数据标签:
class_names = ['T-shirt/top', 'Trouser', 'Pullover', 'Dress', 'Coat', 'Sandal', 'Shirt', 'Sneaker', 'Bag', 'Ankle boot']
通过print函数,可以知道训练数据有60000组,每个图片是28*28的二维数据;测试数据有10000组
print(train_images.shape)  # (60000, 28, 28)
print(test_images.shape)  # (10000, 28, 28)
构建全连接神经网络模型
我们第一个模型是全连接的,以层为单位建模,使用tensorflow的keras高级API作为工具。
model = tf.keras.Sequential([tf.keras.layers.Flatten(input_shape=(28, 28)),tf.keras.layers.Dense(128, activation=tf.nn.relu),tf.keras.layers.Dense(10, activation=tf.nn.softmax)
])
tf.keras.Sequential是一个最基础的方式,它把每一层从前到后进行自动连接。我们模型有3层,第一层是输入数据,第二层是使用relu的全连接层,第三层是使用softmax的结果层。
tf.keras.layers.Flatten()是把高维数据展开成一维的
tf.keras.layers.Dense()表示一个全连接层
这个model高度封装了从训练到测试的所有有用的数据。
配置模型的训练方式
model.compile(optimizer='adam',loss='sparse_categorical_crossentropy',metrics=['accuracy'])
optimizer:反向梯度计算的算法loss:损失函数metrics:用于监视寻来你和测试步骤,这里使用了精度的方式
训练模型
tf.keras的API高度封装了整个流程,因此只需要指定训练数据和训练的轮数即可。
model.fit(trains_images, train_labels, epochs=5)
评估模型
训练完成后,需要在测试集上评估模型准确率,使用
test_loss, test_acc = model.evaluate(test_images, test_labels)
返回损失值和精度,表示平均损失值和预测的准确率
使用训练好的模型进行预测
predictions = model.predict(test_image)
通过输入一组预测数据,得到一组预测值,注意predictions是个二维的。
predictions[0] = array([1.6707758e-06, 8.3274145e-08, 9.8423456e-08, 1.9251273e-07,1.4543222e-06, 2.4620399e-02, 8.9157339e-07, 4.9053874e-02,6.1236402e-05, 9.2625999e-01], dtype=float32)
通过np.argmax(predictions[0])可以索引出最大的下标。
第一部分的代码
import tensorflow as tf
import numpy as npfashion_mnist = tf.keras.datasets.fashion_mnist
(train_images, train_labels), (test_images, test_labels) = fashion_mnist.load_data()# 参数标准化到0-1
train_images = train_images / 255.0
test_images = test_images / 255.0model = tf.keras.Sequential([tf.keras.layers.Flatten(input_shape=(28, 28)),tf.keras.layers.Dense(128, activation=tf.nn.relu),tf.keras.layers.Dense(10, activation=tf.nn.softmax)
])model.compile(optimizer='adam',loss='sparse_categorical_crossentropy',metrics=['accuracy'])model.fit(train_images, train_labels, epochs=5)test_err, test_acc = model.evaluate(test_images, test_labels)
print('Test accuracy:', test_acc)predictions = model.predict(test_images)print(np.argmax(predictions[0]))
绘图部分
掌握基本的绘图工具,应该是一项基本的技能,否则无法描述更复杂的网络,先学习使用最基本的matplotlib.pyplot这个最常用的库。
创建一个新的图片
https://matplotlib.org/api/_as_gen/matplotlib.pyplot.figure.html#matplotlib.pyplot.figure
matplotlib.pyplot.figure(num=None, figsize=None, dpi=None, facecolor=None, edgecolor=None, frameon=True, FigureClass=<class 'matplotlib.figure.Figure'>, clear=False, **kwargs)
一般都是用默认的即可,具体参考文档。
显示照片
https://matplotlib.org/api/_as_gen/matplotlib.pyplot.imshow.html#matplotlib.pyplot.imshow
matplotlib.pyplot.imshow(X, cmap=None, norm=None, aspect=None, interpolation=None, alpha=None, vmin=None, vmax=None, origin=None, extent=None, shape=None, filternorm=1, filterrad=4.0, imlim=None, resample=None, url=None, *, data=None, **kwargs)
具体参照文档即可
绘制子图片
subplot(nrows, ncols, index, **kwargs)
nrows行,ncols列,第index个位置
显示图片
show()
调用该函数,才会有图片显示出来。
完整代码
import tensorflow as tf
import matplotlib.pyplot as plt
import numpy as npprint(tf.__version__)fashion_mnist = tf.keras.datasets.fashion_mnist
(train_images, train_labels), (test_images, test_labels) = fashion_mnist.load_data()class_names = ['T-shirt/top', 'Trouser', 'Pullover', 'Dress', 'Coat','Sandal', 'Shirt', 'Sneaker', 'Bag', 'Ankle boot']train_images = train_images / 255.0
test_images = test_images / 255.0model = tf.keras.Sequential([tf.keras.layers.Flatten(input_shape=(28, 28)),tf.keras.layers.Dense(128, activation=tf.nn.relu),tf.keras.layers.Dense(10, activation=tf.nn.softmax)
])model.compile(optimizer='adam',loss='sparse_categorical_crossentropy',metrics=['accuracy']
)model.fit(train_images, train_labels, epochs=5)test_loss, test_acc = model.evaluate(test_images, test_labels)
print('Test accuracy:', test_acc)predictions = model.predict(test_images)def plot_image(i, prediction_array, true_label, imag):prediction_array, true_label, imag = prediction_array[i], true_label[i], imag[i]plt.grid(False)plt.xticks([])plt.yticks([])plt.imshow(imag, cmap=plt.cm.binary)predicted_label = np.argmax(prediction_array)if predicted_label == true_label:color = 'blue'else:color = 'red'plt.xlabel("{} {:2.0f}% ({})".format(class_names[predicted_label],100 * np.max(prediction_array),class_names[true_label],color=color))def plot_value_array(i, predictions_array, true_label):predictions_array, true_label = predictions_array[i], true_label[i]plt.grid(False)plt.xticks([])plt.yticks([])thisplot = plt.bar(range(10), predictions_array, color="#777777")plt.ylim([0, 1])predicted_label = np.argmax(predictions_array)# 颜色重叠覆盖thisplot[predicted_label].set_color('red')thisplot[true_label].set_color('blue')num_rows = 5
num_cols = 2
num_images = num_rows * num_cols
plt.figure(figsize=(2 * 2 * num_cols, 2 * num_cols))
for i in range(num_images):plt.subplot(num_rows, 2 * num_cols, 2 * i + 1)plot_image(i, predictions, test_labels, test_images)plt.subplot(num_rows, 2 * num_cols, 2 * i + 2)plot_value_array(i, predictions, test_labels)plt.show()img = test_images[0]
print(img.shape)
img = (np.expand_dims(img, 0))
print(img.shape)predictions_single = model.predict(img)
print(predictions_single)plot_value_array(0, predictions_single, test_labels)
_ = plt.xticks(range(10), class_names, rotation=45)print(np.argmax(predictions_single[0]))
Tensorflow学习笔记1----基础分类模型相关推荐
- Tensorflow学习笔记2----文本分类模型
词向量和Embedding Layer简介 先给出学习的资料地址: https://www.youtube.com/watch?v=D-ekE-Wlcds https://towardsdatasci ...
- TensorFlow学习笔记——实现经典LeNet5模型
TensorFlow实现LeNet-5模型 文章目录 TensorFlow实现LeNet-5模型 前言 一.什么是TensorFlow? 计算图 Session 二.什么是LeNet-5? INPUT ...
- TensorFlow学习笔记(三)模型的基本步骤
在本教程中,我们将学到构建一个TensorFlow模型的基本步骤,并将通过这些步骤为MNIST构建一个深度卷积神经网络. 安装 在创建模型之前,我们会先加载MNIST数据集,然后启动一个TensorF ...
- 深度学习---TensorFlow学习笔记:搭建CNN模型
转载自:http://jermmy.xyz/2017/02/16/2017-2-16-learn-tensorflow-build-cnn-model/ 最近跟着 Udacity 上的深度学习课程学了 ...
- TensorFlow学习笔记-实现经典LeNet5模型(转载)
LeNet5模型是Yann LeCun教授于1998年提出来的,它是第一个成功应用于数字识别问题的卷积神经网络.在MNIST数据中,它的准确率达到大约99.2%. 通过TensorFlow实现的LeN ...
- PowerDesigner 15学习笔记:十大模型及五大分类
原文:PowerDesigner 15学习笔记:十大模型及五大分类 个人认为PowerDesigner 最大的特点和优势就是1)提供了一整套的解决方案,面向了不同的人员提供不同的模型工具,比如有针对企 ...
- tensorflow学习笔记——使用TensorFlow操作MNIST数据(1)
续集请点击我:tensorflow学习笔记--使用TensorFlow操作MNIST数据(2) 本节开始学习使用tensorflow教程,当然从最简单的MNIST开始.这怎么说呢,就好比编程入门有He ...
- Win10:tensorflow学习笔记(4)
前言 学以致用,以学促用.输出检验,完整闭环. 经过前段时间的努力,已经在电脑上搭好了深度学习系统,接下来就要开始跑程序了,将AI落地了. 安装win10下tensforlow 可以参照之前的例子:w ...
- tensorflow学习笔记(八):LSTM手写体(MNIST)识别
文章目录 一.LSTM简介 二.主要函数 三.LSTM手写体(MNIST)识别 1.MNIST数据集简介 2.网络描述 3.项目实战 一.LSTM简介 LSTM是一种特殊的RNN,很好的解决了RNN中 ...
最新文章
- Asp.Net 使用 GDI+ 绘制3D饼图入门篇源码
- 来说一下Ansible的简明教程
- springboot启动出错,
- 计算机系统的优化项目,电脑开机显示时间后有个优化项目是什么意思
- WriteComponent,ReadComponent
- vue-cli部署ngixs_nginx部署访问vue-cli搭建的项目的方法
- 汇编语言——移位指令
- base64字符串转换为图片
- 2 最长上升子序列及其衍生
- 即将毕业大学生的第一个五年计划
- elk笔记16--aggs-Bucket Aggregations
- 【原生微信小程序】 组件的使用,权限弹窗
- strncpy和strcpy和memcpy
- 《离散数学》每章内容及其重点梳理
- pip升级失败 -- 解决WARNING: You are using pip version 20.0.2; however, version 20.1 is available 的问题
- Docker swarm 通过 docker-compose 部署应用
- “国防七校”之一西工大遭境外网络攻击
- 借生态力量,openGauss突破性能瓶颈
- 兄弟连”破产“:疫情下的互联网公司寒冬加剧,十年倒闭超6千家
- 分布式.RPC-WebService入门案例(java实现,注解实现,xsd文件解析,wsdl文件解析)
热门文章
- 数位板驱动压力测试_数位屏应如何选择?
- 修改caffe源码--支持多标签--关键点检测
- python调用TensorFlow时报错:FutureWarning: Passing (type, 1) or ‘1type‘ as a synonym of type is deprecated
- Vivado设计流程(二)设计文件输入
- Java 1.1.3 修改字符串、不可变字符串
- Ubuntu系统上安装微信(legacy)
- 关于机器学习 Machine Learning中loss函数参数正则化的一点思考
- 同一Inputstream的父类和子类对象请维持最具体的子类对象,不要混合使用
- C++继承机制(三)——多继承、菱形继承、虚继承原理
- 不借助第三个变量进行两个变量的换位输出