Smooth Freehand Drawing on iOS
原网址:https://code.tutsplus.com/tutorials/smooth-freehand-drawing-on-ios--mobile-13164
博客中中文转载地址(直接网页翻译的):http://blog.csdn.net/u013410274/article/details/78894440
整理的代码地址 : http://download.csdn.net/download/u013410274/10203776
This tutorial will teach you how to implement an advanced drawing algorithm for smooth, freehand drawing on iOS devices. Read on!
Theoretical Overview
Touch is the primary way a user will interact with iOS devices. One of the most natural and obvious functionalities these devices are expected to provide is allowing the user to draw on the screen with their finger. There are many freehand drawing and note-taking apps currently in the App Store, and many companies even ask customers to sign an iDevice when making purchases. How do these applications actually work? Let's stop and think for a minute about what's going on "under the hood".
When a user scrolls a table view, pinches to enlarge a picture, or draws a curve in a painting app, the device display is rapidly updating (say, 60 times a second) and the application run-loop is constantly sampling the location of the user's finger(s). During this process the "analog" input of a finger dragging across the screen must be converted to a digital set of points on the display, and this conversion process can pose significant challenges. In the context of our painting app, we have a "data-fitting" problem on our hands. As the user scribbles away merrily on the device, the programmer essentially must interpolate missing analog information ("connect-the-dots") that has been lost among the sampled touch points that iOS reported to us. Further, this interpolation must occur in such a way that the result is a stroke that appears continuous, natural, and smooth to the end user, as if he had been sketching with a pen on a notepad made of paper.
The purpose of this tutorial is to show how freehand drawing can be implemented on iOS, starting from a basic algorithm that performs straight line interpolation and advancing to a more sophisticated algorithm that approaches the quality provided by well-known applications like Penultimate. As if creating an algorithm that works isn't hard enough, we also need to make sure that the algorithm performs well. As we shall see, a naïve drawing implementation can lead to an app with significant performance issues that will make drawing cumbersome and eventually unusable.
Getting Started
I'm assuming you're not totally new to iOS development, so I've skimmed over the steps of creating a new project, adding files to the project, etc. Hopefully there's nothing too difficult here anyway, but just in case, the full project code is available for you to download and play around with.
Start a new Xcode iPad project based on the "Single View Application" Template and name it "FreehandDrawingTut". Be sure to enable Automatic Reference Counting (ARC), but to deselect Storyboards and unit tests. You can make this project either an iPhone or Universal app, depending on what devices you have available for testing.

Next, go ahead and select the "FreeHandDrawingTut" project in the Xcode Navigator and make sure that only the portrait orientation is supported:

If you're going to deploy to iOS 5.x or earlier, you can change the orientation support this way:
|
1
2
3
4
|
- (BOOL)shouldAutorotateToInterfaceOrientation:(UIInterfaceOrientation)interfaceOrientation
{
return(interfaceOrientation == UIInterfaceOrientationPortrait);
}
|
I'm doing this to keep things simple so we can focus on the main problem at hand.
I want to develop our code iteratively, improving upon it in an incremental fashion - as you would realistically do if you started from scratch - instead of dropping the final version on you in one go. I'm hoping this approach will give you a better handle on the different issues involved. Keeping this in mind, and to save from having to repeatedly delete, modify and add code in the same file, which might get messy and error-prone, I will take the following approach:
- For each iteration, we'll be creating a new UIView subclass. I will post all the code needed so you can simply copy and paste into the .m file of the new UIView subclass you create. There won't be a public interface to the view subclass' functionality, which means you won't need to touch the .h file.
- To test each new version, we will need to assign the UIView subclass we created to be the view currently taking up the screen. I'll show you how to do that with Interface Builder the first time, going through the steps in detail, and then remind you of this step every time we code a new version.
First Attempt at Drawing
In Xcode, choose File > New > File..., choose Objective-C class as the template, and on the next screen name the file LinearInterpView and make it a subclass of UIView. Save it. The name "LinearInterp" is short for "linear interpolation" here. For the sake of the tutorial, I'll name every UIView subclass we create to emphasize some concept or approach introduced within the class code.
As I previously mentioned, you can leave the header file as it is. Delete all the code present in LinearInterpView.m file, and replace it with the following:
|
01
02
03
04
05
06
07
08
09
10
11
12
13
14
15
16
17
18
19
20
21
22
23
24
25
26
27
28
29
30
31
32
33
34
35
36
37
38
39
40
41
42
43
44
45
46
47
48
49
50
51
52
|
#import "LinearInterpView.h"
@implementationLinearInterpView
{
UIBezierPath*path;// (3)
}
- (id)initWithCoder:(NSCoder*)aDecoder// (1)
{
if(self= [superinitWithCoder:aDecoder])
{
[selfsetMultipleTouchEnabled:NO];// (2)
[selfsetBackgroundColor:[UIColorwhiteColor]];
path = [UIBezierPathbezierPath];
[pathsetLineWidth:2.0];
}
returnself;
}
- (void)drawRect:(CGRect)rect// (5)
{
[[UIColorblackColor]setStroke];
[pathstroke];
}
- (void)touchesBegan:(NSSet*)toucheswithEvent:(UIEvent*)event
{
UITouch*touch = [touches anyObject];
CGPointp = [touch locationInView:self];
[pathmoveToPoint:p];
}
- (void)touchesMoved:(NSSet*)toucheswithEvent:(UIEvent*)event
{
UITouch*touch = [touches anyObject];
CGPointp = [touch locationInView:self];
[pathaddLineToPoint:p];// (4)
[selfsetNeedsDisplay];
}
- (void)touchesEnded:(NSSet*)toucheswithEvent:(UIEvent*)event
{
[selftouchesMoved:toucheswithEvent:event];
}
- (void)touchesCancelled:(NSSet*)toucheswithEvent:(UIEvent*)event
{
[selftouchesEnded:toucheswithEvent:event];
}
@end
|
In this code, we're working directly with the touch events that the application reports to us every time we have a touch sequence. that is, the user places a finger on the onscreen view, moves the finger across it, and finally lifts his finger from the screen. For each event in this sequence, the application sends us a corresponding message (in iOS terminology, the messages are sent to the "first responder"; you can refer to the documentation for details).
To deal with these messages, we implement the methods -touchesBegan:WithEvent: and company, which are declared in the UIResponder class from which UIView inherits. We can write code to handle the touch events whatever way we like. In our app we want to query the on-screen location of the touches, do some processing, and then draw lines on the screen.
The points refer to the corresponding commented numbers from the code above:
- We override
-initWithCoder:because the view is born from a XIB, as we'll set up shortly. - We disabled multiple touches: we are going to deal with only one touch sequence, which means the user can only draw with one finger at a time; any other finger placed on the screen during that time will be ignored. This is a simplification, but not necessarily an unreasonable one -people don't usually write on paper with two pens at a time either! In any case, it'll keep us from digressing too far, as we have enough work to do already.
- The
UIBezierPathis a UIKit class that lets us draw shapes on the screen composed of straight lines or certain types of curves. - Since we're doing custom drawing, we need to override the view's
-drawRect:method. We do this by stroking the path every time a new line segment is added. - Note also that while the line width is a property of the path, the color of the line itself is a property of the drawing context. If you're unfamiliar with graphics contexts, you can read about them in the Apple docs. For now, think of a graphics context as a "canvas" you draw into when you override the
-drawRect:method, and the result of what you see is the view on screen. We'll come across another sort of drawing context shortly.
Before we can build the application, we need to set the view subclass we just created to the on-screen view.
- In the navigator pane, click on ViewController.xib (in case you created a Universal app, simply carry out this step for both the ViewController~iPhone.xib and ViewController~iPad.xib files).
- When the view shows up on the interface builder canvas, click on it to select it. In the utilities pane, click on the "Identities Inspector" (third button from the right at the top of the pane). The topmost section says "Custom Class", this is where you'll set the class of the view you clicked on.
- Right now it should say "UIView", but we need to change it to (you guessed it) LinearInterpView. Type in the name of the class (simply typing "L" should cause autocomplete to chime in reassuringly).
- Again, if you're going to be testing this as a universal app, repeat this exact step for both of the XIB files that the template made for you.

Now build the application. You should get a shiny white view that you can draw into with your finger. Considering the few lines of code we've written, the results aren't too shabby! Of course, they aren't spectacular either. The connect-the-dots appearance is rather noticeable (and yes, my handwriting sucks too).

Make sure you run the app not only on the simulator but on a real device as well.
If you play with the application for awhile on your device, you're bound to notice something: eventually the UI response begins to lag, and instead of the ~60 touch points that were being acquired per second, for some reason the number of points the UI is able to sample drops further and further. Since the points are becoming further apart, the straight line interpolation renders the drawing even "blockier" than before. This is certainly undesirable. So, what's going on?
Maintaining Performance and Responsiveness
Let's review what we've been doing: as we draw, we're acquiring points, adding them to an ever-growing path, and then rendering the *complete* path in every cycle of the main loop. So as the path gets longer, in every iteration the drawing system has more to draw and eventually it becomes too much, making it hard for the app to keep up. Since everything is happening on the main thread, our drawing code is competing with the UI code that, among other things, has to sample the touches on the screen.
You'd be forgiven for thinking there was a way to draw "on top of" what was already on the screen; unfortunately this is where we need to break free of the pen-on-paper analogy as the graphics system doesn't quite work that way by default. Although, by virtue of the code we're going to be writing next, we are indirectly going to be implementing the "draw-on-top" approach.
While there are a few things we might try to fix the performance of our code, we're only going to implement one idea, because it turns out to be sufficient for our present needs.
Create a new UIView subclass as you did before, naming it CachedLIView (the LI is to remind us we're still doing Linear Interpolation). Delete all the contents of CachedLIView.m and replace it with the following:
|
01
02
03
04
05
06
07
08
09
10
11
12
13
14
15
16
17
18
19
20
21
22
23
24
25
26
27
28
29
30
31
32
33
34
35
36
37
38
39
40
41
42
43
44
45
46
47
48
49
50
51
52
53
54
55
56
57
58
59
60
61
62
63
64
65
66
67
68
69
70
71
72
73
|
#import "CachedLIView.h"
@implementationCachedLIView
{
UIBezierPath*path;
UIImage*incrementalImage;// (1)
}
- (id)initWithCoder:(NSCoder*)aDecoder
{
if(self= [superinitWithCoder:aDecoder])
{
[selfsetMultipleTouchEnabled:NO];
[selfsetBackgroundColor:[UIColorwhiteColor]];
path = [UIBezierPathbezierPath];
[pathsetLineWidth:2.0];
}
returnself;
}
- (void)drawRect:(CGRect)rect
{
[incrementalImagedrawInRect:rect];// (3)
[pathstroke];
}
- (void)touchesBegan:(NSSet*)toucheswithEvent:(UIEvent*)event
{
UITouch*touch = [touches anyObject];
CGPointp = [touch locationInView:self];
[pathmoveToPoint:p];
}
- (void)touchesMoved:(NSSet*)toucheswithEvent:(UIEvent*)event
{
UITouch*touch = [touches anyObject];
CGPointp = [touch locationInView:self];
[pathaddLineToPoint:p];
[selfsetNeedsDisplay];
}
- (void)touchesEnded:(NSSet*)toucheswithEvent:(UIEvent*)event// (2)
{
UITouch*touch = [touches anyObject];
CGPointp = [touch locationInView:self];
[pathaddLineToPoint:p];
[selfdrawBitmap];// (3)
[selfsetNeedsDisplay];
[pathremoveAllPoints];//(4)
}
- (void)touchesCancelled:(NSSet*)toucheswithEvent:(UIEvent*)event
{
[selftouchesEnded:toucheswithEvent:event];
}
- (void)drawBitmap// (3)
{
UIGraphicsBeginImageContextWithOptions(self.bounds.size,YES,0.0);
[[UIColorblackColor]setStroke];
if(!incrementalImage)// first draw; paint background white by ...
{
UIBezierPath*rectpath = [UIBezierPathbezierPathWithRect:self.bounds];// enclosing bitmap by a rectangle defined by another UIBezierPath object
[[UIColorwhiteColor]setFill];
[rectpathfill];// filling it with white
}
[incrementalImagedrawAtPoint:CGPointZero];
[pathstroke];
incrementalImage = UIGraphicsGetImageFromCurrentImageContext();
UIGraphicsEndImageContext();
}
@end
|
After saving, remember to change the class of the view object in your XIB(s) to CachedLIView!
When the user places his finger on the screen to draw, we start with a fresh path with no points or lines in it, and we append line segments to it just like we did before.
Again, referring to the numbers in the comments:
- We additionally maintain in memory an (offscreen) bitmap image of the same size as our canvas (i.e. on screen view), in which we can store what we've drawn thus far.
- We draw the contents on screen into this buffer every time the user lifts his finger (signalled by -touchesEnded:WithEvent).
- The drawBitmap method creates a bitmap context - UIKit methods need a "current context" (a canvas) to draw into. When we are inside
-drawRect:this context is automatically made available to us and reflects what we draw into our onscreen view. In contrast, the bitmap context needs to be created and destroyed explicitly, and the drawn contents reside in memory. - By caching the previous drawing in this manner, we can get rid of the previous contents of the path, and in this manner keep the path from getting too long.
- Now every time
drawRect:is called, we first draw the contents of the memory buffer into our view which (by design) has the exact same size, and so for the user we maintain the illusion of continuous drawing, only in a different way than before.
While this isn't perfect (what if our user keeps drawing without raising his finger, ever?), it'll be good enough for the scope of this tutorial. You are encouraged to experiment on your own to find a better method. For example, you could try caching the drawing periodically instead of only when the user lifts his finger. As it happens, this off-screen caching procedure affords us the opportunity of background processing, should we choose to implement it. But we aren't going to do that in this tutorial. You are invited to try on your own, though!
Improving the Visual Stroke Quality
Now let's turn our attention to making the drawing "look better". So far, we've been joining adjacent touch points with straight line segments. But normally when we draw freehand, our natural stroke has a free-flowing and curvy (rather than blocky and rigid) appearance. It makes sense that we try to interpolate our points with curves rather than line segments. Luckily, the UIBezierPath class lets us draw its namesake: Bezier curves.
What are Bezier curves? Without invoking the mathematical definition, a Bezier curve is defined by four points: two endpoints through which a curve passes and two "control points" which help define tangents that the curve must touch at its endpoints (this is technically a cubic Bezier curve, but for simplicity I'll refer to it as simply a "Bezier curve").

Bezier curves allow us to draw all kinds of interesting shapes.

What we're going to try now is to group sequences of four adjacent touch points and interpolate the point sequence within a Bezier curve segment. Every adjacent pair of Bezier segments will share an endpoint in common in order to maintain the continuity of the stroke.
You know the drill by now. Create a new UIView subclass and name it BezierInterpView. Paste the following code into the .m file:
|
01
02
03
04
05
06
07
08
09
10
11
12
13
14
15
16
17
18
19
20
21
22
23
24
25
26
27
28
29
30
31
32
33
34
35
36
37
38
39
40
41
42
43
44
45
46
47
48
49
50
51
52
53
54
55
56
57
58
59
60
61
62
63
64
65
66
67
68
69
70
71
72
73
74
75
76
77
78
79
80
81
82
83
84
85
86
|
#import "BezierInterpView.h"
@implementationBezierInterpView
{
UIBezierPath*path;
UIImage*incrementalImage;
CGPointpts[4];// to keep track of the four points of our Bezier segment
uint ctr; // a counter variable to keep track of the point index
}
- (id)initWithCoder:(NSCoder*)aDecoder
{
if(self= [superinitWithCoder:aDecoder])
{
[selfsetMultipleTouchEnabled:NO];
[selfsetBackgroundColor:[UIColorwhiteColor]];
path = [UIBezierPathbezierPath];
[pathsetLineWidth:2.0];
}
returnself;
}
- (void)drawRect:(CGRect)rect
{
[incrementalImagedrawInRect:rect];
[pathstroke];
}
- (void)touchesBegan:(NSSet*)toucheswithEvent:(UIEvent*)event
{
ctr = 0;
UITouch*touch = [touches anyObject];
pts[0] = [touch locationInView:self];
}
- (void)touchesMoved:(NSSet*)toucheswithEvent:(UIEvent*)event
{
UITouch*touch = [touches anyObject];
CGPointp = [touch locationInView:self];
ctr++;
pts[ctr] = p;
if(ctr == 3)// 4th point
{
[pathmoveToPoint:pts[0]];
[pathaddCurveToPoint:pts[3]controlPoint1:pts[1]controlPoint2:pts[2]];// this is how a Bezier curve is appended to a path. We are adding a cubic Bezier from pt[0] to pt[3], with control points pt[1] and pt[2]
[selfsetNeedsDisplay];
pts[0] = [path currentPoint];
ctr = 0;
}
}
- (void)touchesEnded:(NSSet*)toucheswithEvent:(UIEvent*)event
{
[selfdrawBitmap];
[selfsetNeedsDisplay];
pts[0] = [path currentPoint];// let the second endpoint of the current Bezier segment be the first one for the next Bezier segment
[pathremoveAllPoints];
ctr = 0;
}
- (void)touchesCancelled:(NSSet*)toucheswithEvent:(UIEvent*)event
{
[selftouchesEnded:toucheswithEvent:event];
}
- (void)drawBitmap
{
UIGraphicsBeginImageContextWithOptions(self.bounds.size,YES,0.0);
[[UIColorblackColor]setStroke];
if(!incrementalImage)// first time; paint background white
{
UIBezierPath*rectpath = [UIBezierPathbezierPathWithRect:self.bounds];
[[UIColorwhiteColor]setFill];
[rectpathfill];
}
[incrementalImagedrawAtPoint:CGPointZero];
[pathstroke];
incrementalImage = UIGraphicsGetImageFromCurrentImageContext();
UIGraphicsEndImageContext();
}
@end
|
As the inline comments indicate, the main change is the introduction of a couple of new variables to keep track of the points in our Bezier segments, and a modification of the -(void)touchesMoved:withEvent: method to draw a Bezier segment for every four points (actually, every three points, in terms of the touches that the app reports to us, because we share one endpoint for every pair of adjacent of Bezier segments).
You might point out here that we've neglected the case of the user lifting his finger and ending the touch sequence before we have enough points to complete our last Bezier segment. If so, you would be right! While visually this doesn't make much difference, in certain important cases it does. For example, try drawing a tiny circle. It might not close completely, and in a real app you'd want to appropriately handle this in the -touchesEnded:WithEvent method. While we're at it, we've also not been giving any special regard to the case of touch cancellation. The touchesCancelled:WithEvent instance method handles this. Have a look at the official documentation and see if there are any special cases that you might need to handle here.
So, what do the results look like? Once more, I remind you to set the correct class in the XIB before building.

Huh. It doesn't seem like a whole lot of improvement, does it? I think it might be slightly better than straight line interpolation, or perhaps that's just wishful thinking. In any case, it's nothing worth bragging about.
Further Improving the Stroke Quality
Here's what I think is happening: while we're taking the trouble to interpolate each sequence of four points with a smooth curve segment, we aren't making any effort to make a curve segment to transition smoothly into the next one, so effectively we still have a problem with the final result.
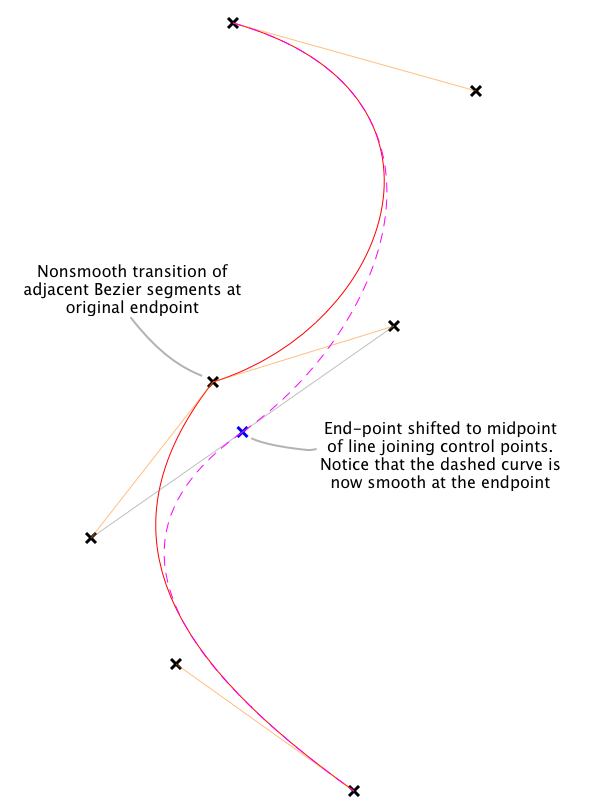
So, what can we do about it? If we're going to stick to the approach we started in the last version (i.e. using Bezier curves), we need to take care of the continuity and smoothness at the "junction point" of two adjacent Bezier segments. The two tangents at the end point with the corresponding control points (second control point of the first segment and first control point of the second segment) seem to be the key; if both these tangents had the same direction, then the curve would be smoother at the junction.

What if we moved the common endpoint somewhere on the line joining the two control points? Without utilizing additional data about the touch points, the best point would seem to be the midpoint of the line joining the two control points in consideration, and our imposed requirement on the direction of the two tangents would be satisfied. Let's try this!
Create a UIView subclass (yet again) and name it SmoothedBIView. Replace the entire code in the .m file with the following:
|
001
002
003
004
005
006
007
008
009
010
011
012
013
014
015
016
017
018
019
020
021
022
023
024
025
026
027
028
029
030
031
032
033
034
035
036
037
038
039
040
041
042
043
044
045
046
047
048
049
050
051
052
053
054
055
056
057
058
059
060
061
062
063
064
065
066
067
068
069
070
071
072
073
074
075
076
077
078
079
080
081
082
083
084
085
086
087
088
089
090
091
092
093
094
095
096
097
098
099
100
101
102
103
104
|
#import "SmoothedBIView.h"
@implementationSmoothedBIView
{
UIBezierPath*path;
UIImage*incrementalImage;
CGPointpts[5];// we now need to keep track of the four points of a Bezier segment and the first control point of the next segment
uint ctr;
}
- (id)initWithCoder:(NSCoder*)aDecoder
{
if(self= [superinitWithCoder:aDecoder])
{
[selfsetMultipleTouchEnabled:NO];
[selfsetBackgroundColor:[UIColorwhiteColor]];
path = [UIBezierPathbezierPath];
[pathsetLineWidth:2.0];
}
returnself;
}
- (id)initWithFrame:(CGRect)frame
{
self= [superinitWithFrame:frame];
if(self) {
[selfsetMultipleTouchEnabled:NO];
path = [UIBezierPathbezierPath];
[pathsetLineWidth:2.0];
}
returnself;
}
// Only override drawRect: if you perform custom drawing.
// An empty implementation adversely affects performance during animation.
- (void)drawRect:(CGRect)rect
{
[incrementalImagedrawInRect:rect];
[pathstroke];
}
- (void)touchesBegan:(NSSet*)toucheswithEvent:(UIEvent*)event
{
ctr = 0;
UITouch*touch = [touches anyObject];
pts[0] = [touch locationInView:self];
}
- (void)touchesMoved:(NSSet*)toucheswithEvent:(UIEvent*)event
{
UITouch*touch = [touches anyObject];
CGPointp = [touch locationInView:self];
ctr++;
pts[ctr] = p;
if(ctr == 4)
{
pts[3] = CGPointMake((pts[2].x+ pts[4].x)/2.0, (pts[2].y+ pts[4].y)/2.0);// move the endpoint to the middle of the line joining the second control point of the first Bezier segment and the first control point of the second Bezier segment
[pathmoveToPoint:pts[0]];
[pathaddCurveToPoint:pts[3]controlPoint1:pts[1]controlPoint2:pts[2]];// add a cubic Bezier from pt[0] to pt[3], with control points pt[1] and pt[2]
[selfsetNeedsDisplay];
// replace points and get ready to handle the next segment
pts[0] = pts[3];
pts[1] = pts[4];
ctr = 1;
}
}
- (void)touchesEnded:(NSSet*)toucheswithEvent:(UIEvent*)event
{
[selfdrawBitmap];
[selfsetNeedsDisplay];
[pathremoveAllPoints];
ctr = 0;
}
- (void)touchesCancelled:(NSSet*)toucheswithEvent:(UIEvent*)event
{
[selftouchesEnded:toucheswithEvent:event];
}
- (void)drawBitmap
{
UIGraphicsBeginImageContextWithOptions(self.bounds.size,YES,0.0);
if(!incrementalImage)// first time; paint background white
{
UIBezierPath*rectpath = [UIBezierPathbezierPathWithRect:self.bounds];
[[UIColorwhiteColor]setFill];
[rectpathfill];
}
[incrementalImagedrawAtPoint:CGPointZero];
[[UIColorblackColor]setStroke];
[pathstroke];
incrementalImage = UIGraphicsGetImageFromCurrentImageContext();
UIGraphicsEndImageContext();
}
@end
|
The crux of the algorithm we discussed above is implemented in the -touchesMoved:WithEvent: method. The inline comments should help you link the discussion with the code.
So, how are the results, visually speaking? Remember to do the thing with the XIB.

Happily, there's substantial improvement this time around. Considering the simplicity of our modification, it looks rather good (if I do say so myself!). Our analysis of the problem with the previous iteration, and our proposed solution, have been validated as well.
Where to Go From Here
I hope you found this tutorial beneficial. Hopefully you'll develop your own ideas on how to improve the code. One of the most important (but easy) improvements you can incorporate is handling the end of the touch sequences more gracefully, as discussed previously.
Another case I neglected is handling a touch sequence that consists of the user touching the view with their finger and then lifting it without having moved it -effectively a tap on the screen. The user would probably expect to draw a point or small squiggle on the view this way, but with our current implementation nothing happens because our drawing code doesn't kick in unless our view receives the -touchesMoved:WithEvent: message. You might want to take a look at the UIBezierPath class documentation to see what other types of paths you can construct.
If your app does more work than what we did here (and in a drawing app worth shipping, it would!), designing it such that the non-UI code (in particular, the off-screen caching) runs in a background thread might make significant difference on a multicore device (iPad 2 onwards). Even on a single-processor device, such as the iPhone 4, the performance ought to improve, since I expect the processor would divvy up the caching work which, after all, happens only once every few cycles of the main loop.
I encourage you to flex your coding muscles and play with the UIKit API in order to develop and improve upon some of the ideas implemented in this tutorial. Have fun, and thanks for reading!
Smooth Freehand Drawing on iOS相关推荐
- ipad html阅读器,iPad 超强文档阅读应用(GoodReader)
GoodReader 可以说是 iPad 平台上最好阅读工具,支持 Office 文档.PDF.TXT.HTML 等文件浏览,支持书签,支持横屏,可以对 PDF 进行批注,还可以通过 WIFI 与 P ...
- favicon图标修改_7个方便,免费的图标和Favicon编辑器
favicon图标修改 Earlier in the year we looked at some handy, 'pre-fab' icons that were ready to plug str ...
- OpenLayers 官网例子的中文详解
当你希望实现某种功能的时候,即使你对 openlayers 几乎一窍不通,照着官网的例子做,也可以很快的实现想要的效果. 问题在于,官网的例子都是英文啊,不能很快定位到想要的效果是在哪个例子里面!!( ...
- layer添加元素 openlayer_OpenLayers 官网例子的中文详解
当你希望实现某种功能的时候,即使你对 openlayers 几乎一窍不通,照着官网的例子做,也可以很快的实现想要的效果. 问题在于,官网的例子都是英文啊,不能很快定位到想要的效果是在哪个例子里面!!( ...
- 移动机器人运动仿真:从Mobotsim到Robotsim
Mobotsim(Mobile Robot Simulator)是早期一款移动机器人仿真软件,在Windows 下的2D动态仿真.它提供了一个图形界面,可以很方便的建立和编辑你的机器人,支持basic ...
- 计算机图形学 光栅化_计算机图形学中的光栅扫描和随机扫描显示
计算机图形学 光栅化 光栅扫描显示 (Raster Scan Display) Raster can be explained as a rectangular collection of dots ...
- 【NGUI基础知识】—Scroll View(滚动视图)详解
下面给大家分享下NGUI中Scroll View(滚动视图)中的各功能属性,帮助大家去理解及使用. ScrollView属性 1.Content Origin: 控制 panle 相对的 Scroll ...
- 《iOS Drawing Practical UIKit Solutions》读书笔记(四) —— 遮罩,模糊和动画
遮罩,模糊和动画会为我们的APP增色不少,现在,就让我们了解一下吧. 用Blocks绘制Images 利用下面工具函数,可以简化创建image的过程. typedef void(^DrawingSta ...
- 《iOS Drawing Practical UIKit Solutions》读书笔记(三) —— Drawing Images
UIKit Images UIKit提供了许多函数可以让我们操作Image,甚至我们可以仅通过代码的方式,获取一个UIImage. UIImage *SwatchWithColor(UIColor * ...
最新文章
- [转载]jQuery.extend 函数详解
- mysql1045_win10系统登录mysql时报错1045的解决方案
- windows下spark开发环境配置
- c语言题库杭电,C语言杭电18级B卷试题答案.doc
- MySQL流浪记(四)—— DDL和DML区别与介绍
- allegro导出坐标文件正反面_Orcad与Allegro交互
- 用鼠标在窗口中画方形的程序------基于OpenCV+VS
- Kubernetes 小白学习笔记(16)--集群网络-pod网络、service网络
- js 对象数组追加元素
- 讯飞输入法第11次作答:效率升维、场景细分、个性满足
- 程序员接私活常用平台汇总!
- 完美世界hr给大家的简历修改和面试的建议
- Mac上修改hosts文件无效的解决方案
- 多屏下dde-dock切换速度太慢
- linux 彻底删除oracle,Linux下完美卸载Oracle
- ROS小车实践记录(一)
- 自然人如何开发票-以广西为例
- map的put 方法的返回值 null
- 经常玩电脑正确的坐姿_电脑族玩游戏正确坐姿 7要点坐不伤身
- Java使用Jsoup获得新闻联播所有文字稿