struts实现分页_在TensorFlow中实现点Struts
struts实现分页
If you want to get started on 3D Object Detection and more specifically on Point Pillars, I have a series of posts written on it just for that purpose. Here’s the link. Also, going through the Point Pillars paper directly will be really helpful to understand this post better, however, it’s not a prerequisite.
如果您想开始使用3D对象检测,更具体地说是关于“点Struts”,那么我就为此目的撰写了一系列文章。 这是链接 。 另外,直接阅读Point Pillars论文对于更好地理解此文章确实很有帮助,但是,这不是前提条件。
Github Repo for this tutorial: https://github.com/tyagi-iiitv/PointPillars. Thanks to Francesco Ferroni for the initial code.
本教程的Github Repo: https : //github.com/tyagi-iiitv/PointPillars 。 感谢Francesco Ferroni的初始代码。
内容 (Contents)
- Defining Initial Configurations定义初始配置
- Building Point Pillars Network建筑点Struts网络
- Loss functions损失函数
- Data Readers for Kitti DatasetKitti数据集的数据读取器
- Training训练
- Inference推理
定义初始配置(config.py) (Defining Initial Configurations (config.py))
We define initial configurations that include the limits for x,y,z dimensions. These limits define the region of interest in which we will be predicting the bounding boxes. Since the range of LiDARs is generally very high, we focus on a smaller region in this space which is defined by these limits. Other configurations include the maximum number of Pillars, maximum points per pillar, etc.
我们定义了包括x,y,z尺寸限制的初始配置。 这些限制定义了我们将在其中预测边界框的感兴趣区域。 由于LiDAR的范围通常很高,因此我们将重点放在由这些限制定义的该空间中的一个较小区域。 其他配置包括最大Struts数量,每个Struts的最大点数等。

These configurations are generally used to transfer the point cloud from 3D coordinates to Pillar coordinates in the Point Pillars detection pipeline as discussed in the next section. For now, just remember that all the configurations are defined in this file.
这些配置通常用于将点云从3D坐标传递到点Struts检测管道中的Struts坐标,如下一节所述。 现在,请记住,所有配置都在此文件中定义。
建立点Struts网络(network.py) (Building the Point Pillars Network (network.py))
The overall architecture of Point Pillars contains three components: A pillar feature net, A Backbone 2D CNN, and a Detection Head. We will discuss these three components individually.
点Struts的整体体系结构包含三个组件:Struts特征网,骨干2D CNN和检测头。 我们将分别讨论这三个组成部分。

Struts特征网 (Pillar Feature Net)

pillars/input (Input Layer) (4,12000,100,7) refers to — Batch Size (4), Maximum Number of Pillars (12000), Maximum number of Points per Pillar (100), 7 dim vector: [x,y,z,intensity,Xc,Yc,Zc]. X,y,z are the 3D coordinates of a point inside a point cloud and its intensity as measured by the LiDAR device is stored inside “intensity”, Xc, Yc, Zc stores the distance of that point from the Pillar Center in each dimension.
Struts/输入(输入层)(4,12000,100,7)指代— 批大小(4),最大Struts数(12000),每个Struts的最大点数(100),7个暗矢量:[x, y,z,强度,Xc,Yc,Zc]。 X,y,z是点云中点的3D坐标,由LiDAR设备测量的点的强度存储在“强度”内部,Xc,Yc,Zc存储该点到各个维度中距柱心的距离。
- This input is now transformed from 7 dimensions to a 64-dimensional vector with features extracted using a CNN.现在,此输入已从7维转换为具有使用CNN提取的特征的64维矢量。
pillars/indices (InputLayer) (4,12000,3) refers to — Batch Size, Maximum number of Pillars, and the center of each pillar, i.e. the x,y and z coordinates. This layer contains the center of each pillar, which is used to map the features learned for each pillar back to the x-y grid in pillars/scatter_nd (Lambda) layer.
Struts/索引(InputLayer)(4,12000,3)指- 批大小,最大Struts数以及每个Struts的中心,即x,y和z坐标。 该层包含每个Struts的中心,该中心用于将为每个Struts学习的特征映射回Struts/ scatter_nd(Lambda)层中的xy网格。
- pillars/scatter_nd (Lambda) — Using the x,y coordinates from the above layer, the point cloud space is divided into (504 X 504) x-y grid with each grid cell containing the 64 features of the corresponding pillar.Struts/散点图(Lambda)-使用来自上一层的x,y坐标,将点云空间划分为(504 X 504)xy栅格,每个栅格单元包含对应Struts的64个要素。
骨干2D CNN (Backbone 2D CNN)
This is a practically simple layer with input being the pillar features encoded in an x-y grid, as described in the previous section. This grid is treated as an image and is transformed into different scales with features extracted at those scales and finally concatenated. We are trying to capture features from different scales of the point cloud and concatenate them into a single tensor.
如上一节所述,这是一个实际上简单的图层,输入是在xy网格中编码的Struts特征。 该网格被视为图像,并转换为不同的比例,并以这些比例提取特征并最终进行连接。 我们正在尝试从不同比例的点云中捕获特征,并将它们连接为单个张量。


检测头 (Detection Head)
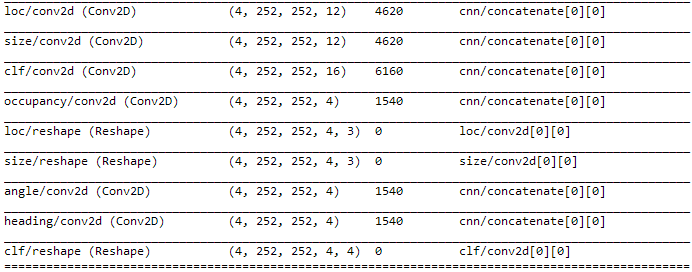
In this part, we are predicting the regression targets for the anchor boxes as described below. All of these predictions are for each grid cell in the x-y coordinates (252 X 252). The bounding boxes are not directly predicted in this case, but the initial anchor boxes are resized to generate the predicted bounding box. The initial anchor boxes are provided inside the config.py file.
在这一部分中,我们将预测锚框的回归目标,如下所述。 所有这些预测都是针对xy坐标(252 X 252)中的每个网格单元。 在这种情况下,不会直接预测边界框,但是会调整初始锚点框的大小以生成预测的边界框。 初始锚框位于config.py文件中。
- Occupancy — Whether the predicted label contains an element. 1 — Yes and No Otherwise. So we only need to check other predictions (loc, size, angle, heading, and clf) only when occupancy is 1.占用率—预测的标签是否包含元素。 1-是,否则,否。 因此,仅当占用率为1时,我们才需要检查其他预测(位置,大小,角度,航向和clf)。
- Loc — Contains the delta x,y,z for the corresponding anchor box.Loc —包含相应锚点框的增量x,y,z。
- Size — Contains delta length, width, and height for the corresponding anchor box.大小-包含相应锚点框的增量长度,宽度和高度。
- Angle — Contains the delta yaw value.角度—包含增量偏航值。
- Heading — Contains if Angle is > 90 to check the heading angle of the object.航向—包含“角度”是否大于90,以检查对象的航向角。
- Clf — Contains the classification id and the confidence score for each prediction.Clf —包含每个预测的分类ID和置信度分数。
Note that the Detection head predicts 4 bounding boxes per grid cell, and each bounding box has the properties listed above.
请注意,检测头会为每个网格单元预测4个边界框,并且每个边界框都具有上面列出的属性。
损失函数(loss.py) (Loss Functions (loss.py))
Once we have decided on the network architecture, we create the loss functions to complete the training process definitions. As you can see in the loss.py file, we are calculating the loss values for each of our regression targets and adding them with weights assigned to each error. So, the final loss value will be a weighted sum of each loss value.
一旦确定了网络体系结构,就创建损失函数以完成训练过程定义。 正如您在loss.py文件中看到的那样,我们正在计算每个回归目标的损失值,并将它们与分配给每个错误的权重相加。 因此,最终损失值将是每个损失值的加权和。

focal_weight*focal_loss + loc_weight*loc_loss + size_weight*size_loss + angle_weight*angle_loss + ...Kitti数据集的数据读取器(readers.py) (Data Readers for Kitti Dataset (readers.py))
We have designed a class to read the files in the Kitti Dataset and extract the 3D bounding box dimensions from the label (txt) files. Every row in the labels file contain the following information:
我们设计了一个类来读取Kitti数据集中的文件,并从标签(txt)文件中提取3D边框尺寸。 标签文件中的每一行都包含以下信息:

- Type of object (Car, Truck, etc.)对象类型(汽车,卡车等)
- Truncated Float, 0 means truncated and 1 means non-truncated截断浮点,0表示被截断,1表示不截断
- Occlusion State, 0=Fully Visible, 1=Partly Occluded, 2=Largely Occluded, 3=Unknown遮挡状态,0 =完全可见,1 =部分遮挡,2 =大遮挡,3 =未知
- Alpha Observation angle阿尔法观察角
- 4 2D bounding box parameters (center, length, width)4个2D边界框参数(中心,长度,宽度)
- 3D object dimensions (height, width, length)3D对象尺寸(高度,宽度,长度)
- 3D object location (x,y,z) in camera coordinates相机坐标中的3D对象位置(x,y,z)
- Yaw angle偏航角
培训(point_pillars_training_run.py,processors.py,src / point_pillars.cpp) (Training (point_pillars_training_run.py, processors.py, src/point_pillars.cpp))
After defining loss functions, configurations, and data generators for each data point in the Kitti dataset, the SimpleDataGenerator in the processor.py file, generates the training examples. The main steps in this process are:
在为Kitti数据集中的每个数据点定义损失函数,配置和数据生成器之后, processor.py文件中的SimpleDataGenerator会生成训练示例。 此过程的主要步骤是:
Generate Pillars and Pillar Ids (DataProcessor.make_point_pillars inside processor.py file)
生成Struts和StrutsID( processor.py文件中的DataProcessor.make_point_pillars )
Generate the regression targets (discussed above) from the label files and given anchor boxes in the config.py file. (DataProcessor.make_ground_truth inside processor.py file)
从标签文件和config.py文件中给定的锚定框生成回归目标(如上所述)。 (processor.py文件中的DataProcessor.make_ground_truth )
The helper functions for these two tasks are provided inside the src/point_pillars.cpp file which is included with the current python code using Pybind.
这两个任务的帮助程序功能在src / point_pillars.cpp文件中提供,该文件包含在使用Pybind的当前python代码中。
- createPillars (src/point_pillars.cpp) — Generates the maximum number of pillars and assign pillar centers to each pillar. Use zero-padding if the number of points inside a pillar is less than the maximum points and random sampling otherwise. Each pillar will have 100 points and 7 values for each point (x, y, z, intensity, Xc, Yc, Zc). We start from the (0,0) LiDAR coordinates and expand radially in the field of view until we reach a maximum number of pillars.createPillars(src / point_pillars.cpp)-生成最大数量的Struts并将Struts中心分配给每个Struts。 如果Struts内的点数少于最大点数,请使用零填充,否则使用随机抽样。 每个Struts将具有100个点和每个点7个值(x,y,z,强度,Xc,Yc,Zc)。 我们从(0,0)LiDAR坐标开始,在视场中径向扩展,直到达到最大柱数为止。

- createPillarsTarget (src/point_pillars.cpp) — Generates the regression targets which can be used to calculate the loss values later. For each 3D bounding box given inside the labels file, it is compared to the anchor boxes. First, a search radius is created around the original bounding box based on object dimensions (red circle on the grid below). Then for each grid cell inside that radius, the anchor boxes are placed and IoU is calculated between each anchor box and the original bounding box.createPillarsTarget(src / point_pillars.cpp)-生成可用于以后计算损失值的回归目标。 对于标签文件中给定的每个3D边界框,将其与锚定框进行比较。 首先,根据对象尺寸(下面的网格上的红色圆圈)在原始边界框周围创建搜索半径。 然后,对于该半径内的每个网格单元,放置锚框,并在每个锚框和原始边界框之间计算IoU。
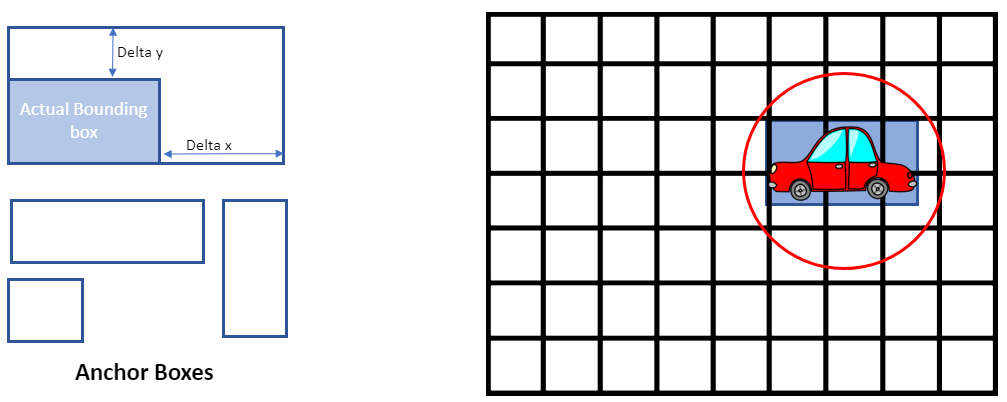

If the IoU value is above a certain threshold, then the targets (delta - x, y, z, length, width height, yaw, etc.) are stored for that bounding box. Otherwise, if no anchor passed the threshold, the best anchor based on IoU scores is chosen for that grid cell and is stored. These values are then used to calculate the loss values as described above.
如果IoU值高于某个阈值,则将为该边界框存储目标(δ-x,y,z,长度,宽度,高度,偏航等)。 否则,如果没有锚点超过阈值,则为该网格单元选择基于IoU分数的最佳锚点并将其存储。 然后,将这些值用于计算如上所述的损耗值。
推论(point_pillars_prediction.py) (Inference (point_pillars_prediction.py))
The last part of this codebase is the point_pillars_prediction.py file used for inferencing. After we have trained the network based on the loss functions described before, during the inference stage, the output of the network is the regression targets, occupancy index, and the classification confidence value for each prediction. You can verify that for each grid cell, the network outputs 4 bounding boxes with their respective parameters.
该代码库的最后一部分是用于推理的point_pillars_prediction.py文件。 在根据之前所述的损失函数对网络进行训练之后,在推理阶段,网络的输出是每个预测的回归目标,占用指数和分类置信度值 。 您可以验证网络是否为每个网格单元输出4个边界框及其各自的参数。
We can remove most of the predicted boxes based on the occupancy index since we only want the boxes with occupancy 1, which means that the network has actually predicted a bounding box on that grid cell. Still, there can be many bounding boxes that are predicted by the network for the same object. To filter these, we can use Non-Maximum Suppression and come up with final bounding box predictions. Non-Maximum Suppression ranks the bounding boxes on the basis of IoU and their classification confidence values and selects the one with the best value as the final bounding box. Refer to this post to read more on Non-Maximum Suppression.
由于我们只希望占用率为1的框,因此我们可以根据占用率索引删除大多数预测框,这意味着网络实际上已经预测了该网格单元上的边界框。 但是,网络仍然可以为同一对象预测许多边界框。 为了过滤这些,我们可以使用非最大抑制,并给出最终的边界框预测。 非最大抑制基于IoU及其分类置信度对边界框进行排序,并选择具有最佳值的边界框作为最终边界框。 请参阅这篇文章,以了解有关非最大抑制的更多信息。

结论 (Conclusion)
This post covered the details of Point Pillars implementation on Tensorflow. All the code details including configuration files, model implementation, data generators, training, and inference are explained with code examples. The code is available in this Github repo and can be used to experiment with the details given in this article. As the next steps, we are working on generating inference results on the Kitti data which will be posted on the Github repo.
这篇文章涵盖了在Tensorflow上实现Point Pillars的细节。 所有代码细节(包括配置文件,模型实现,数据生成器,培训和推断)均通过代码示例进行了说明。 该代码可在该Github存储库中使用 ,并可用于试验本文给出的详细信息。 下一步,我们正在根据Kitti数据生成推断结果,该结果将发布在Github存储库中。
If you are interested in contributing to this project, please check out the issues on the GitHub repo.
如果您有兴趣为该项目做贡献,请在GitHub存储库上查看问题。
翻译自: https://towardsdatascience.com/implementing-point-pillars-in-tensorflow-c38d10e9286
struts实现分页
http://www.taodudu.cc/news/show-997502.html
相关文章:
- 钉钉设置jira机器人_这是当您机器学习JIRA票证时发生的事情
- 小程序点击地图气泡获取气泡_气泡上的气泡
- PopTheBubble —测量媒体偏差的产品创意
- 面向Tableau开发人员的Python简要介绍(第3部分)
- pymc3使用_使用PyMC3了解飞机事故趋势
- 吴恩达神经网络1-2-2_图神经网络进行药物发现-第2部分
- 数据图表可视化_数据可视化十大最有用的图表
- 接facebook广告_Facebook广告分析
- eda可视化_5用于探索性数据分析(EDA)的高级可视化
- css跑道_如何不超出跑道:计划种子的简单方法
- 熊猫数据集_为数据科学拆箱熊猫
- matplotlib可视化_使用Matplotlib改善可视化设计的5个魔术技巧
- 感知器 机器学习_机器学习感知器实现
- 快速排序简便记_建立和测试股票交易策略的快速简便方法
- 美剧迷失_迷失(机器)翻译
- 我如何预测10场英超联赛的确切结果
- 深度学习数据自动编码器_如何学习数据科学编码
- 图深度学习-第1部分
- 项目经济规模的估算方法_估算英国退欧的经济影响
- 机器学习 量子_量子机器学习:神经网络学习
- 爬虫神经网络_股市筛选和分析:在投资中使用网络爬虫,神经网络和回归分析...
- 双城记s001_双城记! (使用数据讲故事)
- rfm模型分析与客户细分_如何使用基于RFM的细分来确定最佳客户
- 数据仓库项目分析_数据分析项目:仓库库存
- 有没有改期末考试成绩的软件_如果考试成绩没有正常分配怎么办?
- 探索性数据分析(EDA):Python
- 写作工具_4种加快数据科学写作速度的工具
- 大数据(big data)_如何使用Big Query&Data Studio处理和可视化Google Cloud上的财务数据...
- 多元时间序列回归模型_多元时间序列分析和预测:将向量自回归(VAR)模型应用于实际的多元数据集...
- 数据分析和大数据哪个更吃香_处理数据,大数据甚至更大数据的17种策略
struts实现分页_在TensorFlow中实现点Struts相关推荐
- tensorflow没有这个参数_解决TensorFlow中Batch Normalization参数没有保存的问题
batch normalization的坑我真的是踩到要吐了,几个月前就踩了一次,看了网上好多资料,虽然跑通了但是当时没记录下来,结果这次又遇到了.时隔几个月,已经忘得差不多了,结果又花了半天重新踩了 ...
- python维度扩展_在TensorFlow中实现矩阵维度扩展
一般TensorFlow中扩展维度可以使用tf.expand_dims().近来发现另一种可以直接运用取数据操作符[]就能扩展维度的方法. 用法很简单,在要扩展的维度上加上tf.newaxis就行了. ...
- python实现胶囊网络_在TensorFlow中实现胶囊网络
点击上方"小白学视觉",选择加"星标"或"置顶" 重磅干货,第一时间送达 我们都知道,在许多计算机视觉任务中,卷积神经网络(CNN)的性能均 ...
- 编译原理 数据流方程_数据科学中最可悲的方程式
编译原理 数据流方程 重点 (Top highlight) Prepare a box of tissues! I'm about to drop a truth bomb about statist ...
- python读取图像数据流_浅谈TensorFlow中读取图像数据的三种方式
本文面对三种常常遇到的情况,总结三种读取数据的方式,分别用于处理单张图片.大量图片,和TFRecorder读取方式.并且还补充了功能相近的tf函数. 1.处理单张图片 我们训练完模型之后,常常要用图片 ...
- keras构建卷积神经网络_在python中使用tensorflow s keras api构建卷积神经网络的初学者指南...
keras构建卷积神经网络 初学者的深度学习 (DEEP LEARNING FOR BEGINNERS) Welcome to Part 2 of the Neural Network series! ...
- java 详解 搭建 框架_在Eclipse中搭建Struts框架过程详解
虽然用MyEclipse搭建Struts框架是更为便捷的方式,但是用Eclipse可以增强自己对Struts的理解.本文演示了使用Eclipse搭建Struts 1.2框架的过程.此项目实现了简单的功 ...
- tensorflow打印模型结构_社区分享 | 详解 TensorFlow 中 Placement 的最后一道防线 — Placer 算法...
本文作者王思宇,阿里巴巴算法专家,从事深度学习算法平台建设,TensorFlow 分布式架构设计与大规模分布式性能优化工作,开源 TensorFlow 项目 contributor. 本文转自:互联网 ...
- tensorflow打印模型图_从Tensorflow模型文件中解析并显示网络结构图(pb模型篇)...
最近看到一个巨牛的人工智能教程,分享一下给大家.教程不仅是零基础,通俗易懂,而且非常风趣幽默,像看小说一样!觉得太牛了,所以分享给大家.平时碎片时间可以当小说看,[点这里可以去膜拜一下大神的" ...
最新文章
- Swift 值类型和引用类型的内存管理
- C++语言基本类型—字符型
- mysql base64
- idea设置自动清除不需要的import包,自动清除导包
- c bitset get_Java BitSet get()方法与示例
- linux判断redis是否启动成功_087、Redis
- kettle资源库配置
- python中的下划线用法
- Pytorch——分类问题
- 第二季-专题11-世界一下变大了-MMU
- java.util.current_Java基础知识-java.util.concurrent包下常见类的使用
- 玩一下就停不下来的h5休闲小游戏
- 入门大数据基础知识了解
- 如何写一个简单的Web Service
- [地图]通用网格地图库:粗糙地形导航的实现和用例
- Python模拟QQ群发邮件
- android 全局悬浮按钮,Android自定义APP全局悬浮按钮
- Python-Opencv fitLine 拟合直线
- react中列表渲染的局部刷新
- Python的基本语法(十一)(持续更新)